Linoleum flooring repair. How to seal linoleum: methods and tools, we seal a hole or torn linoleum at home with step-by-step actions. Fixing holes in linoleum
Linoleum is one of the most popular floor coverings, which is used both in residential premises and in public places.
One of its disadvantages is that it does not have sufficient resistance to damage. Defects can occur due to improper preparation of the surface for laying the coating, with improper care or mechanical stress.
If a gap, swelling or hole has formed on the linoleum, there is no need to rush to change the flooring to a new one. You can easily repair linoleum with your own hands, following the recommendations described in this article.
Causes of damage
 Very often the coating is wiped under a computer chair
 Not everyone attaches importance to the preparation of the base for laying linoleum. If the flooring is laid on a base with a difference in the height of the slab of more than 2 mm, and there are also irregularities, this will lead to the formation of cracks during operation.
Many are in a hurry to finish the repair, lay the flooring on an incompletely dried screed. In this case, mold formation cannot be avoided.
When using low quality glue or non-compliance with the technology of its application, peeling of the coating is possible.
 When linoleum is laid on a soft substrate, then furniture is placed on it without using foot pads, or walking on heels, which leads to the formation of dents and holes.
With improper care or cleaning with abrasive detergents, the top layer is gradually destroyed.
When eliminating defects, it is impossible to use methods and means that will lead to the destruction of the polyurethane protective layer.
Types of defects and ways to eliminate them
For each type of damage, there are several ways to eliminate:
For each specific type of defect, it is necessary to select the most suitable recovery option. At the same time, we use tools adapted to work with a specific type of coating.
Means for repair and care
 Polish will protect the coating from scuffs
There are many products used for the care and repair of linoleum:
- universal detergents and cleaners for everyday cleaning and stain removal;
- polymer-based suspensions and mastics contribute to the renewal of the top layer of linoleum and prevent slipping;
- glossy and matte polish - protects the flooring from abrasion;
- to restore the upper protective layer, restoring emulsions made on the basis of modified polyurethane are used;
- special concentrated formulations are used to remove stains.
To restore the appearance of the coating, it is not recommended to use gasoline, acetone and substances containing chlorine.
Elimination of small defects
Consider how to repair linoleum with your own hands, if it has minor mechanical damage and abrasions. 
Compositions for the repair of minor defects are discussed in the table:
| № | Compound | Characteristic |
|---|---|---|
| 1 | represented by glue based on C-type PVC; has a composition close to the constituent polymers used in the manufacture of linoleum | |
| 2 | Sealants for wood materials | can repair minor abrasions and damage |
| 3 | Nail polish | you need to choose the most suitable shade and apply a thin layer on the coating |
| 4 | Top layer from a piece of linoleum with the same color | glue on top of the damage, perfectly combining the pattern |
| 5 | Furniture wax, mastic, polish | we select the most suitable tone, overwrite damaged areas |
Before proceeding with the repair, the coating must be cleaned of dust and degreased.
Stages of repair by cold welding
 Remove excess adhesive from the surface immediately.
 You can easily and quickly repair a small gap with cold welding adhesive.
Repair sequence:

To protect the coating from contamination, before applying the adhesive, we glue masking tape on a horizontal plane to the repair site.
Burnt area update
 A piece of the patch should repeat the pattern in the defective area
 The ease of eliminating the defect depends on the depth of damage to the linoleum.
A small spark destroys 1 or 2 top layers: protective and decorative.
Less commonly, the polyvinyl chloride base is destroyed or it burns through.
| № | Degree of damage | Remedy |
|---|---|---|
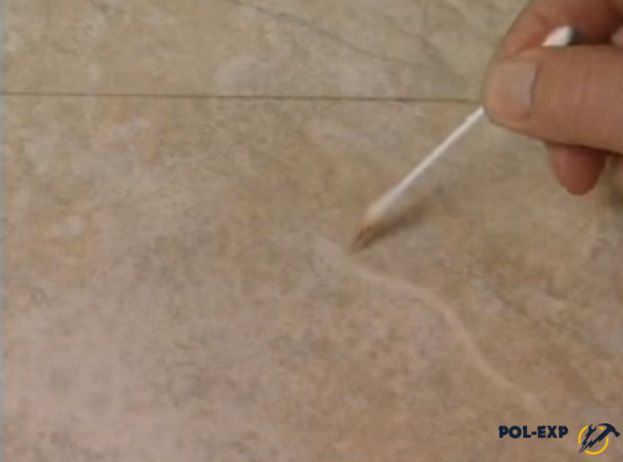
| 1 | Burning the top transparent layer | We clean the burnt edges, shade the border of the formation of the defect with the edge of a coin, cover it with mastic for linoleum or colorless nail polish. |
| 2 | The drawing and its basis are burned | We carry out repairs with the help of cold welding. If possible, glue a piece with the same pattern. If there is no coating residue, you can cut off a piece from the place under the baseboard. We scrape off the top crumb from the piece, mix it with glue and fill the hole, cut off the excess. |
| 3 | Hole | Installing the patch. |
How to place a patch:
- We select a piece of linoleum with the same pattern as in the place of the hole. We put it on top of the damaged area, cut out two layers at once a little wider than the defect.
- We clean the edge, degrease, remove dust with a vacuum cleaner from under the coating.
- We raise the flooring, glue the edge of the damaged area to the base.
- We smear the patch with glue cold welding from the bottom and along the edges. We insert into the hole, press down. We install a heavy object at the place of repair of linoleum.
We also repair large ragged holes. If the gap has a smooth edge, we glue it according to the method of joining the joints. If the edge is torn, we select a patch from the remnants of linoleum with the same structure and pattern. For information on how to close a hole in the coating, see this video:
After repair, do not throw away the remnants of building materials, they can be useful for restoring damaged areas.
We eliminate dents and punctures
We eliminate puncture sites as soon as possible. Otherwise, when cleaning, water will get under the flooring, which can lead to the formation of mold or swelling of the flooring.
| № | Type of damage | Remedy |
|---|---|---|
| 1 | Puncture less than 1.5 mm in diameter | We glue masking tape to the place of the defect so that it does not cover the edge of the puncture. We make a hole in the tape over the damaged area. Through the syringe, we introduce polyvinyl chloride glue into the hole. After drying, cut off the excess glue. |
| 2 | Puncture more than 1.5 mm in cross section | We carry out repairs according to the principle described above, only we use cold welding glue. |
| 3 | dents | Close up with putty, smooth it with a spatula. After hardening, we perform grouting, cover with polish. |
 How to make putty with your own hands:
 - You will need: 5 parts of alcohol, 4 parts of castor oil, 20 parts of rosin, a pigment that matches the color. We mix the components.
- You will need: 1 part rosin, 1 part thick turpentine, pigment. We mix.
You can restore linoleum immediately after preparing the composition.
If the seams have come apart
 Cold welding firmly glues the material
 You can glue the joints with your own hands in a "hot" and "cold" way.
Cold welding is carried out using a special adhesive composition. Thanks to its active ingredients, the surface dissolves a little at the edges, and then sticks firmly together. In this case, the layers of material penetrate each other by 1-5 mm.
Step-by-step instructions for performing cold welding:
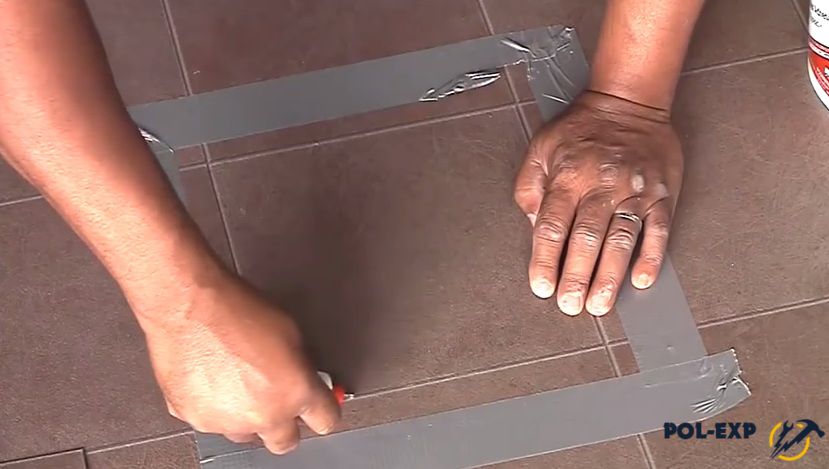
- We combine two adjacent strips with an overlap of 3-6 mm.
- We draw a straight line in the middle of the overlap.
- Cut with a sharp knife along the marked border for the entire length of both strips. We put a metal bar under them to make it convenient to cut under a long metal ruler.
- Throw away the cuttings. We glue masking tape along the entire length of the joint, cut it through the place of joining. The adhesive tape will protect the material from contamination with glue.
- Using a thin tip or a glue gun, fill the joint with glue. Remove the tape after 15-30 minutes.
 Hot welding requires a special tool
 We perform hot welding using a polymer cord heated with a building hair dryer with a special nozzle.
Repair sequence:
- We expand the joint to 5 mm.
- We warm up the polymer cord, it becomes very plastic.
- Quickly, so that it does not have time to cool, we put it inside the seam. Bonding of surfaces is carried out by vulcanization of the edges of the material, while the strips are soldered into one.
The hot method is more reliable than the cold method, but requires experience with a hair dryer and the presence of a tool.
Eliminate waves
The surface swells if the material is laid on an improperly prepared base or the installation technology is violated. For information on why the material swells and what to do about it, see this video:
If the coating has gone in waves over the entire area, you need to cut off the excess distance along the perimeter of the walls so that a temperature gap of 1 cm remains.
 Trim the cover on three sides
 Step-by-step instructions for removing swelling:
- We dismantle the plinth on three sides of the room, cut the linoleum.
- We leave the flooring for several days so that it matures and straightens out.
- Glue with glue or fix around the perimeter with skirting boards.
How to fix the coating if the waves formed in the center of the room is discussed in the table:
By following the recommendations described in this article, you can easily repair and restore the flooring with your own hands. In order to avoid the formation of defects during operation, it is necessary to properly care for linoleum and protect it from mechanical damage.
Linoleum is one of the most popular modern and practical floor coverings. He deserved such fame due to his versatility, reasonable price and ease of installation. But it happens that sometimes the flooring undergoes some unwanted changes and can no longer function fully. Therefore, many people sooner or later face the question of how to repair linoleum in their lives. In this article, we will look at the most common floor defects and how to deal with them.
Repair of through gaps
If the linoleum has been torn through, this situation can be corrected in the following way:
- Cut out a part of a certain shape and size on the surface;
- From linoleum, which will be a patch, also form a similar element;
- Insert the material into the hole, after placing a piece of masking tape around the perimeter;
- In adhesive tape, at the level of the main surface, we make a gap where we pour special glue.
- Once dry, carefully remove the tape.
Repair of cuts and split seams
In this case, the most suitable option for repair is welding. With this process, the procedure for restoring linoleum is as follows:

- Clean the surface and substrate from dust and all kinds of contaminants;
- Carry out the sealing of the seam;
- Remove the remnants of the influx.
Also, when repairing a cut, you can use glue, as with a through gap. To do this, simply pour it into the desired part and get a strong seam. This method is not as reliable as welding, but if the damage is not too big, it will do.
Stain removal
One way or another, you will have to deal with stains of different origin on linoleum. How to deal with the main ones:

- A trace from a felt-tip pen or pen can easily be removed with a cotton swab dipped in acetone;
- Removal of paint, enamel or even brilliant green is carried out using ordinary hydrogen peroxide;
- Grease stains can be removed with soapy water or, if they have been placed on the surface of linoleum for a long time, use dishwashing detergent.
- A place damaged by mold can be treated with whiteness. In this case, be as careful as possible to clean the area as thoroughly as possible and prevent the fungus from spreading to the rest of the coating.
- Rust can be easily removed with citric acid or a slice of regular lemon. Simply apply an acid washcloth or a fresh cut lemon to the desired area and enjoy the result.
Linoleum went in waves
This is also one of the fairly common defects in linoleum and you definitely need to know how to fix it.

In such a situation, do the following:
- Remove the plinth from 3 sides of the room and trim the linoleum;
- Leave the coating for several days to give it the opportunity to straighten out;
- Reattach the laminate.
torn holes
Repair of linoleum with a hole can be similar to the case with a through gap in the canvas, or it can be eliminated with the help of a special adhesive composition. When choosing the latter, the operation is carried out according to the following algorithm:

Coating peeled off
If the linoleum has peeled off a little, this does not mean that it needs to be completely dismantled. You can quite cope with this locally and also on your own. To repair in such a situation:
- Peel off loose coatings with a thin spatula;
- Moisten the floor under the removed part with hot water;
- Clean the linoleum itself and the substrate from the old mastic;
- Dry well;
- Apply new mastic and glue the canvas;
- Use additional weight to secure the material as firmly as possible.
Scuff removal
 Did you notice that small scuffs appeared on the surface of the linoleum? Do not panic. This process is completely normal during the use of this flooring.
To remedy the situation, it is worth purchasing a special wax-based mastic. It will not completely restore the area, but will make the damage less noticeable.
Apply the product to linoleum with a dry, lint-free material. Felt will do an excellent job with this task.
Swelling and shrinkage of the material
If you notice that the linoleum has shrunk, its repair is carried out in the same way as in the situation with seam divergences, using special glue.
But if swelling has formed, you should follow these recommendations:

Peeling edges and corners and repairing scratches
Special mastic will always help to cope with these problems. This multifunctional linoleum repair tool will not only help to glue the lagging canvas into place, but also make the scratches that appear almost invisible.
Remember that when using paste, you must pay maximum attention to cleaning in the work area, otherwise the gluing may not be carried out reliably or the part on which the scratches were repaired will not be able to get the desired appearance.
It is also sometimes possible to burn linoleum. If the trace is very small, then use an ordinary coin in this place to blend the damage and then apply mastic. If the burn is more severe, replace the necessary part with a suitable material, carefully gluing it.
How to refresh linoleum
In order for linoleum to last for many years, you should properly care for it. And to be able at the right time not only to carry out repairs, but also to refresh it.
In order to give the canvas a fresh look, you can always use the standard mastic, which we mentioned earlier.
Also for the care of linoleum there are:

- Special detergents that are suitable not only for removing stains, but also for cleaning every day;
- Suspensions that are responsible for restoring the top layer of the coating, and also prevent possible slip;
- Polishes. Their main vocation is to prevent scuffs on the canvas;
- Emulsions based on polyurethane. They form a protective layer on the floor and if used constantly help to avoid damage to it;
- concentrated funds. Such compositions are very strong and are recommended only if the contamination cannot be dealt with with a conventional detergent.
When you have familiarized yourself with what are the defects of linoleum, and how to repair them yourself, you will be able to successfully cope with possible troubles due to damage to the flooring on your own. We wish you success!
Despite the large number of new flooring materials that have appeared recently, linoleum remains a very popular flooring. It can be seen on the floor in private houses, in high-rise apartments, and in respectable offices. It is less common in industrial and warehouse premises.
The most common defects in linoleum are swelling, peeling, abrasions and small holes, cracks, cuts or small tears.
The relatively low price, rather high strength, remarkable flexibility, water resistance, and most importantly, the simplicity and speed of laying, thanks to which even a person who has never worked with his own hands can easily do this work, helps to maintain its popularity for so long.
The main causes of defects

But it is precisely the lack of sufficient experience that is the main reason that various defects may appear in the laid linoleum. Another reason for the appearance of defects or damage may be incorrect or careless use of the floor.
The most common defects are:
- swelling;
- exfoliation;
- scuffs and small holes;
- cracks, cuts or small tears.
The first two defects are most often the result of poor-quality base preparation or incorrectly applied mastic. The last two are the result of improper use or poor quality linoleum.
But do not rush to change the entire laid linoleum, as some impatient owners do. Of course, the defects that appear are a nuisance, but often a simple repair is enough to eliminate them, which is easy to do on your own, the main thing is to know how and what to do.
Back to index
Blisters

If the linoleum is swollen on most of the floor or completely peeled off, then it is irrational to deal with gluing it. In this case, it is better to carefully tear off the linoleum from the base, clean its back side from the applied mastic, and then spread it in one layer with the back side up. The base is also cleaned of mastic, if necessary, re-leveled, then it must be primed. When the primer dries, mastic is applied on it again and linoleum is laid again.
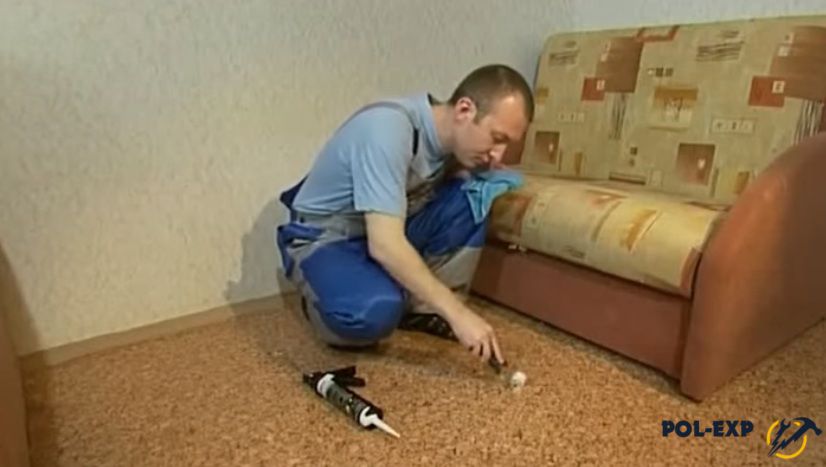
Small blisters are easy to fix. If the linoleum was laid using hot bitumen or rubber-bitumen mastic, then in the place of swelling, you need to make a puncture with a sharp object, like an awl, and squeeze out the accumulated air through the hole formed. Then the puncture must be closed with a sheet of paper and walked several times on top with a heated iron. When heated, the mastic will melt and re-seize with linoleum.

If the linoleum was laid on a solvent-based adhesive mastic, then in this case, on top of the swelling, you need to make a cut with a sharp knife, squeeze out the air and inject the solvent that forms the basis of the mastic into the space between the base and the linoleum with a syringe. After a few minutes, the solvent will soften the mastic, and the linoleum can be re-glued to the base, after leveling it and putting some heavy weight on top.
Sometimes it happens that, despite all the efforts, the linoleum is still not glued to the base. This can happen if, during the initial laying, this area was poorly smeared or not smeared at all.
In this case, through the undercut, it is necessary to introduce not a solvent, but mastic under the linoleum, using a polished long and thin wooden chip or spatula as a working tool, try to evenly level it over the base, and then, in the same way as in the case of a solvent, glue it to him linoleum.
Back to index
Repair of cuts and tears

Eliminating cracks, tears and cuts in linoleum can be done using cold welding, for which a specially designed C-type PVC adhesive is used. This glue has a thick consistency and in its composition is as close as possible to the chemical composition of the polymers from which linoleum is made. It is thanks to this similarity that it is easy to glue cracks and cuts with glue.
Repair of linoleum in this case is carried out according to the following scheme. First you need to do a little preparatory work: thoroughly clean and dry the place of future gluing and lightly walk along the ends of the gust or cut with sandpaper to remove burrs on them. Then, using double-sided tape, fix the edges of the cuts, attaching them to the base.
Upon completion of the preparatory work, you can start welding. The glue is squeezed out at the place of the cut or rupture along its entire length. Due to its density, the glue lies strictly in the cut with a tubercle, without spreading over the front of the linoleum. After the glue has completely dried (24 hours), the resulting tubercles must be carefully cut off and additionally mask the welding spots with a special linoleum mastic matched to the color of the linoleum.
Back to index
Repair of small punctures
If you find small punctures on the surface of linoleum, they must be eliminated.
If this is not done, then soon in this place the linoleum will begin to crack fan-shaped.

Elimination of small punctures, the diameter of which does not exceed 1.5 mm, is best done with liquid PVC glue.
At the puncture site of the linoleum, masking tape is glued onto it, which is then also pierced exactly above the puncture site, but at the same time, pieces of adhesive tape at the puncture site should not cover the ends of the linoleum. This is the only difficulty of such a repair. Further, the hole made is carefully filled with glue, after it has set and completely dried, the adhesive tape is removed, and the remaining tubercle of glue is carefully cut off at the floor level.
For punctures larger than 1.5 mm, it is best to use the same C-type adhesive as for cold welding. Since it is thicker, then when using it to seal punctures, tape can not be used.
During operation, tears, scuffs, scratches may appear on the linoleum, due to which the floor has a sloppy look. A complete replacement of the coating is not always advisable, especially if the damage is single and small, so you need to look for another solution to the problem. There are several simple ways to close a hole in linoleum without visible marks and at minimal cost, which practical owners will definitely appreciate.
So, let's look at the causes of holes and other common defects on the flooring, as well as options for eliminating them.
Linoleum, even the strongest and highest quality, still remains quite soft, and therefore prone to mechanical damage. Most often, the coating laid on an uneven base is torn. Despite the elasticity, the material cannot fill the small voids of the subfloor, but only masks them for the time being. It is worth accidentally pressing something sharp there, for example, walking on the floor on stilettos, and a hole will appear in the coating. In places where there are tubercles, gaps also form over time, as the coating wears out and rubs more.

Violation of laying technology can also cause damage to linoleum. For example, too thin or, conversely, a thick layer of glue or mastic, uneven application of the adhesive, a damp base - all this leads to peeling and deformation of the web. The coating swells in waves and interferes with normal movement around the room. In places of greatest traffic, folds are formed, on the bends of which linoleum cracks first.


Another common mistake is laying linoleum on a thick soft substrate in rooms with high floor loads. Heavy furniture, as well as the legs of tables and chairs, with active use, leave deep dents on the canvas, and in some cases they push holes to the rough base. As a rule, this applies to low-grade household linoleum.

No less often, holes in the coating are formed due to banal negligence. A dropped cigarette or coals from a hookah leave deep marks on linoleum. They are rarely through: the protective and decorative layers are usually damaged, sometimes the PVC base layer is damaged. It all depends on the class of coverage and the degree of deterioration at the time of damage. At first, these defects may not be noticeable, especially on a surface with a small motley pattern, but later dirt will begin to fill in the holes, the edges will fray and the holes will become larger.
Tarkett linoleum prices
linoleum Tarkett

Inaccurate rearrangement of furniture also has consequences: sharp corners or legs leave noticeable scratches on the surface, and if you hook it hard, you can tear out a whole shred of the coating.

Of course, it is impossible to completely eliminate the risks of damage, but everyone can reduce them to a minimum. To do this, you need to choose linoleum in accordance with the operating conditions, strictly adhere to the laying technology and follow the recommendations for care during operation. And if it was still not possible to avoid damage, it should be eliminated as soon as possible in order to minimize the consequences.
Elimination of small holes, punctures, burns
If the damage area does not exceed 1 cm2, you will need a polymer mastic or putty and a pigment of a suitable color for sealing. Now on sale there are ready-made kits for repairing such coatings, including mastic, color pigment, spatula and solvent.

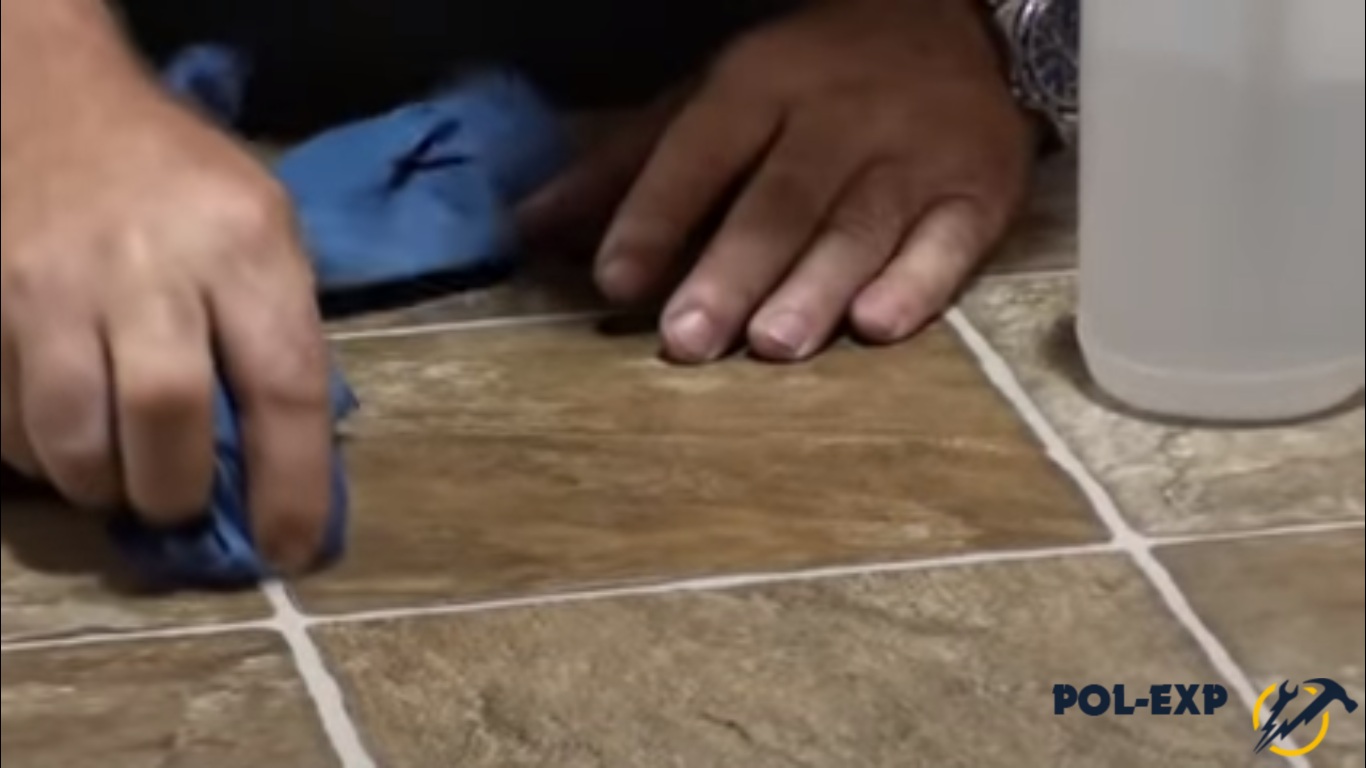
Step 1. The place of damage is cleaned of dirt and dust, the edges are rubbed so that there are no burrs left, and degreased.

Step 2 Pigment corresponding to the color of linoleum is added to the mastic, mixed well.


Pour the base (mastic)


Step 3 The finished mass is collected with a plastic narrow spatula and the recess on the coating is carefully filled. The excess is removed, the linoleum around the hole is wiped with a cloth dipped in a solvent.


Step 4 After the mastic dries, the surface is polished with a dense cloth.

As a rule, linoleum has a non-uniform color, and after repairing the damage, the mastic may stand out a little against the general background. To make the restored area absolutely indistinguishable, you can apply a little more mixture on top, slightly changing the shade. It is most convenient to do this with a cotton swab.


Advice. In the absence of a repair kit, ordinary mastic for linoleum or C-type cold welding glue will do. You can get the desired color of the repair mixture as follows: take a piece of linoleum left after laying, and scrape off a little colored crumb from its surface with the tip of a knife. After mixing the crumbs with glue, the composition is applied to the damaged area with a spatula. If there are no pieces of linoleum left, you can cut off a small piece of the coating where it will not be visible, for example, under the baseboard.
Table. Varieties of cold welding compositions
| Glue type | Description |
|---|---|
| The composition is quite liquid, as it contains a large percentage of the solvent. Glue is intended for joining canvases when laying new linoleum. It easily fills narrow gaps and forms very thin, neat seams that are invisible on the coating. Cannot be used for gaps larger than 2 mm |
| There is less solvent here, and PVC, on the contrary, more, so the glue has a thick consistency. It is great for sealing small holes, scratches and cracks in old linoleum, parted joints. On wide seams (4-5 mm), the adhesive may form small protrusions that are cut off with a knife after the composition dries |
| Transparent elastic composition for professional use. Designed to fix seams in commercial and semi-commercial polyester and PVC flooring |


You can make a repair compound yourself based on rosin and solvent:
- rosin must be dissolved in alcohol in a ratio of 20: 5, pour in 4 parts of castor oil and pour in the powdered pigment of the desired shade. Everything should be mixed until smooth;
- rosin is poured with turpentine in a ratio of 1:4, then pigment is added and mixed until smooth.
This composition is great for sealing small punctures, scratches and dents.
Repairing large holes in the coating
If the area of the hole exceeds 1 cm2, sealing with mastic will not help. Depending on the type of damage, two methods are used to eliminate the defect - with and without a patch. Let's consider each of them in detail.
Patching with a patch
The method is used in cases where a piece of the coating is completely torn out or there is a through burn on the linoleum. Depending on the size of the patch, it can be glued over the entire area or only around the perimeter.
1 option

For work you will need:
- a piece of linoleum of the same color as on the floor;
- sharp mounting knife;
- metal ruler;
- construction tape;
- mastic for linoleum and glue "cold welding";
- notched trowel;
- hard roller.
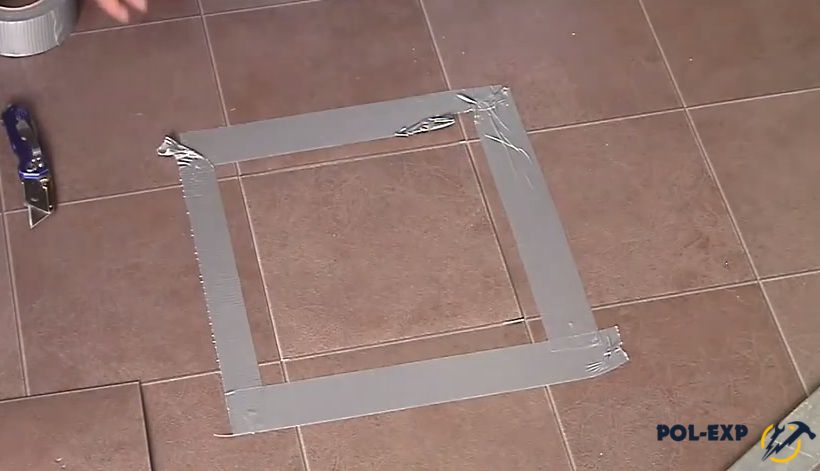
Step 1. Linoleum is cleaned of dirt and dust. Take the prepared piece of coating and lay it on top of the defect so as to exactly match the lines of the pattern.


Step 2 Having picked up the correct position, the linoleum is fixed with adhesive tape around the perimeter.


Step 4 Remove the top piece, set it aside and carefully remove the cut out fragment with the hole.


Advice. If the coating has been glued to the floor, the surface must be carefully cleaned from adhesive residues or base fibers. Any irregularities, even the smallest ones, will show through under the patch and eventually lead to the appearance of new defects.
Step 5 They try on a patch to a cut hole in linoleum, check the tightness of the joints and the compatibility of the pattern.
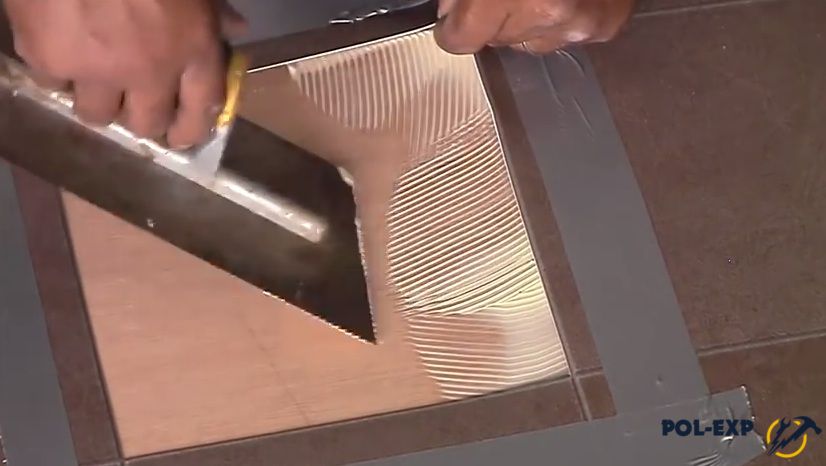
Step 6 Take mastic for linoleum and apply a thin layer on the base with a spatula with small teeth. For better fastening, the edges of the coating around the perimeter of the cut out area need to be slightly lifted with your fingers and smeared under them with mastic.
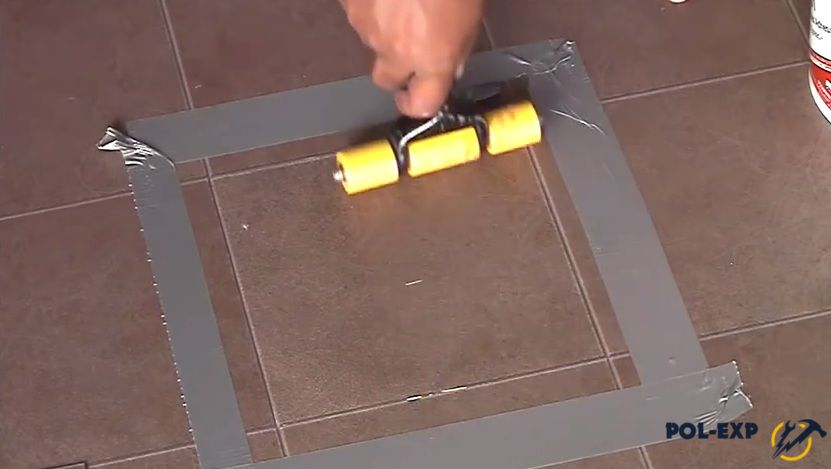
Step 7 Lay the patch in place, following the correct location of the pattern. Smooth the material with your hands, pressing along the edges, and then roll it with a roller with force in all directions.

Step 8 Now take a tube of A-type "cold welding" glue, insert the tip into the seam and gently guide it along the perimeter of the patch. Glue should evenly fill the seams.
Until the glue dries, touch the patch, step on it is impossible to avoid displacement and deformation. It is best to lay a piece of plywood on it, press it down with a load and leave it for a couple of days.
Option 2
If the patches are small, it is permissible to glue only around the perimeter using C-type cold welding.

Step 1. Select a segment of the coating according to the drawing.
Step 2 From the back side, a double-sided adhesive tape is glued onto the workpiece and the material is fixed on the coating. Be sure to make sure that the lines of the drawing are aligned correctly!
Step 3 The boundaries of the patch are determined and both layers of linoleum are carefully cut under the ruler.
Step 4 Scraps are removed, the patch and the damaged bottom layer are removed.
Advice. In order not to check the location of the patch along the lines of the drawing each time, you need to take two pieces of adhesive tape and stick one on the edge of the patch, and the second next to the cover. This will allow you to immediately lay the fragment in the right direction.
Step 5 The base is cleaned and a thin continuous strip of glue is applied around the perimeter of the cutout.
Step 6 Lay the patch, press it well, squeezing out the air, roll it around the edges with a roller. Excess glue is wiped off with a damp cloth.
Patches can have any geometric shape, depending on the area of damage and the size of the spare material. It is most convenient to work with linoleum that imitates tiles: here they simply cut out a square along the drawn lines. For linoleum with laminate imitation, you can use rectangular or triangular patches.

Advice. If there was no linoleum of a suitable color, you can connect your imagination and make patches in the form of an application. The main thing is that they look neat and combined with the design of the coating.
Repair holes without patches
This method is used if a piece of linoleum is not completely torn out and remains hanging in a flap.

To close up such a hole without visible traces, you first need to straighten the torn flap. To do this, you can press it down with something heavy and leave it for a day, or, more effectively, iron it with a hot iron through wet gauze. In order not to melt the protective layer, the gauze must be folded into 10-15 layers. After the material is straightened, you can start embedding.
Step 1. The base under the gap is cleaned of dust and dirt.
Step 2 Using a gun, glue liquid nails are applied along the perimeter of the damage in a continuous strip.

Step 3 The torn flap is placed in place and pressed tightly with a hand, after which it is well rolled out with a roller.
Step 4 Wipe off excess adhesive with a damp cloth.

It takes at least a day to dry, so protect the repaired floor area from any loads. Instead of liquid nails, you can use mastic or glue for linoleum.

Seal gaps and split seams
If a hole in the coating was formed as a result of a cut, that is, it has smooth edges, it will not be difficult to eliminate it without a trace. The same applies to the parted seams between the canvases.

To work, you need double-sided tape, a roller and a primer.
Step 1. The edges of the canvas are slightly turned to the sides and dust and accumulated debris are cleaned out.
Step 2 The rough base is primed and dried.
Step 3 Double-sided tape is placed in the gap and attached to the base along the seam.

Step 4 Remove the protective coating and press the edges of the linoleum, and then iron it with a roller.
If the edges of the linoleum do not fit tightly and there is a gap of 1-2 mm, it is necessary to additionally process the seam with A-type cold welding. After that, it is almost impossible to detect a slot, and the coating will last for more than one year.
Video - How to fix a dent in linoleum
What to do if the linoleum is torn? Changing the coating is too troublesome, and expensive, but you can’t leave it with damage either: not only does such a floor look sloppy, but also dirt will accumulate. The repair of the coating will help to solve the problem, and it will not require special costs, and the result will be excellent. Tears, burns, holes in the canvas, open seams - all this can be eliminated almost without a trace, and the floor will look like new again.
Consider how to seal linoleum, and what is needed for this.
The main tool in working with linoleum is a knife. It should be durable, very sharp, with a comfortable handle. Although linoleum is a fairly thin and plastic material, it will take some effort to cut it, and it will not work quickly and accurately with a blunt knife. Now on sale there are special knives for linoleum, which are very convenient to work with.
| Type of knife | Description |
|---|---|
| This knife is intended for cutting the fabric in a straight line. With it, it is easy to trim frayed edges, cut patches of the correct shape for large holes. Replaceable blades are highly durable, they do not bend or break. A special screw holds the blade firmly, preventing it from moving. Such a knife is great for multi-layered fabric and gives an absolutely even cut. |
| The knife is equipped with a strong blade, resistant to bending, and a durable ergonomic handle. The tool easily cuts thick multilayer linoleum, not only straight, but also at an angle. Well suited for cutting blades in hard-to-reach places, such as under a radiator and around the outlet of utility pipes |
| A very practical tool with a round sharpened blade. Allows you to cut the blade straight and along curved markings. It is convenient to use when making patches of irregular shape, trimming the coating at thresholds, communication outlets, around ledges and niches. |
| The curved blade allows you to carefully remove dried glue from the surface, correct cuts, and eliminate burrs on the edges of the blade. With the help of such a knife it is convenient to repair minor damage and smooth out seams on the old linoleum |


In addition to the knife, you will also need:
- spatula for applying glue;
- metal ruler or rail;
- marker;
- roller
To seal large holes, you will need patches from linoleum of the same type that is laid on the floor. That is why it is recommended to purchase a new coating with a margin: cuttings of the canvas do not take up much space, and in case of damage they will help to quietly patch holes. Separately, it is difficult to find exactly the same material: the assortment of linoleum is constantly changing, and even if it was possible to find a similar pattern, the samples may not match in color.

To fix the patches and dock the dispersed canvases, you will need adhesive tape (double-sided and ordinary masking tape) and glue.

For such coatings, there are special adhesives - water-dispersion, acrylic-based, two-component epoxy resin, as well as "cold welding" adhesives.
| Glue name | purpose |
|---|---|
| It is used for PVC linoleum on a fabric and felt basis. Suitable for bonding sheets to wood and concrete floors, plywood and other absorbent substrates |
| Used for PVC linoleum with or without backing, suitable for all absorbent substrates: plank floor, screed, chipboard or fiberboard |
| The composition is specially designed for PVC coatings on various types of substrates - fabric, pile, foam. Suitable for absorbent substrates: concrete screed and DSP, wooden floor, plywood, fiberboard |
| It is a polyurethane reaction compound that is intended for fixing PVC coatings to absorbent and non-absorbent substrates. Suitable for rooms with high humidity |
| Transparent compound used for hermetic connection of PVC coating sheets. Can be used to seal minor damage on linoleum - punctures, small cuts with smooth edges |


To eliminate minor scratches, burns and punctures, mastic or polymer putty is used. In order for the repair composition to match the color of the coating, small crumbs scraped off from a piece of linoleum are added to it. Special repair kits are also available, consisting of mastic, solvent and color pigment. With the help of these tools, small defects in linoleum can be carefully repaired so that no traces of damage remain.
Prices for Bustilat glue
glue Bustilat

Repair of holes and tears in the canvas
This type of damage is the most serious, and therefore the repair will take longer. If a large hole has formed in the canvas, it is eliminated with a patch.
Step 1. Pick up a piece of linoleum for a patch. It should match perfectly in color and pattern so that the repaired area does not stand out on the floor. The segment is laid over the hole on the coating and the lines of the pattern are combined with the main canvas.


Step 2 The material is fixed with masking tape on all sides to avoid displacement. If the segment is small, it is enough to fix it with tape in the corners.


Step 3 They take a knife and very carefully cut both layers of linoleum along the lines of the pattern. It is advisable to cut the patch in the shape of a square or rectangle - it is more convenient to fix it and the joints will not be noticeable.

Step 4 They remove the adhesive tape, remove the trimmings of linoleum, put the patch aside. Now it is necessary to remove the damaged piece of linoleum: it is hooked with a knife and opened from the base over the entire area. The remains of the adhesive layer are also cleaned so that they do not interfere with the adhesion of the canvas to the base.

Step 5 Next, take the glue and apply it in an even layer on the cleaned surface with a spatula. If the edges of the canvas around the cutout are not glued, it is also necessary to smear the surface under them with glue - this will allow the edges to be more securely fixed.


Step 6 After waiting a few minutes, a patch is placed on the glue and smoothed over the entire area so that there are no air bubbles under the linoleum. Make sure the patch is placed correctly and that all lines match.

Step 7 The glued piece is rolled with a roller for reliability, and then wiped with a clean, damp cloth, removing excess adhesive mixture.
Step 8 At the seams on each side of the patch, a docking adhesive is applied with a thin strip, the excess is removed. After the glue has set, the joints are wiped with a thick cloth or sponge.


Advice. During the day, mechanical impacts on the repaired area should be avoided until the glue is completely dry. After that, the coating is ready for full operation.
If instead of a hole on the linoleum there is a partially torn flap, you can do without a patch. To do this, the flap is first straightened (you can iron it with an iron through a dense fabric), dirt and dust are cleaned from under it, and then a layer of glue is applied to the base. After that, it remains to lay the flap on the glue, align the edges and press it with something heavy for a day.
Joint repair
Open joints are one of the most pressing problems for floors covered with linoleum.

Sometimes the edges of the canvases only slightly move away from the base, in other cases they noticeably swell and diverge to the sides, revealing the draft floor. You can’t start such a problem: garbage accumulates in the seams, water gets there during cleaning, mold starts, and the protruding edges are frayed and torn, making it difficult to walk around the room. Consider how to connect the joints with the greatest efficiency.
Fast way
Step 1. The edges of the canvases are folded outward and all dust is thoroughly cleaned from under the coating.

Step 2 Prime the floor with a small brush, leave to dry completely.
Step 3. Double-sided tape is placed in the gap between the canvases so that the middle of the tape is located exactly along the seam.

Step 4 remove the protective layer from the adhesive surface and press the edges to the floor.
Step 5 Carefully straighten the edges, press and smooth the seam with your hands. Further, it is desirable to roll this section with a roller in order to finally align the joint.

If the linoleum sheets have shifted during operation, and the joint has moved apart by several millimeters, there is a simple and cheap way to eliminate the gap. To do this, it is necessary to clean the seam of dust, degrease, dry thoroughly. Next, you should take a wax candle, melt it and carefully pour the wax into the gap between the canvases. After that, the wax residues are easily removed with a spatula blade or knife, and the surface of the seam is polished with a soft cloth.
Advice. This method is only suitable for dry rooms with low traffic, since under intense load the wax will come off the edge of the canvas and a gap will form again.
Cold welding of joints
For high-quality sealing of parted seams, it is best to use cold C-type welding. This adhesive has a thick consistency and perfectly fills joints up to 3 mm wide. In addition, it melts the sections of the canvases and forms a monolithic surface, impervious to moisture and dust. But for the new linoleum, they use A-type glue, which is more liquid and reacts faster with PVC. How to do this, consider in detail.

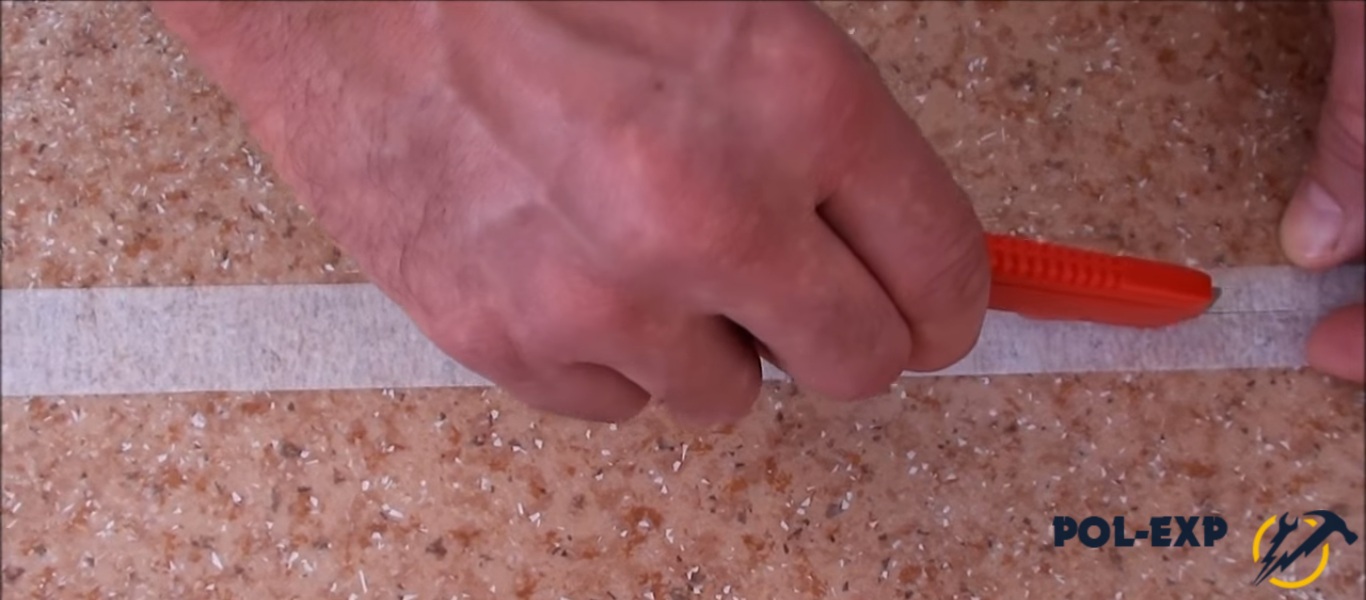
Step 1. The coating strips are laid on the prepared floor with an overlap of 5-6 cm.
Step 2 Mark the cut line exactly in the center of the overlap, measuring the desired distance with a ruler. The line is drawn with a pencil along the entire length of the joint.
Step 3 A ruler or a metal rail is applied to the markup and both canvases are cut with a sharp knife.


Step 4 Remove the cut strips to the side and smooth the edges of the canvases.

Step 5 Masking tape is glued to the joint along its entire length. This is necessary in order not to stain the front surface of the coating with glue.

Step 6. With the tip of a knife, carefully cut the adhesive tape along the junction line.
Step 7 They take glue, put a cap with a needle on the tube, twist it tightly. Next, insert the tip of the needle into the gap and lightly press the tube until a spot of glue up to 4 mm wide is formed on the adhesive tape. After that, you need to smoothly move the needle along the seam, evenly filling it with adhesive.


Advice. The width of the adhesive strip during application should not exceed 3-4 mm. The excess glue will still have to be wiped off, and the seam will not be stronger from this. But it’s also not worth saving too much: a lack of glue will make the seam less airtight and reliable.
Step 8 After about 15 minutes, when the glue sets, the tape is carefully removed from the linoleum.

You can walk on the coating after the glue has completely hardened. The manufacturer indicates the exact drying time in the instructions on the tube, so carefully read all the information about the composition before use.

Removing blisters on linoleum
Often, blisters appear on the coating, which increase over time, interfere with walking, and then tear. This happens for various reasons, but it is necessary to eliminate such defects as early as possible so that the linoleum does not have to be changed.

Removing bubbles is easy, the main thing is to know how
Small bubbles can be easily removed with heat. You can use a household hair dryer or a bag of hot sand, but it is more convenient to use an iron. To do this, cover the problem area with a clean rag or a piece of parchment and smooth it with an iron in the steaming mode.

Large swellings are eliminated in a different way. A cruciform incision is made in the center of the bubble, after which the resulting flaps are folded together and the excess cut off at the edges. After making sure that all parts fit evenly, they are bent outward and the base is cleaned of old glue and dust. Now it remains only to apply fresh glue and press the patches to the floor. You can put some weight on top so that the linoleum sticks better.

If the linoleum was originally laid without glue, swelling can be eliminated without cutting the canvas. First you need to loosen the baseboards on the wall closest to the bubble. Next, the surface begins to smooth out towards the wall, expelling air from under the linoleum. If necessary, the edge of the canvas can be trimmed to leave a temperature gap between the wall and the floor.

Video - How to seal linoleum