Folding garage doors with your own hands. Lifting garage door drawing. Assembling the frame of the future design
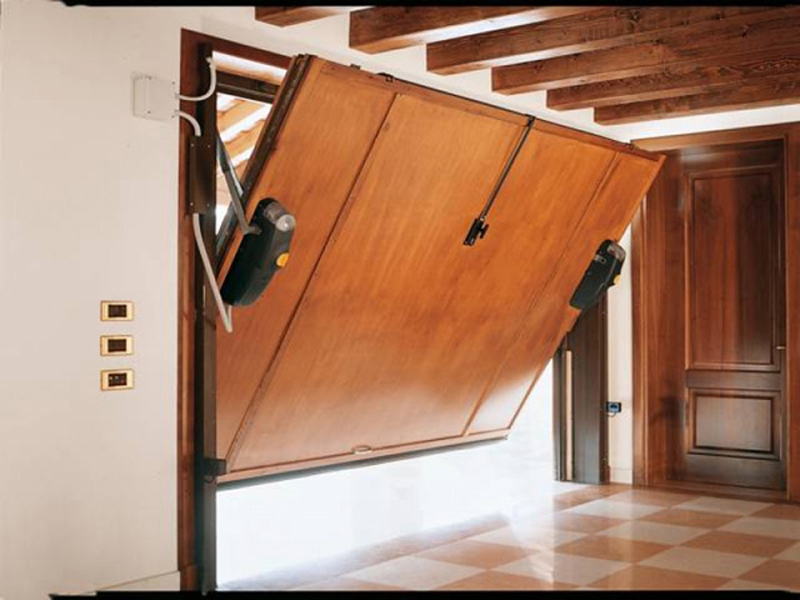
If you need to close the space of a garage or outbuilding, an up-and-over door is the best choice. The design is convenient in that when opened, the canvas is on top (parallel to the ceiling), which means it does not occupy the usable space of the area. So, let's consider how to assemble such gates using a specific example.
Read also about: and their features!
How overhead doors work
In our case, the width of the gate is 3 meters, and the height is 2.3 meters. The canvas opens and closes by lowering and raising suspended loads. For example, several bricks located on the right and left in a special box or plastic pipe so that they do not scratch the wall. Their total weight is about 9 kg.
When the gates are closed, they are fixed with a built-in furniture ball. It pops out through a hole in the side supports.
To open the canvas, you need to fill up the upper part, holding the bottom of the gate, and then lift it up. About 1/5 of the distance they will be fully raised horizontally to the ground.
The driving cable (for example, "six") is thrown over the rollers (there are 2 of them at the edges): 1 - embedded inside the corner, 2 - located above the load.
Responsible stage - drawing preparation
Before assembling the frame and sheathing them with a sheet, it is necessary to prepare a drawing of the gate.
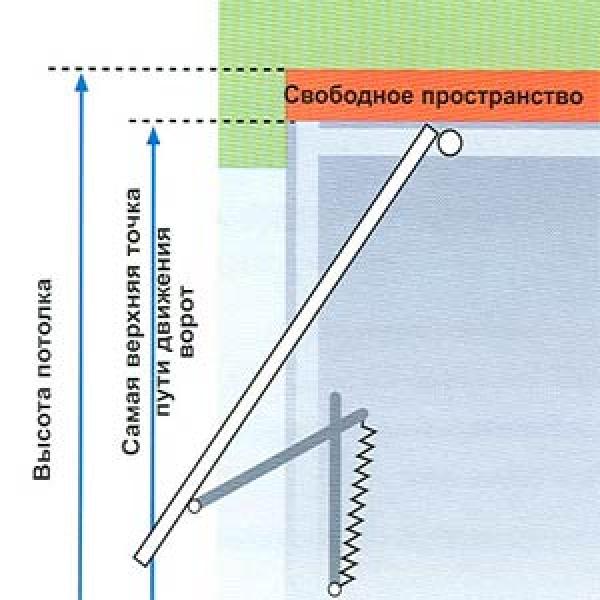
Give this step enough time, because if the path of the upper and lower edges of the overhead door is incorrectly calculated, it may rest against the ceiling, be too low when opened and interfere with the use of the room.
Our gates are 3 meters wide and 2.3 meters high. We will make a drawing on a scale of 10 cm = 10 mm.
Sequencing:
- Draw a vertical line 23 cm long. Make a horizontal line from above (upper edge of the canvas). Make marks from 1 to 5 cm even higher (extend the vertical line up by 5 cm) - this is the height of the ceiling (50 cm above the gate). You must have at least 40 cm from the gate opening up, otherwise the gate will not work.
- Mark the middle of the canvas 1.15 m, we are interested in the space above this point.
- Approximately we take 1.4 m. Keep in mind that the lower part of the gate will run from the bottom to the top point - 2.3 m.
- To see how the canvas will open, we take a compass with a step of 1.4. We draw a vertical line to the right at a distance of a compass step from the first vertical line. Next, we take the step of the compass from the height of the ceiling (a point 50 cm above the top of the gate) to 1.4. We draw an arc (it is described by the lower part of the gate).
- Reduce the height to 1.3. Again, draw a vertical line on the right (compass pitch from 0 to 1.3). Draw an arc in increments of 50+ to 1.3. The point of intersection of the lines turned out to be at a height of 1.8 (it is at this point that the canvas will take a horizontal position) instead of 2.3.
- We take a height of 1.35. We repeat the steps described above. And now the intersection point is in the desired position (4 mm = 4 cm error, it will go to the thickness of the canvas).
Thus, when the lever is attached at a height of 50 cm above the opening and the sash height is 2.3, the attachment point of the lever from the bottom is 1.35.
Construction assembly
When the plan is ready, we proceed to the installation. We assemble hinge nodes and interface nodes, a metal frame. We install tacks in the opening, the porch and the groove for the rollers.
To reduce backlash and friction, we replaced the standard bolts with automotive bushings (aka rear shock absorbers).
In conclusion, we assemble the movable mechanisms and the gate itself, hang the load.
Buying a solid garage design in our time is not a cheap pleasure. Do-it-yourself garage doors are cheaper to make, but certain knowledge and skills are required. It is also desirable to have welding skills. Therefore, how to make a garage door with your own hands is a question that needs to be thoroughly understood. And then it will be possible to start the task at hand.
Near a private house
Most users choose them for their compact size.
Advantages: convenience, protection against hacking, universal in use. Disadvantages: high cost, folding structures are prone to damage.
swing gate
The photo shows a swing version of the design.
In the suburban area
Sliding gates
Rollback option
Overhead gate
These are the most practical and convenient vertical designs. When opened, the sheet of metal rises up and lies horizontally in the form of a visor. The design of such a mechanism is simple. The canvas is attached to the frame and moves around the axis, changing the horizontal position to the vertical one. Folding gates are convenient in operation.
lifting structure drawing
Advantages: resistance to corrosion and burglary, do not require additional space.
Feature Comparison
Guided by the indicators in the table, we can say that the choice is only for the buyer. It all comes down to cost and reliability. For example, swing and sectional models are good to install in a home garage, but they are not suitable for garage cooperatives, as they have a low degree of reliability.
Up-and-over garage doors are suitable for any building, but their main drawback is their high cost. Due to the low price, swing gates are suitable for a private garage. If necessary, they can be insulated, automated and reinforced with an additional sheet of metal. In addition, it is not difficult to weld garage doors at home.
Frame device diagram
The frame is made of a metal corner, which is welded around the entire perimeter of the doorway. Thus trim the slope inside and out. Between themselves, the inner and outer corners are welded with metal strips in several places. You should get a frame frame.
After the frame is ready, collapsible hinges are welded on the sides. The lower part must be connected with an outer corner, and the upper part with a frame frame. This design is also suitable for a garage from
To date, a wide variety of garage doors have been developed and successfully implemented in practice. Among all existing options, traditional lifting gates are especially convenient and ergonomic, effectively leaving under the garage ceiling during opening. At the same time, you can assemble and install lifting garage doors yourself.
There are 2 main types of overhead garage doors.
Doors of lifting sectional type

The leaf of such gates consists of a number of individual panels, each of which is about 50 cm high. Steel, wood and plastic can be used to make panels.
Hinges are used to connect the panels. Rollers, couplings and other moving elements are made of steel or plastic, stainless materials are used for the manufacture of guides.
The inside of the canvas is necessarily insulated (mainly polyurethane foam), which allows you to save additional heat inside the garage.

Among the main advantages of overhead sectional doors, the following points should be noted:
- safety of use;
- simplicity and maximum ease of use;
- good strength properties.
The main disadvantage of this subspecies of the gate is the almost complete absence of the possibility of breaking and illegal entry. In addition, you will not be able to make such a gate yourself - it is extremely difficult.
The only available option is to buy a factory kit and mount the gate yourself according to the instructions.
Up-and-over doors

A similar design can be assembled and installed independently. When this gate is opened, the whole sash rises at once. The hinge-lever type system is responsible for the movement of the moving part. The gates are characterized by excellent strength characteristics (the final indicator depends on the properties of the material of manufacture) and provide reliable protection of the garage from intruders.

The structure can be assembled without the use of guides and rollers. Thanks to this, the canvas will move silently.
To assemble such a design, narrow technical knowledge is not needed. This event does not require large financial investments either.
Advantages and disadvantages
Like all existing mechanisms, lifting garage doors have a number of strengths and some disadvantages.
Advantages
The main advantage of the systems under consideration is increased burglar resistance. The only way to get inside the garage is to cut through the canvas. It is almost impossible to file a frame and get inside without attracting attention.

The second important advantage of the design is a long service life. However, in order for the gate to serve for a really long time, high quality galvanized metal should be used to make the leaf.

The gate does not take up space in front of the garage, which makes entry and exit as convenient as possible.
disadvantages
Among the main disadvantages of lifting gates, the following should be noted:
- large weight of the structure. The disadvantage is relative - other existing designs weigh no less. But in order for the operation of the lifting gate to be safe, special attention must be paid to the quality and reliability of the frame;
- slightly increased consumption of raw materials;
- some inconvenience when checking into the garage. For example, you will need to constantly get out of the car, before reaching the garage about 1.5-2 m - without such a margin, the gate simply will not open.
- in the open position, the gate takes about 20-30 cm of the height of the opening;
- in case of significant damage to the canvas, it will have to be completely dismantled.
However, despite all their small drawbacks, such gates are an incredibly convenient and ergonomic solution.
Design features

Traditional overhead gates are made up of many elements. Check out the features of each.
The frame acts as the basis for the entire structure. The frame should be as rigid as possible and securely fixed in the garage wall.
The side profile is a guide element along which the main part of the structure moves.
Guides - without them, as already noted, you can do without. But if possible, it is better not to exclude them from the composition of the structure.

Canvas. Manufactured as a one piece unit. Usually made from corrugated board. Sometimes wood is also used to make canvases, but it is better to refuse such a decision - the material is heavy and relatively short-lived.
Insulation. Fitted between sheets of fabric. It is most convenient to use polyurethane foam.
Rollers, springs and levers. These elements are responsible for the movement of the gate leaf. The sash rises along the guide element, takes a horizontal position closer to the ceiling and, finally, is fixed parallel to the ceiling surface.
Provides easier lifting of the canvas.

Electric or mechanical drive. Electronics is more convenient - to control the gate, just press the button on the portable remote control. Mechanics are more reliable in most cases. If you decide to use an electric drive, remember an important rule - the gate shield should have a somewhat lightweight design.
If desired, the finished canvas can be decorated with a variety of decorative elements. All of them are available for sale in specialized stores.
It is important to remember: any decorative element, especially if it is forging, contributes to an increase in the weight of the structure. Know the measure.

What to buy?
You can do it yourself with the manufacture of most elements of the gate. However, there are some things that are better to buy ready-made and not waste time. Give preference to fixtures made of good quality metals. In general, you will need the following:

DIY gate
Do-it-yourself manufacturing and installation of the gate will allow you to save a significant amount of money on the purchase of a ready-made system and the services of third-party installers.
Video - Installation of sectional doors

First step. Select the appropriate type of gate opener.
The most popular are hinged-lever mechanisms. This design is durable and extremely simple. However, its installation requires increased precision from the installer at the stage of placing the guides and setting the level of spring tension. The rails must be installed exclusively vertically and parallel.
The second option is a mechanism made using counterweights. The cable is attached to the corners of the support frame in its lower part, passes along the block in the direction of the pulley, and already at its (cable) end there is some kind of counterweight. The heavier and larger the blade, the heavier the counterweight must be used. It is recommended to give preference to this mechanism only in case of installation of massive and very heavy lifting gates.
Video - Lifting gate inside view
Second step. Design a gate. Pre-measure the existing opening and prepare a sketch (or choose a ready-made option from open sources).
Third step. Prepare the tools for assembling the gate. You will need the following:
- wooden blocks of high strength;
- good quality metal pins;
- corners;
- brackets;
- hard springs;
- metal bars;
- decorative elements.
Fourth step. Assemble a box of future gates from a transverse and a pair of vertical bars. To connect the bars, use squares, plates are also suitable.

Fifth step. Deepen the bottom of the box into the concrete screed of the garage floor by about 20 mm and fix the product in the opening with metal pins.
Sixth step. Assemble the frame and sheathe it with the selected material.

Seventh step. Make a base. Use a corner as a starting material. Make a hole in the shelf with a drill for fixing to the racks. In the second shelf, prepare already 3 holes for installing the bracket. To make a spring support, use a channel bracket.
Eighth step. Prepare a plate from a strip of steel. Connect the bracket and a suitable spring with a steel plate. Bend the extreme turns of the fixed spring like hooks. Connect the tension controller made of a metal bar from below.

Ninth step. Make a lower hinged corner. You need to drill a hole of about 8.5 mm in diameter in the corner and weld the product to the support frame of the structure, stepping back from the bottom edge to the center of the prepared hole. The gap will allow you to place the lift arm in the right place on the hinge.
Tenth step. Attach the plate to the end of the lift arm. Use welding to securely fix the elements.
Eleventh step. Make rails for the movement of the gate leaf. Use a couple of corners as a starting material. Make them up and weld along one edge. The distance between the inner tops of the steel angles should be 50 mm.
Twelfth step. Attach the finished rail to the previously prepared plate. For fastening, use welding. At the same time, leave an 8 cm indent between the axis of the guide part and the edge of the transverse product below. Attach a piece of channel to the second end of the rail by welding, while stepping back about 15 cm. Then screw the channel to the ceiling beam with a bolt.
Video - Guides for lifting garage doors, part 1
Video - Guides for lifting garage doors, part 2
Thirteenth step. Mount several translucent inserts into the canvas. This is an optional item. Use translucent inserts when you need to improve natural lighting inside the garage.
Video - Lifting gate frame, part 3
Video - Wheels for lifting gates, part 4
Fourteenth step. Stick on the rubber seal. It also does not hurt to stick compensating pads. Together, these elements will increase the stability of homemade lifting gates.
Fifteenth step. Fix the canvas in the box.
Thus, there are no super-difficult tasks in self-assembly of lifting garage doors, but this work must be approached with maximum responsibility and knowledge of the matter. Follow the instructions, do everything as accurately as possible, and the gate of your garage will become its reliable and durable protection.
Successful work!
Video - DIY lifting garage doors
Car owners pay increased attention to the technical equipment of their garage. The main role in this is assigned to the installation of durable gates, which are distinguished by functionality and aesthetics. Especially popular are lifting gates, which are easy to manufacture and install with your own hands.
Features of overhead garage doors
When planning to equip a vehicle storage room with homemade lifting mechanisms, carefully familiarize yourself with their design and operational features.
Carefully analyze the positive aspects of the design, study the negative points.
Gate design options: which one to choose
In garages, various types of overhead doors are used:
Roll-up gates secure the garage securely. For their manufacture, you can use purchased components or use self-made elements. The latter option will save you a lot of money.
Benefits of swing garage doors
The lifting structure compares favorably with other types of garage fences. Main advantages:
Disadvantages of swing gates
Any gate design, along with advantages, has certain disadvantages. The lift-and-swivel mechanism is no exception:
The main parts of lifting structures are a metal power frame, a hinged canvas and a movement mechanism.
Structural elements of lifting gates are not as numerous as it might seem
The construction frame is made of rectangular steel profiles or durable wooden beams. It is a power element that carries the main load. The box is fixed in the garage opening and provides fastening of the suspension associated with the movement mechanism.
The hinged sash must match the parameters of the garage opening. The canvas is a frame made of metal profiles. It is sewn up with steel sheets or sandwich panels. In order to reduce costs, wooden shields are sometimes used. To protect the door leaf from corrosion, it can be upholstered with galvanized steel. Additional attractiveness of the fence is given by decorative panels installed from the outside.
The gate opening device provides for the use of one of the following mechanisms:
- articulated lever, characterized by reliability and simple design. It allows you to lift the sash with simultaneous rotation and prevent blocking. During installation, it is important to ensure the accuracy of the installation of the guides and to adjust the springs that facilitate movement;
- a drive equipped with counterweights, used for massive canvases. Such gates are made of thick sheet steel or heavy wood. The device includes a steel cable fixed in the corners of the metal structure and passing through the winch block to the counterweight. Sometimes a steel chain is used instead of a cable. In the design with counterweights, the balancers act as springs, compensating for the weight of the gate.
The scheme of the lifting mechanism
Opening of lifting gates with the help of a hinged-lever design is carried out thanks to rollers and lifting levers. The movement of the canvas occurs along the guides fixed on the ceiling of the garage.
After lifting, the canvas is fixed in the ceiling of the garage. At the same time, the bottom of the sash forms a canopy over the opening. When the doors are closed, the springs are in a stretched state, and in the open position - in a compressed state.
Many car owners equip storage rooms for vehicles with a hinged-lever design.
The opening of the panel sheet can be carried out manually or using a special electric drive that provides for the possibility of remote control.
Preparing to make a gate with your own hands
The preliminary stage includes the choice of design, the development of your own scheme or the study of existing documentation and the selection of a finished drawing. This will determine the need for materials, as well as prepare the necessary equipment and tools.
Selection of a design solution and development of a drawing according to the available dimensions
When deciding on the design of the lifting fence, use a proven technical solution - a lever mechanism with a hinged mount.
Carrying out measurements of the garage opening is a mandatory operation carried out at the design stage.
You can independently develop a sketch of the future design.
If there are no design skills, it is advisable to use ready-made documentation.
Having studied the documentation, you should put down on it the actual dimensions of the garage. This will determine the need for materials.
When choosing materials, pay attention to their strength and fire safety.
The choice of materials and components depends on the size of the opening, the design of the gate and the degree of automation.
The basic kit, which allows you to independently manufacture a lifting structure with a lever mechanism, includes:
- a rectangular metal pipe measuring 6x12 cm with a wall thickness of 3-4 mm, necessary for the manufacture of the frame;
- wooden bars with a section of 8x12 cm, from which you can make a box if you do not have a steel rectangular pipe;
It is better to make a frame from a metal pipe, but if it is not there, you can use wooden bars
- metal pins and brackets necessary for fastening the gate frame to the opening;
- a set of steel channels No. 8 or 10, as well as corners 4x4 cm, used for folding hinged elements and guide rails;
- a square steel pipe with a side of 4 cm for assembling the gate frame;
The frame of the gate is also made of a metal pipe.
- compensation springs made of wire with a diameter of 3 cm for the drive mechanism;
- rubber seal to compensate for gaps around the perimeter of the structure;
- steel sheets 3 mm thick, plank boards or sandwich panels necessary for sewing the door leaf;
- a set of equipment for assembling an electric drive, if automatic equipment is planned;
Installing an electric drive will allow you to control the gate remotely
- plastic panels or decorative finishing materials that allow cladding from the outside;
- insulation - mineral wool, polystyrene foam or expanded polystyrene.
All materials should be pre-cut into blanks that meet the requirements of the project documentation.
Required Tools
In the process, you will need the following tools and electrical equipment:
- tape measure 5 meters long, building level;
- a set of wrenches and a set of various screwdrivers;
- electric drill complete with drills;
- grinder with a cutting wheel with a diameter of 180 mm;
- apparatus for electric welding.
A standard set of electrical equipment and locksmith tools will allow you to independently manufacture lifting gates.
Recommendations for assembly and installation of garage doors
Work on the manufacture of gate elements and installation of the assembled structure requires prior familiarization with the step-by-step instructions.
Sequence of operations
The manufacture and installation of rotary gate assemblies is carried out according to the following algorithm:
- Weld the power box using rectangular metal pipes. It is possible, if necessary, to assemble the gate frame from wooden bars.
- Smooth out irregularities and sags formed after the completion of welding work.
Removing bumps and sagging after welding will improve the appearance of the gate
- Fix the frame in the doorway using steel rods and brackets. Deepen the bottom beam of the frame 2 cm below the floor level.
- Assemble the frame of the door leaf, corresponding to the dimensions of the opening, taking into account the gaps required for assembly. Connect workpieces using electric welding.
- Sheathe the frame with sheet material using welding. When using sandwich panels or wooden panels, fix the sheathing with self-tapping screws. Install insulation sheets if necessary.
- Fasten the rubber seal around the perimeter. Its height should correspond to the gap between the canvas and the box installed in the opening.
- Fabricate linkage support brackets. Drill mounting holes.
- Mount guide strips from a channel or two welded corners in the ceiling of the room. This will allow the rollers of the hinge mechanism to move.
- Attach hinges to move the sash with bolts.
- Make a preliminary installation of the assembled door leaf in the garage opening. Mark the fixation points of the pivot joints.
- Check up a possibility of free movement of levers on directing levels. If necessary, change the coordinates of the attachment points. Pay attention to the parallel arrangement of the levers.
- Make the final fastening of the elements (after adjusting the position) using standard fasteners and electric welding.
- Install return springs on opposite sides of the sash, ensuring that they are parallel.
- Check the function of the spring mechanism. It must ensure complete closure of the gate. If necessary, select counterweights of the required mass.
- Seal the joints around the perimeter of the power box using cement mortar. Install decorative trims along the contour of the door frame.
- Paint structural elements.
When making a mechanism according to step-by-step instructions, control the compliance with the dimensions. Be guided by the values indicated on the drawing or sketch.
How to insulate fabric
To prevent heat from leaving the room through the sashes, they must be insulated. To do this, you can use foam, basalt wool or polystyrene foam panels.
Guided by fire safety considerations, it is better to use fire-resistant materials for insulation - basalt wool or expanded polystyrene foam sheets.
For full insulation, a rubber seal is used. It is installed along the perimeter of the building envelope. The tight fit of the elastic seal along the contour of the opening makes it difficult for cold air masses to penetrate into the garage.
The nuances of operation: what needs to be done so that the canvas opens well and does not tip over
It is important to comply with special requirements to ensure trouble-free operation. Pay attention to the following points:

With proper operation of the up-and-over gate, problematic situations will not arise. It is important to monitor the state of the structure during use and, if necessary, to eliminate emerging defects in time.
Video: how to make a homemade gate with a remote folding mechanism
The gate of the lifting and turning structure can be made independently. This is a serious but doable task. Use properly developed documentation, follow manufacturing technology, use high-quality materials. The result is equipping your own garage with reliable lifting doors, significant savings in money resources and gaining additional skills in working with tools.
If there is not enough space in front of the garage, then lifting garage doors will come to the rescue. The design allows the sashes to be lifted to the ceiling. Products from manufacturers are provided in a wide range, but, as a rule, they are very expensive. But if you have little experience with a welding machine and power tools, then you can make a lifting gate with your own hands.
Main types
Before proceeding with the installation, it is necessary to understand what is the difference between lifting structures and other types, what advantages or disadvantages they have. All this will help you choose the most suitable option for yourself. At the very beginning, you need to decide on the device.
Create a lift gate for your garage
Gates can be divided into several types:
- Lifting sectional - this option is presented in the form of a canvas, divided into several parts, which are interconnected by a rigid structure. Rising, they begin to bend and gather, and when lowered, on the contrary, they straighten and level out.
- Swivel - this design, unlike the previous type, is not capable of deforming. The opening of the gate occurs by lifting the leaf along a curved path, with the upper part of the gate deepening a little inside the garage, and the rest of the gate rising up, but from the side of the street.
Both types are installed almost identically. Having drawings of lifting gates, the necessary tools and materials, you can make the design yourself.
In this video, we will consider lifting garage doors:
Advantages and disadvantages
Such homemade gates have their advantages and disadvantages. The advantages include:
- They don't take up much space. The sash rises up to the ceiling itself, and usually this space is empty, which allows you to save the area near the garage and use it for other purposes.
- Reliability. Since the structure is made of a single piece of canvas, it is almost impossible to crack the lifting doors to the garage.
- If desired, you can insulate the sashes, mainly polystyrene foam is used for this.
- It is possible to equip the gate with an automatic lift, which means that you can open and close the garage without having to get out of the car.
- Allows installation on garage openings of any size.
The exterior finish of such gates can be done in any way. Therefore, they will perfectly and harmoniously look both with a residential building and with the site as a whole. But this design has a number of disadvantages, namely:
- In the event of a breakdown of one of the parts, it will be necessary to replace the canvas completely, partial repairs are not provided.
- Gates are installed exclusively in rectangular openings.
- It is quite difficult to assemble a garage lifting gate with your own hands; installation requires certain knowledge and skills.
- If you plan to insulate the sashes, then you need to take care of this in advance, since an extra layer can increase the load on the mechanism, which will lead to frequent failures and breakdowns.
It should also be noted that such structures are very heavy, so the frame must be very strong and durable. Owners of tall vehicles or minibuses should take into account that raised doors make the ceiling 20-30 cm lower.
Preparatory work
Before proceeding with the installation, it is necessary to prepare, align the walls and ceilings of the garage so that the guides stand up straight, without any slope. It is necessary to carry out all construction and finishing work even before the assembly of the structure. The fact is that dust, falling on the rollers, disrupts the operation of the entire mechanism.
Since the frame is brought into the garage by 2-5 cm, it is more expedient to lay the floor covering after the gate is fully installed. The doorway is prepared in advance, calculations are made, a drawing and a scheme of work are drawn up.
The amount of materials depends on the chosen design: whether there will be a lifting gate with a door, how many leaves the structure will have, and also what size the garage opening will be.
But for a simple standard option, you will need:
- wooden bars per box (120 × 80 mm);
- metal pins;
- steel corners on the frame (35 × 35 × 4 mm);
- corners for rails (40×40×4);
- spring (30 mm in diameter);
- channel (80 × 45);
- metal rods with a diameter of 8 mm;
- leaf fabric.
This list may change, be supplemented, since any change in the scheme, even the smallest one, will require additional details. In addition to the main material, tools will also be required. Therefore, it is first necessary to prepare a grinder, an electric drill, metal and wood drills, a welding machine and a level.
Construction stages
The production of folding gates takes place in several stages. First, the frame is assembled, rollers are installed, then they begin to create sashes and attach additional elements. And at the final stage, the structure is assembled as a whole, and, if desired, an automatic lifting mechanism is installed.
Frame assembly
The structure on which the lifting gate will be fixed is the frame. The main burden falls on her, therefore initially collect this particular part. To make it, you will need wooden bars, although metal profiles can be used for greater reliability, it all depends on financial capabilities. The described option is simpler and more economical.
A box is assembled from wooden bars, to connect the elements, you will need steel corners or special plates. When installing the frame, it must be borne in mind that its lower part should be deepened into the ground by about 2-5 cm. After the box is prepared, it must be checked; for this, the structure is installed in the opening and the vertical and horizontal position is checked using a level. If everything suits, then the frame is fixed with metal pins (anchors), and 1 pin is required for each running meter. After completing the assembly, proceed to the installation of horizontal rails on the ceiling.
Keep up with the times with automatic gates in your garage
Now you need to fix the brackets for the rollers. In order for the wings to ride freely and not cling, you need to place them a little deeper than the bottom ones. Be sure to measure the position with a level, incorrect installation will not allow the gate to rise. After that, the structure is fixed with bolts, and clamps are installed along the edges of the rails, which will block the movement of the rollers.
Leaf preparation
The canvas, which will play the role of sashes, can be made from almost any material. But when choosing, it should be borne in mind that the initial function of the gate is still protection, so it is worth purchasing a material that is resistant to climatic influences. Most often, for such structures, metal sheets are used on a wooden frame, which are fixed on the inside, then there is a layer of insulation, and from the side of the street the gates are upholstered with plastic.
Many owners of such garages make a gate for convenience, in which case the gate does not need to be constantly opened, which means that they will last longer. And some even have a window; installing these additional elements is easy. When the frame is fully assembled, it must be installed on the rails and the mechanism checked for operability.
Additional elements
Installation work complete with the installation of construction fittings: inserting a lock or latch, fastening handles or other auxiliary elements. If you do not plan to install an automatic lift, then the handles are essential, since clinging to dirty edges is not very convenient. It is best to place them at the bottom of the shield.
If a gate is built in, then it is best to secure the garage with an internal latch. Such locks can be made independently, it is enough to fix special arches on the canvas and frame. After the structure is fully assembled, proceed to the finishing work. The gates are treated with protective compounds, painted and fixed finishing material.
Automation system
You can install an automatic lift yourself, of course, the price of a home-made gate will become more expensive from this, but the level of comfort will increase significantly. You don't have to manually open and close your garage door every time. But in order to install such a device, you need to choose the right drive so that it matches the garage lifting mechanism.
The installation of each device is individual, but all step-by-step actions are described in the instructions, so there should not be any particular difficulties during operation. Performance will also not differ from factory designs. All actions are performed from a special remote control, which saves time.
