Making plastic containers with your own hands. How to make a stainless steel water tank for a bath. Video: DIY summer shower ideas
Installing a water tank in the bath opens up a number of amenities and advantages for the owner. Firstly, it becomes possible to prepare hot water in the process of heating the furnace, which allows you to save energy resources and spend them as expediently as possible. Secondly, the use of such a unit in most cases makes it possible to abandon the installation of an electric water heater, which also benefits the budget allocated for the arrangement of the bath.
There are several basic requirements for water tanks: they must be capacious, durable, warm up in the shortest possible time and retain heat for as long as the needs of the steam room visitors dictate. Among the options available to the average user, products made of stainless steel meet the listed criteria to the greatest extent.


Scheme - an example of installing a remote water tank
The modern market offers a wide range of water tanks made of cast iron, stainless steel and enamelled material. As practice shows, it is stainless steel that is most popular among bathhouse owners, which is due to a competent and acceptable ratio of operational and technical characteristics and cost indicators.
Stainless steel is characterized by excellent thermal conductivity, normally tolerates temperature fluctuations and objectively lasts longer than various ferrous metals.


Here a logical question arises: which of the existing brands of stainless steel is better suited for the manufacture of the container in question, intended for use in a bathhouse? Firstly, it is brand 08X17 (430), secondly, 8-12X18H10 (304). The mentioned materials are, among other things, used for the production of tableware and are characterized by high resistance to high temperatures, are completely hygienic, do not rust or deform during use. In addition, such materials are unpretentious and extremely easy to maintain.

Summing up the above, we can distinguish 3 main advantages of water tanks made of stainless steel:
- products do not require the arrangement of additional protection against high humidity and normally tolerate operation in conditions typical for a bath steam room;
- stainless steel is characterized by high thermal conductivity, which makes it possible to obtain hot water in the shortest possible time;
- stainless steel tanks do not deform due to sudden temperature changes, or these deformations are insignificant.
Prices for stainless steel sheets
stainless steel sheets
Design options for water tanks for a bath
Water tanks designed for use in a bath can have a different design. There are 3 main options: built-in tank, remote tank and pipe-mounted unit. You can find the features of each type of construction in the following table.
Table. Stainless steel water tanks
| Construction type | Description |
|---|---|
| The installation of representatives of this category is carried out in the process of building a sauna stove, as a result of which the stove and tank become a single structure. The heating of water in a built-in stainless steel tank is carried out by the forces of fire, due to which the efficiency of the water tank itself is kept at a rather impressive level. The key disadvantage of this design is the fact that a significant part of the heat is spent on heating the water in the tank, as a result of which the heat transfer from the sauna stove itself drops noticeably. Helpful note! Much easier to manufacture and use is a top-mounted/hinged tank mounted on top of the heater. |
|
| A more convenient and practical option compared to the previous model, especially if the tank is designed and installed for permanent use. If desired, a ready-made stainless steel water tank can be installed in the washing room of the bath, connecting it with a pipe system to the furnace heat exchanger. The optimal pipe material is copper or brass. The only significant drawback of an external water tank is the likelihood of burns in case of careless handling - the situation is especially relevant if children go to the bathhouse. |
|
| The tubular water tank can be installed either directly above the sauna stove or in the attic space. In such structures, water is heated in the shortest possible time. At the same time, the heat transfer indicators of the furnace unit do not decrease. The undoubted advantage of installing a water tank in the attic is the ability to “unload” the steam room, excluding the container from its environment and providing more free space. |
The table does not include another possible option for installing the tank - on the side of the stove.

 Stove with a side tank - photo
The method is neglected for the simple reason that it is the worst. Water in such a tank will boil very quickly. If the soaring process drags on, the atmosphere in the steam room will become simply unbearable due to the constantly boiling water. Yes, and with the maintenance of such a tank there are continuous inconveniences: in order to save space, the capacity is made high, but very narrow.
Having dealt with the features of stainless steel water tanks and choosing the most acceptable design option, it remains only to determine the optimal volume of the container, after which you can proceed directly to the stage of its manufacture.
When choosing the required volume of a stainless steel water tank, it is necessary, first of all, to focus on the planned number of visitors who will go to the bathhouse at the same time. For example, if the steam room is not capable of accommodating more than 2-3 people due to its physical dimensions, you can safely put a tank of 50-80 liters, at the rate of 25-30 liters of water for each attendant.

Tanks come in different sizes - choose the right one
Using the above recommendation, you can calculate the required volume of the water tank, taking into account the attendance of the equipped bath. For greater convenience, it is recommended to add at least 10-20 liters on top of the calculated value - each person has different needs and ideas about comfortable washing.

DIY stainless steel water tank
Most factory models of water tanks are made of 1 mm thick stainless steel. For self-production, it is recommended to use thicker sheets - about 1.2-1.8 mm (a specific indicator is selected in accordance with the volume of the container). The cost of manufacturing the structure in this case will be higher, but for many years you will not have to think about the need for repair, painting, coating with various special compounds and other similar maintenance of the tank.
As an example, you can use the following drawing - this is the easiest for self-assembly and one of the most popular design options.
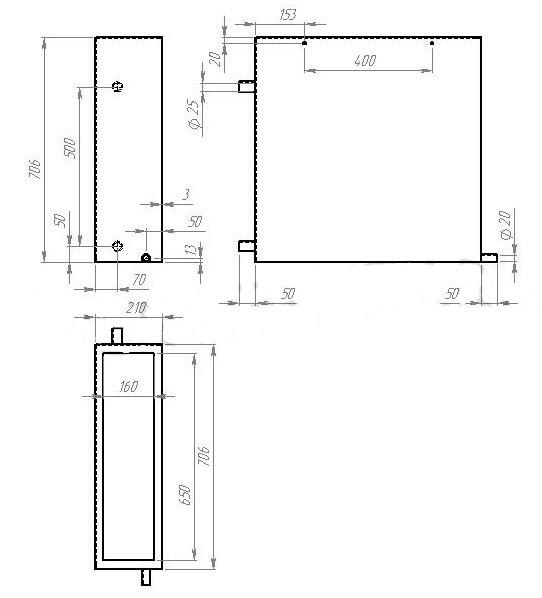
You can proportionally change the dimensions in accordance with the required volume of the container. The calculation of the volume is carried out according to the standard formula, i.e. indicators of length, width and height of the product are successively multiplied. For example, the volume of the container presented as an example will be about 25 liters.
Helpful advice! An even simpler version of a water tank is a product made from a piece of seamless stainless steel pipe. By giving preference to such a solution, you get a number of advantages. Firstly, you don’t have to waste time and effort on cutting sheet metal, calculating allowances, stocks and other points, i.e. the possibility of errors is reduced to a minimum. Secondly, the manufacture of a water tank for water from a pipe requires the use of welding in a minimum amount.
Stainless steel pipes with a diameter of up to 1020 mm and even more are available for sale, which makes it possible to purchase a product for the manufacture of a container of the required volume without any problems. To determine the volume of the cylinder (namely, this is the shape that the storage tank will have in the end), use the following formula.

Helpful note! If you wish, no one will forbid you to make a tank from a profiled stainless pipe, and then the tank will have a rectangular shape.
The further procedure for self-manufacturing a water tank will be considered precisely on the example of using a pipe segment as a blank.

Pipe - billet
Important! If an on-pipe water tank is planned, it is better to use a shorter but wider blank for its manufacture so that the chimney can be passed through the internal cavity of the tank. It will look something like this.


The procedure for manufacturing a water tank from a pipe is presented in the following table.
Table. Making a water tank for a bath
| Stage of work | Description |
|---|---|
| Previously, a formula was given to calculate the volume of a cylinder. With its help, we find the required height of the water tank. For example, we want to get a tank with a volume of 30 liters and use a pipe with a diameter of 1020 mm to make it. By simple arithmetic manipulations at the level of grade 5, we transform the formula into the following form: H \u003d 30 / (3.14 * 0.512) \u003d 37 cm - this is the length that a pipe cut should have to obtain a water tank of the specified volume. To cut a piece of pipe, use a grinder. For working with stainless steel, discs with a thickness of 1 mm and a diameter of 11.5 or 12.5 cm are suitable. |
|
| In order for the finished water tank to look beautiful, you need to properly process the cut areas. In the future, similar actions will be performed when boring holes for connecting nozzles with taps. The most convenient tool that allows you to quickly and efficiently deal with the solution of the above tasks is a manual drill. Such devices are equipped with a wide variety of abrasive nozzles, allowing you to achieve the maximum quality of processing a particular material. In the absence of a manual drill, the seams will have to be put in order with improvised means: a file, sandpaper, etc., which is definitely a longer and more laborious undertaking. |
|
| At this stage, we need a stainless steel sheet. The lid, and especially the bottom, is recommended to be made of a material that has a greater thickness than the walls of the pipe chosen for the manufacture of the body. The work is carried out in several stages: - a circle is drawn on a sheet of stainless steel according to the diameter of the holes that it will close. You can simply put the pipe on a sheet of metal and draw a circle by circling the product along the contour; - in accordance with the markup, 2 blanks are cut. For cutting and subsequent grinding of the edges, you can use the previously mentioned grinder and manual drill. If a tubular method of installing a water tank is assumed, at the same stage, holes can be prepared in the bottom and lid according to the diameter of the chimney pipe (it is better to 1 mm more so that the chimney can pass through them, in the future the gap will be leveled by welding). Also at this stage, it is possible to prepare holes for further connection of branch pipes with taps, if they are mounted in the bottom (relevant for remote structures installed away from the furnace, in the case of over-furnace / built-in and tube tanks, it is more expedient to cut the pipes into the wall of the tank body). In more detail, the nuances of drilling and welding stainless steel will be discussed in the relevant sections of the instructions. |
|
| The photo shows a profiled pipe, but the welding process for this case and working with a round billet remains the same. Products from the material in question can be connected in different ways: - by soldering using lead-free or high-temperature solders; - manual or automatic welding (in the case of stainless steel, work is carried out exclusively in a protective gas environment). The most preferred is the second option, the easiest to learn - manual arc welding. Argon is used as the shielding gas. Welding is carried out using a non-consumable electrode for working with stainless steel. In the international classification, devices designed for such welding are marked with the abbreviation TIG. When buying or renting a welding machine, do not forget to purchase / rent an argon tank and a reducer. The function of the latter is to reduce the pressure of the protective gas at the outlet. Seams should be as neat and uniform as possible. After completion, it is recommended to clean them up. Recommendations for a suitable tool for this have been given previously. Helpful advice! If desired, the tank cover can not be welded, but attached with bolts and lugs, or simply made removable. The option is relevant for cases where water will be added manually by the user, and not supplied through the water supply. The container is ready. We proceed to the preparation of holes for further insertion of pipes. |
|
| The structures under consideration are equipped with two branch pipes with taps. Cold water is traditionally supplied to the container through the upper pipe, and the heated liquid goes to the consumer through the lower pipe. The diameters of the plumbing pipes correspond to the diameters of the water pipes used in combination with them. Most often, pipes with a diameter of ½ or 1 inch are used. For drilling stainless steel, an ordinary electric drill is suitable. The main thing is that the work is done at low speeds - no more than 100 rpm. In a drill with an electronic regulator, setting the required mode is not a problem. If there is no such regulator, you simply need to activate the start button with short presses - within a second the tool will not have time to accelerate to operating power. Holes are best made with a P18 drill. An even more convenient option is a special stepped drill (shown in the image). Such a tool does not lift the edges of the hole, so that it gets a perfectly round shape. Along with this, for drilling holes with a diameter of more than 14 mm, it is more convenient to use special nozzles - the so-called. "crowns". |
|
| The presented diameters of such crowns correspond to both inch and metric graduations of plumbing pipes. With the help of appropriate drill bits, you can also prepare holes in the bottom and lid of the tank if it is intended to be installed on a pipe. |
|
| Branch pipes with taps are available for sale to shut off the flow of water. In combination with a stainless steel tank, it is preferable to use components made of the same material. In order not to waste extra time on arranging the thread, the pipes are simply welded to the previously prepared holes. Recommendations for tools and welding modes remain the same. After installing the water tank in accordance with the selected scheme (to be discussed later), water pipes are connected to the nozzles (it was previously noted that it is best to use copper or brass products) of a suitable diameter. The connection of the branch pipe to the pipe is carried out in any suitable way, for example, using a threaded adapter. |
So, the water tank is ready, and even the pipe fittings have already been installed. It remains only to connect the finished device for its subsequent use for its intended purpose.
How to connect a stainless steel water tank
Important notes before you start
It was previously noted that the following options for mounting the tank are most common: inside the furnace, away from it and on the chimney. We propose to replace the first option with a method in which the installation of the tank is carried out above the stove heater. This method is easier to implement, at the same time, you can resort to using it even if the stove has already been built - suddenly you thought at first that you would not need such a heater, and after studying the material presented, you understood all the advantages of using it and wanted to install it in your bath .
Important! It will be possible to implement the mentioned replacement only in the case of a collapsible chimney. The proposed method involves the combined installation of the tank - it will be simultaneously placed above the stones and around the chimney, which will make the efficiency of water heating as high as possible. Otherwise, you will either have to give preference to the built-in tank model (if the furnace is just being built), or install the unit at a distance from the stove.
If the oven is brick, the preparation of the place for the tank and its direct installation are carried out during the masonry process (the specific stage depends on the chosen design of the oven and the size of the furnace, most often it is the 10th row). When laying a row, an opening is left to accommodate the tank. The size of the opening should exceed the dimensions of the structure to be installed by several millimeters to compensate for thermal expansion.

On the diagram - an opening for installing a tank
Note! Pipes are laid between the marked quarters of bricks, the presence of which will increase the heating efficiency - these are the design features of this particular furnace unit, these pipes may not be available in the project you have chosen.
The oven with the tank installed looks like this.

A sanitary faucet is embedded into the wall of the tank from below. It is assumed that the user will collect hot water directly in the steam room. If desired, the design can be improved by inserting the previously mentioned branch pipe instead of a tap, connecting a water pipe to it and leading it into the washing room.
When the masonry is brought to the upper edge of the tank, 2 metal strips are laid on it, the presence of which will allow you to safely cover the storage tank with a brick.


In the case of metal sauna stoves, the water tank is welded over the firebox (recommendations regarding welding were given earlier). As a result, the heating of the container is carried out by the forces of the flame, which ensures the fastest possible preparation of water. The design looks like this.

Important! If a built-in tank design is preferred, metal with a thickness of more than 1 mm should be used for its manufacture and, at the same time, ensure that the quality of the welds is as high as possible. Otherwise, the tank will either burn out quickly or leak through poor-quality seams.
Helpful advice! In the case of a brick oven, you can go the simpler way by laying the water tank on the body of the oven above the firebox. The structure looks something like this.

Installing a water tank above the heater
This method, as noted, involves combining the options for installing the tank above the heater and on the chimney. The distance between the heater and the bottom of the tank is usually maintained in the range of 20-35 cm with the possibility of changing in both directions: the smaller this indicator, the faster the water will heat up, but the tank will last less, and vice versa.
It makes no sense to give detailed step-by-step instructions - you already have all the necessary knowledge. Previously, it was described how to prepare holes in the bottom and lid of the tank for passing a chimney pipe through them. Do it.
Next, you need to pass an element of the smoke exhaust system through the internal cavity of the tank and connect the pipe to the tank at the entry and exit points (in the bottom and lid) by welding. You also know how to do it.
Stainless steel water tanks are relatively lightweight (for example, cast iron is much heavier and a tank made of it would require fixing to the ceiling with chains or other suitable method) and do not require additional fastening. Further installation of the chimney is carried out according to the standard scheme, depending on the type of construction chosen.
Ideally, the finished system will look like this.


In the image shown as an example, pipes and taps are not visible. The next design is not so beautiful in appearance, but the connection of the water outlet is clearly demonstrated here.

As for the supply of cold water, it can be organized in several ways, depending on the particular situation:
- filling the tank is carried out manually;
- water is supplied from a well / well;
- Water is supplied from a centralized water supply system.
We will not consider in detail each of the listed options, because. these are topics for separate voluminous instructions.
Installing an external water tank
The arrangement of such a system is also not overly complicated. The only thing is that the scheme is supplemented with a new device - a heat exchanger. It can be built-in or external. For self-production, it is better to choose the second option - it is more convenient and easy to implement.
A diagram of a system with an external water tank is shown in the following image.
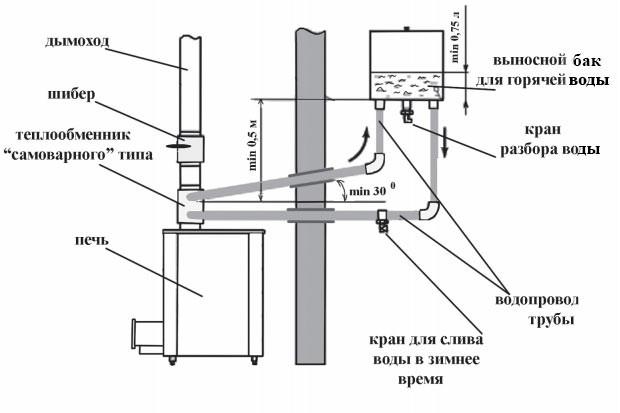
Here we see that the external heat exchanger is installed on the chimney. The water in the heat exchanger is heated by the heat of the flue gases transferred through the pipe walls. If an open heater is located under the heat exchanger, additional heating will be carried out by the heat of hot stones.
Heated in the heat exchanger, the water goes into the external tank, from there, cooling down, back to the heat exchanger. Water circulation will be ensured by the slopes created and the pressure difference in the tanks with hot and cooled liquid.


Remote tank with hot water for 60 l
You can make a heat exchanger yourself. In fact, this is the same water tank, the manufacturing instructions for which you have already studied, only of a smaller volume (usually up to 5 liters). The installation of the heat exchanger is carried out in the same way as the tank in the previous instructions (on the chimney).


Register - heat exchanger for sauna stoves

Prices for heat exchangers
heat exchanger
You already know how to make the necessary holes, install pipes, taps and pipes. Where to do it - look at the diagram. It remains only to prepare all the required elements and assemble them into a single system, maintaining the necessary distances and slopes in accordance with the above scheme.
In this example, a remote water tank is installed in the wash room and is equipped with a standard plumbing tap to drain the water. Pipes, like the mentioned tap, are cut into the bottom of the tank. Holes for laying pipes through the partition can be made using a suitable tool, such as a puncher.
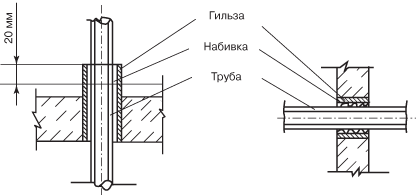
In accordance with the current provisions of the current standards, pipelines for cold and hot water supply, if they are laid through a partition wall, must be laid through a sleeve. The diameter of the latter is selected so that it exceeds the outer diameter of the pipe being mounted by 0.5-1 cm. To seal the gap between the sleeve and the pipe, a non-combustible soft material is used, so that, as a result, it is possible to move the pipe along the longitudinal axis in the event of thermal expansion. This is shown schematically in the following image.
The gaps in the partition can be masked in any suitable way, for example, by filling with the mentioned soft fireproof material and closing with an exterior trim element (lining, etc.).
It remains only to figure out how to fix the water tank on the wall. The easiest option is to install on metal corners, the power of which would be enough to support the weight of the water tank.
Fastening is carried out as follows. Having attached the corners to the wall, you put marks on the surface, drill holes according to the marks and mount dowels in them. Next, screw the corners to the wall with bolts 8-10 cm long and 1-1.2 cm in diameter.

You can install your water tank on the corners. The method is extremely simple to implement, but not the most reliable (they made a mistake when choosing the corners - they caved in - the tank fell), and it is objectively suitable only for rectangular structures of small volume. More reliable is the fastening method used when installing domestic water heaters. To implement it, you will have to work with the welding machine again. You already have all the necessary knowledge, so no further explanation is required. The procedure is as follows:
- a strip of metal is cut off (the same stainless steel is suitable) with a thickness of 1.5-2 mm, a width of 5-10 cm and a length so that it protrudes beyond the side walls of the heater by several centimeters on each side;
- holes are drilled in the strip according to the diameter of the mounting bolts (you will understand by looking at the image below);
- the finished mounting plate is welded to the rear wall of the tank.
Further steps are similar to the previous instructions, with the only difference that the water tank is not installed on the corners, but is attached to the wall through them by means of a welded bar. It looks like this.

Buck installed. You can test and, if everything is fine (no leaks, excessive heating and other adverse phenomena), take the structure into permanent operation.
If desired, the system can be improved almost to infinity, completing with a variety of automation, measuring instruments, etc. The possibility of installing additional wiring in order to connect the tank to the shower cabin in the washroom is also not ruled out - this will allow you to wash with maximum comfort. An example of the implementation of such an idea is shown in the following image.

Helpful advice! Install the tank in such a way that it is as far away from both the sauna stove and the hot water intake as possible.
Having sufficiently mastered the art of stainless steel welding, if you wish, you can make a tank not from a pipe, but from sheet material - this is a more responsible job compared to the considered option. An example of its implementation is detailed in the attached video.
Successful work!
Video - How to make a stainless steel water tank for a bath
There is no doubt that it is always necessary to have a supply of water in the country house and garden plot. And usually used for this different kind of metal containers. It is not always convenient to use such containers: they take up a lot of space and do not decorate the estate. But these shortcomings do not have an underground tank!
I built my tanks 20 years ago, and they still serve me.
Before starting construction, it was necessary to examine the tanks built earlier, but which had become unusable. Why did this happen? The containers made by plastering the walls of the pit do not last long: the outer part, the glass, is torn off from the ceiling if it is connected with the blind area.
In both cases, after filling the container with water, the soil is compacted, the concrete of the walls loses its stability and collapses. In turn, when the soil is compacted under the bottom, the container begins to sink, and the blind area slab, if it is firmly connected to the glass, tries to hold it, which is the reason for its separation from the ceiling.
In order to avoid this, before the blind area, the glass should be wrapped with a piece of roofing material.
underground construction
Now about the construction of the tank itself, its underground part. After the pit of the required size is dug and cleaned, several rows of stakes are driven into the wall, to which the formwork is tied. After that, the bottom is poured. The initial hardening of concrete occurs in 3-4 days, then it is possible to install the formwork for casting the wall. For this purpose, you can use ordinary sheets of iron, which are tied to stakes with wire through holes punched in the sheets. Formwork is installed at a distance of 8-10 cm
from the wall. Reinforcement is placed in the resulting space before pouring the solution, which can be any household scrap metal.
In the process of pouring, the solution must be tamped and tapped on the formwork so that voids do not form.
When the filled part of the wall hardens, the formwork rises higher and is fixed for the next filling. The contact point between concrete and mortar should be flushed to remove debris and avoid stickiness.
After the erection of the walls, they proceed to the device of the ceiling (ceiling). To do this, a suspended formwork with a hole is installed.
The formwork is suspended by the reinforcement, after which it is poured. In order to prevent the solution from flowing out, a roofing material or plastic film is laid on the formwork.
The device of the above-ground part of the glass is carried out after the mortar has hardened well in the ceiling, the formwork has been removed, construction debris has been cleaned in the container, all defects made during construction have been repaired, and ironing of the internal surfaces has been completed. The ironing process is carried out by applying a cement mortar without adding aggregate.
Well in retro style
If the container is planned to be used for collecting rainwater, then a hole is made in the wall for the pipe to enter.
Asbestos-cement pipes are well suited for this purpose, they are durable. To organize the collection of rainwater under the drain pipes from the roof of the building, a receiving well is arranged, covered with a mesh to retain large-sized debris, and the receiving neck of the pipe is covered with a mesh with a fine mesh.
It is necessary to position the receiving neck significantly above the bottom of the well - this will enable heavy fractions to settle without falling into the tank.
In conclusion, it should be noted that, if the location of the container allows it and if there is imagination, it can be camouflaged as an old rural well - this can become an architectural addition to the estate.
With any design of the above-ground part, the glass must be equipped with a hatch with a lock to protect the kids.
Below are other entries on the topic "Cottage and garden - with your own hands"
Remote suburban areas are often cut off from the central water supply system, which makes it much more difficult to care for the crops grown. Throughout the season, plants require abundant watering, especially in hot and dry weather. If it is rather problematic to equip a well on a site, you can create your own storage facility where water will be accumulated and saved.
Everyone can afford to install a tank for irrigation on the site. With its help, timely watering is organized, and a prototype of a water supply system is created, which allows the use of liquid for various purposes.
What materials are storage tanks made of?
Tanks for storing and supplying water are available on the market in various versions and are made of metal or durable plastic. When buying a container for irrigation for a long time, you should consider what material it is made of. Modern polymers make it possible to create very durable products with high technical characteristics. In terms of quality and strength, they can surpass metal counterparts.
Metal

A tank made of this material is a classic version, familiar to most summer residents. Iron products have been used to store fluid for many years. Everyone who works in the country and uses an artificial metal drive knows about all its shortcomings:
- susceptibility to corrosion;
- fast contamination;
- difficult care.
Protecting a metal tank from destructive corrosion is quite difficult. To maintain its holistic appearance from the outside, it is enough to paint the surface with paint. But inside, the water will create a constant impact that destroys the metal. After a couple of months, sediment forms at the bottom of such tanks. Internal cleaning is a difficult task. The positive side is the good warming up of the barrel and its contents under the rays of the sun.
An alternative solution would be to purchase a stainless steel product that does not have these disadvantages. This also applies to the option with high financial costs.
VIDEO: Barrel for watering, making a stand
Durable plastic
Buying a watering tank of 500 liters or more is a reasonable decision, based on the fact that they do not have the disadvantages of metal structures. Such products are made of high-tech plastic, which allows them to withstand heavy loads. Unlike cheap plastic, they are not afraid of temperature changes. Integrity is also maintained under the influence of high water pressure.
.jpg)
One of the main advantages of plastic tanks is their light weight. They are easy to transport and install in the right place. You can install the plastic structure yourself without special equipment.
In order to prevent the tank from bursting when the water freezes in winter, it is either completely drained, or a large log or 5-liter plastic bottles are thrown inside, which completely cover the surface.
To make a container for irrigation for a large volume, it is additionally strengthened with special metal rings. This design gives the final product resistance to the pressure generated by water. The next advantage of products made of plastic is the price. It is more affordable than analogues made of metal. The technology of manufacturing plastic containers allows us to offer the buyer tanks of various shapes:
- cylindrical;
- rectangular;
- square.
The shape of the container does not affect the quality of irrigation. The main thing is that it succinctly fit into the surrounding landscape and be convenient for installation.
eurocube

The Eurocube has a cubic shape, reinforced on the outside with a solid metal grate. The container is installed on a special pallet. This is a great option for organizing a drip irrigation system with the addition of fertilizers. It is designed for one cube of water. The design provides for a screw-on lid and a tap for draining the liquid at the bottom. To protect against rupture, the same technology is used as described above.
How to calculate the volume of the tank for irrigation
If, in the manufacture of a metal container, you can independently determine the volume in advance - from 1 to 10 cubic meters (a larger volume may not withstand the support), then a plastic one is bought ready-made. In general, the volume of the reservoir depends on the area of the irrigated area. On average, 1 square takes about 30 liters of water per irrigation. Thus, if the area of \u200b\u200bthe garden or plot is 50 sq.m., then the minimum volume of the tank will be 1.5 cubic meters (1500 liters), while a supply of water is required.
Gardeners on plots of 6 acres usually install 3 cubic meters, which is enough for a weekly watering.
Installation of containers for irrigation
All the positive characteristics of tanks for storing and supplying water for irrigating plants are offset by poor installation and location. Therefore, it is important to properly place and install the irrigation tank on the site. The storage tank must be located in a place where rainwater drains. This is the easiest way to restock this resource without any effort. Rain water is the most useful for plants.

It is necessary to determine where the barrel will stand:
- underground;
- on the surface;
- on a special platform.
Mounting the product in a suspended state allows you to install a faucet, and by connecting a hose to it, get pressure from its own weight of water. Otherwise, a pump is installed that supplies water from the barrel.
For reference! To create the optimal pressure of the water column for the required pressure, you need to raise the tank to a height of two meters. This will result in a pressure of 0.2 atmospheres. It is desirable to make it higher, but at the same time you need to think carefully about how to make a stable pedestal and how to give it optimal rigidity.
Technical advantages of using a vegetable garden irrigation tank
Using a pump to raise water from a well is quite enough to meet domestic needs. However, their power may not be enough to supply liquid to the planted area. Inexpensive pumps are not able to work at a pressure of 3-4 bar. The pump will operate at its maximum capacity, but will not create optimal conditions for irrigation.
If a tank for irrigation is installed on the site, then this problem will be solved. Gradually, the pump will pump the necessary amount of liquid for abundant irrigation of all plants. In order for the water from the barrel to flow and flow through the hoses, there is no need to create high pressure. Automatic protection installed on the equipment will turn off the pump when the water runs out.
To protect the pump from permanent shutdown or possible breakdown, it is necessary to set the level, dropping to which water will again flow into the tank. You can protect yourself from overflowing with a float valve.
If you take water in the country directly from the well, then it will flow to the plants in a cold form. This adversely affects their condition and causes the development of various diseases. The liquid passing through the storage tank is heated to the ambient temperature, which is optimal for garden crops.
The well may also contain various particles that will be in suspension in the water. Their contact with plants is not desirable. Water that has stood for several hours in the tank will give a sediment at the bottom with all the harmful impurities.
Modern solutions for the manufacture of containers for irrigation
Those who do not want to connect hoses, valves and other equipment for arranging an irrigation system should purchase a watering tank based on the installation of a special equipment system inside the tank. This is a station for supplying heated water under pressure, which is configured for automatic irrigation of plantings.

This set of equipment consists of:
- durable plastic tank;
- powerful submersible pump;
- filters;
- locking valve;
- valves;
- automatic water level control systems;
- bottom drain.
Such systems for irrigation of the site have a number of key advantages:
- operate in silent mode;
- provide maximum pressure;
- filter and warm water;
- control the liquid level in the tank.
With the correct installation of the barrel used for everyday irrigation, the land plot will be fully provided with the resource necessary for caring for garden plants. The main thing is to correctly determine the amount of capacity required for your needs. It should correspond to the water flow in your area with a small margin.
VIDEO: Irrigation tank and outlet water pressure
One of the most annoying household problems is the lack of water in the tap. It is easy to survive the absence of light or gas, but water is an indispensable component of human life, and when it is not there or not enough, problems begin. You can constantly keep several containers of water in the house, for example, plastic bottles, but it is much more practical to determine what kind of storage tank for water supply and the system diagram for a private house are needed so as not to lose comfort and continue to use household appliances and a sink with a bathroom, no matter how what never happened.
Why is it needed and how to use it
If for some reason the pump in the autonomous water supply system does not work, or there is no pressure in the centralized city water supply, then it can be supplied to the sink or toilet bowl from a previously collected reserve tank. Simply put, it is better to always have a supply of drinking water in the house and use it in emergency situations.
For the convenience of using the reserve water supply, the storage tank must be integrated into the water supply system so that it is either automatically used in the absence of external pressure, or it can be activated by simply turning the valve.
There are many variations on how to install and connect a storage tank, depending on the type of water source, the possible location of the tank, and even the layout of the house. It is enough to choose the appropriate option and decide on the type of the storage tank itself.
Types
The storage tank can be a tank with a sufficient internal volume, made of a material resistant to corrosion and safe for storing drinking water. The following materials are used:
- polyvinyl chloride;
- cross-linked polyethylene of high or low pressure;
- polypropylene;
- stainless steel;
- steel coated with waterproof varnishes and ceramic coatings.
 plastic tanks
 Although galvanized steel is resistant to corrosion and waterproof, over time the protective layer of zinc can become thinner, especially at the joints and welds.
By design, allocate:
- open containers that have a neck with or without a lid, but with sealed walls and a bottom;
- closed fully sealed containers of membrane type.
In the first case, everything is simple, the entire internal volume is filled with water and, if necessary, drains through a pipe fixed at the lowest point.
In the case of membrane storage tanks, the usable volume is at least a third less than the volume of the entire structure. Part of the volume is allocated under the air chamber, separated from the water by a strong elastic membrane. As the container fills with water, the membrane presses on the air chamber, creating excess pressure. When it is required to receive water back, the valve opens, and it enters the water supply system under the action of the accumulated pressure.
Bottom or top
There are three options for connecting the storage tank and using the water supply:
- Top location of the container. In this case, the water intake is carried out under the action of gravity. The higher the accumulator is located in relation to the consumer, the stronger the water pressure. Every 10 meters of altitude adds 0.1 atmosphere, or about 1 bar.
- The lower location of a simple storage tank. Gravity will no longer help, and a pump is used to supply the water supply, raising the pressure to the optimum level.
- Membrane-type storage tanks themselves create the required pressure for water supply. The lower location at the level of the consumer is optimal for them, since there will be no advantage from installation in an attic or tower.
How to determine the best option?
If a house with several floors and it is possible to place a storage tank in the attic, then this will allow you to do without additional installation of a pump, and you do not need to spend money on an expensive membrane tank. In fact, this is an analogue of a water tower. However, raise the container so high as to provide a comfortable pressure at the level of 2-2.5 atm. it's still difficult. Moreover, the question arises of warming the tank so that in winter the water in it does not freeze.
In the event of an emergency shutdown of the available water pressure of 0.2-0.3 atm. it will be enough to use the mixer in the sink, toilet or even a shower, but it will not be possible to use some household appliances, such as a washing machine or dishwasher, which require more pressure to operate the solenoid valves.
Installing the tank at the level with the consumer is suitable in cases where it is not possible to raise the tank to the attic or at least one floor higher. The same applies to the installation of a storage tank in the apartment. You will need a small pump to supply water to the water supply under pressure. To ensure adequate operation, the pump will require an expansion membrane tank.
A storage tank with a membrane is perfect for storing water both when using a centralized water supply system and in an autonomous system. However, it does not require additional equipment or top location. However, its cost is much higher than any conventional storage tank, even when combined with a simple pump.
Volume of the tank

In the event of problems on the city water supply line and water cuts, repairs are usually completed in a day or two. However, accidents also happen on holidays, and in places where a quick repair is simply impossible, then you have to wait much longer. The optimal supply of water for 2-3 days is based on the use of the toilet, maintaining personal hygiene and cooking.
For a family of three, 100 liters per day is enough when using water in economy mode. For one wash, approximately 80 liters of water are required, you can find out more precisely in the passport for the washing machine. Same for dishwasher.
It turns out that for 2-3 days when using household appliances, you need to look for a storage capacity of at least 500 liters, half a cubic meter.
However, there are a number of limitations:
- The larger the volume of water and the storage tank of an open type, the faster it will begin to overgrow with sediment. It is not recommended to use containers with a volume of more than 200-250 liters in everyday life for long-term storage of water.
- The margin of safety of the ceiling and load-bearing walls should be taken into account. The installation of the tank must be laid at the design stage of the house.
- When using autonomous water supply, the volume of the storage tank, especially of the membrane type, should not exceed the debit of the well. If this rule cannot be observed, then the pump must be protected from idling.
Membrane-type storage tanks are limited in their volume and are not able to give up the entire supply of stored liquid. To form a stock of more than 300 liters, you will have to connect several tanks of a smaller capacity in parallel to each other.
General connection rules
A water tank is installed on a prepared site: a concrete base tied with a foundation, or a reinforced metal frame made of a profiled pipe. The design must withstand one and a half weight of the tank and the water in it when completely filled.
The inlet pipe can be of any suitable diameter, water is supplied under pressure. The outlet pipe and the pipe to the water supply are chosen with a diameter one and a half to two times larger than the cross section of the main line. The optimal size is 32 mm.
Insulation, even of the highest quality, only slows down the decrease in temperature in the tank. To prevent freezing of water when installing the tank in an unheated attic or on the roof, any suitable heating system for pipes and the tank itself should be used.
With centralized water supply
Any type of storage tank connection requires a check valve at the entrance to the house or apartment. It is the valve that will prevent the flow of stored water back into the pipeline, and not to the consumer.
Top connection
The tank is installed under the ceiling of the first floor, the floor above the bathroom and kitchen or in the attic. The tank should have a fitting at the top for water supply, another one a little higher for discharge into the sewer when overflowing, and a fitting at the very bottom for water intake.
After entering the coarse filter of the shut-off valve, the meter and the check valve, a tee is installed, from which the pipe goes to the tank inlet, a shut-off valve or a controlled valve is installed in front of the fitting.
A shut-off valve is connected to the outlet fitting and the pipe is lowered back to the water supply, to which it is connected by means of a tee.
The excess discharge hose is lowered into the sewer or led out of the house into the front garden or drainage system.
To control the filling, a mechanical valve with a float is used, similar to those used in the toilet bowl.
To use the stored water, it is enough to open the outlet valve.
Bottom connection
Connection is identical to the first option. However, a pump must be installed at the outlet to create additional pressure in the water supply. Before each use of water, you will have to turn on the pump first.
A ready-made pumping station or the addition of a pump with a membrane-type expansion tank and a pressure switch will help simplify life.
Bottom connection of storage tank with membrane
To connect the tank, only one pipe is used, connected to the water supply through a tee with a valve. The insert is also carried out after the filter, counter and check valve.
Before use, the pressure in the air chamber must be adjusted. This must be done strictly in accordance with the instructions for the selected model. The normal pressure in the water supply is preliminarily studied, moreover, taking into account fluctuations during the day. As a result, the average value is taken, which is used to adjust the tank. This is the only way to use the maximum useful volume of the tank.
For autonomous water supply
As in the case of centralized water supply, there are several connection options.
Water tower
The storage tank is installed at a level of 15-20 meters above ground level on a reinforced tower or attic. Water from a borehole pump or pumping station is supplied directly to the tank, and from there it is distributed to the bathroom and kitchen in the house. The pressure in the system is provided by the height difference between the water level in the tank and the mixer tap in the house.

The disadvantage is the constant passage through the water tank, which will cause sediment to accumulate over time, even if a filter system is pre-installed.
The advantage is the simplicity of the design and the minimum of expensive elements, with the exception of the tower structure itself and the obligatory insulation of the tank to protect it from freezing even when it is placed in the attic.
Bottom tank connection
The tank is installed flush with the pumping station or on the ground floor in the house. It is filled during normal operation of the pump due to water from the well. The limiter is a float switch.
This option saves with excessive water consumption and a decrease in the water level in a well or well. However, it is useless when the electricity is turned off, since a pump is required to supply the end user with water from the reserve.

Membrane storage tank
A membrane tank for storing water is installed after the pumping station and the check valve, with a bottom connection. If the pumping station for some reason does not work and does not maintain pressure in the system, then water comes from the storage tank.
People, plants, animals need water. Without it, they cannot develop and exist. And therefore it is important to have a stock of it on your site. Of course, almost everywhere there is running water, wells, wells. But there are circumstances when the water disappears. This happens most often in hot, dry summers. And then all your labors invested in flowers, vegetables, fruit trees and shrubs will be lost. It will be painful to watch your plants wither.
To avoid such sad situations, it is recommended to install a storage tank for water on your site.
According to the materials of manufacture, they are:
- metal;
- plastic.
According to the manufacturing method to be done on:
- industrial;
- homemade.
Depending on what the water will be used for, choose what material the metal container should be made of.
If the water is drinking, for cooking, washing, then the water tank must be made of high-quality, stainless, gost steel. Such a tank should have a ventilated hole with a tight-fitting lid. It is a good idea to install a protective grid on this hole. A water faucet is embedded in a stainless steel container.
Twice a year, it must be washed with disinfectants so that the quality of drinking water does not deteriorate. Therefore, in the side part there is a hatch through which it is possible to wash the stainless steel barrel.
If you will use water for technical needs:
- glaze;
- household purposes;
- rainwater collection,
then you can purchase a tank from any metal.
In order not to increase the consumption of drinking water, it is best to install a rainwater collection tank in the country. It can be either a simple fifty-liter metal barrel or special storage tanks with filters for water purification.

And if the barrel is inexpensive, besides, you can use a used one, the main thing is that chemicals are not stored there before, then special containers for collecting rainwater are quite expensive. True, the water collected in them can be used for washing and for watering. But in barrels you can leave water for the winter.
plastic container for water
These containers are the most popular. The advantages of these containers:
- cheaper than similar ones made of stainless steel;
- a large selection of different volumes;
- tightness;
- do not require additional care (painting, primer);
- do not rust;
- long service life;
- not afraid of temperature changes;
- withstand 30 degree frosts.
The plastic container can be made of both food-grade plastic and technical plastic.
Plastic food barrels are made of high-strength, frost-resistant plastic. It does not transmit ultraviolet rays, so drinking water in them does not deteriorate for a long time.
Most of these barrels are equipped with threaded holes with a stopper, the diameter of these holes allows you to install taps in the tank.
Each plastic container has a quality certificate.

Plastic containers can be vertical and horizontal.
Eurocubes are in great demand, which they willingly purchase for the dacha. They are made of polymeric materials; for greater stability, the cube is placed in a metal crate. It has a neck at the top and a drain cock at the bottom.
Cube containers are widely used in private households. They can be used as a storage tank for:
- glaze;
- soul;
- household needs.
It is worth mentioning that eurocubes are used to transport various liquids; they cannot be used as containers for drinking water.
If you have enough money, you can buy a factory-made water tank for your summer cottage.
But, having spent a little time, you can make a water tank with your own hands, and it will be no worse than the factory one.
How to design a container yourself
It is very easy to make an unusual storage water tank from old tractor tires with your own hands. To do this, you just need to purchase decommissioned tires of large diameter and install them on your site.

The container can be easily installed with your own hands, for this:
- Align the place where the container will be located well.
- Cut out the upper inner part of the tire.
- Place the tire on the prepared surface.
- We take three parts of sand, one part of cement, diluted with water to a state of thick sour cream. We mix everything well.
- Pour the bottom of the tire with the resulting solutions, level the surface.
- We cover the tire with cellophane so that water does not get in in case of rain. We wait a week until the solution hardens.
- Remove the film and fill the tank with water.
The water that will be stored here is, of course, unsuitable for drinking and washing. But on the other hand, it will heat up quickly, and it will be possible to water the plants in the greenhouse with it. In addition, the tank will serve as an excellent reservoir for rainwater. The advantage of the tank is reliability and durability.
Such containers are suitable as a fallback for a small amount of water. If you need a large volume, then it is worth making storage tanks more solid.
To make a container that can hold 7 m3 of water, you will need:
- three beams three meters long;
- sixteen bricks wrapped in polyethylene for waterproofing;

- ten boards with a length of at least 3.5 meters and a thickness of 0.5 centimeters;
- six OSB boards 2.5x1.25 meters;
- geotextile insulation;
- black polyethylene film.
- self-tapping screws.
Manufacturing steps:
- Along the perimeter of the leveled area, we lay out the bricks at the same distance.
- We lay three beams on the bricks.
- We fasten five boards to the beam with screws.
- We attach 2 OSB boards from above with self-tapping screws.
- We make a frame from boards, fasten it to the base.
- We fasten the remaining OSB sheets along the frame.
- We tighten the container from the inside with a geotextile attached from above with brackets.
- Then we lay the film, hanging freely over the edges of the box.
- We fill the container with water.
- For reliability, we fasten the film from the outside with a stapler.
- On top of the container we nail two boards with a cross.
Advantages of this container:
- low cost;
- just do it yourself;
- easy to disassemble, move to another place.
True, to use such a container, a pump is needed, and the water in it will not be potable.
On a hot summer day, after working in the garden, you want to take a warm shower. But in order for the water to be hot, you need to heat it. You can buy an electric heater for the dacha, but it's not economical.

It is easier to install a storage tank in which water will be heated by the sun. Any barrel can serve as such a container - galvanized, stainless steel or metal, plastic.
To do this, just set the container at a height and fill it with water.
The easiest way to install plastic containers.
A stainless steel container will not rust, the water in it will not bloom, it will be drinkable. But stainless steel products are expensive.
An alternative may be a galvanized barrel, of course, it is not so durable, but if the galvanization is not broken, it will not rust either.
The most economical option is a metal water tank, but it must be painted to prevent corrosion.