Useful and original crafts from garbage to give. How to make useful things out of unnecessary rubbish Do-it-yourself rubbish
How exciting it is to create beautiful things with your own hands from unnecessary trash. “The second life of unnecessary things” is the slogan of designers, needlewomen, creative people who never throw away such things, but do everything to transform them. Some items can be used to create children's crafts, while others can decorate the interior, others can even bring practical value in everyday life.
DIY bucket basket
Few people guessed that from a simple plastic paint bucket you can make a cozy basket. To create such a basket you will need:

 First of all, you need to prepare a plastic bucket. To do this, you need to walk along its outer sidewalls with fine sandpaper, then degrease the container with alcohol. Carefully, so as not to get hurt, remove the iron springs from the clothespins. For convenience, you can help with a small flat screwdriver. Prying off the edge of the metal blank with a screwdriver, you must first release one wooden part of the clothespin, and then the other.
Lubricate each wooden blank with Moment glue, attach them to the outside of the plastic bucket, applying the halves of the clothespins to it with the flat side. The second is glued in the same way, located closer to the first. When all the clothespins are glued, it is necessary to measure the diameter inside the bucket with a centimeter tape, and then wrap the tape around the inner side of the container at the bottom and top. Determine the height of the container. Based on these measurements, two parts must be cut out: a rectangular sidewall and a bottom, which has a rounded shape. Sweep between each other to get a fabric cylinder with a bottom.
Lace must be sewn to the top of the received part. Insert the resulting cover inside the bucket so that the seam is inside the container. Wrap the handle of the bucket with twine, fix it with glue.
Put the handle back in place. In conclusion, it is necessary to cut the rope of the required length, string beads on it, fix it by wrapping two knots. Wrap the bucket with the resulting decorative element.
The finished bucket can be used for staging in the fairy tale "Little Red Riding Hood", so that the main character carries pies to her grandmother in it. In addition, you can store various tools, knitting threads and other needlework items in the bucket.
Pencil stand
To create such a stand with your own hands, you can also use all sorts of unnecessary items, including the wooden clothespins that we used to make the basket. They are disassembled in exactly the same way, separating the metal part. The plastic container must be degreased, the halves of the disassembled wooden clothespins must be glued, pre-painted in any color.
To make such a stand you will need:

You can even use toilet paper rolls if you like. Consider how to make a pencil holder from a sleeve. To do this, you will need the following tools and things:
- 3 toilet paper rolls.
- Newspaper.
- PVA glue.
 From the newspaper it is necessary to cut off a strip, the width of which will be equal to the height of the sleeve. Such a stand for pencils can be made with or without a bottom. In the latter case, the stand will have to be moved around the table if it is necessary to move it, but without lifting it.
If you want to make a pencil stand with a bottom, then the sleeve must be placed on a sheet of cardboard, outline the bottom circle. Cut a cardboard blank along the resulting contour, adding a little in diameter. Glue the circle to the bottom of the sleeve.
Apply glue to one side of the cut newspaper strip, glue it to the sleeve. Make two more in the same way. Glue all three together. When the resulting design dries, it can be filled with pencils.
Other ideas for transforming bushings
Bushings can be given a second life if you use the following transformation idea. For her, the following tools were taken:

The sleeve can be dressed up in a suit. To create a suit from a piece of fabric, you need to cut a blank for a rectangular shirt, draw a tie with a marker. Glue the resulting element to the sleeve. From above, attach the fabric for the suit with glue, close the upper edge of the sleeve with it.
To make a pencil holder with buttons, they must be glued to the surface of the fabric to which the sleeve is attached. Another pencil case can be decorated with sports pictures and colored paper cut out from the magazine.
To make a stand for pencils from a sleeve and natural material, it is necessary to shorten two sleeves at different levels, and then glue them together. With a jigsaw, you need to cut small branches into small segments, and then glue them to the bushings, decorating the pencil stand.
Coasters from other waste containers
 Quite interesting hair stands are obtained from empty bottles of shampoo, hair balm or other colored plastic bottles. To create such a craft, you need to remove the lids from the containers. If you want, you can cut off the top with a knife to make it wavy. Cut out a funny mouth from black and colored paper, glue white teeth to it. Attach the resulting element to the front side of the shampoo can. The resulting pencil stand will raise your mood while studying or working, especially if you attach eyes for dolls to them.
If you do not have unnecessary eyes for dolls, it is easy to make them yourself by cutting out two empty transparent pill capsules. Pieces of dark plasticine or beads are placed inside so that they act as a pupil.
The stand can also be made from empty tin cans. Instead of eyes, bottle caps are attached for this, and a bottle ring will serve as a mouth.
To build coasters for pens and pencils for a kindergarten or a large family, you can cut off empty plastic canisters, process the edges with sandpaper, attach them to the wall with self-tapping screws.
Paper desk pencil cases
To make a wonderful desk pencil case, you can use old unwanted magazines. For such an idea you will need:
- Thick unnecessary magazine.
- Thick cardboard.
- PVA glue.
- Pencil.
 The magazine must be placed on its edge, its sheets divided into 5 equal parts. Secure them with paper clips. Connect the last group of sheets with the first so that they are arranged in a circle. Place a pencil in the center. Pull the edges of each part to the center, glue using PVA glue.
Put the blank on a sheet of colored cardboard, draw the resulting petals on it. Cut out this figure from cardboard, glue it to the bottom of the future stand. When the glue dries, the product must be turned over, after which you can put pens, pencils and markers in it.
You can also get the original stand from unwanted magazines or books. For this you will need:

First of all, you need to cut the binding of the book, fold the sheets in a pile. Cut out a template from cardboard according to the diameter of the containers. Attach the resulting template to a small bundle of sheets. Make two notches with a utility knife. The same holes must be cut in all pages, and then glued in groups. Put various office supplies in the resulting container.
Things from old newspapers
You just have no idea how many unusual things can be made from old unwanted newspapers. Consider the example of a composition from a house with a garden. For work you will need:

You need to follow the following instructions:

In conclusion, it is only necessary to make a newspaper tree. But this is worth stopping in order to study in more detail the technique of its creation.
To create a tree you will need:
- Newspaper.
- Glue.
- Paper tape.
- Needle number 1.5.
- White gouache and paint brushes if you want to paint the wood.
 To make a tree, you need 7 double sheets of newspapers. Roll up tubes from newspaper strips, wind them on a knitting needle, glue the ends of the newspaper so that they do not turn around. In total, 30 newspaper tubes must be prepared. 15 of them must be folded together, fastened with paper tape.
Take a newspaper tube, step back a little from the bottom of the tree trunk, start wrapping it. For a good fixation of the tube, it must be glued to the trunk with the tips. Divide the tubes of the trunk in half, wrap one half of the newspaper at the bottom. This fragment must be divided into several more parts, wrapping each of them with a paper tube to get branches.
Wrap the ends of the branches, wrap paper tubes at the bottom of the trunk several times to make the tree more stable . If black and white newspapers were used, then you can leave your craft in this form, but if you used colored newspapers, then the tree can be covered with a mixture of glue and paint.
Finally, you need to cut out the leaves and glue them to the tree trunk.
Crafts from old shoes
Considering ideas from old things, it is also worth mentioning the use of old shoes. But what can be done with this rubbish? Decor from unnecessary shoes can decorate any garden and home.

Now you have learned, how you can get rid of excess trash and what can be done from waste by putting things in order in your house. Of course, there are many different ideas on this topic. You can also show a little imagination and creativity to create some of your own unique things for your home.
All children and adults love to make their own hands. Handmade items are of particular value. To create crafts, you do not need to go to the store for materials. Everything you need can be found in the yard, in the barn or on the street. The current summer residents show all their imagination and creativity in the improvement of the territory. They make various crafts from the trash in the country with their own hands. The most commonly used materials are plastic bottles and tires. All devices can be divided into two types: decorative and useful.
Gardeners prefer not only to decorate their plot with various decor, but also to make the most useful devices for working in the garden and in the garden. For example, it is very easy to turn a plastic canister into a watering can. And what other do-it-yourself junk crafts for the garden you can do, you will learn in this article.
Tires to the rescue
Car tires are a common material for creating crafts. They make original decor for the garden and vegetable garden from the tire: swans, parrots, flowerpots, children's sandboxes, containers for filling water and so on.
For example, to make a swan, you should cut several tires according to the scheme, then bend the workpiece, turn it out and paint it. Such crafts will become a real decoration of the garden.


A video with detailed instructions will help you easily make a beautiful swan.
The original ones are obtained from tires for flower pots. They are very different: multi-tiered, suspended, in the form of birds, animals and pyramids.


Pay attention to the diagram of how to make a simple planter on a leg. It is enough to cut out the parts according to the indicated scheme and fill the ground inside the tire.

Video instruction to help you.
You are used to the standard swing. Their cost is not affordable for everyone. We offer to make an unusual swing from tires. They will not only bring joy to the child, but also become an ornament to the summer cottage.


From a large-diameter tire, dads and grandfathers make a sandbox for a child in the garden.

It also makes a wonderful pond.

If you don't have steps to the garden, tires are a great substitute.

Most often, tires are used to make garden decor. Funny figures surprise and delight. To create crafts from trash, you need to be patient and set aside a few hours a day. But the result will please.


We offer you to watch a video selection of crafts from tires.
For example, if you cut off half a bottle, it will turn into a container for seedlings or automatic watering.

Such a wonderful idea could come only to our compatriots. A similar device is used in greenhouses when there is simply not enough time to water the plants.
Step 1. Cut off the bottom of the bottle.
Step 2. Twist the cork.
Step 3. Stick the neck into the ground next to the plants.
The water poured into the container will slowly saturate the plants, and they will not die. In addition, right in the garden you can make a small washstand.

Also, hundreds of various crafts and flower vases are made from plastic bottles.

A high-quality and effective broom for the garden will turn out from several plastic containers. It is necessary to cut off the bottom of the bottle, and cut the walls into strips, and then put on the stalk.

And some craftsmen even thought of cutting plastic from a bottle and sewing all the parts into one canvas, thus creating a greenhouse.

If you put bottles in a row, slightly digging them in, they can serve as a fence for flower beds.

By cutting off the neck of the container, you can make a bucket for picking berries. Such a device will facilitate the work in the garden.

As you can see, it’s easy to make crafts from old trash with your own hands. Even bicycle parts can be useful on the farm.
If you have old jeans, don't throw them away. From this clothes you can make a hammock for relaxation.

Sew several pairs of trousers with strong thread and fasten the guides together with the rope. From scraps, you can sew pockets for water bottles.
Old torn books can not only be handed over for waste paper or burned in the oven, but also made into wonderful decorations. The principle of the craft is quite simple.
Step 1. Cut out a pattern of the required shape from plywood or thick cardboard.
Step 2. Lay the template on the first page and cut off all the excess.
Step 3 Remove the book cover.
Step 4. Expand the book and glue the front pages.
The shape of the workpiece depends on the type of pattern. You can not cut the pages, but bend them, as shown in the picture.
Most often, craftswomen make paper clocks with a funny little man. There are many interpretations on this topic. You need to cut the book into two parts and mold a little man out of plasticine. The cover in this case will serve as the hands of the clock.
Such a picture can be hung on the wall or hung on the veranda or in the garden gazebo.
We offer a video selection of crafts from the trash.
lujayka.com
Crafts for giving with their own hands from the trash
Say what you like, but there is always enough trash in the country! Old newspapers, magazines, books, glass jars and plastic bottles. However, all this does not have to be thrown away at all; you can make very stylish crafts for giving your own hands from these things.
Crafts from books
In one of the posts, we have already made paper decorations from newspapers and magazines. And today's crafts from old books are no less interesting and creative.
So, the principle of such crafts is very simple, for this you need to cut a pattern of an interesting shape from a solid material - thick cardboard or thin plywood.
Pattern Trimming Gluing the outer pages Different shapes
The template is superimposed on the first page of an open book and everything superfluous is cut off with a sharp knife. The cover of the book is removed. Next, unfold the book and glue the front pages.
According to different patterns, you can make completely different interesting forms. You can not cut the pages, but simply bend them in different ways shown in the photo.
The most original idea can be considered - a paper clock with a little man, made in different interpretations. In this case, the book is cut in half, and the covers serve as improvised clock hands. A little man can be molded from plasticine or wax.
Morning to evening Three o'clock Six o'clock Nine o'clock
Such crafts can be used to create panels on the wall. Fanariks - can be hung not only in the house, but also on the veranda and in the gazebo in the garden. The main thing is that they would hang under the roof and be protected from the rain.
junk craft ideas
- A wonderful and comfortable coffee table with a leg from the same old books will add to your collection of homemade country furniture. An iron rod or wooden pole should be passed through a stack of books, which is attached to the table top on one side and to a flat stand on the other. Books are fanned around the axis.
- Cute vases for indoor plants, cherry tomatoes or decorative peppers can be made from plastic bottles. From one bottle you get as many as two pots. We cut the bottle across the curly line. The lower part is already ready for planting, and the upper part is glued with a lid to a non-tender CD. Then, with the help of spray paints, we give the vases the desired color.
- An original idea for decorating a garden will come from the remnants of a corrugated ventilation pipe. A cute pumpkin will look wonderful in a corner of your garden, next to original topiary figurines or creative crafts made from old shovels.
Beautiful glass vases
If at home there are glass jars or bottles of an interesting shape that are gathering dust in a closet, then very interesting flower vases will turn out of them.
We create vases using waterproof acrylic paint, which we draw into a syringe and carefully pour into the bottom of a bottle or jar. Then turning the jar evenly paint the walls. We put the bottles upside down so that the excess paint would be glass.
You can also make decorative curly influxes, then when tilting the can, we do not bring the paint to the neck.
You can do such crafts for giving with your own hands with your children, they will definitely like your ideas.
DIY foam crafts master class - video
idei-dlia-dachi.com
Useful and beautiful crafts from trash to give
Do-it-yourself creation of necessary and useful crafts from trash for a summer residence will help not only get rid of old things, but also bring back to life those of them that were dear and loved. And recycling various plastic packaging, allowing it to benefit, and not pollute the environment, is an invaluable contribution to the health of our planet.

Any old thing can be used in the country. From an old bicycle you can make an original flower bed.
How can plastic containers be used?
The use of empty PET bottles for the benefit and beauty has long been one of the areas of folk art in our country. But besides them, there are also canisters for detergents and other chemicals, which are quite durable and often have a significant volume (5-10 liters), which allows them to be used in the country for household purposes. For example, instead of buying a new watering can from the same plastic, you can successfully use a large package of detergent, antifreeze or car oil. To make a watering can you need:
Figure 1. Watering can from a plastic bottle.
- canister with a volume of 5-10 l;
- drill with a thin drill (1-2 mm).
Thoroughly clean the canister: rinse liquid soap several times with water, dishwashing detergent cleans oils well. Drill several holes in the lid of the prepared container to get perforation, as on a watering can grid. In order for air to enter the canister and water to pour out of the perforated lid, you will need to make another hole - to equalize the pressure inside and outside the container. It can be cut in a convenient place for this at the top of the canister, for example, in a handle, as in fig. one.
A watering can of large capacity will serve more than one season in the country garden. From a small container in the same way, you can make a watering can for indoor plants in a city apartment or a children's watering can for young helpers. They will be able to decorate a new thing with waterproof paints or a marker.
A plastic bottle from mineral water (1.5-2 l) is also suitable for irrigation. To make a sprinkler, you will also need 12-15 plastic cases from ballpoint pens or markers, used felt-tip pens and similar items that accumulate in many families with children.
Visually divide the bottle in half lengthwise. In one half of it, drill or burn with a thin soldering iron 3 rows of holes, 4-5 pieces in a row. Their diameter should be slightly less than the thinnest part of the handle body. Cut off the body to a length of 4-5 cm, leaving the side where the writing rod came out. This is a finished thin hole. Insert with force the resulting nozzles into the holes of the bottle with the cut side.
For watering the beds, you can make a sprinkler from a plastic bottle.
Choose a hose adapter with a reduced diameter. Measure the smaller part of the adapter. Drill a hole in the cap of the PET bottle in such a way that the adapter fits very tightly into it. Connect the finished watering device to the hose and let the water run. With such an impromptu nozzle, you can water the beds, holding it in your hands or laying it on the ground with the handles sticking up.
To entertain the kids in the country, you can make a real sailboat from an empty bottle. Rice. 2. In addition to the bottle itself, you will need:
- two thin nails or pieces of wire;
- neat sticks for masts (wooden skewers for barbecue are also suitable);
- some thread for the rigging of the ship;
- paper, thin plastic (from thick bags or multifor), non-woven from packaging, etc. for sails;
- awl, marker, scissors.
Draw a line from the bottom to the neck of the bottle strictly vertically. Mark 3 points on it at approximately equal distance from each other. Pierce with an awl and expand the holes at these points with scissors. The size of the holes should be slightly less than the thickness of the sticks for the masts. At the bottom of the bottle, closer to the side where the holes for the masts, make two holes for nails or wire. Insert them there, and sticks into the holes for the masts. It should be noted that the middle mast is always slightly higher than the other two.
Cut the sails and put them on the masts, giving a slight bulge. From the upper ends of the rear mast to the nails on the “stern” of the ship, stretch the threads, pulling them slightly: they will hold the sticks and prevent them from dangling to the sides.
Figure 2. Making a ship from a plastic bottle.
Pull the thread from the top of the middle mast to the top of the back and fasten off. From the top of the middle mast, stretch the thread down to the hull and, circling around it once or twice, return it to the top of the mast from the opposite side. Fasten the front mast in the same way and, additionally from its top, stretch the thread to the neck of the bottle, pulling and securing it there.
For the stability of the sailboat on the water, pour river sand or fine gravel into the bottle by about 1/3 of the volume of the bottle. Shaking it, even out the sand on the bottom of the bottle, lying on its side. Conduct a test run of the ship. If there is a list to either side or trim to the stern or bow, eliminate it by moving the sand inside. When complete balance of the toy is achieved, it can be launched into the pond. There are many design options for such a boat: it all depends on the imagination. You can make a pirate ship from a dark beer bottle with black sails, and a boat with scarlet sails and a white hull. Big ship - big voyage. What if there is no water nearby? But maybe there is an old bathtub somewhere?
How to use an old acrylic bathtub in the country?
It can make a wonderful mini-pond, near which the whole family will be happy to relax. To do this, you just need to close the drain holes in the body, choose a place and dig a hole according to the size of the bath. Place the acrylic body in the pit, cover the gaps between it and the wall of the pit with earth or sand. Decorate the banks of the pond with stones or sand, plant near-water plants, fill the bathtub with water. Rice. 3.
Sometimes, to give a look close to natural, the inner surface of the bath is painted in dark colors.
Figure 3. Stages of making a reservoir from an old bath.
If there is no need for a reservoir on the site, or there is a real pond, then with a flick of the wrist an old acrylic bathtub can be turned into an elegant new sofa or garden bench.
Rice. 4. To do this, you only need a grinder and the bath itself.
The process of making a sofa is simple, like everything ingenious: you just need to cut down one of the walls of the bathtub along the body.
If she already has legs, then the piece of furniture is completely ready after sanding the cut.
If there are no legs, then you should look for them among old furniture or make them from suitable logs.
The great artist Salvador Dali advised his students to look at the clouds and imagine what they look like in order to train their imagination. In the country, you can play an equally exciting game and find a new use for old and broken items. In your hands, useless things will find a new life!
Furniture crafts
From old furniture you can create interesting compositions for giving. However, the material for future creations must be prepared for being outdoors:
- Wood products that will be used outdoors must be treated with moisture-repellent and anti-rotten compounds.
- For old metal, use a rust converter that turns iron oxides into a protective layer.
- Also, products need to be painted with durable, UV-resistant and water-resistant paints based on oil or nitro.
Photo gallery: decor from interior items
You can place a house on a chair and surround it with a “garden” Flowers can be planted in the boxes of an unnecessary school corner Patina and cracked paint create the effect of noble antiquity A table from a sewing machine looks great surrounded by flowers Such a rarity, like a piano, will become a bright detail of the garden landscape Bed in the garden looks fantastic Drawers of an old bedside table with flowers in them will make an interesting composition
The use of plumbing for country needs
Plumbing is also useful for country creativity. Sinks, bathtubs and other items are designed for constant contact with water, temperature fluctuations. These items will last for decades.
Photo gallery: new life of sanitary ceramics
A shell with flowers in it can become part of an ensemble in the style of French Provence To create a flower bed in a sink, it is not necessary to use flowers: moss looks no less picturesque An elegant shell with flowers in it can become part of a composition in an exquisite antique style An excellent table for a veranda will come out of an old bathtub can serve its intended purpose
Non-standard use of faulty equipment
Manufacturers of household appliances pay great attention to the strength and reliability of the case. Therefore, things can serve even after the technical “stuffing” is out of order.
For example, the drum of washing machines is made of high-quality stainless steel. It has a comfortable shape, is not afraid of moisture and high temperatures! The hull also finds a worthy use.
Photo gallery: interesting ideas for owners of broken washing machines
The Soviet washing machine is a bright detail of any flower arrangement An excellent flowerpot will come out of the drum of the washing machine The composition with plants in the washing machine looks like a frame from a movie about the apocalypse The drum of a washing machine can be turned into a country fireplace
Inside the washing machine there are counterweights - heavy artificial stones. They serve to ensure that the device does not vibrate during operation. Remember to remove the weights before transporting the instrument! You will make your task much easier.
PC monitors and tube TVs make excellent flower beds. Holes in the housings serve to divert excess views. But this is not the only application of technology!
Photo gallery: the possibilities of using old TVs
An outdated TV can become a flower bed for geraniums
A refrigerator that has lost its ability to produce cold can still come in handy. Take advantage of its ability to maintain a stable temperature inside - organize a stylish bar for country gatherings!
The old gas stove, although it looks unimportant, does not lose its ability to withstand high temperatures. With a little refinement, it can become a great fireplace. If you don’t want to mess with the chimney, make a flower bed out of the oven.
Photo gallery: ideas for a new use of old kitchen appliances
Do not remove rust from the chrome surfaces of the stove: it will give the flower garden a special charm. The old refrigerator is useful as a mini-bar. The stove can also become a barbecue
New suitcase travel
A rare genuine leather suitcase is too good to go to the trash. In order to turn it into a flower bed, just pick up a couple of pots with bright flowers. And if you have upholstery fabric and carpentry tools, you can make a comfortable chair out of a suitcase.
Photo gallery: suitcase mood
You can buy decorative stickers for your suitcase at a hobby store. A suitcase can turn into a comfortable folding seat that will not get dusty Use various items, such as wine bottles brought from travels, to compose a suitcase and flowers.
What to do with leaky canisters
Spoiled canisters can also be used. For creativity, choose food containers. For the manufacture of such containers, safe, non-toxic plastic is used.
Photo gallery: creative crafts from canisters
Canisters can be turned into works of art Canisters will make an interesting pot for growing greens Canisters and plants can be used to create unusual portraits
How to use fruit crates
Plastic and wooden crates make good bases for crafts for many reasons. They are strong, reliable and durable. Openwork design gives a lot of ideas.
Photo gallery: creative designs from boxes
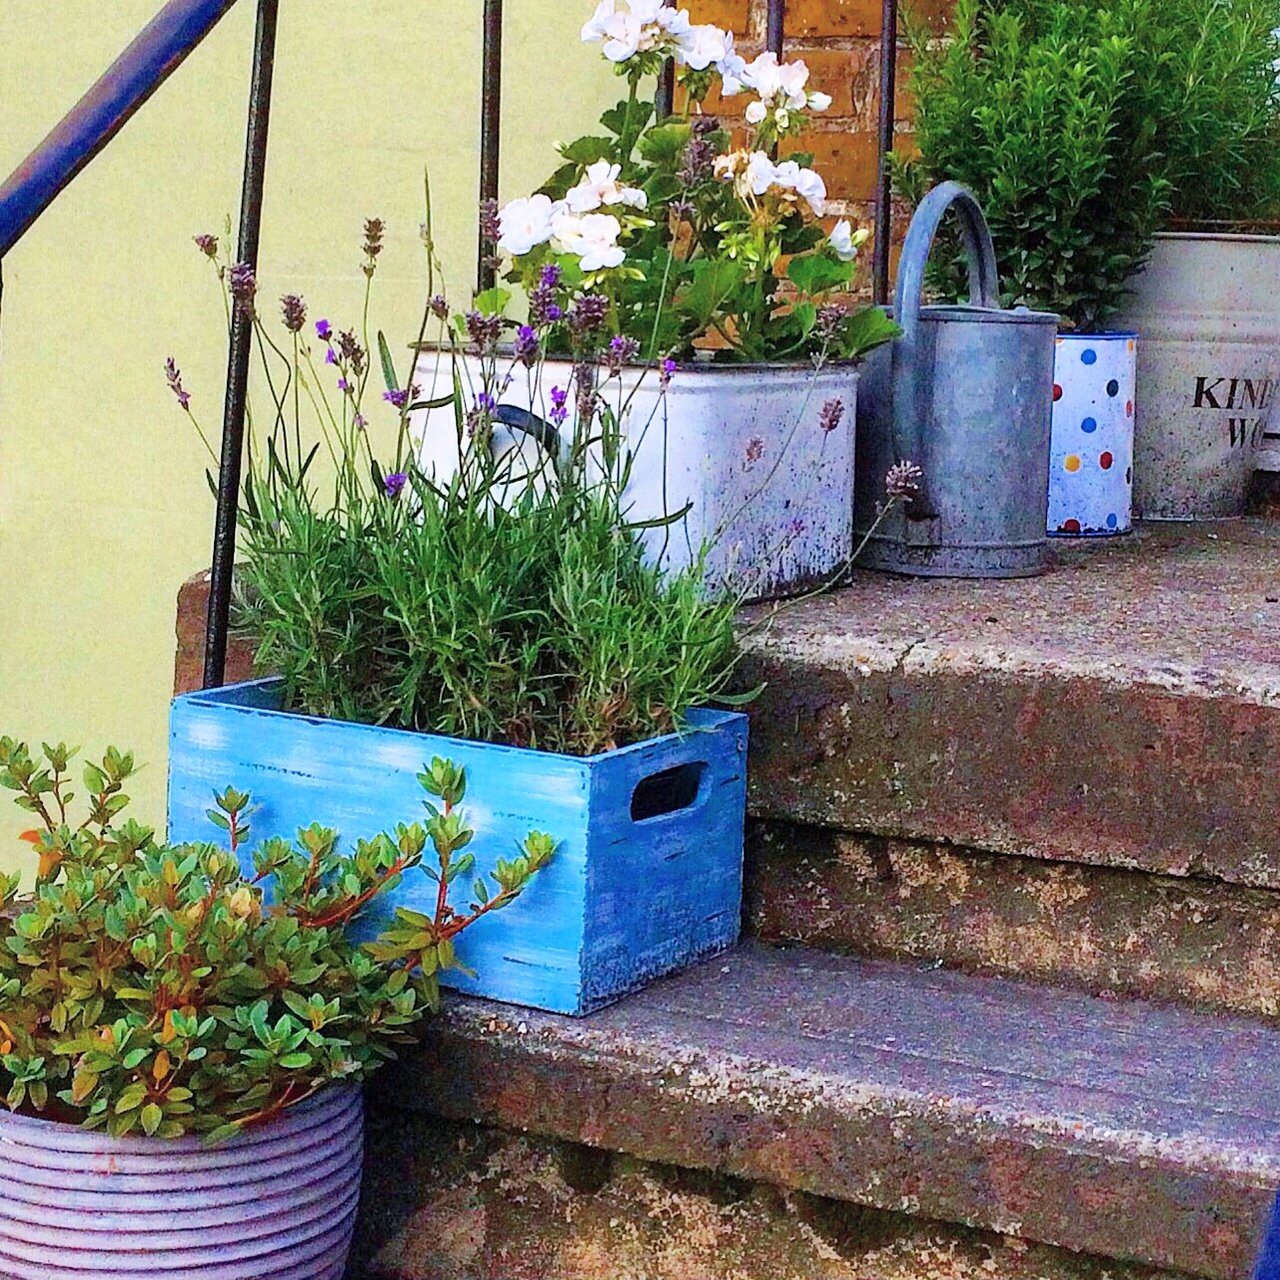 Flower bed boxes can be placed on the stairs or along the path Four drawers can be easily turned into an elegant table for a veranda or gazebo Vertical flower bed takes up minimal space From the boxes you can make comfortable and durable stools Rack of boards and boxes will not take up much space in the house
tin crafts
If an enamel pot has a chip on the bottom, you can't cook food in it. Now this is a wonderful flower garden for giving!
Photo gallery: the use of old buckets, watering cans, dishes
Buckets with a whole bottom can be used as a flower bed and to collect rainwater With a watering can you can create a charming lamp An old basin and plaster of paris are excellent materials for creating a cute planter turtle Composition with teapots creates a feeling of comfort Old basins can serve as flower beds From buckets and a basin you can create a complex spectacular composition for the garden Use your imagination and you will get a pot-pot with a friendly, friendly character. From a watering can and iron rods, you can create a composition that cannot but delight
Unusual use of old beer kegs
Old beer kegs can also decorate your dacha. Containers can be purchased online or at your nearest draft beer store. They are made of high-quality, reliable alloys, so they will last for more than one year.
All children and adults love to make their own hands. Handmade items are of particular value. To create crafts, you do not need to go to the store for materials. Everything you need can be found in the yard, in the barn or on the street. The current summer residents show all their imagination and creativity in the improvement of the territory. They make various crafts from the trash in the country with their own hands. The most commonly used materials are plastic bottles and tires. All devices can be divided into two types: decorative and useful.
Gardeners prefer not only to decorate their plot with various decor, but also to make the most useful devices for working in the garden and in the garden. For example, it is very easy to turn a plastic canister into a watering can. And what other do-it-yourself junk crafts for the garden you can do, you will learn in this article.
Tires to the rescue
Car tires are a common material for creating crafts. They make original decor for the garden and vegetable garden from the tire: swans, parrots, flowerpots, children's sandboxes, containers for filling water and so on.
For example, to make a swan, you should cut several tires according to the scheme, then bend the workpiece, turn it out and paint it. Such crafts will become a real decoration of the garden.

A video with detailed instructions will help you easily make a beautiful swan.
The original ones are obtained from tires for flower pots. They are very different: multi-tiered, suspended, in the form of birds, animals and pyramids.


Pay attention to the diagram of how to make a simple planter on a leg. It is enough to cut out the parts according to the indicated scheme and fill the ground inside the tire.

Video instruction to help you.
You are used to the standard swing. Their cost is not affordable for everyone. We offer to make an unusual swing from tires. They will not only bring joy to the child, but also become an ornament to the summer cottage.


From a large-diameter tire, dads and grandfathers make a sandbox for a child in the garden.
It also makes a wonderful pond.

If you don't have steps to the garden, tires are a great substitute.
Most often, tires are used to make garden decor. Funny figures surprise and delight. To create crafts from trash, you need to be patient and set aside a few hours a day. But the result will please.


We offer you to watch a video selection of crafts from tires.
For example, if you cut off half a bottle, it will turn into a container for seedlings or automatic watering.
Such a wonderful idea could come only to our compatriots. A similar device is used in greenhouses when there is simply not enough time to water the plants.
Step 1. Cut off the bottom of the bottle.
Step 2. Twist the cork.
Step 3. Stick the neck into the ground next to the plants.
The water poured into the container will slowly saturate the plants, and they will not die. In addition, right in the garden you can make a small washstand.
Also, hundreds of various crafts and flower vases are made from plastic bottles.
A high-quality and effective broom for the garden will turn out from several plastic containers. It is necessary to cut off the bottom of the bottle, and cut the walls into strips, and then put on the stalk.
And some craftsmen even thought of cutting plastic from a bottle and sewing all the parts into one canvas, thus creating a greenhouse.
If you put bottles in a row, slightly digging them in, they can serve as a fence for flower beds.
By cutting off the neck of the container, you can make a bucket for picking berries. Such a device will facilitate the work in the garden.
As you can see, it’s easy to make crafts from old trash with your own hands. Even bicycle parts can be useful on the farm.
If you have old jeans, don't throw them away. From this clothes you can make a hammock for relaxation.

Sew several pairs of trousers with strong thread and fasten the guides together with the rope. From scraps, you can sew pockets for water bottles.
Old torn books can not only be handed over for waste paper or burned in the oven, but also made into wonderful decorations. The principle of the craft is quite simple.
Step 1. Cut out a pattern of the required shape from plywood or thick cardboard.
Ordinary things and objects are associated with memories, it seems that they can still serve the benefit of the family. It is useful to get acquainted with other people's ideas and make something practical out of unnecessary things with your own hands.
Making a fence in the country
With the help of decorating the fence, you can zone individual areas. For example, make a children's corner or highlight a recreation area.
To turn a wooden fence into an art object sparkling in the sun with colorful lights, you need some free time and set of materials:
- Glass colored stones or large beads.
- Drill and drills with a diameter corresponding to the size of the stones.
- Glue gun.
- Soft cloth.
Stages of work:
- Use a drill to make holes in the tree according to the number of multi-colored stones available.
- Apply glue along the edge of the stone or bead and carefully insert them into the prepared holes. With a cloth, if necessary, remove excess glue and polish the stones.
 Another design option for the fence allows you to use old wheel caps from car wheels.
Caps are distinguished by a variety of shapes and allow you to create an interesting flower arrangement.
For such a design of the fence, in addition to caps, you will need paint of several colors and imagination.
The performer does not require special drawing skills.
You can choose the color scheme according to your taste: some like calm tones, while others like bright and juicy ones.
With your own hands, you can create vertical flower beds from unnecessary things that will decorate any fence. The main thing is that it is strong enough to withstand such decoration.

Old window frames, shallow wooden boxes for vegetables or fruits, or you can put together a rectangle from unnecessary boards as a frame for a flower bed. To prevent plants and earth from falling out of the container, the surface of the flower bed must be reinforced with a reinforced mesh.
Tire beds
The properties of automotive rubber that do not rot or deteriorate from exposure to the sun, snow and water can be used to implement useful creative ideas.
Tire bed options:
- A simple and therefore popular use of a tire is a flower bed.
 With your own hands, you can create a lot of unnecessary things. For example, old tires make wonderful flower beds.
 To make a flower bed, you need to thoroughly wash the rubber with a brush. A clean and dried tire is recommended to be painted with bright paint. For planting ampelous or climbing plants, the tire can be hung on a tree using a chain or a strong rope.
- If there are several tires available, then it is better to make a large flower bed.

The difficulty that can arise when working with tires if they need to be cut to implement the idea. To cut rubber, you must have a shoe or hunting knife and a jigsaw. In rare cases, the tire can only be cut with a perforator (this depends on the structure and properties of the rubber).
Next, you need to insert the knife into the rubber and cut it, making short jerks, as if trying to tear the surface. If the knife is not perfectly sharpened, but has a relief blade, then this is even better. One place can be visited several times.
Where it was possible to cut through the rubber, it is necessary to bend the end to the side in order to increase the view and simplify the cutting process. It is advisable to do this together. If the integrity of the tire is violated, it will begin to lose rigidity. If this happens, then cutting should be continued with a jigsaw.
- Flower bed on legs.
 To make a flower bed you will need:
- Tire.
- A round wooden board with a diameter corresponding to the diameter of the tire minus 4 cm.
- Wooden stable legs - 3 pcs.
- Self-tapping screws.
- Screwdriver.
- Twine or rope. The thicker the twine, the more interesting the appearance of the product will turn out.
- Glue gun.
Stages of work:
- The round board must be screwed to the tire with a screwdriver and 6-8 self-tapping screws.
- The legs are fixed with self-tapping screws, while you should focus on the center of the board.
- The design of the outer side of the tire with twine begins with the edge of the round board - the base, and then goes in a circle in the direction from bottom to top.
Glue should be applied to the rope at the point where it is bonded to the rubber, and also after the completion of the circle, on the side of the twine, where the ropes should be in contact with each other.
- If everything is done correctly, then the wooden base and the entire rubber surface will be hidden under the twine. Next, you need to fix the end of the rope inside the tire with glue. The flower bed can be used.
Used shoes for mini-beds
With your own hands, from unnecessary things, you can realize country ideas that amaze with a riot of imagination, for example, flowerbeds from old shoes. Moss and various succulents will be an excellent design for old shoes.. These are the most suitable plants for such flower beds.

The older worn shoes look, the more effective they will look framed by moss.
For country beds, any shoes are suitable. It is convenient to use rubber because it does not let water through, and you can make hanging planters.

Flower garden from old dishes
The main rule of giving says: for a container of any size there is a plant for planting. Succulents can be planted in small or holey dishes.

Pots are suitable for making hanging planters. Even if you simply place kitchen utensils with flowers planted in them on the territory of the garden, the appearance of the garden plot will change.

Old cups and saucers can be collected on one rack.

A variety of shapes and colors of dishes, together with fresh flowers, will create an interesting solution for decorating the space.
Seedling growing containers
With your own hands, you can make containers for seedlings from unnecessary things.
Suitable for this:
- TetraPak packages from milk, kefir or juice.
A liter package must be cut across into 2 halves. Such a "pot" is suitable for large seedlings. If you cut the package lengthwise, you get a tray for small seedlings. These containers, except for paper, are made of foil and polyethylene, so they are strong and do not get wet from watering.

- Plastic bottles. They can also be cut lengthwise or across.

- Egg trays. This option is suitable for low seedlings. Both cardboard and plastic trays will do. So that the water does not stagnate, it is necessary to make holes for each recess with an awl.

- Toilet paper rolls.

To use the sleeve as a container, one end must be folded and sealed so that it serves as the bottom. Such a container is suitable for medium-sized seedlings.
Garden figures from plastic bottles
Garden figures made from plastic bottles will decorate and make any personal plot original:
- Palm.

To make a palm tree you will need:
- Brown bottles of the same size 2 or 1.5 liters.
- Green bottles. You can use containers of various diameters and shades of green.
- Iron fittings for the barrel. If the palm tree is planned to be small, then you can use a plastic pipe.
- A piece of wire for leaves.
- Scissors and knife for cutting papers.
- Scotch.
Creating a palm tree:
- Bottles must be sorted, caps removed and labels removed. Wash if necessary.
- The length of the palm leaf will depend on the number of bottles. In order for the tree to have a lush crown, it is advisable to make at least 7 sheets.
- Green bottles must be cut across with a knife in the middle. Further work will be carried out only with the upper part. On it with scissors you need to make a fringe. The width of each part of the fringe is from 0.5 to 1 cm.

- Next, you should collect the sheet, for this the bottles are strung on a soft wire (wire) one after another. The lid must be put on the first and last bottle of the sheet so that it is possible to fix the wire. A long cable tail should be left at the point where the sheet is attached to the trunk. It will be needed when assembling the crown.

- With the help of strong adhesive tape and using the tails from the wire, you need to collect the leaves into a crown and fix them on the armature.
- Brown bottles are used for the barrel. They need to cut the bottom. Then each blank is cut lengthwise into 6 pieces. 1/3 of the bottle at the neck should remain intact.

- To form the trunk of a palm tree, the bottles are strung on the armature in the same way as the leaves were made. You need to move from the bottom up towards the crown.

- The finished palm tree should be installed. Despite the apparent lightness of plastic bottles, even a small palm tree is a rather heavy structure. This must be taken into account when preparing the foundation. Iron fittings must be deepened into the ground at a distance of 1 m or more if the palm tree is high.

In addition to plastic palm trees, flowers of any shape and color can be “planted” on personal plots.
Tire trash can
Such a thing as a tire is a versatile material for street creativity. If there are 2-3 tires available, then you can quickly make a garbage tank.

To do this, you need to put tires on top of each other and fasten them together with self-tapping screws. 2 wheels are fastened with 4 self-tapping screws 5 cm long. To give the tank a gloss, it should be painted in a bright color. Buck is ready. At the end, you need to insert a 200 l garbage bag into it and you can use it.
Ball crafts
From an ordinary basketball, you can make a cache-pot. To do this, you need to cut the ball in half and make 4 holes with an awl in which to fix the cord or chain on which the pots will hang.

The same idea, but in a different interpretation - a flower pot.

There are also non-standard solutions: you can make a bag out of an unnecessary ball.

Old balls of different sizes allow you to create plot compositions in the garden and vegetable garden. Such creativity will captivate both adults and children.
To make a frog figure from a ball, you will need:
- Old ball.
- Paint in several colors.
- Brush.
- Styrofoam spheres.
- Solvent.
- Glue.
- Stand (you can use an unnecessary saucer).

Stages of work:
- The surface of the ball should be degreased with a solvent.
- Next, the ball is covered with paint, according to the chosen plot. If there is no art education in the arsenal, then you can download a picture on the Internet and transfer it to the ball.
To make the frog last longer, the paint must be applied in a thin layer. Otherwise, it will soon begin to crack.
- Eyes should be drawn on foam spheres, after degreasing their surface.
- After the paint dries, the foam eyes are glued to the ball using any superglue.
- The frog stand can also be painted.
Wicket from old gardening tools
The resourceful gardener does not have a question where to put the old rusty garden tools. He will make, for example, a gate out of them.

To get the original gate, you need to collect unnecessary inventory. Next, it should be evenly placed on the surface of the gate, after removing it from the hinges. This must be done in such a way that each tool can be fixed in 2 places.
To fix the metal parts you will need a welding machine. Wooden parts are fixed with self-tapping screws. The finished gate can be painted if necessary. It is better to use spray paint for this.
Garden fountain from a waste inflatable pool

Making a fountain with your own hands is easier than it seems.
At the same time, almost any container can be used as a water reservoir: an old basin, a bathtub, a tire from a large-sized machine.
An interesting solution is to make a fountain out of old children's inflatable pools.
The fountain pump will need to be immersed in the bottom of the pool. In order for the pump to stand steadily, pools without an inflatable bottom should be used.
In the fountain, water will circulate: with the help of a pump, it comes out in fountain jets, then drops fall back into the pool and back into the pump.
Use of an old skateboard
From an old skateboard you get an original hanger. Of course, it needs to be updated, painted and selected hooks that will be in the same style with it. It is not a shame to hang such a piece of furniture even in a city apartment.

Another option for using a skateboard is as a seat at a small bench.

A skateboard plus a little creativity and a stylish magazine stand is ready.

And in the country from a skateboard you can make a swing for future generations.

With your own hands from unnecessary things, you can realize ideas by giving things a second life.
From an old stool you get a small shelf for bath accessories. It is especially beautiful if the stool is old. It may be necessary to carry out a small restoration: sand and prime the chips, renew the paint. But the result will delight the eye and surprise guests for a long time.

Or an unnecessary stool can be turned into a bedside table. To do this, it should be painted and decorated in such a way that it fits into the overall look of the room.

After the repair, ceramic tiles or tiles in small quantities always remain in the apartment. Even this small amount will allow you to make unique things or give a new look to old items.
Any broken tiles and other small details (beads, pebbles) are suitable for mosaics. In order for the tile to hold well, the surface of the object should be prepared: first degrease, for example, with white spirit, then apply primer, and then glue the tile on any tile adhesive. The space between the mosaic pieces should be filled with tile grout.


It happens that one of the ceiling lights breaks at the chandelier, and it becomes unnecessary. Don't be in a hurry to throw it away. With your own hands, many amazing things are created from unnecessary things. The remaining whole shades will make flower pots.

If fantasy allows, they can be further decorated or left intact.

The frame from the chandelier can also be used. It can be converted into an unusual planter.

For hanging pots you will need:
- Frame from an old chandelier.
- Flower pots.
- Aerosol paint.
- Degreaser.
Stages of work:
- The old chandelier must be cleaned of dust and dirt.
- The entire frame should be degreased for better adhesion of the paint to the surface.
- Next, the chandelier needs to be painted. Better to use spray paint. It is easier to lay down on objects with many small or curly details.

- In a single color with a chandelier, flower pots should be painted.
- At the final stage, flower pots are installed on the base for the shades and the planter is carefully hung on a hook prepared in advance. The resulting planter and flower pots weigh several kilograms, this must be taken into account when choosing a place for it.
creative hangers
Hangers are an indispensable piece of furniture for any apartment, house, barn. The budget version of the hanger will turn out if you use the items that are at hand in every home.

With your own hands, you can make a hanger for garden gloves from unnecessary things, having a wooden board and a few clothespins available.

A clothes hanger will turn out if you look at the usual hangers that hang in every closet from a different angle.

Wooden skis gathering dust in the garage, with the right approach, will last for more than one year if you make a floor hanger out of them. It occupies a small area and will become a useful piece of furniture.
Key holder
As often at the last minute before leaving the house, it turns out that the keys are missing. It is better not to make meaningless promises, always put the keys in one place, but to take 10 minutes of your time and make a key holder.
For the holder you will need a tennis ball and a clerical knife.

It is necessary to make a horizontal cut in the ball, 6 cm long. It should be cut just below the middle of the ball, where the mouth will be located at the future muzzle. Eyes are drawn or ready-made can be glued.
Such a holder is suitable not only for keys, but also for papers, towels, various office supplies. Depending on the tasks, the ball can be glued to the wall with superglue or attached with a screw.

With your own hands, it is possible to create another version of the key holder from unnecessary parts of the Lego constructor. The convenience is that the designer will perform two roles at once - the holder and the key fob.
Rack for garden supplies from old rakes
The shape of the rake itself suggests that they can be used as hooks.


In the gazebo, under a canopy, in a barn or garage, such a hanger will look quite harmonious. And garden tools, which every gardener and gardener has a lot of, will no longer have to be looked for.
Clock from unnecessary things
With your own hands, you can make a watch out of unnecessary things. This will allow for each room to make original interior items and at the same time save.
The main thing you need to have is a mechanism and arrows. They can be taken from old, obsolete watches or bought in a specialized store.

An interesting idea is to use domino chips for the clock, as they already have "numbers" of dots on them.
To make this watch you will need:
- 12 dominoes corresponding to numbers from 1 to 12.
- Wooden boards.
- Finished frame.
- Paint with a brush.
- Glue.
- Clock mechanism with arrows.
- Drill, nails.
Stages of work:
- The boards must be cut to the size of the frame and fastened together. A hole is made in the center with a drill for attaching arrows.
- Next, paint the frame with the boards in a single color.
- Domino chips are glued evenly around the circumference.
- Then the clock mechanism and hands are attached to the workpiece.


Other things can be used to make watches, for example, a pot lid, a cookie tin. In every house there are enough old things that can be given a second life.
Transforming a suitcase into a comfortable armchair
If the house has an unnecessary old suitcase, then having the skills to work with a screwdriver and a hammer, you can create an exclusive chair. Little is required of a suitcase: be wide enough so that it is comfortable to sit on, and have the side panels in good condition, as they will be visible in the finished product.
Also side panels must be strong to support the weight of an adult. Before you start creating a masterpiece, you need to sit on a suitcase and make sure that all these requirements are met.

To make a chair from a suitcase you will need:
- Suitcase.
- 4 chair legs.
- Screwdriver and screws.
- Hammer and nails.
- Buttons.
- Glue.
- Paint and brush.
- Scissors.
- Upholstery fabric.
- Furniture stapler.
- 2 pieces of foam rubber corresponding to the size of the suitcase lid and 5 cm wide.
- 2 boards 1.8 cm wide.
- 2 narrow wooden planks measuring 10 by 40 cm.
- Sandpaper.
Stages of work:
- From the boards it is necessary to cut the seat of the future chair. The size of the workpiece should be slightly smaller than the size of the suitcase. That is, the board should fit neatly into the suitcase and hold on to its walls. You need to cut 2 identical blanks.
- To make a seat, glue foam rubber to a wooden blank.
- Next, the base is upholstered with fabric. This can be done with a furniture stapler.
- To decorate the seat with buttons, you need to screw in the screws at their location. And then glue the decorative buttons on top.

- 2 wooden planks are fixed inside the suitcase in such a way that the seat can be placed on them.

- The second cut out board is needed to attach the legs of the chair. It should be lowered inside the suitcase and attach legs to it. Self-tapping screws should pierce the surface of the suitcase and enter the wooden base.
- For the back of the chair, foam rubber should be upholstered with fabric and decorated with buttons. The resulting blank is glued to the inside of the suitcase lid.
Video tutorial on making beautiful garden furniture from old car tires:
Old garage parts
In the garage there will always be spare parts that are no longer used, but it's a pity to throw them away. Also, every garage owner tries to organize the space so that it is comfortable and functional.
Objects created with your own hand from old things that organize a comfortable space bring great joy.

It is quite easy to make a sofa out of old car seats.

The barrel of engine oil can be transformed into a convenient bedside table for the washbasin. The metal from which the barrels are made can be easily cut into the shape of a shell, and the pipes can be hidden inside the barrel.

A car disk can act as a sink.

Old headlights are suitable for creating an original chandelier.

From the hooks of the safety cables you will get a hanger.
Hooks from waste wrenches
Products from old wrenches will fit perfectly into the interior of a garage or barn.


For example, they can be used as coat hooks or doorknobs.
Tape box in the garage
If the garage space is organized incorrectly, then finding the tape can take time. To always know where to look for adhesive tape, it is recommended to make a special box with compartments where adhesive tape and electrical tape will be stored.
An important quality of the box is to provide the ability to fix the ends of the adhesive tape, so that if necessary it can be used quickly.
Reservoir for small tools
In the garage or in the country there is a problem where and how to store small tools or parts. To clean up the little things, you can use jars with lids. Cans are suitable for any size.
The advantages of such an organization of storage of small things are many:
- Through the transparent glass you can see what is in the jar.
- Space saving. The shelf can be used at the same time for its intended purpose - to put things on top of it.
- The problem of recycling cans is being solved.


To make a shelf for storing small things from jars with twist-on lids, you will need:
- Lots of jars of the same size and shape.
- Finished wooden shelf.
- Screws.
- Screwdriver.
- Pencil, ruler.
Stages of work:
- It is necessary to prepare an even number of cans. To do this, unscrew the lids, wash, remove the labels.
- Banks will be placed in 2 rows. With a ruler and a pencil, lines and notches should be marked at the place where the lids are attached (the calculation depends on the number of cans available).
- The covers are fixed with screws to the shelf, in accordance with the markings made earlier. Jars should be put on the lids. Containers for small things are ready.
ladder rack
From a ladder that has lost its usual purpose, you can make a rack.

What you need to make a shelving unit:
- Ladder.
- Boards.
- Self-tapping screws and screwdriver.
- Metal corners.

To make a rack, you should install the boards and fix them to the ladder with the help of corners and self-tapping screws.
Tennis ball massage chair
There are many options for resuscitation of old chairs, armchairs, stools. An interesting idea to create a massage chair. It will take skill and skill to make it, but the result is worth it. Tennis balls act as massage parts.

Necessary materials:
- Old chair.
- 50 tennis balls.
- Plywood. You will need 2 sheets corresponding to the dimensions of the back and seat of the chair.
- MDF. 4 sheets, the same dimensions as plywood.
- Self-tapping screws.
- Drill.
- Jigsaw.
- Perforator.
- Sandpaper.
- Textile.
Stages of work:
- The chair should be dismantled: remove the back and seat.
- On sheets of plywood, it is necessary to draw circles 2-3 mm wider than the diameter of the ball (usually tennis balls have a diameter of 6.3 to 6.7 cm) and cut out the drawn circles with a jigsaw.

- Next, you should redraw the circles from plywood onto MDF sheets. The resulting circles should be reduced. Their diameter should be 2-3 mm smaller than the diameter of the ball. This is done so that the ball fixed in the resulting “sandwich” (MDF-plywood-MDF) can rotate, but does not fall out.
Then you need to cut out the circles:
- Round holes should be rubbed with sandpaper so that the ball does not touch them for anything, but scrolls well.
- MDF boards are varnished from the outside.
- The seat needs to be assembled. From below, an MDF board, then plywood, you need to put balls in the holes and cover with an MDF board from above. If everything is done correctly, then the balls should not fall out, but they will scroll well, creating a massage effect.

- Boards around the perimeter should be fastened with self-tapping screws, as well as in several places in the center.

- For the manufacture of the back of the chair, it is necessary to repeat p.p. 2-6.
Cork bath mat
A cork rug has many advantages:
- Eco-friendly.
- Keeps warm.
- Does not get wet from moisture.
- The surface is non-slip.
For a small rug 40 by 60 cm, you need a lot of traffic jams (at least 100). It is difficult to collect such an amount, even if you involve all relatives and friends in this activity. It's easier to buy them. On average, 100 pieces will cost 500 rubles.
 To make a rug you will need:
- Rubber base. It can be a new or already used rubber mat.
If you use an old rug, then you must first wash and degrease it.
- Wine corks. The quantity will depend on the size of the base, but not less than 100 pcs.
- Glue gun.
- Stationery knife.
- Sandpaper.
Manufacturing steps:
- All corks must be cut in half lengthwise. And treat each cut with sandpaper so that it is even.
- Glue the halves of the corks first along the perimeter of the base. And only then fill the inner space.
Different orientation of the plugs when creating a rug will allow you to achieve different effects and patterns.

And finally, one more photo of items that can be made from things that are unnecessary in the household.

Do-it-yourself creation of new things from old things allows people to show their creativity, solve small issues on a budget, and possibly find a new hobby.
Article formatting: Natalie Podolskaya
Video about creating different useful items from unnecessary things with your own hands
Video, how to make useful items out of unnecessary things with your own hands: