How and from what to make a home egg incubator. Three types of homemade egg incubators are a good alternative to store-bought Homemade egg incubators
If you often raise chickens, you know that a good incubator is indispensable for such a business. Either the hen did not arrive in time, then the breed of chickens with poorly developed incubation instincts (most laying hens), then the general absence of adult chickens. In this case, of course, you need to buy an incubator. But you can do it yourself. How to make an incubator with your own hands, let's try to figure it out.
Peculiarities
Probably, such a name, at least, will surprise many. How can a refrigerator be an incubator? The answer is yes, and how! But everything is in order. As for a home-made device, many of our domestic poultry farmers successfully raise chickens even in the simplest incubators. Such a home-made device can serve as a faithful assistant until the breeder acquires an automatic industrial production.
We also recommend that you familiarize yourself with incubators on aliexpress.
What do you need to make a homemade incubator?
- The first thing you need for a homemade incubator is a convenient suitable chamber, box or box. They can be either wooden or plastic. At the same time, if you have a cardboard box, then it can also be easily adapted by sheathing it with plywood and thick paper. It is important to seal all cracks and openings with sealant to prevent heat leakage during container assembly.
- An important component is baths with water. Make them the size of your incubator and place them in the bottom of the box.
- Trays are best made from planed boards, the height of which is 70 mm. We cover the lower part with a metal mesh with a 10x10 cell.
- Inside the box, we attach guides from metal corners to install the trays. Our design should resemble the type of whatnot.
- For heating we use 4-5 light bulbs of 25 watts each. One of the lamps can be attached at the bottom so that the heat is evenly distributed throughout the structure.
- Do not forget about the thermometer, it should always be inside the incubator.
- We make exhaust holes at the bottom, about 16 holes of 25 mm each.
- Also be sure to provide a viewing window in the top wall. This is important for additional control of incubation during the "hatching" of eggs.
Drawing of a simple incubator by A. Varvarova

Materials and tools
As materials and tools during work, we need:
- cardboard or wooden box, sheets of plywood, plastic or foam.
- sealant;
- screws;
- metal mesh and corners;
- screwdriver;
- light bulbs;
- sharp knife;
- paper or foil;
- glass for viewing window;
- egg trays.
Manufacturing instructions
Fridge incubator

So, if you have an old refrigerator, then do not rush to throw it away. It is easy to build a homemade incubator for home poultry farming from his chamber. The fact is that the very design of the refrigerator keeps a constant temperature inside well, which is very convenient for our case. All you need is the former refrigerator itself, 100-watt light bulbs (about 4 pieces), temperature controller, contactor-relay KR-6. So let's get started.
- Remove the freezer from the refrigerator, if any.
- Inside we attach lampholders, a temperature controller and a contactor-relay KR-6.
- Cut out a small viewing window on the front door.
- We equip grates for the supply of eggs and trays.
- Attach a thermometer.
For visual clarity, we suggest viewing a drawing of a home-made incubator.

Drawing of an incubator from the refrigerator
Automatic incubator from the refrigerator
An incubator from a refrigerator with an automatic egg flip is very convenient and completely replaces a conventional industrial production device. However, in order to do it, you have to work a little. But as a result, depending on the brand of refrigerator, you can warm up about 50 eggs at a time without any problems.
- Everything is the same as in the first case, we remove all unnecessary, including the freezer.
- In the front door we cut out a window and glass it. We remove all the cracks with a sealant, and for a more accurate appearance, we close the edges of the window with a frame of skirting boards of kitchen furniture.
- The main control unit in this design is an automatic thermostat, a Dream 12 tray turner with a 12V power supply, and a humidity regulator.
- It is good to use two computer units as a power source (one for the Dream-12 + heating bundle, the second for turning the trays over).
- Trays, by the way, are better to buy ready-made for automatic incubators.
- We fix two light bulbs on top and four on the bottom. We make a serial connection of 2 light bulbs.
- We check the operation of the lamps by making a positive wire through the Dream 12 thermostat relay, connect the thermostat to the power supply.
- We fix the temperature sensors.
- For everything else, look in more detail at the photo, video, and also at the drawings.

Scheme of the device of a home-made incubator S. Kozin: 1-thermostat sensor; 2-thermostat; 3-incandescent lamps; 4-fan; 5-handle for turning trays; 6-trays; 7-plate; 8-bath with water.
The simplest incubator out of the box
So, for example, one simple construction is offered to us by P. Yakimenko from Moscow. He made a home-made incubator from an ordinary cardboard box measuring 56x47x58 cm. From the inside, the cardboard is pasted over with paper or felt in two layers. A viewing window 12x10 cm is made in the upper wall. Small holes for wires are also given. With their help, three 25 W light bulbs are installed inside.
Lamps for heat release should be installed at a height of 15 centimeters from the surface of the eggs themselves. And the holes where the wiring is threaded, it is important to clog with cotton wool to prevent heat leakage. Then they make wooden trays, a convenient door, slats for the trays.

In such a simple home-made device, it is also important to maintain a high temperature, so we attach a thermometer to a special bar. For high humidity, put a container of water inside the device. In the first 12 hours after laying the eggs, the temperature in the box should be about 41 degrees, in the following hours it is reduced to 39 degrees.
It is important to install such an apparatus with your own hands not on the floor, but not on small bars 15-20 centimeters high. There must be constant air circulation, both inside and outside the box.
Video "An example of a homemade incubator from the refrigerator"
To breed chickens at home, you will need to either buy an industrial apparatus or make an incubator with your own hands. The second option is convenient in that it is possible to assemble a device of the required size, and for the required number of eggs. In addition, cheap materials such as foam or plywood are used to create it. All egg turning and temperature adjustment work can be fully automated.
What you need to create a homemade incubator
The basis of any type of apparatus for breeding chicks is the body. It must keep the heat inside well so that the temperature of the eggs does not change dramatically. Since due to significant jumps, the likelihood of a healthy brood is noticeably reduced. You can make a home incubator case from a frame and plywood, polystyrene foam, a TV or refrigerator case. Eggs are laid in wooden or plastic trays, with a bottom made of slats or mesh. There are automatic trays with motors that turn the eggs themselves. Or rather, they deflect them to the side after the time indicated on the timer.
To heat the air in a do-it-yourself incubator, incandescent lamps are most often used, with a power of 25 to 100 W, depending on the size of the device. Temperature control is carried out using an ordinary thermometer or an electronic thermostat with a sensor. To avoid stagnation of air in the incubator, natural or forced ventilation is required. If the device is small, then it is enough just to make holes near the bottom and on the lid. For a do-it-yourself incubator made from a refrigerator, you will need to install fans, both above and below. This is the only way to ensure the necessary air movement, as well as an even distribution of heat.
So that the incubation process is not disturbed, you need to correctly calculate the number of trays. The distance between the incandescent lamps and the tray must be at least 15 cm.
The same distance must be left between the other trays in the do-it-yourself incubator so that the air movement is free. Also, at least 4-5 cm should remain between them and the walls.
 Ventilation holes are made from 12 to 20 mm in size, in the upper and lower parts of the incubator.
Before laying eggs, be sure to check that the fans are correctly positioned and that the lamps have enough power to evenly heat the incubator. This value should not exceed ±0.5°C in each corner of the machine after it has fully warmed up.
How to make a do-it-yourself foam incubator
 Expanded polystyrene is one of the most popular materials for creating an incubator. It is not only affordable, but has excellent thermal insulation properties and low weight. For the manufacture will need the following materials:
- foam sheets 2 pcs. with a thickness of 50 mm;
- adhesive tape, glue;
- incandescent lamps 4 pcs. 25 W and cartridges for them;
- fan (the one used to cool the computer is also suitable);
- thermostat;
- trays for eggs and 1 for water.
Before you start assembling an incubator with your own hands, you should draw up detailed drawings with dimensions.
Step-by-step instruction:


1 - water tank; 2 - viewing window; 3 - tray; 4 - thermostat; 5 - temperature controller sensor.
- If desired or necessary, a fan is installed, but in such a way that the air flow hits the light bulbs, and not the eggs. Otherwise, they may dry out.
The heat inside the incubator, assembled from polystyrene with your own hands, will be retained even better if all the walls, bottom and ceiling are pasted over with foil insulation.
Incubators with automatic or manual egg turning
For the process to be successful, the eggs must be constantly turned 180 °. But doing it manually takes a lot of time. For this purpose, flip mechanisms are used.
There are several types of these devices:
- mobile grid;
- roller rotation;
- tray tilt 45°.
 The first option is most often used in small incubators, for example, foam ones. The principle of operation is as follows: the grid slowly moves from one side to the other, as a result, the eggs lying in its cells turn over. This process can be automated or done manually. To do this, it is enough to attach a piece of wire to the grid and bring it out. The disadvantage of such a mechanism is that the egg can simply drag through and not roll over. Roller rotation is less commonly used in homemade incubators with automatic egg turning, as it requires a lot of round parts and bushings to create it. The device works with the help of rollers covered with a mesh (mosquito).
 So that the eggs do not roll, they are in the cells of a wooden lattice. When the tape starts to move, all the eggs turn over.
A swivel mechanism that tilts the trays is used in larger incubators, such as those made from a refrigerator. In addition, this method performs its task better than others, since in any case each egg leans. There are automatic egg turning trays. They come with a motor and a power supply. There are several smaller ones in one tray. Each rotates separately after a user-set time.
How to make a device for hatching chicks from a refrigerator or plywood
 Before you start making an incubator with your own hands, you need to draw up a drawing and a diagram for connecting all the elements. All shelves are pulled out of the refrigerator, including the freezer.
Step-by-step instruction:
- In the ceiling, holes are drilled from the inside for incandescent lamps and one through for ventilation.
- It is recommended to finish the walls of a home-made incubator from the refrigerator with sheets of expanded polystyrene, then it will retain heat longer.
- Old racks for shelves can be converted into trays or put new ones on them.
- A thermostat is mounted on top of the outside of the refrigerator, and the sensor is installed inside.
- Closer to the bottom, at least 3 holes are drilled for air ventilation, 1.5x1.5 cm in size.
- For better circulation, you can install 1 or 2 fans on top near the lamps and the same number below on the floor.
To make it easier to monitor the temperature and eggs, it is necessary to cut a hole in the door for a viewing window. It is closed with glass or transparent plastic, the slots are carefully smeared, for example, with a sealant.
The video shows a do-it-yourself incubator made from a refrigerator.
If there is no refrigerator, then the frame is made of wooden beams, and the walls are made of plywood. Moreover, they should be two-layer, and a heater is laid between them. Bulb holders are attached to the ceiling, bars are mounted in the middle of the two walls for installing the tray. At the bottom, another additional bulb is placed for better evaporation of water. The distance between it and the tray should be at least 15-17 cm. A viewing window with a sliding glass for ventilation is made in the lid. Closer to the floor, holes are drilled along the long walls for air circulation.
By the same principle, incubators are often made from TV cases for a small number of eggs. The process of turning eggs in them is most often carried out manually, as it takes a little time. Trays can be made from rounded rails. Such an incubator does not need fans, since ventilation occurs every time the lid is opened to turn the eggs. 
At the bottom of any incubator, a container of water is placed to create the optimal level of humidity required for the eggs.
To hatch a very small batch of chicks (10 chicks), 2 inverted basins can be used. To do this, one of them is turned over to the second one and fastened with a furniture canopy from one edge. The main thing is that they cannot move out of each other. A lamp holder is attached to the ceiling from the inside. Sand is poured at the bottom, which is covered with foil and hay. The foil should have many holes with a diameter of 3 mm in order for moisture to pass through it. To adjust the temperature, a bar with steps is used, which is inserted between the basins.
In order for the chicks to hatch in any incubator at the same time, the eggs must be of the same size, and uniform heating of the entire space of the apparatus is also necessary.
Two-chamber homemade incubator - video
Every beginner poultry farmer who plans to engage in the regular reproduction of young birds will need a home incubator. Moreover, it will be possible to grow not only chickens, geese, turkeys and ducks in it. The equipment will also allow breeding exotic birds: parrots, quails and ostriches. How to make an incubator will be discussed in this article.
First you need to decide on the number of eggs that will be loaded into the incubator. The arrangement of the internal part of the incubator depends on this.
If it is planned to place more than 50 eggs in it, then the installation of a fan is mandatory. It will provide uniform temperature to all parts of the structure. When placing a small number of eggs, a fan is not needed. You just need to properly position the heating elements.
Most poultry incubators consist of these four parts:
- corps;
- heating systems;
- egg trays;
- devices that control humidity and temperature.
Frame
The body of the incubator can be made of various materials and equipment:
- plywood;
- chipboard sheets;
- packing boxes made of cardboard;
- old refrigerator.
The main condition for creating a hull is effective thermal insulation. To do this, you can use felt, foam, batting or other heaters. When using chipboard or plywood, the walls of the case are made double.
The normal movement of air flows occurs when there is a gap of 5-8 cm between the extreme part of the tray and the walls of the case. If a large incubator is created, several additional holes are made to remove carbon dioxide.
You should also provide for a gap between the bottom of the structure and the floor. Air should flow without problems through the holes made in the bottom of the case.
Heating system
Egg incubators are equipped with heating devices. They can be placed in different places of the structure:
- above trays;
- along the perimeter;
- under trays.

The best option is to install heating elements in the upper part of the incubator. Thus, maximum heat transfer is achieved. The distance between the egg tray and the heating device is influenced by the type and power of the latter. When using a nichrome spiral, it is 10 cm, incandescent lamps - 25 cm or more.
It is worth noting that when laying 50 eggs, the total power of the heating devices should be 80 watts. Moreover, it is more expedient to install 3 lamps of 25 W each, rather than 2 pieces of 40 W each. Their connection occurs in sequential order.
egg tray
In a homemade incubator, eggs are laid in a tray made of wood. The frame of the tray is made of metal or nylon mesh with 5 * 5 mm cells. To prevent the mesh from sagging during operation, it is reinforced with slats from the underside.
The height of the side of the tray is 6-8 cm. The tray itself is recommended to be installed on legs up to 10 cm long. If possible, it is best to make trays, the principle of which is similar to retractable furniture drawers.
Inspection of eggs is carried out with their constant turning over. If it will be carried out manually, then one side of the eggs should be marked with a marker. It is possible to make a device, thanks to which the entire egg tray will be turned over at the same time.
For this, a movable frame is installed in it, which does not have a bottom. This fixture must have the following dimensions:
- width - 1-2 mm less than the inside of the tray;
- length - 10 cm than the same tray size.
Between the small sides of the movable frame, slats are fixed at a distance of 8-10 cm from each other. Eggs should be located between the slats. The principle of operation of the movable frame is that when it is turned, all the eggs turn 180º at once.

Devices for monitoring humidity and air temperature
Constant humidity and air temperature are essential attributes for the normal development of bird embryos. To maintain them, special devices are used.
A psychrometer is used to control humidity. It can be purchased at a veterinary pharmacy or do it yourself. In the latter case, two identical thermometers are taken and fixed on a small board.
The end of one thermometer is wrapped with 2-3 layers of bandage and lowered into a container filled with distilled water. The second thermometer remains dry. The difference in temperature between the two thermometers is the basis for determining the air humidity.
Normal temperature conditions are maintained using a thermostat for the incubator. An electronic device that has a power of up to 300 watts will suffice. It regulates the temperature within the range of 35-40ºС with an accuracy of approximately 0.2ºС.
The thermostat is placed in a plastic case and is additionally equipped with a temperature controller, a sensor and a load indicator. The thermostat is mounted in the outer part, and the sensor - in the inner part of the incubator. It must function continuously throughout the day.
Incubator device
There are many incubator schemes, ranging from the simplest designs to devices with increased complexity. In this review, we will cover three types of incubators:
- made from an ordinary cardboard box;
- increased complexity;
- with electronic control.
cardboard box incubator
Creating this design is the simplest and most affordable solution for building an incubator at home. At the top of the box is cut out:
- window;
- three holes.
The holes are equally spaced and are designed for three cartridges into which incandescent lamps are inserted. The power of each lamp is 25W. They are suspended at a distance of 15 cm from the eggs.
Holes are also cut in the side walls of the box. It will be enough four holes, which are located at the bottom of the cardboard structure.
The front side of the box is equipped with a door measuring 0.4 * 0.4 m. It must be reinforced with a film and open from top to bottom. The door should fit as tightly as possible to the body. There must be no heat leakage from the incubator.
The egg tray is made from thin wooden boards. The height of the side is 6-7 cm. A mesh with small cells is attached to the bottom of the frame. The tray should be inserted without problems and, if necessary, pulled out of the cardboard incubator.
Moreover, it is necessary to provide for a gap between the side walls (near the ventilation holes) and the tray within 6 cm. In the front and rear parts of the structure, the tray can be installed closely. Eggs are turned over on the first day.
Mounting the tray is installed on pre-made legs. Their height is 10-12 cm. A thermometer is attached to any side of the tray. He must not touch the eggshell. A small tub filled with water is placed under the tray.
The optimal humidity inside the incubator depends on the timing of hatching. At the beginning of the incubation period, only a bath of water and a small moistened cloth is used, which is placed inside the box.
When the time comes for the hatching of the chicks, the increased humidity in the incubator is maintained thanks to the bath and a larger rag. The rag is washed regularly in soapy water, which improves the evaporation process.
Complex design
There is a great opportunity to make an incubator with your own hands, which is characterized by increased design complexity. And it should be characterized:
- absolute tightness;
- uniform mixing of air flows.
The creation of the same temperature and the removal of waste gases that are released during the development of embryos will be possible thanks to an effective forced ventilation device. The eggs should be arranged in this order:
- chicken - in a vertical position, the sharp end goes down;
- goose - in a horizontal position;
- turkey and duck - in an inclined or horizontal position.

Features of the functioning of the incubator with a coup depend on its mode. With automatic mode:
- the angle of rotation of the sides is 90º;
- the rotation itself is carried out with a time interval of 1 hour.
If a manual mode of turning eggs is provided, then it can be carried out once every 3 hours. Mounting of measuring instruments (psychrometers and thermometers) is carried out on the same level with the tray. But they should not come into contact with the eggshell. The best place to place them is the door. It is recommended that the heating elements have no effect on the temperature sensor.
At the initial stage of the incubation process (about 12 hours), the readings of the dry thermometer should not be higher than 41ºС. In the future, there is a decrease in temperature for eggs of chickens and turkey poults to 37.5-37.7ºС, for eggs of waterfowl - to 37.8ºС. The wet bulb reading should be at 28.5°C. This will correspond to a humidity of 53%.
At the final stage, the temperature regime should be:
- 37ºС - on a dry device;
- 33.4ºС - on a wet bulb.
In this way, the humidity in the incubator will be set at 80%.
Electronic Incubator
In the manufacture of the frame of such an incubator, it is better to use wooden bars, which are sheathed on both sides with plywood sheets. The space between them is insulated with foam.
An axis is created in the ceiling of the structure, to which the egg tray is attached. A pin is located on the axis, with the help of which the eggs will be automatically turned over. It is displayed through the top panel.
- cells measuring 5 * 2 cm;
- wire thickness - 2 mm.
The inside of the tray is covered with a nylon mesh.

The control thermometer is mounted above the tray. Moreover, it is located strictly along the axis. Turning the tray should not be accompanied by contact of the device with the eggs. The temperature scale is displayed in the outer part of the incubator. For this, the top panel of the structure is used.
4 electric lamps are used as heating elements. The power of each of them should be 25 watts. It is imperative to provide for a paired coating of lamps using a sheet of metal 1 mm thick.
Optimum humidity in the incubator is maintained using a container of water. Typically, a tinplate container is used. 3 U-shaped copper arcs up to 8 cm high are soldered to it. A rag is hung on these arcs, the end of which touches the water in the bath. Thus, the area of evaporation increases.
Efficient air exchange is carried out with the help of 8-10 holes, which are made in the ceiling and at the bottom of the incubator. This ventilation system involves:
- fresh air intake from the bottom side;
- heating of streams by heating elements;
- air humidification from a wet rag;
- heating eggs located in the tray;
- exit to the outside through the holes in the ceiling.
The temperature sensor is placed inside the incubator. During the first six days, the temperature should be within 38ºС with a gradual decrease to 37.5 ºС in the following days.
Care of the functioning of the incubator is reduced to:
- temperature sensor adjustment;
- periodic turning of eggs;
- pouring water into baths;
- washing cloths in soapy water.
To output electronic readings to the outer part of the structure, a relay is used, which:
- should operate at a voltage of 5 to 15 V;
- has contacts that provide for the use of lamps with a power of 100 watts.
Video on creating an incubator at home:
" Equipment
In this article, we will talk about what the simplest household incubator consists of and how you can make it yourself without large investments. The components of a household incubator can vary depending on whether you want to make it fully manual, semi-automatic or automatic.
You will need:
- lid with a viewing window;
- frame;
- lattice for eggs;
- light bulbs with chambers;
- containers for water;
- fan at 12 V;
- Regulator voltage 12 V;
- thermometer;
- thermostat;
- temperature sensor;
- controller flipping frequency (digital timer).
What can you make this useful thing at home?
- from polystyrene;
- from cardboard boxes;
- from plywood or tree;
- from the old refrigerator.
This list is not final. The specified list of different materials implies the manufacture of the cover and body from these materials. A detailed description, characteristics and device of each type of incubator can be found below.
Incubator Dimensions will depend primarily on:
- number of eggs that you will put.
- from location light bulbs that heat the incubator.
For reference: with an average length of the incubator of 450 - 470 mm and a width of 300 - 400 mm, egg capacity, pcs. (depending on size):
- chicken up to 70;
- duck or turkey up to 55;
- goose up to 40;
- quail up to 200.
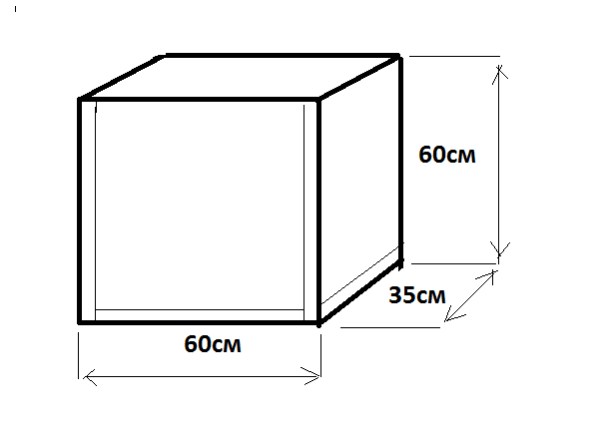
Homemade foam incubator, description and drawings
You will need: sheets of foam (expanded polystyrene) measuring 50 x 100 cm. Thickness - 50 mm.
We mark the sheet with a pencil and a ruler. We take arbitrary sizes. Example:
Side wall: Length - 50 cm, height -50 cm.
End wall: length - 35 cm, height - 50 cm.
Cut the foam to size with a sharp knife. If the foam is not extruded, then it is better to cut stationery knife- it is very sharp, the blade is thin.

We do the same with the second sheet.
Further assemble the body according to the drawing shown. This is done with rubber glue or simply wrap the joints with wide tape. Thus, we get the side, end sides and bottom of the case. At the bottom of the hull, which is also cut to fit the walls, be sure to make 2-3 holes for air ventilation.
Lid we manufacture separately with a viewing window and a pair of holes for ventilation as shown in the diagram below.
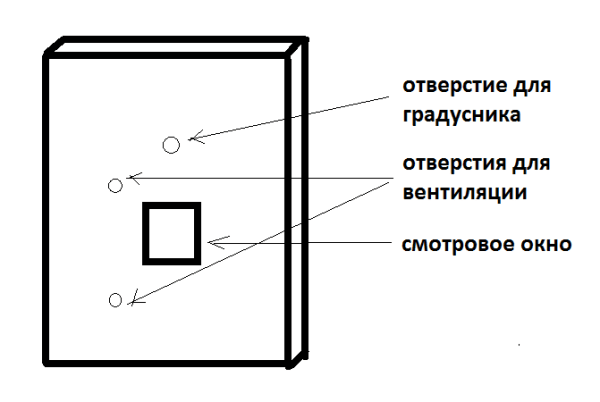
Glass You don't need to "tightly" fix it. After the chicks appear, we adjust the temperature in the incubator by moving it a quarter or half. The proposed design of the incubator assumes that it will be heated by three electric 25 watt bulbs, this is enough to maintain the required temperature. The lid must be made with partially cut out sides so that it does not move along the body. For this purpose, you can also glue bumpers. The material used is wooden blocks or foam blocks.
On the lid, fasten three electric chuck with light bulbs.

We install a thermostat on top (if the design suggests it).
The egg rack is made from welded galvanized mesh 16 x 24 mm, closed from the inside with a plastic mosquito net. The net is needed so that small chicks do not fall into the cells with their paws. In addition, they stick their heads in the cells, which ends up badly for them (and for you). Growing on the grid bumpers(walls), the height of which should be at least 8 - 10 cm, otherwise the chicks will jump over it. If you do not plan to roll the eggs by turning the grate along its axis, then we make the sides smaller than the grate around the entire perimeter, and the grate will cover the entire interior of the incubator and will lie on the bars. In this design, you have to turn each egg by hand, marking them on one side with a plus (+), and on the other, respectively, with a minus (-). Come up with your notation.

This design can improve, equipping it with an ordinary computer 12-volt fan, using a voltage regulator, an adapter (respectively, 12 volts) and a thermostat.
It is possible to construct an indicator with heating from light bulbs, which will be located below, under the tray (lattice) with eggs. Then the design will be more compact. Its height may not exceed 25-30 cm. Bulbs and chambers for them can be taken as in a conventional household refrigerator. You can use a different type of heater (film from underfloor heating systems).

To do not turn each egg, you can put the grate (tray) not on the bars at the bottom, but make holes closer to the bottom of the incubator, insert bushings there, attach the grate to the bushings with corners or other clamps. Outside, attach handles or holders. Thus, the grate can be rotated along its axis, changing the degree of inclination of the eggs and, accordingly, heating one side of the eggs, then the other. The grate in this case should be smaller in size than the inner walls of the incubator so that it can change the angle of inclination without interference. Lattice sides then they should be higher than 5 cm, because otherwise the chicks can roll over the side and fall to the bottom of the incubator to the light bulbs and water containers.

From a cardboard box, diagram and device
Perhaps the simplest and cheap incubator- This is a cardboard box. Cardboard is very inferior in strength to all other materials, so this type of incubator has certain features.
Ventilation holes are located from the bottom by 3-4 cm; on the side walls, at a distance of 6-7 cm from the bottom, we attach wooden slats to the walls. Instead of rails, you can put bars on the bottom of the box, which we cover with foil. It should be larger than the bottom so that its edges go onto the walls. per pallet install any container with water.
We lay the usual egg packaging on slats or bars. Cut a hole in the middle for better air ventilation. He makes a lid on the box with two holes: in the middle, for the lamp, and on the side for the thermometer.

From plywood do it yourself
If you make an incubator from this material, then it walls should be double. The top cover, as in the previous versions, is removable. A viewing window with glass is cut through it. Doing ventilation holes similar to the previous options.
Mounted on the inside of the incubator lamp holders, and slats for the tray are nailed below. We also drill holes in the plywood floor for ventilation. They can be 4-10 pieces.
Tray or a lattice of eggs arrange also frame type. On the grate we put a mosquito net or construction mesh for puttying. The incubator is installed in a warm room.
Attention! Do not forget that the minimum distance from the lamp to the eggs should not be less than 25 cm if low power incandescent lamps are used as a source.
From an old refrigerator
If you have on the farm old refrigerator, which you managed to replace with a new one, and the old one has not yet been thrown away, you can use it as a homemade incubator.
We throw away everything superfluous, including the freezer. From above are done ventilation holes. They are also made at the bottom of the incubator. Bottom install 12 volt fan.
Next you need to install heaters. This role is played by electrical 25 watt bulbs. You need 4 such bulbs. Two bulbs are placed at the top of the refrigerator, and two at the bottom. Below we fix the chambers in such a way that at the bottom it is possible to place a tray with water.
Egg trays are also made from galvanized welded mesh with sides. If you choose plastic fruit boxes as the material, that’s also good. Then they are cut to a height of 6 cm. All trays are mounted on the axis and are connected to each other with a bar, with the help of which the inclination of the eggs changes.

Auto
In some of the above options, it was proposed to manufacture manual or semi-automatic incubator. To make automatic incubator, you need to additionally purchase:
- block thermostat;
- tray automatic egg turning, which turns the eggs at a certain angle;
- frequency controller coup (timer).
Differences in temperature regimes for different types of poultry
In the first two days, you need to warm up the eggs well, so the temperature in the incubator is set at 38-38.7 ° C.
Remember! An increase in temperature adversely affects the embryos.
Chicken eggs in the first days of incubation, they are kept at a temperature of 39 to 38 degrees, gradually lowering it. In the last days (20-21) - 37.6.
duck- from 37.8 to 37.1 degrees down.
Goose– from 38.4 to 37.4.
Turkeys– from 37.6 to 37.1.
Quail all 17 days of incubation are kept at the same temperature of 37.5 degrees.
As you can see, doing home incubator, the material can be varied and depends on what is at hand. In order to orient the reader what will be the financial benefit from this event (meaning the difference between a ready-made incubator bought in a store and a do-it-yourself one), we can say that benefit is at least threefold. If you do not buy automation, then the difference will be even greater. Of course, what you make will have and minuses: does not look so aesthetically pleasing, perhaps not such a long service life. Despite this, many prudent owners prefer make an incubator rather than buy.
Comparing the material from which the body of the incubator is made, we can say that foam incubator has the lowest heat loss, from a cardboard box- the cheapest. From what material you will make - it's up to you.
Intending to make an incubator with their own hands, the owners are often interested in what materials and type of construction to choose for the manufacture of the device and what conditions need to be created for the successful incubation of healthy chicks. Different types of incubators differ in their operational characteristics and the specifics of handling eggs. The article shows these differences and describes the process of creating an incubator with your own hands at home.
Where to start creating an incubator?
Before starting work on creating a system for hatching chicks at home, you need to:
- Select camera material. The most significant criterion is the ability to retain heat. Large pieces of styrofoam are the preferred choice, and a cardboard box is the worst choice (it is easiest to make an incubator with your own hands). Refrigerators are also used.
- Decide on the size of the structure - it depends on the number of eggs placed at a time and the type of bird.
- Choose devices to maintain the required air temperature. A thermometer is used to measure indicators, and lamps are used for heating. Sometimes they get a thermostat.
- Decide if the structure will be equipped with an automatic egg turning mechanism. It will require investments, but will save time resources. More often, the mechanism is used for large systems where two hundred eggs are placed.
What you need to create a homemade incubator
To design a home-made incubator with your own hands, you will need to purchase or make its elements:
- Egg trays - made of wood and plastic. The bottom is slatted or made of mesh. An automated turning option is available (eggs turn after a user-defined time interval). Install a water tray.
- A housing with good thermal insulation properties, ensuring a constant temperature inside the structure without sudden jumps. It is made from foam or plywood sheet.
- Incandescent lamps installed in the corners (a 25 W element is suitable for a small device, a 100 W model is used for a large one). The distance from the lamp to the tray must be at least 15 centimeters.
- Thermometer.
- Fans - will be required if the structure is made from the refrigerator body. Then they will need to be installed at the top and bottom. In other cases, to ensure ventilation, it is enough to make holes with a diameter of 1-2 centimeters in the lid and on the wall near the bottom.
What conditions must be maintained in a homemade incubator
Of great importance for the normal formation of chickens is the observance of the temperature regime. The first two days for chicken and goose eggs, you need to keep the temperature at 38-38.5 degrees Celsius, gradually lowering it to 37.5 by 19-21 days. For ducks and turkeys, these parameters are 37.8 at the beginning and 37 at the end. Quail eggs are kept at a temperature of 37.5 for the entire incubation period (16-18 days). Humidity is also important - at the beginning it should be in the range of 45-60%, by the last days it is increased to a value of 75-80%.
How to make your own chicken egg incubator: step by step instructions
The manufacturing methods of the unit differ depending on the source material for the housing. Below are the most available options.
How to make a do-it-yourself foam incubator
The advantages of polystyrene as a material for a bird hatcher are excellent thermal insulation properties, low cost and lightness. To make a foam incubator with your own hands, you will need tools and accessories:
- two sheets of material 5 cm thick;
- four incandescent lamps - for the small design under consideration, 25 W lamps are enough;
- scotch;
- soldering iron for cutting holes (material crumbles easily when cutting with a knife);
- a set of trays;
- thermometer;
- liquid glue;
- fan.
Sequence of work:
- Side walls are made from the first sheet by cutting it into 4 equal parts.
- The walls are glued.
- From the second sheet, a base is made 40 cm wide and a lid 60 cm wide (the length of both parts is 50 cm).
- The sides of the base are smeared with glue and inserted into the blank from the walls.
- Paste the resulting box with adhesive tape for greater structural rigidity (starting from the bottom).
- Foam bars 6 cm high are installed at the bottom, on which the trays will be placed.
- Drill 2 holes for ventilation with a diameter of 1-1.5 cm at a centimeter height from the bottom.
- Install lamps.
- They put the thermostat on the outside of the lid, while the sensor is placed on the inside, making a small hole under it.
- They put the tray - it should be at a distance of at least 4 cm from the walls.
Do-it-yourself incubator with automatic and manual flip

To make a homemade incubator with automatic egg flipping, you will need to purchase a turning device. Types of mechanisms for turning eggs are used:
- Moving grid - suitable for small incubators. With its slow movement (automatic or manual), the position of the eggs changes.
- The roller mechanism is used less frequently: its independent production requires many small parts.
- An automatic mechanism that rotates the trays after a predetermined time is used in large units.
How to make a device for hatching chicks from a refrigerator or plywood

The design of the refrigerator is prepared as follows:
- Shelves and containers for food storage are removed from the chamber.
- 3-4 bottom ventilation holes are drilled.
- Installed fans and lamps. Depending on the size of the chamber, you will need 2-4 fans placed next to the lamps.
- A viewing window is mounted in the lid or wall.
You can construct a model from plywood sheets. Its dimensions and arrangement differ little from those for foam plastic. The walls of the case should consist of two layers of material, between which a heater is mounted. A viewing window with shifting glass is installed in the roof, allowing ventilation of the incubator.
How to make an incubator out of the box - the easiest way
The simplest do-it-yourself incubator is constructed from cardboard. This material has the least strength and does not retain heat well. The process is different from working with foam:
- Holes for blowing are made at a height of 3-4 cm from the bottom.
- Tray slats are attached 6-7 cm above the bottom level; a store egg box is used as a tray.
- Holes are made in the roof for a lamp (in the center) and a thermometer (on the edge), as well as a viewing window.
Advantages and disadvantages of homemade incubators
Making your own is beneficial for the following reasons:
- Save money compared to the factory version by 2-3 times.
- The ability to breed several types of birds in one incubator, subject to the similarity of the recommended temperature regimes.
- High survival rate of chicks - up to 90%.
- Small power consumption.
- Ease of manufacture.
As a minus, you can indicate the need to take care of turning the eggs - do it regularly (recommended frequency - once every 8 hours) manually or purchase a special mechanism.