How to prune shrubs with a spherical shape. Trimming trees and shrubs: how to give a decorative shape. How to cut bushes in the shape of a ball or pyramid
Curly cutting bushes is not just a whim of gardeners who want to decorate their site in an original way, but a real art, the roots of which go back to the most ancient times. It is generally accepted that the art of topiary originated in Persia and Ancient Egypt, but the greatest flowering occurred in the 15th century. It was at this time that Louis XV stood at the reins of France, wishing that Versailles was decorated with hedges. This fashion quickly took root in all the gardens of Europe.
At present, topiary is not forgotten, on the contrary, interest in it is experiencing a certain fashionable boom.
Not only professionals, landscape designers, but also simple amateurs who want to create an individual style for their garden are now interested in the art of curly pruning of bushes.
The most common suitable are the following bushes for decorative pruning:
- boxwood;
- holly;
- privet;
- cotoneaster.

The first plant, despite its toxicity, is quite often used in garden compositions, requiring a haircut twice a year. Yew requires similar care to boxwood and is also great for making figurative statues. Holly is a thorny plant from which you can organize a real living fence. Cotoneaster is good for carving shapes, but needs to be trimmed quite often for a neat and tidy look.
The ideal material for creating hedges is, which requires a haircut only once a year in warm weather.

Necessary tools and preparation
To create a beautiful style in your garden, you need to take care of the availability of specific tools in advance:
- Secateurs used to cut branches
- Garden knife - needed for cutting shoots
- Brush cutter - useful for crown formation
- Saw - needed to eliminate excess thick branches
- Lopper - used for remote pruning of branches
If you first decided to create a topiary on your site, then you should not immediately start mastering complex figures. It is best to start acquaintance with this art with the simplest figures: a cone, an oval, a ball.

All tools should also be checked: they must be serviceable, in good condition, sharpened and capable.
If you are no longer a beginner in this business, and have decided to decorate the garden with more intricate figures, then frames made of steel rods will be of great benefit. This tool has recently become used in topiary and serves as an assistant to create more complex ideas.

Features of creating complex shapes
Decorative cutting of bushes includes several stages of creating a composition.
- First you need to create a wire frame of the desired shape, in which the selected plant is placed. As it grows, shoots and branches may extend beyond the frame, which must be closely monitored. All unnecessary details are cut off even at that moment, if the branches on the opposite side have not yet reached the frame.
- It may take several years for a bush to grow to a certain shape, and during all this time you need to monitor its shape and trim it from different sides. As soon as the plant reaches the shape that was intended, the wire corset is removed, and you just need to take care of the resulting figure.
- To create complex decorative figures and sculptures, stationary templates are used that are not removed, but are connected to the plant with the help of steel rods and remain so to give it the necessary shape.
- To create particularly complex shapes, special fillable patterns are used in which the plant develops. Most often, such structures are filled with sphagnum moss and peat, and creeping plants are planted on them, for example, most often it is ivy. However, the creation of such complex figures requires certain skills and abilities, as well as a lot of experience, since they require careful maintenance.
Curly haircut of bushes and trees (video)
Techniques and methods for curly cutting bushes
If you decide to do landscaping and create an original landscape on the site, then you need to know the methods and techniques of curly cutting bushes.
- So, deciduous trees are pruned once a year in spring, until the buds have blossomed. Due to last year's branches, they increase their volume by 5 - 10 cm.
- But the plants used to create a hedge need to be trimmed several times during the year. The first curly haircut of the bushes must be carried out before bud break, leaving 5 cm of growth from last year. The next haircut is made to the level of the first.
- If the fence is built on the use of coniferous shrubs, then you should know that it is impossible to cut the shrub from the sides strictly vertically, since they should taper slightly towards the top. If this is not done, then the lower part will very quickly remain without needles.
- In order for the crown of the plant to be lush and eye-catching with its density, it is recommended to cut young plants quite plentifully. It is best to use a garden knife or pruner for this.
Beautiful decorative cutting of bushes can be carried out not only by specially trained professionals, but also by you personally on your own site. It just takes a little patience, attention and imagination. Heather lovers will be useful.
Reviews and comments
Oksana Dmitrievna 23.10.2014
Hello! I share my interesting experience of getting a rich harvest. I got it interview with Mikhail Chursin, Doctor of Agricultural Sciences and inspired by the article, I decided to use his recommendations, and you know, I made the right decision .. All summer we ate cucumbers and tomatoes from the garden, and prepared a seam for myself and my family for the winter. For anyone interested, here


Learning how to cut ornamental shrubs makes sense already in order to give the entrance area of \u200b\u200byour home splendor and respectability. At the same time, it doesn’t matter at all what your house looks like and is called - a cottage, a mansion or a hut on chicken legs. Nicely decorated entrance to face and rickety shack. And even if you don’t get that grandeur and pomposity that skillful gardeners in France and England achieve, in any case, the entrance to the house will take on an elegant, well-groomed look.
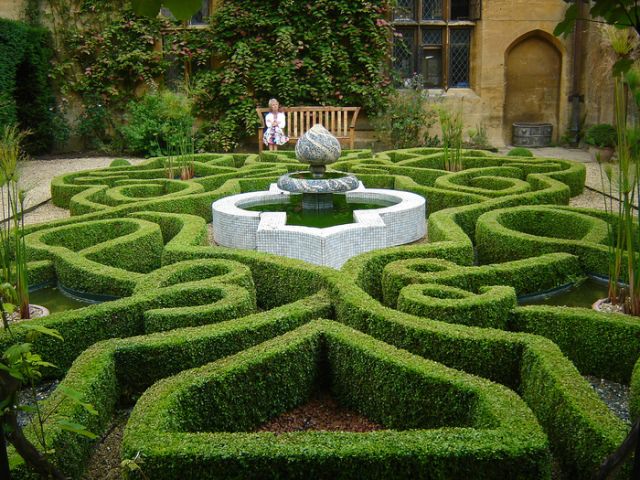
I also want to note that the entrance area is exactly the place that it is advisable to decorate with the greatest possible diligence, because this is the most visited and prominent place of any site, garden, yard. It is at the entrance to the dwelling that geometrically correct sheared borders, hedges and more complex sheared figures look most appropriate and organic.
I cut everything.
If you don’t know how to cut shrubs, or don’t dare to start, buy scissors and try to cut bushes that you don’t mind, gaining experience and remembering what’s what. Your first objects may be shrubs that are known to tolerate shearing well and make blunders: willow, privet, vesicle ... or even ordinary currants. I want to note that even professional gardeners, starting a haircut, often do not know what exactly this will lead to. For example, the world-famous sheared yews of the English estate “Livens Hall”, were originally sheared in the form of hemispheres, and now, after three centuries, they turned out to be “chess pieces”. So cut everything in a row and watch how the bushes behave. So you will gain practical experience, which alone is needed in this matter.
I note that in Europe the most popular objects for shearing are very heat-loving yew and boxwood. In our country, both of these plants suffer from frost, but to say that they are completely banned would be wrong. Studying their assortment, I am sure, will still lead to pleasant surprises. We will return to this at the end of this article.
Something for your scissors.
Trees and shrubs that tolerate shearing well, even here in central Russia, you can count how many dozens. And with varieties there are hundreds of them. If varietal plants are not available to you, you can easily find objects for cutting in the forest. Our common breeds such as linden, willow, spruce, juniper, elm, and alder are well cut. But there are shrubs that have a more pronounced ability to tolerate shearing and keep the shape of growth. Here are just a small part of the shrubs with which you can decorate the entrance to your family nest.
Common privet- has all the qualities necessary for a curb shrub. It has medium-sized foliage, grows well after a haircut, keeps the shape given by a haircut for a long time. Its disadvantage is the relatively low winter hardiness. But if you use its decorative form "Atrovirens" ("Atrovirens"), which, by the way, is the most common, and cut "products" are limited to a height of 60-70 cm, then frost damage is practically excluded. In Europe, privet is used for shoulder-high geometric hedges. We can reach such a height in the Chernozem region and to the south. I note that in order for the high hedge to be thick enough, the bushes are planted densely enough. multi-row and cut as one piece.
The privet has a variety "Aurea" with golden foliage. It is three times lower than the main form, and less hardy. But if you use it for squat curbs 15-25 cm high, there is practically no freezing.
Willow brittle- is best known for its popular decorative form "Bullat", which is also called "self-reaching" due to the density of the contours. It should be said that the wild varieties of this willow are not inferior in attractiveness to the cultivated form, and also cut well. In nature, it is usually a medium-sized tree 7-8 (up to 15) meters high with a dense tent-shaped, leafy crown only from above. If you start cutting a tree early, you can first, successively retreating, maintain the shape of an “inverted drop”. Then, as you grow older, you can smoothly turn the crown into a “box on a trunk”, which is also interesting. Since the tree grows quickly, the number of haircuts should be at least 3-4 per season.
Cotoneaster brilliant- in terms of representation in landscaping and park construction, this is the main curb shrub for central Russia and the North-West. But in urban plantations, it often does not impress with its appearance, which discourages gardeners from using this shrub in the garden. I must say that the fault of the cotoneaster itself is not in this. It's just that our gardeners act according to the rule - "stuck and forget", forgetting that the bush must first be planted in accordance with all the rules, and then fertilize and loosen the foot, water it in a drought. And most importantly, hedges and borders must be cut on time, otherwise nothing good will come of it.
Usually, low borders 60-70 cm high are made from cotoneaster, which, if properly set up, can be very decorative. Look at what cotoneaster is capable of, from which wide curly hedges are created by dense multi-row planting. Such hedges are sheared up to 5-6 times per season. But if impeccability is not in the first place for you, then three times is enough. It is easier to give free haircut silhouettes, for example, in the form of asymmetrical pillows and hemispheres. Small pillows are created from single bushes, large ones are formed from several plants planted nearby.
Vesicle viburnum- thanks to the pliability in the haircut, and especially its two "colored varieties", this shrub is one of the most useful decorative deciduous shrubs for yard gardening and a small amateur garden. It allows an unusually diverse use in the garden. Both varieties (purple "Diabolo" and yellow "Aurea") can be used for sheared trapezoidal hedges 120-170 cm high. A hedge, if cut only from the sides, can also be semi-free. In both cases, the hedges not only do a good job of enclosing, but are excellent screens from prying eyes, serve as an excellent background, against which the most ordinary flower arrangements become unusually attractive.
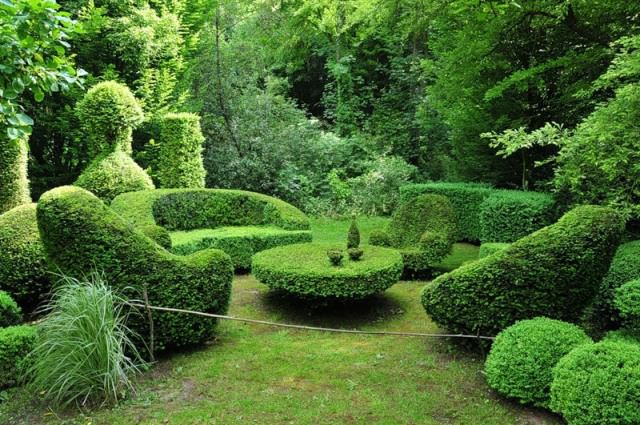
Separate bushes can be formed in the form of an "inverted drop". Thus, by the way, it is possible to ennoble a completely adult bush. Other forms of haircuts can be a variety of geometric shapes: balls and hemispheres, cubes, pyramids. Asymmetrical forms of haircuts look no less impressive - a variety of pillows, mop, which can be created by cutting a single plant or several densely planted bushes, combined by a haircut into one.
Rhododendron Katevbinsky- colorful flowering is expected from rhododendron, and few people notice how good its shiny leathery leaves are, similar to lingonberries, but 10-15 times larger. This species itself is winter-hardy, but does not bloom every year. The bush is initially quite dense, but with age it can stretch and thin out. If the growth of the plant is slightly adjusted, blinding the growth points at the very beginning of their development, then the density and silhouette of the bush can be dramatically improved. With these manipulations, one should strive to reduce and compact the crown of the bush so that it takes the form of a squat, dense hemisphere or pillow.
"Golden Princess" - Japanese spirea has a lot of varieties that initially have thick and dense crowns. It is not difficult to ennoble their appearance by transforming them into pillows, balls and hemispheres. This, by the way, does not have any negative consequences for their flowering. As for the Golden Princess variety, it is remarkable for its small leaves, the golden color of which is practically unchanged from spring to autumn. The shrub, which is given a spherical shape, is thus equally beautiful all season. The number of haircuts is 3-4 per season, the last one is at the end of August.
Suitable for shearing are also the varieties "Little Princess", "Shirobana", "Gold Mound", "Gold Flame", etc.
Thuja western- almost all varietal thujas are well cut. But when cutting them, it is advisable to adhere to the rule: the silhouette of the haircut should be similar to the natural growth form of the variety. Balls, hemispheres and pillows are formed from spherical varieties; from pyramidal - columns, pyramids, cones, etc. Number of haircuts from 3 to 6 per season.
Good in cutting varieties "Rhein Gold", "Aurea", "Smaragd", "Globoz", "Golden-tipped", "Cristata", etc.
Kuril tea- most varieties of Kuril tea have sprawling and loose crowns. Giving density and smooth contours unrecognizably change the appearance of the shrub for the better. Even a non-flowering bush becomes unusually attractive. In addition, the haircut does not interfere, but on the contrary, stimulates flowering. Depending on the natural shape of the crown of the variety, it makes sense to give the bush a spherical silhouette (Abbotswood, Gold Star, Goldfinger varieties) or a more squat cushion shape (Hopleys Orange, Primrose Beauty, Farrery).
Yew and boxwood - and they are not forbidden.
Both of these shrubs have winter-hardy varieties and forms that winter quite steadily under the snow. In boxwood, the most attractive are dwarf and undersized spherical varieties, which are given greater density by shearing. They can also be planted in dense stitches as informal borders or in arrays one on top of the other, trimmed flat at the top.
The yew has squat forms, growing spreading, in the manner of the Cossack juniper. Several fairly winter-hardy varieties of yew have already been identified, which are excellent material for low geometric borders of 40-60 cm. What is especially attractive about yew is that it grows very slowly, so it does not need frequent haircuts.
Articles about the plant
CLASSIC TOPIARI FIGURES - ADVICE FOR BEGINNERS
Classic topiary.
Traditionally, the first figures for a beginner to master curly cutting of plants are a cube, a ball, a cylinder (column), a pyramid or a cone. To begin with, it is necessary to decide on the object of molding - whether it will be a plant already growing in a certain place, or for a future figure, it is planned to plant young seedlings. If the selected plant is no longer young, then before cutting it is necessary to carry out anti-aging pruning. When planting a young plant, it needs to be given the opportunity to take root and adapt to a new place, so you should start cutting it only from the next season.
cube. The size of the cube is determined by the choice of plants for cutting - their number, depending on the author's idea, can vary from 1 to 5 or more. The main thing is that as they grow, they form a visually whole plant, from which the future cube will be formed. For example, five seedlings need to be planted in a square with one plant in its center, while not forgetting to take into account that the square at the base of the future cube will be wider than that formed by the pits when planting.
Topiary - cube haircut. Having decided on the object, let's go directly to the haircut. Let's mark on the ground the square of the base of the planned figure and at its vertices we will vertically install the slats that define the side edges of the future cube. Then we connect the installed rails with four perpendicular ones that define the upper horizontal edges of the figure. 
Now, armed with trellis scissors, at a height of several centimeters from the improvised frame, we begin to cut, focusing on the slats, the upper face of the cube.
Having formed the top, go to the side faces. Having finished the haircut, we change the trellis scissors for a secateurs, with which we remove, if necessary, the bully on the bark and hemp, as well as halves of the leaves, in the case of cutting a large-leaved plant. Your first topiary is ready! In the future, it remains to regularly carry out a corrective haircut, improving the figure and stuffing the hand.
Ball (sphere) or hemisphere (hemisphere). Despite the apparent simplicity of this figure, the formation of a ball requires a good eye and patience. At the initial stage of mastering the art of toriari, cutting a ball or a hemisphere can begin with the formation of a cube, from which we then cut off the vertices and bring the resulting polygon to the required shape by eye.
If the plant has a spherical crown, you can start by cutting out the “equator” and four “meridians” that determine the size of the future figure. Then, using these geographical landmarks, we cut the crown on the remaining parts of the plant.
Another option for a free haircut of the ball is to cut the side shoots at the base along the future rounding from the bottom, then cut it off from the top along the height of the ball, then cut the upper bevels and sides and round the resulting figure to the intended ball shape.
Topiary - haircut ball. If you do not rely on your eye, you can use auxiliary tools. For example, by making a blank on your own or by purchasing a finished structure consisting of a rod with a wire semicircle attached to it, the radius of which corresponds to the radius of the future ball. 
We stick the rod as close as possible to the trunk of the plant and rotate the semicircle around the crown, cutting off the shoots protruding beyond the template. In addition to wire, you can use plywood, in which a semicircle is cut along the radius of the future ball.
When planning a haircut in the form of a ball, it must be taken into account that the lower part of the formed crown will not be sufficiently illuminated and the light-loving plant may eventually become bare from below.
Also, if you want the future ball to look like it touches the ground only at the top, the selected plant should have one axial shoot at the base. Shrubs with several shoots at the base and light-loving plants can be shaped into an incomplete ball with varying degrees of visual "drown" in the ground.
If it is planned to give the shape of a ball to the crown of a tree, then it is necessary to start by trimming the lower branches and the axial shoot - we only pinch the tips of the side shoots. In the future, we cut the axial shoot into 3 - 5 buds, and the lateral ones - in case of going beyond the planned ball, and at the same time we make sure that the last bud remaining after pruning is external.
Topiary - pyramid haircut.
Pyramid. Depending on the planned number of faces, we draw an equilateral triangle, square or hexagon on the ground around the plant, at the vertices of which we install slats, which we fasten at the top above the imaginary center of the drawn figure. Guide rails outline the side edges of the future pyramid. 
It is necessary to cut at the same time equal to the plane of all faces, since an error in the formation of one of them will force all the others to be cut again. The beauty of the pyramid to a very large extent depends on the plane of its faces, so for such a figure you should choose a plant with small dense foliage.
At the stage of mastering the creation of topiary, to facilitate cutting, you can choose a plant with a natural cone-shaped crown. An almost ideal object for a pyramid haircut is the thuja western variety Smaragd.
Cone. The technology is almost the same as when creating a pyramid - at the base of the plant we draw a circle, on the line of which we install guide rails, fastened together above its imaginary center. The number of rails can be different - and three, and eight, depending on your confidence in the accuracy of the haircut.

We start cutting along the rails. Then we cut the rest of the hair by eye, focusing on the drawn circle, starting from the bottom and moving to the top of the future figure. The value of the radius used in the first formation of the circle must be saved for subsequent shearing.
If it is planned to give the shape of a cone to the crown of the tree, then when pruning, we do not touch the lower branches and the vertical axial shoot. But the side shoots are regularly cut to achieve the intended shape.
Topiary - column haircut. Column (Cylinder). As in the case of the formation of a cone, draw a circle at the base of the plant and install guide rails on its line, but in this case we place them vertically and parallel to each other. To facilitate work at the top (and, if necessary, at the bottom), we fasten the slats with a circle of wire.
We carry out a haircut in the direction from top to bottom and at the same time do not forget to move a certain distance more often in order to assess the correctness of the formation of the figure and correct the shortcomings in time. For a plant cut in the form of a column, an important condition is the uniform access of sunlight.
Spiral. The initial stage in the formation of this figure is the creation of a cone or column, after which you can begin to form a spiral. Lines for cutting coils are marked with a bright tape, wide colored tape or acrylic paint.
We fix one end of the tape (adhesive tape) in the lower part of the trunk, and wrap the other end around the crown in turns and fix it on top of the plant. The width of the turns or the pitch of the spiral can both decrease as you move towards the top, and remain unchanged. The number of turns can also be different, but the figures with three or five turns look the most elegant.
Topiary - spiral haircut.
When using acrylic paint, to start with the opposite sides of the crown relative to the center of the spiral, we define two lines (you can use slats). On one of them, at a height from the ground, equal to 1/3 of the width of the lower turn, we put the first mark, which determines the beginning of the future spiral. Next, at equal distances of the spiral, we alternately put marks on the lines (slats), which we then connect in the form of a spiral with a line of paint. 
Having made the markup, we arm ourselves with a pruner and start a rough cut of the contour along the tape (adhesive tape) or cutting off the shoots that got paint. Then, with the help of scissors, we form the final shape of the figure. To create spirals, you can choose plants with both one and several trunks. Moreover, in the first case, the contour with a coil can be cut to the trunk, and in the second it is desirable only to outline.
Depending on the width of the cut contour, which determines the distance between the turns, and the width of the turns, the shape of the spirals is divided into types. So, if the width of the contour is large, then the spiral is called a "spindle", if the width of the turns is the same - a "corkscrew".
Having mastered the haircut of simple shapes, you can move on to more complex options that require several years to form. To grow figures on a trunk (i.e., on a support of a certain height), the main (leading) shoot is selected and the side branches are removed. Upon reaching the planned height of the bole, the growth point is pinched, and in the future, from the beginning of the bushing, the plants form the intended figure.
If you want to create a multi-tiered sculpture from geometric shapes placed one on top of the other, the figure of the lower tier is first formed, in the center of which several main shoots are left, on the basis of which the figure of the next tier is formed, etc.
Topiary art
Despite the fact that topiary has its roots in Persia and Ancient Egypt, this type of decorative cutting of bushes, trees and shrubs appeared in its full glory in the 15th century. It was then in France, under the reign of King Louis the Fifteenth, that hedges began to decorate both Versailles itself and most of the gardens of Europe.
There was also a slight decline in interest in this type of art, however, today topiary is experiencing a real boom all over the world. They are trying to master not only professionals, but also simple amateurs who seek to give their garden an individual style. A combination of fluffy trees with clear outlines of figures is now in vogue, and this species is considered exclusively British. It involves working on already grown trees and bushes.
Haircut instructions and rules
But, despite the seeming lightness, not all tree species are suitable for creating a unique style - the main feature of topiary art. Gardeners who want to apply this style, it is advisable to pay attention to plants such as:

- boxwood(often found in gardens, despite being poisonous and requiring shearing twice a year);
- Yew(similar to caring for boxwood, also great for topiary);
- Holly(a prickly plant, with which a magnificent living fence is obtained);
- Cotoneaster(allows you to create any shape, but requires frequent haircuts);
- Privet(Ideal for hedges, requires a haircut in the warm season).

But where to start, and what tools may an amateur gardener need to create figures from plants and trees on his site?
Tool required for the job:
- garden knife(needed for pruning shoots);
- Secateurs(required for pruning branches);
- brush cutter(required for the formation of crowns);
- Lopper(required for remote pruning of branches);
- Saw(needed to remove thick branches).

Starting to create topiori for the first time, you should not immediately strive to make complex figures. Experts recommend starting with simple shapes - balls, cones, ovals. But initially, of course, you should prepare a sketch of the work on paper in order to have an idea of \u200b\u200bwhat should be the final result. You should also make sure that the garden shears - the main tool for creating topiori - are sharp.
During preparatory work (if there are no necessary plants on the site), a row of juniper or spruce should also be planted. This is done in early spring or autumn. The distance between the trees should be approximately 80 cm. During the year, the plants will grow up, and it will be possible to test their own strength on them in cutting out the simplest form.

If there is a desire to create a more complicated option, you should acquire frames made of steel bars. They are a relatively new introduction to the creation of topiori, since until now the main tool of all masters is only scissors, but they can help to achieve the desired result without any problems. It is important for gardeners to understand that a green figure of complex geometric shape will be created for more than one year, however, the end result will delight and amaze with its perfection.

Stages of work on creating a complex figure
- A young plant is “dressed” in a woven wire frame having the desired shape;
- As the plant grows, it begins to crawl out of its leaves outside the frame. It is important for the gardener to carefully monitor this stage of creating the topiori and cut off excess leaves and twigs even when they have not yet grown to the border on the other side of the frame;
- As a rule, a bush grows for several years, and during all this time it should be given the desired shape, trimming it from one side or the other;
- As soon as the plant reaches the intended shape, the steel corset is removed. Further, the gardener simply takes care of the figure, regularly cutting off the excess.

Methods and techniques for cutting bushes and trees
Having taken up the improvement of the territory and the creation of a unique landscape design on your site, it is important to know about the methods and techniques of cutting bushes and trees. For example, deciduous trees are trimmed once a year, usually in the spring - before bud break. Their crown is gradually growing by 5-10 centimeters due to last year's branches. But hedges, as well as shaped shrubs, are cut more often, several times a year.

The first cut also occurs before bud break and leaves about 5 centimeters of growth from last year. Subsequent shearing of shoots is carried out to the level of the first shearing. It should be noted that when cutting live coniferous hedges, in no case should the sides be cut strictly vertically. Hedges should taper slightly at the top. Otherwise, its lower part will quickly lose all the needles.
It is important to know that regardless of the type of plant (deciduous or coniferous), it must be cut from the bottom up. Also an important point is the constant feeding with cool water and feeding with vitamins. So that the bush does not dry out, you need to leave a few buds on it.

- In order for a hedge or a figure to have a lush crown, young plants should be pruned quite plentifully. This is easiest to do with a hand pruner or garden knife, as young plants require a special cut.
- If there is a need to create new shoots, young plants are cut from ground level at a height of 15 centimeters.
- To create the perfect hedge, it is recommended to use several groups of plants.