Crafts from stumps with your own hands: ways of processing the material, as well as a selection of original products for home and garden. Stump in the garden: a problem or an additional opportunity? What to make from birch stumps for the garden
From a stump, with your own hands, you can build an incredible variety of things. These items will be the most diverse furniture, garden decoration, as well as the practical application of this - even without depriving it of its connection with the place of growth. You can decorate a house, a summer house, a garden with objects from a stump, turn an already unnecessary remnant of a tree into a work of art. Huge stumps turn into masterpiece chairs, if you add a couple of pillows - you can even sleep in such a chair in nature. Lamps are created from stumps, creating an amazing atmosphere in the interior. Beautifully processed stumps are even used as coasters for bottles of wine. The most incredible tables are created with the help of stumps, miniature stools, comfortable chairs with carvings and sculptures of trees. Stumps are used to create one-piece stands-tables on wheels, which is incredibly convenient in practice. Below will be presented 8 DIY stump craft ideas.
Stump-stand for wine and stool.

Fabulous motifs of the invention from a stump, amaze squirrels, eagle owl and raven in the work of the author.

An amazing table made from the remains of a stump.

Books, tea, a vase of flowers fit very harmoniously into such wooden coasters.


Forest harmony is preserved in its entirety, with only a slight adjustment.

Very wide bed for rest from a huge stump.

Very original lamp made of stump cuts.

Do-it-yourself stump table: 10 stunning photos
A table is an important attribute of any home. At the table, the most important action takes place - the meal. Scientists advise using wooden tables - they do not release toxins like plastic ones. Glass tables are more dangerous and can be fragile. Good wooden tables cost a lot of money, and many decide to make a table with their own hands. The cheapest and easiest way is to make a table out of hemp.
It looks very beautiful and beautiful, but this is an ordinary stump.

They simply nailed the countertop to the hemp, and it turned out to be a good table.

Such work will require considerable time and experience in carpentry, but it is worth it.

A table can be made from small stumps and varnished.

It's not easy to find such a large stump, but the coffee table came out - excellent.

To create such a small table, they took a small stump and an ordinary round timber from a tree.

The tabletop can also be placed on top of glass, which will add even more attractiveness to your table.

You can also fasten the wheels to the stumps and the table will be mobile.

A backlit table can also be made from hemp.

The coffee table in the form of a month is a wonderful work.

They say that sitting on a stump is even useful. Previously, hemp was often used as a chair and did not bother much, even now many people do this in the villages. But in an apartment or house you can make a beautiful chair from a stump with your own hands, for this you need only properly growing hands and imagination. In this article you will be able to consider the best work.
Very simple and soft - soft stump.

You can carve the original chair with a chainsaw and a turbine.

And here is a stump-chair with legs.

In hemp, you can make the back if desired.

Nice dark wood stool.

Screw on the wheels and here is a stump office chair.

Stumps can be used almost any.

From small stumps, you can glue such a table and a stool.

Hemp chairs for the whole family.

And in such here they even made a former.

Hemp royally look beautiful.

You can cut the stump into pieces and make a stool.

Crafts from stumps for the garden with your own hands: 10 photos
The garden plot can be decorated with a variety of materials that have already served their time, as well as materials of natural origin. These include cut down trees, or rather what is left of them - these are real stumps. From stumps, you can build a variety of outlandish things that can please the eye. Let's present 10 photos of DIY crafts from stumps for the garden.
A stump with a cute frog perched on it.

An original and outstanding fly agaric was built from a stump.

Baba - Yaga from a stump will please anyone, make him laugh, and even cheer up.

Forest brethren from birch stumps.

Stump house for a variety of inhabitants.

The fly agaric house is a great idea.

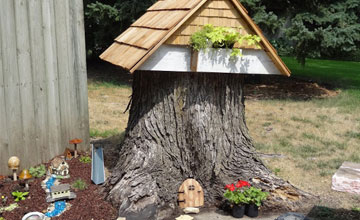
A stump house with a roof, windows and flower beds - balconies.

The two stump brothers created an interesting composition.

House for an Elf from a stump with a powerful door.

A house with a chimney and a porch for the gnomes.

Top 13 do-it-yourself stump products - only the best ideas
Unnecessary tree stumps are an excellent material for creativity and making money. And fantasy, as you know, has no limits and boundaries. With a certain processing, objects from the stump will last a very long time. We have prepared a selection of the top 13 DIY stump products. Happy viewing! These will only be the best ideas.
Glowing seats can be made from a stump. Having painted them with luminescent paint, it is good to use in the garden.

Stump candlesticks are a creative idea for the home.

If you carefully work with tools, then from a stump you can get a stand and a shelf for books: two in one.

A stump lamp is an ordinary accessory made from an unusual material.

From a stump you can make a bar counter for several bottles of wine.

A coffee table made of stump and glass will successfully fit into the interior of the living room.

From a small stump you can make a bird feeder.

Mini - a waterfall from a stump. But the stump is suitable from a healthy dried tree, carefully treated with impregnations.

Stump crafts in garden design are a great idea.

A stump garden table will decorate a terrace or a conservatory.

Stands and flowerpots are obtained from a stump of different sizes.

A stump of an old tree will make a beautiful flower garden.

Figurines from a stump can be placed in a garden, park, playground.

Do-it-yourself stool from a stump. 10 amazing ideas + photos
From unnecessary leftovers, designer things are obtained. From an unnecessary stump you can make: benches, tables, stools. The stump does not need to be processed with tools. Such furniture has a special style and design. Furniture in Russian traditions will look in the garden, bathhouse, summer kitchen. We offer to evaluate stools from a stump with your own hands. 10 amazing ideas + photos.
Economical furniture: the stool is made from two saw cuts of one stump.

For this stool, you will need a high stump so that you can cut the back back.

This model is sustainable. But you need to make an effort to cut a figured leg out of a stump.


The most common model of a stump stool. But in order for the furniture to last longer, you need to properly fix the legs.

The stump is upholstered with soft fabric. This stool is comfortable to sit on.

A stump stool is a convenient and simple model: cut out the legs - the seat is ready.

Stable, not high stump stools. True, they do not weigh much.

To make such stools from a stump, it will take a lot of time and effort, large stumps. And yes, the price will be high.

This high stump stool is perfect for a bar counter.

A dacha is a space for creativity, creation and contemplation, where a person can relax and work for his own pleasure.
It is also a great opportunity to show imagination, and we will help you with inspiration. Today we will tell you how to make beautiful crafts from stumps for the garden, what materials and techniques to use.
This is a great opportunity to decorate the landscape, spending very little money, and in some cases, all costs will consist only of the time and effort spent.
As a result, you will get a wonderful decoration, original and bringing joy.
What can be done with old stumps?
Human fantasy is truly endless! Sometimes you wonder yourself - where do ideas come from. Moreover, even the most ancient thing, if desired, can be used. So it is with an old stump or snag, which not very enterprising people will most likely throw out or burn. But do not rush, because he can be given a second life. You ask how? And we will answer - very simply!

An old stump can become furniture, which is so necessary in the garden, or part of it, for example, a high chair for children and adults, which depends on the size of the stump. If it is high, then you can use a chainsaw to cut out a part so that you get a back, and if the stump is also very large in girth, then you can make armrests and you will get a large chair.

Small low stumps are perfect for a playground. The upper cut must be cleaned and sanded, a colored pattern can be applied on top with paints.

It immediately suggests itself to make a table for the chair, at which it is so pleasant to have a cup of tea under a sprawling apple tree in the shade. Our stump can become both a support for the tabletop and the table itself, if dimensions allow. In the first case, you must first level the surface of the stump, treat it with special impregnations that will not allow it to rot.

Then on the sides, parallel opposite each other, we nail two strips, and we fill two more perpendicularly on them. After that, we knock down a countertop of any shape that you like from the boards and fasten it with nails to the planks from below. This is one of the many options. For the product to serve you for a long time, cover it with varnish.


You can also make other crafts from stumps with your own hands. which can be used as garden sculptures. For example, a bright fly agaric will become an accent on a green lawn or under a spreading bush.

The stump will be a foot fungus, and make a hat from an old bowl, which must be covered with red spray paint, and when it dries, draw white spots. You can also paint the leg and even draw a face on it and thereby revive the fly agaric. Thus, you can make not only fly agaric, but also other mushrooms.

With a little imagination, you will have a one-of-a-kind stump sculpture.

Also, the stump can become a pedestal for any sculpture, a plant in a tub, and even for a barrel of water for watering the garden.

And what beautiful containers for plants are obtained from stumps! To get a flower pot, you just need to remove part of the core, pour drainage (expanded clay), fertile soil there and plant the plants. It will look very beautiful young, for which about 4 cm of earth is enough.

And if the stump is large, then it can be used as a planter and insert a flower pot there. Or cut the middle to a depth of 25-30 cm and arrange a real mini-flower bed.

To do this, again, make a drainage layer of 5-10 cm and pour about 20 cm of fertile soil. And then you plant different plants.

Curly species (ornamental strawberries, petunia, nasturtium, etc.) will look beautiful in combination with undersized annuals and annuals. Such a decorative element will be a great addition to larger landscape compositions.

How can you use a snag in the country?
Crafts from stumps and snags, which make up a single composition, look very unusual. After all, for sure, everyone in the country has a broken thick branch, a small fallen tree, etc. They can also be adapted for summer cottages, for example, as a stand with an unusual curved shape, on which you can attach a garden washbasin or hang a small planter made of the same hemp.

And if you come across a large branched branch with a base thickness of 6-10 cm, then you are very lucky. From such an instance, you can build a beautiful composition. First, the branch must be cleaned and treated with a protective compound. Then firmly fix it in the ground, for example, concrete or dig to a sufficient depth.
And then turn on the fantasy! On one branch you can hang a bird feeder, on the other - a stylized clock, a decorative nest or flower pots. Also, such a branch can become a country dryer for cups, jars and other utensils.

If you have an alpine slide, then a snag covered with moss and elongated in a horizontal direction will be a great addition to the composition. It can be planted with ground cover ornamental plants, which over time will partially cover the snag.

Or maybe you will come across a snag with various natural depressions. Then you can pour a little soil into them and plant stonecrops, rejuvenated and other plants. This thing looks very impressive and beautiful.
The V-shaped sprig can be used as a clothes hook. This is done as follows: fasten one end of a strong rope to a branch, and the other to the wall.

You can even assemble a bench from snags. It will have an unusual and very original look. The main thing is to choose strong branches that will surely be able to withstand the weight of a person.

Also, a thick branch can be cut into cylinders of different heights, cut a shallow hole in them and used as candlesticks. Just be very careful, wood is flammable.
It is worth remembering that wood is a rather fragile material., which, when exposed to moisture, collapses, rots. A stump is an old tree that is doubly subject to self-destruction. Therefore, it is imperative to carry out treatment with special chemicals and varnishes to prevent these destructive processes, especially if you want to make crafts from stumps and snags for more than one season. However, if you want to get the effect of moss, then there is no need for such events.
Get inspired, fantasize and boldly bring your ideas to life!
An old stump, a log or a snag ... In the eyes of many, this is garbage that needs to be disposed of, and the sooner the better. However, a person with a rich imagination and skillful hands can make an interesting landscape design object out of an ordinary piece of wood - not only useful, but also beautiful.
Here are some popular ways to turn stumps and logs into an original decoration for a suburban area.
1. Garden furniture is an indispensable thing both for drinking tea in the fresh air and for a quiet rest under a sprawling apple tree. Of course, a table and chairs can be bought at the store, but a furniture set of several stumps or thick logs will look very colorful.

Usually, the upper cut of the tree is trimmed and treated with varnish or special impregnations that protect the wood from decay. If desired, you can paint the entire wooden blank by building a multi-colored set of stools. The table top is usually made from one or more planks, although a large stump can be used as a table on its own.
From the high and voluminous part of the trunk, you can make a chair with a back and even an armchair, and from a horizontally laid log you can turn a large garden bench.
2. To arrange a flower bed in the country, you can buy special flowerpots or lay out a stone fence. But for a small flower garden, a stump will also fit: it needs to be cleaned from the inside, treated with an anti-mold compound, and then fill the resulting cavity with earth.

Nondescript stump and bright, fresh flowers - a harmony of contrasts.
In such a natural "pot" bright flowers will look beautiful, for example, pansies, marigolds, petunia, but you can try to plant strawberries or ferns inside the stump - suddenly the experiment will succeed.

3. Something useful can be made from any piece of wood - a shelf, stand, etc. Looking for where to attach a snag or stump? Install them next to a path or in a far corner of the garden, attach a solar-powered lantern to them, and you will have decorative lighting on your site.

4. A few logs can be donated to equip a miniature playground for children. The simplest swing made of a log and a board laid across it is just one of the possible options. You can paint logs with spray paint, draw funny faces, flowers on them, attach a windmill - it all depends on your imagination.

5. Roots and driftwood are very picturesque, therefore, cleaned of dirt, sanded and covered with transparent varnish, they look spectacular in the middle of a flower bed, and also go well with stones. If you master the art of wood carving, a unique sculptural composition may well appear on your summer cottage.


H
It is often a pity to throw away or use a stump, log or stump for firewood, because it can be used to create a beautiful and unique thing in nature. For example, a table, a chair or a flower bed for a garden can be made from a stump or a log, all kinds of beautiful crafts are made from stumps. Let's look at what can be done from a stump, hemp or log with your own hands, what crafts for a garden from stumps, logs you can make yourself and what you need for this.
Content:
1.
2.
3.
4.
4.1
4.2
4.3
4.4
4.5
5.
5.1
5.2
5.3
5.4
5.5
6.
6.1
6.2
6.3
7.
General requirements for wood
Our future craft from a stump or log should initially be dry wood. Fresh wood must be dried for at least 1-2 months at a temperature of 15-25 degrees. It is best in a dry room and / or without direct sunlight, otherwise our stump may crack and crafts from it may not work.
Frankly rotten stumps or logs should not be taken, but if the stump is a little rotten on the outside, such a stump can be used by treating it with a grinder with a brush, removing the rotten layer from it, in which case something can be made from it. The bark can be removed before drying the stump, for which it is convenient to use a chisel and a hammer or an ax, or you can leave it, it will need to be well treated from decay, for example, with iron sulfate and varnish.

If you have a stump on the site that you have wanted for a long time, be sure to do it, or use it untouched, ingrown into the ground - this option is also applicable for arranging a table or chair from a stump or decorative crafts for the garden.
How to make a chair, stool or chair from a stump, hemp or logs with your own hands
The options for chairs made of hemp and logs, as well as tables, are endless. There are two main technologies for creating a hemp chair or stool:
- roasting method,
- chainsaw.
Using the firing method to make a chair or stool is quite simple. First, the log is sawn lengthwise crosswise to the desired length of the legs. The cracks are wedged with wood chips. Small chips, branches are poured into the wedged cracks, a little gasoline is added and set on fire, fuel is gradually added to maintain combustion and ignite the bulk of the log. This burns out the center of the log. After the necessary firing of the angle grinder with a brush-brush, excess coals are removed and a do-it-yourself stool is made from a log or hemp on 4 legs. Further processed.
The necessary workpiece is cut out with a chainsaw and then the angle grinder is polished, or it is fired, painted, etc. You can also put the stool on furniture wheels by screwing them from below, while the bottom surface should be perfectly flat. You can attach a pillow to the hemp on top, so you can do it. Putting a slice of wood on legs, you will also get a wonderful stool.
Consider several options for a stool and / or chair with your own hands, presented in the video.
How to make a stool from ordinary acacia hemp with your own hands at home (video)
Do-it-yourself hemp stool by firing method.
Do-it-yourself hemp chair-stool (video)
Chair-stool made of hemp (logs) with a chainsaw.
Do-it-yourself garden chair-chair made of logs (video)
A simple log chair is made in much the same way as a stool, but the back is cut with a chainsaw, as in the video below.
Hand-shaped log garden chair (video)
Chairs or armchairs from logs can be made in any shape and size, for example, in the shape of a hand. To do this, you need to work well with a benzo or electric chain saw.
Gallery of photographs of chairs, armchairs and stools made of logs, stumps
Finally, options for creating armchairs, chairs, stools from logs and stumps.

As you can see, there is nothing particularly difficult in making a chair or stool from a log, the main thing is to approach the matter with soul and diligence.
How to make a flower bed or flowerpot from hemp, do-it-yourself logs
What else can be done from hemp or logs in the garden? Well, of course, a flower bed! For flowers or seedlings. There are again a great many design options here, we will try to identify the main ones.
In its simplest form, a core is cut along a log of the required length with a chainsaw and / or an ax to make a container for backfilling the earth. The container is covered with polyethylene so that the log does not rot and the flower bed for the garden is ready.

The second option is a log cabin. We build a small log house from logs, and it is desirable according to all the rules. That is, with the device of a small foundation and the caulking of cracks between the logs. The base (foundation) for a flower bed with your own hands in its simplest form is stones, on a cement-sand mortar. It is best to caulk the gaps between the logs with moss, it is more beautiful. Then you can paint the flower bed with varnish or paint.

A flowerpot or pot made of logs is easy to make. We set the log vertically and, using a chainsaw, a hammer with a chisel or an ax, cut the core to the desired depth. We cover the formed niche with polyethylene, lay the ground and plant plants. The flowerpot can be varnished. You can do the same with the stump that "grows" in your area.

A couple of videos to illustrate.
How to make a flower bed from a log with your own hands (video)
Do-it-yourself vase from a log (video)
Stumps in the ground or uprooted are a good material for making various crafts.
The unusual appearance and high strength of wood make it possible to make from them not only outwardly beautiful products, but also functional furniture.
The main conditions for high-quality crafts are the maximum compliance of the hemp or tree roots with the purpose that they have prepared for them, as well as the correct processing of wood.
Crafts can be made from any stump, driftwood or roots, regardless of their condition, but it must be understood that it is desirable to make furniture from material not damaged by rot or decay because it has higher strength.
But even a rotten crumbling stump can serve as the basis for a figure or some kind of decoration.
First you have to use other people's ideas, but as you gain experience working with this material, you can see not only the stump or roots, but also what kind of craft for your home or garden can be obtained from them after processing.
How to work with this material?
Regardless of the shape and type of material to work with use standard actions:
- debarking;
- removal of affected areas;
- surface leveling;
- cutting;
- sawing;
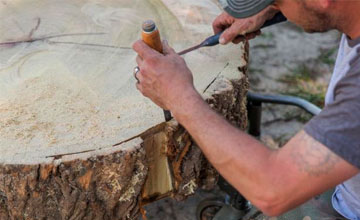
- chiselling and cutting;
- grinding;
- connecting parts to each other;
- staining;
- painting and varnishing.
debarking
 This operation is performed if there is dust / pests under the bark, or it spoils the appearance of the future product.
Filming her with a not too sharp chisel, prying and peeling pieces of bark to her.
Where the bark has exfoliated from the wood, it is hooked with a chisel and broken off in layers.
If the bark sits tightly on the wood, then the chisel is attached to the bast or cambium (layers of different colors between the cork and the wood), then with light blows of the hammer it is directed along the trunk, then a piece of bark is broken off.
This the operation must be carried out carefully, because if the chisel touches not only soft bast or cambium, but also hard sapwood, then it will be quite difficult to eliminate damage to the wood.
Removal of affected areas
If there are strongly rotten areas on the stump that spoil the appearance of the material, then they are removed in various ways. Surface defects, as well as the remains of the bark, removed with a manual metal brush. It will not harm healthy wood, but it will quickly clean off dust and rot.
If the lesion has penetrated deeply, then its contours are outlined with a pencil or marker. Subsequent actions depend on the structure of the stump and the location of the damaged area.
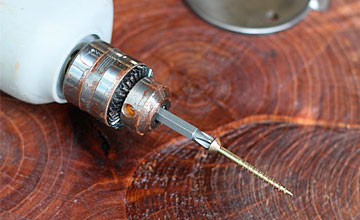
If the material inside is empty(the core is rotten), then this area cut out with a jigsaw(wall thickness 2–4 cm) or chainsaw (wall thickness ≤4 cm). On a stump with a whole core, the contour is cut with an electric jigsaw, then carefully, in small pieces, break out the defective wood with a chisel.
If the depth of the lesion is greater than the saw blade of the jigsaw, then the rest of the affected material is removed with a chisel, first deepening the contour line with it, then removing it with strips 1–2 mm thick. You can not immediately use the chisel, because it is likely to go beyond the contour and damage healthy wood.
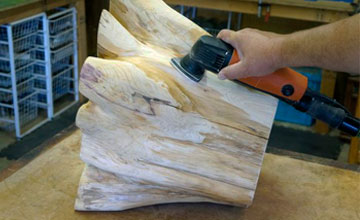 You can also remove the affected material using a metal brush mounted on a drill or grinder (angle grinder, angle grinder) with soft start and speed control.
The advantage of this method is that after it there are no clear edges, and the treated surface looks natural.
When using this tool be sure to use a respirator and goggles because the brush creates a lot of dust.
Surface leveling
This operation is performed if necessary. align protruding parts, for example, mounds or branches. Large irregularities, such branches or roots, are first cut off with a hacksaw or chainsaw, then the surface is leveled sharpened planer.
When leveling unevenness caused by wood wear, you need to move the planer only from top to bottom, otherwise there is a high probability of scoring, which is quite difficult to remove.
When leveling irregularities left after removal of branches or knots, care must be taken to move the planer from the edge to the center of the irregularity.
Another way to level the surface - cutting off excess wood with an ax. It is used only to level the destroyed wood. Optimal results are obtained by striking with a blade directed to the wood at an angle of 10-25 degrees in relation to the direction of the fibers.
In this case, the sharpened blade accurately cuts off the layer of wood and immediately forms a relatively flat surface directed along the grain.
 Small irregularities can be removed with a grinder with coarse sandpaper.
The grinder can be moved in any direction, this will not lead to scuffing, however, when working with it, avoid sudden movements or strong pressure.
This can lead to holes, because sandpaper, moving at a fairly high speed, quickly grinds even healthy wood.
The same method is also used to level the surface remaining after the removal of knots and branches, if the planer gives constant scuffing. You can also use an electric planer, it does not give scuffing, regardless of the direction of movement.
If it is necessary to cut off the roots, then the stump with the roots is placed on the deck, then they are beaten from above with an ax. And the direction of impact depends on the thickness root. Thin roots (1–3 cm) are cut at a right angle; when cutting thicker roots (4–6 cm), the blade is tilted at an angle of 45–75 degrees.
If the root is thicker, then it is necessary either periodically (every 3-6 strokes) to change the direction of the ax tilt at the same angle, or cut them off with a chainsaw.
Chopping off thick roots is permissible only in two cases, that is, when the remainder of the root:
- can be leveled with a grinder (it’s easier to immediately cut off evenly with a chainsaw);
- will be invisible on the finished craft.
slicing
The meaning of this operation is to cut off one or more layers from the stump, which can then be used in various ways.
 In addition, a stump with a straight cut top or bottom can be used as a beautiful decorative stand, such as a dining or coffee table.
Such a stand will look especially impressive with a tabletop made of transparent plexiglass (plexiglas).
For cutting, the stump is fixed so that the line passing inside the trunk from the roots to the top is strictly perpendicular to the floor surface.
Then mark the cut line with a felt-tip pen, marker or spray paint. You can also use a plywood guide. To do this, take a piece of flat plywood 10 mm thick and cut a hole in it according to the size of the stump.
After the guide is put on the stump and fastened on the reverse side with furniture corners using self-tapping screws. When the guide is set, a chainsaw tire is moved along it.
Thanks to the large width, the guide prevents the chainsaw bar from deflecting and a clean cut is obtained. If the length of the tire is less than the diameter of the stump, then first cut through on one side, then on the other.
It is best to level the cut surface with an electric jointer- This tool is long enough to form a flat plane and does not scorch, regardless of the direction of travel.
You should not use a conventional or electric planer for this work, the first one cuts poorly across the fibers, and the second does not have the desired length and cannot form a flat plane.
Sawing
 If the need arises cut a piece of healthy wood stump or root, then they are cut with a small chainsaw.
Unfortunately, a chainsaw can only make rectangular cuts or cut out pieces of walls in stumps with a rotten core.
If you need to make a recess of a complex shape, you can remove the bulk of the material with a chainsaw, and fix the rest with a knife and a chisel.
It takes less time than a full cut, but requires great skill with a chainsaw.
Chiselling and cutting
The only difference between chiselling and carving is that when chiselling, part of the impact with a chisel (a chisel with a reinforced handle designed for hitting with a hammer or mallet) falls across the fibers.
The result of such an impact (cutting) is the separation of the fibers, so that their cutting to the point of separation does not lead to the appearance of scuffs after the cut.
Unlike a chainsaw, chisel can create patterns of complex shape, and a chisel or knife can not only remove a layer of wood parallel to the direction of the fibers, but also make various ones, including figured recesses.
grinding
This operation is used to make the surface of the wood as smooth as possible. for grinding can't use grinder, because any inaccurate movement can lead to the appearance of a recess in the hemp, which will spoil the appearance of crafts from it.
 That's why grind the material only by hand, using sandpaper for this different sizes, first the largest, then gradually move to the smallest.
If during the grinding process it is not possible to completely remove the pile, then the surface of the wood should be slightly moistened.
Thanks to this, the villi will rise, then move the sandpaper alternately from bottom to top (in the direction of the fibers), then across. You can switch to finer sandpaper only after completely removing the pile.
After every change of sanding paper it is desirable to blow the surface with air flow from the compressor or a vacuum cleaner and, placing it in a brightly lit place, inspect from all sides, periodically turning the craft. This will help to detect sanding defects that will reflect light differently.
How to connect different parts together?
Separate parts, which can be whole stumps, individual roots or even cut pieces of wood, connect using:
- castles;
- glue and dowels;
- threaded bushings and screws;
- studs with nuts;
- furniture corners;
- screws and nails.
Lock
Locks suitable for connecting rectangular or hidden parts. The type of lock is selected based on the configuration and dimensions of the parts to be connected.
It should be noted that quite serious carpentry and carpentry skills are required for such work.
In addition, the locks only hold the parts when exposed in certain directions, so they it is desirable to additionally fix in any way.
Glue and dowel
Glue and dowels used to connect flat adjacent surfaces. The smoother the surfaces, the stronger the connection will be, therefore, before gluing the plane, it is advisable to process it with a manual or electric planer.
 For gluing wood use the following types of glue:
- casein;
- acrylic;
- thermo;
- polyurethane;
- epoxy;
- carpentry;
- bituminous;
- nitrocellulose.
When working with any adhesive, it is necessary to strictly follow the instructions for use, which can be found in a container with it or a packaging box. If the dowel is placed outside, then a hole for it is drilled immediately after the parts to be glued are joined together, then a tightly fitting dowel is driven into it.
If the dowel is installed inside, then first, coordinated holes are drilled and the parts are assembled on the dowel without glue, then all the parts are smeared with glue and connected to each other. Nagel can be made from any suitable piece of wood by cutting it with a knife.
Threaded bushings and screws
Threaded bushings are used in cases where it is necessary to firmly attach parts that cannot be glued.
To do this, a hole is drilled under the bushing, the diameter of which is necessary for threading, then carefully, without warping, the bushing is screwed into this hole.
To make the connection more reliable, the hole and the external thread of the bushing are lubricated with PVA glue. After that, a hole is drilled for a bolt, screw or stud and the parts are connected to each other.
Studs with nuts
“This is the easiest way to connect several parts together. To do this, all the parts are put in place, then a through hole is drilled through each of them, a stud is inserted into it and fixed with nuts.
 This type of connection does not prevent parts from rotating around the axis of the stud.
Therefore, it is used where such rotation is permissible or is prevented in any way possible.
Instead of one of the nuts, you can use a threaded sleeve, thanks to this, the stud will protrude from the interconnected parts only on one side.
Furniture corners
With furniture corners connect parts to flat surfaces located at an angle of 90 degrees to each other. Theoretically, it is possible to cut areas for corners in parts that are at different angles or do not have flat surfaces.
The corners are fixed with self-tapping screws, pre-drilling a hole with a diameter of 1–2 mm under them. A single corner will not provide reliable fastening, however, by installing at least 3 corners, they create a fairly strong fixation, comparable to high-quality gluing. At the same time, the connection with the help of nuts and bolts will still be noticeably more reliable.
Therefore, the only advantage of the corners is that they are installed in places hidden from view, so they do not spoil the appearance of the craft.
If, instead of a furniture corner, you use a steel corner with a shelf size of 30–50 mm, and also fasten it with several self-tapping screws in increments of 2–3 cm, then even with a length of 10 cm, such a corner will provide a very reliable fixation.
The only downside to this mount is that that excess load on the parts leads to the tearing of self-tapping screws from wood, after which the corner can no longer perform its function, and it must be transferred to an undamaged area of \u200b\u200bthe parts.
Self-tapping screws and nails
 In most cases, the use of screws and nails does not cause difficulties or problems.
If they need to attach a part of small width and thickness, then it is necessary to drill a hole in it according to the diameter of a nail or self-tapping screw.
Shouldn't be used this method of fastening in cases where when the nail or the self-tapping screw will not enter across, but along, because this way the wood will not be able to effectively hold them.
If the parts need to be connected in this way, then it is better to use a bolt or screw and a threaded bushing.
Staining
Stains do not paint wood, but change its color from the inside., because of which, even after fine grinding, stained wood retains its color. Most stains come in the form of water or alcohol solutions, which are sold in hardware or hardware stores.
The color of stain and stained wood does not always match, in addition, it depends on the breed, so you need to carefully read the instructions for the preparation.
Mordants water based safe, so goggles and rubber gloves are enough to work with them, and they can be used in rooms with natural ventilation. You can work with alcohol stains only in the air or in rooms with forced ventilation.
Painting and varnishing
Unlike morbidity painting does not change the color of the wood, but creates a thin film of a certain color on its surface. Any type of paint can be used to paint wood. Water-based paints should be used with caution, as they can lift the pile and spoil the appearance of the finished hemp product.
 It is necessary to work with paints based on organic solvents either outdoors or in a room with good forced ventilation.
wood can be coated with any varnish, which not only give the surface a glossy effect, but also reduce the ability of wood to absorb water.
Thanks to this, she suffers less from rot and harmful bacteria.
What can be made from tree stumps and snags?
Here is a short list of what can be done from the above and below ground parts of the stump:
- flower beds;
- stands for flowers in pots;
- stools;
- decorative armchairs;
- coffee tables;
- decorative lamps;
- candlesticks;
- figures of goblin, brownies, animals or various monsters;
- decorative ornaments.
We prepared a selection crafts from stumps and driftwood, as well as a brief description of each such product for home and garden.
Armchair
To make a chair large stumps are suitable, the diameter of the upper part of which exceeds 70 cm. In this case, you get a classic chair with armrests and a back.
To increase the comfort of the seat, armrests/backrest can be covered with foam and cover with leatherette, so that they become softer.
If the stump is of a smaller diameter, then the armrests / back of the manufactured furniture can be made from roots that are attached to the wood in various ways.
Bench on wheels
Such a bench is useful in the country, and for its manufacture you will need the above-ground part of the stump and furniture wheels. Using a chainsaw, the stump is cut so that the upper and lower cuts are parallel to each other and perpendicular to the center line.
 Then both surfaces leveled with an electric planer and grinder.
To remove the bark or not, you will have to decide on the spot, it depends on the appearance of the material. Cleaned wood can be decorated in any suitable way.
If on the top of such a bench put foam rubber and beautifully cover with leatherette, you get a soft comfortable ottoman, which is not a shame to offer guests.
A coffee table can be made in the same way, however, you will need a stump with a large difference in the circumferences of the above-ground and underground parts. In this case, the underground part, located above the lateral roots, will be the top, and the wheels must be attached to the upper cut.
decorative table
The main problem that arises in the manufacture of tables from stumps is related to the search for material for the tabletop. After all, it is quite difficult to find a stump with an upper part diameter of 80 cm or more, and then make an even cut of the required thickness from it. That's why countertops are often made from other materials, such as:
- board (shield of boards);
Opaque materials can be fixed with countersunk nails or furniture corners, however, for fixing plexiglass, it is advisable to use adhesives based on suitable solvents (toluene, dichloroethane, ether, etc., depending on the type of plexiglass).
Epoxy-based adhesives and suitable degreasers can be used to fix the glass top. You can also first make an epoxy cap, then level it until it is flat and glue it with special glue for glass.
Flower bed for the garden
A flower garden can be made from a stump uprooted or sticking out in the ground. The disadvantage of the material in the ground is that it is more difficult to process due to the fact that you have to bend down a lot, and in order to cut out drawings on it, sometimes you have to lie down on the ground.

The uprooted material is lifted to the workbench, where it is much easier to work with it. Large stumps (30–40 cm diameter at the top) serve as a decor in the country as a flower garden for 5-15 years depending on weather conditions and other factors.
If, however, a drainage hole is drilled in the stump and the plants are planted not in wood, but in a pot, which is then placed in a prepared recess, and the stump itself is treated with hydrophobic / aseptic materials and varnished, then its service life will be tens of years.
Decorative lamps
For a lamp, the underground part of the stump is best suited, from which it is necessary to remove excess roots. If you put such a stump on the roots, and fix a lamp with a lampshade on the upper part, you get stylish table lamp.
If you turn the stump upside down and install a lamp between them, you get an equally stylish lamp that casts unusual shadows.
His Can be placed on a table or wall mounted(for this you will have to make a plane adjacent to the wall).
Painted garden furniture
For the manufacture of such furniture can be used how logs(a tree trunk sawn into pieces), and various parts of the stump, including deep roots. Wood is cleaned before painting from dirt, bark and damage, then impregnated with antiseptics and dried, after which they are painted with any paints.
Bottle rack
 Bottle rack It will be appropriate to look not only in a country house, but also in the kitchen or in the living room.
Obviously, the larger the stump, the more storage space for bottles can be made from it.
Desirable clean the wood from bark and any damage The more unusual the shape of the stand, the more attention it will attract.
If the surface of the stump sand, sand and varnish, you get a very stylish product that harmoniously fits into the interior.
birdhouse
Such birdhouse will be appropriate not only in the garden, but also in the residential area of a country or country house. From spring to autumn, birds nesting in it will delight with their singing.
For the manufacture of it is advisable to use healthy wood. In the stump, the inner space is first hollowed out, then a bird hole is drilled. The roof can be made from bark or other materials.
Candlestick
Few things are better for creating an atmosphere of mystery and romance than upside-down candlestick stump.
It will need to remove all the bark from it, as well as sand thoroughly, coat with stain and flame retardants, that is, substances that reduce the combustibility of wood.
Then the candlestick is varnished and equipped with a reliable stand.
House made of stumps and clay
Stumps, like wood logs, are a good material for building houses, because wood has low thermal conductivity, so the house will be warm, and also passes steam well, so that the rooms will always have the same humidity.

Due to the rather large distance between adjacent wooden elements, a house made of stumps and clay very resistant to fire, so it will not catch fire from a short circuit or a cigarette that has fallen on the floor. For such construction, it is better to use stumps with a minimum difference in the diameters of the upper and lower parts.
Toy house made of rotten material
Such a house will be a wonderful decoration not only for a garden or vegetable garden, but even for a living room or a children's room.
Rot eats away the stump from the inside unevenly, therefore after removal of the affected areas, the material takes on rather bizarre shapes and you can pick up a stump from which you get a beautiful and unusual toy house.
The main conditions are:
- complete removal of damaged wood;
- high-quality drying of the stump;
- antiseptic treatment.
 Stump after wood processing it is desirable to cover with furniture or parquet varnish, because they create a waterproof film and do not emit toxic substances.
The roof can be made from earth sown with grass, so the house will take on some resemblance to the hobbit hole shown in various films.
A small house can also be made from an intact stump without cracks and dust. The roof is often made from bark, and windows and doors are made from various children's toy sets.
Other application
Uprooted stumps are made from the same wood as tree trunks, so can be made from them:
- firewood, including for (due to the higher content of juices and resins, such firewood gives food a stronger flavor and aroma);
- chips for;
- for various purposes;
Conclusion
Stumps uprooted from the ground are a good material for making various crafts. The creation of most of them does not require a high qualification of a carpenter, joiner or woodcarver, but enough knowledge gained at school in labor lessons.
Now you know how to process any stump and make a table, a lamp or any other beautiful product out of it that attracts the attention of neighbors and acquaintances.
In contact with