Welt carving (openwork) and stencils. Wood carving for beginners: the secrets of craftsmanship from experienced craftsmen
Of all the types of carving, the relief technique is one of the most expressive. Realistic wooden bas-reliefs, with accurate detailing, spectacular play of shadows and well-constructed composition, can truly fascinate. Relief technique can be regarded as a transitional stage to sculptural carving, rightfully considered the crowning achievement of carved art.
In this material, we will talk about the basic principles of embossed woodcarving. Our advice will be useful not only for beginner carvers, but also for masters who have already tried their hand at this technique. On the example of the proposed project, you will get acquainted with the basic principles of clean and accurate cutting, learn how to correctly model the volume, master professional secrets that will help emphasize the three-dimensional qualities of the carved composition.
What is the difference between relief carving and other techniques?
Relief technique is distinguished from flat-relief, contour, geometric and other types of non-volumetric carving, first of all, by its emphasized three-dimensional character. The main composition here comes to the fore due to the cropped background, due to which the image becomes more expressive, with a characteristic abundance of chiaroscuro.
If the main drawing of the composition rises only slightly, no more than half of the thickness of the entire product, then such a thread is called bas-relief (and the product itself is a bas-relief). With a higher and protruding relief, the carving is called high relief.
Beginner's Toolkit
To learn wood carving, it is not at all necessary to acquire an arsenal of chisels, knives and other cutters, as many tend to think. To master the basic skills of relief technique, several corner chisels (geimus) will be enough, for example, 10 mm and 6 mm, straight chisel 12 mm, radius (semicircular) 10 mm, scoring knife and a small engraver. Other types of chisels for woodcarving are appropriate to acquire as the carving skill grows.

Always keep your tool sharp. If the cutter leaves a rough mark and chips the wood in small chips, instead of easily peeling off neat layers, this is a sure sign that the chisel needs to be sharpened. A blunt tool spoils the quality of work, requires a lot of effort when carving, and does not allow a novice carver to “feel” the chisel correctly.
What wood to choose for relief carving?
The right choice of wood is the key to success for the master, mastering the intricacies of this technique. Almost all soft hardwoods are optimal for the needs of carvers: aspen, alder, birch, walnut, etc. But the main wood for most craftsmen, who are engaged not only in volumetric, but also in flat, flat, geometric and other types of woodcarving, is linden.

Linden is a soft and light wood with a uniform density, due to which it is particularly well processed: it is easy to cut, sharpen and plan in all directions. Linden almost does not warp and does not dry out, does not emit tannins, therefore it is considered an ideal raw material, including for the manufacture of dishes. The disadvantage of linden is its poor coloring in other colors.
Development of relief carving skills on the example of the project "Fox"
We will tell you step by step how to make a bas-relief carving on a tree using the example of a simple Fox project. As a blank, we recommend using a saw cut of linden or an ordinary board from any other soft hardwood.

To transfer a drawing to a wooden base, carbon paper is used as the simplest and most effective solution. If necessary, the lines of carbon paper can be easily erased, making the necessary changes as you go. To prevent the pattern from shifting during the transfer process, fix the wooden blank or place a rubber backing under it. Think about where to place the image in order to make the composition look more lively and interesting. In our case, we will shift it from the center to the bottom (photo 1).

To cut the outer contour, use a corner chisel #12 (blade width 10 mm/injection 60°). It will allow not only to make a neat outline of the main figure, but also immediately remove a significant part of the background (photo 2).

Technique for cutting with a corner chisel:
- Hold the tool tightly with your left hand, and push it forward with your right hand; the correct grip of the chisel will allow you to accurately guide the cutter, keep a neat cut line and prevent the blade from slipping off the contour.
- Mark the main contour of the lines with a cutter, then cut them to the desired depth (in our case 4-5 mm). By cutting the wood a little at a time, you will have better control over the carving process and reduce the risk of chipping.
- Overcoming the resistance of the wood, evenly distribute the pressure on the chisel, achieving a smooth and uniform surface.
- When working with a chisel, consider the direction of the wood fibers, because. the incisor always tends to move along solid annual rings.
- Under no circumstances point the chisel in your direction: cut away from you or hold the tool parallel to your chest.
- Work with the chisel right behind the pencil lines, leaving them visible.
The essence of embossed woodcarving lies in the correct and accurate removal of the background. Mastering this skill is a responsible task for a novice carver. Radius chisels (semicircular or sloping) help to remove a lot of background with minimal effort. In our case, we will leave the background of the composition in the form of wide decorative grooves (photo 3). If necessary, it can be made even using a flat chisel.

Having formed the background, we will return to the corner chisel and once again “finish” we will walk along the contour of the main composition (photo 4). After we trim the background (photo 5).

Corner chisels are optimal as a tool for fine contouring #15 (blade width 6 mm/injection 45°) or #16 (blade width 6 mm/injection 35°).
Outline the fox's eye, keeping the pencil outline (Pic 6). Go down and work on the mouth: carefully select the background around the teeth and inside the mouth (photo 7). Be guided by the volume and laws of perspective in the composition: since the front teeth are in the foreground, they should be slightly overestimated. Work on the nose area.

To work out the shape of the head, use a radius (sloping) chisel with a width 10 mm. Start with the ears: make the left ear in the foreground taller (Pic 8).

Round the shape of the head (Pic 9), making a smooth transition to the muzzle, which should remain flatter and without pronounced volume (Pic 10).

When working on specific areas, do not forget to periodically evaluate the overall composition: how well the volume flows, how the perspective is worked out, etc. Here, every detail is interconnected with each other. Relief carving should be perceived as an integral composition, and not a collage from a set of carved elements.
To work on this element, use a cerasik - a deep semicircular chisel with a width 5 mm(photo 11). This narrow tool is well suited for working out small elements and creating sheet relief.

Make a neat trim around the entire perimeter of the sheet so that it stands out well from the overall composition and, as it were, is torn off from the background (photo 12). Having outlined the main contour and selected the background around the sheet, proceed to cut out the veins (photo 13). When you have finished shaping the relief, cut off all the remaining flat places with a engraver (photo 14).
Create a deep shadow above the eye with a scoring knife, line the lower eyelid with the chisel, and give the eye a roundness (Pic 15).

Finish with a cutter the study of small elements of the mouth (photo 16).

Imitating the texture of wool is an important skill that every carver needs to work out, because in the future you will repeatedly encounter the carving of various animals. In the presented project, fox fur is created according to the simplest scheme: cerazik 5 mm short and shallow strokes are made (arrows indicate the direction of natural growth of the animal's hair) (photo 17).

For greater naturalism, you can work out the texture of the wool with a thin steel cutter - a chisel. Work on the texture until there is not a single flat spot left.
How to clean wood carving?
With careful work, the sharpest cutters almost always remain rough spots and minor defects that need to be eliminated. For cleaning recessed places and trimming small chips, use a small engraver. Volumetric surfaces are cleaned sandpaper P150. To finally make sure that there are no unnoticed minor defects, wipe the picture with a rag soaked in white spirit, and carefully examine it again from different angles. When all the flaws are cleaned, you can start finishing.
How to cover wood carving?
For a monochromatic finish, the following compositions are used:
wood stain . In flat-relief carving, they are used not only to give the wood a more noble appearance. With the help of stains, they enhance the contrast of certain areas, they, in turn, emphasize the relief and volume of the composition. To achieve this effect, it is enough to apply stain to deep sections of the thread, which should appear shaded.
If you decide to completely tint your work, you need to use the stain carefully, taking into account the type of wood and the features of the workpiece on which the composition is carved. Under the influence of moisture, small-relief carvings can swell, warp, raised pile and other defects can form on it, which will irreparably spoil the appearance of the work. A common flaw in the staining of threads is the heterogeneity of tone, which is especially often manifested in the places where the bars are glued together.
The presented wood carving lessons will introduce beginners to this craft so that you can create objects from natural material with your own hands.
The history of the craft and types
Wood carving is a type of arts and crafts that originated in antiquity. In Russia, woodcarving was called carving, and the drawing performed in this technique was called a sign, a pattern, or a pattern. In this technique, masters made braids, teeth, grooves, poppy seeds, fungi, etc. on a flat surface. You can see such samples in the Assumption Cathedral by visiting the royal place.
Russia owes the development of woodcarving to the monk Ambrose, a novice of the Trinity-Sergius Lavra, who at the end of the 15th century combined Russian ornament with Western and Eastern in his works.
In 1660, the masters decorated the royal dining room with German carvings, which were figured, with Gothic motifs. This is how German elements appeared in Russian carving, including new tools and terms.
Thread types are conditionally divided into:
- through;
- deaf;
- brownie;
- sculptural;
- chainsaw thread.

Here's how they differ:
- The through thread is subdivided into consignment note and through thread. This includes slotted carving, when through sections are cut with chisels and chisels; and profile carving, where such sections are cut with a jigsaw or saw. If these types of carving are performed using a relief ornament, then this is called openwork.
- If there is not a single through hole in the processed tree, such a thread is called blind.
- Facades of buildings are decorated with house carvings.
- Sculptural - one of the most complex types of carving, requires great skill. In this technique, figures of animals, sculptures of people are made.
- With the help of carving with a chainsaw, global work is performed. This requires strength, therefore it is more suitable for men, while women also successfully master other types of carving.
Woodworking tool, cutting blanks
Beginners can use only 2 tools - a well-honed penknife and a joint knife.
When you learn how to perform simple elements with them, you want to improve, then you can buy wood tools, for example, such a set.

There may be even more tools, but only professional carvers who perform complex work need such a number.

See what types of recesses you can make with semi-circular cutters of different sizes, sharp-angled.

But what set of tools should a cabinetmaker have in order to perform the following types of woodwork:
- carving;
- sawing off;
- splitting and trimming;
- planing;
- turning;
- chiselling.

- Pay attention to the cutters that are used for manual turning of wood. In addition to the semicircular, there is also a flat oblique, angular, detachable, beveled, angular, etc.
- Saws are used to saw off the workpiece. They can be transverse, longitudinal, universal. The teeth of the rip saws are chisel-shaped; in the transverse they are triangular, sharp. Universal are equipped with teeth having a right angle. Such a tool can cut fibers both along and across and at an angle. Each of these saws can be hacksaws, simple, one-handed.
- If the workpiece is made from a ridge, beam or trunk, then axes or cleavers are used. Adze - a kind of ax, the blade here is located perpendicular to the handle, used to create figured and concave products.
- To remove chips from the workpiece, turning or hand tools are used, planers can be used.

The most popular carving tools are chisels. They usually consist of:
- steel rods;
- cutting blades;
- shank.
- Wide and straight are used for cutting or stripping flat or convex workpieces.
- With round blades - for working with horn knots or hardwood.
- With the help of narrow workpieces are processed in narrow places.
- A chisel with a thick steel rod is used to clean a deep cavity or workpiece with a hollow. Deepen the chisel into the wood with a mallet.
- Cranberries make gutters of various depths and radii.
- Corner chisels make grooves and triangular recesses.
Wood carving: sketches and master classes
After you have learned a lot of useful things, got the necessary, let's try to cut a flower. To make it, you need the following:
- flat wooden blank;
- pencil;
- transparent paper;
- v-shaped chisel-corner;
- narrow and wide semicircular chisels.
If you don't already have a v-shaped chisel, you can use a sharp knife for this pattern.
Attach a sheet of paper to the screen, redraw the diagram.

Then transfer it to a wooden blank. Start by cutting along the outline of the center circle, then cut towards the center from the outer circle using a large semi-circular chisel.

Mark up the flower petals.

Using a v-shaped chisel, cut the petals along the outline.

With the same tool, remove the excess wood between the petals (“triangles”).

Take the next woodworking tool in your hand - a semicircular chisel to cut out the outer contour of the petal. In doing so, it will become similar to the upper part of the heart.

With a large semi-circular chisel, make cuts inside the contour of the petal.

With a small semicircular chisel, make two cuts on this contour from the center of the flower.

To increase the cut area, just cut again.

Unfold the chisel and round the center of the flower.

Now you need to take the next carving tool - a v-shaped chisel and make such cuts in the center of the flower.

Everything, you can admire the result of the work.

If you want to carve a fox, the following sketches will come in handy.

If you want to make butterflies, wood carving sketches are also included.

If you want to make a mold for printed cookies with the image of the Snow Maiden, then prepare:
- beech plank;
- ruler;
- jigsaw;
- simple pencil;
- ruler;
- sandpaper;
- eraser;
- linseed oil.
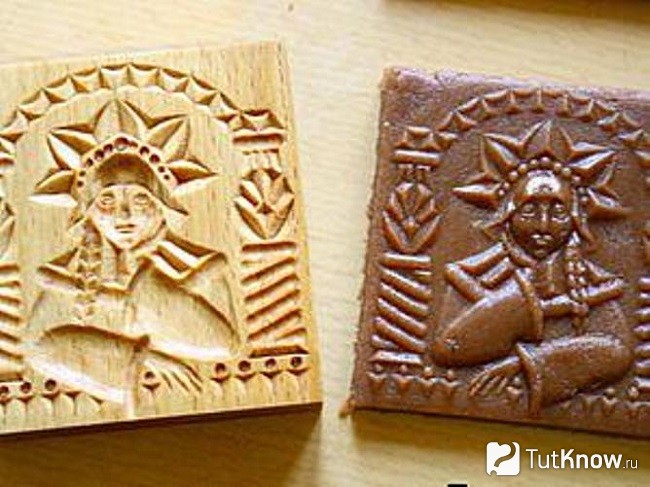
Draw a rectangle on the board. Drink it up.

If you do not have an electric jigsaw, then you can cut the workpiece with a saw or an ordinary manual jigsaw.
Make the surface of the cuts even with sandpaper. If the farm has a grinder, use it for this procedure. Transfer the drawing to the workpiece using a simple pencil.

With the help of a semicircular chisel, we make a recess in place of the face, then we again apply its contours here.

The ongoing wood carving sketches will help you carve out the facial features correctly. At this stage, we also make a cape on the head of the Snow Maiden. Note that it is at a level above the face.

Based on the sketch, cut out other elements of the workpiece.

Now you need to erase the pencil with an eraser-rubber, then with the finest sandpaper. If you immediately do this with sandpaper, then part of the stylus will rub into the tree.
Pour linseed oil into a container, dip our wooden mold into it for an hour. If you are doing a lot of work, then saturate it with oil using a swab or squirrel brush and leave to dry for 3-4 days.

Everything, you can roll out the dough, cut it into rectangles, apply a pattern using a wooden blank and bake.

To prevent the cookies from burning in some places, you need to cut a stamp out of wood so that there are no too prominent elements on it.
How to cut a sign for a bath?
For her, take:
- a board (in this case, a coniferous wood step was used);
- triangular ruler;
- simple pencil;
- saw;
- furniture varnish in a can;
- stain;
- brush;
- sandpaper.

To draw letters, download the letters you like from the Internet, then redraw them on wood. You can use this sample.
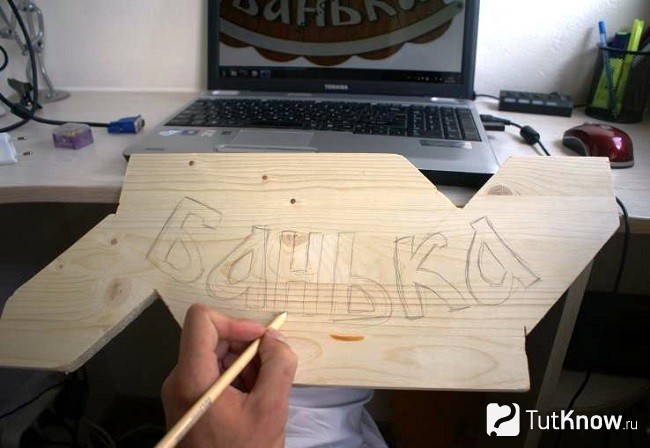
Draw oak leaves on the right and left on the plate.

Next, the carving begins. For beginners, such tasks are great, because they do not require long training and a lot of tools. Here, 3 types of cutters were used: a joint-cutter and chisels "Tatyanka". Make cuts according to the pattern with a chisel cutter along the outlined contours, cut it under the contour with a chisel to highlight the pattern above the background.

Next, the carved surface is sanded with sandpaper No. 180 and No. 220. Draw clouds at the top and bottom of the plate, cut them out with a chisel and a chisel, and then sand them.

It remains to cover the product with stain. For this plate, it was applied in 1 layer, and when it dried, the recesses were painted a second time. After that, you need to go through the letters with sandpaper to give the effect of a three-dimensional image.
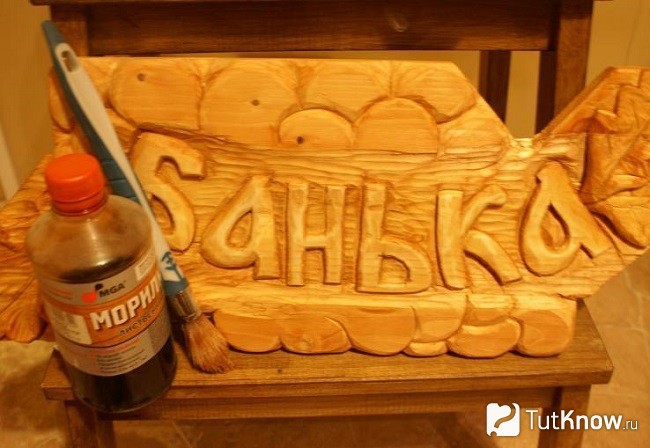
After coating with varnish from a spray can, you need to let it dry for 12 hours and you can hang the sign in place.

How to turn soap into beautiful flowers with your own hands?
You can cut not only on wood, but also using soap. This is a softer material and at first you can “stuff” your hand on it.

This soap will be a nice present for friends. After all, manual work is highly valued. In order to make a rose out of soap, you will need a little, namely:
- a piece of soap;
- cutter;
- tassel.

Then you need to cut out the second and subsequent petals. At the same time, move from left to right in a circle.

This is what the job should look like after you make the first circle.

Perform the second and subsequent ones in a checkerboard pattern in relation to the previous ones.

Here's how to decorate soap with your own hands by combining carving and woodcarving.
In conclusion, 3 plots are offered to you. From the first one you will learn in detail about wood carving, about tools for beginners.
After viewing the second, you will be able to carve a spoon with a beautiful carved handle.
From the third, you will learn how to carve a charming rose from wood.
The art of wood carving. How long ago did it occur? Nobody will say now. Since ancient times, wood has been the closest material to the worldview for a person. It often seems that, they say, this knot needs to be slightly corrected, the excess removed, and it will become a work of art. But no, in fact, woodcarving is a painstaking professional job. Skillfully, you can make a masterpiece!
- First, desire creativity and good mood.
- Second, the material. In principle, you can cut on any kind of wood. But it is easiest to work with birch, linden, aspen, pine, spruce and cherry. The tree must be well dried. In addition, wood needs paper for sketches, a template for smooth transitions of lines, a ruler, a compass, a triangle and a pencil.
- Third, tools. In general, a large set of tools is used for cutting. But for a beginner carver, a jigsaw, an awl and a knife will suffice.
- Fourth, workplace. Before picking up a cutter, be sure to create a workplace for yourself. For this, you will need a table or bench. They must be stable and durable. But it's better to make a workbench. It is more convenient and reliable.
- Fifth, you need to create sketches for woodcarving.
Let's get acquainted with the main types of carving. We note 2 commonly encountered species: sculpture and relief.
- Sculpture - these are free-standing works and plots. Usually these are people, animals and abstract forms.
- With relief wood carving, images are made on the surface (background). For example, a bird soaring against the backdrop of a mountain landscape.
To get started, we need sketches. Where can you get them? This is your fantasy! Whatever you think of and put on the tree. But, if fantasy is tight, then you can find ready-made sketches on the Internet. The main thing is to start with simple sketches for stencils.
Found a sketch for woodcarving. You need to turn it into a stencil. What is a stencil? This is the transfer of a drawing to paper. The paper must be strong. It can be tracing paper or carbon paper. With the help of them, we simply transfer the drawing to the surface. Or create a stencil out of cardboard. After that, we attach it to the tree and outline the outline.
And if you use geometric carving, then you can simply draw a pattern on a blank. First of all, you need to select areas for yourself and determine which of them will be convex and which will be concave. Only in this case will the correct drawing on the tree be obtained. By the way, this is the easiest type of carving. It is great for making boxes, boards, frames.
Gallery: stencil woodcarving (25 photos)


Stencils for contour carving
 It is also easy contour thread. Here, the main thing is the ability to correctly cut grooves of the same thickness and depth. Why do we use a variety of chisels. After cutting the canvas in this style, usually the inside of the grooves is tinted. Then the sketch is perfectly visible and looks very picturesque. . The advantage of this type sawing is the ability to take virtually any stencil and transfer to a blank. But there are many ready-made templates for those who want to try themselves just in this form of cutting. Animals, plants and landscapes look very good in this technique.
Geometric patterns for woodcarving
The simplest patterns are geometric shapes, floral ornaments (leaves, twigs), butterflies. They are often used in the manufacture of carved platbands for windows. In ancient times, it was believed that platbands protect the house from evil spirits. Therefore, they were often decorated with patterns in the form of laurel leaves, oak, lotus flowers and lilies. They also used Celtic (Scandinavian) braid. This is a braid pattern., various weaves.
Stencils for planar technology
And with the help of planar technology, you can create interesting figures of various animals. For example, put a wooden bear or a swimming swan in your garden. You can make fairy-tale heroes - formidable dragon or Serpent Gorynych. Or scare guests with masks of some mythical characters. By the way, the masks are made in three-dimensional technique. This carving requires skill and skill. Their sizes are different: from 25 to 50 cm in length. You can come up with sketches for mask stencils yourself or take ancient Slavic heroes from books, for example.
Stencils in Flat Relief Cut Styles
 Here the process will not be easy.. Here you need to make a deep background, it is located, as it were, under the relief. The relief itself, as a rule, collapses. Transitions are created smooth with a file or emery. We make the background even or leave it slightly textured. In order for the artistic carving to come out truly luxurious, we also cannot do without a stencil.
The ability to cut wood allows you to create many things that are amazing in beauty and inner energy. Developing technique and constantly learning, you can make real masterpieces of art. For example, you can start cutting out icons and paintings. This is a very painstaking and exciting task. Such canvases are quite expensive.
And having imagination, you can make original gifts to your relatives and friends. For example, a wooden medallion engraved or carved clock. The latter can be both wall-mounted and floor-mounted.
So wood carving can be not only an exciting but also a profitable hobby. The main thing is to have imagination, creativity and put your soul into the work. Then the products will not only delight you and your friends, but also protect you from negativity.
Volumetric, contour and geometric wood carving are one of the most ancient methods of decorating a wide variety of products. By and large, nothing is needed for work, except for a wooden blank and a fairly sharp knife: with proper skill, a carved casing, a beautiful toy, or any other product can be obtained.
Of course, you will get masterpieces only after many years of practice. But you can start mastering carving from the simplest details: just study this article and understand the basics.
Thread types

Despite the fact that the simplest tools are used in working with a tree, and the processing techniques are not difficult, the result can be very different. Depending on the appearance of the treated surface, the following types of threads are distinguished:

- contour thread- perhaps the simplest (outwardly, not in terms of execution technique). The pattern is applied to a flat surface with shallow lines, forming the contours of the pattern.
- Geometric carving- the most common due to ease of development. Unlike contour, patterns are formed not by lines, but by a combination of geometric shapes, most often wedge-shaped recesses.

- Flat serrated thread - the technology of applying an ornament or pattern on a flat board. At the same time, recesses are cut out on a flat background, which form the pattern we need.

A variation of this technique is also considered a through thread, in which not only recesses, but also holes are formed in the workpiece.
- sculptural carving(volumetric) - the most difficult technique. A chock, branch or root is taken as a blank, after which the part is given the desired shape. Here it is important not only the skill of the carver, but also how competently the wood is selected.

Of course, this classification is very arbitrary, but it gives an idea of where you can strive to improve your skills.
What do you need to work?
Carver's tools
To make wooden toys, carved frames, architraves and other decorative objects, the craftsman needs the right tools. In addition to the usual carpentry (saw, drill, file), you need to use special tools:
| Illustration | Tool | Purpose |
 |
joint knife | A versatile tool that is used for both geometric woodcarving and sculptural work. |
 |
Chisels | The most extensive group of tools used to form recesses. Depending on the shape of the edge, the following varieties are distinguished:
|
 |
Cranberries | Special chisels with a curved working part. With their help, a relief carving with a strong deepening is performed. |
 |
Spoon cutters | As the name suggests, special tools for making wooden spoons. The special shape of the blade (ring or semi-ring with one-sided sharpening) allows you to effectively select large volumes of wood. |
The price of professional cutting tools is quite high. And yet, a novice master should not save money: it is better to purchase several knives and chisels of decent quality. Then the first experience will not be spoiled, and it will be possible to focus on mastering the techniques and techniques of carving.
Choice of wood

Artistic carving requires the formation of a fairly clear relief. And for this you need not only suitable tools, but also the appropriate material. Not every wood is suitable for carving, and if you are just starting to master the technique, then you need to be very meticulous in choosing:

- Linden- Ideal for the beginner. The material is soft and homogeneous, therefore it is better to master the most complex patterns for woodcarving on linden.
- Alder (red and black)- also a very good option, albeit more dense. Ideally cut, almost does not warp when dried. The main downside is hard to find!

- Birch- firmer and more resilient, but at the same time quite suitable for learning the basics of carving. When dried, it can be deformed, therefore, small products are usually cut from birch.
- Oak- a great option, but only for an experienced master. The relief is perfect, but you need a very sharp tool and a confident hand.

- Pear- wood with high density and good uniformity. The structure of the material allows you to make the thinnest products.

From a tree of these species, it is first necessary to cut blanks, dry them, and, if necessary, process them rough. Only after that, drawings and sketches are applied to them, according to which carving is carried out.

Techniques and techniques for geometric carving
In fact, all work on a carved detail comes down to three operations:
- Training- selection and roughing of the workpiece, transferring the pattern.
- Actually carving- drawing a relief pattern.
- Finishing- elimination of defects, grinding, varnishing, etc.
Instructions for performing basic threading operations are shown in the table:
| Illustration | Stage of work |
 |
Drawing drawing.
We transfer the contours of the pattern to the workpiece of the desired size for processing. You can build a drawing yourself, using a ruler and a compass, or you can use ready-made sketches for woodcarving. In the second case, we print the sketch and transfer it to the base, making punctures with an awl at the intersection points of the lines. |
 |
Cutting contours.
Focusing on the drawing, we cut the contour lines with a cutter. At the same time, we observe the depth and direction of cutting. |
 |
Cutting out triangular elements.
After the basic cutting, we move on to the main part of the work. We cut each triangle into a wedge on both sides. After that, we cut out the third side, removing a piece of wood. |
 |
Cut out other elements.
After all the triangles are selected, we move on to other details of the thread - bevels, planes, arcs, etc. We cut them, trying not to damage the already processed area. |
 |
Clear cut.
After completing the main operations with a sharp cutter, we process problem areas, removing defects and forming even, clear lines. We carefully grind the planes, trying not to remove the relief. |
 |
Staining / varnishing
We process the product with stain or varnish, or apply decorative impregnation with a tinting effect. |
Conclusion
By no means do I want to say that woodcarving is easy. To achieve results, you need to study and practice, preferably under the guidance of a mentor. But the tips and videos in this article will help you take the first steps, and in the comments you can get answers to all your questions.
Making your home memorable and beautiful is the dream of any owner. If the house is no longer new, it is not so easy. One of the possibilities is carved platbands. They even turn an ordinary “box” into a masterpiece.
Trim material
Carved platbands are made mainly from coniferous wood. The best option is pine, it is normally cut, inexpensive, and durable due to the high resin content. In principle, you can use any other coniferous board, but it is better not to try with a spruce board: it is too fibrous, it cannot be cut even with the sharpest tool.
You can also make carved architraves from hardwoods - linden (the softest), poplar, maple, oak, cherry, etc. But with each breed you need to be able to work, fill your hand and there is no guarantee that something digestible will turn out, and hardwood is expensive. Therefore, platbands are made on windows more often all the same from pine. You just need to pay attention to the quality characteristics.
Carved platbands on the windows - a way to make your home unique
If there is wood or a board that has lain for 3 years or more, you can use it: it is already dry for sure, only processing and calibration will be required. If there is no woodworking equipment at home (thickness gauge and circular saw), a cutting board will be needed. Under carved platbands, wood of the first or highest grade is suitable. This means that there should be no knots, chips, resin pockets on the board. Take wood chamber drying, with a moisture content of not more than 8-12%. This is not for sale in the markets; you need to look for it at sawmills and hardware stores.
Why chamber drying? Because it is dried in a special chamber, quickly removing moisture. At the same time, part of the boards cracks, bends - these go to rejection, the rest are sold. If you make carved architraves from chamber-dried wood, they will definitely not be warped and they will not crack.
Instruments
To make carved platbands with your own hands, you will need the following minimum set:
- drill with a set of drills;
- electric jigsaw with a soft start and a bunch of different saws for wood;
- chisels;
- sandpaper with grains of different sizes;
- petal disk from sandpaper for wood on a drill.

To reduce the time it takes to create carved patterns and polishing, it is better to have a router and grinder.
One by one or in bulk?
Carved platbands usually consist of repeating elements. At least two vertical slats on each window are made the same. And since several windows are usually designed, a lot of identical elements are required. If you are going to make platbands slotted, naturally there is a desire to cut several pieces at the same time, folding the boards in a pile and somehow fixing them.

The desire is understandable, but difficult to implement, and the benefits over time are not as great as it seems. The first difficulty is that home craftsmen usually have jigsaws of not too much power. To cut through several boards, you have to move the file more slowly along the intended pattern. On straight lines, the speed is still tolerable, on curves - low. And, the smaller the bending radius, the slower you have to move the file. If you work with one board, there are no such problems. So in terms of time, the gain, if any, is quite small.
One more moment. Even thick, good, expensive files are rejected with a large thickness of the workpiece. So, when cutting several boards at the same time, the quality of the cut on the bottom (or two) remains a big question.
The procedure for manufacturing a platband with a slotted thread
We transfer the desired drawing using a template to the board (where to get it, how to enlarge it, how to make a template, read below). If necessary, we correct, draw the details well. Next, we describe the procedure step by step.

We remove wood in the slots of the pattern

Since the carving will be looked at from afar, some inaccuracies are not fatal, but it is still worth striving for the ideal.
Making a curved edge
Some platbands have a smooth edge. Then we skip this step. If the edge is curly, you will still have to work with a jigsaw.

If the cut is difficult, not very attractive places may remain. It's not scary, then we will process them where necessary - with chisels, the same jigsaw, emery. When you are satisfied with the result, you can move on.
Finalization
Owners of wooden houses probably know everything about how to process wood. But, just in case, we repeat once again the general rules.

The choice of paints and varnishes is very wide. Suitable for any outdoor use. But keep in mind that opaque paints will have to be updated periodically - once a year for sure. And that means - to remove the old paint, primer, paint again. The situation is simpler with oils for wood - they do not leave a film on the surface of the wood, but are absorbed into the fibers. It is also necessary to update the coating, but just clean it of dust and cover with a new layer. And the processing frequency is less. Cons of oil for wood - higher price, fewer colors.

How to enlarge a template
Simple carved platbands can be made without templates. A few examples will be in the video - it shows how to draw, how to cut. But not everyone can draw more or less complex patterns on their own. It takes skill and talent. The easiest way is to find a diagram, print it in the right size, transfer it to cardboard and cut it out. You will get a template that you can circle.
The second way: draw from a photograph. Not all schemes can be found. Some, especially antique window frames, you will not find anywhere else. If there is at least some drawing ability, they can be copied.

Even such an ornament can be copied ... if you have the skill
You may have questions about how to increase the size of the found scheme or template. There are three options:
- With the help of any graphic editor. The simplest - Paint - is on any computer running Windows (tab "Image", line "Resize image", select "centimeters" and put the desired length (height) in the box. The resulting file can be printed. If the printer is small, it may be necessary to split into several pages.They should then be glued together and, according to the resulting drawing, make a template.
- With a photocopy. Copiers have a zoom function.
- Taking graph paper, transfer the drawing to the desired scale. To do this, we divide the original image into squares with a side of 0.5 or 1 cm (you can print it on a sheet in a cage). Then we transfer the lines to graph paper, increasing them in the desired proportion.
The first two methods are faster. But when scaling, the picture may turn out to be fuzzy and blurry. It can be corrected by hand, it can be drawn in some editor, for example, CorelDRAW. See the video for how to do this. Just an example of drawing a diagram for a thread.
Related videos
Schemes, patterns, patterns


The style is completely different...