Cheap ways to make garden fences. How to make beds from boards The most comfortable beds in the garden
Working in the garden and caring for plants takes a lot of time and effort, and the results are not always equal to labor costs. High beds will help to increase productivity in the summer cottage and facilitate physical labor. Growing a bountiful harvest without straining your back is easy - high beds are easy enough to make yourself.
An example of a classic high garden in the country
This does not require complex tools and special skills.
Pros of high beds
High or smart beds are almost the perfect way to grow any plant: vegetables, berries, fruits, herbs or flowers. Compared to traditional beds, high fences have many advantages:

Arrangement of high beds with the help of unhewn boards

Materials for the construction of smart beds
Do-it-yourself high beds can be made from various building materials, here are the most popular ones:

Raised bed options
When installing high beds, some recommendations should be followed and the following features should be taken into account.
Optimal Height

Length and width of raised beds
The length of the beds is unimportant, you can make any length - as long as the territory of the site allows. The only condition is that long beds need to be strengthened with additional jumpers or retaining posts.
You need to pay more attention to the width of the beds:

Where to install a high bed
If the nature of the soil does not matter much for a smart garden, then sunlight is important for any crops. For landing, you should choose a site on which direct sunlight falls for at least 5 hours.
Before filling the beds, do the following:
- A construction mesh is nailed to the bottom of the box - it will protect the plants from rodents and moles;
- Then dense cardboard or geotextiles are laid - weeds will not break through such an obstacle, and water will not stagnate.
What to plant
You can plant almost any vegetables, berries, herbs or flowers on high beds. On the decorated beds, you can annually make a crop rotation, changing crops in places. Only such plants as sunflower or corn are not very convenient to grow in such boxes because of the high-growing stems.
Do-it-yourself high beds from boards
Wooden boards are the easiest and most environmentally friendly way to make a garden bed. In addition, this material is always available.
However, many gardeners rightly believe that such processing reduces the environmental safety of the material and this affects the quality of the grown fruits and vegetables. The most environmentally friendly way to extend the life of wood is. It is even better to use boards with good resistance to decay - larch or oak.

Making a high bed of bars
Also, after antiseptic treatment from the inside, the bed can be sheathed with a film to limit the contact of the soil with wood treated with chemicals.
Inventory and materials
To assemble a wooden garden bed, you will need the following tools and materials:
- boards 5x20 cm;
- bars 5x5 cm;
- hacksaw;
- wood screws;
- screwdriver or screwdriver;
- shovel;
- building level and tape measure;
- building network.
High bed installation

Filling a high bed
The bed is ready, now you need to fill it. The efficiency of smart beds is achieved by their correct layer-by-layer filling:
- First, you can lay cardboard to protect the beds from the germination of weeds.
- A small layer of sand is poured onto the cardboard.
- Organic layer - long rotting organic material (twigs, bark, coarse thick tops, wood chips).
- Plant residues - plant tops, vegetable and fruit peelings, leaves, non-perennial weeds.
- The bed is spilled with water, and preferably with manure infusion and fertile land is poured 15-20 cm.
Raised slate beds
Slate is a simple and budget option for arranging raised beds. And if this roofing material lies dead weight after replacing the roof, then this is also a free way to make smart beds in the backyard.
Advantages and disadvantages of slate for arranging beds
The advantages of building slate are as follows:
- low cost;
- durability;
- rigidity and strength;
- chemical neutrality;
- neat appearance.
The minus of the slate border is strong heating in hot weather. Plants will need more frequent watering.
To say that plants do not care on which bed only a person who is far from agriculture can grow. The level of soil moisture, the intensity of gas exchange and the species composition of microorganisms that live in the upper layers of the earth depend on the shape and size of the beds. All these factors have a direct impact on the quality of the substrate, and therefore on the level of yield - the main criterion for success for any gardener or gardener. How to use a scientific approach for the benefit of your garden, how to create not only a neat appearance of the beds, but also to maximize the yield of your site? We will try to answer these questions in this publication with a large selection of photos of a wide variety of beds.
The principles of arranging beds
A garden bed is a relatively small, often quite isolated area of soil on which it is possible to provide individual care for a plant of a particular crop, create a moisture regime and carry out top dressing. It is obvious that plants with different agricultural practices are grown in a summer cottage or garden, often with opposite requirements for care - without an individual approach, it will not be possible to achieve high yields. It is for this that differentiation is necessary on the site - the division of the territory into zones, and the zones into beds.


If the purpose of the beds is more or less clear to every gardener, then such nuances as the level of illumination, the composition of the soil and even its consistency, necessary for different crops, are not always and not taken into account by everyone. Unfortunately, not understanding that cucumbers and tomatoes, for example, require a different approach, leads to a significant loss in yield. By creating difficult trenches for planting certain crops, and isolated beds, the owner of the site can give the plants proper care - all efforts will invariably pay off with the quality or quantity of the crop.


Ways of cultivating the land
There are two main (and diametrically opposed) approaches to farming:
- traditional;
- ecological.
The traditional way of cultivating the land is an outdated, incredibly laborious and often irrational principle that is extremely traumatic for the ecosystem. It is based on the attempts of a person to control the processes in the soil, its condition. The traditional way of farming includes the following activities:
- two-time digging of the soil (per year);
- herbicidal treatment;
- uncontrolled amount of fertilizer applied to the soil;
- beds with this principle of farming are cultivated in such a way that they have a small number of capillaries and, as a result, an insufficient number of microorganisms.
- All these factors inevitably lead to low yields and depletion of soil resources.


The second approach, ecological (natural), is based on the ability of the soil to regenerate itself. There are many principles of natural farming, but all of them are based on the fact that a person rarely interferes with the natural course of processes occurring in the soil. Digging the earth is replaced by surface loosening, and weeding once a week or two is replaced by timely mulching.


Modern farming methods are based on an ecological method, and with this approach, microorganisms, plant roots and insects independently restore the soil structure. An increase in the number of capillaries increases the processes of gas exchange, as a result, the roots of plants are enriched with nitrogen in a natural way, which leads to an increase in both the quality and quantity of the crop. All this can happen without chemical fertilizers at all or with their minimum amount.


Types of beds for a modern garden
Only at first glance it may seem that the beds differ from each other only in size and shape. Although these indicators are of great importance for plants that need an individual approach and isolation from other crops. The beds may differ in the very principle of formation, for example, not on the site, but above it, located on the so-called "green wall" or inside plastic pipes of large diameter. It all depends on how you care for each specific type of plant.


Bed in the form of a box
The bed-box is one of the most popular ways of cultivating the soil today. This method of planting allows not only to create a separate place for each crop, but also to organize the landscape of a summer cottage or garden at a high aesthetic level. It is not difficult to organize a bed in the form of a box - a fence in the form of low shields is installed on the prepared and marked place of the site (hacienda or a small backyard).


To organize the fence of the bed-box, you can use:
- flat or wavy slate;
- unnecessary boards;
- polycarbonate sheets;
- plastic;
- any waste material that can tolerate soil moisture for more than one summer season.


Further, in the prepared compartment, organic matter is poured in layers and the soil itself. For the winter, such beds are not dismantled, and in the spring, after surface loosening, it will be possible to plant seeds or seedlings of certain crops again. This approach is not only practical, rational, but also aesthetic.


Raised beds with high sides
High beds are usually presented in the form of ridges or trapeziums. The rise of the soil, as a rule, is provided by a "cushion" of the compost layer, on top of which the earth is poured. In areas of our country where the bear is common, a layer of compost is not used, the rise is carried out only by pouring earth. Medvedka usually builds nests in the compost layer (a warm and humid place is an ideal habitat) and can spread very quickly throughout the site.


High beds are most often used for growing melons and gourds:
- cucumbers;
- pumpkins;
- zucchini;
- sometimes some varieties of potatoes are grown in this way.


High-sided beds are created for one season. In most cases, the embankment strongly settles under the weight of snow and loses its functional background. If weaving plants (for example, cucumbers, some types of zucchini) will be grown in a bed with a box design, then it will not be superfluous to equip the fence with a vertical lattice (made of wood or metal, created using weaving, any improvised means).


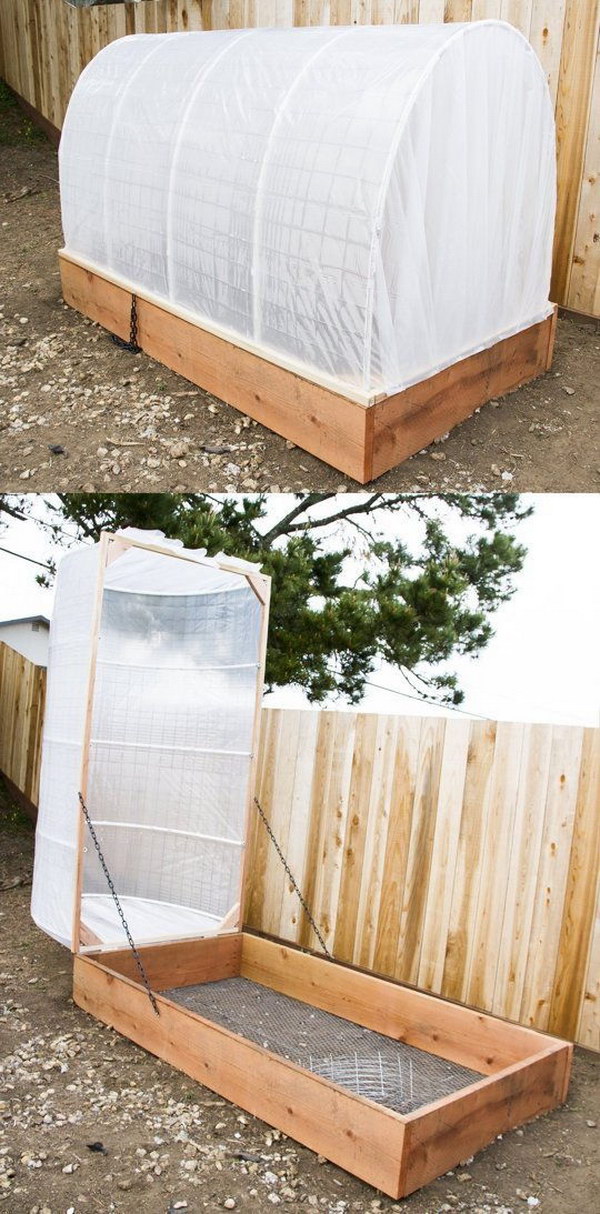
If such a structure is equipped with a high dome, covered with a film, then an ordinary garden bed becomes a greenhouse. Growing seedlings in such portable structures is very convenient and practical.

"Warm" beds
"Warm" beds are called due to the fact that in their lower layers there is fresh, not rotted manure. The mound of manure is carried out in late autumn, so that during the winter period, under the cover of snow, all processes take place. In early spring, after the snow melts, such beds are cleaned so that they warm up with the sun and the decomposition processes start.


Further, the manure begins to rot with a large release of heat. As a rule, in compost heaps during "burning" the temperature inside can reach 40-50 degrees. But on the beds, the manure layer is low and this effect does not occur, moreover, winter exposure significantly slows down the “burning” processes. All these manipulations and preparations are needed in order to plant crops in a finished, “warm” garden bed. Usually this is done for planting plants with a shallow root system - cucumbers, radishes, etc.


After the end of the summer season, all manure is recycled. If you remove the top layer of soil, then under it you can find - humus, which is a very valuable substrate. This natural fertilizer can be sprinkled throughout the garden or summer cottage. And at the end of autumn, it will be possible to put manure in the bed again and start the process of preparing a “warm” bed in a new way.


Garden beds with drainage
In clay buds, in very low places, into which all the water is constantly drained, and in wetlands, it is necessary to equip beds with drainage. It is not difficult to make them - usually 50-60 cm of the soil layer is removed, then sand about 20 cm high is laid out at the bottom of the resulting pit, then sawdust, humus are poured, and only after that - the soil. Drainage and gas exchange in this type of beds are excellent - an ideal place for growing root crops (for example, potatoes).


Material for making beds with your own hands
Creating a bed of any configuration requires some preparation. In order to equip the beds in the form of boxes, you will need to use the following materials:
- slate or boards, plastic or polycarbonate of such a height that there is at least 30 cm in the ground, and at least 20 cm on the surface of the entire size of the product;
- pegs made of wood or metal, which will be needed to secure the material of the fence;
- non-woven material with which it will be possible to cover the bottom of the prepared trench.


After the blank - the dug hole is covered with non-woven material, it will be necessary to fill it with the following layers from above:
- sawdust or straw - about 10 cm;
- dry foliage (which you prepared in advance in the fall) - about 10 cm;
- a mixture of compost and soil, in a ratio of 1 to 2 (layer size 10 cm or more);
- clean layer of earth at least 10 cm.

- marking on the ground - usually done using pegs and a stretched cord. When calculating the size of the beds, it is important to understand that the narrower the trench, the faster it will dry out;
- then comes the preparation of the material for the fence - cutting it, preparing the pegs. If the box is not very large, then it will be more convenient to assemble it in advance using self-tapping screws. Such structures are reusable, they can be removed for the winter period if the beds are transferred;
- then a fence is installed on the garden;
- then a material of non-woven origin is laid at the bottom of the pit;
- a layer of sawdust, dry foliage, soil mixed with compost and just earth is successively filled up.


And in conclusion. Your site can not only bring a good harvest, but also look aesthetically pleasing. Landscape design can manifest itself not only in the courtyard of a private house, but also in the garden, in the garden. But the main principle of the location of the beds on the territory should still be the needs of plants in sunlight. On a properly located bed, plant care will require minimal care.


Reading time ≈ 12 minutes
Land cultivation in a summer cottage always requires a lot of time and effort. Every plant and vegetable crop needs a certain degree of moisture to ripen well, and groundwater is often higher than normal. The solution to this problem was high beds, you can make them yourself with step-by-step instructions from specialists.
Features of high beds
Tall and smart - this is a real find for summer residents, they are suitable for growing any plants: vegetables, herbs, berries, fruit trees and garden flowers.
High raised fences have many advantages:

The disadvantage of raised structures can be considered the need for frequent fertilization, enhanced fertilizing with minerals and watering the beds, since the soil inside such structures dries quickly. You can cope with this problem by organizing an automatic watering system or by mulching the soil.
Optimal dimensions:

The optimal perennial height should be up to 20 centimeters, otherwise the soil will freeze during winter frosts.
The construction of such structures on its suburban area does not require large financial investments, which is why they are so popular among summer residents. Making high beds with your own hands is shown in the video with step-by-step instructions.
Varieties of beds
To organize a garden on a suburban area, several types of beds are used:

High bulk beds are also:

How to choose material
What to make a high structure in your garden from? First you need to choose the material suitable for a particular area. Raised beds can be:
- From a tree. The advantage of this material is its availability, convenience and environmental friendliness. To assemble the structure, you will need boards, bars and logs of different sizes. Before use, the wood must be treated with special antifungal and water-repellent solutions to protect the bed.

- From slate. The assembly of this design is easy and fast, the material is affordable and inexpensive. The slate is quite fragile, so it requires accuracy during installation and further operation. The fence can be painted and painted with ornaments of different colors.

- From brick. A plus is the durability and strength of the structure. Brick or stone beds fit perfectly into any landscape, but are characterized by high cost and a complex manufacturing process. The constituent elements must be connected with a concrete solution. However, in too massive installations, the earth warms up more slowly, so you can not overdo it with the layer thickness.

- From twigs and vines. Sides for beds can be woven from small branches and twigs of trees. This design looks original and elegant, can be used as a decor. Such wicker structures should be covered from the inside with a layer of polyethylene film so that water does not seep through. The downside is their fragility, the service life will be no more than one season.

- From metal. Such structures have a long service life, are durable and stable. They are made by erecting a frame of welding metal elements. The material must be coated with an anti-corrosion compound for comfortable use and durable service.

- From plastic. The material is strong, durable and easy to install. However, some types of plastic sheets can release substances that are toxic and harmful to plants.

- From concrete. Used for the construction of multi-tiered structures. The fence can be made from separate blocks (as in the photo), or be monolithic. Concrete beds are durable and can be decorated with various decors. The installation process is complex and lengthy.

- From metal meshes and pebbles. You can make a bed using the "gabion" technique, which is used to build flower beds. Such a backfill fence consists of a double mesh frame, the inner wall is covered with a film, and small stones and pebbles are poured between the frame posts.

Technique "Gabion"
To make a structure, summer residents sometimes use improvised budget materials, for example, plastic bottles, old empty boxes and small pieces of plastic fences.
Making high beds with your own hands is shown in the video.
How to choose a seat
It is extremely important to choose the right place for the construction of a high bed in a summer cottage. It is necessary to carefully study the territory and draw a diagram of the location of structures.
What to consider when arranging a vegetable garden with raised beds:
- The ground surface should be flat and preferably without strong slopes.
- The place should be well lit by the sun.
- It is necessary to take into account the shade from standing nearby trees.

Creating a frame is only a small part of the work, it is also important to correctly fill the structure with soil. It is necessary to start these works already in the fall. Internal filling consists of several layers of different widths. The dimensions of each layer depend on the height and beds.

How to fill the structure with soil:
- It is necessary to lay a fine metal mesh or geotextile on the bottom to protect the garden from small rodents and pests.
- Then the first drainage layer is laid from pieces of crushed bark, branches, dry leaves, plant stems and shavings.
- The second layer is various fertilizers, such as manure.
- The third layer is usually formed by a waterproof material: cardboard, clean paper or old natural burlap.
- To create the next fourth layer, organic matter in the form of plant remains and a small amount of mineral fertilizers will be required.
- Fertile soil serves as the last fifth layer, the layer is laid with a thickness of 10 centimeters. Soil should be selected depending on the crops grown.

As soon as the high bed is completely filled with earth, it must be watered abundantly and left for 3 days, during which time the layers will settle a little. Then the structure is covered with polyethylene so that the soil warms up well. And only in the spring you can start sowing seeds or planting plants. The step-by-step process of building such a bed is shown in the video below.
Bed-box from boards
Most often, summer residents prefer wood when it comes to making boards for high beds. The advantage of this material is the fact that the tree does not overheat and is easy to process.
It is better to use boards made of ash, oak, cedar or larch. Pine is considered a budget option, since this type of wood is more prone to decay.

Do-it-yourself high bed-box
Necessary tools and materials:
- Wooden boards 50*200 mm.
- Metal grid.
- Nails and hammer.
- Protective mixture for impregnation.
- Shovel.
- Roulette for measurements.
- Miter box for cutting.
Manufacturing process:

To create a design, both flat and wavy slate are suitable. At the end, the material can be painted in any color with special acrylic paint.
Materials and tools:
- Slate sheets.
- Bulgarian (can be replaced with an electric jigsaw).
- Shovel.
- Chalk or a simple pencil.
- Drill (can be replaced with a screwdriver).
- Roulette for measurements.
- Rubber mallet.
- Building level.
- Pegs made of wood or metal rods.

A bed of wavy slate in the summer area
Manufacturing technology:

Raised beds come in a variety of designs, shapes and sizes. With the help of such structures, you can realize any ideas and transform your summer cottage beyond recognition. The garden will look well-groomed, and the harvest will delight with its quality!

You will be surprised at your past doubts - whether to make high beds in the country ... Your back will be grateful to you - you just bend down a little to care for the garden. Your knees will thank you - you can just sit on the edge of the garden and work on your garden.
Your plants will thank you - no more competition from weeds or nearby fruit trees. Your land will be grateful to you - you do not trample it down and ennoble it with humus. Your high-bed garden can look beautiful, comfortable, and reward you with a generous harvest.
How to make high beds with your own hands.
1. First we must mark out the place for the beds. The usual width of the beds is 1.2 m, the length can be any. We mark the rectangles of the desired size on the ground with sand.
2. We collect high beds. The high bed has no bottom and consists of posts with grooves on all four sides and boards with corresponding grooves. You can buy ready-made garden fences or make your own. For fences, it is better to take hardwood, because. conifers emit resin, which can have an unnecessary effect on soil composition. We check the horizontal installation of the garden box with a level.
3. We lengthen the high beds. Because Our beds are modular, we can extend our beds from any side with another module.
4. How to protect a high bed from rodents. Even if you have not encountered moles and other underground garden pests in your summer cottage, it is better to provide protection for your garden right now than to unsuccessfully fight these rodents later. At the bottom of each box we put a metal mesh so that it goes a little to the edges of the fences.
5. How to protect the soil on a high bed from being washed out into the main soil. To do this, we use ordinary packing cardboard in two layers so that it covers the entire bottom of our garden box. If there are not enough whole pieces, we use cardboard scraps - we fasten them with a stapler with the main piece so that the cardboard at the bottom of the box does not move when the soil is poured.
6. The soil for high beds should be light, crumbly and "fluffy". You can easily check its quality by poking your finger into the ground - if it sinks to the third joint - this is the norm. To improve the composition of the soil, you can add peat or compost. We pour the soil into the garden box, check its horizontal level, water it to compact it a little. During the season, we will need to add a little soil.
7. Irrigation system for high beds. Along the contour of the high beds, it is planned to fix a garden hose with watering nozzles: we need 90 and 180 degree splitters.
8. Trellis for high beds. Because the ground in the high bed is loose, then it will not be possible to install a trellis in it, so we fix the trellis from pvc pipes into the ground next to the garden box. On the trellis we stretch nets for climbing plants - cucumbers and beans. For tomatoes, we install light supports made of steel rod.
What you need to know when arranging a high bed.
1. Try to protect high beds from strong winds and heat by creating partial shade with flower trellises or tall shrubs.
2. The long side of the bed should face south - so the plants will be evenly lit, otherwise, taller plants will obscure the others.
3. Planting density on a high bed is twice as high as on a regular bed. So plants fight weeds and create a humid microclimate with foliage.
4. High beds with sides will make it possible for older people or people with back problems to take care of the garden.
5. A high bed is a warm bed. Such a bed warms up faster in the spring, and if you make a mini greenhouse on its basis, it will surprise you with an early and generous harvest.
6. Divide a long, tall bed into square segments with cross braces to reduce soil pressure on the side walls of the bed.
Fences for high beds.
1. Most often, wooden fences are used for understandable beds. There are a few points here - do not use used wood, especially sleepers, which can contain harmful chemicals. Do not treat fresh wood with wood preservatives unless you are sure they are completely environmentally friendly.
2. Wattle as a fence for a high bed. For all its environmental friendliness, such a fence has three significant drawbacks - the soil in the bed dries quickly from the wind, proper thermal insulation of the bed is not provided, the soil can spill out through the cracks. Everything is fixable - use a layer of double cardboard around the inner perimeter of the fence. Environmentally friendly, the air gap between the sheets serves as thermal insulation, the earth no longer spills out.
3. As a fence for a high bed, you can use a metal profile, including from an old roof or fence.
5. You can make fences for a high bed with your own hands from brick or concrete. This is a very good option, but keep in mind that concrete will affect the acidity of the soil in the garden for 2-3 years.
6. The best raised bed railings are plastic. They do not emit anything of their own into the soil, excellent thermal insulation, long service life and the ability to set any shape of the beds, unlike standard rectangles of beds with wooden fences.
7. Fences for high beds from improvised materials. You can make the sides of the beds from bottles laid like bricks on a concrete mortar.
Why do we need high beds.
High beds allow you to increase the area under the garden. you can use inconvenient slopes or poor or weedy soil. Raised beds provide an environmentally friendly way to deal with weeds and soil erosion.
Such beds warm up faster and give an earlier harvest. They allow more economical use of moisture for irrigation.
Various types of high beds.
In addition to the traditional raised bed with high sides, there are several other types of raised beds.
1. Circular high bed. It consists of a round frame, in which there is a path to the center of the garden. This form of high beds is also called the "keyhole".
Branches, roots, paper, compost are placed at the bottom of the beds. In the middle of the bed there is a tunnel for fresh organic waste and water.
For irrigation of bulk high beds, an irrigation irrigation system is used when water comes from a ditch between the beds - a good option for gardens flooded in the spring, or you can use a drip irrigation option when water enters the bed from mini terraces.
The paths between the beds are covered with straw or large sawdust. Never step on the ground in a high bed - this will compact it, and it will be more difficult for plants to receive moisture and nutrients.
Spare no space for paths between high beds - so you can always drive there with a garden wheelbarrow both for harvesting and with a new portion of humus. Have pity on your back - use a wheelbarrow.
If your raised beds are located next to fruit trees, you may need to install a root barrier before laying out the beds - dig a trench, cut the root at the approach to the beds, install a metal sheet in the trench that will prevent the root from growing in that direction and cover the trench with soil.
Learn more about raised beds through your own experience. There are many interesting finds, experiments and new discoveries in this topic for every gardener.
What amateur gardeners just don’t come up with to get a good harvest.
Today we will introduce you to an unusual technology - growing crops in high beds.
Advantages and disadvantages of high beds
High beds are a limited space raised above the ground. They are used for growing other crops. 
It is best to build such structures in the fall, but with proper maintenance, you can create an "elevated" one at other times of the year.
Important! If you build too high sides - more than 70 cm, the bees will not be able to perform pollination, which will negatively affect the further growth of the crop.
Like any vegetable growing solution, this one has its advantages and disadvantages.
We list the advantages of high beds:
- in spring it warms up faster, and sowing can be carried out much earlier than in open ground; this will increase the yield by 2 times;
- thanks to the borders of the box, the mulch will not be washed away or carried away by gusts of wind;
- the design provides good - this will avoid moisture stagnation;
- there is the possibility of individual selection of soil for each site, which will provide optimal conditions for growing crops;
- thanks to the design, it is possible to protect the crop from sudden changes in temperature;
- it is much easier to cultivate the soil, as the amount of work is significantly reduced;
- raised areas are convenient in that you do not have to lean too much towards;
- the structure looks beautiful, with the right approach to construction, it will last a long time and will not collapse;
- can be built in any sunny place.
 Despite the huge number of advantages, this method also has disadvantages. The disadvantages of high beds are:
- the need to constantly carry out top dressing due to limited space;
- physical and material investments necessary for the construction of the structure;
- the risk of reproduction of pathogenic microorganisms that can be dangerous to plants.
Do not be afraid of possible difficulties - it is enough to seriously approach the construction of an unusual design, and you will get a rich harvest.
Optimal dimensions
Each gardener can independently choose the size of the future beds, since there are no clearly defined dimensions. However, there are certain recommendations that may come in handy when you build tall ones with your own hands. 
Height
The optimal height of the sides varies from 15 to 50 cm. If you plan to place the structure on fertile soil, you need to limit yourself to a height of 15–20 cm. This amount of embankment is quite enough to get a good harvest.
If the land on the site is not very favorable for growing crops, the bed should be raised higher - by about 50 cm. Depending on the wishes of gardeners, you can raise the walls of the structure even higher - in this case, you do not have to bend over during weeding or planting. But, remember that such a design will require more materials. 
Width and length
The optimal width of the structure is considered to be a distance from 90 to 120 cm. It is necessary to equip the site in such a way that it can fit 2 rows. Such a layout will allow the plants to receive a sufficient amount of air and sunlight, which will undoubtedly affect the yield. 
If you plant a lot of rows, it is likely that the ones in the center will not receive the necessary amount of air and light, which will lead to a decrease in yield. The ridge of standard width is convenient in processing.
Important! When choosing plastic for construction, be careful: some of its types emit toxins and are not suitable for use in agriculture.
Reflecting on the length of the site, you can be guided solely by the possibilities of the territory. However, most often there are structures with a length of 1.5 to 3 m. Such areas look compact and neat.
Choosing a place on a summer cottage
It is very important to responsibly approach the choice of a place where the structure will be located in the future. It is better to place high beds in the country in sunny areas: light should come to this place for at least 6 hours a day. Be sure to consider this requirement if you plan to place the structure near any buildings or fence.
When placing an embankment on open ground, you should adhere to the following recommendations:
- put a metal mesh on the soil - this will protect the roots of plants from rodents;
- lay out old newspapers at the bottom of the structure - this technique will significantly slow down growth.

Material selection and step-by-step manufacturing instructions
A wide variety of materials can be used to build tall ones. We offer you to get acquainted with the most common options for structures and the features of their manufacture.
Wooden structure
This material is perhaps the classic for creating beds. It attracts gardeners with its accessibility. For manufacturing, you can use boards and logs.
Did you know? By choosing larch boards for the construction, you will significantly increase the service life of the structure. The resin of the tree is an excellent protector from external influences and prevents the destruction of the boards.
- Before proceeding with the assembly of the structure, it is necessary to process the boards. To do this, you can use all kinds of impregnations that will prevent the decomposition of the tree. You can also cover the boards with varnish or paint. The safest and most affordable way to process wood is lime - just whiten the elements.
- Using a conventional tool, you need to attach the bars to the boards. To do this, it is necessary to nail posts to the edges of short boards. Long boards are also connected to the bars. Choose the bars so that they go 20–30 cm into the ground.
- The next step is to knock down the box. Try to avoid cracks, the boards should fit snugly against the bars.
- The final stage is the installation of the mounted box. After you hammer the bars into the ground, check with a level that it is level.

Important! When installing a bed next to fruit trees, you will need to install a barrier for the root system before marking.
After installing the structure, you can fill it with soil and start planting plants.
Use of stone
Undoubtedly, there can be no doubt about the durability of such a design. But due to the high cost of the material, not everyone can afford such beauty. If you find funds for a stone bed, it will be a wonderful decoration for your summer cottage. 
Instructions for the manufacture of such a design include the following steps:
- it is necessary to dig a trench along the perimeter of the proposed site, 30 cm deep;
- we lay polyethylene or roofing material on the bottom;
- we fill the trench with sand to a third of the depth;
- laying stones;
- we fill the concrete foundation with a pre-prepared solution;
- then masonry is carried out along the perimeter using a solution that is applied only to the inside of the stone;
- after 2-3 weeks, you can pour the soil and plant the plants.
brick beds
Having built a high brick bed, you will undoubtedly decorate your site. Such a construction is very similar to a stone structure: it has the same construction principle and the relatively high cost of materials. 
In addition to the cost of materials and the lengthy manufacturing process, you will have to find a specialist who can lay out a beautiful even composition.
from slate
This material is known for its durability. Everyone in the country has unnecessary pieces of slate, which are just right for building high beds. 
We invite you to read the manufacturing instructions.:
- First of all, the materials are prepared: it is necessary to cut the plates and give them the desired size.
- At the next stage, a trench is dug according to predetermined dimensions.
- Sliced slate plates are installed in the dug hole around the perimeter. If you use flat slate, you need to connect the strips with corners - this will add reliability to the structure.
- Then the trench must be covered with soil and compacted well.
Made of plastic
Plastic beds can be of two types. The first is the use of plastic panels. In this case, this is almost an ideal option for creating a design. It has excellent thermal insulation, has a long service life and allows you to create a bed of any shape.
Such blanks can be purchased in specialized stores. The principle of construction of the structure is the same as in the case of slate.
Important! When making beds from slate, you should not drive it into the ground - this way there is a possibility of its destruction. To install the sides, carefully dig the slate into the soil.
Another option is to make a bed out of plastic bottles. However, this is not a very good way, since tightness is out of the question. In addition, plastic bottles quickly yield to deformation, which over time will make the site not very attractive. 
From straw and branches
One of the cheapest materials for making beds is straw.. Bales have a very affordable cost, so this way to build beds is the most budgetary. 