How to quickly grow a crystal at home. How to grow a crystal at home from different substances
Crystal… From this word it really blows with magic. I don’t know about the magical properties of crystals, but they definitely have a variety of useful physical properties. Crystals are widely used in modern electronics, optics, and other fields of technology. And, of course, the crystals are simply beautiful. They attract the eye with their regular shape and natural symmetry. And this applies not only to precious crystals, but also to crystals grown from improvised means.
We already know something about the crystalline state of matter from the article on. It's time to move on to practical exercises 🙂
The crystal growth experiment has a number of features. One of these features is the duration of the experiment. The thing is that a good and beautiful, and, most importantly, a large crystal cannot be grown quickly. This takes time. That is why the experience of growing crystals for nine days developed in the rubric, where you could observe the progress of the process and, perhaps, even conduct your own experiment in parallel. This article is a summary of the information obtained during the experience. So, instructions for those who want to grow a crystal themselves.
For this we need:
- The container in which the crystal will grow. It is best if the container is transparent, such as a glass jar. In this case, it will be convenient to monitor the progress of the process.
- A small piece of cardboard to cut out the container lid
- Funnel
- Filter paper or any material with which it will be possible to filter the solution. You can use a napkin.
- Thread. It is better to take a thinner and smoother thread, for example, silk.
- And, of course, the substance from which we will grow the crystal. Copper sulphate is used in the experiment. The crystal from it should turn out to be a beautiful blue color. In addition, getting blue vitriol is quite simple - it is usually sold in any gardening store. If you could not find blue vitriol or are just too lazy to go to the store, then you can use any crystalline substance, for example, ordinary table salt or sugar.

Before starting the experiment, I must warn you, in case you want to repeat it, about personal safety measures. You will be working with chemicals that can harm you. Do not use food containers for your experiment, use protective equipment (gloves, glasses), wash your laboratory glassware thoroughly. If chemicals come into contact with skin or eyes, rinse thoroughly with water. If swallowed, seek medical attention.
Well, with the formalities over, let's get started.
Day 1.
As I said, growing crystals is a procedure that has some peculiarities. Another feature of this experiment, in addition to the duration, is the need to grow the so-called seed, i.e. a small crystal, on the basis of which a large crystal will grow. You can do without a seed, but in this case it is difficult to grow a beautiful single crystal. Therefore, it is better to grow a seed after all, especially since there is nothing complicated in this.
Prepare a saturated solution.
Let's pour some copper sulphate into a glass container (hereinafter I will talk about copper sulphate, since it is he who is involved in the experiment, but you use the substance that you managed to find).

Pour salt (and copper sulfate is sulfur-copper salt) with a small amount of hot water. The use of hot water is mandatory, because. at elevated temperatures, the solubility of salts increases.

It is better to place the container in a water bath so that the solution does not cool prematurely.

Stir the salt until dissolved, and then add more salt and stir again. We repeat this until the salt ceases to dissolve in water.
Thus, we have obtained a saturated salt solution.
Now the resulting solution must be filtered. This must be done so that no foreign particles, such as dust or impurities, remain in the solution. Foreign particles can serve as additional centers of crystallization, i.e. other crystals will begin to form around them, but we do not need this. At this stage of the experiment, this is not very critical, but later the purity of the solution will be very important.


After filtering, you need to throw a few salt crystals into the solution - seeds will begin to form on them.

Now the container needs to be placed in a place where a more or less constant temperature regime will be ensured (the windowsill is great for this), and covered with something to prevent foreign impurities from entering.

The solution will begin to cool and supersaturate, i.e. salt will begin to become more in solution than it can dissolve at a given temperature. The salt will begin to crystallize, and the grains of salt that we added to the saturated solution will become the centers of crystallization. You will have to wait 2-3 days. After that, we proceed to the next stage of the experiment.
Day 2
It can be seen that crystals began to form at the bottom of the vessel.

Day 3
The crystals have grown. In principle, they are large enough to be used as a seed, but I will try to keep them for another day.

Day 4
Well, enough time has passed, and we have formed a good seed material. It remains to choose the right candidate.

Pretty pretty already, isn't it? But we will not stop there and will continue our experiment.
It seems that the resulting mass of crystals is a monolith, but in fact it is not difficult to separate the crystals.

Try to choose a crystal of the most correct shape. I chose far from the largest available, but I liked its shape the most. The more correct the shape of the seed, the more correct the shape of the crystal will be in the future. To make the dimensions of the seed more clear, I put a match next to it.

Now you need to tie a thread to the seed. As I wrote at the beginning of the article, it is better to take a less fuzzy thread so that side crystals do not form on its protruding fibers. Do not use wire as a hanger.

Now the thread with the seed must be passed through the lid of the container and fixed on the reverse side. You need to fix it so that at any time it is possible to adjust the height of the suspension. For example, you can wind the excess thread on the match from the back or secure the thread with a paper clip.

Now we need to prepare a fresh salt solution. It is done in the same way as for the seed: dissolving salt in hot water until it stops dissolving, filtering the solution. In this fresh solution we place our seed. Make sure that the seed does not touch the bottom and walls of the container, otherwise the crystal will begin to grow in an irregular shape.

And now we have two ways. The first one is more complex. It requires more attention and effort. The fact is that the most beautiful and regular crystals are obtained when the crystallization process is slow. Therefore, we need to ensure smooth cooling of the salt solution. To do this, we need to place our seed container in thermo-vessels, constantly control the temperature of the solution. In simple terms, there is quite a lot of fuss. But the reward for such efforts is worthwhile - the crystal will turn out to be as clean and regular as possible.
The second way is much easier. You have placed the seed in a hot solution and you can forget about it for a while, leaving the crystallization process to chance. With this method, the growing crystal may not be an ideal shape, but the growth process will be faster.
I chose the second way. In the end, after going down the easier path and gaining some experience, I can always do a more complex version of the experiment. In addition, you need to keep in mind that the quick version of the experience does not mean at all that it can be done in a couple of hours. Even with an accelerated experience, the crystal will grow for several days. In the case of a long-term option, the experiment can stretch for 1-2 months.
But in both cases it is necessary to monitor the growth of the crystal. Once again, you don’t need to take out the crystal and touch it - this may affect its shape. If side crystals begin to form on a crystal or thread, they must be carefully removed so that they also do not spoil the shape of the main crystal.
And one moment. If you lowered the seed into the solution, but it did not increase, but quite the opposite, it dissolves, then this means that you have prepared an unsaturated solution. The procedure for preparing the solution will have to be repeated.
So we continue to monitor the growth of the crystal. If you have any questions, you can contact me in the comments or through the form.
Day 5
During the day, the crystal grew significantly. In the photo, the crystal is compared with a match and a crystal - an understudy of the seed, which I left yesterday just in case.

However, as you can see, the shape of the crystal is not ideal, there are many defects. This is the result of the rapid growth of the crystal. But I still like it 🙂
I updated the solution as I did before, and lowered the crystal back into it. Since the crystal size increased significantly compared to the previous day, an adjustment in the height of the seed suspension was required. The experiment continues.
Day 6
Crystal has grown. Again updated the copper sulphate solution.

Day 7
The crystal barely fits into my glass! Do not forget to clean the thread from growing small crystals.

Day 8

Day 9
Well, here comes, I think, the last day of the experiment. The latter is not because the crystal will not be able to grow further, but because it has become too crowded in my laboratory glassware. We take out the crystal, cut the thread to the very root and blot it with napkins. We are one step away from admiring our work of art. The fact is that if you leave the crystal as it is, it will collapse pretty soon. To prevent this from happening, it must be "dressed" in a protective shell. The best option is to cover it with clear varnish. You can also place it in a hermetically sealed container, for example, in a jar. But it seems to me that the best option is to cover it with varnish. This will give it additional brilliance, and it will be possible to observe it, as they say, live, and not through glass.

And now you can take a good look at the crystal. Of course, his form was not perfect. But I deliberately chose the fast way of crystal growth instead of the qualitative one. In any case, I was pleased with the result. In nine days, the crystal grew more than seven centimeters in length - a pretty good result!

I even wanted to give it a name. Names are given to large and unique gemstones. For example, how the famous diamond was given the name "Count Orlov". My crystal, of course, is far from a diamond, but it is dear to me in its own way 🙂 Therefore, not without a share of humor, I decided to call the resulting seven-centimeter pebble the Kid.
Good luck with your experiments!


Few people are able to remember school chemistry lessons without a shudder. Boring and incomprehensible formulas, indistinct names of substances, similar to the words of an exotic language ... the only outlet was laboratory experiments! So why not remember your school years (or if you are still studying, put the knowledge you have gained into practice) and not grow crystals at home? After all, crystals are one of the most beautiful phenomena of inanimate nature. Shining in the light, shiny, bizarre, transparent-colorless or with bright juicy colors: scarlet, azure, lemon yellow ...
Do you want to know, how to grow a crystal at home from regular sugar? Then read this article and you will know everything!
Safety Precautions When Growing Crystals at Home
Warning! Before we move on to growing crystals at home (even if they are as safe as sugar crystals) it will not be superfluous to recall the need to comply with safety precautions:
- do not use food utensils during the experiment, otherwise you can get poisoned;
- do not use unknown or expired substances;
- after completing the experiments, thoroughly ventilate the room and wash your hands with soap;
- when conducting the experiment, use gloves, goggles and an apron;
- If reagents come in contact with skin or eyes, rinse them immediately with running water!
- keep reagents away from children! Be extremely careful and careful!
And now, you can proceed to the experiment itself.
How to grow a crystal from sugar
Let's start with perhaps the safest and most affordable option - growing a crystal from regular sugar. We will grow an unusual crystal, but a crystal on a stick! It should turn out very beautiful and unusual. So, here is a step-by-step instruction on how to grow a crystal from sugar:
1. First you need to prepare blanks - sticks on which we will grow sugar crystals at home. More precisely, we need 2 sets of sticks. That is, there should be twice as many of them as the number of grown crystals (it is optimal to grow at a time 5 crystals).
Any sticks will do: thin twigs, sushi sticks, etc.
Then you need to make some sugar syrup. To do this, heat a quarter cup of water with two tablespoons of granulated sugar until the mixture reaches the consistency of syrup. Dip one of the sticks in the syrup and roll it in granulated sugar so that the sugar grains cover it evenly. One of the ends of the stick (half or third of the length) should remain clean. This will be the “handle” of the sugar crystal.

First of all, you need to prepare the blanks: roll the sticks dipped in syrup before in granulated sugar
Repeat the operation with the remaining sticks.
Leave the sticks to dry overnight (or, if unbearable, at least 2-3 hours).
2. In the morning, take a saucepan and pour into it 2 full glasses of water. Put some sugar in there too. 2.5 glasses. Turn on a slow fire and constantly stirring the sugar, wait until it is completely dissolved.
In the resulting sugar syrup, add another 2.5 cups Sahara. The new mixture should also be boiled until completely dissolved.
Next, the fire is turned off, and the syrup is left on the stove to cool for 15-20 minutes. At this time, our seed sticks should be prepared. Take the sticks prepared yesterday and at the top, where there are no sugars, tie the second stick crosswise with a thread. This is necessary so that the seed can be vertically lowered into a glass with a solution when growing a crystal from sugar.

Instead of a second stick, as a holder you can use .... regular clothespin!
3. Carefully pour hot syrup into glasses. Please note that the syrup must certainly be still hot! Otherwise, nothing will come of it.
If you want to the crystal was colored, you can add a little food coloring to the syrup. Add different colors of dyes to each glass of syrup and get multi-colored crystals!
In the center of each of the glasses with syrup, lower the sticks vertically. They should not touch the bottom of the glass, let alone its walls! The second stick will act as a holder. By the way, instead of it, you can use thick cardboard by sticking a stick with a seed into it. Or clothespin.

Glasses with syrup and sticks - leave blanks in a warm place for 7 days
Put the glasses with chopsticks in a warm and secluded place where no one will accidentally drop them, and cover with a film or newspaper to protect from dust. Crystals will grow from sugar at home 7 days. So be patient, after all, it's not that long!
4. After a week, you can carefully remove the crystals from the glasses and enjoy them! Don't be discouraged if something doesn't work the first time. Try again and everything will definitely work out! But usually, if you do everything according to the instructions, there are no problems with growing crystals from sugar at home.

These are such cute multi-colored sugar crystals that you will get in the end!
The resulting crystals can be given away to friends (an original gift!) Or give a whole bunch of multi-colored crystals to your girlfriend (she hardly expects this). And you can keep it as a beautiful souvenir.
That's all. Next time you will learn how to grow a crystal from salt, soda and blue vitriol at home. Successful experiences!
A wonderful and exciting activity - growing crystals at home can distract your child from harmful gadgets for a long time. Before our eyes, real magic will happen - both adults and children will be surprised. And if you grow a crystal from sugar, the result will be not only beautiful, but also tasty.
The main thing is to be patient, crystals do not grow quickly, they need time. But you don't have to wait a year either. One or two weeks is enough - and now, the crystal is ready. Of course, it is not possible to grow ruby or emerald druse at home, but, one way or another, the process will be very entertaining and interesting.
You should know that when artificial jewelry is grown under industrial conditions - crystals of diamond, ruby and others - the process is very slow, but one large crystal can be grown. And if you need a lot of small crystals, then the process should be fast.
Ways
Solution cooling
In this case, a salt solution is prepared and then cooled. In this case, a chemical reaction occurs when the dissolved substances in the water precipitate from a decrease in temperature and, accordingly, settle on the walls of the vessel or on a carefully placed stick or thread.

If the cooling is slow enough, it is possible to grow some rather large crystals of a beautiful, geometrically regular shape. And if you cool immediately and sharply, then a lot of small salt crystals are formed, and all of them are of arbitrary, irregular shape. After all, with rapid and rapid growth in close proximity it becomes crowded. But sometimes it is fun to grow such crystals - a miracle happens literally before our eyes. Ruby crystals, of course, cannot be grown this way, but in any case, the result and the process will be interesting.
Water removal
With this method, water is gradually evaporated from a solution of salt or sugar - in a natural way. It is important to evaporate the water as slowly as possible - the result will be more accurate. It is advisable to generally cover the vessel with the solution with paper. As a result, you will get large beautiful crystals. In addition, this way dust will not get into the vessel and spoil all the beauty.
A thread or a stick is usually placed in the vessel - crystals grow on these objects. If you didn't put anything, then the crystals will begin to form at the bottom of the vessel - in this case, it will be necessary to periodically turn the crystals over so that they grow evenly from all sides and have the correct edges.

The water will begin to evaporate over time and it will be necessary to add fresh nutrient concentrate.
It is interesting that even if the crystal was initially wrong, for example, it grew in cramped conditions, then if it is separated and grown separately, over time it acquires the correct, beautiful shape, as if “recovering”.
What to use?
Consider what materials you can grow a crystal from:
- salt for cooking
- Copper or iron sulphate
- Alum
- Sugar. The result will be beautiful and delicious. By the way, sometimes in stores and especially in tea boutiques, you can see sugar crystals on sticks that are sold. If you have seen it, you will agree that it is very appetizing and looks chic, but the price is frustrating. But you can grow sugar crystals on your own, pleasing yourself and surprising your loved ones.

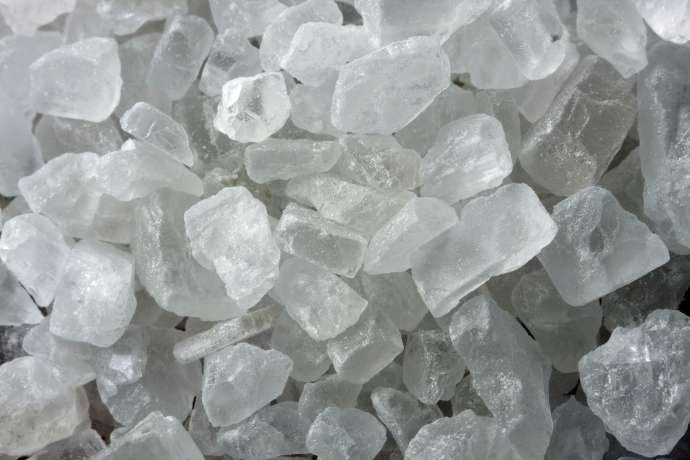
salt crystal
Edible salt is in every home, so this cheap, unpretentious material can be used for crystalline experiments. In general, a crystal can be grown from any salt. But far from everyone has access to chemicals and substances, so sodium chloride is the most accessible salt to us, unlike complex and expensive substances for growing ruby or emerald.
- Pour water into a glass and put it in a container with water. Any water will do. If you need ideal growing conditions - use distilled. And if you are just conducting an amateur experiment, it will do from the tap
- Salt should be poured into a glass and mixed. She starts to dissolve. If the water in a large container begins to cool, constantly add warm
- Add salt and dissolve it by stirring and maintaining a constantly high temperature of the water that surrounds the glass

- Keep adding new salt until it no longer dissolves. You will understand this when you see that the newly added salt began to simply settle at the bottom. Everything, a concentrated salt solution is obtained
- Now it should be poured into another container. At the same time, the precipitate that formed from the last addition of salt must be left in the old glass - it will not be useful for growing crystals
- Carefully sort through your salt and find a crystal large enough, then put it in the bottom of the glass with the solution. Around this "base" new crystals will form and grow.
- It will be more difficult to tie a crystal to a thread and hang it in a container with a solution - but at the end you can get a thread hung with clusters
- In two days, you will already notice the growth that has begun. And with each subsequent day they will become more and more beautiful. If you want, you can add food coloring to the water - and you will have your own ruby or chrysolite crystals

If you do the whole process again over again, and use the crystal you have grown as a "base", it will increase even more. So you can continue, almost indefinitely. If you want, you can grow a salt crystal the size of your palm or smaller.
Keep in mind that a standard glass of 200 grams can hold about 70 grams of salt - that's 3.5 tablespoons. This should be taken into account when preparing the solution. The proportion is calculated for a water temperature of 20 degrees. If you raise the temperature, more salt can get into the glass. This refers to the amount that can be dissolved in water without precipitation.
- It is not recommended to pull the growing "jewels" out of the nutrient solution into the air. This can slow or even stop their growth.
- It is better to cover the container where the "pet" grows, since even the ingress of ordinary dust can be detrimental to the "growing organism"
- Be sure to keep an eye on the solution, update it as necessary - and your "ruby" or "emerald" crystal will delight you with fast, active growth.

- It is undesirable to use dishes from which you ever plan to eat for your experiments.
- Do not use unfamiliar reagents and chemicals. It could be dangerous
- If you are experimenting with chemicals, be sure to wear gloves and protective clothing.
How to store
Suppose we have grown our jewel. Now you need to learn how to care for it and properly store it.
If you have grown a crystal from alum, then it cannot be left in the open air, because under the influence of oxygen it will turn into a grayish powder. Therefore, it should be stored only in a jar with a closing lid. If you are going to keep it in the public domain and show it to friends, then it is better to cover the grown exhibit with a colorless varnish, thereby limiting the supply of oxygen. You can also cover it with color, stylizing it, for example, in the color of a ruby.

As for the "minerals" from copper sulphate and salt, they are more stable. Therefore, for home cultivation, it is better to start with them. It is clear that it is undesirable to expose the salt crystal to water and keep it in a damp place.
In general, making your own crystals even from salt is very exciting. By the way, a crystal can theoretically be grown in any size, if an appropriate vessel is found. But such dimensions, of course, are useless. And everyone can grow a neat and beautiful specimen at home. Some particularly enthusiastic chemists, and even amateurs, grew crystals at home of such a size that only a few people could lift the "colossus".
Do you like to conduct scientific experiments and want to involve your children in this? The best way to do this is to try to grow a crystal together from ordinary salt, which everyone in the house probably has.
Safety regulations
The experiment is based on the chemical reaction of a saturated salt solution. Both cooking and sea are used almost every day in everyday life, it will not harm you. But still try to work with gloves and a scarf. This will prevent the ingress of foreign objects into the liquid - dust, hair.
If you have unhealed wounds or burrs on your hands, you need to be very careful, as the solution can corrode the skin in damaged areas and cause acute pain.
In order to grow such a crystal at home, you do not need any laboratory equipment. Everything you need is at your fingertips.
Regular salt crystals should have even, large faces
Do not add natural or artificial colors. This makes no sense: the salt crystal will still grow colorless.
How to grow a crystal
So, water and salt will act as reagents in the experiment, and the equipment will be:

Note! Jars or glasses must be absolutely clean. Any mote on their inner surface can become the basis for the growth of additional crystals that interfere with the main one.
Solution preparation

The germ of a crystal of sea or common salt
Prepare the embryos on which the crystals will grow. They should be large so that you can easily attach them to a thread.
The easiest way to make a selection is as follows: pour salt into the salt shaker and shake until all the small crystals fall out. Those that did not go through the holes of the salt shaker and remained inside are great for our purpose. Choose the largest of them, with a shape close to a rectangle, with a minimum of deviations.
Try to choose the largest and evenest crystals as the embryo of the future crystal
Fix the selected embryo on a thread, and, in turn, wind it on a stick or pencil so that over time it will be easy to adjust the immersion depth.
Growth
The main and longest phase of the experiment begins. In a saturated solution poured into a second jar, immerse the embryos, wrap the container with something warm so that the liquid cools more slowly.
If the solution was sufficiently saturated and clean, the embryos will increase slightly in a day. Otherwise, they will dissolve.
Now cover the top of the jar with paper to avoid dirt and dust, and leave for 3-4 days. Water will gradually evaporate, and salt will precipitate, growing on the embryo and ensuring the growth of crystals.
It is at this stage that mistakes made in the preparation process may appear. For example, you could incorrectly fasten a loop of thread on a crystal, and it will simply grow into the middle. To avoid this, fasten the embryo not in a knot, but in a thread loop, both ends of which are brought out. After the growth process is over, pull the ends of the loop one by one to loosen the clamp, and remove the thread.

You can set any shape to the crystal during the growth period
If you want to grow a crystal quickly, take it out of the container after a few days. Over time, it should already increase in size. Prepare a new saturated salt solution and lower the crystal there again. Some experts advise simply adding the required amount of salt to the jar and mix thoroughly.
Part one: "How to grow a polycrystal in just 1 hour"
There are many articles on the Internet on how to grow crystals. Most often, a crystal is grown from copper sulfate (the color is beautiful, easy to get, easy to grow).
A seed (a small crystal) is lowered into a saturated solution of copper sulfate on a thread, the glass is covered with gauze and the solution is left to slowly evaporate. The procedure is simple, but it takes weeks, and sometimes months, for the crystal to grow.
Is it not possible in grow crystals faster, for example - per day?! Of course, you can, but instead of one large crystal, you have an intergrowth of smaller crystals - POLYXTAL - which, due to its bizarre shape, is in no way inferior, and even surpasses the beauty of a regular-shaped crystal.
In this article, we will tell and show how to grow beautiful copper sulfate polycrystals (see picture) in the shortest possible time.
Materials:
Copper sulfate 200 g, water, 0.25 l jar, ice cream stick, 0.5 l jar, threads.
Step 1.
In hot clean water (boiling water is not needed, 70-80 ˚C), we dissolve copper sulphate powder (sold in any garden-garden store in the fertilizer department) with the calculation of 100-150 g of copper sulphate per 200 ml of water. Stir the solution with a stick until the vitriol ceases to dissolve in water.


Note : If you managed to dissolve all the vitriol in water, then it is not enough and you need to add more. In the jar at the bottom, an insoluble precipitate should eventually remain.
Our main goal is to achieve a saturated state of the solution (i.e., such a solution in which even more substance cannot dissolve). To do this, you need to dissolve as many grams of copper sulfate as possible in a given volume of liquid.
* How to achieve a saturated solution or how much vitriol should be diluted in water?
To answer this question, let's see how the solubility of copper sulfate changes with temperature (Figure 1).

Figure 1. Change in the solubility of CuSO 4 with temperature (in g per 100 g of water)
As can be seen from the graph, with increasing temperature, the solubility of copper sulfate increases quite rapidly. But when the temperature reaches about 80 ° C, then further heating almost does not lead to an increase in solubility.
In addition, when heated above 90 degrees, the solution becomes cloudy and black flakes precipitate in the form of a precipitate, which affects the purity of the crystal.
Therefore, the optimum dissolution temperature of copper sulphate for growing a crystal is 80 degrees.
Step 2
As soon as we have achieved a saturated solution, we need to filter it. We used a 0.5 liter jar as an intermediate reservoir. We poured the entire solution with sediment into it.


The jar in which we grow the crystal was rinsed from the remnants of the sediment.

Now filter the solution. To do this, we fold the gauze or bandage in several layers and pour our liquid through it.

The sediment remains on the gauze.

Step 3
We cut a recess in the ice cream stick and wind a thread around it. At the end of the thread we tie a knot or hang any weight on which the crystal will subsequently grow.


Step 4
We lower the thread with a knot into the filtered saturated solution so that the knot is in the center of the liquid volume. The height of the knot can be adjusted by winding and unwinding the thread around the stick.

Step 5
We cover the jar with a layer of gauze and put the jar in a quiet place with a constant temperature. The jar was covered with gauze so that dust and dirt would not get into it. And temperature drops and shaking can adversely affect the growth of the crystal.

Step 6
We wait.
As the solution cools (nearest hour), the concentration of copper sulphate in the jar will increase sharply, tk. at a lower temperature, much less substance dissolves in water and the excess substance formed during cooling precipitates in the form of crystals.
As it cools, all the "excess" at a given temperature, the substance passes into the solid phase, building a crystalline structure in the crystallization center - on the thread. As a result, many small crystals form on the thread, which grow on each other with new layers, forming a beautiful polycrystalline body.


Here is a crystal that grew in 2 hours of growth in cooling water. Good start. But still ahead. How to grow a crystal further into a big and beautiful one in just one day, read in our next article.
In the meantime, you can watch everything that we talked about in this article in the video version, which shows in detail all the stages of growing a crystal, described above.
We hope our article and video material will help you grow your own unique crystal that will delight you and your loved ones with its beauty.Good luck!
The second part of the article"On how to continue to grow a large crystal in a short time") read here: