How to break the beds on the slope, or the development of terrain differences. Plot on a slope: planning, strengthening the slope and organizing drainage (85 photos) How to install ready-made beds on an inclined plot
If there are ledges on a sloping site, it is necessary to equip a drainage system so that it is possible to divert excess water from precipitation, melt or irrigation.
With an average slope, the site lends itself well to strengthening. To do this, it is enough to sow its entire sloping territory with Moorish lawn, that is, seeds of herbaceous plants with a very branched root system to strengthen the soil and prevent its erosion. Among such plants, meadow fescue, buttercup, daisy, and clover are especially common. For planting improved, more ornamental plants, soil alone is not enough; a geogrid is required, which must be laid in the desired location, covered with soil and planted in cells specially provided for this purpose.
On very steep slopes, it is almost impossible to equip neither beds nor flower beds. Such soil is subject to rapid natural erosion. To save it and make it suitable for growing plants, terracing is required. But it is not at all necessary to dig out sites in the slopes, but you will have to fill up the soil from the inside of the fences prepared in advance. For herbaceous plants and vegetable crops, wicker fences, for example, from vines or constructed from wooden boards or from slate, are needed, within which earth is poured to level the soil level.
If on the slope you have to organize a whole garden orassemble a greenhouse
, then in this case there are some wisdom. Even the steepest mountain slopes can strengthen trees with their strong roots. On a garden plot, it is quite possible to use this property of trees to strengthen the soil around the entire perimeter. Unfortunately, not all decorative types of trees or shrubs can play such a role. If the slope is very steep, you can try to make landscape changes to it.
Wide terraces will be required for planting trees, which are planted on a slope only in specially constructed ledges with a solid stone support under them.
For fencing garden plantings, very durable materials are usually chosen. Most often it is natural stone or brick, fastened with cement. This is done because wooden barriers eventually break through the strong roots of garden trees, and stone or brick is insurmountable for them, which means they will not undergo natural destruction.
The steeper the slope, the wider the terraces, the more garden trees on the ledges, the higher the fences should be built. Trees are planted with strict observance of the distance required by all the rules from one seedling to another. If there are relatively few tree seedlings planned, and the rest of the slope will be filled with a flower garden, then narrow stepped terraces no more than two meters wide will be enough for it.
Some areas are subject to pronounced terrain changes. The owners do not always understand how rationally you can use such a territory. Most often, the slopes are not ennobled and overgrown with weeds, sometimes they are sown with a meadow lawn. Although the soil on the slopes is fertile, and vegetables can be grown on it. The slope can be an alternative solution when increasing the number of planting beds and expanding the usable area of the garden plot. Barriers made of slate help out here, inside which the space is filled with earth. Slate walls are very fragile, so it is not recommended to erect high terraces in order to avoid their destruction. Permissible ledge height - up to 0.5 meters.
Steps are most reliably obtained from wattle, which is the most suitable material for fencing. But it should be regularly maintained in a functional state. To limit not very high ledges along the slope, logs can be laid, unless, of course, the slope is gentle.
Vegetable ridges are best equipped on a slope in the form of steps, regardless of the level of the slope of the site. A vertical garden will turn out on a steep steep slope at a 45-degree slope, if placed on narrow steps with a stone or brick fence. Spicy plants can also be grown on such terraces.
But in any case, no matter how much you want to make the slope of the site the most functional, you should not neglect the rules for seating plants and crops: the distance between them and the path (or stairs) should be no less than the outstretched hand of an adult.
A plot on a slope almost always seems to potential buyers not the most attractive way to invest.
Naturally, unlike flat territories, it will require additional financial costs for its improvement, and such a prospect will not suit everyone.
Let's try to study in more detail the process of landscaping a site on a slope and consider its most significant stages.
Pros and cons of a site on a slope
According to experts, such, at first glance, complex territories may turn out to be quite a suitable place for building a house, arranging a vegetable garden or a picturesque garden, and all the efforts made will justify themselves as a result of the beauty and originality of the resulting landscape.
Practice shows that it is on inclined areas that it is most convenient to create colorful rock gardens and rockeries, to equip artificial waterfalls, which are built with great difficulty on flat surfaces.
Among the possible problems associated with the improvement of the site on the slope, landscape designers note the openness of the area to the wind and heavy clay soils. All other sides of such a territory are rightfully considered to be advantageous.
Landscaping methods on a slope
For landscaping purposes, a wide range of methods are used, the most common of which are:
- Geoplastics - a method that provides for the artificial formation of relief;

- Terracing - strengthening horizontal ledges of the earth with retaining walls.

In practice, both of these methods are usually combined with each other, which allows you to achieve brilliant results. So, a multi-level plot with artificially created terraces looks much more impressive than even backyard territories - especially if it is equipped not with classic straight lines, but with gracefully curved retaining walls.
The main stages of transformation
Landscaping of the territory going down the slope is carried out in several stages. Previously, experts determine the slope of the site, based on the ratio of its height to the horizontal plane of the base. Further, the territory is marked on the plan, breaking it into separate lanes - the so-called. "platforms-terraces", the dimensions of which make it possible to place a house, outbuildings, a vegetable garden, a garden, a flower garden and other objects in their space.

They unite the disparate space into a single whole with the help of small wide stairs and the already mentioned retaining walls, which not only protect the earth from slipping, but also act as a spectacular decoration of the terraces themselves.
The arrangement of terraces begins from the highest point of the site, gradually moving down the slope. At the same time, the land cut from the upper platforms is transferred down, using it to create terraces of the second and third levels.
Each platform is fixed with retaining walls that prevent soil from sliding and serve as the basis for the underlying terrace. The material for these structures can be:
- massive logs, wooden beams;

- gabions - containers made of durable metal mesh, filled with rubble, large gravel, pebbles, etc.;
- pergons - lattice welded structures with the same filling as that of gabions;

- concrete and decorative slabs.
Small (up to 1 m), vertical walls are usually erected from durable logs, the lower part of which is pre-treated with antiseptics and anti-rot agents. A retaining wall made of wood is installed in the ground to a depth of 45-50 cm, after which it is covered with a waterproofing material from the side of the backfill and proceed to the arrangement of the terrace. It is desirable that the slope of the wall varies within 8-10°, which will allow the structure to maintain the ground pressure of the erected site.
In recent years, pergons and gabions are used more and more often in the improvement of sites on the slopes - lattice and wire boxes, the space of which is filled with stone (read more in the article Gabions with your own hands). Such structures not only successfully cope with their primary function - holding the soil on the terraces, but also act as their spectacular decoration.
The areas reinforced with retaining walls made of rubble stone, horizontal beams and wooden saw cuts look original. Another option popular with landscape designers is concrete retaining walls lined with pellet or sandstone. In this case, the method of laying the wall is very interesting, which involves facing with stones, similar to the principle of laying tiles. All stone fragments of such masonry are held together with a mixture of earth, sand and cement.
In the future, in the spaces between the stones, shaving, garden saxifrage and other unpretentious plants that can adequately decorate the landscape will be able to take root.
The advantage of concrete and stone structures is also that, due to their strength characteristics, the height of retaining walls can be increased up to two meters (although many designers do not recommend exceeding the optimal limit of 0.6-1 m).
How to organize a garden on a slope? How to make raised beds

When erecting retaining walls made of stone or concrete, a foundation must first be laid under them, thanks to which the finished structure will gain additional strength and durability.
Another important stage of improvement is the organization of a drainage system that protects the soil from erosion. It is logical that during heavy rains and spring floods, water flows inevitably form on the top of the slope, which, rushing down the terraces, wash out the soil. In addition, the water stagnant behind the retaining walls becomes swampy, which over time can lead to their deformation and destruction. To prevent this from happening, a drainage system is equipped in the walls, one of the following types, namely:
- Underground drainage.
- Ground drainage.
- Filtration holes.
In addition, the terraces are equipped with storm sewers and drainage systems, the projects of which are developed in advance.
In parallel with the construction of retaining walls, staircases made of stone, monolithic concrete or brick are erected on steep slopes. The simplest option is a staircase made of wooden boards or logs, reinforced with stringers - inclined beams, to which risers are nailed.
Choosing Plants for Slope Plots
Already on fully finished terraces, it is recommended to plant trees and shrubs with a wide-spread root system, which will serve as a kind of frame that binds the soil into a single block. So, from large bushes, whose roots are able to "hold" the soil, barberries, terry and semi-double wild roses, euonymus, sods have won the greatest popularity. Of the conifers, cotoneasters, junipers, globular arborvitae and dwarf spruces are perfect.
Do not forget that the process of landscaping a site on a slope requires specific knowledge and skills, so before starting any work, contact the experts for advice and assistance in implementing the tasks.
Beds on a slope made of wood
Slope beds – SADURAD
GARDENER'S HANDBOOK
Skip to content
The beds on the slope
How to set up a vegetable garden on sloping ground
Growing cultivated plants in horizontally flat beds is, of course, ideal for a gardener. But what to do when the area reserved for landing is sloping? Gardeners are forced to create beds on the slopes of garden plots of various levels of flatness, resorting to various tricks against washing out the fertile soil layer and the subsequent death of cultivated plants.
A site on a slope is not a serious obstacle for growing herbaceous crops. There should be no doubt if your garden located under a ten-degree slope, as this is the permissible limit for landings. Plants planted on the slopes do not experience moisture deficiency, because it is easier to water them: irrigation water flows down faster into the inter-ridges. On garden slopes, many gardeners grow flowers, which is a very good solution.
Terrain irregularities are classified into three types:
Gentle slopes: the distance from the top to the bottom of the site per meter of slope is less than 30 cm.
Slopes of medium slope: the slope of the site is from 25 to 28 degrees.
Steep slopes: the slope of the site exceeds 30 degrees.

If there are ledges on a sloping site, it is necessary to equip a drainage system so that it is possible to divert excess water from precipitation, melt or irrigation.
With an average slope, the site lends itself well to strengthening. To do this, it is enough to sow its entire sloping territory with Moorish lawn, that is, seeds of herbaceous plants with a very branched root system to strengthen the soil and prevent its erosion. Among such plants, meadow fescue, buttercup, daisy, and clover are especially common. For planting improved, more ornamental plants, soil alone is not enough; a geogrid is required, which must be laid in the desired location, covered with soil and planted in cells specially provided for this purpose.
On very steep slopes, it is almost impossible to equip neither beds nor flower beds. Such soil is subject to rapid natural erosion. To save it and make it suitable for growing plants, terracing is required.
Slope beds – SADURAD
But it is not at all necessary to dig out sites in the slopes, but you will have to fill up the soil from the inside of the fences prepared in advance. For herbaceous plants and vegetable crops, wicker fences, for example, from vines or constructed from wooden boards or from slate, are needed, within which earth is poured to level the soil level.
If on the slope you have to organize a whole garden or assemble a greenhouse, then in this case there are some wisdom. Even the steepest mountain slopes can strengthen trees with their strong roots. On a garden plot, it is quite possible to use this property of trees to strengthen the soil around the entire perimeter. Unfortunately, not all decorative types of trees or shrubs can play such a role. If the slope is very steep, you can try to make landscape changes to it.
Wide terraces will be required for planting trees, which are planted on a slope only in specially constructed ledges with a solid stone support under them.
For fencing garden plantings, very durable materials are usually chosen. Most often it is natural stone or brick, fastened with cement. This is done because wooden barriers eventually break through the strong roots of garden trees, and stone or brick is insurmountable for them, which means they will not undergo natural destruction.
The steeper the slope, the wider the terraces, the more garden trees on the ledges, the higher the fences should be built. Trees are planted with strict observance of the distance required by all the rules from one seedling to another. If there are relatively few tree seedlings planned, and the rest of the slope will be filled with a flower garden, then narrow stepped terraces no more than two meters wide will be enough for it.
Some areas are subject to pronounced terrain changes. The owners do not always understand how rationally you can use such a territory. Most often, the slopes are not ennobled and overgrown with weeds, sometimes they are sown with a meadow lawn. Although the soil on the slopes is fertile, and vegetables can be grown on it. The slope can be an alternative solution when increasing the number of planting beds and expanding the usable area of the garden plot. Barriers made of slate help out here, inside which the space is filled with earth. Slate walls are very fragile, so it is not recommended to erect high terraces in order to avoid their destruction. Permissible ledge height - up to 0.5 meters.
Steps are most reliably obtained from wattle, which is the most suitable material for fencing. But it should be regularly maintained in a functional state. To limit not very high ledges along the slope, logs can be laid, unless, of course, the slope is gentle.
Vegetable ridges are best equipped on a slope in the form of steps, regardless of the level of the slope of the site. A vertical garden will turn out on a steep steep slope at a 45-degree slope, if placed on narrow steps with a stone or brick fence. Spicy plants can also be grown on such terraces.
But in any case, no matter how much you want to make the slope of the site the most functional, you should not neglect the rules for seating plants and crops: the distance between them and the path (or stairs) should be no less than the outstretched hand of an adult.
Back to content
To say that plants do not care on which bed only a person who is far from agriculture can grow. The level of soil moisture, the intensity of gas exchange and the species composition of microorganisms that live in the upper layers of the earth depend on the shape and size of the beds. All these factors have a direct impact on the quality of the substrate, and therefore on the level of yield - the main criterion for success for any gardener or gardener. How to use a scientific approach for the benefit of your garden, how to create not only a neat appearance of the beds, but also to maximize the yield of your site? We will try to answer these questions in this publication with a large selection of photos of a wide variety of beds.
The principles of arranging beds
A bed is a relatively small, often quite isolated area of soil, where it is possible to provide individual care for a plant of a particular crop, create a moisture regime and carry out top dressing. Obviously, plants with different agricultural practices are grown in a summer cottage or garden, often with opposite care requirements - without an individual approach, it will not be possible to achieve high yields. It is for this that differentiation is necessary on the site - the division of the territory into zones, and the zones into beds.


If the purpose of the beds is more or less clear to every gardener, then such nuances as the level of illumination, the composition of the soil and even its consistency, necessary for different crops, are not always and not taken into account by everyone. Unfortunately, not understanding that cucumbers and tomatoes, for example, require a different approach, leads to a significant loss in yield. By creating difficult trenches for planting certain crops, and isolated beds, the owner of the site can give the plants proper care - all efforts will invariably pay off with the quality or quantity of the crop.


Ways of cultivating the land
There are two main (and diametrically opposed) approaches to farming:
- traditional;
- ecological.
The traditional way of cultivating the land is an outdated, incredibly laborious and often irrational principle that is extremely traumatic for the ecosystem. It is based on the attempts of a person to control the processes in the soil, its condition. The traditional way of farming includes the following activities:
- two-time digging of the soil (per year);
- herbicidal treatment;
- uncontrolled amount of fertilizer applied to the soil;
- beds with this principle of farming are cultivated in such a way that they have a small number of capillaries and, as a result, an insufficient number of microorganisms.
- All these factors inevitably lead to low yields and depletion of soil resources.


The second approach, ecological (natural), is based on the ability of the soil to regenerate itself. There are many principles of natural farming, but all of them are based on the fact that a person rarely interferes with the natural course of processes occurring in the soil. Digging the earth is replaced by surface loosening, and weeding once a week or two is replaced by timely mulching.


Modern farming methods are based on an ecological method and with this approach, microorganisms, plant roots and insects independently restore the soil structure. An increase in the number of capillaries increases the processes of gas exchange, as a result, the roots of plants are enriched with nitrogen in a natural way, which leads to an increase in both the quality and quantity of the crop. All this can happen without chemical fertilizers at all or with their minimum amount.


Types of beds for a modern garden
Only at first glance it may seem that the beds differ from each other only in size and shape. Although these indicators are of great importance for plants that need an individual approach and isolation from other crops. The beds may differ in the very principle of formation, for example, not on the site, but above it, located on the so-called "green wall" or inside large-diameter plastic pipes. It all depends on how you care for each specific type of plant.


Bed in the form of a box
The bed-box is one of the most popular ways of cultivating the soil today. This method of planting allows not only to create a separate place for each crop, but also to organize the landscape of a summer cottage or garden at a high aesthetic level. It is not difficult to organize a bed in the form of a box - a fence in the form of low shields is installed on the prepared and marked place of the site (hacienda or a small backyard).


To organize the fence of the bed-box, you can use:
- flat or wavy slate;
- unnecessary boards;
- polycarbonate sheets;
- plastic;
- any waste material that can tolerate soil moisture for more than one summer season.


Further, in the prepared compartment, organic matter is poured in layers and the soil itself. For the winter, such beds are not dismantled, and in the spring, after surface loosening, it will be possible to plant seeds or seedlings of certain crops again. This approach is not only practical, rational, but also aesthetic.


Raised beds with high sides
High beds are usually presented in the form of ridges or trapeziums. The rise of the soil, as a rule, is provided by a "cushion" of the compost layer, on top of which the earth is poured. In areas of our country where the bear is common, a layer of compost is not used, the rise is carried out only by pouring earth. Medvedka usually builds nests in the compost layer (a warm and humid place is an ideal habitat) and can spread very quickly throughout the site.


High beds are most often used for growing melons and gourds:
- cucumbers;
- pumpkins;
- zucchini;
- sometimes some varieties of potatoes are grown in this way.


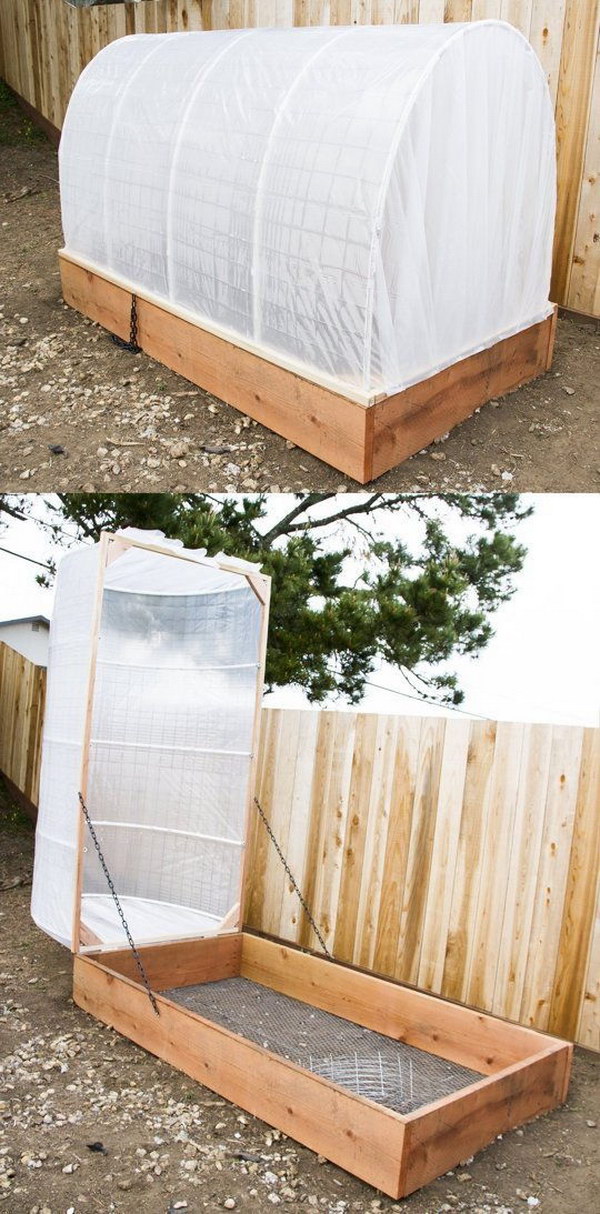
High-sided beds are created for one season. In most cases, the embankment strongly settles under the weight of snow and loses its functional background. If weaving plants (for example, cucumbers, some types of zucchini) will be grown in a bed with a box structure, then it will not be superfluous to equip the fence with a vertical lattice (made of wood or metal, created using weaving, any improvised means).


If such a structure is equipped with a high dome, covered with a film, then an ordinary garden bed becomes a greenhouse. Growing seedlings in such portable structures is very convenient and practical.

"Warm" beds
"Warm" beds are called due to the fact that in their lower layers there is fresh, not rotted manure. The mound of manure is carried out in late autumn, so that during the winter period, under the cover of snow, all processes take place. In early spring, after the snow melts, such beds are cleaned so that they warm up with the sun and the decomposition processes start.


Further, the manure begins to rot with a large release of heat. As a rule, in compost heaps during "burning" the temperature inside can reach 40-50 degrees. But on the beds, the manure layer is low and this effect does not occur, moreover, winter exposure significantly slows down the “burning” processes. All these manipulations and preparations are needed in order to plant crops in a finished, “warm” garden bed. Usually this is done for planting plants with a shallow root system - cucumbers, radishes, etc.


After the end of the summer season, all manure is recycled. If you remove the top layer of soil, then under it you can find - humus, which is a very valuable substrate. This natural fertilizer can be sprinkled throughout the garden or summer cottage. And at the end of autumn, it will be possible to put manure in the bed again and start the process of preparing a “warm” bed in a new way.


Garden beds with drainage
In clay buds, in very low places, into which all the water is constantly drained, and in wetlands, it is necessary to equip beds with drainage. It is not difficult to make them - usually 50-60 cm of the soil layer is removed, then sand about 20 cm high is laid out at the bottom of the resulting pit, then sawdust, humus are poured, and only after that - the soil. Drainage and gas exchange in this type of beds are excellent - an ideal place for growing root crops (for example, potatoes).


Material for making beds with your own hands
Creating a bed of any configuration requires some preparation. In order to equip the beds in the form of boxes, you will need to use the following materials:
- slate or boards, plastic or polycarbonate of such a height that there is at least 30 cm in the ground, and at least 20 cm on the surface of the entire size of the product;
- pegs made of wood or metal, which will be needed to secure the material of the fence;
- non-woven material with which it will be possible to cover the bottom of the prepared trench.


After the blank - the dug hole is covered with non-woven material, it will be necessary to fill it with the following layers from above:
- sawdust or straw - about 10 cm;
- dry foliage (which you prepared in advance in the fall) - about 10 cm;
- a mixture of compost and soil, in a ratio of 1 to 2 (layer size 10 cm or more);
- clean layer of earth at least 10 cm.

- marking on the ground - usually done using pegs and a stretched cord. When calculating the size of the beds, it is important to understand that the narrower the trench, the faster it will dry out;
- then comes the preparation of the material for the fence - cutting it, preparing the pegs. If the box is not very large, then it will be more convenient to assemble it in advance using self-tapping screws. Such structures are reusable, they can be removed for the winter period if the beds are transferred;
- then a fence is installed on the garden;
- then a material of non-woven origin is laid at the bottom of the pit;
- a layer of sawdust, dry foliage, soil mixed with compost and just earth is successively filled up.


And in conclusion. Your site can not only bring a good harvest, but also look aesthetically pleasing. Landscape design can manifest itself not only in the courtyard of a private house, but also in the garden, in the garden. But the main principle of the location of the beds on the territory should still be the needs of plants in sunlight. On a properly located bed, plant care will require minimal care.


I have a complex terrain in my dacha: in some places the slope reaches 30 °. After long attempts to improve the site, I still managed to find a good solution, and for twenty years now we have been reliably served by comfortable bench beds that do not require any maintenance. (some even manage to make a pool on the slope)
Agree, working in the country, there is often a desire to sit comfortably, relax, admire nature. Carrying a folding chair for this is inconvenient.
And here - please, you not only relax where you work, but also work, sitting comfortably. You will appreciate the convenience of such a bed when you dig up soil in it or water plants: slate walls do not allow the earth to crumble and water to drain when watering.
In addition to these advantages, there is one more thing - the low cost of its arrangement. Judge for yourself: you will need several small scraps of unnecessary pipes with a diameter of at least 5 cm, from 4 to 6 boards (depending on the length of the bed),
a few pieces of old slate and a few self-tapping screws. And the time for their construction will take just nothing - 1-2 hours, provided that the building material has already been prepared. By the way, I have more than 20 such beds.
The order of work is the following. First, you calculate the bed geometry: determine the line of convergence of the ground level plane in it with the slope relief and mark it directly on the ground.
Then, using a board, the length of which is equal to the width of the bed, mark out the places for driving in metal pipes, for which you combine one of its ends with the line of convergence of the ground planes (it should be as close to horizontal as possible so that when watering the water evenly spreads over the bed), and on place a plumb line at the other end.
After that, using the level, set the board horizontally, and the plumb line will show you a point on the installation line of the support pipes. By marking another 2-3 points in this way, you can mark the line itself on the ground. It remains to determine where you want to place the ends of the beds, and you can start driving pipes into the ground.
When choosing their length, you need to remember the golden rule: the deeper the pipe is driven in, the greater the stability of the bed wall (including soil freezing).
Therefore, the length of the pipe should be equal to the height of the facade wall plus the depth of the depth, which depends on the height of the bed and the properties of the soil, but should not be less than the height of the bed itself.
And you can determine it using the same board and level. When marking the driving points, take into account the step of the slate wave so that the pipes fall into the recesses when it is installed. Pipes should be driven in 10-15 cm above the height of the bed.
They are driven in to a level 10-15 cm higher than the height of the beds. Next, wooden plugs are inserted into them, and in the process of hammering them into the pipe, the latter deepens until its upper edge of the plug reaches the height of the bed.
Now you can start assembling the frame of the bench.
On fig. 1 shows that the boards are connected to each other in the form of the letter G. In other words, the front frame board is vertically attached to the board on which you will sit down and from the edge.
This is done using self-tapping screws screwed into pre-drilled holes in the top board. The connection with nails did not justify itself - when the boards dry out, the nails come out and the frame warps. On fig. 2 shows how the boards are connected at the corners.
If their length is not enough for the garden, then the joints of the horizontal and vertical parts must be located as far apart as possible, and the outer edges of the joints should be fixed to each other using self-tapping screws with a piece of picket fence, a metal plate or a corner. Then when they dry out, they will not diverge.
The frame assembled in this way is installed on driven supports. Next, holes are marked for self-tapping screws on the boards above the plugs in the pipes and the frame is screwed to the supports. The final adjustment of the horizontal position of the bed is made by blows on the frame at the points of its attachment to the supports.
This must be done carefully, laying a piece of wood so that the frame boards do not burst.
Now you can lay pieces of slate pre-cut to size by a grinder. They descend into a pre-dug groove along the support installation line (a depth of half a spade bayonet is quite sufficient).
And their top must necessarily rest against the board of the bench (achieve this by changing the depth of the groove). After installing the slate, fill the groove with earth and tamp it down. All! You can sit on the edge of the bench bed and make sure that it is strong, reliable and comfortable.
Now it remains only to fill the bed with earth, while observing an important rule: the soil should not reach the horizontal boards by at least 5 cm, otherwise they will begin to rot.
The beds on the site with a slope - drawings

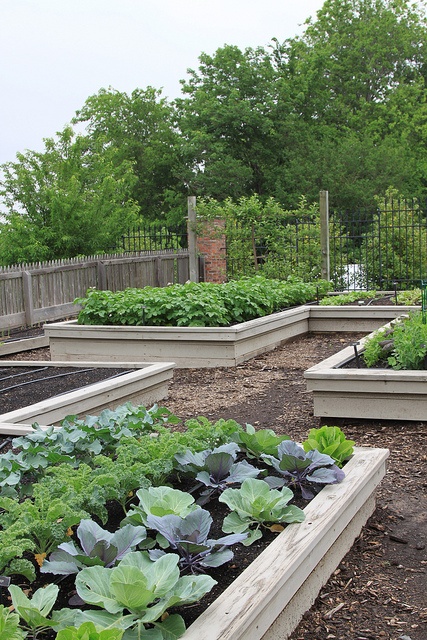
Consider an example of organizing a garden on a slope.
Raised beds were made for vegetables and herbs. The sides of the beds are assembled on the grooves. The groove for the middle dividing bar is sawn to the top, so it is convenient to remove the bar. Moisture will accumulate in the grooves, the wood will rot faster, so you need to take into account the climatic conditions of your region. Since the sides of the beds are installed on a slope, their legs are deepened for stability.
After the sides are installed and leveled in place, they are filled with fertile soil. A layer of fine wire mesh was laid at the bottom of the beds before backfilling to protect against moles.
In the project, the steps are made of stone. You can also use paving slabs, paving stone, wooden logs, etc. An example of how steps are made from logs can be viewed here. If you use wood for stairs and walkways, nail wire to it so that it will not be slippery after rain.
It is better to lay geotextiles under the steps, it will prevent weeds from germinating. Sometimes there are tips to use film instead of geotextile, because it is cheaper, but the film will quickly collapse and weeds will sprout.
The author of the project did not put geotextiles and weeds appeared on the steps.
The taller plants are planted so as not to obscure the lower ones. Some plants grow well together. Raised beds are easier to care for but require more frequent watering. Mulching will help solve this problem, and at the same time the problem of weeds.
Such a garden is not only useful, but also looks pretty)


