How to insulate a wall from the inside: step by step instructions. Features of wall insulation in a panel house Wall insulation inside a panel house apartment
Houses built over the past 2-3 decades hold heat much better than buildings from the Soviet Union. This is especially noticeable in the cold season - "Khrushchev", built from panels or bricks, freeze through an order of magnitude faster, so they need more insulation materials and heating. Since millions of people live in such houses, the issue of wall insulation is especially relevant for them.
To normalize the microclimate of the room, residents can use one or two methods of thermal insulation:
- outdoor;
- internal.
The implementation of the first method is often complicated by two factors:
- the location of the apartment on the upper floors;
- the layout of the living space, in which most of the walls border on the walls of neighboring rooms (it happens that only a balcony can be sheathed from the outside).
The second method is not without a number of disadvantages:
- inevitable reduction in the usable area of the premises;
- for good insulation from the inside, you will have to thoroughly prepare the walls, destroying your usual life;
- temporary relocation of residents is required, especially if work is carried out with materials containing harmful impurities;
- insulation from the inside reduces the service life of the panel structure, since in winter the wall enters the zone of negative temperatures.
However, internal wall insulation is preferable to thermal insulation from the outside, saving money - residents do not have to spend money on high-altitude work. They will also spend less on insulation.
Materials for wall insulation of a panel house
The operation of the apartment is accompanied by a periodic increase and decrease in the air temperature inside the premises.
Therefore, the material must not only be an excellent heat insulator, but also have acceptable moisture-resistant properties.
This requirement is fully met by the two most popular heaters, which we will consider. Recently, liquid heaters have also gained popularity, but these are the topics of our other articles.
Insulation supplied in the form of foam that hardens after application. It has a low coefficient of thermal conductivity, so it keeps the heated air in the house well. Formwork must be used for uniform application and crystallization. Its role can be played by bars with a section of 25 × 25 mm or a little more, located vertically and horizontally along the wall. The formed cells (sections) will be evenly filled with polyurethane foam.
The thermal insulation of the walls of a panel house with the help of polyurethane foam has several more features:
- after the polyurethane foam has hardened, an additional layer of waterproofing is required (to reduce the amount of condensate formed);
- the impossibility of finishing and cladding (you will have to build a second plasterboard wall on top of the PPU, on which you can apply wallpaper, plaster, etc.);
- if the previously listed conditions are met, a minimum of condensate will occur, after which it will be diverted to the junction of the wall with the insulation.
The cost of thermal insulation of the walls of a panel house from the outside or inside with the help of PPU is high - special equipment will be required, as well as skilled workers. Therefore, consumers prefer the second good material.

Expanded polystyrene extruded (polystyrene)
The biggest difficulties in working with the material arise at the stage of its installation. Styrofoam is supplied in even slabs of 100 × 50 cm or more, therefore, when sheathing uneven walls, its distortion is inevitable. Therefore, it is required to carefully prepare the initial surface, otherwise air gaps will appear, where condensate will penetrate.
The plates are attached to the wall with special glue, applied evenly to the entire sheet, and the joints are smeared with sealant. The use of anchor joints is excluded - leaky transitions may occur throughout the entire foam layer. It is better to use a T-shaped profile fixed on the floor and ceiling.
Work performance technology
When warming, it is worth adhering to the stages of work described below.
- The choice of insulation method (outside / inside; the second one is easier to implement).
- Calculation of the insulated area, purchase of material; transition to the preparatory stage.
- Drying the surface (heat guns, heaters are used). The walls are insulated strictly in the warm season!
- Old coatings (wallpaper, paint, decor) are removed, plaster is removed to the concrete base.
- The surface is cleaned of dirt, dust (using a broom or a vacuum cleaner).
- Treatment of internal walls with an antiseptic.
- Priming of the original surface (it is better to use a deep penetration primer and apply it in several layers).
- Let the walls dry properly.
- Leveling with special mixtures (those used in bathroom decoration are acceptable). When the plaster dries, heaters are not used - this way it will acquire normal strength.
- Installation of foam. Unlike polyurethane foam, it does not require formwork - the slabs are glued directly to the dry surface. When using PPU, the insulation is applied a little later after the manufacture of the wooden frame.
- Following the complete drying of the glue, the joints of the plates are sealed with sealant.
- On top of the resulting structure, a second wall is applied with a final finish.

If all the steps are followed correctly, the temperature increase inside the premise of the panel house is guaranteed. If the work did not bring results, you will also have to insulate the floor of the apartment.
The range of good heaters is quite large, but few of them are suitable for panel buildings. Due to the inability to insulate the apartment from the outside, residents have to carry out internal work, which is not very complicated, effective and does not require special skills or knowledge. Even residents of hopelessly freezing panel buildings can achieve an increase in room comfort if they use the heaters recommended above.
The walls of a panel house need additional insulation over time. Unlike brick buildings, with temperature differences, they can freeze, accumulate moisture, which leads to the destruction of the external facade of the house, the appearance of cracks, mold and other unpleasant changes. Residents may notice that the apartments are cold, despite the presence of heating. To eliminate the consequences of such changes, and to keep the level of heat inside the premises as much as possible, it is recommended to insulate the panel house from the outside.
Benefits of outdoor insulation
External insulation of the house will not only prevent heat leakage through the walls, but also protect the facade from further destruction. With the use of various options for decorative design in the exterior, the house will look new. In addition, wall insulation from the outside has the following advantages:
- there is no need to evict tenants from the house during the repair work,
- increasing the temperature inside the building by protecting the walls from freezing and other adverse effects of weather conditions,
- there is no change in the size of the interior - the entire living area is preserved,
- insulation technology strengthens the supporting structure of the panel house, the building becomes more durable and its service life increases,
- a layer of insulation on the outside acts as an additional good soundproofing of the building.
External wall insulation is most effective for panel houses - it is possible to save up to 50% of heat.
Types of insulation
The choice of what material is better to insulate the walls from the outside is influenced by:
- location of the panel house in a certain climatic region,
- rainfall, wind strength and speed,
- allocated budget for the insulation of a panel house,
- other individual factors.
useful at work
The estimate and project for the work is usually compiled by the management company or HOA. And the team of industrial climbers directly performs the process of warming from the outside.
For panel houses, two types of insulation are mainly used:
Mineral wool
For outdoor work, it is convenient to work with mineral wool slabs, which are produced by various manufacturers. She has good performance in terms of basic characteristics, including thermal conductivity. However, care must be taken to ensure that mineral wool does not get wet, otherwise it will lose its thermal insulation properties. To do this, a vapor-permeable membrane is laid under the insulation layer, which will protect it from vapors.
When finishing with a ventilated facade, condensate from the walls of the house will be removed due to the air gap and the membrane can be omitted. 
Styrofoam
Differs in ease, simplicity when laying plates on a wall. It also has good parameters for heat and sound insulation. For outdoor work, it is important to use a material that does not support self-combustion. Manufacturers mark it with the G1 marking, however, the results of many tests confirm that the foam is flammable, and this name does not meet the requirements of GOST 30244-94. When buying a heater, be sure to ask the seller for product certificates.

It's important to know
The insulation of a panel house from the outside is limited by the thickness of the insulating material. The maximum value of foam plastic thickness for walls is calculated using special formulas, taking into account average temperatures in a certain climatic region and the purpose of the building (residential, public, industrial).
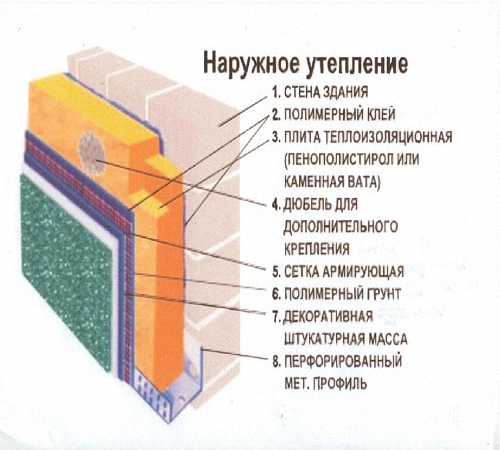
Stages of the facade insulation process
Depending on the method of insulation chosen, the installation will vary. There are two main technologies:
- Wet Facade
- Ventilated facade
The process of warming with a "wet" method is described below.
Wall surface preparation
It is necessary to carefully prepare the surface of the facade of the house in order to insulate it with high quality. Each wall is leveled, cleaned of various deposits, voids and cracks are sealed, especially paying attention to panel joints. If necessary, a sealant is laid in them, the gaps are smeared with special mastics.
Irregularities of the wall surface are allowed within 1 - 2 cm, but no more.
After cleaning and processing the joints, the walls are left to dry. Then they are covered with a universal primer using a roller or sprayer.
Insulation installation
Mounting of heat-insulating material on the walls is possible in three ways:
- for glue
- fasteners (dowels, plastic nails),
- combination of glue with fasteners.
The video shows in detail the method of fixing the foam with a dowel for thermal insulation.
For example, the foam is fixed in a combined way from the first floor to the upper ones. At the bottom, a starting bar is installed, from which insulation begins to be glued. In this case, the glue is applied to the walls gently with a spatula, filling in the existing irregularities. Then foam sheets are pressed tightly against the treated surface. The evenness of the rows of insulation is checked by a level. Before the adhesive base sets, it is possible to correct minor errors. Now you need to wait 2 - 3 days for the glue to dry completely and the insulation to be well fixed on the walls. Next, the foam is additionally fixed with dowels - 4 - 5 pieces per sheet. Holes for fasteners are made with a puncher.

The second and subsequent rows of foam sheets are laid in a checkerboard pattern so that the joints of adjacent layers do not match. All seams between the insulation and the gaps from the fasteners are filled with a special mounting foam, designed specifically for the installation of foam, in order to minimize the likelihood of heat leakage. Such foam is produced in cylinders and it is better to apply it with a special gun. Excess, the remains of the foam after drying cut off.
Grid pinning
Styrofoam is a rather fragile material, therefore, to give strength and rigidity to the insulation elements, it is reinforced. To do this, a special stable mesh is installed on the outside of the foam sheets. It is convenient to cut it into separate parts of the same size and fasten with an overlap in small fragments. A layer of a special adhesive solution for facade work is evenly applied to the insulated surfaces, and the mesh is pressed into it. Then another adhesive layer is applied for alignment. After installing the grid on the whole house, they are waiting for the glue to dry in order to treat the surfaces with sandpaper from smudges of the mortar and irregularities during the fastening process.
The reinforcement provides mechanical stability for the final decorative coating of the panel house.
Finishing
After insulation, external facades, as a rule, are decorated with decorative plaster. For the best adhesion of materials, the general layer of thermal insulation is primed again.
In addition, for residential apartment buildings, the technology of hinged ventilated facades is often used. The thermal insulation layer has already been completed - it remains to mount the outer cladding with a ventilation gap.
Today we offer a wide range of materials for exterior decoration in the curtain wall system:
- metal products (profiling, siding, facade cassettes),
- aluminum composite panels
- slabs of porcelain stoneware, natural or artificial stone.

Each of them can be selected according to the external structure, colors and other characteristics.
Ventilated facade technology not only protects the walls of the building, but also allows you to implement a variety of design ideas and solutions.
To fix the ventilated facade, an additional frame will be required.
The process of warming panel houses can be carried out during their reconstruction or overhaul. If your choice fell on the “wet” facade technology, it is advisable to plan work in the summer or at temperatures above 5°C. When using ventilated facades, installation can be done year-round.
In order to live in the house as comfortable as possible, it should be warm and cozy. Most often, high-quality insulated walls help to keep the heat that comes from heating appliances. The lack of insulation leads to an increase in heat losses and an increase in heating costs. Let's talk about how to insulate walls in a panel house.
Wall insulation in a panel house: advantages and disadvantages
There are two main types of wall insulation:
- internal;
- external.

The choice of one or another option depends on the individual capabilities of the premises, its area, the type of building in which the work is carried out and the number of storeys. Insulating the walls inside the house, you will get the following benefits:
- weather and climatic conditions do not affect the process of warming in any way;
- reduction of heat losses in the room;
- ease and speed of work, since there is no need to create various kinds of structural elements for wall insulation.
Despite this, internal wall insulation has the following disadvantages:
- a slight decrease in the useful area of \u200b\u200brooms, especially important for small apartments;
- internal insulation negatively affects the general microclimate of the room, since in the winter season condensate forms behind the wall, which, passing through the surface of the insulation, accumulates on the wall and leads to the formation of mold and fungus on it.

In order to avoid the appearance of the last drawback, it is necessary to build a so-called pie in the process of laying the insulation. In its composition there are materials with various kinds of vapor permeability, while the decrease in this factor is carried out closer to the outer wall.
For example, when insulating a panel house with mineral wool, it is imperative to install waterproofing in front of the insulation. Thus, the condensate that forms in the wall will be gradually discharged through the concrete surface, and will not enter the interior of the room. In addition, a high-quality ventilation system should be provided in the room.
Insulation for thermal insulation of internal walls should have the following characteristics:
- long service life;
- high level of fire safety and resistance to ignition;
- environmental safety, which is especially important in internal insulation, since the use of low-quality heaters negatively affects the health of people living in the house;
- resistance to rodents;
- form retention;
- low level of heat losses.

If you have the opportunity to carry out external insulation, then we recommend giving preference to it. For its implementation, materials of high quality properties are used. Most often, they are used in a slab or matte version. Among the advantages of external insulation, we note:
- Prevention of damage to the walls of the house by precipitation, low temperature and other external factors. Therefore, the building remains thermally stable both in winter and in summer. The lifespan of a building is significantly increased.
- There are no cold bridges between the connection of the walls. Accordingly, it reduces the risk of condensation, which leads to the formation of mold and mildew on the walls.
- In addition to protective functions, the choice of external insulation allows you to get a high-quality soundproof building. Ensuring the removal of the race point outside the house improves the resistance of the house to wetting and condensation. At the same time, it is possible to preserve the facade finish for a longer time than without the use of insulation.
- It is possible to save the usable area in the room, especially true for small one-room apartments.
- With external insulation, there are more options for insulation for installation on the facade of a building than with internal insulation. In addition, the insulation will not emit substances harmful to human health inside the house.
However, the performance of external insulation must be accompanied by protection of the insulation from external factors. To do this, ventilated facades are equipped on the facade surface or the insulation is finished in a wet type.

How to insulate a wall in a panel house: the choice of insulation
Mineral wool is used for wall insulation in panel houses most often. For its manufacture, slag or basalt stone is pressed and thermally processed. Due to the fibrous structure, warm air is retained inside the wool, thereby preventing heat loss. There are rolled and slab versions of mineral wool. Due to its non-toxicity and safety, mineral wool is used both for internal and external insulation.
The material is characterized by low thermal conductivity, good vapor permeability, long service life, fire safety. The only drawback of this insulation is instability to moisture, therefore, during its installation, maximum waterproofing of the insulation should be ensured.

The installation of mineral wool inside the room reduces its usable area, therefore, if possible, it is recommended to use insulation from the outside.
Wall insulation on the outside of a panel house with glass wool has its advantages. This material is highly resistant to fire and low temperatures. In addition, it has excellent resistance to moisture, rodents, mold and mildew. However, during the installation of this material, special care should be taken, since the smallest particles of glass can get on the mucous membranes of the body and cause allergies and irritation. Therefore, when working with this material, wear protective clothing and a respirator.

Glass wool has excellent sound insulation characteristics, in addition, it is resistant to shrinkage and is cheap compared to other types of insulation.
Among the advantages of cellulose-based insulation, we note:
- versatility of application;
- environmental safety;
- high thermal insulation performance;
- breathability.
However, this insulation itself is unstable to moisture, fungus and mold. Therefore, it is treated with special compounds that help get rid of these shortcomings.
Styrofoam or expanded polystyrene is one of the most economical options for insulation. This insulation is characterized by moisture resistance, good sound and heat insulation characteristics, light weight and ease of installation. Expanded polystyrene is resistant to bacteria, fungi and mold. A small amount of insulation has a high thermal conductivity. Expanded polystyrene is most often used for insulation in the form of plates. If you follow the technology of its installation, then this type of insulation will serve you for a very long time.

Higher strength and durability is characterized by the use of extruded polystyrene foam, which is essentially the same foam, but has a liquid form. For blowing polystyrene foam, special equipment is used. The resulting coating is seamless, durable and has good performance characteristics.
After drying and pressing wood chips, a heater called fibrolite is formed. To connect the chips together, a binder is used, in the form of Portland cement or magnesium salt. The material has the form of plates, on the upper part of which there is a protective film. It is with its help that it is possible to prevent moisture, fungus and mold from affecting the insulation. With an increase in humidity, damage to the material occurs, therefore, after its installation, it is recommended to plaster the surface. The material is easy to install and process. The base, after its installation, becomes strong and rigid.
Cork-based insulation materials are used to insulate the walls of a panel house from the inside. This version of the insulation is the most environmentally friendly of all the above materials. Cork insulation has high strength, low thermal conductivity and vapor permeability. The insulation is in the form of panels, which are lightweight, resistant to mechanical damage and shrinkage. The material is functional and has a long service life. After installation indoors, further finishing is not necessary, as the plates themselves have an attractive appearance. In addition, cork insulation is resistant to various kinds of biological organisms. However, its only drawback is its too high cost, which fully pays off with the advantages of the material.

To create a heat-insulating barrier, which is highly resistant to moisture, a heater in the form of foamed polyurethane is used. The application of this material requires the availability of special equipment and the installation of formwork. Since the material polymerizes very quickly, in order to create a flat surface, formwork should be built from wooden boards.
After applying the foamed polyurethane, its waterproofing and vapor-permeable layer should be provided. For these purposes, most often the insulation is covered with a layer of polyethylene. Since the material has low strength, for further wall decoration, plasterboard walls should be mounted, so this insulation option will not only reduce the usable area, but will also require additional costs for installing plasterboard or plywood walls.
Before starting wall insulation in a panel house, you should perform the following steps:
- choose the method of insulation, the type of material and its shape;
- purchase materials and additional tools, if necessary;
- insulation of external walls is carried out only at positive temperatures, preferably in summer;
- walls should not be wet; use a cannon to dry them additionally;
- all finishes should be removed from the walls, for interior walls - wallpaper, paint, decorative finishing materials, for exterior walls - the facade should also be well cleaned and dried;
- use a vacuum cleaner and a broom to clean the walls;
- before installing the insulation, apply an antiseptic composition to the surface of the walls;
- then a deep penetration primer should be applied to the wall, which will ensure high adhesion of the insulation to the wall.

Make sure that before applying the primer, the wall dries as much as possible after the antiseptic. For additional alignment of the walls, plaster is used. Only after it dries does the process of installing insulation on panel walls follow.
For additional sealing of all seams, use a silicone-based sealant. The technology for installing the insulation depends on what kind of insulation it was purchased earlier. Plate or roll options are most often fixed on the wall using special fasteners with large hats. To install foamed insulation options, presented in liquid form, compressor equipment is used.
Heating in the wall of a panel house: foam insulation
After preparing the surface, leveling it and coating it with a primer, the insulation should be installed. At the preparatory stage, make sure that the seams at the joints of the walls are airtight. If there is a crumbling finish, it should be removed.
To install foam plastic on the outer wall of a panel house, several spatulas should be prepared for applying glue. It is most reliable to install insulation using a combined method, that is, using glue and dowels.
Start work from the bottom of the wall, gradually moving to the top. Install the starting bar on the lower part of the facade. For applying glue, it is best to use a spatula or comb.
Try to completely cover the wall with glue, even in uneven places and seams. Otherwise, through the bridges of cold, the level of heat loss in the house will increase. After surface treatment with glue, the foam board is applied to the wall and pressed. After a few days, the work continues. In order to further secure the foam, special fasteners or plastic nails are used. If there are small gaps, use foam to fill them. In order to remove bumps from the wall after insulation, use a plastic grater.
For additional reinforcement of the foam, use a mesh. First, it is used to glue the corners, then the rest of the wall. To fix the mesh on the surface, glue is used, and after it dries, the walls are leveled with plaster or special mixtures and the finish is made.
Old Soviet panel houses are much inferior in terms of thermal insulation to modern monolithic buildings. New SNIPs dictate to developers to comply with the required wall thickness and insulate facades immediately after completion of pouring work and laying out walls. Panel five and nine-story buildings were calculated only for internal heating, without isolating the outer walls from the cold. Thousands of people live in corner apartments, and the issue of their thermal insulation becomes more relevant every year.
Options for insulating the walls of panel houses
Modern technologies present two options for insulating the surfaces of the walls of an apartment building: from the inside and outside. Both options will solve the problem of low room temperature and rapid heat loss. In prefabricated houses, more cast-iron radiators with excellent heating qualities were installed, but due to the thinness of the walls and their direct contact with frosty air, the efficiency of radiators is significantly reduced.
Important! The task of thermal insulation is not to heat the room, but to keep it warm and exclude air cooling due to its contact with the cold surface of the walls, especially if the corner apartment is an end one.
Both options are suitable for this, but their implementation is radically different, so you need to determine a simpler and more economical one that you can do yourself.
Which method is preferable?
Consider the pros and cons of both methods and choose the most suitable one. Advantages of wall insulation outside the panel house:
- work will be carried out on the facade, which means it will not interfere with residents directly living in apartments;
- along with the insulation, at the same time, the external renovation of the facade will take place with decorative plaster or hinged panels;
- the whole house will be insulated, which means that the common areas will become less cold.
Insulation of the outer walls of a panel house - disadvantages:
- the inability to insulate only your apartment, even if it is corner - at least two walls in each room will be adjacent to non-insulated neighboring apartments;
- high cost of work - a specially hired team will be engaged in warming and finishing, which needs constant monitoring and payment;
- lack of privacy in a multi-storey building - work will take place outside, which means that builders will need scaffolding structures or a hinged cradle, and this entails their constant presence right outside the windows of the apartment, where they can look freely;
- the duration of the process - if the house is large, then work can go on for more than one month, and all this time there will be trucks, lifts, building materials and scaffolding near the house.
Wall insulation in a panel house from the inside - cons:
- a decrease in the living area of rooms - hanging additional structures on the walls will increase the removal of each of them by at least 5 - 8 centimeters;
- the inability to live in the room where the renovation is taking place - the tenants will have to move to other rooms, because the area under repair will be occupied by materials;
- the likelihood of temporary relocation - the work may be associated with painting and the use of strong-smelling substances, so it will not be possible to stay in it during warming.
Benefits of internal insulation:
- independent implementation of insulation inside the housing - high-altitude work and the construction of additional structures will not be required, only attentiveness, a competent approach and tools will be required;
- low cost - compared to insulation from the outside, internal work will cost less if we consider only insulation, because the final decorative finish of the walls can be anything and be expensive;
- short terms - if all the material is purchased and there is enough time, then each room inside can be insulated in 2 days and the same amount of time will be needed for finishing, so it will not take long to endure inconvenience and a temporary move.

Having studied all the nuances, it can be seen that the advantages of internal heaters are greater than those of external ones, and they are more significant. Important: timing, cost and the ability to do everything yourself. Therefore, we will consider this option further.
The choice of insulation material
The modern world of building materials provides a wide range of opportunities. Here are the main options for insulating a panel house from the inside:
- polystyrene (foam);
- polyurethane foam;
- mineral wool.
Any of them will cope with the task, but they differ in the method of installation and cost, which can affect the choice of insulation. It all depends on what tools are available and the size of the budget.
Important! The least attractive option is to use polyurethane foam, because it will require deep formwork, which means that such insulation will “eat up” more room area. For its installation, a special sprayer is required, which may not be available.
Mineral wool is a good option for insulating the walls of an apartment building, it is quite thin, easy to change shape and is not expensive. The main disadvantage is its composition, which includes fiberglass. When in contact with the skin, it leaves an unpleasant sensation and may cause irritation. From this saves clothes with long sleeves and a special mask on the face. 
Penoplex is convenient in that it is pre-cut into convenient panels. It is lightweight and can be mounted alone. Each panel is placed groove in groove and assembled as a constructor. It can be selected to the optimal thickness, saving the cut area. The disadvantage over other materials is the higher cost, but it is offset by the ability to do the finishing without the use of drywall. The best way would be to carry out work using foam insulation.
Preparatory work
Regardless of the option chosen, before warming, it will be necessary to carry out preparatory work. An important note is that insulation is best done during the warm and dry seasons in order to avoid sudden temperature changes and condensation. What will need to be done:
- free up space in the room, remove unnecessary pieces of furniture and restrict the entry of strangers and pets into the living space;
- get rid of the current wall decoration - remove old paint or wallpaper from partitions;
- remove plaster from the walls - this will require special scrapers;
- vacuum or wash the walls - this is required to get rid of dust;
- make a primer and let dry;
- align the plane - if necessary, if it is clear that the irregularities are too large;
- dry the room completely.
What you need to work on the insulation of a room in an apartment building
Insulation work will require due skill and attention, but it is easy to cope with this if you clearly follow the technology and have the necessary tools at hand. Here is a list of what you might need:
- construction stapler;
- mounting foam;
- sealant gun;
- screwdriver;
- puncher or powerful drill;
- construction knife;
- stairs or goats;
- a hammer;
- self-tapping screws for metal;
- metal corners;
- liquid level;
- thread;
- sickle;
- putty knife;
- liquid nails for outdoor work;
- plastic fungi for fixing foam;
- vapor barrier film.
The specified list may be wider depending on the installation method, but you can easily get by with what is listed. With everything you need, you can get to work. Remember that it is better to ventilate the room well, and carry out noisy work only at the permitted time of the day in order to avoid conflicts with neighbors.
Do-it-yourself installation
By following the steps in stages, you can achieve the perfect result. Begin:
- Glue (liquid nails) is abundantly applied to the surface of the wall and the foam panel, and then they are tightly pressed against each other. We carry out such actions with each panel, placing the next one exactly in the groove with the previous end side. This also applies to the side segments and those on top. Penoplex is easily cut with a knife, so where the whole panel does not fit, it is carefully cut and inserted into the space. It is important to cut exactly to size in order to leave a minimum of gaps and lay them exactly in the end.
- You can also fasten the panels with the help of wall anchors and plastic fungi, for this, holes are made in the walls and fasteners are driven into them right through the attached foam. This method is very noisy, so we recommend the first option.
- All joints between panels, walls, floors and ceilings are coated with sealant. This is necessary to ensure maximum thermal insulation.
- The tighter the foam is pressed against the wall surface, the better its insulating properties, so do not spare glue or anchors.
- This installation option provides for the final finishing with plaster. After the sealant dries, the entire plane of the wall is covered with putty and leveled. If desired, further strengthen the layer - a special mesh (serpyanka) can be smeared into the plaster.
- After the final leveling, the putty must be allowed to dry, and then primed, thereby preparing its surface for painting or wallpapering.
Important! If you plan to hang cabinets on the wall, then you need to choose a slightly different mounting option. Before the first paragraph in the previous instructions, you need to mount a hinged metal profile structure on the walls, and lay out the foam plastic between the guides according to the instructions. The following list is considered a continuation of the previous one, after the fourth paragraph:
- A vapor barrier film must be stretched over the foam and guides to isolate the formation of moisture inside the wall. Its installation is carried out with the help of plastic fungi through the foam.
- We fix drywall to vertical and horizontal rails using self-tapping screws.
- Further, as in the previous instructions, he putty, leveling and priming the surface.
Installation is not at all difficult. The main thing is to stick to technology, then the work will be done quickly and efficiently. After finishing, you will immediately feel that the apartment has become much warmer and drier, even if it is an end one. This is because the insulation helped keep warm air from touching the surface of the cold walls. Therefore, if heating is not due to batteries, but to underfloor heating, they can be turned on less often, thereby saving on utility costs.
Insulation of the apartment from the inside most often becomes necessary in houses with panel walls, as they are not thick enough, they quickly cool down, the heating system cannot fully cope with its tasks, and the temperature in the rooms drops. How to insulate a wall inside an apartment, and what methods and materials to use - this question confronts most homeowners in concrete high-rise buildings. External walls in such houses become cold especially quickly, and often, due to temperature changes, they begin to dampen and become covered with mold.
Sometimes, when there is such an opportunity, the thermal insulation of the walls is carried out from the outside, since this is - more efficient way keeping warm. However, this option is very expensive due to the complexity of its implementation, and it is impossible to carry out such events on your own, without the use of special equipment, if the apartment is located above the first or second floor. Therefore, a decision is made to insulate the walls from the inside, to the detriment of the total usable area. But be that as it may, a warm apartment of a slightly smaller area is better than large cold rooms. Internal work may well be carried out with your own hands, without the involvement of specialists. The main thing is to choose the right material and have the right tools.
If autonomous heating equipment is installed in the apartment, then wall insulation will help save energy resources, which are very expensive today.
Compared with the external thermal insulation of walls, the internal insulation of the apartment has its rather significant drawbacks:
- An insulated wall does not accumulate or retain heat, and heat losses range from 8 to 15%.
With internal insulation, the “dew point” may be inside the insulation, which leads to dampness
- The "dew point" for internal thermal insulation is between the insulation and the wall, sometimes inside the insulation layer. This leads to the formation of condensation and the appearance of mold colonies.
- An improperly insulated wall from the inside will freeze all the time, and this inevitably causes irreversible destructive processes in the thickness of the material over time.
Proper insulation
So that condensation does not form under the thermal insulation layer from temperature changes in winter, and also, as a result, mold spots do not appear on the walls, you must carefully follow all the technological recommendations for insulating concrete walls from the inside of the apartment.
An important element in the structure of the thermal insulation "pie" is a high-quality vapor barrier. It should protect the insulation from moisture penetration, which will allow the entire structure to effectively perform its functions for a long time.
What work needs to be done to achieve the goal?
- It is necessary to purchase a high quality vapor barrier film and waterproof tape to seal the seams on the connection of its sheets.
- For the insulation layer, you need to choose a material that has low vapor permeability. It is desirable that this indicator be lower than the vapor permeability of the wall material. In this case, moisture evaporation will occur towards the street, and not inside the apartment.
- When gluing the insulation, its surface is completely smeared with glue using spatula-comb, and it is pressed very tightly against the surface of the wall, so that even small cavities do not remain between them.
- In order to avoid the occurrence of excessively high relative humidity inside the premises, they must be equipped with additional ventilation of a natural or forced type. For example, for this, valves are installed on the window frames through which air will enter the room.
- Next, you need to accurately calculate the required thickness of the insulation. It will depend on the average daily temperature in the region in winter. The thickness of the thermal insulation material should not be less than those parameters that were obtained during the calculations, otherwise the steam and heat balance will be violated.
- Before installing the insulation system, the walls must be treated with special primers. They will "treat" the wall, will not allow mold colonies to form on it, and will also increase adhesion when gluing thermal insulation.
- Installation of insulation can only be started after the wall has completely dried.
- It is impossible to allow the formation of "cold bridges", which can nullify the entire insulation process. The risk of their occurrence is especially high at the junctions of walls and ceilings.
What heaters and how are they used
For the process of wall insulation from the inside, several types of heaters are applicable. Which one to choose is up to the homeowner to decide after he gets to know their characteristics and installation methods better.
Mineral wool
Mineral wool is a traditional material for insulating interior work, but for concrete exterior walls, you need to choose a type of thermal insulator that has a very high density - this creates vapor tightness, and in this case it is necessary. The property of mineral wool to pass air, i.e. It is rather harmful to “breathe” in this situation, since condensation will form on the wall during temperature changes. To avoid this, it is necessary to choose mineral wool with a high density, comparable to expanded polystyrene.
In addition, high-quality installation of vapor barrier is necessary. If all these conditions are not met, the work will be done in vain, since after the appearance of fungus and the smell of dampness in the premises, the structure will have to be dismantled. Therefore, for insulation of external walls, not insulated from the street, it is better to refuse to use mineral wool, or to use only its dense types with the creation of the necessary air gap for ventilation. Learn more about it in this video:
Video: wall insulation inside using mineral wool
Styrofoam
Styrofoam, polystyrene foam or penoplex are more suitable for insulating external walls from inside the apartment. These materials have all the necessary properties, the main of which is low thermal conductivity. In addition to this quality, expanded polystyrene has other important characteristics that predetermine the possibility of its use specifically for internal thermal insulation works:
Extruded polystyrene foam is an excellent insulation, but "eats" a lot of usable area
- The mass of the material is small, and this facilitates installation. In addition, the hard and flat surface allows you to fix it well on the wall.
- Expanded polystyrene is easy to process - if necessary, it can be cut with a construction knife.
- The material is able to withstand tearing forces and strong compression, which often occur in walls, for example, during temperature changes or structural shrinkage.
Since ordinary or extruded polystyrene foam practically does not absorb moisture, it will not allow it to enter the “dew point”, therefore, using this material, you can not use a vapor barrier. At the joints of walls and floor slabs, cold bridges can be insulated with mounting foam. You can also fix the plates to the wall surface with foam - it, expanding, will fill all the gaps between insulation boards and the wall, making the surface airtight. Special locking grooves and spikes available on extruded polystyrene foam plates will help to make the surface whole.
Having installed a number of plates, they are attached to the wall with the help of special “fungus” fasteners. To do this, the mounted panels are drilled through, making a hole in the wall, and then fasteners are hammered into it.
It should be noted that the foam does not dampen the noise enough and this is one of its shortcomings. In addition, any of the types of expanded polystyrene is combustible, to one degree or another, and when ignited, it releases substances hazardous to human health.
After installing the plates and "sealing" all the cracks and seams, the thermal insulation layer can be plastered or covered with drywall sheets.
Video: insulation of the inner wall with expanded polystyrene panels
polyurethane foam
Polyurethane foam is a form of all-foaming polymer that is sprayed onto the prepared wall using special equipment. At the household level, almost everyone met him if they used polyurethane foam.
A crate made of wooden beams is pre-fixed to the wall to be insulated, which will serve as support guides for the sprayed material, as well as the basis for fixing decorative finishes or plasterboard sheathing.
Polyurethane foam is good because it penetrates into all cracks and irregularities, creating a seamless sealed surface that fits snugly, without any "pockets" and voids to the load-bearing wall, leaving no cavities for condensate to accumulate.
This material is moisture resistant and has a very low thermal conductivity. When deciding to use polyurethane foam, you can safely refuse hydro and vapor barrier.
Installation of polyurethane foam is carried out quickly enough, but without special equipment it will not work to produce it on your own, so you will have to invite specialists.
Insulation with polyurethane foam is very effective, but only specialists can carry it out
In addition to the above positive qualities of this material, the following can be mentioned:
- After spraying, polyurethane foam quickly acquires volumetric shapes and hardens. Thus, having installed such a thermal insulation layer, the very next day you can safely proceed with the installation of drywall.
- The insulation perfectly seals the "cold bridges" at the junctions of the planes.
- Polyurethane foam has good adhesive qualities with any, even and uneven surfaces and perfectly isolates the dew point from the penetration of moisture to it from the inside.
- The material is suitable for warming rooms that have non-standard shapes, for example, if the transition from wall to ceiling has an arch design or the walls are made in a curved configuration.
- Such a coating can have any - plasterboard or plaster exterior finish, at the choice of the owners of insulated housing.
Video: wall insulation from the inside with polyurethane foam spraying
Cork
Another material for insulation, the installation of which can be done independently, is cork.
Insulation of the apartment with mineral wool
With this technique, the walls do not require special preparation, they do not even need to be plastered. Wooden or metal slats are immediately attached to the surface. The height of the rails must correspond to the thickness of the heat insulator, the distance between them is taken as the width of the roll (mat) minus 2 cm to ensure a tight entry of the material into the frame.
A vapor barrier film is laid on top of the rails; it can be attached to the wall with “liquid nails”. Next, mineral wool is laid, on top of which another layer of vapor barrier is performed. After that, the entire structure is covered with drywall, the sheets of which are attached directly to the rails. Further finishing is a matter of taste of the owners.

Plaster as a method of insulation
Plastering of wall surfaces is one of the oldest ways of insulating a dwelling by a person. Nevertheless, it is still effectively used today according to proven modern technology in three layers:
- The first layer (5-10 mm) is sprayed. It is applied with a liquid mortar to fill cracks and crevices.
- The second layer (50-60 mm) is the primer. Acts as a heat insulator
- The third layer (3-5 mm) - covering, finishing alignment of the wall
It remains to be added that this method is a champion in environmental cleanliness and hygiene of the premises.