Installation of a soft roof shinglas jazz. Soft roof "Shinglas": installation instructions, technology, recommendations and reviews. Special roofing nails
The Shinglas tile from TM TechnoNIKOL is considered a modern representative of non-rolled material for the roof. Flexible shingles are sheets 1000x317, 1000x333, 1000x335 mm, one end of which is cut out figured.
Looking at their cutting, you can guess which collection the sheet belongs to: "Chord", "Jazz", "Sonata", "Tango", "Trio", "Country", "Rancho", "Finnish" or another.
Classification
When laying a soft roof Shinglas, you can pay attention to the variety of colors for the base and topping, as well as the structure (two-, three-, multilayer).
Roof covering of five layers includes:
- bituminous polymer with an adhesive base and a film for protection;
- modified bitumen;
- non-woven fiberglass;
- modified bitumen;
- basalt sprinkle.
Specific Features of Shinglas Tiles
There are a lot of them, but the main ones can be distinguished:
- The duration of operation of the coating is a quarter of a century, and for laminated representatives - half a century.
- Shinglas shingles are in demand for pitched (slope over 12%), bulbous and hipped roofs.
- Resistant to high and low temperatures (-70̊ to +90̊).
- Demanded in the construction of low-rise buildings.
- Excellent sound-proofing properties in comparison with other roofing coverings.
- Resistant to UV rays, strong gusts of wind, acid rain and hail.
- anti-corrosion properties.
- Material overrun is quite low even on notched roofs.
- Ease.
- Can be installed over worn bitumen coatings.
- Color fastness throughout the entire operational period.
- The possibility of condensation of electric charges and attraction of lightning discharges is excluded.
- Excluded the possibility of fire in the event of an unexpected appearance of an open source of fire.
How to calculate the consumption rate of the material
When installing Shinglas tiles, it is important to correctly calculate the required number of shingles and accessories for it.
For this it is important to know:
- lengths of end components, ridges, valley carpets, ribs, cornices, junctions;
- total roof area;
- perimeters of chimneys and devices for ventilation.

Materials to be used:
- valley carpet;
- ridge-cornice tiles;
- lining carpet;
- droppers, pediment strips, metal junctions;
- OS HF barrier;
- bituminous mastic;
- galvanized ;
- tiles "Jazz" or other series.
The amount of consumption of roofing material when laying Shinglas tiles for each variety is calculated individually.
Preliminary preparation of the base
The material for load-bearing structures can be wood, metal and reinforced concrete. When choosing rafters, it is necessary to pay attention to the shape of the roof and the possible load. The pitch width of the rafters is in the range of 0.6–1.5 m. Moisture-resistant plywood, boards (edged / tongue-and-groove), oriented strand boards are most often used as a coating.
With a small rafter pitch, these materials are chosen from among the more reliable ones (with a thickness of 12 to 37 mm). Their installation is carried out in such a way that the height difference does not exceed two millimeters, and the gap between the boards - five millimeters, between the sheets - three millimeters. All wooden rafters, boards must be impregnated with fire-retardant compounds.
How to strengthen the cornice overhang
To do this, it is necessary to apply eaves strips on the lining carpet, which are fixed evenly in sections every 15-20 cm, at the overlap point - after 3 cm, and then covered with ridge-cornice tiles.
Construction mastic is useful for smearing the edges of sheets.
How to install underlayment
If the roof slope exceeds 18̊ C, then the Shinglas laying technology is as follows:
- Skates cover 0.5 m in width.
- Overhangs (cornice, end) - by 0.4 m.
If the slope of the roof is less than 18̊ C, then:
- The entire surface is to be covered.
- Rolls must be laid from the bottom up, keeping parallel with the cornice overhangs.
- Lubricate the overlaps with mastic.
- Keep the fastening step -20 cm.
How to strengthen gable overhangs
With the help of end strips, which must be smeared with mastic before installation and installed on the lining layer. Before laying shingles, trim the top corners.
How to prepare valleys
The procedure is interconnected with the installation method: open or by cutting. Regardless of the method and slope, in the valleys, a meter-wide "Barrier OS HF" is laid - a bitumen-polymer material on a self-adhesive basis.
If an open method is used, then a meter-wide valley carpet is laid on top of this layer, and the edges of the sheets are smeared with mastic and fastened with nails. In hot climates, the valley carpet can be replaced with a metal sheet that is resistant to corrosion.
How to mark a roof slope
With chalk. When inserting a dormer or dormer window, the procedure starts from the center of the upper part of the opening. The main task when marking the roof slope is precisely the alignment of the shingles, and not the designation of their attachment points. It is important to remember that vertical signs are placed after one meter, and horizontal signs after 80 cm.
Shinglas flexible roof installation
Before proceeding with the installation of Shinglas soft tiles, you need to remember the general tips:
- In order for the shingles in the package to be easily separated, bend the container and shake it.
- If it is cool outside, then the flexible roof must be kept warm for 24 hours before installation.
- Heat the self-adhesive strip with a building hair dryer.
- Before starting work, remove the protective film.
- If you want to keep the color scheme of the tiles, remove the shingles one by one from different packages.
- When shingles are being cut, be sure to underlay a board so as not to damage the undercoat.
- Laying shingles Shinglas is carried out from the bottom up.
How to fix ordinary shingles Shinglas
- If the roof slope is less than 45̊, then four nails are needed to secure the shingle.
- If the slope is greater, then the number of fasteners increases to six.
What is the starting strip for editing
It is a ridge-cornice tile or shingle with cut protruding petals. The starting strip is fixed with nails, and those places where there is no adhesive layer should be covered with mastic.

How to mount the 1st, 2nd and next rows of coating
The first one is laid, retreating a couple of centimeters from the starting strip and the middle of the cornice towards the gables. Each subsequent row is placed, shifted so that a high-quality picture is obtained according to the finished project.

Valley laying technology
This procedure is performed in several ways:
- "Open". The sheets are placed on the valley carpet and cut in such a way that a 5-15 cm gutter is formed. In the case of heavy leaf fall, the maximum width of the gutter can be provided.
- "Undercut". This method is in demand if the slopes have different angles of inclination. So, at a small angle, it is necessary to cover with shingles so that they are superimposed on a steeper slope by 30 cm. The top of the sheets is fastened with nails. Next, Shinglas is performed on a slope with a large angle of inclination. Having indented 8 cm from the center of the valley, you need to beat off the chalk line and remove the excess. Treat the ends of the sheets with mastic, and cut off the corners at the top. See also: "".
How to prepare the ribs of skates and skates
To perform this procedure, you can use several technologies:
- With the help of a ridge-eaves coating. According to the existing perforation, the roof is divided into three parts. Installation is carried out from below, and when preparing the skates, it is necessary to take into account the direction of the priority winds, so the device is done on the opposite side. Ordinary sheets can be used in other forms of cutting. To facilitate the process of bending shingles at a specific angle, some craftsmen prefer heated pipes with a diameter of 10 mm.
- In a segmental way, which is only suitable for curved surfaces. First, a lining carpet is placed on the roof of Shinglas technonikol and markings are made on it. The surface segments are covered with shingles, and the joints are insulated with eaves and ridge tiles.
- in a seamless way. This technology involves the placement of a lining carpet with a step marking corresponding to a half of a tile petal. The dividing strips must be drawn to the top, and the shingles should be divided into petals, laying the initial row of the roof in this way. Each subsequent one is shifted by the width of half of the petal.

Connection preparation:
- To Wall. This procedure includes plastering the wall and coating it with a primer. Next, a rail with a triangular cross section is installed on it, on which the shingle is wound. Then the valley carpet must be cut into 50 cm strips, covered with mastic and placed on the junction. At the same time, from 30 cm or more of a carpet should lie on the wall, the upper part of which is fastened with a metal apron. Existing gaps must be sealed with sealant.
- To the chimney. If it is brick, then TechnoNIKOL is laid in the same sequence as when laying against the wall. The connection to the chimneys is distinguished by the need to cut out a pattern from the valley and prepare a groove for the outlet of waste water.
What are considered passing elements
These are special devices that are attached to the tiles with nails. On top of them you need to lay sheets, cut and isolate with mastic. Then, on the through elements, mount roof outlets, which are classified into non-insulated (for the southern regions) and insulated with polyurethane (for the northern ones).

Pass-through elements can be sealed with:
- Shaped rubber parts made of EPDM. They have found application as accessories for pipes with a cross section of 10-250 mm. First, the horizontal surface must be covered with mastic and a pattern of shingles should be applied on top. Tighten the top of the fitting with a metal clamp and apply a polyurethane or polysulfide sealant.
- A glass made of steel, which is in demand for tubular products with a diameter of less than 10 mm, etc. The device is installed on a lining carpet. Warm mastic should be applied on top and bottom of the glass, and on top of it - cut sheets for tight contact. The steel product must be filled to the middle with mounting foam, then with polyurethane or thiokol sealant. In the case of stable heating of the pipes, it will be necessary to install a box with non-combustible mineral insulation. This procedure for joining the box resembles a scheme for the wall.
Roof maintenance
Not only the qualified installation of the Shinglas soft roof is important, but also the proper care of it. Despite the fact that the coating of shingles is easy to maintain, it still needs timely seasonal inspections. Particular attention should be paid to skates, valley carpet, walkways and junctions. This is the only way to detect possible damage and eliminate them at the initial stages.
Roof maintenance includes cleaning of dirt, debris, various seeds to avoid the appearance of mosses, lichens and various plants on its surface. Snow removal required.
Repair
The procedure is simple, representing the replacement of damaged sections of the roof with new ones or the usual application of patches. Repairs can be done independently by heating new pieces with a building hair dryer, and then fixing them with nails and mastic. The patch should be ten centimeters larger than the destroyed place.
Knowing now how to lay Shinglas tiles, you will ensure long-term operation and beauty of the building, save money without sacrificing quality, and using a variety of colors and figured cuts, give wide scope to your creative inventions.
The life of the roof without the need for repair directly depends on the choice of roofing material. Tiling is a classic roof covering in many countries at all times, it is still relevant today. Shinglas shingles based on bituminous binder have the greatest similarity with a real ceramic coating. It gives a neat and presentable appearance to the facade, retains its appearance, and also has the function of damping sounds!
What is shinglas?
Shinglas bituminous tile is a piece waterproofing and roofing material. Roof covering elements are made from oxidized or modified bitumen, mainly from European raw materials. The Shinglas technology was developed in Spain; in Russia, production is carried out by the TechnoNIKOL company under the control of the Spanish company Chova.
The main plant for the production of soft roofing is located in Ryazan. From here, durable and practical shinglas shingles are delivered all over the country.
Compound
A distinctive feature of shinglas technonikol roofing is the multi-layered elements. Each sheet consists of several functional layers (from top to bottom):
- Sprinkling of basalt chips or powder of different fractions. Often colored.
- Bitumen modified or oxidized (depending on the series).
- Fiberglass is a load-bearing strength element.
- Bituminous impregnation bottom.
- Self-adhesive film that protects the canvas and fixes the canvas on the base.
Fiberglass ensures the strength of the tile and its integrity under any circumstances. Bituminous impregnation is resistant to weather and temperature fluctuations, and basalt powder protects the roof from overheating, melting and fading under the scorching sun. The quality of shinglas technonikol soft tiles is confirmed by certificates of compliance with established European and Russian standards, the manufacturer gives a guarantee of up to 30 years.
Advantages of Shinglas Roofing
There are many manufacturers on the market offering bitumen roofing. Why you should give preference to shinglas tiles:
- absolute resistance to any weather phenomena - rains, snow covers of considerable thickness and weight, winds of any strength, summer heat and winter frost, the coating is not afraid of anything;
- ease of installation of shinglas - the technology is available even to a non-professional. The design of the sheets for assembly is thought out in such a way that they are easy to lay according to simple instructions;
- the environmental friendliness of the tiles is confirmed by certificates of quality and compliance with European environmental safety standards (can be requested from the manufacturer or seller);
- fire safety - bituminous products do not melt, do not support combustion and do not spread flame;
- long-term operation due to high operational capacity;
- acceptable cost of the material;
- the minimum amount of waste during installation - about 5% with correct calculations;
- with proper installation, 100% tightness of the coating is achieved, eliminating the need for arranging a separate waterproofing.
Varieties
Shinglas soft roof is available in several basic series, products in which differ in composition and design:
- the number of layers;
- the shape of the shingle (sheet);
- ornament;
- colors.
Collection Continent
The collection is named after the main continents of the planet: Europe, Asia, America, Africa, which associate the colors of the tiles. Its shape imitates stone tiles, which is very unusual for this type of material. The complex coloring and geometry of the product make the Continent Shinglas collection premium and noble.
Three-layer sheets, but no less practical and durable than multi-layer ones, the manufacturer gives a guarantee for them up to 50 years.

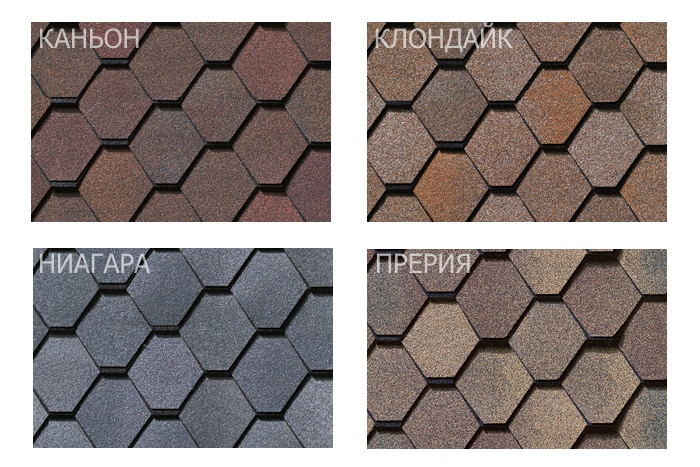
Collection Western
The classic form of tiles in the Western collection. This is a diamond-shaped undercut that mimics real ceramics. Canyon, Klondike, Niagara and Prairie colorways combine natural tiling with Niagara blue motifs.
In addition, the upper parts of the "tongues" protrude above the lower ones, creating the effect of volumetric coverage.
shinglas ranch
The sheets in the Ranch collection are inspired by American farmhouses. The pattern and edges of the tiled sheets are trimmed with squares. Solid colors: brown, red, gray, pink. This is the most affordable type of coating in Shinglas technology.

Country Collection
The most diverse collection of shinglas Country in terms of color schemes. The line includes cuts of the Dragon's tooth shape, symbolizing some American states: Alabama, Atlanta, Arizona, Indiana, Michigan, Ontario, Ohio, Texas, Utah. Interesting tint combinations allow you to make a choice in favor of the ideal tonality for each. The coating imitates natural coatings from natural material - shingles, slate, tree bark. A distinctive feature of the products of the series is their reduced weight while maintaining the strength and performance characteristics.

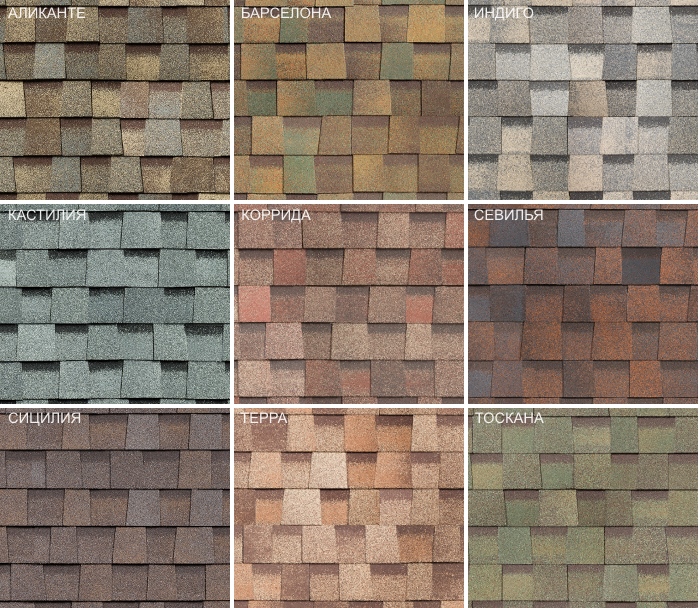
Jazz Collection
Shinglas Jazz is a multilayer tile with graphic cutting. Unlike the Ranch series, Jazz contains several colors and shades within one representative of the collection. The assembled roof plays with colors, especially in the sun.
This is one of the most popular shinglas collections with an optimal price-quality ratio.
Series Classic
Classic includes several collections, but one thing unites them - the traditional form of classical ceramic tiles.
Art Nouveau, cutting Breeze:

Tango is also an imitator of the classic roof:

The Flamenco collection is the epitome of the classic decoration of the building, which will give the house austerity and graphic quality:

The cutting of the Sonata of the Quadrille collection was created based on semiprecious stones:

The Rumba collection in complex cuts and deep walnut colors gives the exterior of the house a nobility and uniqueness:

Ultra Series
The tiles of this series are made on modified bitumen, so the coating has the most adaptive performance characteristics. The sophisticated Foxtrot cutting makes the coating original due to the asymmetrical chaotic pattern of the edge of the rows.

Slicing Samba is made in unique deep colors:

A series of shingles Finnish
This is the cheapest, but still durable and practical type of roofing. Tiles Finnish single-layer (bituminous). It is produced in two types of trim - Accord and Sonata.

The price of Finnish shinglas does not exceed the cost of metal sheets for roofing, so the material is available for developers with any budget.

Shinglas roof installation
Bituminous elements for roof covering are of considerable weight and relatively small in size, so the base must be solid. To do this, any sheet material is attached to the rafters:
- OSB boards;
- moisture resistant plywood;
- decking from grooved boards.
On the cornice overhang of the flooring, waterproofing is made with bituminous coating, and a dropper - a metal profile - is strengthened from above.
Next, a bedding is laid on the base - a bitumen sheet, on which shinglas tiles will be glued. First, the joints of the slopes are blocked, then the canvas is spread in the direction from the lower edge to the ridge. Nails are stuffed along the edge of the rolled material to fix the bedding. Neighboring canvases must be overlapped.
Now the gables. They are fixed along the lateral free edge - the profile will close the end and protect the coating from wind and moisture.
Shinglas installation instructions
When the base is ready, you can start marking. A line is drawn horizontally along the visor with a width equal to 5 rows of sheets, vertically - 1 meter. These guidelines will help you align the canvas during installation.
First row assembly:
- To decorate the cornice line, special sheets or ordinary tiles with cut petals are used. Remove the protective film and attach it parallel to the eaves on the drip, stepping back from the edge of 1.5 cm. This is the value of the compensation gap.
- Roofing nails along the edge of the sheet fix the first row of the coating.
- Subsequent sheets overlap the previous ones.
- To improve the quality of the coupling, the elements can be coated with bitumen-based adhesive mastic.
Ordinary tile:
- The protective film is removed from the product.
- The sheet is laid on the first row with an indent from the edge of 1.5 cm.
- Each sheet is fixed with nails in such a way that the cap does not cut into the product and is covered by the top laid tiles.
These processes are described in more detail and clearly in the video:
It is important to make the correct overlap of tiles:
- for the Jazz collection - 15 ... 85 cm;
- Trio form - offset by ½ petal;
- Tango - offset ½ petal;
- Sonata - ½ petal;
- cutting Accord - the right petal overlaps the joint of tiles of the adjacent row.
Valley design:
- Mark the gutter.
- Sheets are nailed as close as possible to the edge of the gutter and trimmed.
- The edges are smeared with mastic and pressed tightly to the base.
The pediment is designed similarly to slopes, with the difference that the extreme tiles that go to the side metal profile are smeared with mastic and glued. The connections to the pipes are treated in a similar way, a substrate is laid on them with a call to the pipe itself, it is covered with a metal design plate, and sealed.
A ridge profile is attached to the ridge, it is covered with tiles for the ridge.
All these processes are described in the second part of the video:
Lastly, I mount storm drains and gutters.
Shinglas with different color codes cannot be used on the roof of the same building.
Mixing tiles from 5-6 packs will help to avoid visible differences in the color shades of different parts of the roofing (if this is not done, then a subtle difference in color tones may be distinguishable on the finished roof).
In cold weather (at outdoor temperatures below 5-10 degrees), Shinglas must be stored in a warm place for at least a day before installation. The temperature in the room should not be lower than 20 degrees, and no more than 5-6 packages should be taken out into the cold at a time. The following packages can only be delivered to the roof after the tiles from the previous ones have been laid.
The self-adhesive strips on bituminous shingles need to be warmed up in cold weather. For this purpose, a building hair dryer is used.
Tiling fastening
Fig. 12 (scheme of fastening sheets with nails)

The tile sheets on the slope are fastened to the continuous flooring with roofing nails resistant to corrosion. These wide-headed nails are driven in in such a way that the head does not go deep into the surface of the tile sheet either directly or obliquely. The bottom edge of the cap must be exactly in line with the surface of the tile (see top image in fig. 12).
The required number of nails depends on the angle of the slopes, as well as on the SHINGLAS collection and the shape of the tiles. The recommended position of nails for different series of Shinglas is shown in fig. 12.
Important: the flexible tiles of the JAZZ and COUNTRY series are mounted with an overlap, therefore, at the junction, two adjacent sheets are fixed with one nail. To correctly determine the place of fixation, one should be guided by the assembly line, which is present on the outer surface of the tiles of these series (this line is applied during the manufacture of the roofing material).
For fastening roofing sheets of the CONTINENT series, only long nails with a wide head (4.5 centimeters long) are suitable.
Installation of the starting strip
The material for the starting strip is selected depending on the SHINGLAS series. In some collections, ridge-cornice tiles are used for this purpose, while in others, standard ordinary tiles are used.
Ridge and cornice universal tiles do not require cutting and are laid with the adhesive side down over the waterproofing lining material, indented from the cornice strip fold by 10-20 millimeters. The longer the roof slope and the greater the angle of its inclination, the wider this indent should be.
Fig.13 
The starting strip for Shinglas with the shape of cutting Accord, Beaver Tail, Sonata or Trio is made from ordinary tiled sheets, from which the petals are cut. On the underside, the entire surface of the strip, with the exception of the adhesive layer, is covered with a layer of mastic, after which it is glued in exactly the same way as described above.
Under a soft roof with a Continent and Dragon's Tooth thread, the starting strip is made from shingles of an ordinary tile without cutting off the petals.
Laying the first and next rows of Shinglas
It is recommended to lay the sheets of soft roofing starting from the middle of the slope. This makes it easier to align the shingles, especially on long pitches. The first row of tiles starts from the starting strip with a gap of 10-20 millimeters between it and the lower edge of the roofing sheets.
Laying the next rows is carried out from the bottom up diagonally.
Features of the installation of ordinary tiles, depending on the shape of the cut, are shown in fig. 14 and 15.
Western and Sonata 
Chord 
beaver tail 
Trio 
dragon tooth 
Continent 
The second row is laid from the middle of the slope with a shift in one direction or another by the width of half the petal. You can carry out installation from the center of the slope in any direction - to the right or to the left.
The lower edge of the petals after fixing the second row of tiles with nails should coincide with the upper edge of the cutouts in the previous row.
In the same way, with a shift of half a petal and alignment with the cutouts of the previous row, the third row of shingles and all subsequent ones are laid.
On fig. 16 shows a variant of the installation of Shinglas shingles from the middle of the slope in strips, and in fig. 17 - in the form of a pyramid.
Fig.16 
Fig.17 
With a downpour or slanting rain, the risk of moisture leakage along the edge of the roof increases. To avoid this, it is advisable to glue Shinglas shingles along the edge of the roof with FIXER mastic to a width of 100 millimeters.
At the gable, the corners of the shingles that fit the end plank must be trimmed, as indicated above, in fig. 9. This is done to organize the proper flow of water from the roof.
Modern flexible tile is a unique roofing material with which you can bring any architectural idea to life, revive a country house and give a country cottage an elite look. And in this article we will consider all the advantages and disadvantages of the popular domestic bitumen shingles, which come from the Shinglas brand.
To begin with, you will be interested to know that the popular Shinglas soft roof is Russian-made. It is produced by the manufacturer of various building materials TechnoNIKOL, which is known to many for its roll-on welded roofing. And here the rule no longer works that domestic is always worse than foreign. Why? Now we'll figure it all out!
What is a flexible tile Shinglas?
So, let's first deal with the concepts so that you can understand what will be discussed next. So, the basis of the Shinglas tile is fiberglass, which provides the roofing material with sufficient elasticity and density. It is clear that the elasticity parameter directly affects the flexibility of the tile, and the final quality of the product depends on the density.
The base of the tile is covered on both sides with layers of bitumen (which is why soft tiles are called bituminous). The quality of the layer affects the elasticity of the material, wear resistance and water permeability. Next, the top and bottom layers of shingles. The top one is covered with basalt chips, which makes the product resistant to any weather conditions, plus decorative effect. And the lower layer of the tile is covered with a polymer mass and a protective layer, which should prevent further destruction of the roofing sheets if some violations of the technology were made during the installation.
There is an adhesive strip underneath. Moreover, this is not just glue - it is a frost-resistant polymer mass that covers up to 60% of the shingle area and ensures reliable laying of roofing material. And finally, the protective layer is a silicone easily removable film that protects the sheets from sticking together.
As a topping for this tile, a special granulate is used, which is produced by Tegola. This is a basalt crumb of three fractions at once, i.e. the most durable and strong rock is used as raw material, which is not afraid of any weather conditions. And the granulate itself is pre-painted by high-temperature firing, so that the roofing does not change its color throughout the entire service life.
The main advantages of Shinglas
The main advantage of domestic shingles Shinglas is 100% tightness. But, of course, other indicators are also pleasing:
- Flexibility that allows you to equip the roof of the most complex configuration - from almost flat surfaces with a 12 ° slope to intricate domes.
- Light weight, and therefore there is no need to strengthen the rafters.
- Biological stability - neither corrosion nor decay threatens such a roof.
- Absolute water resistance and frost resistance. Such a roof does not absorb water at all due to its non-porous structure.
- Wind resistance is a wonderful roofing quality for the windiest areas, where ordinary corrugated board breaks in one jerk.
- Chemical resistance. Shinglas tile, thanks to its dressing and protective layers, easily tolerates both acid rain and salt ingress.
- Practical and cost-effective: low waste even at the most complex sites, affordable price and compactness valuable for transportation.
Impressive? But all this is due to the special production technology of Shinglas. And the new collection of three-layer tiles conquers at all:

Shinglas soft roof collections
In total, 22 colors, several types of shingle cuts and options for the number of layers are used to create various combinations of Shinglas soft tiles. For example, the most popular TechnoNIKOL Shinglas series are Jazz and Country. Novelties - two-layer tile "Rancho" and three-layer "Continent".
All series of flexible shingles Shinglas mainly differ in the mass of bitumen used and in the quality and color of the dressing. So, for example, the series "Ranch" is distinguished by simple colors, and "Jazz" and Country" are already for true connoisseurs of design, because more expensive dressing and the ability to create a bright pattern are used here. As for the thickness of bitumen, it grows from the Ranch series to Jazz, which is why there is a difference in price.

If you are looking for a roofing material with soft, natural shades that will never go out of style, pay attention to the Country series. Here are seven model lines that bear the names of American states.

Tiles of the "Ultra" series are distinguished by unusual shapes and noticeable bright colors - blue, gray, green, red and brown. Such a roof is good for implementing a variety of design ideas.
But the Jazz series presents 7 types of spectacular imitation of a wide variety of architectural styles - from classic to modern. The thickness of this tile is quite large, and therefore the quality is one of the best series presented.

But we will talk about collections not only from the design side (color, texture, cutting), but also from the side of quality and durability. Therefore, all Shinglas collections are divided into three main groups: single-layer, two-layer and three-layer.
Single-layer tile Shinglas: neat style and practicality
A single-layer tile, as you already understood from the name, is a shingle glued to a solid base. The volume of such a roofing imitates a specially applied shadow. It looks good, and the only question is practicality.
Pay attention to the Samba series, which compares favorably with its bright colors:

On Jive, which is made according to noble classical motives:

And the popular quadrille:

Two-layer shingles Shinglas: 3D effect of volume
Multi-layer tiles are of the best quality, rich in color solutions, leave almost no waste and are easy to install. Such a tile will cost you 20-30% more than a regular single-layer one, but there are reasons for this. The main difference is in the manufacturing technology. In this case, several sheets of soft tiles are used, which are interconnected with bituminous mastic. Of course, the result is a completely new level of quality.
So, the advantages of a double tile are as follows:
- Durability. The warranty period for such a product is two to three times higher than for ordinary single-layer tiles.
- Reliability. It is clear that two layers of any material in terms of their technical performance are at least twice as good as one layer.
- Strength. It is no longer easy to damage such a roof, and certainly not an apple that has fallen from a tree.
- Ease of installation. Here, the layers are glued together in the factory, and therefore they do not need to be combined on the spot. This is a valuable item, as not all of us are aesthetes and not all of us have such a good eye to perfectly combine segments of different colors with each other.
- Design. Now you can see the volume, texture, and texture. Such a roof looks much more spectacular and more expensive than just a flat pasted image, even with a shadow. This type of soft roof is already more realistically called a tile, and not its imitation.
Two-layer tiles are also loved by professional exterior designers - for its volume, richness of color and texture. And for the fact that with its help it is quite easy to hide any flaws in the roof.
And two-layer tiles are almost indispensable when you need to cover a roof of complex shape, with all kinds of turrets and gables. But we know that modern architects have unlimited imagination!
Three-layer tile Shinglas: a new word in construction!
These tiles are the roofing of the future! Firstly, the upper third layer serves as an additional mechanical protection of the roof, and secondly, it allows you to achieve a stunning three-dimensional effect. See for yourself:
Subtleties and nuances of installation
Shinglas products can cover the roof even with a slope of less than 11 °, not to mention other angles of inclination. Moreover, it is possible to carry out the installation of this soft tile even in the cold season - you just need to hold the rolls in a warm room in advance so that they can be straightened.
What is good, the manufacturer TechnoNIKOL made sure that the adhesive base does not change its properties even at sub-zero temperatures. Therefore, it is possible to work with Shinglas tiles at negative temperatures, only you have to heat up the adhesive strip with a building hair dryer if the temperature drops below + 10 ° C.
And now let's take a closer look at all the subtleties and nuances of working with this roofing.
What will you have to deal with?
At the moment, many promotions from TechnoNIKOL are being held in Russia, where detailed master classes are held on the installation of soft tiles. As a result, sales increase significantly, because any person is inclined to purchase what he has already figured out in reality. And therefore, even in the remote corners of Russia, you can find old houses with new soft tiles - marketing is doing its job. But let's talk about the cons.
A significant disadvantage of Shinglas soft tiles from TechnoNIKOL, which can spoil the whole impression, is the need to choose colors yourself. Moreover, if you bought some series you liked at the same time, and then considered that it wasn’t enough, and after six months or a year you bought the same one, you can’t put them together. Because the shades will already be different, which will become noticeable. In addition, they come across different sometimes even in the same pack!
True, nimble consumers have found a way out. We buy 4-5 packs and just mix the colors. It turns out stylish, and no one will notice the difference. You have to be a designer! But many other manufacturers supply their products with ready-made colors, over which you do not need to rack your brains. Although who likes what.

Preparatory work
So, first of all, solve the issue of ventilation. So, if there is only a non-residential attic under the roof, ventilation is indispensable. This is important so that hot air does not collect under the roof in summer, and moisture can freely escape. You don’t want the rafters to get damp in just a couple of years, do you? Therefore, be sure to put a ventilation pipe above the level of the ridge. The fact is that shingles are almost as vapor-tight as roofing material.
If there is no need for waterproofing, then the vapor barrier cannot be forgotten - just stretch the film from the inside, under the roof.
Choosing a base
But what do you need to glue flexible tiles? For this purpose, even planed boards, OSB boards and moisture-resistant plywood are quite suitable. Such materials are not only durable, but also hold dynamic loads from nails well. But the usual lining cannot be used - it is easily split by thick nails, which have to be used to fasten the tiles. Moreover, plywood, due to its structure, in practice turns out to be much stronger than an ordinary board of the same thickness.
In any case, the main requirements for the base under the tiles are as follows:
- Absolute dryness - otherwise, then all the tiles will walk, and the solution to this problem will not be cheap.
- Rigidity - no deflection!
- Ideal evenness - such that the maximum difference in height within one square meter should not exceed 2 mm!
- Strength. Yes, shingles are light, but you can't forget about the snow, right? Remember how hard it is to remove snow on heavy days, and now imagine how much pressure it exerts with a layer of only 30 cm!
Make the rafter step 50 cm if you use a solid board, and 90 cm if you have plywood. Here is a good example:

Mounting technology
So, we proceed to laying the Shinglas soft roof, having previously laid a lining carpet on the finished base. In principle, any of those offered by the modern market is suitable here, but TechnoNIKOL itself advises taking Anderep Barrier or Anderep Prof brand carpets, because. they have a special propylene protective layer.
Although there is such a practice when the lining carpet is not laid over the entire roof, but only in the most problematic places - where there are junctions, around skylights and pipes:

But it’s better to do everything from the very beginning technologically correctly:
- Step 1. First, lay the lining carpet in the valley and fix with nails in 20 cm increments, and then mount in rows from the bottom up - so that they are parallel to the eaves, with an overlap of 10 cm in the longitudinal position and 20 cm in the transverse position.
- Step 2. Fix all edges of the lining carpet with nails at intervals of 15 cm, glue the seams with K-36 glue, and leave an additional overlap of 15 cm on the carpet in the valleys.
- Step 3. Installation of the Shinglas soft roof according to the rules is carried out from the bottom up, over the entire surface of the slopes. Then we glue and nail the tile itself.
- Step 4. Do not forget to remove the protective film from each tile. And that part of the tile that will be close to the gable overhang, additionally treat with special glue or mastic with a layer width of up to 12 cm.
- Step 5. We close the ridge with cornice tiles.
- Step 6. And now it is important to protect the edges of the base from rain and snow. Therefore, we mount metal cornice strips. They need to be laid with an overlap of 5 cm and hammered with three nails so that they flash through both planks. Fasten in a zigzag pattern, in 10 cm increments.
- Step 7. To protect the laid soft tiles from moisture during rain, lay an additional valley carpet along the valleys. Glue it along the edges and fix it with roofing nails in 10 cm increments.
- Step 8. If the angle of the roof slope is less than 12 °, then, in order to avoid leaks, lay the self-adhesive lining carpet in two layers, and increase the ventilation gap between the wooden base and the insulation to 80 mm.
We offer you two detailed master classes that will clearly explain everything to you:


That's all the difficulty. Feel free to purchase domestic tiles, and perform installation in accordance with all the rules. Then the result will surely please!
Do not use products with different color codes and production dates on the same roof. To minimize tonal imbalance, randomly mix the contents of 5-6 packs before use.
If roofing works are carried out at temperatures below +5°C, packages with TechnoNICOL SHINGLAS flexible tiles should be kept in a warm room at a temperature of +20°C for at least a day and submitted for work in 5-6 packs. The self-adhesive strip on the tile must be additionally heated with a building (heat) hair dryer at an ambient temperature below + 10°C.
To exclude damage to the integrity of the roof, the material on the roof should be cut on a specially placed plank.
Attention: in order to avoid the appearance of stains and footprints, it is not recommended to walk on the roof in hot sunny and cold wet weather. To move along the slope of the roof, special manholes should be used.
2. Fixing ordinary tiles
Proper nailing
Fig.12

Each ordinary tile is attached to the base of the roof with the help of special galvanized nails with wide hats, the number of which depends on the angle of inclination of the slope. The correct nailing of special nails is a very important point. Nails should be nailed in such a way that the head is in the same plane with the surface of TechnoNICOL SHINGLAS, and does not cut into it (Fig. 12).
The correct arrangement of nails and their number for each form of TechnoNIKOL SHINGLAS shingles is shown in fig. eleven.
Attention: In the COUNTRY and JAZZ collections, the nail must simultaneously fix the overlap of the two components of the tile. For reference, the manufacturer puts a special assembly line on the front surface of the laminated tiles (Fig. 12). At the place of installation, make sure that this condition is met. Under the CONTINENT collection, use nails 45 mm long.
As a starting strip, a universal ridge-cornice tile or a pattern from an ordinary tile (shingle with cut petals) is used.
Cornice tiles are glued on top of the lining carpet with a 1-2 cm indent from the place of inflection and nailed (Fig. 13). The amount of indentation depends on the length and angle of inclination of the slope. With an increase in the length and steepness of the slope, the indentation from the place of inflection of the metal cornice strip also increases.
Fig.13

A pattern from an ordinary tile is used for cutting Trio, Beaver tail, Sonata, Accord. When laying, the back side in the area of the absence of the adhesive layer is smeared with TechnoNICOL mastic. Further, it is laid similarly to the installation of ridge-cornice tiles.
With the shape of cutting Dragon's tooth and Continent, the starting strip is laid from ordinary tiles without pre-cutting. In this case, the installation method is used similar to the method of laying a pattern from an ordinary tile.
4. Rules for fixing the first and subsequent rows of ordinary tiles
Mounting must be done with diagonal stripes (Fig. 14, 15).
Fig.14, Fig.15The second row is mounted from the center of the slope with an offset to the left or right by half the petal. It is necessary to nail the flexible tile of TechnoNICOL SHINGLAS in such a way that the lower edge of the petals is on the same level with the upper edge of the cutouts in the first row of masonry.
The third row is laid with an offset relative to the second by half a petal to the left or right, depending on the initially chosen direction.
Start laying tiles from the center of the slope, in the form of a strip or a pyramid (Fig. 16, 17).
Fig.16

Fig.17

For the most effective protection against slanting rain, it is recommended to glue ordinary tiles with TechnoNIKOL bituminous mastic along the roof edge by 10 cm in places where there is no self-adhesive layer. The upper corners of the TechnoNICOL SHINGLAS shingles, which are suitable for the metal gable strip, should be cut by 2–3 cm to repel water, as indicated in fig. 9. When starting laying, make sure that the joint of the starting tile does not coincide with the joint of the tiles of the first row.
Note: When laying shingles of the JAZZ, COUNTRY and RANCH series, the horizontal displacement of shingles of the next row relative to the previous one can vary from 15 to 85 cm (Fig. 15). In this case, there should not be a specific rule for selecting a pattern. The drawing of the finished roof should be abstract.
Open valley method
Fig.18

Ordinary tiles are laid on top of the valley carpet and mounted in a chaotic manner up to the undercut line (3) towards the axis of the valley (1) (Fig. 18). Each tile is additionally fixed with roofing nails in the upper part (2). Special nails should not be nailed at a distance closer than 30 cm from the central axis of the valley (1). This is how two slope surfaces are assembled relative to the valley. After that, with the help of laces (beats), two coated lines (3) are beaten off. Then, ordinary tiles are cut along line 3. In this case, it is necessary to lay a special plank so as not to damage the integrity of the waterproofing carpet. To flush out water in the valley, it is necessary to cut each tile (4) and coat with TechnoNICOL bituminous mastic from the back by 10 cm in places where there is no self-adhesive layer (5).
If the water flow from the slopes is significantly different, then the valley chute must be shifted towards a smaller water flow to compensate for the washing of water from the junction of ordinary tiles and the valley carpet. The width of the valley gutter varies from 5 to 15 cm, depending on the location of the building or structure. If the construction site is located in the thicket of the forest, it is necessary to increase the width of the gutter for the smooth removal of foliage.
Undercut method
First, the installation of ordinary tiles is carried out on a low-slope slope with an overlap on a steeper slope by at least 30 cm (Fig. 18). Each tile is additionally fixed with roofing nails in the upper part (2). Special nails should not be nailed at a distance closer than 30 cm from the central axis of the valley (1). So the entire low-slope roof slope is covered. Then the chalk line (3) is “beaten off” on a steeper slope. The distance from the chalk line (3) to the central axis of the valley (1) is 7–8 cm. Flexible tiles from a steeper slope are cut along the chalk line (3). To flush water into the valley, it is necessary to cut each tile (4) and coat with TechnoNICOL bituminous mastic from the back by 10 cm in places where there is no self-adhesive layer (5).
Fig.19

6. Arrangement of ribs for skates and skates
Method #1
When arranging the edges of slopes and ridges according to this method, ridge tiles are used, obtained by dividing the ridge-eaves tiles into 3 parts according to the places of perforation. Ridge-cornice tiles are supplied for Sonata, Accord, Western, Dragon's Tooth, Continent cutting shapes.
Edge. Ordinary tiles facing the edge are cut so that there is a 0.5 cm wide slot between the coverings of adjacent slopes. The dimensions of the future edge are “beaten off” with a lace (two strips along the edge). Laying of ridge tiles is carried out from the bottom up. Each tile is fixed with four nails (two on each side) so that the overlap (3–5 cm) of the overlying tile overlaps the nails of the underlying one.
Skate. The ridge is laid from the side opposite to the prevailing wind rose in the area. Otherwise, the installation of skates is similar to the installation of ribs.
Method #2
For Beavertail, Trio, Sonata and Dragontooth cutting shapes, ridge tiles can be cut from ordinary tiles. At the same time, for TechnoNIKOL SHINGLAS shingles of the Sonata cutting form, the upper part is visible, and the lower part is closed (Fig. 20).
Fig.20

When laying a ridge tile pattern, its back part in places where there is no self-adhesive layer is additionally smeared with TechnoNICOL mastic. Otherwise, the installation of ribs/ridges using a ridge tile pattern is similar to the installation using ridge-eaves tiles.
Attention: To prevent the formation of cracks in the cold season (at temperatures below +5 ° C), it is recommended to bend on a TechnoNIKOL SHINGLAS CLASSIC and FINNISH TILE series on an artificially heated metal pipe with a diameter of about 10 cm. on a heated pipe at any temperature.
7. Laying TechnoNIKOL SHINGLAS shingles on domed and conical surfaces
The segmental method involves dividing the surface of a dome or cone into equal segments using a "beat". An ordinary tile is laid on each segment. The joints between the segments are covered with ridge tiles in the same way as the ribs and the ridge of the roof. The dimensions of the segments and the width of the ridge tile must correspond to the scale of the surface to be covered.
The seamless laying method (Fig. 21) requires special attention to the marking of the ramp. Chalk notches are applied to the base of the roof, the distance between which is equal to half the petal of a flexible tile. Chalk lines connect from the roof. Then it is necessary to cut the ordinary tiles into separate petals and mount the first row. The overlying rows of pre-cut tile petals are laid with an offset of half the petal of the underlying tile row. Trimming tiles is made according to the applied chalk lines. As soon as the width of the petal of an ordinary tile in a row becomes two times less than the initial one, the laying of the next row begins with the petals of the tile with the original dimensions. In this sequence, installation is carried out to the top of the roof. The top of the roof is formed with a metal cap.
At the joints of the roof slope with the walls (Fig. 22), a triangular rail (1) is stuffed, on which an ordinary tile (4) is wound. As a triangular rail, a wooden beam 50x50 mm, loosened diagonally, or an ordinary wooden plinth (1) can be used. If the surface of the vertical wall is brick, then it must first be plastered and primed. Strips of TechnoNIKOL valley carpet (5) with a width of at least 500 mm are mounted on top of ordinary tiles with TechnoNICOL bituminous mastic glued (mastic is applied to the entire back surface of the valley carpet pattern). On the wall, the strip starts at least 300 mm, and in climatic zones with increased snow loads, this value can be increased. The upper part of the contiguity is inserted into a groove and closed with a metal apron (2), which is mechanically fixed and sealed with silicone, thiokol or polyurethane sealant (3).
Fig.22

To seal the chimneys and ventilation pipes, a pattern is made either from a valley carpet (Fig. 24) or from metal with an anti-corrosion coating (Fig. 24). The resulting patterns are bent or cut in certain places. The installation method is shown in Figure 23. Initially, the front pattern with the factory is mounted on ordinary tiles. Then the left and right are mounted, which are wound under the tiles. Lastly, the rear pattern is mounted. During installation, it is necessary to observe the principle of cascading water. On the left, right and on the back side, it is necessary to make a gutter 8 cm wide. The joints of ordinary tiles should be glued with TechnoNICOL bituminous mastic in places where there is no self-adhesive layer by 10 cm and cut off the corners for water rebound.
Fig.23

Fig.24

To prevent snow accumulation behind chimneys and ventilation pipes, if their cross section exceeds 500x500 mm and they are located across the slope, it is recommended to arrange a groove (Fig. 25).
Fig.25

If the roof slope ends at the junction with the wall, at the end of the slope, a storm drain made of metal with an anti-corrosion coating should be installed (Fig. 26).
Fig.26

9. Arrangement of roof penetrations
Sealing of the lower parts of roofing penetrations, antennas, communication pipes is carried out using special passage elements (Fig. 27).
Fig.27

Pass-through elements are fixed with nail connections. Rows of shingles are laid on the passage element, cut off and glued to the flange with TechnoNICOL No. 23 FIXER bituminous mastic. Next, the necessary roof outlet is mounted on the passage element.
TechnoNICOL ventilation outlets are produced in two types: non-insulated and insulated (Fig. 28) for use in regions with long frosty periods and use for internal ventilation of the premises and for sewerage.
Fig.28

Condensate does not freeze on the inside of the ventilation outlet, which is insulated with polyurethane, even during prolonged frosts. Sewerage outlets are not recommended to be equipped with a cap, because. freezing of condensate inside the hood leads to a deterioration in ventilation.
For the aesthetic expression of the roof, it is permissible to use a decorative cap without internal dissection (Fig. 29).
Fig.29

In this case, precipitation or leaves entering the pipe does not cause trouble, because. everything goes into the drainage system of the building and structures.