Frame structures of verandas. We make a terrace with our own hands Veranda from a log with our own hands
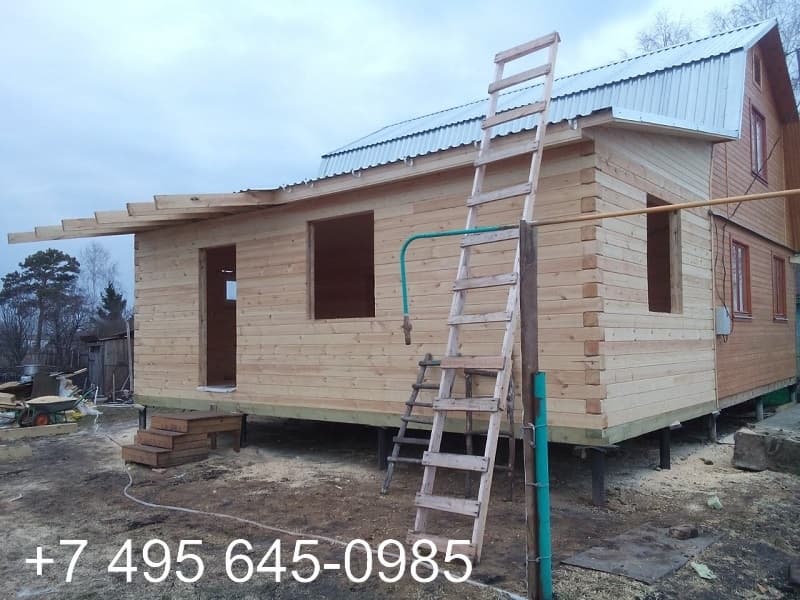
A spacious and cozy veranda made of timber, which can be attached to the house, is a great place for both privacy and relaxation with the family.
At the same time, a well-designed and erected terrace can also become an excellent decoration of the facade, transforming the appearance of the house.
Self-construction of a veranda
The clarification about the choice of building material, timber, only says that the terrace will be built adjacent to the timber house, since most builders and construction specialists recommend using the same material for verandas and outbuildings from which the house itself was built.
Location
The classic or, in other words, the most common projects of log houses with a veranda suggest that the terrace is always built in front of the main entrance, from the facade, so as to be noticeable and remarkable.
Nevertheless, it is possible to build an extension from the side of the house, because the construction should be based on the principle of convenience, and a normal passage from the veranda to the interior of the house.

Calculations
From the point of view of calculations during the construction of an extension, it is possible to take as a basis not only the parameters of the terrace itself, but also the amount of material needed. To do this, all calculations will be carried out using the example of a house, the length of which will protrude and a long terrace, and the width of the veranda will be 2.5 meters.
The length of the facade wall is up to 8 meters. The veranda itself will be closed, that is, glazed.
Thus, the veranda will be 8x2.5, that is, the total area of 20 meters. Next, you need to calculate the area of \u200b\u200bthe walls, regardless of the window and door openings so far.
The height of the walls of the extension is always slightly lower than the walls of the first floor of the house, this is necessary to give the roof a slight slope. Therefore, with a standard wall height of 3 meters, the height of the walls of the extension is at the level of 2.5 meters.
Part of the terrace is the wall of the house, so the veranda to the house from the timber is considered to be three walls. And that turns out 2 walls of 2.5x2.5 each, which is 12.5 meters squared, and the long wall is 8x2.5 \u003d 20. A total of 32.5 squares, this is the area of \u200b\u200bthe walls.
For this, the following work is carried out:
- Site preparation. Here it is always necessary not only to remove the grass, but also to attend to the moment of supplying communications and free access to the construction site.
- Further, the extension of the veranda to the house from the timber requires marking.
- Earthworks consist of simple excavation. The trench should be 1.2 meters deep and 30 cm wide.
- The trench is covered with sand and compacted.
- Rebar laying. You can use simple rectangular structures made of reinforcement with a 10 mm cross section.
- Formwork device. The formwork rises slightly above ground level.
- Pouring concrete.

Frame stage
After a few days, usually 5-7, the formwork can be removed, the concrete has already hardened enough to build a terrace on it.
Here you can also bring everything to some step-by-step instructions:
- Waterproofing concrete base. This is a mandatory action that can be performed either by applying mastic to concrete, or by laying roofing material. By the way, the option with waterproofing will also be required if a bathhouse is being built from a bar with a veranda, so this is a universal moment in construction.

- Next, the bottom trim is arranged. Here you can use the principle of fastening the Mauerlat, that is, the beam is placed on concrete and fastened with an anchor bolt, in steps of 60-80 cm.
- The corners are connected with a direct lock. This is quite simple to do and does not require special tools. The connection itself can be additionally fastened with a screw or nails.
- Logs are also installed here, on which you will later have to lay the floor. Logs can be fastened with additional staples, this will give them rigidity.
- Vertical posts are installed. In the corners and with a step of 1.2 meters. It all depends on what projects of wooden houses from a bar with a veranda the developer chooses. If there should be a lot of windows, then the installation of vertical racks is adjusted according to this parameter.

- After the vertical bars are installed, the top is tied. Here the strapping is necessarily done using screws or nails.

Important!
In general, when working with wood, for the most durable fastening, it is best to use screws.
They perfectly tighten parts of the structure, and at the same time do not lose strength throughout the entire service life.
Roof
Once the frame is ready, the roof can be installed. The calculation here is exactly the same as in the construction of the roof of the house. Rafters are installed in increments of 60-70 cm.
Then an OSB sheet is attached to the bottom. To do this, you will need several assistants, it is difficult to fasten the sheet on your own, and with the help of screws, fastening is carried out over the entire area of \u200b\u200bthe ceiling.

Such a roofing arrangement implies that a kind of crate has been obtained, in which mineral wool and a film can be laid. From above, everything is covered with moisture-resistant plywood, attached to the rafters with screws. Then roofing material and shingles are laid.
It is this instruction that is most simple for implementing the project on its own. Bituminous tiles and plywood sheets with OSB simplify the installation process quite significantly.
Important!
In the roofing device, you should always leave several ventilation holes on the sides so that there is free air circulation.
No matter how the wood is processed, but without ventilation, it can still begin to rot.
Walls
First of all, it is necessary to recall the strong fastening that should be done with the walls of the main structure. There are several ways to properly fasten the frame of the veranda from a bar, and for independent work, fastening to special anchors with spacers is suitable. In addition, it will be possible to additionally fasten everything with brackets.
Now the main thing, because the main area of \u200b\u200bthe veranda, as a rule, is intended for windows, which means that either plywood or a board in size can be used to sheathe the remaining areas. The easiest option is plywood.
To do this, you will need a minimum set of tools:
- Roulette.
- Electric jigsaw.
- Screwdriver.
Sheets of plywood are cut to size and attached to vertical posts. First, one side is sheathed, mineral wool and a vapor barrier film are inserted into the gap between the posts, then the second side is sewn up.

On the one hand, this is a very simple version of the rough decking of the terrace, but on the other hand, it is quite warm and functional.
Advice!
Here it is worth mentioning that expanded clay can be poured and compacted under the floor.
This is an ideal heat-insulating material for constructing a subfloor, and along with the fact that the extension walls are made of, a do-it-yourself porch made of timber can be a cozy room in the winter.
But with regard to windows, here you still need to turn to specialists. The easiest option is to order PVC-U windows, and under them, during the construction process, bring window openings.
Of course, the price of such a veranda will increase somewhat, windows are always an expensive pleasure, but the functionality of the room will also increase. In addition, it is not necessary to order all windows with opening sashes, most can be just a solid window.
Conclusion
It is possible to build an extension on your own, like a house from a bar with a veranda, because the construction technology itself implies both simplicity of work and high functionality of the building. The main thing is to carry out all the stages step by step and do not forget that the structure is made of wood, which means that special attention must be paid to waterproofing.
A terrace is a platform attached to the house or standing separately. Usually it resembles a large porch adjacent to the wall at the entrance to the house. In the southern regions, terraces are usually open. In the middle lane - covered with awnings or awnings. The terrace design can be initially included in the house construction plan and built on the same foundation. But, if the house already exists, it will not be difficult for any home master to attach a terrace to it. Let's talk about what basic terrace structures exist and how to build them yourself.
Before proceeding with the construction of the terrace, it is necessary to carry out the design and decide which design option to give preference to.
The simplest terrace designs are made at ground level. These are platforms paved with paving slabs, paving stones or clinker. Paving is carried out on a gravel-sand cushion laid in a pre-arranged excavation in the ground, 20-30 cm high.
On a gravel bed, you can also build a wooden terrace with flooring from boards or composite decking. Wooden bars or steel profiles are laid on top of the backfill, which play the role of a lag. Wooden support beams are mounted on them. Floor boards are fixed from above.
More complex terrace designs, raised above the ground level. Moreover, they can be raised both by 15-20 cm and by 2-3 m (the level of the second floor). In this case, the foundation is indispensable. Such a terrace is based on reinforced concrete slabs, blocks or piles, which play the role of a monolithic, columnar or pile foundation. An example of a raised terrace: a platform in the form of a reinforced concrete slab, lined with ceramics or porcelain stoneware. During the construction of a wooden raised terrace, on the selected foundation (concrete columns, slabs, piles), wooden logs are fixed, which are sheathed on top with an edged or terraced board (decking).
We will provide you with several options for building a terrace, designed in the form of information master classes.
Option 1. Terrace paved with clinker
This version of the terrace is built on a sandy compacted cushion, at ground level. Clinker tiles, from which the flooring is laid out, allow you to form curved, curved lines of the site. To clearly define the boundaries of the terrace, fences are installed around its perimeter. For example, small wooden posts soaked in antiseptics.
Work is performed as follows:
1. Clear the soil at the site of the paved terrace. Remove stones, driftwood, remove the top layer of soil, 20 cm thick.
2. Sand is poured into the resulting recess, with a layer of 15 cm.
3. A trench with dimensions of 70x70 cm (depth, width) is dug along the intended border of the area. A layer of gravel or sand is poured at the bottom of the trench, 15-20 cm high. It is necessary for better water drainage at the installation site of the fencing posts.
4. In the trench, on the drainage layer, two rows of wooden posts are installed (on the inside and outside). Their verticality is controlled by the building level. The posts installed at the ends of the fence are fastened with self-tapping screws. This solution provides a stronger grip of structural elements, does not allow them to move and fall out of the row.
The fence looks like a closed "pocket", which will later be used as a flower bed framing the terrace. If the arrangement of the flower bed is not included in your plans, then the border can be made in one row by installing bricks, ready-made plastic fences, etc. in the trench.
5. In order to prevent the soil from being washed out of the future flower bed, a layer of roofing material is laid inside the enclosing "pocket", leading it to the walls of the posts. The roofing material is laid at the height of the planned level of backfilling with soil. At several points, the waterproofing layer is fixed on the walls of the columns with self-tapping screws or nails.
6. Pegs are driven into the ground, from the wall of the house to the fence, in increments of 3 m and cords are pulled on them with a slope of 2-3 cm per 1 running meter. Thus, the level of sand filling is outlined, which must necessarily form a slope for rainwater to drain from the terrace area.
7. The sand filling is compacted and leveled according to the level of the stretched cords, adding, if necessary, the missing amount of sand.
8. Begin the installation of clinker tiles. Each tile is laid on a sandy layer, pressed tightly and tapped on the surface with a rubber mallet.
9. The remaining free areas, between paving and fencing, are covered with large decorative gravel.
10. The seams between the tiles are filled with fine sand using a stiff brush.
11. Excess sand on the surface is washed off with a jet of water from under the hose. The pressure should be small so that the sand does not wash out of the seams.
12. In order for rain moisture to be able to drain freely from the paved area, drainage is performed. To do this, along the fence posts, a drainage pipe with slots is laid out with a slope, wrapped in a jute cloth (so that debris and soil do not get into the slots). For masking, the surface of the pipe is covered with gravel.
The end of the laid drainage pipe is connected to the storm sewer pipe. Through the tee, a drainage outlet is also connected here. A gutter with a grate is installed in the right place.

Option #2. Wooden deck on gravel
A durable and simple terrace built on a gravel bed can be easily made from steel profiles (lag), wooden bars and boards. Since in this case they will practically lie at ground level, for this version of the terrace it is allowed to use only wood from hard, non-rotting species: larch, oak, garapa, teak, merbau, etc. Before use, the boards are treated with antiseptics that protect them from moisture, decay, insects, and UV rays.
Progress:
1. At the site of the future site, the top layer of soil is removed, 20-30 cm thick.
2. Fill the pit with gravel.
3. Steel profiles are laid on the gravel, forming a slope of 2-3 cm per 1 running meter. The distance between the profiles is about 500-600 mm.
4. Support beams are attached to the profiles. The distance between the beams is about 600 mm if the thickness of the terrace board is 27 mm. With a board thickness of 20 mm, the step of the beams will have to be reduced to 400 mm. For additional protection of the beams from moisture, in places where they come into contact with the profiles, rubber gaskets are laid, cut to the width of the boards.
5. Bearing beams are covered with a dark protective fabric (geotextile, for example) to prevent the germination of weeds.
6. Flooring is assembled perpendicular to the supporting beams from boards with gaps of 2-3 m. Spacers are installed between the boards and the protective fabric to prevent moisture from accumulating in the floor space. A compensation gap of 1-2 cm is left between the walls and the flooring.
7. At the end of the assembly, the boardwalk is covered with antiseptics, coloring impregnations or varnish.

Option #3. Terrace on a columnar foundation
A wooden terrace on a columnar foundation is the traditional and most win-win option. The design is adjacent to the house and, in fact, is one with it. The columnar foundation is able to raise the site by 15-60 cm. At the same time, the ventilated space formed under the flooring contributes to effective ventilation of the terrace elements and minimizes the possibility of wood decay.
Step by step construction instructions:
1. To connect the future terrace area with the house, the first beam is fixed horizontally (at the level of the terrace) on the wall adjacent to it. A galvanized steel drain is mounted above the upper edge of the beam.
2. Excavations are made at the installation sites of concrete columns. The columns should be installed in increments of 1.5-2 m. The recesses are made taking into account the desired elevation of the terrace, the height of the columns and the obligatory layer of gravel bedding, 10-15 cm thick.
3. Gravel filling is poured into the recesses, then trapezoidal concrete columns are installed. A metal embedded part for square beams is attached to the upper platform of each column.
4. The support beams are inserted into the embedded parts on the posts, fixed with screws.
5. On top of the support beams, perpendicular to them, platform beams are mounted at a distance of 40-60 cm from each other.
6. Terraced boards are screwed to the platform beams with screws, keeping 2-3 mm gaps between them. The gaps serve to prevent the accumulation of rainwater on the deck and its free flow into the underground.
7. If unprepared edged boards are used for the terrace, the flooring surface may look uneven after installation. Therefore, the floor is leveled with a grinder, bringing all points of the terrace to the same level. After grinding, wood dust is removed and the boards are treated with impregnation - antiseptic or coloring. When using a special terrace board, additional surface grinding is not required.

The columnar foundation for the terrace can also be built from flat concrete blocks. A similar version of the construction of the terrace is presented in the video:
Option #4. WPC terrace on a pile-screw foundation
Sometimes it is not rational to install a terrace on a columnar foundation. For example, with a high occurrence of groundwater, on wet and unstable soils. In this case, the soil will swell and push out the concrete columns. Difficulties in the construction of a columnar foundation can also arise in areas with large level differences, on slopes. In all these cases, for light buildings, another type of foundation is more successful - pile-screw. Screw piles make it possible to raise the terrace area to the desired height (even by 2-3 m!), They perfectly hold the wooden flooring with all the necessary furniture. In addition, the screw piles for the terrace are screwed in within 1 day.
Consider the technology of building a light WPC terrace on screw piles.
Progress:
1. Determine the installation points of piles. They are screwed in with a step of 2-3 m, with a mandatory installation in the corners of the future site.
2. Piles are screwed in using special equipment or manually. With manual screwing, a metal scrap is inserted into the slots on the upper end of the pile, which serves as a lever. In the process of scrolling this lever, the pile breaks the soil with its blades and lowers to the required depth (below the freezing level of the soil).
3. Screwed piles are cut to the level of the future supporting frame.
4. Cement mortar is poured inside each screwed pile to increase its strength and prevent corrosion of the internal cavity.
5. A steel metal frame made of shaped pipes is mounted on top of the piles. The frame has the form of a frame with intermediate elements located in 50-60 cm increments. The finished frame is coated with a primer, paying special attention to the welding points.
6. Aluminum logs are laid on the piles. Since when aluminum comes into contact with the steel of the frame, the corrosion process starts, it is recommended to lay logs only through rubber gaskets.
7. Fastening decking boards to aluminum logs is carried out using terminals that are inserted into the slot of the log. Terminals allow you to mount the boards without the use of self-tapping screws and the need to drill holes in them. If the aluminum profile used does not allow the installation of terminals, the fastening of the decking boards is performed traditionally - using self-tapping screws.
8. After assembling the composite flooring, an enclosing aluminum profile is mounted along the ends of the decking. Now a terrace made of composite decking is almost indistinguishable from an expensive wooden structure!

How the installation of the terrace on screw piles is carried out is shown in the video plot:
The veranda to the house is an excellent solution for those who want to acquire additional space not only for summer holidays, but also for full-fledged year-round use. After looking at the photos of these extensions, you can see for yourself their versatility, aesthetics and other advantages. And the fact that you can even build a veranda with your own hands, without the help of specialists, is especially attractive. We invite you to figure out how to quickly and efficiently attach a new room to your wooden house: what project you need to prepare, what foundation to fill, how to mount the frame and other components.
Before the direct construction of a wooden veranda, it is necessary to prepare a project. It must contain the following information:
- dimensions of the veranda - width and length;
- the location of the future veranda: from the facade, from the end or at the corner of the house;
- entry point: from the room, separate from the street or through, that is, through the courtyard into the house;
- door location.
 Before construction begins, create a project for the future veranda and coordinate it with local authorities
 After the project is prepared, take care of issuing a building permit. The construction of the veranda is officially considered a rebuilding of the house, so it must be coordinated with the local office of architecture. You must provide the following documents to the appropriate authority:
- House project;
- project of the future veranda;
- a document that confirms that you are the owner of the site;
- restructuring application.
As practice shows, the project approval procedure takes about two months - keep this in mind when planning construction work.
 An example of drawing up a plan for a house with a veranda
 What happens if you complete the building without permits? The veranda is included in the total area of the house, so its uncoordinated construction can be regarded by the BTI as an unauthorized change in living space, which will entail a fine.
When the issue with permits is closed, proceed to prepare the site for the construction of the veranda. In particular, you need to free the site from debris and all green spaces, as well as remove part of the turf. If you plan to attach a veranda to the facade of the house, you need to remove the canopy over the entrance and the porch.
Foundation pouring
The veranda, as a rule, is erected either on a strip or on a column foundation. How do they differ and how to equip them?
 Pillar foundation for the veranda
 The columnar foundation allows you to build a wooden veranda autonomously from the main foundation of the house, so this option is relatively simple to implement. First you need to mark up and dig holes for the posts. If a small veranda is planned, then four columns in the corners will be enough, but for an overall structure it is better to make holes around the entire perimeter in increments of 50 cm.
Advice. To prevent heaving of the soil, the depth of the pits should be slightly below the freezing level of the soil, that is, at least one meter.
Next, fill each hole with a layer of sand 20 cm and fill it with concrete to ground level. When the concrete dries, coat the resulting post with bitumen and, if there are gaps, fill it with sand again. The ground part of the column can be made from any timber. The height of this support must exactly match the height of the main foundation of the house.
For large-sized verandas, it is better to fill in a strip foundation. It is built in several stages:

Arrangement of the subfloor and frame
Before you start working with the frame, you need to lay the subfloor. It is done like this:
- Fill the subfloor with expanded clay material for insulation.
- Cover the foundation with ruberoid.
- Prepare the logs, treat them with an antiseptic and fix them on the foundation.
- Lay cutting boards on top.
 Subfloor installation
 Next, grab the frame. It is better to build it from 10 x 10 cm bars. First, fix the bottom trim of the timber on the draft floor, connecting it at the corners using the “direct lock” method. Every 50 cm, cut small grooves in the beams for mounting vertical racks, and then install these racks, strengthening them with staples or nails for maximum fixation. The height of the supports should not be the same: the closer to the wall of the house, the higher the racks - this is necessary for the subsequent installation of a shed truss system. Also, when erecting racks, it is important to designate openings for doors and windows.
Then, on the received supports, it is necessary to fix the bars of the upper trim. This part of the frame will perform two functions at once: play the role of a base for the roof truss system and ensure the stability of the entire structure of the veranda.
Advice. In order to prevent the upper trim from deforming during subsequent construction work, it is better to fix it with temporary spacers.
Roof and floor installation
It is desirable that the roof of the veranda be flatter than the main roof of the house. And, as already mentioned, it is better to give preference to single-sided options. Such a roof is mounted as follows:
- On the already installed rafter system, fix a dense crate of unedged boards.
- Lay roofing material on the crate and secure it with bunches.
- Lay heat and moisture insulating material on top.
- Fix the main roof.
 Veranda roof construction
 As for the arrangement of the floor, on the veranda you can use both a traditional floorboard and solid wood. Especially if the room is closed, that is, fully glazed. The flooring must be laid on traditional logs, pre-installed on the bottom trim. At the same time, the boards themselves must be mounted perpendicular to the lags. The method of fixing the floor can be anything: self-tapping screws, bunches, the tongue and groove system - depending on what kind of finish you choose.
Frame sheathing
Wall cladding is the most important stage in the construction of the veranda, since the operational and aesthetic characteristics of the entire extension largely depend on the quality of the work performed and the quality of the finishing material itself. The frame stitching includes the following processes:
- In the area where windows are supposed to be placed, install a window sill - it should be located approximately half a meter from the floor covering. Attach the board to the vertical supports.
- Sheathe the frame on the outside with wood material that stylistically matches the decoration of the main house. Attach the tree to the supports with self-tapping screws or nails.
 Wood frame cladding
 - Lay insulation and waterproofing film on the exterior finish - they will protect the veranda from heat loss and moisture ingress. And don't forget to leave appropriate openings for windows and doors.
- On top of the heat and waterproofing, lay the internal finishing material: chipboard, lining or any other variation of wood. Fasten to the frame with the same screws or nails.
Installation of windows and doors
Windows must be installed in the gap between the window sill beam and the upper trim. For the veranda, both deaf and opening or sliding products are suitable. The general workflow is as follows:
- Using a level, carefully place the window block into the opening and fix it with nails or wedges.
- Close the remaining gaps between the supports and the block with tow - later it will need to be hidden under the casing.
- The final stage is the installation of the frame in the window block and direct glazing.
 Windows and doors are installed at the final stage
 The door must be installed strictly in the opening that was marked at the design stage - it is not recommended to change the location during the construction process, since any adjustments must be re-agreed in the appropriate authority. The door frame begins to be fixed with upper anchors, aligning the horizontal threshold with the building level. Then the lower anchors are attached - here you need to maintain the verticality of the box supports. Then grooves for the lock and hinges are cut out in the structure, after which the door itself is hung.
Remember that only if you strictly follow the instructions for building a veranda, you will get the desired result of your work: a beautiful, functional and comfortable extension that will delight you all year round.
How to attach a veranda to a small house: video
The veranda is an extension to the house, erected during the construction of the main building or subsequently. This extension cannot be considered a separate building, it is part of the house. However, it is necessary to obtain permission for the construction of a veranda and, after completion of work, carry out a new registration of the house. This requirement applies to verandas attached to permanent buildings, and it is associated with an increase in the area of \u200b\u200bthe house.
There are two rules that must be followed when building a veranda. Firstly, it is erected where the door to the house is located. Therefore, they are attached from the front or end side of the main building, but in such a way that the front door to the house opens inside the veranda and it is possible to get into the house only through it. In addition to increasing the area, the owner of the house also receives additional protection for the front door. Secondly, it should match the style of the house, make up a single ensemble with it, not look like an ugly spot against the backdrop of the architecture of the house. Based on this rule, materials are selected for the construction of the extension and its optimal size is determined. Its length should be equal to the length of the side of the house to which it is attached, and the width should be at least 2.5 m. Otherwise, the extension will look either bulky or disproportionately small. There are no other rules for the construction of verandas. They can be L-shaped, have several angles, be semicircular.

There are open and closed verandas. Open-type extensions do not have the upper part of the wall from the fence to the roof, closed verandas differ in the glazing of the space free from walls. Depending on the design, the glazed space in the extension may predominate. In a variety of closed verandas - French - the glazing is continuous, this is a type of extension with completely glass walls.


Open verandas are a combination of a place to relax and a wide porch, closed - a summer dining area and an additional entrance hall.
Consider the stages of adding a closed frame veranda to a house made of timber.
The foundation of the veranda
The foundation of the veranda being built should not come into contact with the foundation of the house, even when they are being built at the same time. The distance between the foundations should be about 10-15 mm. The weight of the extension is much less than the weight of the house and the foundations will behave differently under load. This technical gap must be filled with an elastic gasket to compensate for shrinkage and movement of the foundations. Mineral wool or polystyrene can be used as a gasket.
For the construction of a frame closed veranda, a columnar foundation will be enough:
- At the corners of the future veranda, holes are dug under the pillars. With a significant length of the veranda, several holes should be dug in addition to the corner ones. The depth of the pits is about 1 meter. The bottom of each pit is covered with a layer of crushed stone with a height of about 100 mm, this layer is rammed, a layer of sand of the same height is poured, and it is also rammed.
- The simplest wooden formwork is installed in the pits, knocked down from the remnants of the board, concrete is poured into it. You can use two methods of erecting foundation columns: raise the formwork to a height of 200-250 mm above ground level and completely pour concrete or pour concrete only to ground level (in this case, the formwork should not protrude above the ground). In both cases, the concrete base is carefully leveled horizontally and in height between the pillars.
- When constructing a concrete base to ground level, after leveling and hardening, brick columns are laid out to the desired height.
- Poles for waterproofing are treated with hot bitumen.
- To drain groundwater, a drainage channel is dug along the concrete columns with a slope from the veranda. The soil is selected to a depth of about 25 mm with a channel width of about 1000 mm. The channel is covered with expanded clay or small gravel, covered with a layer of geotextile on top as a protection against clay particles and debris, and covered with soil. Another inexpensive option for a drainage channel is to lay a perforated plastic pipe in a trench covered with geotextile.
- The height of the foundation columns is calculated so that the floor of the veranda is approximately 250 mm below the floor level in the house. This is done so that the height of the veranda is equal to the height of the rooms in the house, and its roof goes under the overhang of the roof of the house.


Important! Experts recommend attaching verandas to log houses only after the shrinkage processes have ended. This usually takes two to three years. When erecting a veranda before the complete completion of shrinkage processes, it is recommended to use the "thorn-groove" system to attach it to the house. This will avoid warping the walls of the veranda.
Frame erection
We proceed to the construction of a frame from a bar. We use a beam of 120x120 mm, before starting work it is treated with an antiseptic and fire impregnation for wood. Anti-capillary waterproofing will be provided by wrapping the beam immediately before laying sheets of roofing material.
We make a double harness for reliability. In the corners, the beam is connected "half a tree". In the upper part of the lower trim, we will also cut logs “half a tree”, we will lay the floor on them. The fastening of the lower trim to the columnar foundation depends on the material of the columns. Studs Ø14 mm can be pre-concreted in concrete posts, put on a strapping beam on the studs and fixed with nuts. The harness can be attached to brick posts with anchor bolts or studs. The attachment points must be treated with an anti-corrosion compound, but this will not protect the timber from the formation of condensate in the attachment points and with the gradual decay of the tree.
The next step is to install a run - a horizontal beam on which the rafters will rest. The slope of the veranda should go under the main roof, so we calculate the height of the purlin fastening based on the thickness of the roof (roofing cake) of the extension and half the thickness of the rafters in the case of fastening “half a tree”. The run can be fixed to the wall of the house with anchor bolts.
There are several ways to install vertical racks of a frame structure. This can be a “half-tree” cutting, a complete cutting of ½ the thickness of the upper beam in the lower trim, or a “groove-thorn” method with a side of 50 mm. Additionally, the racks are fastened with galvanized two-millimeter steel corners, staples or nails. We calculate the distance between the racks based on the width of the purchased frames for glazing the veranda.
The height of the racks is determined by their location in the extension structure - the racks near the wall of the house are higher (the reference point is the mounting height of the run), this is necessary for the installation of the roof slope. When calculating the height of the racks, do not forget about the depth of the groove or cutting made. We need a roof slope of 12%, this is a requirement for the correct laying of soft tiles.
The upper strapping is done in the same way. The beams of the rafters rest at one end on the run, fixed along the wall of the house, at the other - on the upper strapping.
The rigidity of the whole structure is provided by braces, which we nail to the bottom and top of all racks. The crossbars between the uprights, which we need to install the frames and fasten the skin, are installed with the help of corners.


Roof device
According to tradition, the roof of the veranda is made single-pitched and more gentle than the roof of the house. We remember that the extension should be in harmony with the house, and we use the same materials for its roof that were used when constructing the roof of the house.
We make the crate for soft tiles solid from edged boards. We check the humidity of the board, it should not exceed 20%. First we fix the cornice board, carefully align it horizontally. On the cornice board we arrange grooves for attaching the drain holders. The batten boards will protrude 150 mm beyond the side posts. We treat all wooden parts of the roof with an antiseptic and flame retardant.
We lay a waterproofing sheet on the crate in the direction from bottom to top. We make overlaps in the longitudinal and transverse directions. We nail the canvas with galvanized nails, their feature is a wide hat. With bituminous mastic we pass places where the canvas is overlapped.
According to the instructions, we reinforce the roof overhangs with eaves and end metal strips. We nail them with roofing nails. Laying of soft tiles is carried out from the run down. We start in the center of the roof, moving to the right and left side. We take shingles from different packs, our task is to get an abstract pattern on the roof. We remove the protective film from each shingle before laying. We fasten the shingles with galvanized nails, while making sure that the nail head does not damage the tiles. In places where there is no self-adhesive layer, we coat this place with bituminous mastic.


Flooring, finishing and glazing
We want to lay a warm floor on the veranda. To do this, we lay a rough floor from an unedged board, attach a beam of 50x50 mm to it and a step of 500 mm. We put penoplex in the resulting cells, foam those gaps that remain with mounting foam. Penoplex is laid in such a way that a gap of 10 mm remains to the finishing floor. So we will solve the problem with natural ventilation. Before laying the finishing floor, we cover the beam and foam plastic with a water-repellent film and fix it with the help of metallized adhesive tape. From above we lay a finishing floor from a floorboard and cover it with colored polyurethane varnish in two layers.
We line the walls of the veranda with clapboard from the outside. Having fixed the lining, we lay a waterproofing film on the inside. Then we lay the penoplex, foam the remaining gaps with mounting foam. Inside the veranda, we also line the walls with clapboard, do not forget to lay a plastic film.
We mount window blocks in the prepared openings, fasten them with nails. We foam all the remaining gaps, after hardening we cut off the foam and decorate the windows with platbands. We use triple glazed windows.
Do not forget to hem the ceiling and hang the front door on the veranda.


Interior decoration of the veranda
We cover the lining on the walls with a colored polyurethane matte varnish in the same color scheme as the floor, but lighter. We paint the platbands in a contrasting color, paint the ceiling with white paint. Furniture and fixtures are selected based on available options.


You now know how to build a veranda in the country with your own hands, and almost anyone can do it. For its construction does not require a special tool, you will need ordinary materials and ordinary tools. Drafting a project is also not difficult. Just do not forget that you will need to coordinate this project with the district architect.


The veranda is an extension option, a logical continuation of a country house. A veranda built using frame technology can become a comfortable place to relax, be used as a vestibule or additional storage space. A decorated or glazed veranda is a decoration of a low-rise building, giving it a unique style.
Advantages of a frame veranda
The frame veranda is being built in the shortest possible time and has the following advantages:
- creation of additional multifunctional space;
- wall reinforcement;
- improvement of sound insulation of the main premises;
- keeping warm in the house;
- ergonomic appearance.
The veranda can be used as an entrance hall, living room, summer kitchen, greenhouse. It can be divided into several zones, for example, for recreation and storage of garden tools, etc.
What are frame verandas?
The appearance and purpose of the frame veranda make it possible to implement the most innovative design solutions. In shape, they can be both classic rectangular, square, and radial, L- and U-shaped, polygonal, etc. Like verandas made of other materials, frame structures can be:
- open, on which the roof rests on support beams, and one or more walls are missing;
- closed, which is a space completely closed by walls or glazing.
Also, verandas are distinguished by the material from which they are built. The best option is a frame veranda made of timber. Such a structure is perfect not only for a log house, but also for a cottage made of bricks, foam blocks, silicate. In terms of environmental friendliness and ease of construction, a wooden frame veranda has no equal. The only condition is that the wood used for construction must be treated with effective fire and bioprotection.
Designing a frame veranda
Ideally, a framed porch should be included in the project at the design stage. This will immediately make the foundation of the desired area, preserve the improvement of the territory and reduce the cost of the extension. But it's okay if you decide to build a veranda a few years after the operation of the house.
When developing a project for a future frame veranda, you first need to decide on its location. In most cases, the structure is located on the front side of the house, replacing the porch. You can also make a veranda from the end or build an L-shaped extension along two walls of the house.
When designing, the following are determined:
- Veranda dimensions. The standard width is 2.5-3 m, but you can make a mini-veranda or vice versa - a large room that will accommodate a summer kitchen and a recreation area.
- Foundation type. For the construction of an extension, non-buried or shallow-buried strip foundations, as well as columnar foundations, are used. The choice of foundation type depends on the hydrogeological characteristics of the site and the type of existing foundation under the cottage.
- Wall filling. If we are not talking about an open veranda, then light, environmentally friendly material is chosen to fill the walls, such as lining or OSB boards. Glass or mirror walls look spectacular, which can be combined with other materials.
- Roof covering. The best option is to make the roof from the same material as the roof of the house. In this case, the veranda will fit ergonomically into the architecture of the building. However, any other material can be used to cover the extension: inexpensive slate or ondulin, soft tiles, etc.
The veranda must withstand all the loads planned for it. When developing the project, it is envisaged:
- joint work of frame racks and ceilings;
- arrangement of stiffening walls;
- installation of special spacers;
- secure fastening of all nodes.
Particular attention is paid to creating a reliable connection between the veranda and the house.
The foundation for the frame veranda
Frame structures are installed vertically on the lower trim and are connected by the upper trim. Additionally, at a height of 1-1.5 m from the bottom point, a series of horizontal beams are installed that connect the frame, giving it strength and stability. The height of the veranda depends on the height of the ceilings in the house. When installing the frame, it is important to position it so that the roof is sloped. The correct installation of frame supports should be checked by the building level.
The cutting of supports is usually performed using the “straight lock in 1/2 tree” method. To make high-quality connections of horizontal and vertical elements in order to obtain a solid and safe design is a responsible task that only a qualified specialist can do. The joints are reinforced with bolts, angles, screws and other fasteners provided for by the project. To prevent deformation and shift of the frame, it is attached to the foundation elements using anchors or clamps.

To connect the frame veranda with the house, floor beams or parts of the truss system are used. After the frame is assembled, the walls are filled, hydro- and thermal insulation is applied, and finishing is applied.
The roof of the frame veranda
The role of the Mauerlat in the frame veranda is performed by the upper harness, on which the layered or hanging rafters are installed. The roof of the veranda can be single or double sloped. When constructing a shed roof, it is necessary to make such an inclination that will allow precipitation not to accumulate on the roof surface.
The same material is used as roofing as for the roof of the house. Also, the roof of the veranda can be covered with light and durable polycarbonate. The roof is attached to a pre-installed crate. On the roof of the veranda, elements of the drainage system should be installed. They must be connected to the drain of the house for effective water drainage.
Decorative finish of the veranda
The optimal version of the walls of the frame veranda: from the bottom sheathing with OSB boards or other materials made of wood, from above - glazing.
When installing high panoramic windows, a lot of sunlight will fall on the veranda. This option will allow you to equip a greenhouse or a winter garden.

The frame veranda should be in harmony with the appearance of the house. Decorating the veranda depends only on the owner's imagination! Wooden carved racks and railings, varnished or painted, will be an excellent exclusive decoration. You can order carved balusters or make them yourself. There are a lot of options for decorating the veranda, so it is recommended to consider different styles and directions and choose what you like the most.
You can also use different materials to finish the floor of the frame veranda. The most ergonomic solution is a deck board. From inexpensive materials, high-class laminate can be used.
Heated frame veranda
It is possible to turn the veranda into a full-fledged room that can be used all year round with the proper organization of heating. As a rule, the heating system of the house does not allow you to place additional radiators on the veranda. In this case, you can install a small wood or solid fuel stove, if the area of \u200b\u200bthe room allows.

Also, for a heated veranda, high-quality insulation of walls, roof and floor is necessary. Mineral wool is used as a heater, which meets all the requirements for environmental friendliness and fire safety. It is better to use triple-glazed windows for such a veranda to prevent heat loss.
The cost of arranging a heated veranda is much higher than a regular one, but you will get a full-fledged room that can be used as a hall, dining room or recreation room.