Do-it-yourself garden sculpture made of concrete. We make unusual garden figures from concrete with our own hands How to make cement mortar for garden figures
From year to year, the trend to decorate country gardens with amazing flower beds, waterfalls with cascades, winding paths and rock gardens is gaining momentum. When decorating his site, any owner wants not only to transform the territory, but to get the so-called effect "to be different from everyone else." In order to make beautiful and original decor elements, it is not at all necessary to spend fabulous sums. After repair or construction, a small part of cement and putty always remains. Why not use them for business? The original figures made of cement, made by hand, will act as a "highlight" of landscape design, making the site more attractive and interesting.
Just look at this magnificent garden decoration. An exquisite garden figure can easily be confused with the work of a professional craftsman.
For many, the figure evokes interesting sensations that are difficult to express in words. Rather, it has a philosophical inner content, like feng shui garden figures.
The sculptural hand, in addition to its decorative value, also has a practical function. It acts as an original stand for a flower bed with ground cover and undersized plants.
To make a figure, we need:
- cement mortar;
- Putty on concrete for outdoor work;
- Strengthening impregnation for concrete;
- Fine-grained sandpaper;
- A pair of latex or rubber gloves;
- Container with high sides.
The solution is made from a mixture of cement and sand, maintaining a ratio of 3: 1, which we dilute with cold water to the consistency of thick sour cream. To give the concrete figure unusual colors, it is advisable to use special pigments. Dyes are added to the dry mixture at the mixing stage and only then diluted with water.
To make a sculpture in the form of palms, we take gloves and gradually fill them with a solution, trying to avoid the formation of voids with air. Then the filled gloves are placed in a container, giving them the desired position.
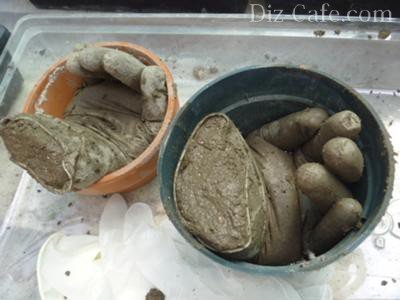
Until the solution has hardened, you can safely experiment with the form, choosing the most optimal option: simply by closing your palms, folding them into a fist or interlacing your fingers together
You can increase the strength of the figure by installing a frame: insert pieces of wire into the finger compartments filled with solution, trying not to damage the rubber with sharp edges.
Having decided on the shape of the sculpture, we leave the gloves filled with the solution in a container for 2-3 days. During this time, the solution will harden and acquire sufficient strength.
When the cement is completely dry, cut the gloves and remove them from the surface of the figure. We remove the remaining rubber with scissors and tweezers. At this stage, a lot of patience will be required, since the rubber will be removed in parts.
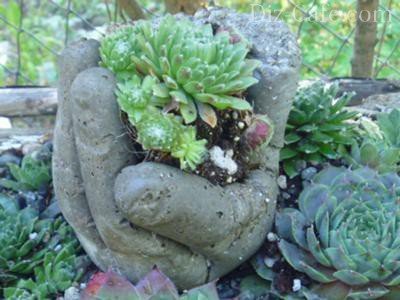
The original figure is ready. It remains only to choose a worthy place for her in the garden and fill it with a mixture for planting ground covers and succulents.
We cover the concrete figure with a layer of putty, carefully leveling the surface, and again leave it to dry for several hours. At the final stage, it remains only to sand the surface of the palms and cover them with a strengthening impregnation.
Exhibit # 2 - elegant flowers made of concrete
A bright decoration of the front part of the house or a recreation area can be flowers poured from concrete. Harmoniously combined with green spaces, they look great both along the curb of winding garden paths and against the backdrop of an emerald lawn.

The main advantage of such garden figures is their resistance to temperature extremes, due to which they are able to act as a decoration of the site for more than one season.
Making elegant flowers out of concrete is not at all difficult. To do this, it is necessary to prepare a form, which we will fill with a solution, and the cement filler itself. The easiest way is to use ready-made silicone molds designed for baking. The variety of the range of silicone molds is quite extensive.
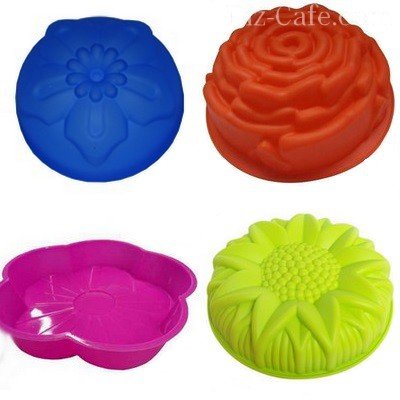
Flowers of various shapes and sizes can be made from silicone blanks: starting with ordinary field daisies and ending with multi-petal chrysanthemums and dahlias
For the manufacture of concrete flowers, we need:
- Cement mortar of the same proportion as in the previous example;
- Acrylic or oil paint for outdoor use;
- Machine oil or drying oil;
- Polyethylene film.
As forms, some craftsmen also use plastic bottles cut along, cut halves of rubber balls and other containers of a suitable size.
Since the key detail in creating flowers from concrete is the form, in order to be able to reuse it, the inner walls must be coated with machine oil or drying oil. To increase the adhesion of the finished mixture and lighten the weight of the figure itself, it is advisable to add pieces of expanded clay to the solution.

We fill the form with a solution, tamping the contents as it is filled. Grasping the edges of the form, you need to shake it a little so that bubbles with excess air from the solution appear on the surface.
We cover the form filled to the brim with plastic wrap and leave it for a couple of days until it hardens in a dry place, hidden from direct sunlight. After the concrete has acquired sufficient strength, we take the flower out of the workpiece and spread it on a flat surface. It takes 4 to 6 days for the figure to dry completely in a shaded place. We can fill the vacated form for the time being again, forming the next flower.
To prevent the formation of cracks on the surface of the flower, it is recommended to moisten the solidifying figure with water once a day. In the case when a crack nevertheless appeared, it is not difficult to correct the situation by covering the flaw with a liquid cement mortar. In order to increase the strength of the finished concrete flower, its surface should be treated with a strengthening impregnation, which can be purchased at the construction center.

To decorate a flower made of concrete, it is better to use acrylic paints, which are able to maintain the brightness of the flower throughout the season.
The choice of shades when decorating a flower depends on the color palette of the flower bed and the taste preferences of the master himself.
Exhibit #3 - Pebble Turtle
A motley turtle, settling in a suburban area, will help create that special atmosphere of coziness and comfort.

With its presence, the Tortilla turtle will certainly cheer up and delight children and guests of the site.
To implement the idea, you need to prepare:
- Medium-sized stones of any shape;
- Pieces of a metal rod;
- cement mortar;
- Impregnation for concrete;
- Acrylic or oil paints.
The dimensions of the figure depend only on the idea of the master and the amount of necessary materials. Having chosen a place to install the figure, we level the area for its placement.
From the stones we form a small hill, which outwardly resembles the body of a turtle. To arrange the paws of the figure at the level of the lower row of stones, we lay metal bars, which will subsequently serve as the frame of the structure. On the same frame, you can "plant" the turtle's head, or lay it on the ground. After the bottom row is laid and metal rods are inserted, we cover it with cement mortar. All voids between the stones should be filled and compacted with cement. By the same principle, we lay out the subsequent rows, carefully fixing the stones.
Having laid out the torso, we proceed to the manufacture of the paws and head of the animal. We select stones of small sizes and lay them out in a slide around the bars. To fix the stones and give the desired semicircular shape to the paws and head of our character, it is better to use a solution of a thicker consistency. After we have formed and fastened the paws of the figure, we proceed to the finishing work. To do this, we level the surface and plaster it with a more liquid cement mortar. On a layer of cement that has not yet hardened, we lay out sea pebbles.

Flat, smooth stones will perfectly imitate shell plates. To fix the pebbles in the shell, it is enough to slightly press them into the “plaster layer”
We leave the finished figure for 2-3 days for complete drying. After the concrete has hardened, the body and shell can be painted with special pigments, and flat sea pebbles with acrylic paints.
Everything is not so difficult. A little imagination and patience - and a new memorable character will appear on your site, which will be a good addition to landscape design.
Having a summer cottage, you always want to equip it, and even somehow in a special way. However, garden decorative elements are not cheap, and they do not differ in durability.
People with a developed imagination can make original garden crafts from cement, which is not only highly resistant to various kinds of influences (frost, hail, sun, water), but also accessible (you can buy it at any hardware store for an affordable price).
For decoration and design additions, you can use flower pots, planters, figurines of fairy-tale characters or objects of the plant world, made by hand from cement. This material is not whimsical, and most have little or no experience with it. Nevertheless, there are several important rules that must be observed in order for cement mortar crafts to be of high quality and durable.
The technology for preparing the mixture itself is as follows. The main components are being prepared: cement, building sand, water and tile adhesive (for better plasticity and reducing the risk of microcracks). For 1 part of cement, 2 parts of sand are taken (for greater strength, you can take 1 part) and 1 part of glue. Lastly, water is added in small portions until the consistency of thick sour cream. It is convenient to work with such a mixture: it does not drain and at the same time it is quite plastic.
All cement products require prolonged drying. Freezing can last up to 7 days. To prevent the surface from cracking, the finished creation is covered with polyethylene. To give the product a beautiful and regular shape, the base is placed on a hill of sand or deepened into it (depending on the idea), but not on a flat surface.
After complete hardening, the figure must be coated with a primer, and only after that can paint or varnish be applied. If the craft has roughness and other irregularities, it is refined with sandpaper and a file before priming.
In addition to cement mortar, concrete is sometimes used, which is distinguished by the presence of large fractions (pebbles or gravel) and increased strength. Concrete crafts for summer cottages can be represented by large monolithic boulders, and it is also convenient to use this material to create the basis for various compositions (a fountain platform, a pedestal for sculpture, a terrace for flower pots, etc.).
Another material similar in its application is gypsum. It is not as strong as cement, but more plastic and decorative. With it, you can create hollow shapes. For garden creativity, molding (sculptural), acrylic and architectural types are used. When working with this material, you need to take into account its rapid solidification. Very often it is recommended to add it to the cement mortar when creating sculptures.
If you have no experience using cement for decorative purposes, it is better to start with something simple that does not require modeling skills and getting the right consistency. The first exhibits in your garden can be cute mushrooms, colorful balls or original flower pots.
To make a mushroom, you will need an old rubber ball (the size of the cap will depend on its size), a plastic bottle (it will become the basis for the leg, its size should be proportional to the cap), a metal bar for attaching the cap to the leg. The ball is cut into two halves, one of which is placed in a bucket of sand and pressed evenly. Next, cement mortar is poured into the resulting form and leveled.

At the plastic bottle, the bottom and neck are cut off and inserted into the filled form in the center, immersing it by 1–2 cm. Then, using a long iron bar, the future stem and cap of the mushroom are connected and the cavity inside the bottle is filled with a solution. For several days, the product should harden, after which you need to remove a piece of the ball and a plastic cylinder.

After a few more days, the product can be covered with paint and decorated with various elements. Mushrooms of different sizes look spectacular on the site in the form of a small clearing. It is also worth noting that your imagination may tell you to use other containers (bowls, jars) and methods for making garden mushrooms.
It is enough just to make an openwork ball that seems so light and airy. For the base, use a balloon (the size of future figures depends on how much you inflate the balloon). Next, any rope is placed in the finished solution and then the ball is wrapped around it.

Do not wrap the base too tightly, you need to leave enough holes for further extraction of pieces of the burst ball. When the product dries, you can proceed to the decorative coating.
If you cover the balloons with cement mortar with the addition of a small amount of gypsum for faster hardening, you can get original garden lanterns or flower pots.

Using this technique, you can also make vases for dried flowers. In this case, not only the outer, but also the inner side is subjected to decorative staining.

If you pour the solution into a small hole in rubber balls, you can get monolithic balls of different sizes. Painted in different bright colors and randomly scattered around the garden, they will become a concise and stylish decoration.

Using plastic containers, you can make pots for Crassula and Crassula Ovata cacti. The container is wrapped in a plastic bag, and a bag of clay or sand is placed inside to keep the container in shape. Then it is covered with cement mortar. After complete drying, all auxiliary materials are removed, drainage holes are made in the bottom with a drill, the product is primed and coated with paint.

It is very easy to make a flowerpot using a plastic bucket or vase and another suitable container.

One container is inserted into another, a solution is poured into the space between them. The result is a solid product that can be additionally decorated by showing your imagination to the fullest.

Flowers planted in a flowerpot made of crossed palms of the hands look attractive. To create such a masterpiece, ordinary rubber gloves are used, which are evenly filled with a solution. For rigidity, a thick wire rod must be inserted into each finger. In order for the product to turn out to be of high quality, the formation of air bubbles should not be allowed.

When the gloves are filled, they are shaped into the desired shape and fixed. After a few days, the rubber is cut and removed. If you want to connect two palms, then the same solution is used for this. At the final stage, the surface is polished with sandpaper, primed and painted.
Complex figures with a frame
It is more entertaining to decorate your country house with sculptures of animals and mythical characters. Such creations involve the preliminary manufacture of a strong frame and the layer-by-layer application of cement mortar.

Interesting flowerpots can be made using buckets of building mixtures. At the first stage, a container of suitable size is wrapped with a plaster mesh and covered with a thick layer of cement. At the second stage, until complete solidification, a decorative adjustment is carried out, making an imitation of an old stump with natural wrinkles on the bark.
Near artificial reservoirs, a monolithic figure of a hippopotamus would be appropriate. The place for it must be determined immediately and carefully aligned, since in the future the figure will be stationary.
As a frame, two elongated plastic basins are suitable, which must be fastened with wire. another option is also possible: a thick cement mortar is covered over a pile of broken bricks or gravel.

The figure itself does not contain complex elements and is easy to perform. After hardening, the product is treated with fixing impregnation and dry pigment for concrete, rubbing the powder with a hard sponge.

More complex sculptures are made in several stages: 1) making a frame from wire and foam or containers; 2) covering the workpiece with a plaster mesh; 3) applying the mixture in several layers; 4) the formation of small details (facial features, special texture, folds of clothing, etc.); 5) priming and painting the finished work.

Flower vases in the form of swans will become an elegant decoration of the garden. The frame of the body is an old plastic basin, the neck is a twisted wire. The head, wings and imitation plumage will have to be made from a cement mixture, showing the skills of a sculptor.

Monolithic figures have a significant weight, so as an alternative, there is a way to create lightweight large-sized objects. You can decorate your garden with boulders of different sizes.

For their manufacture, any unnecessary and light material (cutting foam, plastic bottles, polystyrene) is tied into a tight lump with a wire.

The resulting base is wrapped in a plaster mesh and covered with a thick cement mortar. The more bumps and protrusions there are, the more natural the “stone” will look.
Small garden figurines are made from a mixture of cement with the addition of gypsum or Portland cement.


Here you can use the manufacturing methods described above, as well as any basics: old toys, clothing, household utensils.

Step-by-step instructions for making: 3 master classes
In order to analyze in more detail the nuances of the creativity presented in the article, we will consider the best master classes with a step-by-step explanation of the work being done.
1. Spectacular flowerpots made of cement and fabric
To make garden pots out of cement and cloth, either pure cement or Portland cement is used. In this case, the mixture with water should turn out to be quite liquid. You will also need a bucket or other container for the frame, a piece of polyethylene and a piece of fabric.
The material must be sufficiently dense and absorb liquids well, i.e. synthetics will not work here. It is better to use cotton fabric.

- Cut off a piece of the desired size. If you need smooth edges, then round off;
- Abundantly wet the matter in the solution;
- We fix polyethylene on the prepared bucket;
- Lay out and smooth the fabric soaked in the solution on top;
- After 2 days, the cement will set and the bucket can be removed;
- The product is slightly moistened with water and left to dry completely for another 5 days.
Even large-sized plants can be planted in a finished flowerpot.

Experiment with the shape and color of flowerpots and create your own unique compositions.

2. Funny cat for the garden
To begin with, we prepare a frame from a cut plastic bottle and wooden slats, which are fastened with wire.

The solution is prepared from cement and sand in a ratio of 1: 1, additionally (directly into the hand) gypsum is added during work. Gradually applying the solution, create all the details of the sculpture.

The finished figure is polished with a wet hand and left to dry for 4 days. The final touch is painting with water-based emulsion or enamel.
3. Large drinker leaf for birds and pets
An equally successful and versatile garden decoration will be a sheet of cement. A plastic film is laid on a mound of sand, and then a large sheet (the mound will allow you to get a figure with a recess, not a flat one). If there are small holes in the sheet, then they should be closed with small leaves so that the cement mortar does not leak.

For several days, the workpiece is covered with a film until it dries. Then the sheet is removed, primed and painted.


If desired, a fabulous fountain can be made from several similar blanks.

In recent years, people are increasingly coming to the country not to dig in the beds. To ennoble their garden plots, they often use the services of landscape designers, on whose advice they spend a lot of money on the purchase of park sculptures. After reading this article, you will learn how to make concrete sculptures with your own hands.
A bit of history
Since time immemorial, people have tried to create a special atmosphere in their areas with the help of all kinds of figurines and sculptures. Our distant ancestors believed that stone sculptures not only affect the surrounding vegetation, but also change the fate of their owners. So, a family of little gnomes brings a good harvest and good luck. Animal sculptures give their owners health and longevity, and marble human figures save them from loneliness. The characters of various fairy tales promise their owners an interesting life filled with amazing events.

The main features and advantages of the material used
Many owners will surely always have a certain amount of concrete, cement or putty that can be used to create park decor. The main advantage of a mixture prepared on the basis of sand, cement and water is its plasticity. Therefore, it is very easy and simple to work with such material. In addition, concrete sculptures are resistant to atmospheric precipitation, so they can be safely left outdoors. They also do not require special care. The owners will need to occasionally restore the figure's coating.
Another significant advantage of such products can be considered their weight. Even relatively small concrete sculptures for the garden have a rather impressive mass, so it is unlikely that anyone will steal them.

What is required to create park figurines?
Before making such a decor, it is necessary to decide what functions the future product will perform, since the choice of materials largely depends on this. To produce a concrete sculpture, you will need the following components:
- for the frame;
- concrete or a mixture consisting of water, one part sand and three parts cement; to increase the plasticity of the solution, you can add PVA to it, and to increase moisture resistance - liquid nails;
- putty knife;
- polyethylene film;
- sprayer with water.
In addition, you need to stock up on a suitable size in advance.

Making a sculpture out of concrete in different ways
To date, there are several methods for creating park figurines. The most popular of them are:
- Frame technology, according to which the base is first formed from the wire, subsequently covered with a solution. For the manufacture of thicker elements, a building mesh or the same wire is wound on the desired part of the existing frame. In addition, any suitable and unnecessary item in the household can become the basis. It can be an old bucket, a baking dish or a box.
- Molding technology, according to which the solution is poured into a pre-prepared form. You can buy it or make it yourself from improvised materials, like a rubber ball or a glass container. After the concrete has hardened, it must be removed from the finished figure.
- Coating technology, according to which the solution is applied to the surface of any suitable frame made of fragile material. After hardening, the base inside the product will need to be destroyed. It should be understood that concrete will have a relatively low weight.
All of the above methods can be used not only separately, but also combined with each other.

Sculptures made of concrete and the general style of the site
In order not to turn your garden into something tasteless, you need to use a few simple tips from experts. Before finally deciding on the choice of such a decor, you need to draw a detailed plan of your own site and graphically try on various options for figurines. Each sculpture needs to create a certain background that emphasizes its style and beauty. So, it is desirable to place small products in an open area near artificial reservoirs, garden paths, flower beds, front gardens or fences. High large figures are recommended to be installed next to fountains or neatly trimmed shrubs.
Garden sculpture should be in harmony with the overall style of the garden and emphasize the direction of its image. For a romantic plot planted with delicate flowers, monochromatic graceful human figures or magical sophisticated plant compositions are optimal. A rustic garden can be decorated with colorful folklore elements or pet figurines.
To make high-quality and durable garden sculptures from concrete, it is important to choose the right brand of cement. The better the properties of the consumable material, the higher the performance of the finished product. During work, do not neglect safety measures. It is advisable to work in a special protective mask that prevents cement dust from entering the respiratory tract. Processing of the finished figurine can be done using a special saw with diamond wheels.
Concrete sculptures have many advantages over products made from other materials. Concrete is more flexible than natural stone and therefore easier to work with. Such products are resistant to weather influences, they can be left on the street, only periodically updating the coating. Another plus is that even a small figurine weighs a lot, and therefore you can not be afraid for the safety of the garden decor, on which you have worked hard. This article tells how FORUMHOUSE members make DIY cement crafts.
Concrete sculpture: master class
The first step towards creation is working on a metal frame, on which the solution will then be applied. To get thick parts, you need to wrap the frame with a fine mesh or wire. The second way to make crafts from cement for the garden is molding, when the concrete solution is poured into special forms, and after hardening, the two halves are glued together and the product is sanded.
Nutabena advises filling the insides with various rags to save cement.
If you do not have much experience working with cement, it is unlikely that you will succeed in the perfect craft for the garden the first time. You can start with the simplest crafts. So that the errors can be corrected, glue is added to the cement for crafts. The required color is given with the help of a pigment added to the composition, or a finished figure is dyed. With the help of paint, you can imitate other natural materials: granite, marble, wood, etc. Finally, the concrete mortar sculpture is covered with an anti-graffiti and anti-corrosion coating, which keep the products unchanged for several decades.
Forum participant, summer resident RUS_095 (Moscow) talks about this technology for creating concrete sculptures, which is used by Ukrainian master Vladimir.
ENG_095 FORUMHOUSE user
The solution for the product is made from a mixture of cement and sand in a ratio of 1: 2. Cement is applied to a metal frame, from which the excess is then cut off. Products are painted with ordinary facade paint.
From simple to complex
Galina Ara suggests trying your hand at simple figurines, making a mushroom. For a 1.5-2 liter plastic bottle, cut the neck along the “shoulders”. Prepare a solution: 1 part of cement, 3 of sand, add water to the consistency of “cottage cheese in a pack”. Fill the bottle to the top, set to harden. Then cut and remove the plastic - the mushroom leg is ready.
Make a hat using a metal or plastic bowl of the right size: grease the inner surface with sunflower oil or grease, put the solution there to the very top and let it harden a little. When the solution can be cut with a knife, make a hole 6-7 cm deep in the middle. The diameter should be slightly larger than the diameter of the top of the leg. Wait again for the concrete to harden even more, then carefully turn over and remove from the mold. Sharpen the edge of the hat with a knife.
 Do-it-yourself garden sculptures made of cement.
Decorate the hat: make a hole in it, roll a worm out of the solution and shove it halfway there. After the final drying, cover the figurine with a primer and paint. Be sure to wear gloves before starting work.
Galina Ara makes jewelry made of cement less than 150 cm in size without a frame and fittings. A piece of soft monolith, from which a figure is then cut, can be made using a metal sheet: roll it into a pipe of the required diameter and tie it with a rope. Then fill with mortar and leave to dry.
The disadvantage of the method is that it will not work to make figures with protruding parts, with outstretched arms, etc.

More complex country figures need reinforcing elements. The forum member did the cat in this way. At first they blinded everything except the head. Then, while laying the cement into the mold, I stuck two rebars of the required height and made the frame of the head and ears from thin wire. When the solution (up to the lower jaw) hardened well, I put the pipe again, but this time on a frame of boards at the level of the neck. I cut out the bottom with a hole for the neck from plywood and filled it with mortar. I cut out the head without removing the wooden support. After 2-3 hours, I removed the frame, and smeared the border with a solution.
What else can be done for cement: an activity in Arinka's class
Drinking bowl for birds "Autumn leaf"
Take a large leaf of burdock or rhubarb. Lay cellophane on the table, make a hill of wet sand, form a mound in the middle to give the sheet depth. Cover the slide with cellophane. Lay the sheet with the veins up, straighten it.

Mix non-liquid concrete: 3 parts sand, 1 cement, water. Put the cement on the sheet: the thickness of the cement mortar in the middle should be 2 cm, reduce to 1 cm towards the edges. Then insert a plastic tube with a diameter of 10 cm and a height of 10-15 cm. Coat it with mortar at the junction, fill the pipe cavity with concrete. Cover with cellophane, leaving gaps for ventilation, and leave the product to dry.
Do not turn over the concrete leaf earlier than after two days!
After the concrete has dried, remove the sheet. If it comes off with difficulty, moisten lightly with water. The leaf can be painted twice with yacht varnish with the addition of golden, red and orange colors. Get a high-class garden sculpture!

Waste bin
Arinka put together a trapezoid from old scraps. The size is larger than the diameter of the container that is inserted into the middle of the mold. Then a wooden base was nailed to the walls of the mold. The walls, the bottom of the mold and the bucket were covered with plastic wrap, secured with tape. Reinforced with fine mesh. The cement mortar was poured into the mold, making the bottom of the urn (thickness 8-10 cm). Then she inserted the cellophane-wrapped bucket into the mold, put the burdock leaves against the walls and gradually poured in the solution, holding the leaves so that they did not slip, and leveling the bucket in the center.

The urn was covered with cellophane for 5-6 days. After drying, I turned it over, unscrewed the screws in the bottom, dismantled the walls. The leaves were washed away with a stream of water. The top of the urn and the sharp edges were sanded with a disk. Painted the urn. The product can be decorated with sea shells. Flowerpots, etc. are made according to the same principle.

More ideas
Frau made original decorative stones and figurines from the remnants of cement left over from the paving of paths in the country: they put them in piles and cut out the contours with a knife two days later. Wire and metal mesh reinforced only thin crafts.

You can increase the plasticity of the solution with the help of PVA, reduce moisture permeability - with "liquid" nails.
Olika made beautiful swans to decorate the plot, using an inverted basin, wire and wet strips of an old duvet cover. She sculpted, then poured water and wrapped it with polyethylene so that the cement would seize. A day later, I unwound the film and spread another layer, already without fabric. The neck was done gradually, over five days. The figure was painted with oil paint in two layers. Pebbles in the "lake" - gravel sprinkled with spray paint.

Nyura5 proposes to make a frog for a dry swamp out of cement and bricks with rubble. Blind the model of the figurine from any plasticine, and sculpt a sculpture from it.

Turtles and ladybugs are easy-to-make options: they can be made from an old soccer ball cut in half. Just put the polyethylene on the bottom and pour the solution. Figures can be decorated with fragments of multi-colored tiles.

Waldschnepfer in his dacha fantasizes about the statues of Easter Island. Heads can be made empty: plant some plants there, forming a kind of hair.

Large statues for decorating a summer house will require a significant amount of time. As a basis for them, you can use a thick log or bucket. Wrap the base with wire mesh. The nose, lips, eyebrows and other small details can be made of expanded polystyrene, attaching them to the structure with reinforcing mesh, and filling the gaps with mounting foam. Coat the frame with cement, dry and paint. The garden keeper is ready!
According to the materials of the participants of the forum "House and Dacha"
Decorating a garden, backyard, summer cottage is an endless process. All the time something is changing, removed, added. One way to decorate is to make garden figures. If you correctly place them, they transform the appearance of the site.
Cement figurines: what are good and how to do
You can make garden figures from cement - this is one of the most used and affordable materials. It is inexpensive, allows you to create a variety of figures - from simple and small, to full-length sculptures. There are several ways to make garden figures from cement mortar: with a frame, without it, from a semi-dry mortar. More about everything further.
Very often, mushrooms are made of concrete, but they are not always the same ...
What to add to the solution
There are many additives in cement that improve/change its properties. There are a lot of them, but they are sold in fairly solid volumes, which may be needed only for the manufacture of garden sculptures on an industrial scale. But there are ordinary substances that also change the properties of the concrete solution.

These are the main additives that are needed in the manufacture of garden figurines from concrete. They are easier to work with. But don't add too much. Maximum - one teaspoon per bucket, otherwise you will only make it worse.
How to paint and some technological nuances
After the concrete figure has dried, it must be sanded to smoothness, dust removed and can be painted. In order for the paint to lay down more evenly and be spent less, you first need to cover the product with a primer layer. The primer is selected depending on the type of paint. The painting process itself is no different - usually you need brushes of different sizes. But it is worth knowing some features.

There are still a lot of different technological nuances, but these are the main ones. The rest you will master or invent in the process of work.
How to make garden figures: cutting from a semi-dry mortar
It will not work to make garden figures from a fresh cement-sand mortar - it is too liquid. Even if you mix it with a minimum of water, you won’t be able to blind anything intelligible. But you can wait until the solution begins to harden, but remains still quite soft - it will crumble under pressure. In this state, it is possible to make grooves in it with a metal object, cut off the excess.

From a thick mixture, you can form an approximate shape of the intended character - put it in a piece of film, tie it, give it the desired shape. If there is a liquid solution, find a more or less suitable container or use the same film. The solution in the form is left for 8-12 hours. The time depends on how liquid the cement was initially and the temperature at which you withstand the product. The optimum temperature is around +20°C, at a lower setting time increases, and at a higher one, there is a possibility that the cement will dry and not "set".

Periodically check the condition of the workpiece: there should be a solid mass under the fingers, and when you apply more force, the cement is slightly pressed through. In this state, you can already begin to form a sculpture. You have 7-8 hours to work. For small figurines this is more than enough, but for large figurines, you will have to hurry. To delay the drying of parts that are not yet processed, they can be wrapped with a wet rag.
It is not necessary to paint ... Can be covered with colored fragments of glass or dishes
Take a knife, wire, spatulas, start to cut off the excess little by little. You don’t need to be afraid, if you remove something superfluous, you can add a little solution later, correct it when it dries. In general, the technology is not too complicated, but if there are no artistic abilities, it is difficult to come up with something intelligible on your own. For such cases, there is one trick: find a small figurine from any material, looking at it, sculpt your own.
Making figurines from cement with a base or frame
The technology for manufacturing garden figurines from concrete on the basis consists in layer-by-layer application of the solution onto the frame. But this technique is required when making large figures - about 150 cm and more. Then the bearing capacity of the concrete itself may not be enough. In this case, a solid foundation is needed. In other cases, the frame or base is needed only to minimize the consumption of concrete and reduce the total weight of the product.
The frame for complex products is made (weaved or boiled) from wire, for simpler ones, improvised materials are used. A layer of mortar (thick) 1-2 cm is applied to the finished frame, it is laid with a fiberglass mesh-serpyanka, the solution is applied again, again the mesh. The process alternates until your product acquires the desired shape.

Where and how to find the foundation
The main task is to find a dish, a bottle, a box that is suitable in shape for the intended product. If the shape is complex, it can be grown or completely created from pieces of foam. It is light and cuts well. But such figures - with a foam base - do not withstand the load. If you assume that someone can sit on your products or otherwise mechanically act on them, it is better to use wooden bars or foam concrete blocks instead of foam. Foam concrete is perfectly cut with a saw on wood, it can be planed with a planer, a large knife, and grooves can be made with a sharp object. Everyone knows the principles of working with wood.

The found form is covered with a solution, wrapped with rags, tow, ropes, and then also coated with cement. If the solution layer is more than 2 cm, it is reinforced with a fiberglass mesh (a sickle mesh is used for plastering walls). If plastic is used as a base, it is very difficult to apply a solution to it - it flows down. Such products are wrapped with rags soaked in a solution. After drying, the next layer is applied very well on them.
In the dried solution, grooves are made, which indicate feathers, wool. In general, there are many tricks. Let's give a few examples to make it clearer how to make garden figures out of concrete. Another option is to coat it with a solution into which pebbles are pressed. It creates uneven terrain.
Swans
For example, we want to make figures of swans. The basis for the body is a small rounded basin. The neck is a wire curved in the shape of the letter S. We attach the “neck” to the body in any way possible.

We put a thick solution on the basin, forming the desired bend, add polystyrene foam, pieces of rags, etc. We leave to dry. On the wire (it is better to find a thicker one, you can rebar) we wind rags soaked in the solution. We fix and leave everything for a day. During this time, the concrete will set, and on the “body” you can form wings, make grooves, draw feathers, etc. with the help of scraping.

Closely engaged in the neck and head. We put a solution on the resulting base with our hands (do not forget to wear rubber gloves), forming a neck of the desired shape and thickness. You won’t be able to “build up” a lot at once - only in thin layers. When the neck becomes more like a real one, you can begin to form feathers, outline the beak, eyes, etc. Leave the finished birds to dry for a week or more. Next - sanding, priming painting.
frog princess
In this example, we will demonstrate how garden figurines can be made from cement mortar and stones. A foam block was taken as the basis, trimmed and hewn where necessary. Top coated with a thick solution in several layers.

In the upper, still soft layer, pebbles are reinforced - small flat pebbles, glass fragments are used on the crown. After drying, the figurine is painted with acrylics and varnished twice.
Frameless technology: concrete drinking bowl
If the product is small or thin, a large load is not planned for it, you can make it without a frame. So do all sorts of bowls, plates, small sculptures. For example, a drinker for birds in the form of a leaf. It can also be a stand for flowerpots and flower pots, other figures that do not want to come into contact with the ground.
We find a large leaf - burdock, rhubarb, etc. We put the sheet in the water, from the sand on a flat surface (table) we form a gentle hill, cover it with a film.

We lay out the sheet on a hill, pressing it into the sand. We knead a thick solution - it should not drain. The composition of the solution for sculptures is 1 part cement, 3 parts fine sand, you can add a plasticizer. We spread the solution on top of the sheet, pressing it tightly. In the middle, the thickness of the layer is about 2 cm, towards the edges it becomes thinner - up to 1 cm. Shape the edges carefully. They can be trimmed, but this is not so easy to do.

In the middle we insert a segment of a plastic pipe with a diameter of about 10 cm and a length of 10-15 cm. Coat the joint with a solution, fill the pipe. Cover with plastic wrap. It protects from overheating, rain, dirt. We press the edges with stones or something heavy, but it is not necessary to achieve tightness - excess moisture should evaporate.

Keep the garden sculpture without turning over for at least 2 days. Then remove the outer film, carefully turn over, remove the sheet. If it does not go away, moisten and wait a couple of minutes. Remove debris with a brush. Wait a few more days before painting - preferably two weeks.

That's what happened ... the original bird drinker
Before painting, sand with sandpaper, remove dust. If desired, you can cover with a primer. Its type is selected according to the type of paint. The primer is needed so that the paint lays down more evenly and so that it is less spent. When the paint dries, the product is covered with two layers of varnish. Choose a varnish for outdoor work. Better - matte or semi-matte.
Decorative figurines from polyurethane foam
Very quickly and simply, you can make garden figures from polyurethane foam. Just keep in mind, they are very light, so you need some kind of weighting agents. Plastic bottles, metal containers, cardboard boxes, etc. are suitable as a base. For thin parts - arms, legs, necks - any materials of the desired shape and size are suitable: branches, wire, wire frame, plastic pipes, metal corner, etc. etc.

This is an Alpine goby made of polyurethane foam. There is no need to specially make wool here either: the foam itself forms the desired relief
The basis for thin or strongly protruding details of the figures, can be stuck in later - after the "body" is ready. A wire, a corner, a stick, you can simply stick it into the dried foam. If soft materials are used, they can be nailed or screwed with self-tapping screws, grabbed with staples from a stapler, glued. In general, use whatever method is available.
It is better not to save on the quality of foam - choose an expensive one. It does not flow like a rising yeast dough, but increases in size, maintaining the shape specified during application. But even with expensive polyurethane foam, you should not rush. The main secret is this: apply a thin layer at a time. Then wait until it stops increasing in volume, hardens (25-40 minutes) and apply the next thin layer. Such a consistent increase in volumes is the key to success.
If in steps, then you need to make garden figures from foam like this:

In general, the technology is simple and now you know how to make garden figures from polyurethane foam. But there are nuances. First. If cheap foam was bought and it began to spread, you must wait until it begins to harden, moisten your hands with water and form what you need from it. It is important to catch the moment when the foam is no longer very sticky, but has not yet completely frozen.

Second. If a part of the figure fell off in the process, it can be fixed by dropping foam on the joint, sticking a piece of wire - for greater strength - to connect the parts. Cover the seam with mastic, putty.

The third. When the putty dries, cracks form on the surface of the figurine. Covering them with putty again brings almost no result. The cracks reappear. To avoid them, we take a bandage, wrap the figurine smeared with putty, apply another layer on top, level it.

Fourth. If using a spatula it was not possible to obtain a perfectly flat surface, but you need it, then when the putty dries, you can smooth it with your hands. Moisten hands with water if necessary.
Photo of homemade garden figures and sculptures


The most interesting thing about these garden figurines made of concrete is that the clothes are real, they are simply impregnated with a concrete solution, and after drying they are painted

Garden figurines made of wood are not necessarily carvings. There may be such - from logs. Wonderful horse!


The cat is tall - more than 160 cm at the base of the pin. The head was made separately, then connected to the "body"

Turtles and mushrooms made of concrete - they are most often made by novice sculptors

Sculptures like this need a form...


From the remains of concrete ...


Wooden sculpture for the garden and backyard is a talent…

Mushrooms made of concrete - a plastic glass for the legs and a bowl for the hat. In the future hat, until the solution has hardened, dig a cylindrical hole so that the leg enters there. So the fungus will be very similar to the real one.


