Plasterboard table. Plasterboard tables. Functional plasterboard furniture: varieties
The use of drywall in the repair and interior design of premises has long been in first place in popularity. This material is used not only for interior zoning and interior partitions. It is possible to make quite functional things from GKL, such as furniture, communication boxes, etc. In addition, gypsum is an excellent option for making decorative unique design elements.
Drywall is the simplest and most inexpensive material that can transform the interior beyond recognition. With it, you can do redevelopment, zoning, functional elements and decor.
A multi-level plasterboard ceiling with lighting can not only decorate a room, but also significantly affect the overall perception of the interior. The material will help to understand the intricacies of creating such ceilings:.
GKL designs, both simple and very complex, are divided into two varieties: decorative and functional. Decorative products include products erected to decorate the interior.

For example:
- Modular pictures;
- Figured niches in the walls or other wall elements;
- All kinds of decorations for walls and ceilings;
- columns;
- arches;
- Multi-level curly ceilings;
- wall openings;
- False fireplaces;
- Panel frames.
Products that carry a functional load are cornices for curtains, finishing of door and window slopes, all kinds of furniture, walls and partitions and boxes for communications.
Functional plasterboard furniture: varieties
Plasterboard furniture is a modern solution for any interior. Its main advantage is accessibility, as well as the ability to implement any design ideas.

Gypsum board furniture options:
- Bar counter;
- Rack;
- Wardrobe;
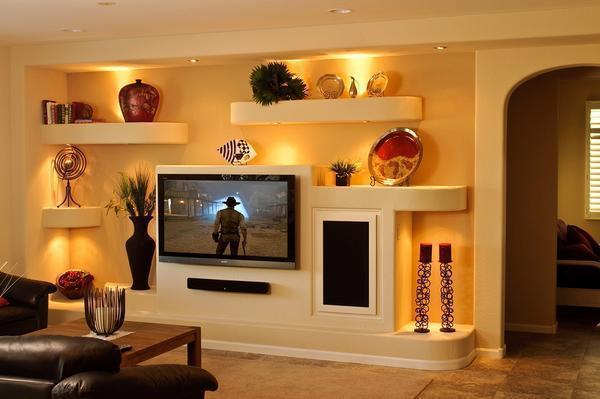
- Wall for the living room under the TV;
- A shelf;
- Mini wall;
- Built-in kitchen;
- Cabinet;
- Table;
- Bed;
- Sofa, etc.
The disadvantages of this furniture include its stationarity. If there is a desire to change something in the interior, such furniture cannot be moved from place to place. Also, drywall is quite fragile, and this must be understood when calculating a particular design.
Modern drywall ideas in interior design
Time does not stand still - it moves forward. And if earlier drywall was used mainly for finishing, or rather, for leveling walls and ceilings, today its use is quite wide.
If you know how to use drywall correctly, you can make a creatively designed multifunctional room out of an ordinary little room.

A figured partition with niches, for example, can serve not only as a rack, but also as an excellent zonator for delimiting one room into two rooms. And a convex illuminated flower on the ceiling, smoothly passing to the wall already in the form of niches, is an excellent solution, say, for a children's room: a night light, shelves and unique decor. A mini-wall for a living room under TV is not only furniture, but also an interior decoration. It is not bulky, can take up a minimum of space, and can have any appearance: everything is in the hands of the master.
Modern design developments are sometimes simply shocking with their beauty and versatility. So, an ordinary wardrobe in the middle of the room, which has sliding mirrored doors and a semicircular shape of the back wall, does not clutter up, but, on the contrary, visually enlarges the space. A decorative partition with a built-in aquarium is not only a zoning wall, but also a “TV” for fauna lovers.
A column or semi-column in the middle of a room can not only decorate the interior, but also hide elements such as:
- Cables;
- Wiring;
- Pipes of water supply, sewerage or heating;
- Ventilation corrugations and other engineering communications.
A false plasterboard fireplace is a stylish and fashionable solution for interior decor. But in addition to decoration, it can serve, for example, as a hiding place for important documents or jewelry.
Tips from the masters: do-it-yourself drywall products
Today, many people make repairs at home using plasterboard structures on their own, without resorting to experienced installers. At the initial stage of "acquaintance" with drywall, it is better for a home master to follow some advice from more experienced professionals.
Namely:
- It is better to study on small interior elements that have a simple design, for example, boxes, partitions, portal arches, slopes, etc.
- You should not start with ceilings: these are quite complex structures in terms of construction, requiring experience in working with the material.
- When working with large structural elements, it is better to have an assistant.
- If you want to cut a large figure out of drywall, it is better to practice on a small piece of material so as not to accidentally ruin the sheet.
- Fastening drywall sheets to the frame should be done with care so as not to “drown” the self-tapping screw too deeply and not push through the material.
- Cutting sheets, in the absence of a knife for plasterboard, can be done with an ordinary knife or a stationery knife.
- Figured elements, including holes, are best cut with an electric jigsaw or a hacksaw blade (which greatly complicates the process).
- When cladding walls, you do not need to rest the drywall on the floor. To avoid deformation of the structure when it sags, a small gap should be left between the floor and the sheet.
- In rooms with high humidity (bathroom, kitchen), special moisture-resistant material should be used, and with increased fire hazard (kitchen) - fire-resistant.
If during the cutting of drywall the material is damaged (scratches occur), you should not write off the element from the accounts. Further finishing will perfectly cope with this.
Varieties of drywall products (video)
There are a lot of modern ideas for drywall products (photos of examples can be seen in the gallery), and by adding your imagination to the impressions of what you have seen, you can create a truly unique masterpiece.
Successful transformations!
Drywall furniture design (photo in the interior)


Is it worth making drywall furniture, which drywall interior elements can be done with your own hands, and for which you need a master's hand - further.
Drywall is really easy to work with, besides, this material lends itself to “shaped deformation”: a plasterboard wall wave in the interior of the living room, an illuminated ceiling semicircle, a figured headboard - all this and much more can be done on any object. The main thing is to have a project and know how to bring it to life.
Drywall sockets
Let's start with the banal: we will make a hole for the socket in the GKL sheet.
After marking in the GKL sheet with a special mounting knife or a special crown, a hole is drilled, holding the working tool strictly perpendicular to the wall surface.
Since you need to put the socket box tightly, it is attached to special paws, drowning in the prepared hole (the paws are pressed against the inner surface of the GKL, screwing in the fasteners).
IMPORTANT! Descriptions are widespread, according to which drywall sockets can be placed on top of the sheet, laying the wiring in an open way. However, the masters insist on hidden wiring laid in the channels behind the GKL.
Drywall cornice
We are moving from technical work with drywall to creative work. The organization of a remote backlit cornice is one of the most common types of ceiling work with gypsum boards. It is possible to fix such a structure on the ceiling only on a metal frame; the frameless technique is not used here.

After the completion of the repair work, sometimes unforeseen plans arise for the alteration of the premises. For example, they decided to change the curtains or hang blinds. But how to hang a cornice on drywall?
Two canopy options

If in the first cornice for curtains was provided in advance, then in the second variant, when the walls are already sewn into drywall, regardless of whether a curtain cornice, a base for curtains or another library shelf is hung on them, it should be fixed to special fasteners for drywall − butterflies (see photo below). Due to its design, the fastener is reliable both for the suspended element and for the GKL sheet.

Photo 4 - Spacer fasteners for drywall 'butterfly'
Drywall shelves
Sheathing the wall with drywall, you can build a lot of useful structures, including shelves. These can be either shelves immersed in the thickness of the wall, or structures independent of the cladding. Both those and others can be made only on a frame basis.

Photo 5 - Not a bad idea - drywall shelving, wooden shelves. Fast and quality work
IMPORTANT! Drywall is not a heavy-duty material, therefore, when erecting a structure frame, consider the estimated weight of the elements that will be located on this plane. For storage of aquariums, home libraries and other weighty interior items, it is better to replace drywall with a more wear-resistant material. Wood or stone. Similarly, if you are going to make kitchen elements from GKL - a countertop, for example. Kitchen furniture must also be waterproof, but even GKLV sheets cannot be compared with acrylic slabs, MDF, or, even more so, a stone surface in terms of water resistance.

A cabinet made of drywall (moisture resistant) is a good idea for a bathroom if you are sure that your actions are consistent with the technology of installing drywall in wet rooms (which includes the bathroom), plus the shower does not come into contact with the prepared surface and a powerful hood is installed in the bathroom. An example of the organization of such an object is below.

Photo 7 - At the stage of repair ...

Photo 8 - ...and upon its completion
Drywall doorways
If the production of shelves succumbs to you, you can move on to larger projects. For example, intra-apartment buildings made of plasterboard of the correct form are made according to the same principle as small plasterboard forms: on a frame basis. Often used include a plasterboard portal, erected both on the site of the former interior passage, and in any other part of the room for redevelopment and changing the distribution of apartment zones. A more simplified version of the work is an arch instead of an interior door.
The latter can be done simply:
- Dismantle the door and prepare the base of the walls for installation (clean and dry).
- Fasten the drywall profile to the top of the passage with self-tapping screws.
- According to the measurements taken, cut out two side panels from the drywall sheet and fix them with self-tapping screws to the profiles, slightly sinking the self-tapping screw.
- In order to close the resulting void between the side panels, a thin sheet of drywall is bent and also fastened to the profile of the desired shape with self-tapping screws.
- The docking corners are covered with sickle, puttied and sanded (plasterboard ledges must be treated with reinforcing material, as well as plasterboard joints).
The arch is ready!

Thanks to several bending methods, any drywall shapes without protruding corners are available: oval, wave, drywall circle, fantasy shapes and drywall patterns, from which, respectively, you can get a backlit drywall sun designed for living rooms, a drywall flower in nursery, spiral ceiling for office or conference room, etc..
Large plasterboard forms, for the construction of which flexible gypsum plasterboard is used, include plasterboard columns and a podium.


Plasterboard dressing room
Overlaps, i.e. the frame for this type of structure is best made of wood, and then supplemented with metal guides.
The joints of the guides and other surfaces (floor, walls, ceiling) must be laid with a reinforcing mesh. Reinforcement is needed to stop wall and floor vibrations.
rack elements of the frame are mounted in a guide profile.
IMPORTANT! The larger the cabinet, the smaller the step should be between the profiles.
The dressing room can be sheathed in one or two plasterboard sheets. After completion of the installation work, the surface of the drywall can be painted in any color, wallpapered or plastered.
Under the wardrobe it is not necessary to take a free corner in the room. Think about what part of your apartment you use to no avail? For example, under the wardrobe with a clear conscience, the space under the stairs can be given. As a result, you will get: a compact storage space, an ownerless area credited earlier, the stairs will be covered with drywall sheets.
On the scale of the entire apartment, in the same way, a plasterboard entrance hall can be divided into zones or finished, a living room and a kitchen, a bedroom and a loggia can be connected (by organizing a new partition or span finishing in place of the demolished wall).

False plasterboard fireplace
To simulate a fireplace at home, a plasterboard frame is used, in which you can “drown” a false fireplace (whether it be a luminous panel or a wall picture).


We have already mentioned some zoning techniques using drywall constructions above. And here is another one - a drywall bar counter. The photo below shows how such a simple design famously fits into the interior of both small and large apartments.

Photo 15 - A modest interior for a one-room apartment - the partition and doors between the kitchen and the room were removed, the bed was separated from the eating area with a plasterboard rack

Drywall Ideas
What other drywall products can be found in the interior? We look: the design of plasterboard walls and ceilings.


Photo 19 - Interior composition - a plasterboard circle above the head of the bed echoes the shape of the bedroom portal
FINDINGS
In principle, a drywall interior is a very practical thing, based on the vastness and variety of forms of working with the material.
However, you should not build a drywall house: surfaces subject to constant mechanical stress should be made of another, more durable material. Those. a plasterboard attic (in terms of sheathing), a plasterboard wall for a TV (in terms of a modern flat-screen TV) - please, but the walls are higher than 10 m, the shelves from the plasterboard for the entire library collection - no.
Cost of drywall work
Depending on the type of drywall work, their price is:
- in Moscow: ceiling work - from 280 rubles / m², wall work - from 190 rubles / m², installation of partitions - from 300 rubles / m².
- in Kyiv: ceiling work - from 65 UAH/m², wall work - from 45 UAH/m², installation of partitions - from 80 UAH/m².
Figured work with drywall is much more expensive and a separate price list must be drawn up for their implementation, based on the project presented to the team.
After appearing on the construction market, drywall quickly gained popularity, this is due to the fact that it is easy to work with and it is not necessary to be a professional for this. This material can also be used for interior decoration, or you can make furniture from drywall.
Drywall can be used for interior decoration, and drywall furniture can also be made.
This building material bends well, so it can be used to create a wave or a semicircle on the ceiling, as well as the head of a bed or wardrobe. Consider what can be done from this building material.

Using drywall, you can make a remote cornice yourself.
From this material, you can make not only furniture, but also interior items, for example, a cornice. Using drywall, you can make a remote cornice yourself, you can install a backlight in it, and your window will look attractive and unique. In order to fix the specified structure on the ceiling, you must first make a metal frame.
An option may arise when you plan to install such a cornice in advance, in this case you just need to create a structure from a metal profile and sheathe it with plasterboard sheets.
If you have already made a ceiling, and you decide to install a drywall cornice, then to attach the frame to the GKL sheets, you need to use special fasteners (butterflies), they allow you to securely fasten the hinged structure.
Back to index
GKL shelves
To carry out the work you will need:
- impact drill or better hammer drill;
- scissors for working with metal;
- screwdriver;
- stationery knife or hacksaw for cutting drywall;
- measuring instruments: plumb, level, tape measure.

Plasterboard shelves can be either hinged or located in the thickness of the wall.
If you decide to make furniture with your own hands from drywall, then most often they opt for creating shelves. They can be both hinged and located in the thickness of the wall. Regardless of the type of shelves, their basis is a frame made of metal guides.
The disadvantage of gypsum sheets is that it is not very durable, so when creating a frame for furniture, you must take into account the weight of the items that will stand on the shelf. To strengthen the structure, it is necessary to make a more durable frame. Drywall is not a universal building material, and if you need to make, for example, a stand for an aquarium, then it is better to choose wood or stone; an acrylic plate is better for a countertop.
From the specified building material, you can make a cabinet for the bathroom, but moisture-resistant sheets must be used. A bath or shower should not be adjacent to it, and there should be a good exhaust hood in the room itself so that excessive moisture does not accumulate.
How to make doorways from plasterboard? If you have mastered the manufacture of furniture such as a shelf, then you can move on to more labor-intensive projects, for example, building various intra-apartment buildings.
Most often, people at the site of the old transition make a plasterboard portal. Many owners prefer to have an original arch instead of a regular doorway.
In order to make an arch, you must:

The "skeleton" of the arch is made of a metal profile.
- remove the old door and its frame;
- clean the walls from pollution;
- fix the profile in the upper part of the opening with self-tapping screws;
- take measurements and cut out two side panels;
- fix the received panels on the profiles;
- bend a sheet of drywall in order to close the void between the side panels;
- the resulting joints and sheets are covered with a reinforcing mesh and puttied, after which they are sanded.
GKL sheets can be bent quite strongly, thanks to which not only arches, but also ovals, columns, and other complex shapes can be made from them.
General trends towards simplicity, minimalism, combinatorics in design have made furniture popular in the arrangement and interior design of the kitchen. The question arises how to make a drywall kitchen set. The advantage of mounting the GKL on the profile is in the sufficient ease of assembly, versatility. In practice, models of any configuration can be assembled from them.
Drywall kitchen set
Kitchens have become a fashionable trend in recent years, designers are trying not to oversaturate the space with furniture. The lower sections are made of furniture materials or sections of plasterboard. This kind of solution is especially relevant for non-standard layouts with ledges, load-bearing columns, niches. It is quite difficult to choose a ready-made furniture set for such a kitchen. Making it custom is expensive. GKL constructions are the optimal solution.
Advantages of kitchen structures FROM GKL:  Drywall Kitchen Rack
- possibility, including non-standard (oval, curvilinear);
- do-it-yourself drywall kitchen sets are mounted quickly enough, with certain skills;
- they install backlights;
- designs are decorated with various materials;
- fit into different stylistic solutions;
- exclusivity, originality of such a headset;
- low cost.
Decor types
Options depend on the style of the kitchen. Country and Provence attract wood, savage stone, brick, tiles under natural materials. Classic, shabby chic dictates wooden overlays, including those with imitation of aged wood. They use patination techniques, applying a layer of paint with the effect of aging, craquelure, artificial cracks are created on the surface. For the classics, decors from namastils, moldings are suitable. Wooden facades with light gilding and silvering look beautiful.  Drywall kitchen box In the style of minimalism, they use finishing with composite materials, aluminum, glass. , you can paint the color of the kitchen, apply texture plaster. Sheathe with material that suits the style.
Where to start making a kitchen from GKL
It is worth noting that in order to make such a kitchen without a project it is difficult. That is why you need to start with it. They plan the space on a scale, draw furniture designs with dimensions in the drawing.
How to make a project:

Read also
Assembly and installation of a greenhouse from drywall profiles
When the layout is ready, they think over what material the gypsum will be finished with, decors, what to make the countertop from. If possible, you can use the services of a designer. He will not only offer a stylistic solution, but also provide detailed drawings.
Countertop options
The work surface is a significant functional element of the kitchen set, it must be practical.

We do not consider the countertop of their natural stone, because at a cost it can be more expensive than a kitchen set. See in the video the manufacture of drywall countertops.
Stages of assembling a drywall kitchen
From you will need: a puncher for holes in concrete, bricks; screwdriver Cut the profile with a grinder, metal scissors. Prepare a hammer with blades. The markup is done with a marker. Expose all structural elements according to the level, plumb line, corner.
Materials:
- profile for GKL;
- self-tapping screws;
- drywall sheets.
Installation of the top drywall box
They begin to make a drywall kitchen set from the markup. The drawing of the kitchen project is transferred to the wall. Markup is done, using a plumb line, angle (90⁰). First, in the following sequence:

Such a design is still quite unstable, since there are no stiffeners yet.

Then, according to the drawing, vertical racks are cut (into the upper twin guide).
The step between them is from 20 to 40 centimeters. Please note that the rack bar is first fixed with screws, but only from above. The next step will be the installation of horizontal racks (into the lower twin rail).
Install them perpendicular to the vertical, with the same step. We remind you that the horizontal racks are fixed to only one upper self-tapping screw. This is done in order to adjust the dimensions of the horizontal racks.  Sheathing the upper box with plasterboard They are carefully measured, all dimensions must match up to a millimeter. Align the dimensions by tightening the bottom screw of the vertical rack. After all the racks are installed and fixed, the frame becomes rigid.
It's no secret that drywall in the kitchen today is used more and more often. This is due to the fact that the material (and all related consumables) is inexpensive, you can make a lot of things out of it, and the key here is the ability to do it yourself, without outside help.
And even if there is no experience and skills in working with this material, then in principle any sensible instruction on the Internet will give answers to most questions. And, in general, there are also enough training videos on the network.
That is, basic theoretical knowledge can be easily obtained - the rest depends on the effort and desire of a person to turn his kitchen into a real design masterpiece. And not only beautiful, but what is no less important in this case - the most functional.
Let's look at how you can use drywall for the kitchen with specific examples.
Options for finishing the kitchen with drywall
In fact, all that can be done, of course, cannot be listed, since there are too many variations, so we will consider only the most popular solutions.
So, from drywall in the kitchen, you can do the following things:
- and shelves. The peculiarity is that you can make any desired size and give the product any shape you like. Wood furniture does not have such flexibility. As for strength, everything is 100% in order with this, since both the GKL are quite rigid, and the metal from which the frame of the structure is made;

- niches. And we are talking here not only about niches for shelves or for radiators, for example, but also about the interior space for refrigerators, furniture or household appliances. Making similar niches from bricks or blocks will be more expensive, longer and not so beautiful;

- arches and partitions. That's when there really is no limit to imagination - this is when similar plasterboard constructions are planned in the kitchen (see also the article). After all, you can make any configuration, and implement difficult backlighting;

- furniture. In principle, almost any design can be implemented - for example, bedside tables, tables, pencil cases, etc.

And of course, you can make not only furniture or plasterboard niches in the kitchen, but also walls and ceilings.
But before doing anything on a specific example, let's look at some of the features of this material - in addition to general characteristics, we will touch on some nuances and important points.
Features of the use of drywall in the kitchen
The most important thing here is to understand that there are no 100% universal tips - because a lot depends on the specific characteristics of the premises and project conditions. This means that the same feature of the material may or may not be taken into account.
For example, if we are talking about the fact that you cannot use ordinary drywall in the kitchen due to the fact that there is high humidity, but you need to buy only moisture resistant, then this is of course correct.
But it’s just that not all kitchens are humid, not all kitchens cook food from morning to evening, etc. In addition, such an air conditioning and ventilation system can be installed in the room so that the level of humidity there will be no more than in other rooms of the house or apartment.

Therefore, it will probably sometimes be more appropriate to focus on the word “optimal” rather than “correctly”.
Let's get acquainted with the features of drywall.
Advantages
We can unambiguously highlight the following points:
- relatively low cost of materials;
- the cost of the services of installers, in principle, is moderate;
- the installation speed of even very complex systems is high;
- a minimum of dirt in the room during the work;
- great design possibilities;
- low weight structures;
- the ability to quickly repair damaged structural fragments;
- the ability to interact with almost any material.
Now let's talk about the negative points.
Disadvantages of drywall constructions
In fact, there are few of them, and they can hardly be called shortcomings. Because if, for example, the plasterboard walls in the kitchen stagger or some individual fragments are made “crookedly-obliquely”, then you will agree that these are primarily the consequences of improper installation, and not the shortcomings of the materials used.
By the way, in such situations, it is also impossible to mount the kitchen on drywall - since what is the point of screwing furniture onto a wall that staggers? It interferes with the fastening of furniture and crooked walls - because if there are vertical deviations, then the doors of the cabinets will constantly open, and the hinges will loosen.

In addition, you can often see violations of the finishing layer - cracks on the surface or, for example, delamination of wallpaper from the wall. And here, in most cases, drywall also has nothing to do with it - most likely, the rules of technology, either installation or finishing, have been violated.
And of course, you need to store the material correctly! After all, you must admit, if the sheets have lain in a wet warehouse for six months, and then went into action, then no moisture resistance will help here.
Therefore, it is so important to pay attention to where and from whom the material is bought. If its price is already very low - then ask yourself - why? As you probably remember - free cheese is only in a mousetrap ...
And now let's take a brief look at a specific example of how do-it-yourself plasterboard kitchen furniture is made - we will mount a cabinet with shelves. As a rule, in the kitchen, such furniture is always relevant.
So, let's begin.
Installation of drywall shelving with shelves

We will make a closet near the wall, and for work we will need the following tools and materials:
- guiding and supporting profile for partitions;
- drywall sheets;
- self-tapping screws and quick installation;
- perforator and screwdriver;
- metal scissors;
- plumb line, rule and possibly water level;
- pencil and upholstery cord with paint;
- hammer and knife with interchangeable blades.
Our shelves will be located on two racks from floor to ceiling, let the shelves be 50 centimeters deep and one and a half meters wide. In principle, such home-made drywall kitchens can be made with doors, but for now let's consider a simpler solution.
First, we make markings for the racks.
- We put a mark in the corner between the floor and the wall - there will be a right stand.
- We retreat from the set point from the wall along the floor 50 cm - this will be the outer edge of the rack.
Please note that for such an operation you will need a square! If you do not use it, then it will be very difficult to derive the correct angle for the racks in relation to the wall.

- From the first point, using the level rule, draw a vertical line along the wall from floor to ceiling.
- We retreat from the received line along the ceiling 50 cm deep into the room - this will be the upper horizontal part of the rack.
- We retreat 1.5 meters to the left from the contour of the right rack and repeat the previous operations - as a result, we get the contour of the second rack.
Now we take the guide profile and, using a perforator, we fasten it to the wall along all the lines set. Then you need to measure the height of the racks and cut off two pieces of the carrier profile in accordance with this value - these will be external vertical racks. We insert them parallel to the wall into the grooves of the guides and connect them.
As a result, we should get two rectangular frames, which we sheathe with drywall.

Tip: in order for the racks to have greater rigidity - before screwing drywall to them, insert several horizontal jumpers between the vertical profile. And it is best to do this at the level where the shelves will be located.
After the racks are sewn up with sheets, we cut off pieces of the guide profile 50 cm each - these will be the right and left edges of the shelves. We fasten them to the racks horizontally. At the same time, do not forget to use the water level - so that it does not happen later that one edge of the shelf is higher than the other.
Now we measure the distance between the racks along the wall, cut off the pieces of the guide profile and fasten them to the wall horizontally - between the previously installed half-meter pieces.
It remains to make the outer horizontal edges of the shelves - we cut off the supporting profiles of the desired length, insert them into the grooves of the side edges and connect them to each other.
It remains to sew up the frame of the shelves with sheets and you can start finishing the surfaces.

If you want to get a full-fledged drywall kitchen with doors, then it’s basically simple to do this - you can hang them on standard hinges, just provide fixing points for them in advance so that there is something to screw the screws to. It is advisable even in these places to put wooden bars inside the profiles in advance so that the hinges are held as rigidly as possible and do not “walk”.
By the way - if you are interested in how to hang a kitchen on drywall, then know that before hanging anything heavy on such walls, at the junction of the wall and self-tapping screws, you also need to put wooden blocks behind the sheets. Otherwise, furniture or the same air conditioner will not hold. The bars themselves must be screwed either to the wall or to the profile.

Conclusion
In principle, we examined what can be done in a drywall kitchen, and even got acquainted with the assembly sequence from this material.
We hope that the information was useful to you, and you will be able to design the kitchen as correctly as possible and without typical mistakes.
Happy repair!
