Marine bottle. How to decorate a bottle in a marine style - do-it-yourself decor Make a bottle with a marine theme yourself
In order to bring a little originality and creativity into the everyday atmosphere of life and your home, a little bit of imagination, free time and a small set of available tools are enough. Any kind of handmade is now at the peak of popularity - on the Internet you can find many master classes for making a wide variety of decor items that you can decorate the interior with. A masterpiece of applied art can literally be born from unnecessary remnants and scraps of various materials. In this publication, we would like to draw your attention to such a type of arts and crafts as bottle decoration. We hope that our selection of 100 different bottle decorating ideas will inspire you to be creative in decorating your home, making a gift or creating a practical yet beautiful household item.

Creativity has no limits
There are many ways to create a decor for a bottle, and the choice of each of them will depend on what kind of end result you need. Whether you want to decorate a bottle for a gift or need decor for a wedding table, maybe you will store spices in a bottle or use it as a vase, maybe you are just looking for an opportunity to decorate your interior, bring bright colors or original ideas to it. In any case, everyone can find their own optimal way to decorate bottles.
So, most often bottles are decorated for the following purposes:
- as a wedding table decoration (usually two bottles of champagne are issued, but options are possible);
- a gift for any kind of celebration;
- decorative element for living room, bedroom, dining room;
- in the kitchen space, a bottle filled with spices carries a functional load and plays the role of a decorative element;
- in the bathroom, a bottle of colored sea salt performs a similar function


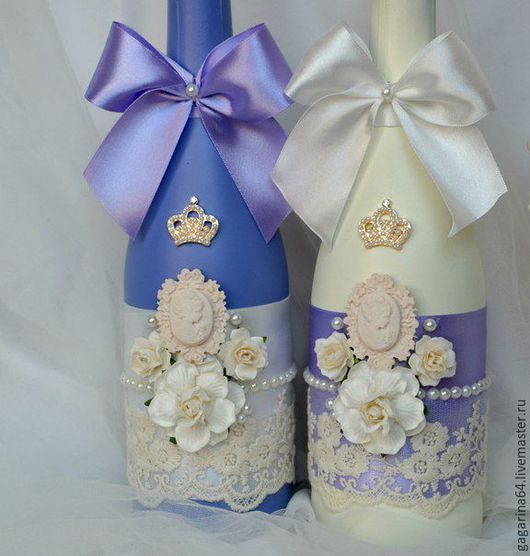
Bottle decoration for various celebrations
Wedding table decor
The wedding tradition of decorating the newlyweds' table with two beautiful bottles of champagne has been around for many years. After the wedding, the so-called "bulls" remain with the newlyweds and are kept in a place of honor. The first bottle is opened on the anniversary of the wedding, and the second - after the birth of the first child. Given such a long journey of wedding bottles, special attention is paid to their decoration. Recently, all wedding decoration has its own unique concept, based on which the color palette and decor of literally every piece of interior, table setting and all kinds of decor are selected.


But there are also universal options for decorating bottles for the newlyweds' table. The best part is that you can do the transformation of simple bottles with your own hands, in a short time and without spending a lot on materials. Most often, bottles are designed similarly to the appearance of the bride and groom - this is what is called a "classic of the genre", time-tested.


bottle as a gift
The best gift is a handmade gift. Such a present not only keeps the warmth of your hands and carries positive energy, but also indicates the exclusivity of the relationship, the special care of the donor in front of the hero of the occasion. A beautifully designed bottle can become a decoration of the festive table, and bring originality to the interior of the home.


New Year holidays
A bottle decorated in a winter, New Year's style can become both a decoration of a festive table and a part of the decor of a room where holidays will be celebrated. This can be as simple as painting the bottle white and coating with coarsely ground salt as an imitation of a snowy surface, or painting the product in the manner of patterns that frost leaves on the windows.


Not only glass, but also plastic bottles can be decorated in the form of a snowman or Santa Claus with a Snow Maiden. Here is an original version of decorating a plastic bottle in the form of a penguin - the most "winter" bird.


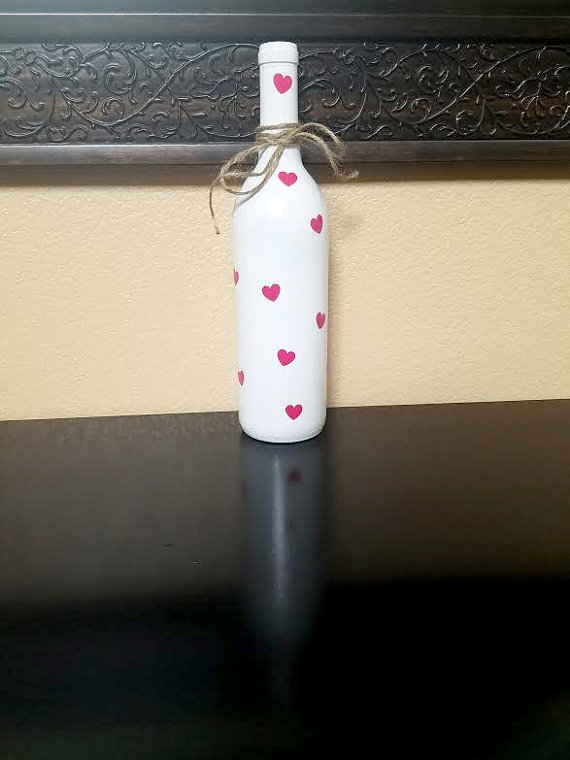
Gift for Valentine's Day or Wedding Anniversary
The main theme of the gift for Valentine's Day is the exploitation of images and crafts in the form of hearts, the active use of various shades of red, various ways of declaring love.


Bottles decorated to celebrate a wedding anniversary can be decorated with the first letters of the names of the spouses, the date of the wedding celebration or the number of years lived together. You can create a family coat of arms and use a stencil to apply it on the surface of the bottles.


No one will refuse a whole bottle filled with delicious sweets. Even a child can make such a gift. A funny inscription or a glued flower, beads or sparkles is enough.

Decorating bottles for the interior
Sea style
Decorating bottles in a marine style is one of the most popular options. And the point is not only that you can pour sea salt into a bottle and decorate the bathroom interior or collect a collection of sands brought from trips to various beaches. The marine theme invariably reminds us of relaxation, travel, pleasant emotions and new experiences.


To decorate bottles in a marine theme, you can use twine and pieces of fishing net, shells brought from travels and small pebbles. And, of course, no one canceled the images of waves, marine life, elements of ships and gear, the use of all shades of blue.


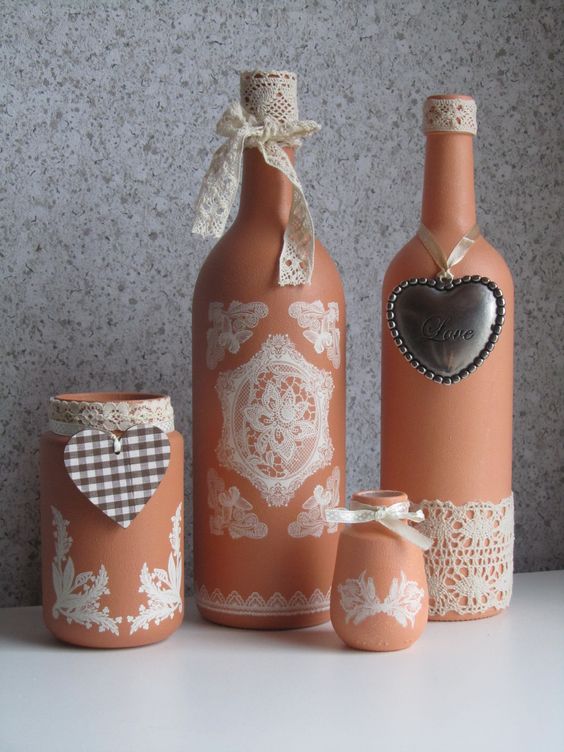
For an interior in the style of Provence and shabby chic
Most often, decoupage and artificial aging are used to decorate rooms decorated in the style of Provence or shabby chic. Not only are various images applied to the bottles (most often flowers and other plants, birds, insects), but also a coating is created that has cracks and even chips.


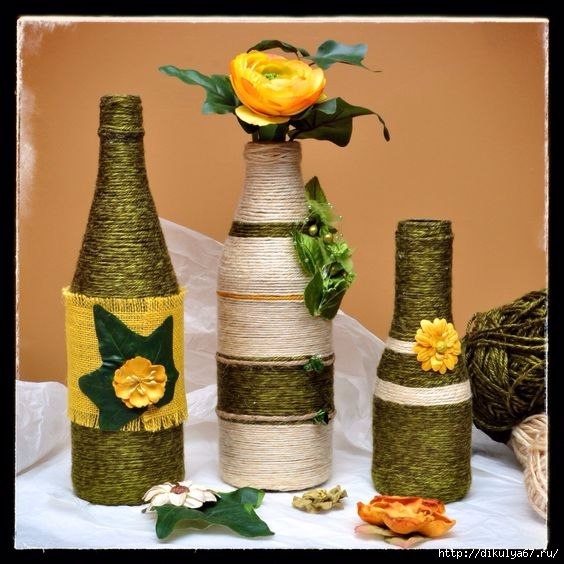
In the interior, decorated in the style of Provence and some other varieties of country style, bottles completely tied with twine or “twine” look great. Most often, such products are decorated with decorative elements - flowers, letters, an impromptu print.
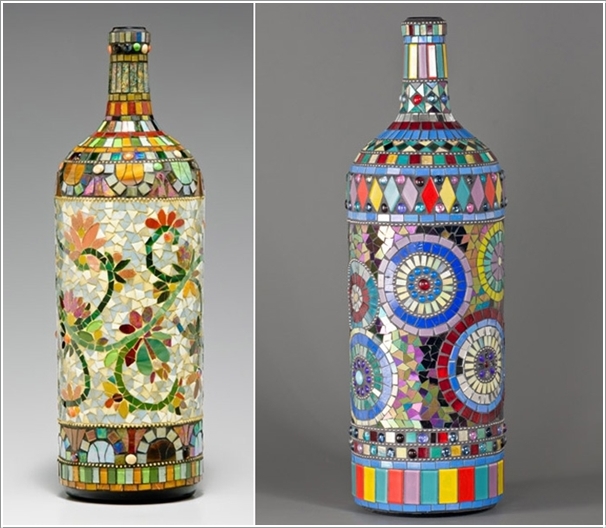
Universal option
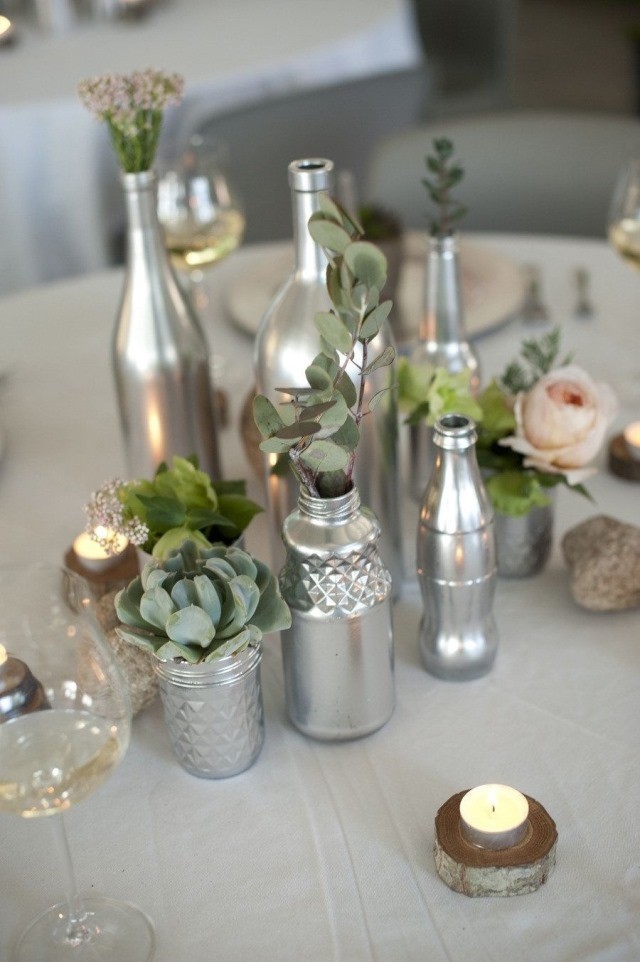
One of the easiest ways to decorate bottles is regular staining. You simply choose the shade you need and, after preliminary cleaning and disinfection of the surface of the bottle, paint it. Most often, various pastel shades, silver or golden color are used. A couple of such bottles can serve as a decorative composition or simultaneously play the role of vases.


If art painting is a simple technique for you, then a simple bottle can be turned into a work of applied art:


The composition of bottles painted using the amber technique looks beautiful. It is better to use the layout according to shades of the same color on all bottles (but they can be of different shapes).


On a painted bottle, you can apply a pattern using stencils or simply “freehand”, stick lace, create a texture with glue droplets, stick decorative elements - flowers, beads, rhinestones, pieces of colored glass, sparkles.


Very often, in combination with dyeing, decoration with twine, burlap and other types of fabrics (lace, hand-knit items, pompons) is used.


Black bottles are convenient because they do not need to be covered with paint. By itself, black is an excellent background for any decorative elements. A composition of several black bottles, decorated in one way or another, always looks contrasting, accentuated, advantageous.


The metallic glitter on the bottles is great for modern and high-tech interiors.


And finally: some creative and practical ideas
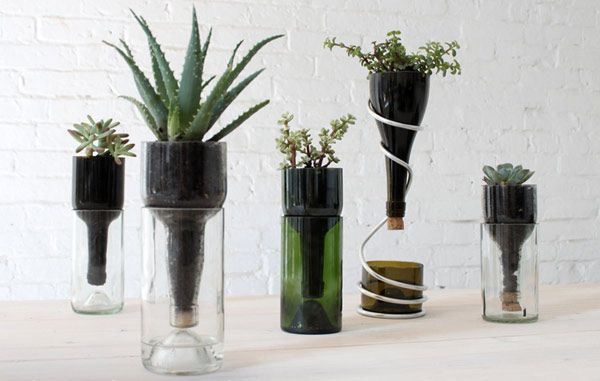
Bottles can perform the functions of not only a vase, but also a flower pot, or rather, a container. By cutting off part of the bottle in the remaining container, you can grow medium-sized plants and decorate both the interior of the home and the landscape design of the site or private courtyard.


From the glass parts of the bottles, you can make a semblance of bells, a device for the so-called "wind music".


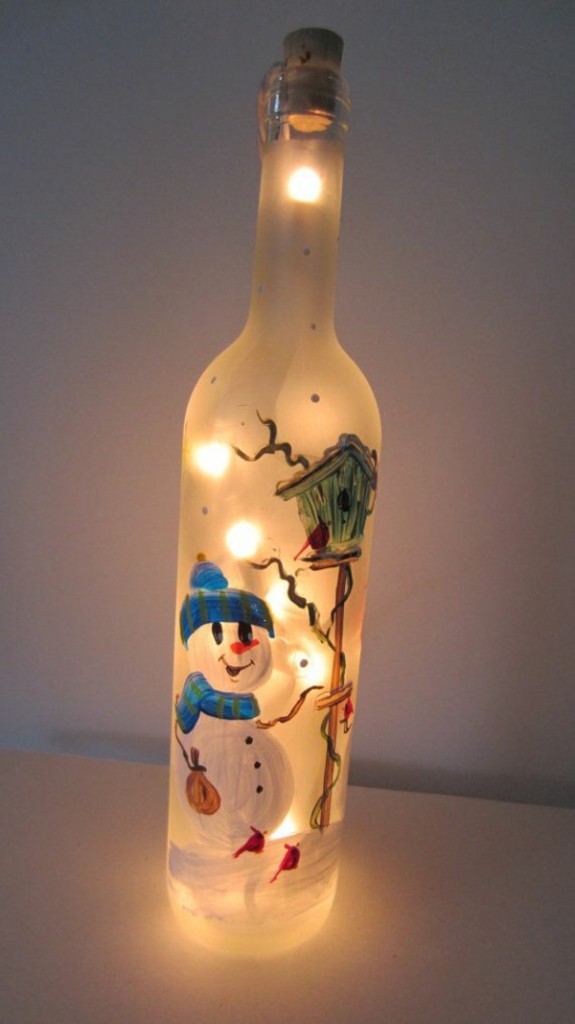
The bottle can be used as a stand for a table lamp if you make it yourself. The bottle can also be an independent decorative element for lighting fixtures in the room. You can lower a garland into a bottle painted in fragments or cut a “window” in the stele and put a small candle inside the bottle.


Bottles filled with rice dyed with food coloring can be a great addition to a kitchen or dining room. The color variety and originality of the design of the room will be provided.

A similar effect can be achieved when creating decor for kitchen and dining rooms. Colored cereals, beans and any other bulk products in transparent bottles look great. without requiring any additional decor.


For serving a festive table (with the obvious saving of countertop space), you can use bottles as a base for high coasters for plates. So on the table you can place more dishes and snacks, not to mention the originality of the approach to traditional serving.

Don't throw away bottle caps - they're a great crafting material. Of these, you can wish for coasters for hot dishes, lay out entire countertops, rugs and make such original decorative elements:


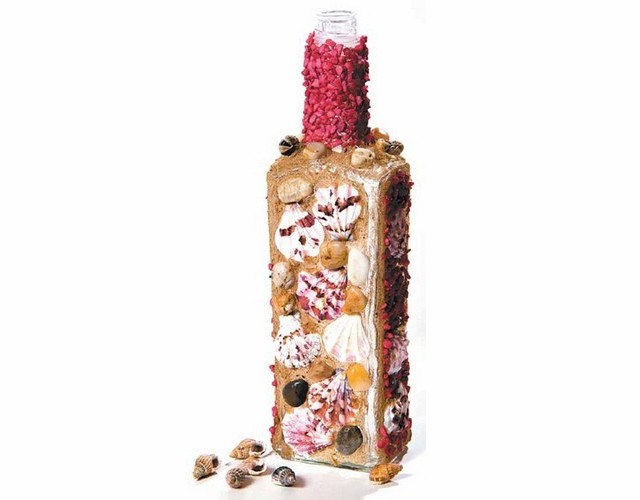
Necessary materials:
- Nice shaped bottle.
- Linen cord white.
- Decorative materials (beads, colored glass, chains, buttons in a marine style, coins, figurines on a marine theme, artificial algae).
- Natural material (colorful sea pebbles, aquarium soil, large and small shells, corals).
- Glue ("Titan", "Moment Installation" transparent).
Coming from a vacation from warm lands, we almost always bring shells, pebbles, corals, etc. with us. I suggest making a decorative bottle out of them that will remind you of your vacation. If you choose a bottle with a cork, then it will be possible to pour the gifts brought from the rest for storage into it, you can also give it to loved ones.
1. Prepare all the necessary materials. Wash and dry the bottle.
2. We start gluing the cord from the bottom of the bottle. Glue "Titan" is applied to the bottle in a circle with a narrow strip (approximately 2-3 cm) and glue the cord, laying it closely round by round. Periodically it is necessary to check the horizontalness of the turns, avoiding waviness, the farther, the more difficult the alignment will be.

3. After the entire bottle is covered with a cord, it is also necessary to wrap the cap, laying the cord on the glue, starting from the side surface, gradually moving to the top, completely cover the top of the cap with the cord, fixing it in the center.

4. Now let's start decorating the bottle. We determine the area that will be decorated, outline an approximate drawing. For fasteners, we use the glue "Moment Installation" transparent (you can also use a glue gun, but in this case it will not be possible to move the shells to a better place). First, glue large shells and stones. More voluminous shells and pebbles are best fixed at the bottom of the bottle. After that, you need to wait a while for the glue to harden (20 minutes).

5. Next, we begin to fill the remaining space with small pebbles, shells, corals. We wait again for 20 minutes. We carefully look where empty spaces or irregularities remain, glue more small shells, you can also use fragments of shells, they also look pretty for decorative purposes. When you are satisfied with the picture that has developed in front of you, you can start decorating with coins, colored glass, beads, chains, you can also use multi-colored aquarium soil. But we must keep in mind that the main "actors" in our decor should be marine "finds", the amount of colored decor should be minimal.

6. But I separately tied the neck of the bottle with a cord, wrapping it three times, tied knots at the ends so that it would not unravel. I also attached a crab, some artificial algae, pieces of coral.

After the bottle is framed, you can decorate the lid. I used a nautical style button (anchor design), maybe you have a small anchor. From above, you can attach a figure of a sailboat or whatever you want in a marine style. We close the bottle with a cap and admire the result.

If you want to get a unique and creative design of the room, turn to handmade techniques. To create unusual art objects, you will need inexpensive improvised materials, imagination and a little free time. Today we will tell you how such a completely ordinary household item as a bottle can become an original gift, addition to a festive table or a practical element of decor.
1. Decor with salt
The process of decorating with salt is so simple that even a child can handle it. Therefore, involve your young inhabitants of the house, and get down to creativity. A pleasant pastime and an excellent result are provided to you.
To get started, take a beautifully shaped bottle and peel it off the labels. Then proceed to the processing of salt. It can be painted with paint or chalk. Divide the total mass into several parts, and then paint each of them with acrylic or gouache in a different color, mix. Dry the resulting mass - do it in the traditional way, or warm in the oven for an hour.
If you want to use chalk, then portions of spices will need to be laid out on thick paper and rubbed with colored chalk. This method is best suited for a small amount of material. By the way, the salt should be coarse, sea or Himalayan.
Once you have prepared the salt, carefully place it into the container in colored layers using the flow sheets. Try not to move the vessel so that the crystals do not mix with each other. To obtain smooth lines, it is enough to carefully tilt the bottle to the sides.


2. Decor with cereals
This type of bottle decoration in its appearance and method of execution resembles decoration with salt, only millet, buckwheat, wheat, rice, peas, beans, lentils and large spices are poured instead. Everything is extremely simple: fill each variety with handfuls in the same way as in the case of salt crystals. Finished decorations also visually echo decorative preservation, but in this case you do not need to be afraid of sudden explosions at unfavorable temperatures.
The decoration of bottles with semolina deserves special attention. She finishes the surface to create exquisite patterns. The ideal image can be obtained thanks to stencils, and if you are faced with the task for the first time, refer to double-sided adhesive bases.


3. Coloring
Another simple way to decorate, but by no means less attractive than others. You can choose transparent stained glass or acrylic paints for interior or exterior decoration.
Coloring the bottle from the inside does not require special skills or tools. Prepare a container, boil it, and then dry it. After these procedures, paint one or more colors inside. For even distribution, rotate the bowl until all areas are covered.
With the help of painting on the outside, you can depict any conceived composition: be it an inscription with congratulations, patterns, or even a landscape. Clean and degrease the surface first. Apply the background color with a washcloth or sponge. As soon as the base is completely dry, proceed to applying the ornament itself, dry it. Fix the image with varnish or lightly sand it with fine sandpaper. For a glossier look, apply several coats of varnish, letting each coat dry.


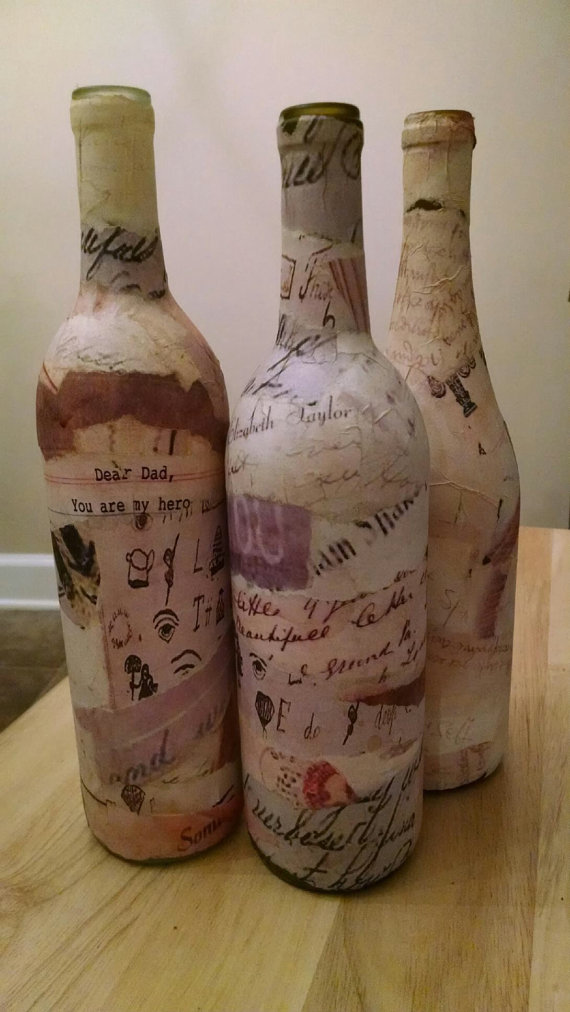
4. Decoupage
Using this technique, you can easily turn the most ordinary bottle into a wonderful gift or an original decorative element. In addition, this creative process is quite simple!
First, wash and degrease the vessel. Then evenly or arbitrarily cover it with a cloth, nylon stocking or burlap. Whatever material you choose, it must be impregnated with glue.
Dry the bottle, paint it with white acrylic, and dry it again. At this time, cut off the ornament of the napkin with nail scissors and very carefully separate its top layer. Attach the resulting image to the surface of the dishes and cover the napkin with acrylic varnish. Try to work quickly and carefully, otherwise you risk getting extra wrinkles and bubbles. After the substance dries, apply acrylic of the chosen shade to the area around the picture, capturing its borders. Dry again. Paint with the final layer of acrylic and, if desired, continue decorating with small elements - lace, beads, sparkles can be quite appropriate.


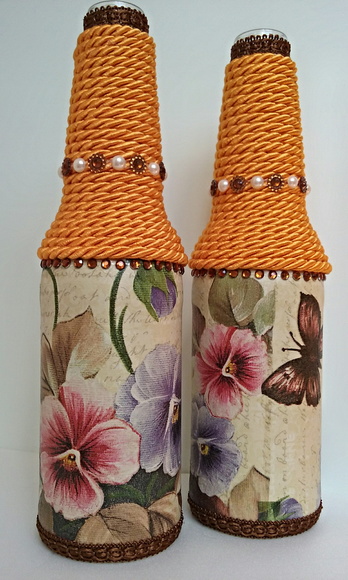
5. Decor with twine
Bottles covered with twine look very modern. They will perfectly complement any interior in a marine, rustic, Scandinavian style, or become an addition to the festive surroundings.
As in other cases, the first stage of work is to remove the label and thoroughly rinse and dry. Moisten the inside of the twine with glue and wrap the product tightly with threads. After the adhesive has dried, continue decorating if necessary, for example with anchors and lifebuoys for a nautical style, or lace for a shabby chic style. It is worth noting that even when decorating with twine alone, a rather original and interesting item is obtained that fits perfectly into almost any room.


6. Decor with vegetables and fruits
Decorative canning is a great alternative to painting and decoupage. The transformed product will look natural and natural, organically fitting into the kitchen design. This is not the easiest method, but the result will definitely please you, and you will not regret the effort expended.
Choose a transparent bottle of an unusual shape, peel off the label and get rid of the glue, wash and sterilize it thoroughly. In parallel with sterilization, prepare food (fruits, vegetables, spices), and clean them as necessary. Come up with an order and lay out the ingredients according to it. It is best to alternate products of different colors and sizes.
To carry out the preservation itself, use concentrated vinegar, saline, formalin or ethyl alcohol. Please note that some of these substances are volatile and dangerous, so you should be extremely careful when interacting with them. Use a funnel, gloves, and if necessary, wear a rubberized apron and a respirator. At the end, fill the neck with melted wax and close the contents with a lid.


7. Floral decor
If you appreciate the delicate beauty of flowers and think that without their presence the interior seems boring and "lifeless", then an ordinary bottle will help keep the fresh look of plants for a long time. Inflorescences are preserved in a container, it is used for growing indoor plants, or simply as a vase.
Canning is very easy. Pour the flowers into a pre-sterilized container and fill them with glycerin. Put in a dark cool place for 2-3 weeks. The completed flower arrangement looks beautiful and weightless.
In order for the bottle to become a cozy home for indoor plants, do the following manipulations. Take a small rope and soak it in alcohol, wind it around a glass bottle, dividing it in half, and set it on fire - this way you will get two parts. Plant a plant in the top one, and pour water into the bottom one, or leave it empty. Put the neck in the resulting glass - the original pot is ready.
You can also put ordinary flowers in the container. Finish the surface with paint or using decoupage techniques, or simply pour decorative sand and place a flowering branch in it.


8. Eggshell decor
Eggshells can give an interesting relief texture. There are many variations of transformations by this method, but in general, the principle of creating such a decor object for any modification is the same.
Start by preparing the shell - wash it well, peel off the film and dry it. Apply glue to the glass of the bottle and lay out the pattern. Dry for 20 minutes. Apply the shade of your choice with a sponge, and if some areas are difficult to reach, use a brush. Next, take the paint a tone darker than the main one, and work it through the entire plane. Fix the result with varnish.
Abstract images and curly lines are created with paint, so think about what exactly you want to get in advance and sketch out the drawing before proceeding with direct coloring.


9. Decor with sparkles and gold
Shimmering paraphernalia will add notes of elegant luxury to the New Year's or wedding table. It is especially pleasant to create such decorations with your own hands.
First you need to remove the labels from the bottle using dishwashing detergent or warming up with a hair dryer. After the vessel is prepared, spread paper, cellophane or cloth, and place the containers on them. Wear gloves to keep your hands clean. We proceed to cover with gold spray paint. To avoid streaks, it must be applied at a distance of about 10-15 centimeters, without bringing the can too close. You need to apply 2 coats, then let the product dry.
For work, we need the following materials:
- bottle
- acrylic paints (burnt umber, ivory, gold. Or any other colors of your choice))
- texture fine-grained paste or putty
- crystal paste
- shells, beads, coins and other "treasures"
To begin with, the bottle must be cleaned of labels and degreased, in order for the bw paint to hold better. You can do this with alcohol or any other means (I use nail polish remover). Next, we prime our bottle (I have cognac) with burnt umber acrylic paint using a sponge, gently “bumping” the entire surface:

We are waiting for the paint to dry, if the paint layer is thin, then you can cover the bottle again. The paint must be tight.

The next step is to apply texture paste, if there is none, then ordinary construction putty will do.

First, we apply putty at random ... we just spread it where we want, bw later we get a relief (like silt and all that).

I do not like all kinds of drawings on the bottles, and therefore I cover them with putty:


We try on our "treasures" to the resulting relief.

It can be various shells, pebbles, coins, beads, etc. and leave the putty to dry.

The next step is to apply crystal paste (or texture paste with glass balls, I think with sand or just coarse-grained paste, too), on which we glue all our "treasures of the bottom of the sea", pressing them into the paste.

In some places we apply the paste on top of the "treasures", as if they had grown into the silt and lime growths on the bottle:

Again, we are waiting for the crystal paste to dry completely and begin to paint the resulting relief with the same burnt umber:

I did not try to thoroughly paint over the entire relief, because. this creates even additional volume and in any case it will still be covered with tinting.

Well, now we actually start toning. Using a sponge and ivory paint, we tint our bottle.

To do this, we collect a small amount of paint on a sponge, dry the sponge on a piece of paper and, with an almost dry sponge, we smack our relief:

It turned out such a silty bottle, overgrown with limescale.


In principle, it was possible to stop there, but I decided to decorate our old copy a little bit and just slightly gilded my bottle.

I tinted the stars, a coin and walked very lightly over the relief:

By the way... don't forget to prime and tint the bottom of the bottle.
Well, that's all! We cover the whole thing with varnish, better matte, because. a bottle of sea water is unlikely to shine, but I didn’t have a matte one, so I had to cover it with a glossy aerosol varnish ... iii ... Here is the result.

Our beautiful bottle is ready! Straight from the bottom of the sea and on our holiday table!


Memories of summer... Probably, they come to every person in winter. We invite you to plunge into summer by creating this unusual gift bottle.
Materials.
Bottle for decoration;
. Adhesive primer (for smooth surfaces - glass, plastic, metal);
. Artistic primer;
. Acrylic paints;
. Acrylic varnish;
. White acrylic putty;
. PVA glue;
. "Liquid Nails";
. Nail polish remover, dishwashing liquid, glass cleaner, alcohol, vodka (something to choose from for degreasing glass);
. Elements for decoration, for example: shells, a chain, buckwheat groats (or beads of various shapes and sizes), twine (sesame thread);
. Napkin with a three-layer pattern;
. Printing a picture on a laser printer;
. Brushes, toothpick, sandpaper "zero" (the smallest), scissors, narrow and wide adhesive tape;
. Polyurethane pressure roller with handle (usually used when wallpapering);
. Sponge for washing dishes (new);
. Empty plastic bottles with a spout (from hair dye, glue or other materials), washed clean.
Progress.
Soak the bottle in room temperature water to remove the labels. We remove the labels, wipe the bottle dry. Apply any degreaser to the bottle, wipe thoroughly, dry.
In this case, it is important that it is clear which drink is in the bottle. Therefore, the cover with the inscriptions will not be touched. In order not to stain the lid with a primer, we glue a narrow stationery tape along the lower edge of the lid.
We cut off about 1/4 part from the sponge for washing dishes and, with plugging movements, evenly apply a primer to the bottle with a sponge, without painting over the neck and bottom. We leave to dry. When the bottle is completely dry, prime the bottom and dry again. We remove the adhesive tape (Fig. 1).
Cut out the picture. We thin it with a wide adhesive tape. To do this, glue the adhesive tape on the back of the picture (with overlapping strips), smooth it and press it well. Then carefully remove the adhesive tape - a thin layer of white paper will also be removed with it.
We apply PVA glue to the desired area of the bottle and to the picture on the reverse side, glue the picture and roll it with a roller. So the glue is evenly distributed and no air bubbles form between the picture and the bottle. Leave until completely dry (Fig. 2).
As planned, there will be a volumetric anchor on the back of the bottle. First you need to mark the drawing with a pencil. Then we dilute the putty a little with water to such a state that it is squeezed out of the bottles, but does not spread. We fill the bottles (one has a thicker nose, the other has a narrower one). To determine the desired consistency of putty, you can apply a pattern on paper and wait for drying (Fig. 3).
We apply the anchor pattern with putty. The whole anchor is from a bottle with a thicker spout, and the tip at the ends is with a thin one. When the anchor is completely dry, adjust its shape and smoothness with a toothpick. Holding it at a slight angle to the drawing, carefully remove the bumps. It is possible to polish the anchor with weak pressure with a “zero” sandpaper (Fig. 4).
Using a gun with “liquid nails”, we glue decorative elements - a chain, shells, cereals or beads. We cover the chain with the same primer that was used for the bottle (Fig. 5.6). Leave until completely dry.
We make the main background putty. To do this, with a small hard brush, we collect putty and apply strokes in different directions to the bottle. You can give the desired texture with the same toothpick. Leave until completely dry. If necessary, carefully sand with sandpaper “zero” (Fig. 7).
We apply artistic primer to the bottle, painting over all the recesses and details.
Mixing paint for the main background. We thoroughly paint over the entire bottle, except for the neck. After drying, we check that there are no unpainted areas left (Fig. 8).
In the paint mixed for the main background, add white paint. We highlight the convex elements of the bottle with the resulting tone. It is better to do this with a dry brush, we pick up a little paint (Fig. 9).
If a little paint gets on the neck during work, remove it with a damp cotton swab. We cover the dried bottle with varnish in one layer. This will make it clearer whether the details have enough volume.
For the best effect, add shades to the recesses on the shells and on the main background - green or blue paint, diluted with water almost to the state of watercolor. The main thing is moderation. We cover the dried bottle with varnish in several layers with complete intermediate drying. More layers of varnish can be applied to the picture than to the entire bottle - for more shine and gloss.
The final stage of work is decorating the neck. To do this, you need a napkin of a suitable color and sesame thread. Cut out a circle of the desired size from a napkin, remove the two lower white layers. We place the napkin on top of the lid and, making neat folds, press it to the neck of the bottle, tie it with a thread. The bottle is ready!