Interesting do-it-yourself decor is not complicated. Do-it-yourself interior items: creation and decoration, master classes. Decorative plaster from ordinary putty
Everyone strives to make their home more comfortable. Wanting to transform the design of your house or apartment unique, you can create interior items with your own hands. So the room will acquire a unique design. It is not always necessary to create some special skills and materials to create decorative elements. Sometimes jewelry is made simply and from improvised means. Next, we will look at the most affordable ways to create designer things.
You can decorate the interior with the help of improvised means

You don't need to have any skills to make jewelry.

Items for decorating the interior can be created independently
Consider several options for creating interior items with your own hands. This will require a minimum set of materials and tools and a good mood.
original tea table
The designer table will become a chic decoration of the living room, winter garden, dining room. To create it, you need to prepare the following items:
- remnants of wallpaper, preferably washable;
- a wooden frame of the size of the proposed table;
- PVA glue;
- acrylic varnish for fixing the coating;
- caps from plastic bottles;
- gold acrylic paint;
- dark brown acrylic paint.

The table can be made from old wooden boxes

Designer table will perfectly decorate the interior of the room
The manufacturing process includes several main stages, each of which requires special attention.
- A piece is cut out of fiberboard (more precisely, it is cut out) to the size of the acquired wooden frame.
- A part with the desired pattern is cut out of the wallpaper and glued to the fiberboard. You can use decoupage technique. Further it will be considered in detail.
- The frame, the upper surface of the bottle caps is painted with dark brown paint.
- After complete drying, in some places strokes are made in gold color and rubbed with a dry flat brush to create a cobweb effect. The same should be done with lids.
- All remaining parts are covered with acrylic varnish.
- The legs are securely glued to the bottom of the table.
The original do-it-yourself piece of furniture is ready and can take pride of place in the room.

It is not difficult to make such a table yourself.

The tea table will perfectly decorate the interior of the room

The process of creating a table includes several stages.
Shelving, kitchen and bookshelves
Various racks and shelves can become a useful and important element of design decoration. The ways to create them are only limited by your imagination. As a rule, old boxes, pallets, barrels and other parts of old furniture are used. Sometimes even from the most useless things in the household it is really possible to create a real miracle.
Most often, people are engaged in the alteration of old objects into new ones. This is explained by the fact that it is a pity to throw it away, and the quality of products manufactured decades ago is sometimes much higher than modern products.
Now let's take a closer look: how can you use old wooden boxes? Furniture made of such elements certainly deserves special attention. With all the budget cost, it helps to place the right accents in the interior. The photo shows several options for such designer furniture.

You can make shelves from old things, giving them a new life

Racks and shelves will perfectly decorate the design of the room
Variety of handmade tables
Not a single room in the house is complete without a table. This is a versatile piece of furniture. They are:
- kitchen;
- written;
- computer;
- dining;
- coffee;
- magazine;
- bedside;
- children's.

There are special techniques for decorating tables

The table is a versatile piece of furniture

No room is complete without a table
Modern decorators distinguish 12 basic techniques for decorating various tables. Their detailed description is given in the table below.
|
Description |
materials |
|
|
Painting |
The most simple and affordable method of transformation. The main step in this case is surface preparation. The quality of staining depends on this. If there is rust on the metal elements, then it is removed (Coca-Cola can help) |
Acrylic putty, enamel, varnishes, paints, aerosols, brushes, rollers, sponges, sprayers. Stencils and masking tape may be required for designer staining. |
|
The painting will help to diversify the ordinary monochromatic coating. If there is no artistic skill, then do not be upset. Stencils and templates will come to the rescue. |
Stencils, acrylic paints, thin brushes. |
|
|
The desired images are cut out or carefully torn off. Using a brush and glue, stick evenly on a smooth surface. After complete drying, varnish. |
Soft brushes, special napkins or any drawings on paper, PVA, transparent fixative varnish. |
|
|
Craquelure |
This type of varnish is able to give the product a cracked, aged look. Craquelure can be of different types, it should be used in accordance with the attached instructions. |
Craquelure lacquer, brushes, vein pigment. |
|
The tile remaining after the repair can always be used to decorate surfaces. The technology used is the same as for laying on walls or floors. This method is perfect for a table located on the veranda or in the garden. |
Ceramic tile |
|
|
Compositions from the smallest fragments always look elegant. There is a lot of room for imagination here. The main thing is to firmly fix all the components. |
Mosaic elements, broken tiles, colored glass, old CDs, pebbles, shells |
|
|
Self-adhesive film |
One of the fastest and easiest ways. |
|
|
Decorative tape |
This type of material can be purchased at any office supply store. Decorating the surface will take just a few minutes. The main thing is to stick sticky strips evenly and accurately. If necessary, the adhesive tape is also quickly removed, and the sticky layer is removed with acetone. |
Scissors, decorative tape. |
|
Epoxy resin |
This is the name of a liquid substance that quickly hardens in the open air. It looks like plastic on the outside. Great for filling cracks in old wood. Pigments can be added to the composition. |
Epoxy resin, brushes, pigments. |
|
Decor under glass |
An original coffee or coffee table can be created by making a small indentation in the table top. Various decorative elements are laid out in it, and everything is covered with glass from above. |
Sand, shells, beautiful stones, dry flowers, beads, miniature toys, glass. |
|
Coloring through tulle |
Initially, the base color of the paint is applied. After drying, the tulle is tightly attached so that there is no slipping and smearing. Contrasting paint is applied on top. For accuracy of work, it is recommended to use a spray gun. |
Base paint, pigment, tulle, brushes, spray. |
|
Gilding |
Gold elements perfectly complement the interior in a classic style. You can use ordinary gold-colored acrylic paint, but the result will be much more effective when applying potali. This is called ultra-thin foil. |
Potal, fixing varnish, brushes. |
When creating a table, it is not necessary to use any one design method. It is quite possible to combine them. These decoration methods are perfect for transforming shelves, cabinets, chests of drawers, bar counters.

On the table you can stick a photo of nature or something else.

A table covered with mosaic will look elegant and beautiful.
We create designer decor
It is not necessary to create exactly pieces of furniture with your own hands. Sometimes, in order to make the interior unique, a few decorative elements are left. Let's take a look at some of the available options.
flower pot from teapot
Such a little thing will become a chic decoration, kitchen, dining room, living room, veranda. For manufacturing you will need the following:
- acrylic paints;
- unnecessary kettle;
- sponge;
- small flower bowl;
- shungite.

It is better to paint the teapot with acrylic paints

This item would be a great decoration for any room.

You can decorate an old teapot and make a flower vase out of it.
Making a pot with your own hands includes the following steps.
- Painting an old teapot with acrylic paint. The surface must first be cleaned. After the product should dry well and apply a second coat of paint so that the color is even.
- The bowl should fit into the kettle in size. It is first necessary to plant a flower in it and only then put it in a teapot. To absorb moisture, shungite is poured onto the bottom.
- If desired, the teapot can not only be painted in one tone, but also drunk. For painting it is really possible to use stencils.

If the appearance of the original appearance of the kettle suits you, you can leave everything as it is

The teapot is best painted with acrylic paint first.
Handmade candles
Candles always create a special atmosphere in the room. Especially if they are made with soul with their own hands. The manufacturing process is not as complicated as it might seem at first glance. For work, you will have to prepare the following materials and tools:
- a container for melting wax;
- a saucepan or a metal bowl for a water bath;
- form for creating a candle;
- a pair of strong sticks (for stirring the wax, for attaching the wick);
- wax crayons;
- remnants of old candles;
- natural cotton threads.

To create candles you need a small set

The process of making candles is not difficult.

Candles can create a special atmosphere in a room.
If everything is ready, then you can proceed to the most interesting: creating a candle with your own hands. The process consists of several interrelated steps.
- Wick manufacturing. For this, cotton thread is useful. Material with synthetic additives will not work. A candle with a colored wick will look original. Its thickness will depend on the size of the candle itself and the materials from which it is made. The thread can be twisted into a bundle, crocheted or braided. The wick must first be impregnated with liquid wax.
- Candle formation. The mold can be made of plastic or metal alloys, juice boxes, yogurt, biscuits can be suitable. For the first experiment, you can use simple smooth containers, and then any curly ones. A hole is made in the middle of two and a wick prepared in advance is inserted into it, it is better to tie a knot outside for reliability. The knot is the top of the candle. A stick is laid across the form, on which the other end of the cotton thread is tied. After that, pieces of wax are added to the container. Then you can start melting in a water bath.
- Product coloring. A candle in color looks much better than a standard gray or cream color. The easiest way to paint it is with ordinary children's wax crayons. They are crushed into crumbs and poured into a container along with pieces of wax. You can also purchase special pigments in the form of tablets.
Finally, the candle is cooled. The main thing is not to forget to leave a “tail” at the wick for subsequent arson. To get a scented candle, you can add a few drops of your favorite scented oil to the wax.

You can add a few drops of scented oil to the candle for scent.

The finished candle can be painted in the desired colors
Bedroom Decor
Most of the time people tend to spend in the bedroom. Naturally, this room should be as cozy and comfortable as possible. Comfort is often created with the help of charming decor elements. The following items are most commonly used.
- Family photos in homemade frames. They can be made using stained glass, shells, polymer clay, durable cardboard. You can also make them with your kids.
- Artificial flowers created from corrugated paper, fabric, hardening plastic.
- Designer textiles, which include beautiful pastel linen, bedspreads, handmade pillows, creative lampshades. To make such a decor will turn out, even if you have an elementary sewing skill.


2016-01-12 12:13
Decorating your home with your own hands is not so difficult. And it's interesting, unusual and inexpensive. Catch the creative wave and get down to business! Find inspiration in our original selection of homemade handmade.
- Photos on clothespins - simple and tasteful
You can stretch the ropes in the frame or on the walls. Another option is to attach clothespins directly to the wall.
- Plant pot from old books

Naturally, the plants are in a small container, which is placed in the hole cut out in the pages. If necessary, you can stack several books. This will make the hole deeper.
- Garland of cones

In the summer, collect beautiful cones in the forest and by the New Year you can make an excellent decoration.
- family tree on the wall

You can buy special stickers or draw the tree yourself. Decorate the branches with photos of members of your large and friendly family.
- soft letters

A great decor that will replace the usual pillows on the sofa. Words, names, numbers... You can do anything!
- Cutlery hanger

An unusual solution for any kitchen.
- living plants
Turn indoor plants into funny characters! Nobody has this.

- Rope stand for cutlery

Using a glue gun, secure the rope to a round base made of cardboard or a thin sheet of fiberboard. The designer thing is ready!
- Paper garlands

Circles, hearts, butterflies, snowflakes. Cut out shapes of various shapes and sizes from multi-colored paper. Then glue them on thin ribbons or sew on a typewriter. Such garlands will look great on walls, curtains, in doorways and above the baby's cradle.
- Graphite or slate paint in the interior

Paint the wall in the nursery, the front of the closet or the desk with this paint and stock up on chalk. This is not only an unusual solution for the interior of the apartment, but also entertainment for the whole family! By the way, the color of the paint can be any.
- Coffee table from old crates

Stylish, functional and original.
- Greenery on the windowsill

Why not grow mint and parsley in your kitchen? Greens will refresh the interior and come in handy in the preparation of a variety of dishes.
- Eco vase

Natural design and environmentally friendly materials are the trend of recent years. Using a glue gun, attach the branches to a glass vase of the correct shape. Get an interesting natural decor.
- Unusual hanger in country style

Boards from the old fence are perfect for her. If necessary, you can give the effect of shabby and just made a fence. To do this, paint the boards with a tinted decorative coating, and after drying, treat the surface with fine sandpaper. So the wood will acquire a pronounced texture. Then, with ordinary white paint, make uneven strokes, creating the effect of a long-painted, but already peeling fence.
- Window sill - a place to relax

A wide window sill can be easily turned into a cozy resting place. If you are not a happy owner of a large window sill, then do not despair, it can always be expanded and completed. The main thing is desire and a good view from the window.
- Pompom rug

Soft, fluffy and warm rug will look great in the nursery. To make a pom pom, cut out two blanks from thick cardboard, put them together and wrap them with thread, as shown in the figure (1). Then cut the threads along the outer side of the circle, thread the thread between the two blanks, pull it off and tie it tightly. Unfold the pom-pom and cut off any excess. Ready!
- Fruit ice

Surprise your guests with unusual ice for cocktails. Freeze berries, pieces of fruit or mint leaves in it.
- Pebble rug

Glue pebbles of approximately the same thickness onto the finished rubberized rug. The finished product can be put in the bathroom or hallway. Ecodesign will not leave anyone indifferent.
- All in openwork

Decorate unnecessary jars with lace using a glue gun or decoupage technique. You can put flowers in them or store bulk products. In any case, such decor will look very gentle and touching.
- Candle decor

Candles in themselves create a special romantic atmosphere. But if they are also decorated, then this fabulous beauty cannot be described in words.
Every woman dreams of equipping her home so that it becomes the most comfortable corner where you always want to rush from work and gather with your family, spend holidays or just enjoy home peace. DIY home decorations are becoming more and more popular today. After all, as you know, various little things add cosiness in the house, which are in harmony with the situation and with the mood of all household members.
And of course, who doesn’t want to decorate their home before the holidays - for example, a birthday or New Year - with various little things of a suitable theme! But you will have to spend a lot of money on decorating rooms, because such trinkets are not as cheap in specialized stores as they seem. Therefore, the best option would be to make home decorations with your own hands, the creation of which will also be an exciting activity for you and even for your children.

It is possible to complement and refresh the interior of any room with the help of exclusive flower pots, and for this it is not necessary to run to the shops, you just have to look for old pots that are lying around idle. With the help of improvised materials and faceless, littered pots with your own hands, you can make wonderful crafts for decorating your home.
There are many ways to decorate flower pots. So, for example, you can use paint from cylinders or wrap them with coarse multi-colored threads, glue fringe or ruffles around.

With the help of improvised materials and faceless, littered pots, you can make wonderful crafts for decorating your home.
Another interesting option is pasting old flower pots with beads, beads, sequins or appliqués, which are then varnished.
Knitted clothes with which they are wrapped will bring originality to the pots. To do this, it is not necessary to start learning to knit yourself, just choose an old knitted sweater or a boring scarf and use scissors and a needle and thread to build a new fashionable dress for a flower pot.

It is a little more difficult to make a colored mosaic for pots, but the result will be so spectacular that you won’t have to regret the time spent. So, to decorate with a mosaic, you will need the following material:
- colored glass, pebbles or pebbles;
- "hot" glue (PVA is also possible);
- grout for tiles;
- tassel.
In order not only to glue the pot, but also to lay out the drawing, you should prepare glass of several colors. Initially, the desired pattern is laid out on paper and only then transferred to the surface. First, the image is glued and only then the rest of the flower pot is processed.

After the entire pot is decorated with glass, tile grout is applied on top. If at this moment some pieces of glass fall off, it's okay: in a day, when the pot dries, you can glue the fallen elements back.
After processing the pot with grout, you need to wait 15-20 minutes and wipe it off the glass with a damp cloth. The grout is re-applied after a day and also washed with a rag. After another 24 hours, at the end, the product is varnished - and the original decoration created by you is ready.
No one else will have these sofa cushions.
When there is a sofa in the living room, it is just furniture, but if you decorate it with a pair of cute pillows, then the room immediately feels cozy and warm.
Advice! To decorate pillows, you can embroider a pillowcase yourself, and not just with threads, but with the use of beads, ruffles or other elements.
Sofa cushions are easy to sew yourself. If there is not enough time for this, you can buy a couple of inexpensive small pillows in the store and use your imagination to create a lovely home decoration from them, inspired by some suitable photo from the Internet.

Sofa cushions are easy to sew yourself
For greater convenience, applications are best done not on the pillow itself, but on top of the pillowcase, which can be removed and washed or changed. And there are many options here. You can prepare the applique yourself and sew it on. Or using an iron to glue a ready-made purchased decor element - this will not be difficult at all. The material for the pillowcase can be silk, velvet or any other fabric suitable for the interior of the room.
Modern sofa cushions do not have to be square - you can make them round, like animals or in the form of letters, for example. If you still decide to sew a pillow yourself, for this you can use not a homogeneous canvas, but shreds of different fabrics. For stuffing, it is better to choose a hypoallergenic material.
DIY decorated vases
Everyone knows perfectly well that in stores you can choose a vase for every taste, any color and size, but it is not always possible to spend the amount that is written on the price tag for the vessel you like. And sometimes you just want to decorate the house with something original and exclusive.
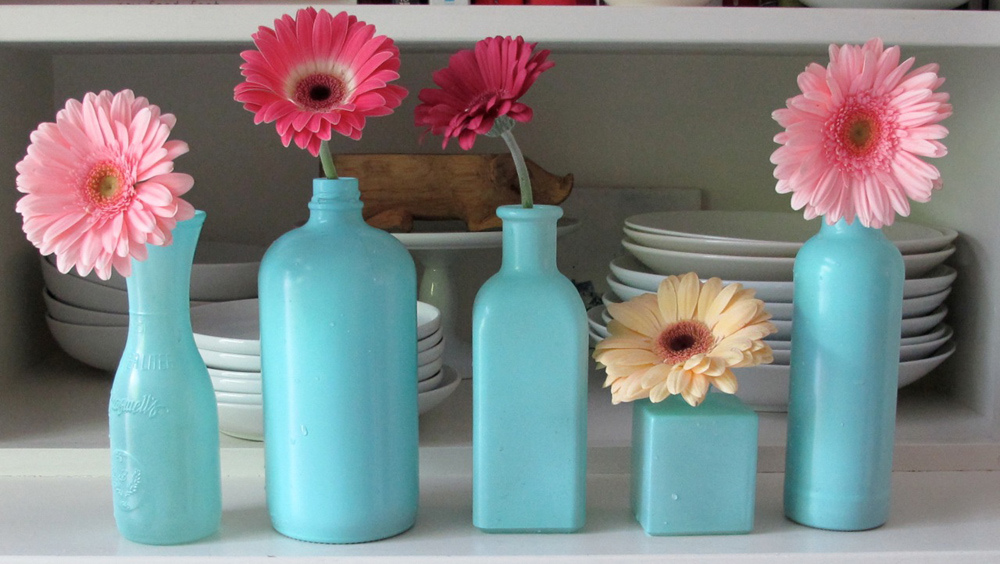
Advice! An easy and excellent solution would be to use a glass bottle of any original shape.
Having previously removed the label, the remaining glue is removed from the bottle, then a bouquet of dried flowers is placed in the bottle. And in the end, the whole composition is sprayed with paint from a can of silver or golden color, or any other can be used - the main thing is that the craft looks harmonious with the room decor.
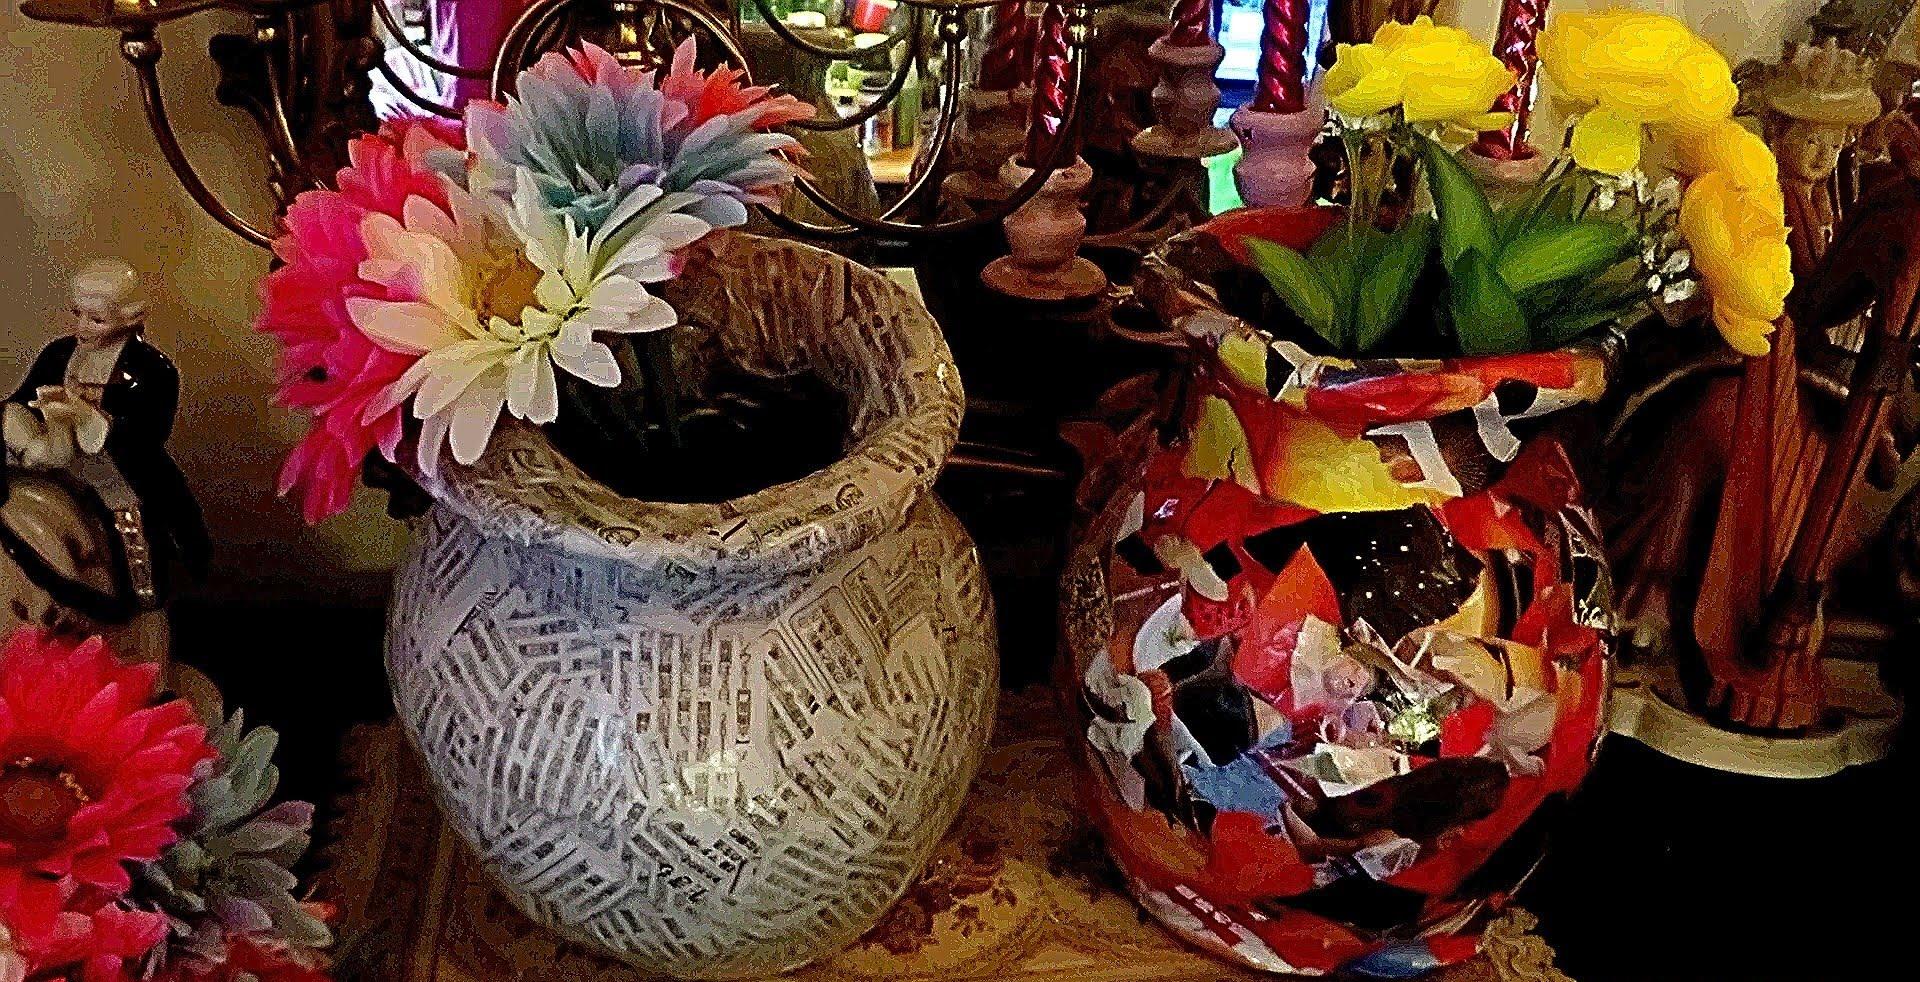
The original decor of a vase with your own hands can be created from paper, and since it is also simple, feel free to connect your child to such an exciting activity - as a result, home decoration and a good mood are guaranteed. For such a vase you will need:
- glass bottle, glass or jar;
- corrugated paper of different shades (or you can use pieces of pages from a fashion magazine);
- PVA glue;
- small scissors.
The selected paper should be cut into uneven pieces of different sizes. Apply glue to the prepared bottle and apply pieces of paper one by one in a chaotic manner. So process the entire bottle. Further, when the first layer is pasted, we apply glue on top again and apply more pieces of paper. Do this until the entire surface is pasted over. At the end, we process the craft again with glue and wait until it dries. If the house has acrylic lacquer, you can varnish the product, but even without this coating, the vase will look great and will become another home decoration made with your own hands from improvised materials.
We complement the interior with a tree from coffee beans
The coffee tree will not only decorate the rooms, but also fill them with a magical aroma. Handmade, original and beautiful tree will be an excellent present for any holiday, as well as a nice decoration for your home.
To make a coffee tree, you should prepare the following material:
- large coffee beans;
- plastic ball;
- brown paint;
- glue;
- gypsum;
- small flower pot;
- Styrofoam.

The coffee tree will not only decorate the rooms, but also fill them with a magical aroma.
First of all, we paint the ball brown, so the original shade will not appear from under the grains glued on top. After the paint dries, we pierce a hole in the ball into which the tree trunk will enter, and begin to glue it with grains.
For the trunk, you can use any stick or branch that will be wrapped with rope, ribbons or something else as you wish. We insert the barrel into the hole made in the ball to the end, we also glue coffee beans around it for better fixation.
Before you strengthen the tree in a pot, you should wrap the base of the trunk with a piece of wire. We put the finished tree in a pot and fill it with foam, then dissolve the gypsum in water and pour it into the pot. When everything dries - the craft is ready. You can decorate it further if you like.
How to decorate a house for a birthday
Birthday is a wonderful holiday for every person, regardless of age. Therefore, many people like to decorate the house to maintain a festive atmosphere and, of course, to the delight of children.
First of all, when decorating rooms, they remember balloons, without which not a single children's holiday can do. But in order for the balls to really bring pleasure, it is better, of course, to make a composition out of them, to come up with something original - then it will not just be a bunch of balls, but a real decoration.
Pictures from multi-colored balloons attached to the walls or ceiling will look beautiful, ribbons can also be used for decoration.

When decorating a room, think about balloons
Another fun option is to scatter inflated colorful balloons randomly on the floor. This idea will appeal to children who will be happy to play with balloons.
Advice! If balloons are filled with helium, and satin ribbons are tied instead of threads, then interesting photos can be attached to the ribbons.
For each of us, the comfort and warmth of a home is a feeling associated with some things and features of the interior. To give your home originality, emphasize the merits, and maybe decorate the flaws, various room design techniques that you can do with your own hands help.
The process of creativity when decorating on your own is always pleasant, and it will allow you to do without any significant costs. Skills in drawing, sewing, working with wood, ceramics, fabric, paper - all these skills will allow you to bring something new into the interior, improve it, decorate it.
Many of us like to periodically change something in our interior: rearrange furniture, update textiles (curtains, rugs, decorative pillows), add accessories, useful little things. You add or take away and, behold, everything looks in a different light.
By creating a series of decorative elements in the same style, you can completely change the familiar environment.
DIY wall decor
You can diversify the interior without changing the finished one, you can transform the room as much as possible with the help of.
You can change the usual background of the walls, add colors, with just a can of paint, the right color scheme and a crumpled rag roller.
There are many ways to transform walls:
- Wall painting, if you have artistic skills.

- Wall decoration with .


- Decor from natural materials (branches, stones).


- Decorative frames from a baguette.

- .

- Unusual hangers and hooks.

What to change in the kitchen?
Most often in the kitchen, where families meet for dinner, you want to change something. Paint walls, furniture, refrigerator, kitchen facades,.
When there are no artistic skills, you can use screen painting. Stencils are made from thick paper. A drawing is applied and cut out with a clerical knife. They can be printed on any printer. Ready-made stencils are also available for purchase.
DIY living room decor. Family traditions.
The hustle and bustle of the city often leaves no time to fill your home with decorative crafts that are easy to make yourself. But it's so nice to take a few hours on a day off to create something unusual for yourself and your family.
Making decorative gizmos with your own hands together is even more interesting, it brings together and gives every family member a reason to be proud of their home.
Each family member makes his own vase. The same methods can be used for flower pots.
DIY bedroom decor
The interior of the bedroom is designed to help calm the owner, relaxation. It is important that nothing strains, and in the morning gives a good mood, a sense of harmony, joy. A few decorative touches can achieve just such results.
You will probably have a dozen colored worn T-shirts to throw away. We cut T-shirts into ribbons and weave.
Materials for them can be the most unexpected: rope, tennis balls, branches.
Bathroom Ideas
Reminders of the sea, symbols of water, purity - we try to put all this in the bathroom. You can also decorate the interior of the bath using items that sometimes have simply accumulated with us over the years. Seashells brought from vacation, pebbles.
Decorating mirrors with shells is always appropriate for a bathroom, no matter what style it is.
Making a children's room with your own hands
Home decor with your own hands, probably, first of all begins in the children's room. After all, children do not like boredom. They themselves become along with adult designers and strive to do a lot with their own hands.
Soft toys, funny decorative pillows, wall paintings, handmade rugs, photo panels, hanging clouds and birds from the ceiling, patchwork bedspreads - all this and much more is simply necessary in the children's room. Joint creativity brings together and makes family ties stronger, develops the child's imagination and motivates to learn.
In this article, we will talk about how to decorate your home with your own hands. Our master classes will help you to realize ready-made ideas, and to be inspired to create your own - a selection of photos with a lot of cool decorations.
Undoubtedly, accessories play an important role in interior design: vases, interesting details, colorful decorative pillows, figurines, etc. So that they do not turn into simple "dust collectors", it is not necessary to invite a designer. With this task, if desired, you can cope on your own. The main thing here is to keep the decorations in the same style, which would not stand out from the general interior of the room or the whole house.
In addition, each room needs an individual solution. For example, such frivolous decorations as decorative amulets, fruits, wicker baskets are not suitable for a living room. These accessories will look better as kitchen decor.
We sew a decorative pillow for the living room
One of the most functional decorations for a living room are pillows (see photo). In addition, they have great aesthetic value. They can be made from contrasting materials or be matched to match the main color of the interior. Such decorative pillows can be made by hand. Even a novice needlewoman can handle this.
For the manufacture of pillows, almost any material you like is suitable, but it must meet certain criteria:
- perfectly keep the shape;
- be resistant to washing;
- be hypoallergenic.
Another concern is to correctly select the material for the filler. It is better to give preference here to foam rubber and silicone. And one more thing: it is better to prefer a dense material for a pillowcase, while its color, if possible, should be light, without patterns. Cotton is the best choice here.
Having decided on the material, we proceed to the selection of the shape of the pillow. It all depends on your personal preferences, as well as on the interior of the room. So, if it is designed in a strict classical style, then pillows in the style of patchwork.
The most popular types of pillows:
- square;
- round;
- rectangular.
We turn to sewing pillows.
Advice! The most successful seam for sewing covers and pillowcases will be linen. We combine the parts and sew them right sides up. Gently iron them, then sew them down. The crumbling edge of the material will thus be inside the seam. This protects it from shedding.
Master class for children
The children's room gives a huge choice for imagination and the implementation of ideas, because children love bright and original things so much. And if you involve them in performing simple crafts under your guidance, then this process will turn into a real game.
Consider some ideas on how to make a toy with your own hands. It will become not only an original decoration for a child's room, but also a true friend for your child.
Materials you will need:
- fabric of two colors (it is advisable to choose one that does not shrink when washed);
- sewing accessories;
- buttons;
- filler (suitable synthetic winterizer).
Advice! Choose a pattern in advance or make it yourself to make the toy more accurate.
Then cut out the pattern and transfer it to the material. In order to make the toy ears, nose and paws, you can use a fabric of a different color, you can contrast it.
We carry out the grinding of the details of the head with our own hands. The front of the head is formed by three parts. We grind the front and back parts, not forgetting about the insertion of pre-prepared ears. We fill the toy with filler gradually, when assembling individual parts. And you will get a toy, as in the photo above.
Decorations for a private home
Paper Home Decoration Ideas
We offer an original version of the decoration, for which you will need the following:
- decorative paper;
- ribbons, lace;
- fabric for decorations made of paper for the interior;
- Photo;
- various handy materials.
With the help of these simple materials, you can beautifully decorate any piece of furniture, but we suggest decorating an old, unnecessary suitcase. This will be an unexpected solution for the interior of the living room or bedroom, or kitchen. And, in addition, it will serve to store various things.
Just carefully cover the outside of the suitcase with paper and cloth. For decoration, you can randomly stick photos on it, and decorate the edges with ribbons, braid, lace. Such a suitcase decorated with paper can be made in any style (see photo).

Geometric paper wall decoration: an abstract plot of volumetric pyramids in muted colors