Wooden lamp in the interior. Homemade lamps made of wood. A master class on how to make a wooden chandelier with your own hands of a simple and complex design Making lamps from wood with your own hands
Wooden chandeliers are increasingly seen in the interior of country mansions. What is the reason for such popularity of such lighting devices? Of course, first of all, it is important to note the environmental safety of natural wood. This useful and high-quality material is ideal for making a wooden chandelier with your own hands.
Wooden chandeliers made of wood fill the room with pleasant and soft light, allow the owner of an apartment or house to completely relax after a busy day.
Wooden chandeliers have excellent technical and operational characteristics. Professional interior stylists note their unique wear resistance, as well as the possibility of making such lighting fixtures with their own hands.

Attention! A high-quality wooden chandelier has a fairly high cost.
It is not necessary to spend money on buying a ready-made lighting fixture, because it is quite possible to make it yourself, turning your creative ideas and original ideas into reality.
In addition, a do-it-yourself wooden chandelier is a guarantee of uniqueness and individuality.

Reasons for choosing wood for making a lamp
In our age of scientific and technological progress and innovative technologies, polymeric materials have become widespread, which have pushed natural wood into the background. Despite the variety of finishing and decorative materials offered by lighting manufacturers on the modern market, interior designers do not stop using natural wood in their work.
The original do-it-yourself wooden chandelier, step-by-step instructions, as well as photos can be found in the video:
Natural wood has certain advantages. For example, this natural material retains its original characteristics during mechanical processing.
Advice! For relaxation, professionals recommend choosing spruce or pine for the manufacture of a wooden ceiling chandelier. Doctors recommend choosing such wooden chandeliers for people with chronic respiratory diseases, as well as asthmatics.

Also among the advantages of natural wood, we highlight the ease of processing. If desired, you can make semi-antique wooden chandeliers, a modern version, and of any degree of complexity.
When choosing a tree for decorating the interior of a living space, you can make it cozy and harmonious.
Wooden ceiling chandeliers will help to bring an accent to the room, emphasize the main idea chosen for decoration.
Advice! In order to put into practice creative fantasies, you can experiment with the selection of wood species.

For example, “antique” wooden chandeliers can be made from oak or larch, and modern versions of lighting fixtures can be made from pine.
Among the advantages of choosing wood for creating ceiling chandeliers, professional stylists note the excellent combination of this decorative material with other decor options: glass, plastic, metal, fabric.
Disadvantages of wooden ceiling lights
It would seem that with such a huge number of positive characteristics, wood should be an ideal option for the manufacture of ceiling lighting fixtures. But unfortunately, even wood has some significant drawbacks that should be mentioned.
Wooden chandeliers are highly flammable as wood is not resistant to high temperatures.
Attention! It is strictly forbidden to use light bulbs in such chandeliers that will heat up during operation.
For safety reasons, professionals working with this natural material prefer to choose fluorescent or LED lamps that cannot create a fire hazard.
Among the shortcomings of ceiling wooden chandeliers used in rooms with high humidity, we highlight the instability of wood to negative environmental influences: moisture, temperature fluctuations.
Ceiling lights made of wood are exposed to insects.
Advice! In order to provide your ceiling lamp with reliable protection against these factors, it is important to coat the finished product with a special protective impregnation.
Also among the disadvantages of choosing lighting fixtures made by hand from wood, we note their high cost. As it dries, in some cases, the original appearance of the ceiling chandelier may also change.
If you take into account all these shortcomings inherent in wooden products, you can make an original and functional lighting device that will become the pride of the owner of an apartment or house.
Work materials
To assemble a ceiling wooden chandelier with your own hands, you will need tools and materials:
- roulette;
- screwdriver and hammer;
- pencil;
- electric drill;
- hammer and pliers;
- antiseptic for processing a wooden product;
- base, light bulb, electric wire;
- decorative elements
Depending on which particular model of the lighting device will be created, this list can be supplemented with other materials and tools.
There are certain rules that must be observed when starting work related to the creation of wooden ceiling chandeliers.
First of all, you need to take care of the full processing of the material with a special antiseptic composition.
In addition, due attention should be paid to the system for attaching the finished product to the ceiling surface. For example, you can pick up the original metal chain so as not to be afraid that the chandelier will fall from the ceiling.
In the process of connecting a wooden lamp, it is better to use the services of a professional electrician in order to prevent emergencies.
Wooden products are widely used in the design of rooms of different styles. Lamps are one of the main interior items. Therefore, lighting fixtures made of wood are considered one of the most fashionable today. Let's talk about how a chandelier is made of wood with your own hands.
Peculiarities
Wood is a practical, beautiful and “warm” material, which is associated with comfort and exquisite taste among the owners. Wooden products are especially appropriate in oriental-style interiors, since the warmth of the material and the strict geometry of the product contribute to relaxation and tranquility.
Important! Country style is generally unthinkable without the use of natural materials. A characteristic feature of the style is straight, deliberately rough forms. Massive wooden chandeliers give the impression of a reliable and stable wealth.
An antique do-it-yourself chandelier creates the atmosphere of a medieval castle with beautiful ladies and jousting tournaments. Such a product, decorated with metal elements, looks especially beautiful.
Advantages of wood products:
- Naturalness. In terms of environmental cleanliness, wood is perhaps unrivaled. In addition, the material saturates the air in the room with essential oils and other healthy substances.
- Ease of processing. Even a child can assemble a simple wooden structure.
- A do-it-yourself wooden chandelier for a country house is a great solution. In itself, summer vacation involves unity with nature.
- Product cost. Even if you use expensive wood, the product will turn out to be very budgetary. You can always find boards and twigs in the country. Buying wires, cartridges and light bulbs also does not entail large costs.
Are there any downsides?
Naturally, there are also disadvantages:
- Fire hazard. There is some truth in this. However, with proper manufacture and use of highly heated lamps (for example, LEDs), this problem disappears. In addition, there are a huge number of wood impregnations that precede ignition.
Important! Impregnation is a good thing, but a lamp made of wood should be placed as far as possible from an open flame source. For example, an absolute taboo is a barbecue or fireplace area.
- Wood is highly hygroscopic. Do-it-yourself lamps made of semi-antique wood look just great in the bath. But they should be placed away from the steam room or shower room. Excessive humidity and sudden temperature changes lead to the destruction of solid wood. Therefore, a product made of a material that imitates wood is more suitable for placing a bath.
- Damage to wood by pests. This problem is quickly solved after impregnation of the material with a special protective compound.
So, how to make a wooden chandelier with your own hands? It's not difficult at all. All you need is a desire, an elementary skill in owning carpentry tools that are available in every home.
DIY wooden chandelier “wheel”
This is one of the most common options. If the product is made carefully and carefully, it will fit into many interiors.
Important! This is a great solution if, for example, you want to create the atmosphere of an Italian trattoria in your own kitchen or a 17th century French tavern (a la Three Musketeers).
Making a wheel
The most important point is the manufacture of a wheel of a given diameter. Of course, you are unlikely to be able to find a finished cart wheel, so you will have to make it yourself. To do this, you will need plywood or furniture board 1.2 cm thick.
It is desirable to make a design in 2 or 3 layers.
Everything is extremely simple:
- Pull 2 plywood sheets at the corners with self-tapping screws.
- Then mark out the center section and rim.
- First, using an electric jigsaw, cut out the core of the round shape, and then the rim.
Important! It is advisable to purchase "spokes" for the wheel at a hardware store. To make them, you need a lathe, and not everyone knows how to use it. Wooden planks of rectangular section will look very primitive.

Chandelier assembly
After all the parts are in stock, you can assemble the product. You will need for this:
- Copper flexible wire with a cross section of 0.75 mm.
- Ceramic lamp sockets.
- Repair bolts.
- Metal chains for hanging.
Important! It is advisable to choose a wire with a fiberglass braid, as it does not ignite.
You can attach the wiring at the top of the rim. It is advisable to use a parallel connection according to the schemes:
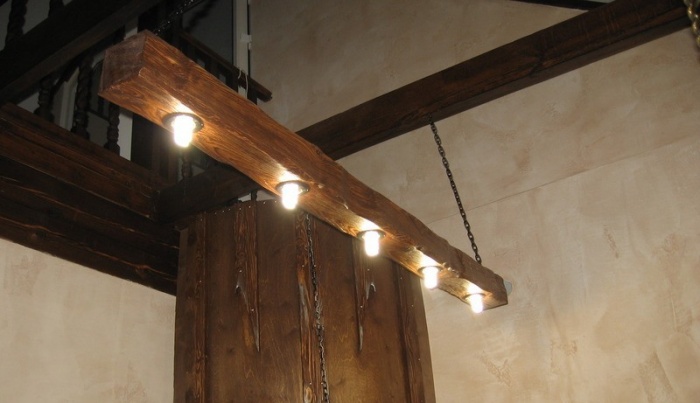
Important! A do-it-yourself chandelier made of timber, which will look great over a long table, is made even easier. The beam can be replaced with a natural round log with a cross section of 20 cm or more. Drill through holes, mount lamp holders in them. Place the wiring at the top of the homemade lighting fixture. It will turn out a beautiful chandelier in a gazebo made of wood with your own hands.
How to process wood?
According to experts, only natural compounds should be used, since they evaporate under the influence of heat. The simplest option is to use homemade peppermint oil.
The ingredients are as follows:
- Flaxseed oil purified - 1 liter.
- Mint - 1 cup.
Application:
- Mix the ingredients and infuse for 14 days in a dark place, shaking every day.
- Add natural beeswax to the resulting mixture (proportions of 1:3, 1:4 or 1:5 are possible) and you will get an excellent mastic for wood from natural materials.
Important! A less time-consuming and cheaper option is to use a solution of potassium permanganate as a stain.
We all know that the most high-quality and useful material for the interior design of any room is wood. Especially beautiful lamps are obtained from this material. This is due to the fact that properly selected lamps in combination with wood give a soft and pleasant light, just right for rest and relaxation. And where else can we rest, if not at home?
It is worth noting that, having unquestionable advantages, such products are quite expensive. But if desired and due diligence, such a lighting device can be made with your own hands. In doing so, you can save a lot of money and get a unique and beautiful chandelier.
Why a tree?
In the modern world, where plastic has begun to play an increasingly important role, and wood has faded into the background, in the interior it still does not intend to give up its positions. Today, due to the prevalence of plastic, wood has become a more expensive and presentable material that is not available to all people. This is because the tree has the following advantages:
- 100% environmentally friendly. Only wood is an environmentally friendly and natural material that undergoes a minimum of modifications during processing;
- a positive effect on the human psyche and his emotional state;
Note! Pine and spruce have the best relaxing effect. Especially such lamps are useful for asthma patients, as well as for chronic respiratory diseases.
- ductility of the material for processing. From wood, you can make lamps of any complexity and any appearance;
- positive association. Using wood in the interior of the room, you will achieve greater comfort, as well as give the room a more impressive look;
Wood and interior
- refined and beautiful appearance that will fit perfectly into both modern styles and traditional ones;
- the ability to change the accent in the room or emphasize a single design idea;
- wide scope for creativity. Here, thanks to a large number of tree species, you can let your imagination run wild;
- a large assortment of breeds for the manufacture of lighting fixtures (chandeliers, wall or table lamps);
- an excellent combination of wood with other materials (glass, steel or openwork forging, paper, fabric, plastic, etc.).
It is just from wood that it is easiest to make a lighting device with your own hands. Especially if it's a ceiling chandelier.
Nevertheless, despite the rather impressive list of positive aspects of working with wood, it must be remembered that there are certain disadvantages here. These include:
- wood can catch fire easily. Do not use light bulbs in such devices that get very hot during operation;
Note! In wooden lamps, LED or fluorescent bulbs are most often used, which do not create a fire hazard.
- the need to protect the material from the adverse effects of environmental factors: humidity, temperature and insects. It is the ceiling chandeliers that are most susceptible to the negative influence of wood insects. It is noteworthy that lamps made of needles or pine are less at risk of damage by insects;

Antiseptic treatments
- high cost of material, especially rare and exclusive breeds;
- during drying, the chandelier can change its volume, as well as deform. As a result, cracks or chips may appear on the product.
These shortcomings, as well as ways to deal with them, must be taken into account if you decide to make a chandelier on the ceiling with your own hands. Ceiling chandeliers, however, like other types of lighting fixtures, are quite easy to do with your own hands, especially if you know the detailed instructions for this process.
What you need
The set of what you need when assembling a chandelier on the ceiling with your own hands may vary depending on the complexity of the design you have chosen. But the general list of what you will need, regardless of the model you choose, includes the following tools:
- a set of tools for working with wood (for carving, etc.);
- wire pliers;
- hammer and screwdriver;
- tape measure or ruler;
- drill;
- pencil;
- a set of brushes.
In addition, you will need the following materials:

Decor materials
- antiseptics for wood treatment to make it more resistant to adverse room factors;
- elements of an old chandelier: a base with a plinth, light bulbs, wires, etc.;
- decorative elements to give the lighting fixture the desired appearance. It can be a variety of things: cups, fabric, paper, badges, ropes, etc.
We clarify that this is only an approximate list of the necessary materials and tools. It can be easily supplemented with other devices that can simplify or improve the upcoming work.
When assembling a ceiling chandelier with your own hands, the following rules must be observed:
- the tree must be protected around the perimeter with a special solution. Such a do-it-yourself ceiling chandelier will serve you for a long time without compromising its performance;
- to protect the tree, it is necessary to use only high-quality products that have not yet expired. Otherwise, all your actions will come to naught in just a few years of using the product;
- take care of the system of fastening the chandelier to the ceiling. Stylized chains can be used as fasteners. The best solution would be a multi-point fixation system. The fact is that the design can turn out to be overall and relatively heavy. Therefore, it is necessary to create maximum conditions for security;
- when connecting the chandelier to the power supply, use the services of a knowledgeable person so as not to burn the device and avoid electrical injury.
Luminaire options
Homemade wooden ceiling chandeliers can have the most incredible shapes and sizes. After all, there are a great many species of trees themselves. Here everyone can show their creative talent and create something new and unique.

Various options
In our article, we present some of the most popular and spectacular types of ceiling-type chandeliers. But you have the right to modify or improve them so that they are more suitable purely for your interior in the room.
Let's consider them separately
coffee service

Creating holes
This is a very beautiful type of chandelier that can be used in both the kitchen and the living room. Here, as a basis, we take a board (best of all, ash, birch, spruce or pine) and carry out the following manipulations with it:
- drill holes in the board;
- we cover the board with stain after it has been processed with sandpaper. If oak was taken, then you can do without painting and varnishing;
- We take several cups of coffee and saucers to them. You will also need wires and rings, the same number of cartridges as cups, and twice as many rubber gaskets;
- make holes in cups and saucers. To do this, you need to use only a special drill for working with tiles or glass;
Note! You need to drill slowly and very carefully.

Ready chandelier
- insert cartridges with wires into the holes made and fix them;
- then we fix the resulting chandelier to the ceiling.
If desired, the lamp can be decorated. But the cups themselves are already an excellent decor. Remember that the main thing is to maintain the style, and not just hang everything that is unnecessary in the house on the chandelier.
If desired, such a lighting device can be hung by chains by attaching rings on the sides of the board.
The most difficult thing in such a chandelier is drilling holes in ceramic cups and saucers, as well as connecting the product to the power supply.
In general, we can say that such a model is quite difficult to make with your own hands. But do not despair, there are much easier models to implement.
And the snag will come in handy

Cutting pattern
An easier way to create a chandelier is to use ordinary driftwood brought from the forest. At the same time, light bulbs in this situation can play the role of stylized fruits, leaves or other decorative elements. The main difficulty here will be masking the wires.
The assembly of a ceiling-type chandelier made of wood in this case will occur according to the following scheme:
- choose a branch that you like more with its bends;
- we clean its surface from excess bark, lichens and moss;
- then we dry the driftwood well and grind it using sandpaper;
- choose the bulbs that are most suitable for the stick you have chosen. Use only energy-saving and non-heating light bulbs;
- for laying wires, we make shallow cuts, into which they will then be placed;
- in case of failure, all unnecessary cuts can be easily masked with putty;
- light bulbs should be placed on the edges of such driftwood. At the same time, they can be placed in plafonds or simply fall from the branches. Both options will be quite original.

Final result
Here you can use a wide variety of decorative elements: beads on a string, glass balls from an old chandelier, soft toys and other materials. Thanks to this, your craft will become unique, unusual and inimitable.
You can hang such a chandelier with screws or chains. In the first case, you will receive a ceiling model, in the second, a suspended one.
Other options

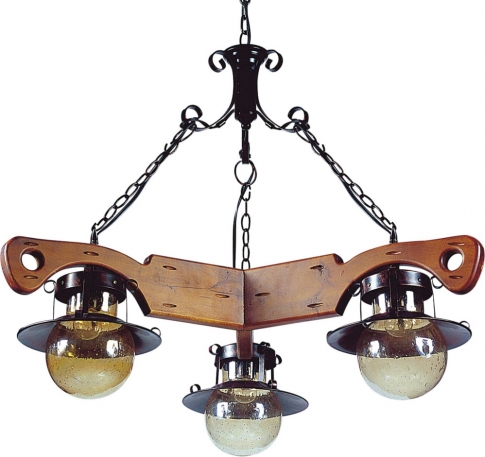
Country style
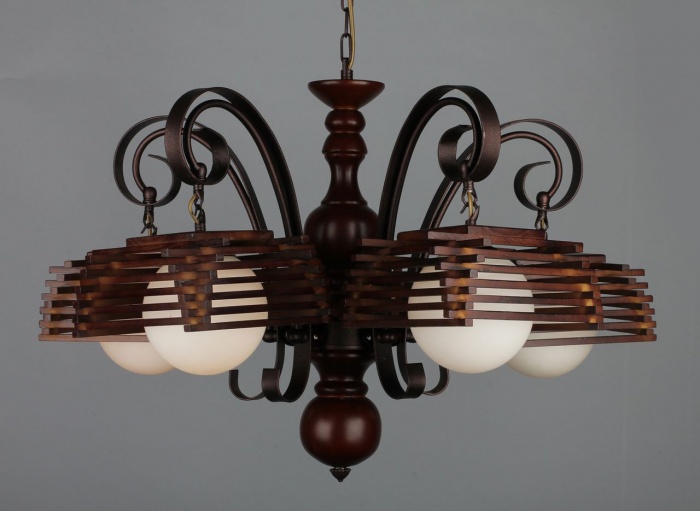
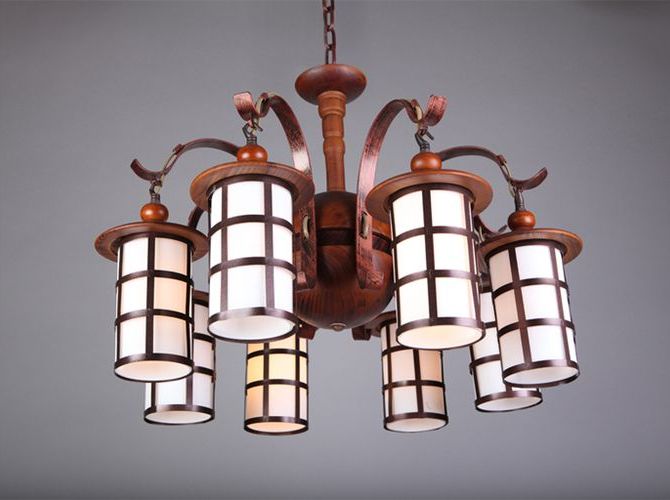
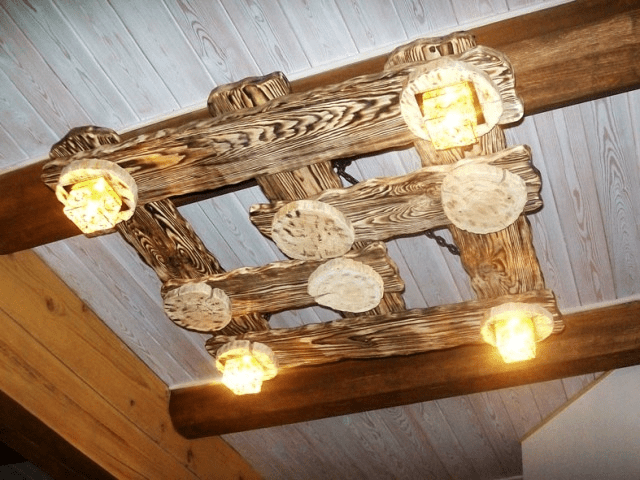
Another popular option is to assemble a country-style lamp. To do this, you will need irregularly shaped boards. They should be processed according to the brushing technique and covered with stain. We install shades along the edges of the boards and, in fact, that's it - the chandelier is ready.
In addition to snags and boards, you can use any household items containing wooden elements. For example, an old small wooden wheel would be a great option. We process it by analogy with other options for chandeliers:
- first clean from dirt;
- then we process with sandpaper;
- put on stain.
After these manipulations, we draw wires along the inside of the wheel, fixing them with clamps. This will make them invisible. Next, either make holes for the cartridges, or hang them at a short distance from each other.

Wheel chandelier
For ceiling mounting of such a lighting fixture, we use a powerful mounting system. This is due to the fact that the lamp will turn out to be quite large and weighty. Therefore, it is best to place the chandelier on chains.
As you can see, almost any wooden object can be used to create a ceiling lighting fixture on your own. It can even be half a wheel, various old wooden lamps, hand carved wood, or other crafts. Therefore, such lamps are good if you want to move away from ordinary lamps and get something original and unique. In recent years, hand-made style has become very popular. One of its main advantages, along with uniqueness, is the complete environmental friendliness of manufactured products. And a wooden chandelier in this case is the best confirmation of this.
It is quite possible to make a ceiling-type chandelier out of wood with your own hands, using a wide variety of materials. Do not forget to treat the tree with special protective agents, and in everything else, just bring your desires and fantasies to life. Be consistent, and an excellent result at the end of the work is guaranteed to you!
Original design lamps made of wood. Homemade lamps made of wood photo.
If you like to do everything with your own hands, we recommend to your attention a selection of the most original wooden lamps made by designers. But to make such lamps it is not at all necessary to be a designer, just look at these photos, show a little imagination and you will succeed.
Wood is a unique material that has been used for home improvement since the time of our ancestors, wood has positive energy, it is an absolutely environmentally friendly material. In this article we will consider the most original options for making lamps made of wood.
Ceiling lamps made of wood.
Original pendant chandeliers made of wood.


Homemade chandelier flower garden.

Chandelier ball, made of rope. To make such a chandelier, an inflated balloon is used, which is wrapped with a rope, then the rope is covered with glue, when the glue dries, the balloon is blown off and the result is such a design from which you can make a pendant lamp.


Pallet lamp. The wooden pallet is sawn into pieces that are used to make lamps.

original solution.

Lamp made from ordinary kitchen graters.

Woven lamps. Here, a basket is woven from a thin vine and hung from the ceiling.

Table lamps made of wood.

Night light made of wood.


- Practicality score
- Material preparation
- What lamps to use
Original interior items made of wood bring comfort and coziness to the atmosphere. If you don’t surprise anyone with solid wood furniture, carvings on the shelves, then a floor lamp, chandelier or sconce made of branches or driftwood will definitely attract the attention of guests.
However, wooden products are not cheap, especially original ones. We offer to save money and create a lighting fixture with your own hands. In addition, this is a great way to implement bold ideas, while spending very little time. For the manufacture of lamps and sconces, you will need standard carpentry tools.
Practicality score
To understand how good a wooden lamp is, let's weigh the pros and cons of this unusual piece of decor.
Advantages:
- The environmental friendliness of wood is an important advantage over polymers and other synthetic materials.
- When heated and in its normal state, the tree emits aromatic substances from the resin - ether, which relaxes and heals.
- Any forms are created from wood materials - the raw materials can be easily processed with carpentry tools.
- An unusual option for interior decoration. Wooden chandeliers in homes and offices are rare.
Flaws:
Disadvantages are reduced by using different impregnations and appropriate timber preparation. Therefore, a wooden lamp can be called a useful accessory that will emphasize the style of the room and give it charm.
Material preparation
Lamps and sconces are made from any wood materials. Boards, branches, snags, plywood are used - the choice is determined by the idea. Nevertheless, no matter what the design for the lamp is made of, it is important to properly prepare the lumber:
- The wood must be dry.
- The blanks should be treated with complex impregnations with refractory and insecticidal, antiseptic components.
- It is worth choosing solid lumber without traces of decay.
In addition to wood, lampshades, carpentry tools and glue (preferably epoxy) are prepared for the manufacture of lampshades.
What lamps to use
Since wood is a flammable material, you need to be careful with the choice of light source. It is better not to use an incandescent lamp for nightlights and lampshades - when burning, it heats up both the cartridge and the wood.
LED lamps and ribbons are suitable for such homemade products - they emit white light and do not heat surfaces, they are fireproof. Diode tapes are ideally combined with wood of any color and texture.
Master class: lamps from boards
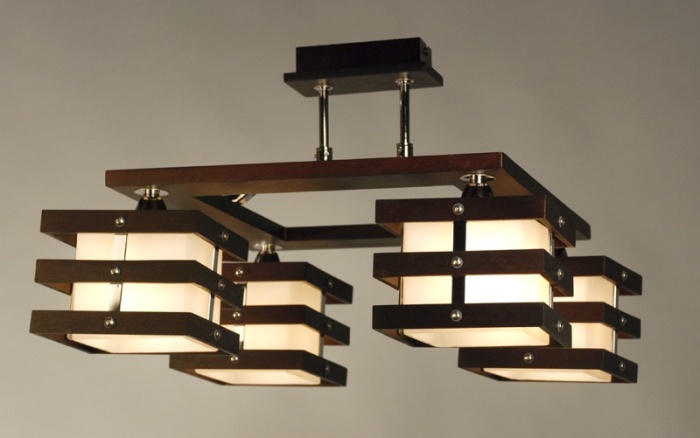
There are countless ideas for making home lamps. We will tell you how to make a homemade chandelier - you can take it as a basis for creativity.

For manufacturing, you will need beams of any section, for example, 100 × 100 mm or less, depending on the desired dimensions of the finished product, as well as a mirror. We recommend that you make a drawing of the chandelier in advance, which will reflect the lengths of the sides and the area of \u200b\u200bthe mirror part (it must protrude beyond the inner perimeter in order to rely on the beams).
- We make a blank from 4 bars of the same length.
- Next, we form a “castle” - we cut out a rectangular cup for half the thickness. A cup cutter or jigsaw will help with this.
- We assemble the structure and glue the parts together.
- After that, we paint.
- From the upper edge we stretch the wiring with a cartridge and fix it to the inside with brackets or small nails.
- Attach a mirror on top. It will act as a reflector of light. We fix on the corners.
- It remains to attach a suspension, for example, a chain.
The accessory is ready.
The video shows a version of the manufacture of such a lighting item, the principle of operation is the same:
More plank lighting ideas:


Lamps built into false beams. To make them, we connect 3 boards in a U-shape, wires and cartridges will hide in the resulting niche.

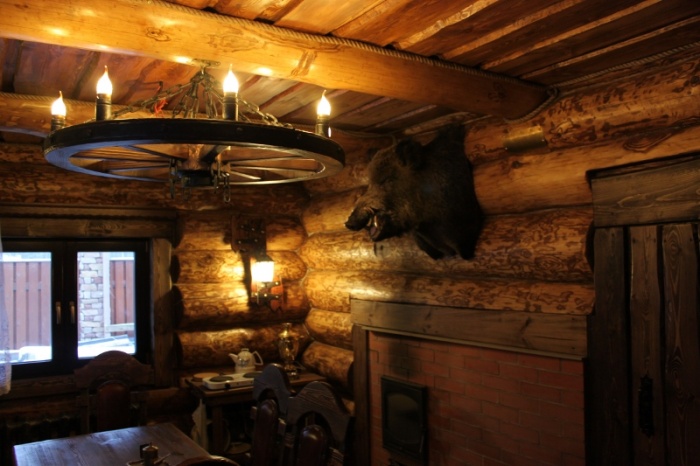
The wheel will create the effect of antiquity or a hunting lodge, a forest bungalow. We fix the electrician on the upper side of the wheel facing the ceiling.


Another interesting solution from the boards, see the video
Master class: lampshades and lamps made of plywood
Plywood is a lightweight material that can be easily processed. From it you can create a variety of products. For example, an unusual night lamp for a children's room or hall. It will look equally good on the terrace of a country house and in a city apartment.

Or like this:

For a night lamp made of plywood in the form of a house, take a universal scheme on which you can make any pattern!

Now let's start making:
- We transfer the templates prepared for all 4 sides onto a plywood sheet of any thickness.
- We send it for cutting under an electric jigsaw (or a laser machine for the finest study of petals and small fragments). You can use manual, but with a complex pattern you will have to tinker.
- Sand the cut edges with sandpaper.
- Roofing works are carried out in the same way. We cut it to size, make a pattern and grind it.
- We glue the workpieces together. In order for thin sheets to hold securely with each other, inside the house in the corners we install bars on which we glue the walls.
- We start the cartridge and fix it on the desired side of the interior. The wire can be brought into the pattern or a separate hole can be made for it.
- We fix the roof, we make the bottom. We glue all the details also on the corner bars.
- We make a suspension or mount in a convenient way.
The house is ready. A homemade night light or chandelier can be simple with a simple ornament or designer with a complex idea, wall or table. We present a video master class on making a house from several sections.
A plywood lamp can be of any kind. The main thing in working with this material is the need to cut holes for the passage of light. More photos of nightlights and lampshades:


To assemble such a lampshade from plywood, you need to cut a groove lock on each blank. Then the connection of parts can be carried out without glue.

A wooden chandelier diffuses light throughout the room. Connection of details is carried out by decorative self-tapping screws.
Master class: lamps and chandeliers from branches
Branches are the most accessible material for creativity. You can collect them at any time in the park or in the square near the house and immediately start creating. The difference between branches and other wooden blanks is that they do not need to be dried. As long as they have moisture in them, they can be bent into different shapes. Over time, they will dry out and no longer straighten out.

Before harvesting twigs, you need to decide on the design of the lampshade or chandelier. Will it be weaving or tying thick sticks with a rope, will wood be combined with other products - forging, metal frames, etc. Here are some interesting ideas:


A master class will help to make such an accessory for the interior:


Generalized instructions for creating a ceiling lamp from branches:
It is easy to make a lampshade from branches; special skills are not required for this, as well as tools.
Master class: log lamp
An ordinary log and even a snag can act as a blank for a chandelier. The main thing is that the material is dried and neutralized from insects and microflora.
- We give the workpiece the desired size.
- In the places where the cartridges are inserted, we make holes of the same diameter as the hidden part of the electrical device.
- We attach hangers.
- Insert electrical.
The master class can be viewed in the video:
An unusually shaped snag or stick can be turned into a masterpiece by adding a simple lampshade to it:

Chandelier bottles
Combined lamps look non-standard, for example, a wooden base and glass bottles as shades.

Glass scatters light and creates shades of different colors. To make such a plafond is simple:
- In a wooden shield we form holes for bottles. The neck should fit tightly, so we select the diameter as accurately as possible.
- We attach a suspension to the top of the boards. Chains look original, for which the structure can be hung from the ceiling.
- Preparing bottles. In order for them to give off light, the bottom must be removed. This can be done by heating the glass with boiling water, then quickly transfer the bottle under a stream of cold water.
- We insert the bottles into the holes in the board, we stretch the electrician through the neck.
The video shows the process of creating an interesting table lamp.