Installation of front door jambs. How to make a door frame: DIY process
When buying doors, it is not necessary to spend money on a new door frame, because you can make it yourself. The main difficulty lies not so much in manufacturing as in assembling the frame for installing the door, since cutting joints and cuts has its own specifics. In this article, we will take a closer look at the entire process of manufacturing and installing a door frame.
In most cases, in stores, the door leaf is sold separately from the box and can be found suitable model is quite difficult. In addition, the purchased box may not fit in the doorway, especially if you built the house yourself or are remodeling the apartment.
Any door frames have a similar design - this is a frame, the folds and bars of which are fastened together in a special way. As fasteners, special bolts or steel plates are used.
Measurements and cutting
To make a door frame with your own hands, you will need special locksmith tools and skills in handling them. But first you need to make accurate measurements so that when installing the finished box there are no unforeseen difficulties.
There are two ways to take measurements:
- by the door;
- along the doorway.
For the first method, measure the sides of the door and add 5 cm to the resulting dimensions (the thickness of the door frame). After that, take measurements of the threshold and the upper part, making the same allowance of 5 cm. Calculate the footage and proceed to the manufacture of the corresponding elements of the box. Then fold the sawn bars on the floor with the grooves up, mark the top and bottom edges future door, not forgetting to add the thickness of the nut. To make the cut line clearly visible, make notches on the bars that will be applied to the crossbar at the top and to the threshold.
Saw the prepared materials and fit them to fit required dimensions. In one of the side blanks, make two small slots for installing loops with a chisel and a hammer. The side on which the slots for the hinges will be made is selected depending on which direction the door will open.

Briefly, the whole process of manufacturing an interior door frame is as follows:
- A smooth board with a thickness of at least 5 cm is sawn into 4 equal parts, two of which correspond to the length of the door (doorway), and the remaining two to the width.
- All elements are processed from three sides (the fourth side will be hidden in the wall, so it is pointless to spend time on it).
- Depending on the width of the board, a cut is made where the door will be placed, and it is made only on the side where the door will open. Thus, protection against drafts and noise penetration is obtained.
- If you want to install a frame for a double door, the cuts must be on both sides.
- The ends of the parts are treated with a planer, polished sandpaper, slightly smooth the corners.
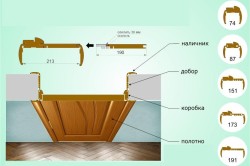
Standard dimensions of the door frame: the long elements of the door frame are 193 cm, and the crossbars are 90 cm each. The depth of the cut should be about 1.5 cm with a board width of 5 cm.
Assembly and installation
To prevent unevenness in the process of installing the door frame in the opening, you must be able to use the building level and plumb line. If the box is crooked, the door will not be able to close tightly, or you will not be able to hang it on the hinges at all.
If you are working with walls made of slabs, only staples can be used as fasteners.
Door frame cuts
Highly important point in the process of assembling the door frame - the creation of cuts. Washdowns are cuts on vertical and horizontal elements design, thanks to which all parts fit together as tightly and securely as possible. Professional door assemblers use two sawing methods - 45° and 90°. Let's consider each of them in more detail.
When sawing the box at 45 °, the master takes the boards and sets them with inside each of them marks - oblique lines to remove the excess and get an angle of 45 °. Then it removes the unnecessary part, while the outside angle will be 45 °, and inside - 135 °. The length and width of all elements are preserved. Small transverse bars are sawn from all sides, and vertical ones - only from above (there is no need to saw at the bottom, since the box will stand on even “legs” more firmly).

To assemble the door frame at 90 °, you must first place all parts of the structure on flat surface. The corners are neatly connected with self-tapping screws (2 pieces in each corner). This method is much easier and faster, however appearance such a box is not as aesthetic as in the case of 45 °. "Direct" boxes are mainly placed in sheds, cellars, bathrooms and other similar premises.
Hinge installation
Before you insert the door frame into the opening, you need to cut the hinges. They must be at least 20 cm from the extreme part door leaf. It is important to correctly calculate the depth of entry of the loop into the box element. Please note that when closed door between the door frame and the leaf there is a gap of 4 mm. The easiest way is to cut the platform for the loop with an electric cutter, but if there is no such tool, use ordinary chisels and a hammer.
Attach the loop to the bar, circle with a pencil and cut out the desired part. For regular wooden door two pieces are enough - above and below. The bottom hinge should be 21 cm from the edge of the frame, as 1 cm must be left for the gap between the floor and the door.

Screw on the hinges and attach the door leaf to the frame to transfer the location of the fasteners. It remains only to cut similar recesses in the canvas and you can proceed with the installation of the box.
How to install a door frame
The task of the door frame is to hold the door leaf in a stable position, so the structure itself must firmly “sit” in the opening. To securely fix the box, specialists use two methods: they strengthen the frame with small rails located perpendicular to the uprights, or add solid wide mounting corners. After placing the box in the opening, install spacers in it that will fix it in correct position. So it will be easier to screw in the screws and finally fix the structure.

During operation, constantly use a plumb line to check the verticality of all elements. Also control the evenness of the corners until the final fixation. The main difficulty lies in the fact that the leaf of the door frame almost never gets up perfectly the first time, and the position has to be corrected. To eliminate the gaps between the frame and the wall, use small wedges or mounting foam.
When you have adjusted the frame to the opening, you should fix the box on the slopes. Check the strength of the structure, make sure that nothing superfluous sticks out at the corners and sides (wedges, spacers, rails, etc.). Use dowels to fix the box to the slopes. Check that the angle is 90° before screwing it all the way in.

To "ennoble" the door frame, platbands should be attached on top of it. To do this, use wood screws, nails or heavy-duty building glue for wood. If you use self-tapping screws, the hats can be covered with decorative caps. On sale you can find platbands with special grooves that you just need to snap into place so that they hold firmly.
Assembling the finished box
Fastening the door frame, as well as assembling, is a rather specific task that is difficult for a person who does not have experience or at least theoretical locksmith knowledge to cope with. If you are not confident in your abilities, it is better to purchase doors with a door frame. Such a ready-made kit is sold disassembled and without hinges, so that the buyer independently chooses which way the door will open.
Assembly process of the finished kit:

The door frame installation video will let you understand the process more clearly:
It often happens that the door frame is not included with the door, or it is included, but sold unassembled, or it is available, but does not fit your doorway - not all types of door frames are suitable for the openings for which they are intended . Or you are just confident in your abilities and want to save money by making a box with your own hands. And there is nothing impossible in this. But still, before you make a door frame, check for necessary tools and materials discussed below.
What is a door frame made of?
All types of door frames are based on four profile bars - two long ones located vertically and constituting the side parts of the box, and two short transverse ones, which are respectively the upper and lower parts of the box.
Removing the dimensions of the future door frame
Bars for the box can be bought ready-made or made by yourself, it all depends on your desire, skills and available tools.

If you are making a box from scratch, you need to start by taking measurements. You can do this in two ways:
- On the finished door.
- Through the doorway.
If you are using a door to be installed as a basis, measure the sides of the door first, adding 5 cm to each. Then measure the top and bottom of the door, also adding 5 cm each. Calculate the results and you can start cutting.
Preparing for cutting and making parts
It is better to start with the bars intended for the side parts of the door frame. The prepared bars are placed on the floor, at the same level, so that the grooves are on top. On them it is necessary to mark the upper and lower borders of the door, taking into account the thickness of the threshold. Then, bars are applied for the upper and lower parts of the door, on which marks are also made for the future cutting line.

After that, you can cut the blanks under the box. First, in order to avoid errors, it is desirable to cut off the blanks with some margin. After that, they should be tried on, and only then make a more accurate fit of the parts.
Production and docking of the door frame
There are two ways to join the side and transverse parts of the box:
- at an angle of 90 degrees;
- at an angle of 45 degrees.

The second method is more difficult, it requires certain skills and extreme accuracy. And for those less experienced in such matters, it is better to use the first method, and cut the side parts at an angle of 90 degrees.

Side preparation
Then, on one of the side parts, which will be located on the side of the loops, you need to mark the places where the loops will be. Do this by attaching this part to the side surface of the door. The depth of the groove is made equal to the thickness of the hinge leaf. The recesses for the hinges are cut out very carefully so as not to damage the door leaf. With your own hands, this is easy to do with a chisel and a hammer, while experts usually use an electric cutter.
Next, you need to put the loops into the recesses prepared for them in this way, and using a drill, make recesses for self-tapping screws on the side surface. Moreover, the diameter of the recesses should be less than the diameter of the screws that will be located here. Then, using self-tapping screws, the hinges are attached to the door leaf.

A latch lock is installed on the other side surface of the door.
Do-it-yourself box assembly

It is most convenient to assemble the details of the door frame into a single whole with your own hands on the floor covered with cardboard or paper. The actual assembly of the box consists in connecting the prepared parts with self-tapping screws. But first, you need to very carefully combine one of the corners of the box, and drill a couple of holes from the side of the transverse bar into the end of the longitudinal part with a drill or screwdriver. This is done to prevent damage to the door leaf with self-tapping screws in the future. Further, self-tapping screws are screwed into the prepared holes. Thus, two self-tapping screws are screwed into all corners of the box (at a right angle).
Do-it-yourself door frame installation
After the manufacture and assembly of the box is completed, you can begin its installation in the doorway, for which you will first need to “try on” the box made. Check the verticality of the box with a plumb line, and the squareness of all corners. It is possible that you will first need to fit the box, which consists in eliminating gaps with wedges or foam.

After that, the box is attached to the slopes with dowels. Don't forget to make sure there are no "adjusting" wedges or slats visible anywhere. Only after this can the manufacturing process of the door frame be considered complete. Then it remains only to hang the door leaf on the hinges and attach the trim.

In general, the assembly is not as simple as it might seem. Still, this requires some experience. But if you are still determined, you should first study the theory of this process well, and study useful photos and videos on it.
door frame- this is basically a frame that contains bars and folds. Strengthen the box with special bolts or use steel lining.
The door frame can be assembled with your own hands using wooden bars and fasteners.
Use a plumb bob and level to prevent unevenness when setting up the box. When stone walls the box is attached to wooden corks using nails. If the walls include slabs, the structures will only be supported by brackets.
Self-made box
In order to understand how to make a door frame with your own hands, you need to familiarize yourself with some points of the work itself.
To begin with, dimensions are taken. There are 2 ways to retrieve data:
- along the doorway;
- on the installed door.
For example, the calculation of data on the current door. First, measure the sides, add 5 cm on all sides of the door. Next, measure the threshold and upper part system, leaving room for allowance. Then they calculate the footage and start sawing.
Next, the bars are folded on the floor, they will be needed when setting up the side box. They should lie on the level, grooves on top. Mark the upper and lower boundaries of the future door, while adding the thickness of the threshold. From the bars that are applied to the threshold and the crossbar, certain notches are made so that the sawing line is visible.

Then the prepared materials are sawn for collection. After cutting the blanks, it is necessary to adjust them to the appropriate size. In one of the blanks, a slot is made for future loops using a chisel and a hammer. Before you start doing, you need to know the necessary side of opening the structure.
To continue self-assembly, it is necessary to use self-tapping screws and nails for the strength of the future structure. Next, hinges are hung and the doorway is strengthened. Even out the gaps.
The necessary tools to help assemble the door are:
- construction knife;
- square;
- roulette;
- pencil;
- a hammer;
- screwdriver;
- plane;
- hacksaw.
Use a set of screwdrivers of different configurations, use pliers, crowbar, small nail pullers.
A hammer drill is required to punch a hole in concrete. Will be able to prepare materials for the door Miter saw. Quite a lot does and electric milling cutter. With the help of it, holes of the necessary locks and hinges are made in a short period of time. If there is a large set of cutters, then even better. If it is necessary to make a door frame with special quality, a woodworking machine will also be needed.
Some Features
The process itself looks something like this. First, a smooth board 5 cm thick (maybe several) is prepared, 4 identical segments are made from it. 2 of them are equal to the length, 2, respectively, to the width of the opening.
At the same time, the segments have processing of only 3 sides - they must be made very smooth, the 4th is placed near the wall. Focusing on the width of the board, make a cut into which the door will be inserted.
An incision is made only on the side where it opens. If planned double door, cuts are made from all sides. It is easier to make cuts on the machine, where it is possible to raise the table and adjust the required length. Existing material cut to the required length, all ends are processed.
When all the necessary blanks have been prepared, they begin to process the transverse segments. Longitudinal compartments standard doors have 193 cm, transverse - 90 cm. The cut at the end of the door frame in depth should be 1.5 cm, width - 5 cm.
First, you need to attach all the strapping located on the top and side, and only then begin to install the box itself in the doorway. In this case, there must be a space between the door and the wall of 2 cm. In the future, it is used as thermal insulation.
One of important elements in fixing the door is washed down. There are 2 options for sawing boxes: 45° and 90°.

I washed down the boxes at 45 ° as follows:
- boards are taken;
- the necessary marks are made on the inside, the unnecessary is removed;
- sawing angle inside should correspond to 135°, and outside 45°, along the length of the vertical boxes should be standard and the same.
The same is done with horizontal small bars. It differs only in that it is necessary to saw off from all sides. The most important thing is not to make mistakes in sizes.
To assemble the box at 90 °, place the finished parts of the future door on a flat surface. The corners are neatly connected with self-tapping screws, screwing 2 self-tapping screws into all corners (at right angles).
To keep the door frame in the desired position, several methods can be used:
- Strengthening the door frame with small rails. Reiki must be fixed perpendicular to the racks with small nails (screws).
- Adding wide and hard corners that are designed for fastening. Install all corners, carefully checking the perpendicularity and verticality.
A box is inserted into the doorway and correctly centered. At the end of all work, be sure to check for cracks, distortions and other irregularities. If necessary, use a seal.
In order for the box to be fixed qualitatively in those places where there is contact with the wall, a sealant is placed.
At the end of all additional operations, the perpendicularity of the elements on the side is checked.
Of course, if you use all the specialized tools and assistants who can supply parts if necessary, making a door on your own will be quite simple. So choose the option that suits you. Good luck!