How to make a vintage cardboard frame with your own hands. Decoration options for a picture: do-it-yourself frames from improvised materials How to make a large do-it-yourself frame
Passepartout with your own hands. Master class with step by step photos
Master class on making a passe-partout for children's work
The master class is designed for teachers primary school, visual arts, organizers of the children's movement, teachers of additional education, leaders of circles, methodologists, creative people related to the organization of exhibitions of children's works.
Tasks:
- teach how to make a passe-partout
- develop creative imagination, constructive thinking;
- to instill the ability to see beauty;
- to cultivate accuracy in the performance of work;
- get a positive charge from work ..
You will need:
1. A-4 size paper
2. Ruler
3. Scissors
4. Children's work
5. Portrait from a magazine
6. Postcard

Passepartout (fr. passe partout) - a piece of cardboard or paper with a quadrangular, oval or round hole under the frame in which a photograph, drawing or engraving is inserted. This allows you to more freely choose the size of the frame for the size of the image.
Passe-partout for children's work contributes to the aesthetic perception of work, instills this taste in children. It should be noted that the passe-partout for students' work helps to coordinate the image with the wall or stand where the work will be placed.
1. We begin the work on making a passe-partout with markings on a sheet of paper in A-4 format. We take a sheet of paper, a ruler and a pencil. Retreating from corners of 2 cm, we put points, then we connect these points with a ruler.

Connecting the marked points, we get a rectangle.

2. Connect the opposite corners of the resulting rectangle diagonally.

3. We make a slit in the center and bring the cuts to the corners of the rectangle diagonally.

A diagonally cut rectangle will look like this:

4. With the help of a ruler, we sequentially bend the cut parts outward.


Turning over the sheet with the bent parts, we will see the following frame:

Turning the passe-partout back, carefully place the student's work.

5. Then we bend all 4 parts sequentially along the outer contour of the children's work.
6. Gently turn over and see the result of our work.

You can place children's works, portraits, illustrations from color magazines, postcards in the passe-partout. They will have a pleasing aesthetic appearance. Thus, we develop aesthetic taste, accuracy, respect for the work of our friends.
Despite the fact that progress does not stand still and digital cameras have long replaced film cameras, we continue to arrange and hang frames throughout the apartment, which to this day are the best design for photo. Big and small, simple and bizarre shapes - all of them are designed not only to be combined with the interior, but also to reflect our mood.
That is why we suggest not to depend on the whims of designers, but to rely on your own taste and try to arrange a photo in accordance with it.
1. Keep old credit cards? And you are doing it right! They are still useful for decorating your favorite photo! True, for this credit card will have to be cut into small pieces. But these are already details ... (ideafrom here )

3. Thrifty needlewomen will love the simple design of the frame from what is at hand. It can be buttons, old jewelry, coins... or spools of thread! Such practical free frames not only look great as a photo frame, but also fit perfectly into any interior. (original idea )

4. Artfully arranged coffee beans around the frame different varieties- beautiful design, which has another unique property - a delicate aroma. ( )

5. Don't rush to burn or throw away old "women's magazines". Thanks to the bright pages, they can become great decor for photo frame. (idea fromsite )

6. An amazingly delicate vintage photo frame is obtained from a piece of old wire. (original article )

7. Sweet tooth will be delighted if you receive a beautiful and quite edible photo frame for the holiday. (originalidea )

8. Ice cream lovers will now eat it with double pleasure, because from sticks painted in different colors, it turns out a bright summer photo frame. (MK )

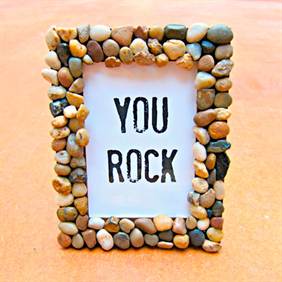
9. Few can resist the temptation and not collect shells or pebbles on the sea coast. But what to do with them then? Put in jars and carefully store as a memory? It is better to decorate a photo frame with stones and shells! (idea )

10. A glamorous frame is obtained if you decorate it with ... ordinary buttons. This option does not look primitive, especially considering that the proposed photo frame design does not require special investments, and those who have a supply of buttons will get it for free. ( )

11. Don't scold your kids for breaking pencils too often! Better use their addiction and decorate the frame with “stubs”. Looks very unusual and colorful! (details )

12. Cute and very tiny photo frames are made from bottle caps. ( )

13. Old CDs - great material for decor. Its strength and lightness will be appreciated by many needlewomen. (MK )

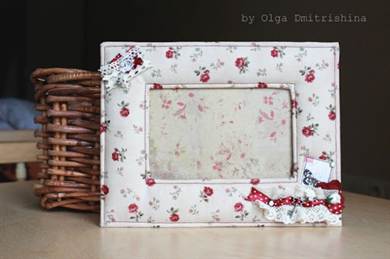
14. For young ladies who love everything cozy and homely, voluminous textile frames will be just a godsend. (original MK )

15. This unusual frame can accommodate photos of all family members, because it has as many as 12 cells. Guessed? It's made from an egg container! ( )

16. The most precious thing in our life is children. And their photos also deserve decent design. (idea
design solution, stylish element decor, great gift for loved ones and an exciting activity for parents and their children - creating photo frames with your own hands from improvised materials. Most important events and pleasant memories captured in the pictures will serve as an excellent decor for your home. How to make a photo frame beautiful and creative, we will tell in this article.

Stylish interior
The most common way to make a photo frame is out of cardboard. This goodness is in bulk in almost every house, we cut it out the right dimensions. You won’t have to think long about how to decorate such a photo frame, pieces of fabric, scrapbooking paper, buttons, quilling paper, brooches, figurines, emoticons, ribbons and beads, tubes from bright magazine pages will be used.
If you have the opportunity, use glass as well so that the photo frame has a quality look.


Making a photo frame can start with buying a ready-made regular frame, just add it with individual elements that you like best. Photo frames made of shells and sea stones, twine, anchor figurines are suitable for decorating photos from summer sea holidays. Such parts are easy to seat on hot glue from a gun.


Decor with beads and ribbons for lovers of bright and shiny jewelry:

Cardboard and colored paper
Consider one of the master classes on how to design a desktop photo frame made of cardboard and paper on a stand.


Step 1. Material preparation. Cardboard, decor paper, beads, ribbons, glue, stationery knife. Cut out the desired size from cardboard. Back, stand and front.


Step 2. Decorate the main parts. We glue the decorative paper cardboard, which is the back, as shown in the photo.


Step 3. We fold a ladder from scrapbooking paper of different sizes, making a visual frame. We sew on a typewriter with a zigzag. Of course, you can not do this, but use, for example, a special decorative tape or just stick it on top.


Step 4. We collect the stand and bend the end. We make holes in the fold with an awl. In the future, brads, small carnations are inserted there.


Step 5. Install the stand. We take cardboard and thicken the place where the stand on the brads will be attached, we simply glue pieces of cardboard. We connect the stand and glue the cardboard to the back.


Step 6. The most important thing is to select the decorations and glue them to the frame. These can be flowers, stickers, ribbons and beads.


Decoupage options
Making photo frames will be an interesting educational activity for children with parents. Learning quilling, decoupage, pasting and painting will captivate with an amusing idea to create own craft for the decor of the children's room.
Old puzzles will certainly lose their details, which cannot upset, paint them or leave the details with the sky, water and grass, glue them randomly to the frame or just leave a smooth outline around the perimeter, if the drawing itself allows it, it will be even more beautiful.

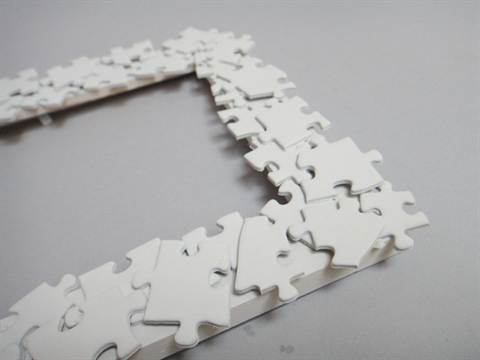

Photo frames with the help of paper modules contribute to the development of fine motor skills of the hands, and spare parts for quilling will create a voluminous carpet of flowers and animal figures. It is easiest to glue on paper with ordinary PVA glue, which is safe and not difficult for children.


Decoupage from small parts involves the application of thick glue. Choose safe, odorless adhesives. Buttons or Lego pieces will create a bright frame, if you do not have bright buttons, but have old ones, you can cover them with paint or varnish.


Decorating with eggshells, cereals, seeds, pasta, coffee also takes place in creativity, especially since such decoration materials can be painted with paints and combined with other decor elements, creating unusual patterns. Photos in the design of food can be placed on the walls of the kitchen or dining room.


Do not forget that frames are often molded from plaster or dough. The dough recipe is very simple, the same as for regular modeling. You can add food coloring to it or color it after it dries. Flour, salt and water are taken in parts 3:3:2. Make a solid frame and wait for it to dry, or if you have modeling skills, create various figures of your child's favorite cartoon characters or just animals.


Video on the topic of the article
In this article, we will talk about how you can make comfortable and beautiful photo frames with your own hands.
Each photo is a unique phenomenon that retains a piece of some emotion. So why not arrange such images in unique frames?
Crafts - beautiful do-it-yourself photo frames from improvised materials: ideas, photos
To get started, we suggest that you familiarize yourself with the ideas of what photo frames you can make:
Photo frame made from burlap roses  Fresh flowers photo frame - short-lived, but beautiful
 Frames with knitted spirals


 Extremely original idea- old clock as a photo frame
DIY cardboard photo frame: master class
To make a cardboard photo frame you will need Stock up on the following:
- corrugated cardboard
- knife
- Pencil
- glue
- Decor paper - absolutely any paper will do
- Buttons, shells, beads
You can start making:
- From a piece of cardboard need cut out the front and back of the frame. Should be like this blanks like in this photo:

- Now is the time to decide how much measure paper for decoration.
IMPORTANT: It must be taken into account that it will have to be folded inward. That is, you can not do without a stock.


- Now the front of the cardboard blank need process with glue, and then glue paper to it for decoration. Until the glue dries completely, you can not proceed to further points.

- But after drying, you can glue the front and back of the photo frame. Only the upper parts do not need to be glued, since a photo will be placed through the top in the future.
- But this is not all, because it is necessary build a support for the frame. For this purpose, you need to cut out such a detail from cardboard, which is indicated in the photo below. You can make it out of paper, then stick it on a cardboard base.


- All that remains is decorate photo frame to taste.


How to make a children's paper frame: templates, diagrams with a description
Such a bright photo frame will surely appeal to children, especially girls. It will definitely decorate the interior of the children's room:

If you like this idea, you should stock up on the following constituents for its implementation:
- Paper - ordinary color, gift or even unnecessary magazines are suitable
- Wooden frame, which can be easily found in a needlework store. Or maybe somewhere in the house an old frame is gathering dust?
- glue
IMPORTANT: Hot glue gun also useful, it is especially convenient for needlework for beginners.
- Scissors or utility knife
- toothpick
You can start:
- If you want to update the frame cover, you can do it now, painting her.
- From paper you need cut strips.

- Then all stripes are needed fold in half.
- Now every strip needs roll into a roll. This is where a toothpick comes in handy, although you can completely do without using it. ends each roll must be carefully glue.

IMPORTANT: Do not be upset if the blanks turn out different size. It is even preferable that each roll is different from the previous one.


- As soon as a sufficient number of bright rolls has accumulated, you can proceed to their commits on the frame. This is where a glue gun comes in handy. You can fasten the parts randomly, but the strength of their pressing to the frame is required!


We bring to your attention one more photo frame manufacturing scheme:


How to make an autumn frame in autumn style - golden autumn: templates, diagrams with descriptions
The easiest way to create a frame in honor of the golden autumn - paste over finished frame leaves. Leaves are pre-required iron out. Then they are recommended soak for one minute in hot water. However, not boiling! So the leaves can lie better on the cardboard.
After fixing the leaves on the frame, it is worth sending the craft under pressure with. You can then cover the surface with a matte varnish.


If you want something not as familiar as leaves, you can decorate the frame acorns.

More a few ideas to create an autumn frame:


How to make a beautiful felt frame: templates, diagrams with descriptions
Felt photo frame-magnet is quite unusual and easy to manufacture.


If you liked the idea need to buy:
- Rigid felt
IMPORTANT: It is desirable that it correspond to a thickness of 2 mm and dimensions of 13x26 cm.
- Tapes approx. 5 mm wide and approx. 3 m long
- Needles - one regular and the other with a wide eye
- Mouline threads - it is preferable that they are one gamut with felt
- Ready-made magnet or magnetic tape
- paper
- Scissors
- ruler
- Toothpick or awl
- colored pencils
- coin

You can get started:
- On the reverse side felt required to draw two squares. Each of them must have sides equal 13 cm.


IMPORTANT: Now is the time to take the coin. You should not ignore this stage if you want to get a rounded frame.

- Blanks can cut out.


- Now is the time to get busy a template for making a hole for a photo. AT this example it is presented as a cloud, but in fact it can be any shape.


- Hole need cut out.


- But of course without sheathing of the cut not enough! For this it will be useful overcasting seam in two threads. Fastening takes place on the inside.


- Now the blank-template must be circled on paper. On it, it is worth outlining the outlines of embroidery.

It's time to get busy ribbon embroidery! Cut off green about 50 cm by inserting it in a needle with a wide eye.
IMPORTANT: Try to cut the end of the tape at an angle of 45 degrees.


- End ribbons should fasten on the wrong side felt blank with a needle and thread.


- Next follows in advance pierce the felt in those places where you plan to thread the needle with the tape. The fact is that the hard felt for the needle is too strong, so it is recommended to use an awl or, in extreme cases, a toothpick.


- Now it's worth flashing the frame in the same way and blue ribbons.


- Next you need fold both blanks for felt. They should sew overlock seam using floss threads.


- Left attach magnetic tape to the back of the frame.


How to make a carved wood photo frame: templates, diagrams with descriptions
The right choice of wood for the manufacture of the frame is already half the success. Highly will look attractive products from cherry, walnut, ash, linden. If in the future painting is planned, then best options will become spruce and pine.
IMPORTANT: It must be remembered that the softer the wood, the easier it will be for the master to make patterns on it. This is especially important for beginners.
You need to make a frame as follows:
- From the plate it is necessary cut blanks,the thickness of which will reach approximately 26 mm. Minimum allowances are required.


- Now you need cut the edges, then gluing the workpiece.
- Having drawn pattern template, it is worth attaching it to a tree. The pattern is transferred to the future frame.
- Contours outlining photo hole, need to be cut.
- It is also necessary to cut and patterns.
- Now we need to define rebate dimensions for photo glass.
IMPORTANT: It is worth following the symmetry of the marks.
- It's the turn milling.
- Now happening leveling with straight chisels.
- Can do back of the frame.


We offer following patterns. They are mainly used by craftsmen for making platbands, but they are also perfect for photo frames:

 Patterns-1 for a photo frame made of wood


How to make a photo frame from plywood: templates, diagrams with a description
For a similar photo frame needed:
- Plywood minimum 10 mm wide
- Saw for wood plywood
- Electric jigsaw
- Drill - can be either manual or electric
IMPORTANT: The most important thing is that there are drills for wood.
- Scissors, measuring instruments
- Furniture stapler and staples
- Metal bracket or reinforced thread to fix the frame
- Grinding devices - fine-grained sandpaper or special grinders
- Lacquer for woodwork

You can get started:
- The first step is to transfer material templates.


- With a drill need to do multiple holes, and through.
- Now a jigsaw must be placed in the holes. They produce pattern cutting.
- Now the time has come grinding.
- Next, you can proceed to painting object.
- Now you can insert photo. If desired, you can put it under glass. In this case, you have to attach back wall, fixing it with a construction stapler or self-tapping screw.


How to make a frame for a photo from a plinth: templates, diagrams with a description
To create such a photo frame needed:
- Pieces of wooden plinth
- Glue type "Moment" or "Adhesive nails"
- Utility knife or construction knife
- Protractor or miter box
- Marker
- Ruler
- Acrylic paints, as well as acrylic putty for woodworking
- Cardboard must be thick


Operating procedure:
- First, it is desirable to cut cardboard base, which will be slightly larger than the desired photo.
- Next, you need to cut out another piece of cardboard - the front of the frame.
IMPORTANT: Each side of the second part must be less than the first by about 5 mm.
- Now both parts must be glued together.
- Then you need to measure 4 pieces of plinth. The stool needs them cut at a 45 degree angle. If there is no miter box, you can draw a corner on paper, then marking it on the plinth with a marker.
- Now you need glue the panels to the cardboard base. If you do not want to make such a basis, you can simply glue the pieces together.


- If there are cracks, they can be easily mask with putty.

- After the putty has dried, you can proceed to painting.
IMPORTANT: If there is no water-based or acrylic paint, it is necessary to cover the workpiece with PVA glue before applying any other. And you need to apply several layers.


- It's time to apply water based varnish.

How to make a photo frame from disks: templates, diagrams with descriptions
For a similar craft needed:
- DVDs, CDs
- Black stained glass paint
- Thick texture cardboard
- Pencil, ruler, scissors, tweezers
You can get started:
- From cardboard cut out blank frame


- Now is the time to get busy cutting pieces from disks.
IMPORTANT: These pieces must be irregular in shape.


- Next you need glue the frame, sticking colored pieces on it. It is best to use tweezers. It is advisable to lay out the parts not tightly to each other, because you need to fill the gaps with paint.


- Now paint fills the gaps between the pieces. The edges of the frame can also be covered with black.


How to make a scrapbooking photo frame: templates, diagrams with descriptions
Necessary things to create a frame:
- Special paper for scrapbooking
- Cardboard
- Construction or stationery knife
- Tape, glue, scissors, ruler
- Decor elements, stencils for drawings
Operating procedure:
- on cardboard are celebrated product borders
- Cut off all excess- only the blank frame should remain.
- received The blank should be glued to the back of the scrapbooking paper.
IMPORTANT: The excess edges of the paper must be slightly incised, and then wrapped around the frame.
- All the edges future framework need fasten with tape. The upper part cannot be glued, since the photo will be inserted through it.
- Further from cardboard need cut a piece for the back of the frame.
- Now it is desirable to create support leg for the frame.
- The most interesting stage of work remains - decor! It can be the most varied.
Attached several ideas:


Decorating, decorating and decorating photo frames with your own hands: ideas, decor, photos
You can also beautifully arrange ready-made standard frames. And after decorating, you will get unique and cute things:


 Photo frame decorated with colorful spools of thread


Do-it-yourself photo frame collage: ideas, photos A collage of photo frames in the form of a puzzle for children's photos 
As you can see, even beginner needleworkers can create an original photo frame. Such a product will give the interior a unique charm and will definitely hold the eyes of guests. And as a gift, such a photo frame will bring a lot of joy.
Master class on creating an unusual carousel photo frame