Assembling kitchen cabinets with your own hands. Furniture drawer assembly
Each furniture consists of several key elements that greatly affect its reliability and quality. One of these important components considered a drawer. It is an indispensable functional component of any office table and kitchen set.
Most experts believe that the correctness and reliability of the installation of such a box greatly affects service life all furniture.
When assembling this component important role plays the quality of parts and the availability of all working means. As a rule, such boxes are always made using laminated chipboard materials. Experts strongly recommend that before starting the assembly of this component, prepare a high-quality drawing and determine all the main dimensions of the future structure. It is also very important to have a clear phasing in the performance of all installation work.
Preparatory stage
Before starting the assembly of an element such as a drawer, it is necessary to prepare correct drawing, as shown in Fig.1. You also need to purchase the most basic part - the guide component. furniture type. In the modern construction market, you can find 3 main types of the above design - with the presence of a finishing mechanism, roller and telescopic. The last type of guide is the most the best option when installing any drawer. Such a telescopic element has maximum versatility and reliability.
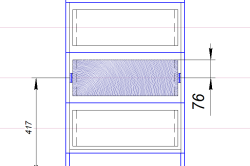
An important point preparatory phase during assembly retractable design the procedure for calculating and preparing the optimal dimensions is considered. The guide component must always be equal in length to the part to which it will be attached. As a rule, this parameter can vary from 300 to 550 mm. The best option width for a drawer is considered a size that does not exceed 490 mm. For quality assembly For this design, you need to prepare the following materials:
- Chipboard laminated type;
- guide components;
- fiberboard material;
- screws and drills;
- small nails.
In the process of this work, you will need the following tools:
- drill;
- hammer and pliers;
- roulette;
- knife and screwdriver;
- level.
Back to index
Mounting process
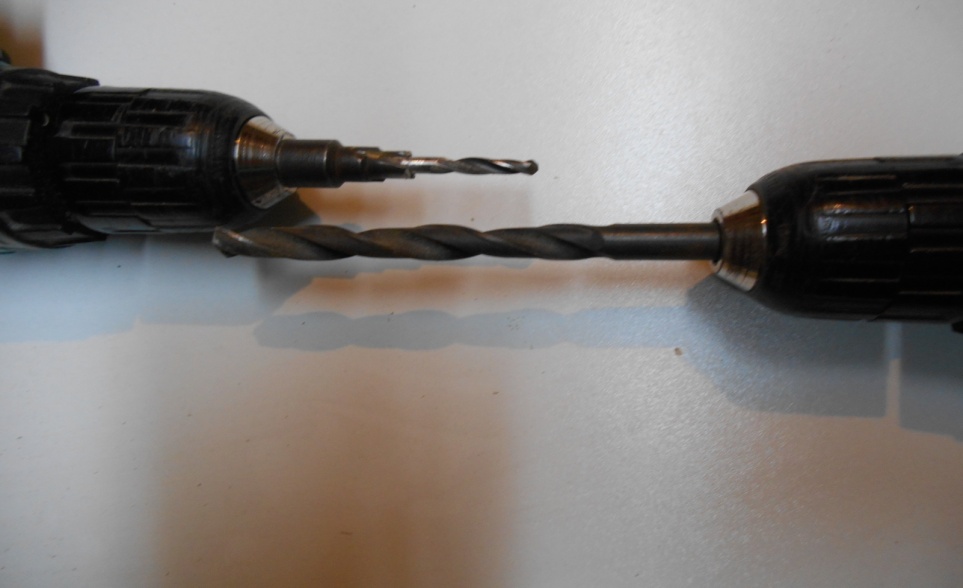
In order to properly assemble the drawers, you must first prepare all the details for fastening the guides and carefully drill them. For these purposes, you can use 2 drills with different diameters - 4 and 10 mm, as shown in Fig. 2. Using the first element, a through-type hole is made. Another type of drill is usually used to increase the depth under the hats of the main screws. Before starting the above process, experts recommend marking all the details. This will improve the accuracy and tightness of all self-tapping screws.
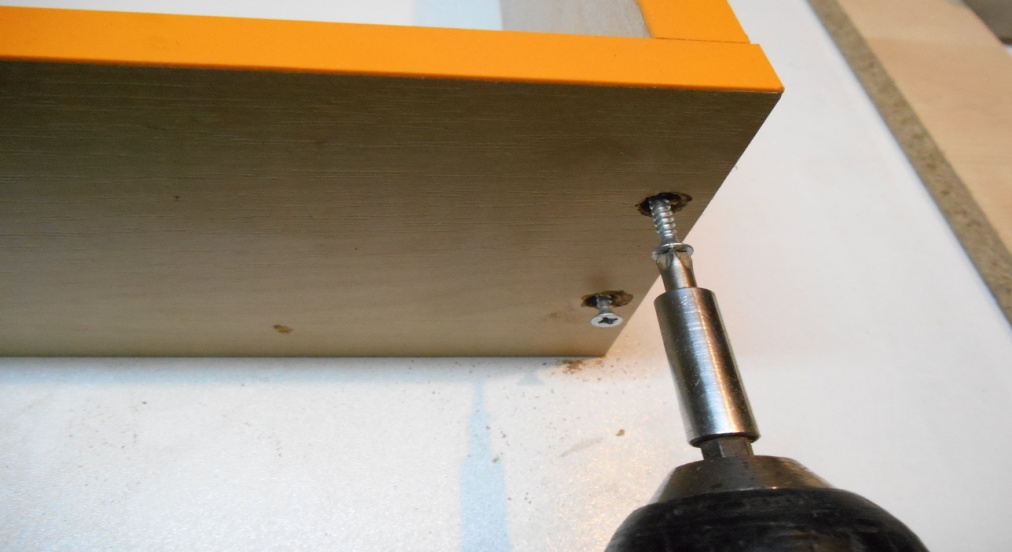
After that, you can use a drill to start drilling the main holes. First of all, a through opening is made. It is placed in the center, between the extreme part of the part and its strip. For these purposes, you can use the first type of drill. Next, you need to make a few holes for the screws. In practice, they are produced using a second type of drill with a diameter of 10 mm. An example of this type of work is shown in Figure 3.
Each box is mounted with special self-tapping screws furniture type. Optimal size such an element is considered a parameter of 4x40-45 mm. Experts strongly advise to screw all the screws perpendicular to the main part. Before the process of attaching the bottom of the box to the already fully assembled body, it is recommended to check the diagonal parameter very carefully. Its absence can cause distortions of the entire structure and breakage of the main guide components.
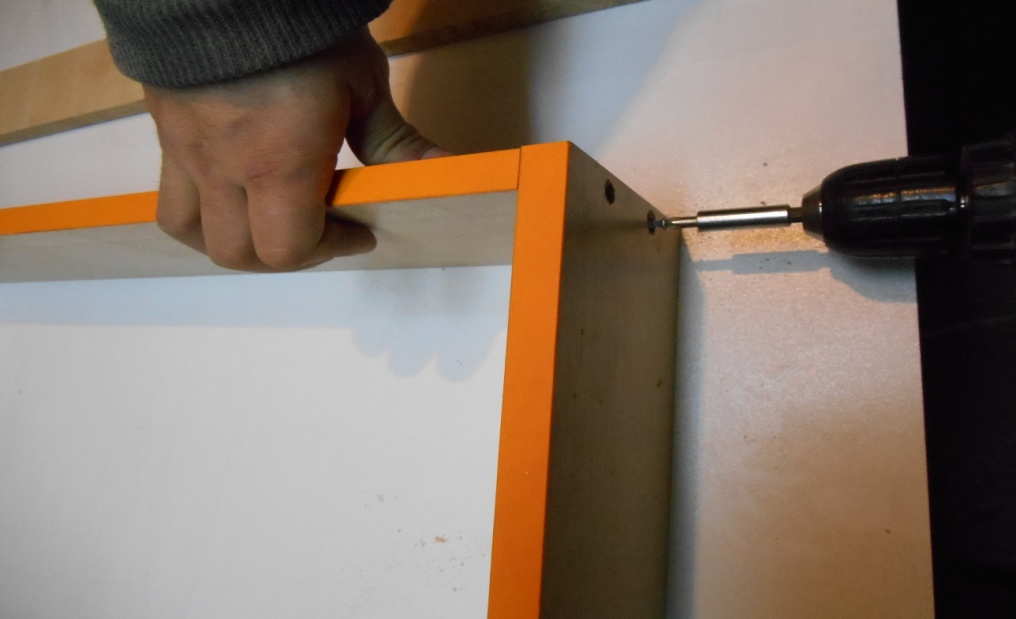
The bottom of a drawer structure must be attached with a few nails and self-tapping screws. The last stage of the assembly is the process of fastening the guide components, as shown in Fig. 4. They are connected to the structure using factory holes strictly on the same level with her bottom. For this purpose, you can use small self-tapping screws with a parameter of 4x16-18 mm.
This article describes the method of assembling a drawer from ready-made factory parts, with marked holes for dowels, minifixes and confirmations. Using this material, you can easily and independently assemble a drawer for your furniture.
Man has been furnishing his home with furniture since the time of the construction of the first house. Gradually, benches, tables, couches appeared, which eventually transformed into comfortable sofas, wardrobes and beds.
There was a time when simple wooden chair impressed with its elegance and beauty. Then the era of unification came and all pieces of furniture began to fulfill only their functional purpose.
But the irresistible desire of a person to live in comfort and coziness made him look for new forms and embody new ideas. The real solution was the production of cabinet furniture, which harmoniously combined attractiveness and simplicity, individuality and accessibility.
Now it's easy to find necessary product, requires only skill in its assembly and the ability to understand furniture details.
For some reason, many questions in this matter arise, in particular, when assembling boxes, for example, for or, especially if the fasteners are minifixes. Let's figure it out?
drawer detail
So, we take our box out of the package and examine it.
If there are paired holes on the sidewalls, then our design will be attached using minifixes (in more detail about installing the minifixes themselves from scratch, it is written).
In addition to them, we will use confirmations, dowels and furniture glue, screws and nails.
To begin with, let's distribute our box on the floor in expanded form, so that it is clear where which part is.
Drawer assembly, installation of dowels
Then, in the largest hole in the back (it is not through), pour glue and insert the dowel. It should fit tightly without distortion. (the process of drilling for dowels is described)
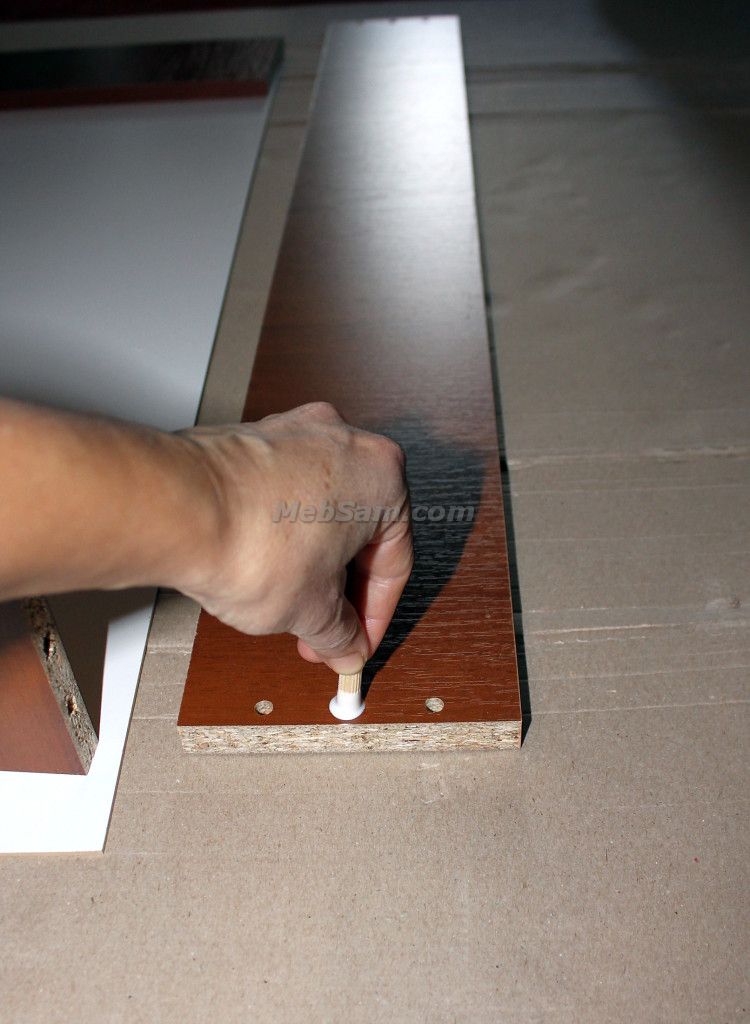
We install the sidewall on the dowel and lightly press on it so that the bar sits tightly in place. We do the same with the other sidewall.

AT front panel box with inside also has holes for different mounts, including under dowel and minifix.
Installing minifixes
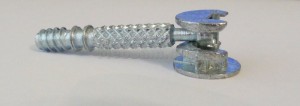
Let's clarify what a minifix is. This mount consists of two parts - a pin and an eccentric. The first one looks like a screw and serves for tight installation with a thread into the panel, and the eccentric is mounted in the side part and its functional duty is to grab the pin and pull the front panel by turning.
We install the dowel in the same way as described above, and screw the pins with a screwdriver into the holes intended for them on the inside of the panel.
Now let's install the eccentrics. We find the corresponding holes in the sidewalls (usually they are located on the same side of both side parts) and insert this fastening part into them. It must be installed in such a way that the cavity inside the eccentric coincides with the exit of the hole for the pin.
We connect the panel and the rest of the structure, combining the dowel and pin with the holes intended for them. In order for the lid to sit tightly on the dowel, you can tap with a hammer at the junction.
This must be done carefully and through a thick piece of cardboard or fabric folded in several layers. With a dowel connection, excessive efforts should not be applied when working with a hammer, because. there is a high probability of damage to the surface of the part.
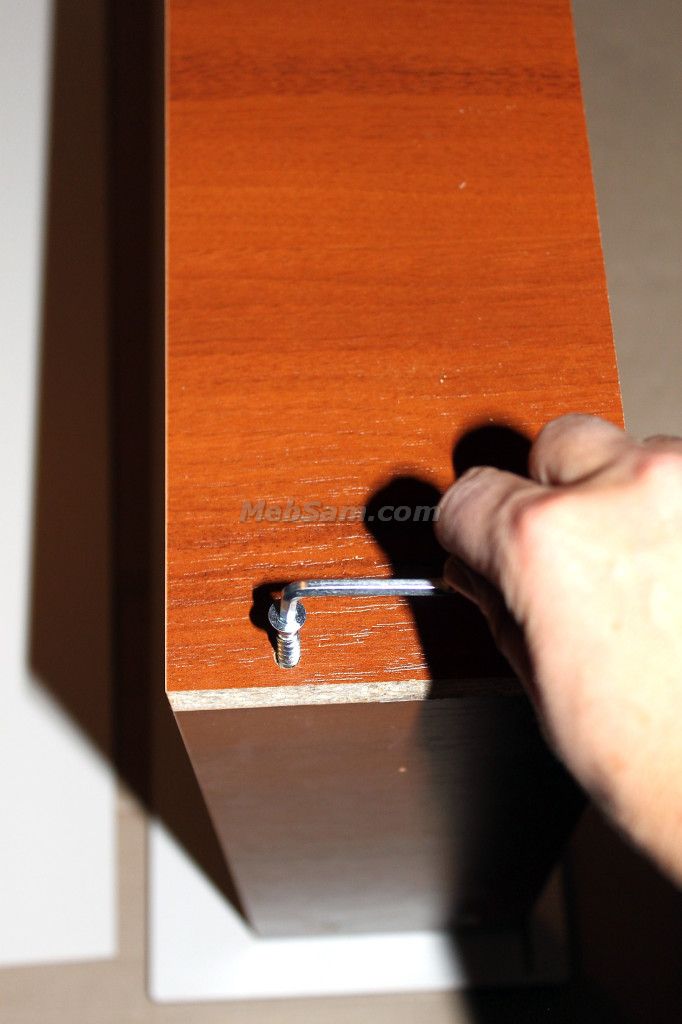
It's time to work with eccentrics. Using a Phillips screwdriver, turn it clockwise, grabbing internal thread pin head and thereby pulling the panel in the connection.
We fasten the confirmations
Installing handles
Now you can drill holes for the handles on the front panel.
Often, this is not done at the factory, so you have to deal with refinement already at the assembly stage.
We nail the bottom of the fiberboard
From the side of the bottom of the resulting box, we nail the structural part of the fiberboard, after aligning the quadrangle along two diagonals
It is very important that the diagonals are equal! Otherwise, you will have problems using the drawer, it will constantly jam when moving, and also not fully go in
The quality and reliability of any piece of furniture largely depends on minor, at first glance, details. Every little thing is important, because it is from them that a single whole is made. One of these important components is a drawer, without which no kitchen set, no closet, no office table. The service life of a piece of furniture as a whole directly depends on how correctly the calculations and assembly of the drawer are made. A very important role in the assembly of the drawer is played by right choice furniture guides.
The drawer consists of four body parts, which are usually made of laminated chipboard, the bottom of the drawer (most often fiberboard is used) and a set of furniture rails.
At the moment, manufacturers produce three main types of guides: roller, telescopic and with a finishing mechanism. The best option for a drawer in terms of price and quality are telescopic full extension furniture rails.
The guides consist of four elements, two of which are mounted on the drawer, and two on the body of the chest of drawers, or cabinets, where the drawers will be located. Distinctive and handy feature telescopic furniture rails, is their versatility. They do not have "right" and "left" elements, as in other types of guides.
Materials and tools for assembling a drawer
- Laminated chipboard;
- Fiberboard (for the bottom of the box);
- Drill;
- Drill, diameter 4 mm;
- Drill, diameter 10 mm;
- self-tapping screws;
- Furniture guides.
How to correctly calculate the size of the box
The calculation of the box body is a simple procedure. The part on which the guide will be attached (drawer depth) is usually taken equal to the length the guides themselves. They, in turn, are produced in multiples of 50 millimeters: 250, 300, and so on, up to 600 millimeters.
The part that will be located across the width of the box is calculated as follows. Opening width, minus 26 millimeters (technological gap on the guides), minus 32 (with a standard chipboard thickness of 16 millimeters). For example, if the opening in which the boxes will be located is 500 millimeters, then the part is 500-26-32 = 442 millimeters.
Drawer Assembly
Before assembling the box, it is necessary to drill the parts on which the guides will be attached. Two drills of different diameters are used for this. A through hole is drilled with a drill with a diameter of 4 mm, and a second drill with a diameter of 10 mm is used to deepen the head of the self-tapping screw.
So that the hole falls exactly in the middle of the part to be joined, and the screws do not come out when twisting, before you start drilling, it is advisable to mark the parts. For simplicity, it is enough to draw a strip with a simple pencil at a distance of the thickness of the chipboard.
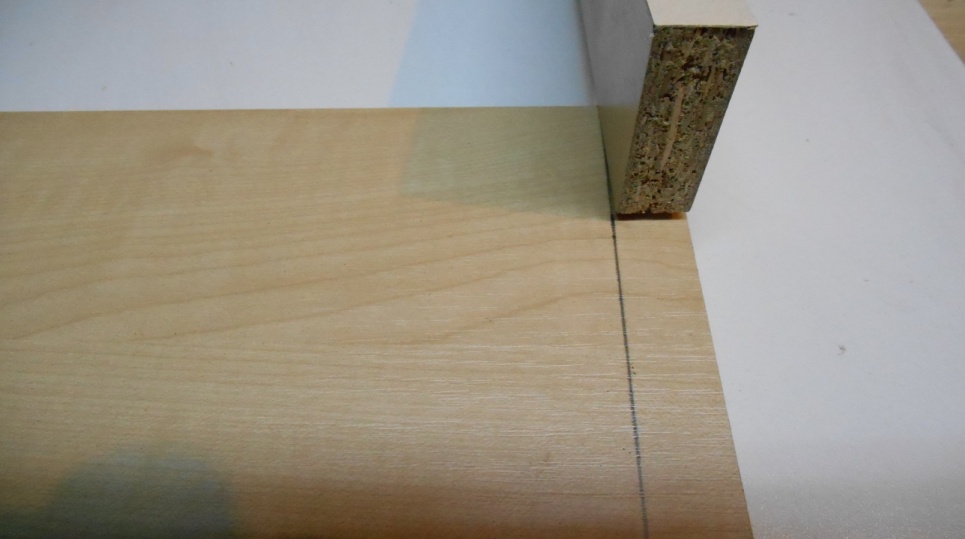
Now you can drill the part. First, exactly in the middle, between the strip and the edge of the part, a through hole is made with a 4 mm drill. Then we take a 10 mm drill and drill to a shallow depth just enough to hide the screw head inside. You need to drill 4 holes on each part.

The box is assembled furniture screws 4x40, or 4x45 mm. Self-tapping screws should be screwed strictly perpendicular to the part.
After complete assembly of the drawer body and before fixing the bottom, it is necessary to check the diagonal. If the box does not have a diagonal, then this can lead to distortions of the structure when extended and, as a result, failure of the guides.

The bottom of the box is stuffed with nails, 20-25 mm long, for reliability, you can also screw in several self-tapping screws.

Now you can attach the rails to the box. They are fastened through factory holes with self-tapping screws 3, 5 × 16, or 4 × 16 mm on the same level with the bottom of the box, but in no case protruding beyond the overall dimensions!

The drawer is ready for installation.