How to make light on the kitchen set. Kitchen lighting: basic rules and current trends
Backlight kitchen set- This important element kitchen design. The backlight is not only a decoration, but also has a great practical value. From my own experience, I can say that it performs two main functions - this is the illumination of the working area of the kitchen set and the illumination of the kitchen when bright light is not required.
kitchen lighting and working area may be organized in different ways. Often do not make additional structural elements directly to the kitchen furniture itself, and organize the lighting on the ceiling. To do this, along the perimeter of kitchen furniture, a plasterboard box is mounted on the ceiling, into which spotlights are built.


This approach is good and universal, but this can only be done at the repair stage. And what to do in the case when the repair has already been done, but the kitchen lighting has not been provided? There are two more options: make a backlight with a visor or install the backlight directly above the countertop.


Countertop lighting is a good option for organizing kitchen lighting. It is possible to make it different ways. Previously, fluorescent lamps were used for these purposes. Now, with the advent of LED strip and special boxes, this task has been greatly simplified. In addition, due to the low power consumption of LEDs, such lighting is also economical.
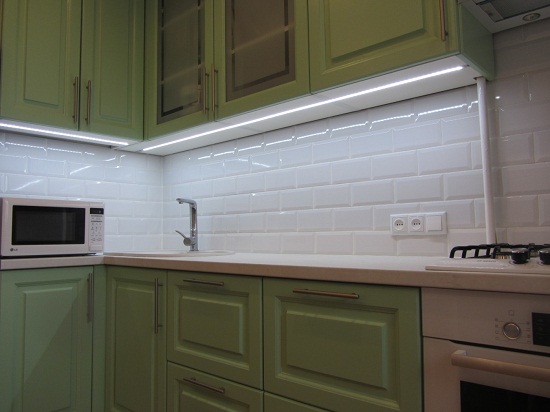
LED strip can be glued both directly on kitchen furniture and in special boxes. Boxes come in various configurations, including a triangular shape. Triangular boxes can serve as a corner covering the seam between the cabinets of the upper row and an apron, and at the same time perform the function of scattering light. The only problem of organizing the illumination of a kitchen set of this type is the low prevalence of such structures in the construction market and their significant cost.


Structurally, the kitchen lighting consists of several laminated chipboards and lamps. Chipboard can be made to order, or purchased ready-made and finalized on site. Depending on the configuration of the kitchen, the visor may consist of one or more parts.

An important feature is the width of the visor. Considering that the depth of the top row cabinets is 30 cm, the width of the canopy will be 50 cm. It turns out that the visor will protrude by about 20 cm, which is enough for mounting furniture fixtures.
The visor looks good when it looks like a single chipboard. If it consists of several parts, then naturally there are joints that are clearly visible, this spoils appearance visor. The joint is clearly visible when the laminated chipboard is glued edging tape. If you join two plates that do not have an edge, then the joint is almost imperceptible. It should be noted that the raw end of the laminated chipboard will not be damaged over time, since it is not exposed to moisture.

The second stage of organizing lighting is the installation of furniture lamps. To do this, holes are drilled in the visor in increments of 60 cm. Drilling is convenient with the help of a special crown for wood.
After that, pre-purchased furniture fixtures are installed in drilled holes. Furniture recessed fixtures can be purchased at almost any specialized store. When buying fixtures, we specify in the store the required number of transformers, if the bulbs are 12 volts.
Thus, you can make the backlight of the kitchen set. As an addition, and to hide the unfinished end of the chipboard, I added a thick stuffed edge.

In my opinion, it turned out well.
![]()


Comparison of LED and halogen lamps
After a little thought, I decided to install 3 W LEDs, which, in fact, is shown in the photo. They look like this.

Acquired specially with yellow light. Here's what happened in the end. This is how it looks during the day.

And this is what it looks like at night.

On the last photo You can see a comparison of the glow of a 3W LED bulb (left) and a 20W halogen bulb (right). The LEDs are less bright, but illuminate the kitchen and countertop quite well. In addition, they do not heat up and have a directional glow, i.e. do not shine upward through the technological holes in the lamps.
Why one halogen lamp? The fact is that due to their low power consumption, all six LED bulbs cannot run a 60 W transformer. Therefore, I had to leave one halogen. Hence the moral, to connect LED bulbs, you must purchase a special low-power transformer.
Kitchen lighting: how to find a balance between aesthetics and convenience
When planning the design of any room, it is very important to organically combine practical and aesthetic components. And this is true for any element of the interior, including kitchen lighting: with our own hands we can create such an ensemble that will be both beautiful and comfortable at the same time.
In our article, we will give some simple recommendations on how to refresh the kitchen by installing new lighting fixtures.
Light in the kitchen: comfortable and beautiful
Kitchen lighting levels
Hanging lamp
Lighting in the kitchen can be divided into several levels, each of which is responsible for performing its tasks.
These levels include:

- General lighting.
- Dining area lighting.
- Illumination of the work area.
- Light design.
Each of these levels within the framework of our article will be considered separately, and we will start with ceiling lights.
The function of a suspended ceiling lamp in the kitchen is very simple: it is responsible for providing light to the room at night and in cloudy weather. quality kitchen lighting should be bright enough so that when working in the kitchen we do not have to strain our eyesight.

Traditional model kitchen chandelier
There may be several requirements for a suspended kitchen chandelier:
- The chandelier should be placed as close as possible to the center of the kitchen - so it will create the most uniform light flux.
- Lighting in a small kitchen can be arranged with a single pendant lamp. For kitchens larger area often used either a series of several lamps of the same type, or a combination of "chandelier + moving lights"
- The power of the light bulbs should ensure that there are no unlit or shaded areas on the working surfaces of the kitchen.
- If we use incandescent lamps, then ideally their total power is at least 20-25 W / m 2. For halogen lamps this figure is 30 - 35 W / m 2.

"ONSHE" - designer lamp from IKEA
Lamps for the dining area
As a rule, secular cuisine did not provide for a separate lamp located above the dining table. And yet, the benefits of such a lamp are beyond doubt, because it is much more comfortable to eat in cozy atmosphere under the light of a separate lamp than under the bright light of a sufficiently powerful ceiling chandelier for kitchen.

Lights above the dining table
As a backlight for the dining area, you can use:
- Suspension lamps on suspensions of adjustable length. Optimal distance from the light bulb to the plane of the table is about 1.5 m, but in some situations it may be necessary to increase or decrease the amount of light entering.
Advice!
Light bulbs should be used to illuminate the dining table warm spectrum.
Best Choice there will be incandescent lamps - although they are uneconomical, they contribute to the creation of a comfortable atmosphere.
- An alternative to a pendant lamp can be a wall lamp with a fabric or paper lampshade.. Naturally, the power of the lamp must be sufficient!
- Another way to ensure dining area necessary quantity light is to make a built-in ceiling light for the kitchen. This technique is most often used in studio kitchens, when dinner table stands on a separate podium.
Illumination of the working area
Despite the fact that a well-chosen ceiling lamp should give enough light, in some cases additional lighting is required for the kitchen. And first of all, it is necessary above the countertop and hob– i.e. where our gaze is directed during almost the entire time when cooking.

Surface-mounted desk lamps
As a functional backlight, you can use:
- Lamps on retractable or swivel arms. On the one hand, such lamps make it possible to direct the light flux exactly where it is most needed at the moment.
On the other hand, both the brackets themselves and the lamp housings interfere with the performance of labor-intensive operations and get quite dirty.
Advice!
Dirty lamp housings lead to overheating and premature failure.
So if you want to change light bulbs less often, you need to clean them regularly. ventilation holes from dust and grease.
- Overhead lamps. Such devices are mounted on the lower part of the kitchen furniture modules and equipped with protective glasses (transparent or frosted). With the exception of the need to periodically wipe the glass, these devices do not have any special drawbacks.
- LED strip is also very often used to create kitchen lighting. .
Cost-effectiveness and ease of installation are the reasons why many of our compatriots choose exactly LED lightening to the kitchen
LED functional lighting
Of course, as a backlight, you can also use table lamp- but, as practice shows, a variety of accessories are enough on the countertop in the kitchen without it. Therefore, it is better to give preference to stationary options.
designer lighting
All of the above concerned mainly the practical side of the issue. At the same time, do not forget that with the help of various lighting fixtures, you can correctly place visual accents in the room.

In order to change the design of the kitchen in better side, many experts recommend installing LED strips either around the perimeter of the ceiling or on top of the headsets. At the same time, we get an effective result with minimal energy consumption, because the power of LED strips is minimal compared to the power of other devices.
You can see examples of kitchen lighting using LEDs in the photo in this article, as well as in other materials in this section.
Lighting installation
Wiring in the kitchen
In this section, we will tell you how to make lighting in the kitchen yourself. And let's start, of course, from the very first stage - with wiring:

Machines in the electrical box
- Regardless of what kitchen lighting options we will implement, we need to calculate the power of our future wiring. We cited the technology for calculating the power of lamps above, but we should not forget that other electrical appliances will also be connected to the wires.
- When the power is determined, select the appropriate wires for wiring. As a rule, in most cases, a 3x2.5 NG wire or similar will suffice.
- In the shield from which the kitchen will be powered, we install the device protective shutdown. If we install several branches of wiring (for example, lighting for a kitchen set or ceiling lighting in the kitchen), then experts advise connecting each branch to a separate machine.
- When everything is ready, you can start laying the wires. It's best to lay them in a hidden way, in the channels (strobes) made in the walls. When making a strobe, do not forget to make recesses for installing switches.

Concealed wiring
We put the wires in plastic casings and fix them in the strobes with wire, after which we close up the holes and proceed to the plastering of the walls. We install sockets and switches on the finished surfaces, after which you can proceed with the installation of lighting fixtures.
Installation of ceiling lights
The first thing to do is to install a ceiling light. As a rule, one such lamp is enough for the lighting of a small kitchen to be effective enough for the rest of the repair work.

We hang a ceiling chandelier
Installation instructions hanging lamp next:
- We de-energize the apartment to avoid defeat electric shock in the course of work.
- In the ceiling at the installation site, we mount a special hook or mounting plate. It is best, of course, to hang the chandelier from a hook embedded in its ceiling at the construction stage - but not everyone is so lucky!
- We assemble the lamp, bringing out the wires necessary for connecting.
Advice!
To ensure a convenient and reliable connection of the lamp contacts to the wires on the ceiling, we recommend using terminal blocks.
The price of this part is small, but it makes the job much easier.

Connection via terminal block
- We hang the lamp on a hook or fix it with screws on the mounting plate. We insert the stripped contacts into the terminal block and clamp them with wines, trying to prevent excessive pressure and deformation.
- We put on a decorative overlay - “glass” at the place of attachment, protecting the contacts from moisture and debris.
Mounting a wall lamp
Wall lamps in most cases are mounted in a similar way:
Mounting the lamp on the wall
- First, we mark the wall in the selected place for drilling holes for fasteners.
- Using an impact drill or hammer drill, we drill nests for installing dowels. For making holes, it is best to use drills or drills with pobedit surfacing.
- We hammer plastic dowels into the holes, after which we fasten the base of the lamp with the help of locking screws.
- We put the case itself on the base, which we either snap onto the fasteners, or fix with screws using a screwdriver.
- If a wall sconce is connected to hidden wiring- then before closing the case, we connect the lamp to the terminal block.
The installed lamp must be checked. If we did everything correctly, then the light bulb will burn brightly, without blinking or making extraneous sounds.
To understand the installation technology in more detail, we advise you to view the instructions posted on our portal.
Connecting LEDs
As for the LED strip, due to the presence of a self-adhesive layer, its installation is not particularly difficult.
But the connection can confuse an inexperienced master - therefore we will pay attention to this issue separately.
- One of the indisputable advantages of the LED strip is that it can be cut into pieces of arbitrary length. In this case, it is important not to go beyond the areas specially allocated for cutting - otherwise there is a risk of damaging the diode itself.
- The cut piece of tape must be soldered to the wires that will go to the power supply. One-color tape requires two wires, and three-color (RGB) requires four.
- The soldering area must be carefully insulated, since the humid environment of the kitchen is potentially unsafe.
- We connect the wires from the tape in compliance with the polarity to the power supply. We attach a three-color tape through a special controller - as shown in the figure.

Connecting the Tricolor Ribbon to the Controller
We plug the power supply into a socket or connect it to the wires laid in the wall. In the second case, a hidden niche in the wall can be provided for installing the controller and power supply unit - so these details will not spoil the interior of the kitchen.
Of course, there are a lot of nuances, but after all, planning the lighting of the kitchen of the studio, and just the kitchen in the very ordinary apartment is a whole art. But if you cope with this task, and find a balance between convenience and aesthetics, then believe me - your kitchen will look completely different!
http://jkuhnya.ru
Visiting various sites, forums on the furniture theme, it was noticed that little attention is paid to the topic of furniture lighting. It is clear that if this is a closet or a bed, then the backlight in this case is considered mainly as additional element furniture. But if this is, for example, a kitchen set, then the lighting of the same working area of the countertop should be mandatory. And this lighting should be comfortable, affordable and bright enough.
The lighting of the kitchen set is divided into: working light, overhead lighting, cabinet lighting, bar counter lighting (if necessary). Each type of lighting should be responsible for its own area of \u200b\u200bthe kitchen. For example, the light of the work area should not blind the eyes, but at the same time it should be bright enough for cooking. The top light should illuminate wall cabinets outside the work area. Illumination of cabinets inside emphasizes the beauty of furniture, glass and dishes, creating a play of light. Bar counter lighting gives a relaxed and not glaring light to the surface of this counter. At the same time, all these types of lighting included together should not interrupt each other, but complement the appearance of the kitchen.
Below are examples of some types of fixtures for different types of kitchen lighting:

Rice. 2 Illumination of the working area.

Rice. 3 Illumination of the working area.

Rice. 4 spot illumination of the working area
Illumination of kitchen cabinets is carried out mainly with the help of spotlights, fluorescent lamps, LED strips And so on. Top and bar lighting are performed different types luminaires, for example, luminaires on flexible or movable brackets (Fig. 5).

Rice. 5 Upper illumination
All types of lamps are selected, taking into account the design of the kitchen.
According to the type of execution, the luminaires are divided into built-in and overhead.
Kitchen design should ideally be handled by a designer. But if you yourself are engaged in design, then decide on the following questions:
- How many lamps do you need?
- How are these lights attached? Are they attached before or after the kitchen is installed?
- What holes and grooves are needed for fixtures? Are the holes made BEFORE or AFTER the kitchen is installed?
- How many transformers for lamps and will they be? Where will they be?
- Where will the light switch be? How many groups does it include?
- Where is the installation of wires for fixtures and how?
- Where is the point of connection of the furniture lighting system to the 220 V network? How will you connect to it?
- What other accessories are needed for lighting installation?

Do not forget about the possibility of servicing fixtures after the entire installation (periodic replacement of lamps or transformers).
It is very desirable to think over many questions before installing the kitchen. For example, conclusions above cabinets for the same overhead lighting must be made before installing the kitchen. For each kitchen, everything is individual and is decided locally. Consult with a specialist.
Good luck with the repair!