Fasteners for kitchen assembly. Assembly of floor elements and wall cabinets. Installation of wall cabinets
- Tools and materials
- Kitchen assembly work
- Work order
After completing all repair work in the kitchen, few people do not want to buy new kitchen furniture. As a rule, specialized stores and bases provide their customers with services such as delivery and assembly of furniture, but all this is not free.
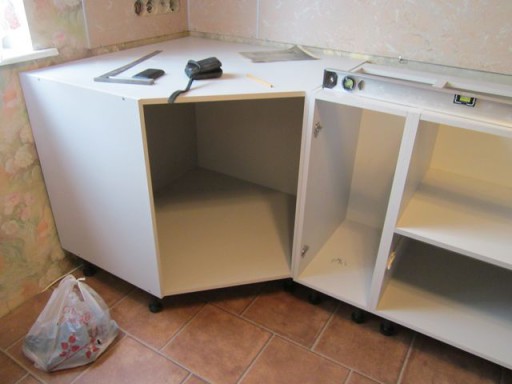
As a rule, the assembly of the kitchen begins with the installation of separate modules, drawers and wall cabinets.
But why pay extra money to strangers, if there is great opportunity save on this, since it does not present any particular difficulties, especially for those owners who can figure out the installation and assembly instructions attached to the set kitchen set.
Tools and materials
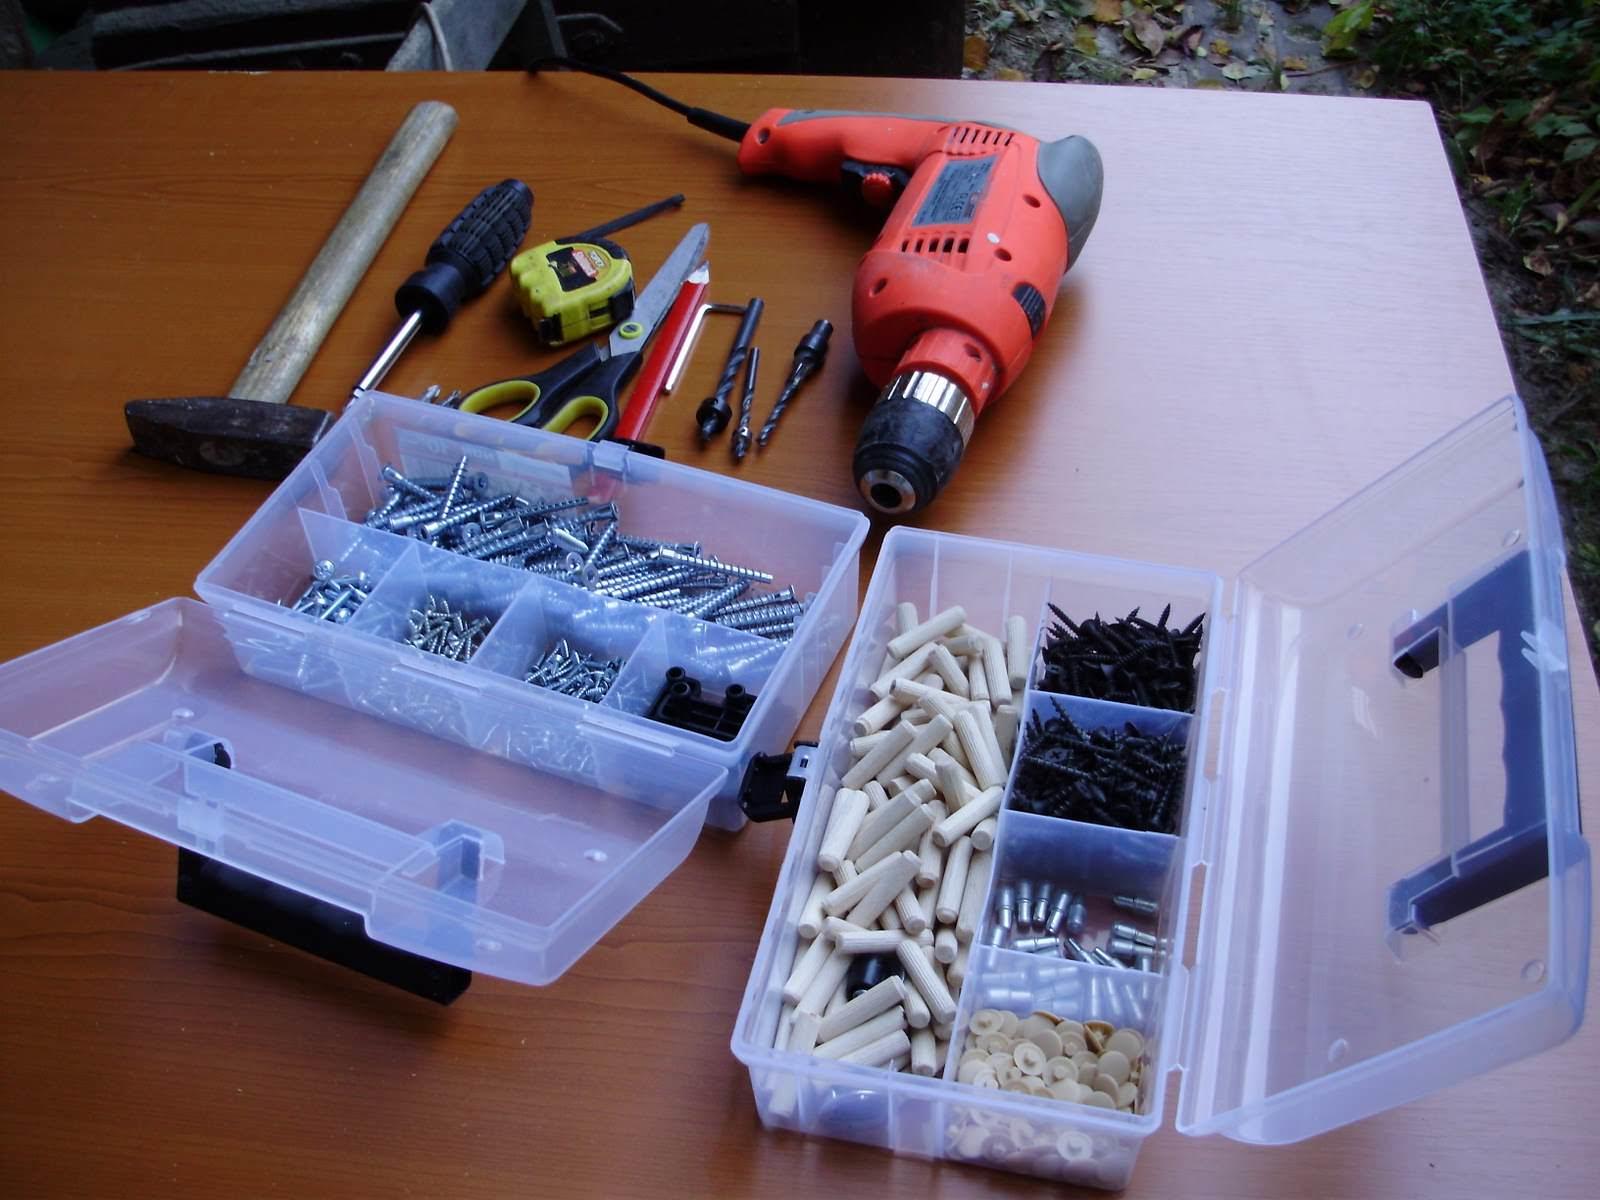
In order to cope with the task, the first thing you need to purchase a set of necessary tools:
- Screwdriver, which may be the easiest. Although kits often include a small screwdriver that is suitable for assembling components, it is better to purchase an additional one in case one of them fails.
- A set consisting of a hammer drill and several drill bits and a drill adapter that can be attached to a drill bit for woodworking. The presence of this tool is mandatory if you need to hang cabinets on a concrete wall. But to connect with wooden elements you can use a regular screwdriver with self-tapping screws.
- Hacksaw or electric jigsaw will be needed in order to cut a hole in the countertop for the sink and stove. Yes, and the tabletop itself will have to be adjusted to the required dimensions.
- A hex wrench is also included in the set. However, it is often disposable, and by the end of the kitchen assembly, all its edges are grinded.
- A standard set of locksmith tools that are present in the house: a hammer, a building level, a clerical knife, pliers and a tape measure.
Back to index
Kitchen assembly work
In order to assemble the kitchen with your own hands, you will need to remember to check standard instruction. It schematically shows which parts are used where, and indicates how the work is done, for example, which tools should be used when assembling a particular piece of furniture. If you screw a part in the wrong place, you will have to disassemble it, and this will reduce the strength level of the specific connection and the entire item. This is of particular importance since the modules are mostly made from cheap chipboard sheets, and components, doors and handles to them break out, most often right from the root.
Back to index
Work order
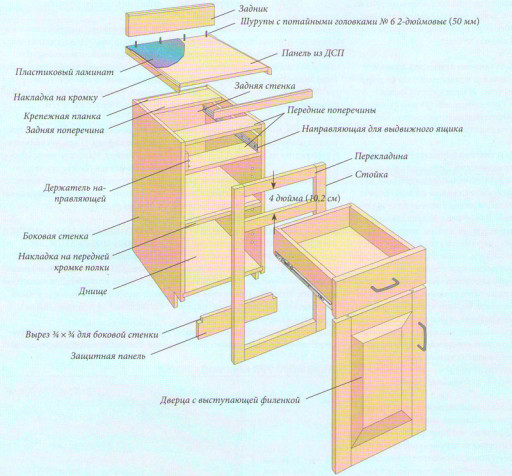
First, on the side boards, attach the fasteners for the valves, which look like a cross. They can be screwed with 2 screws into pre-made recesses.
On the inner sides side walls are fixed with guides for cabinets, since in the future it will be extremely inconvenient to do so.
Further inside all the holes are inserted wooden dowels, which builders are also called chopiks. This is done in order to assemble the furniture frame. They allow you to ensure the evenness of the created structure and even increase the strength characteristics of future structures. Professional workers advise gluing them with wood glue. Insert the dowel into one of the holes, and the second, on the adjoining element, put it on the end of the dowel and squeeze both parts tightly.
When you are sure that the elements are located exactly as the instructions and sketch require, use a hex furniture screw to assemble the two parts together. Then cover the place where the screw is located with a plastic cap, similar in color to the kitchen set.
After all this, if your cabinets must stand on legs, screw them into place and adjust the height.
A hanging cabinet helps save space in the kitchen.
Sometimes, mostly when buying the most ordinary kitchens, in the set instead of legs you can find plastic caps. They are nailed to the base so that the furniture does not come into contact with the entire area of \u200b\u200bthe floor covering and does not spoil it.
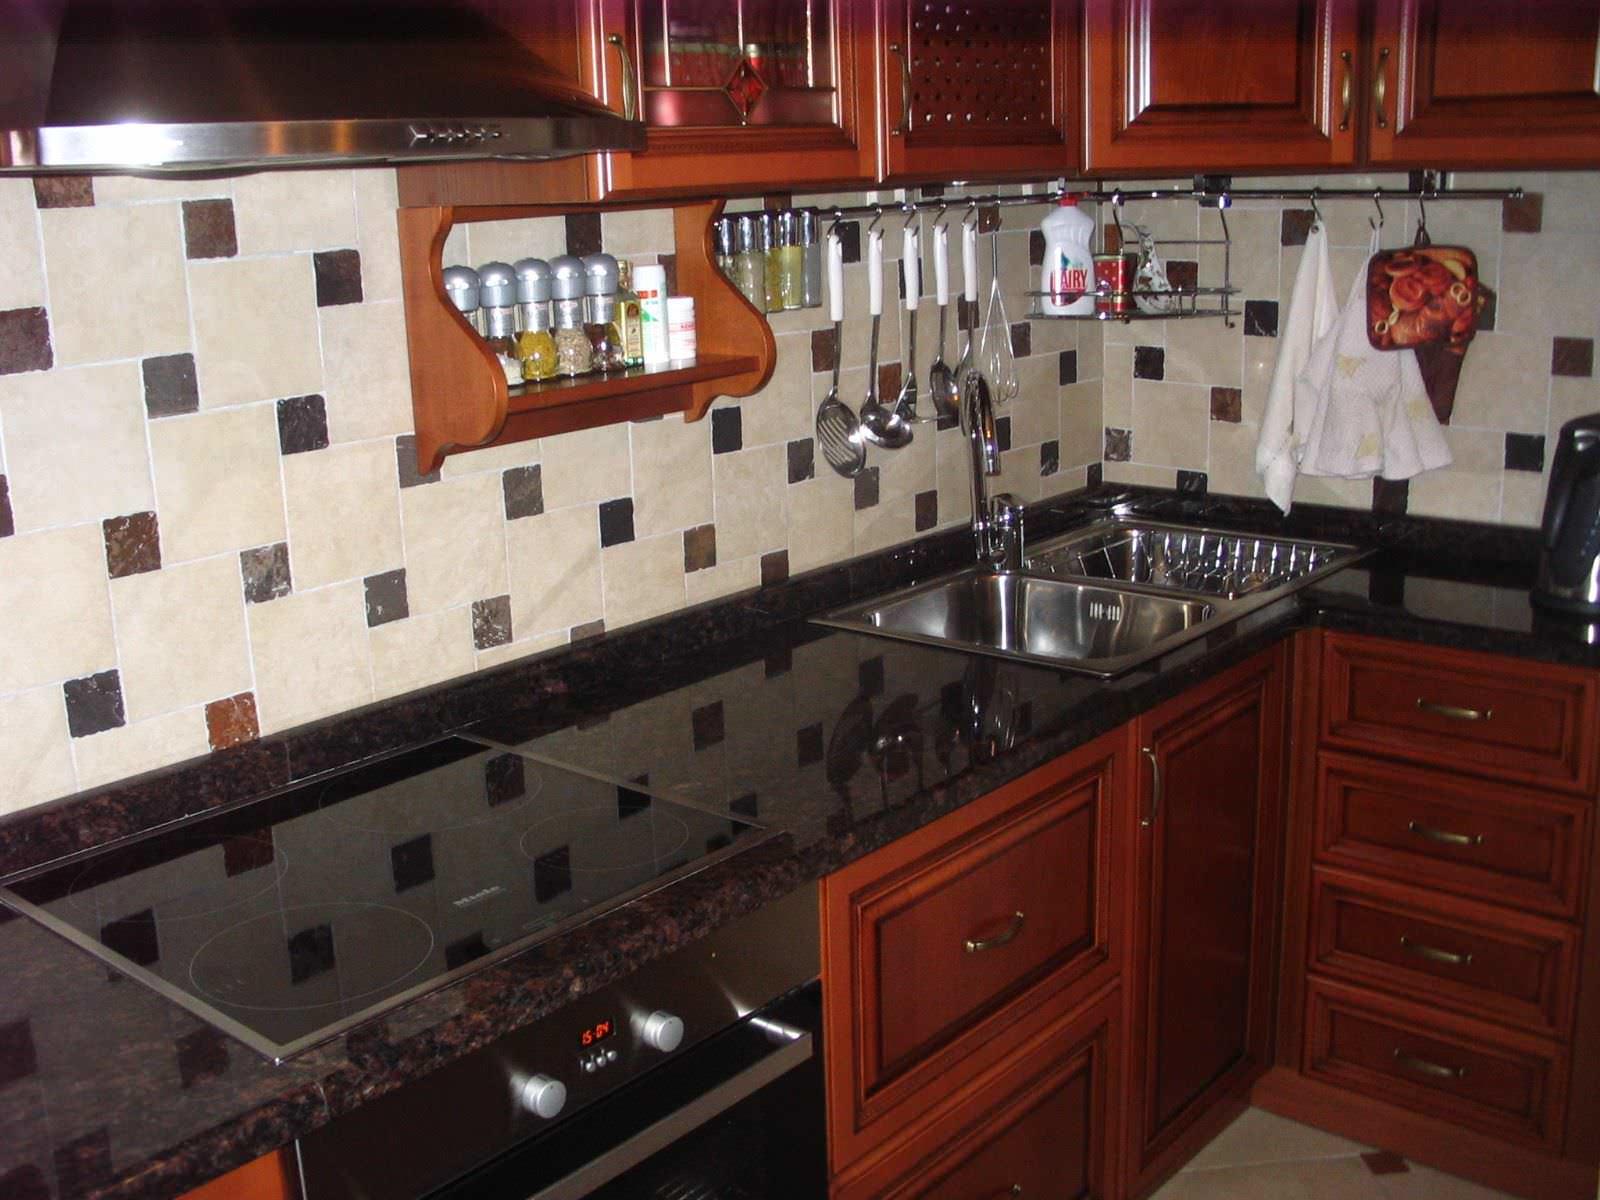
When the assembly of the cabinet body is completed, they are nailed to the sides fiberboard sheet. Which will serve as a back wall for cabinets. Those of them that will have to hang on the walls must be provided with fittings for their reliable fastening to the wall. Currently, as a rule, adjustable canopies are used for this purpose, which only need to be attached to the walls of the cabinets located on the sides as close as possible to the upper corner.
How to assemble a kitchen and drawers with your own hands?
All the walls with which the box is created are assembled in exactly the same way as the cabinets described above.
Having collected 3 components, which are the walls, you will need to install a sheet of fiberboard in the bottom between them.

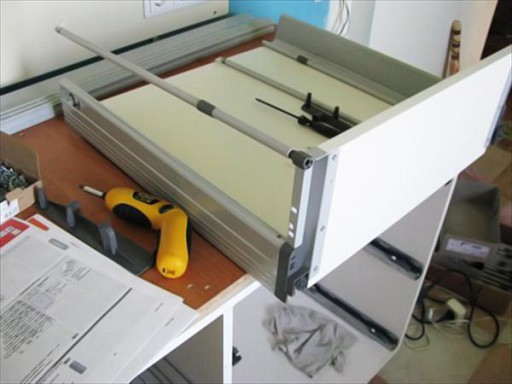
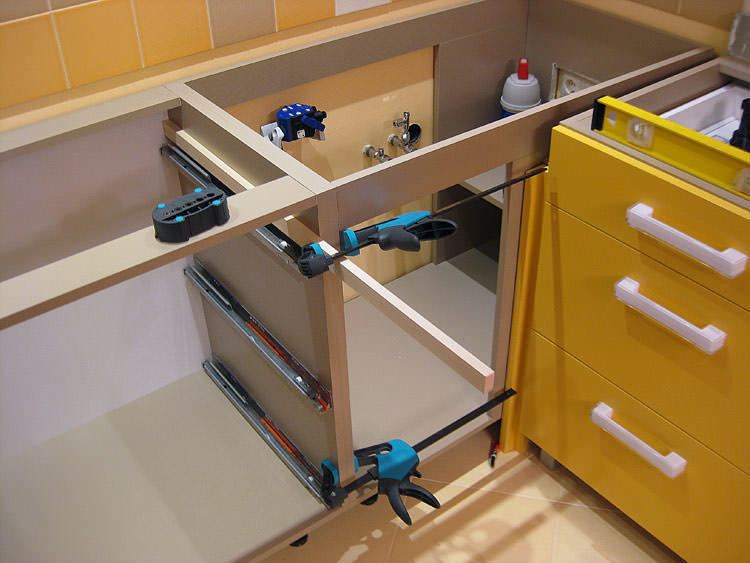
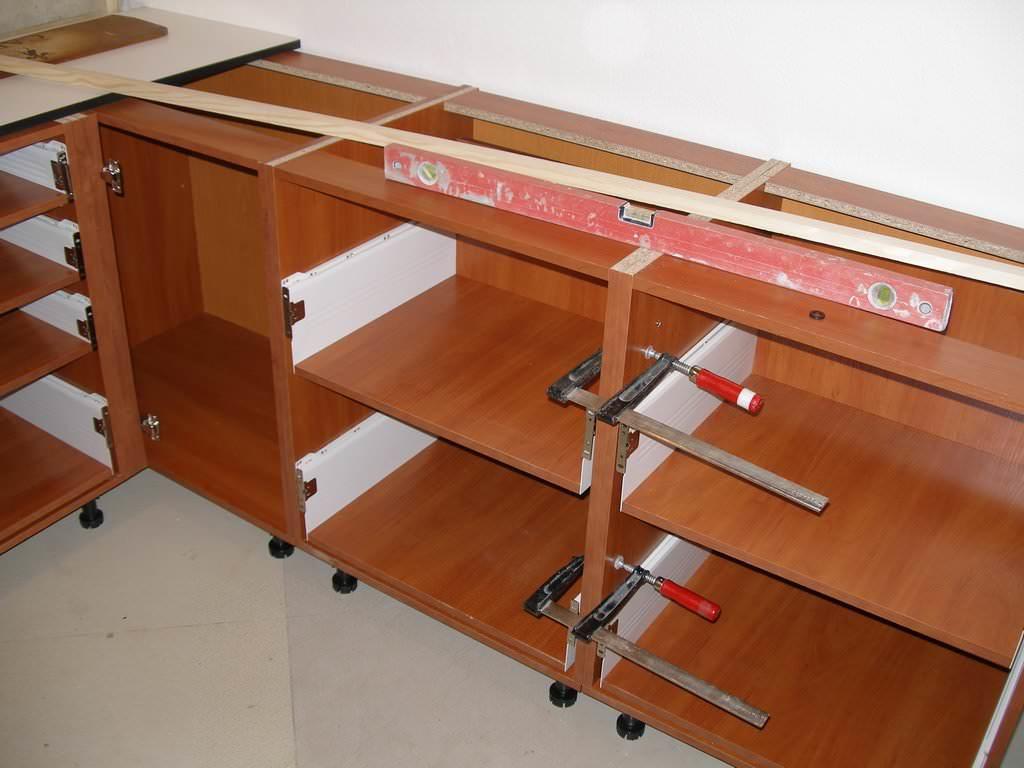
Next, you need to install the front element of the box. In this case, the connection will be made using an eccentric coupler, which is mounted as follows. Initially, a screw is fixed in the front of the box, the end with a cap is inserted into the hole on the sides. FROM reverse side you can insert a screwdriver or reach the cap with a screwdriver, with which the screw can be easily screwed. More visual image this process shown in photo #1.
Then the rollers are attached to the lower corners of the guides. It is important to remember one main rule here, which involves installing them on the back of a drawer with outside, and on the front - from the inside. Then it will be enough to insert the finished box onto the rails, for which the rollers will need to be connected to each other at a slight angle. With this action, the assembly drawers ends.
Install the kitchen with your own hands in the place intended for it
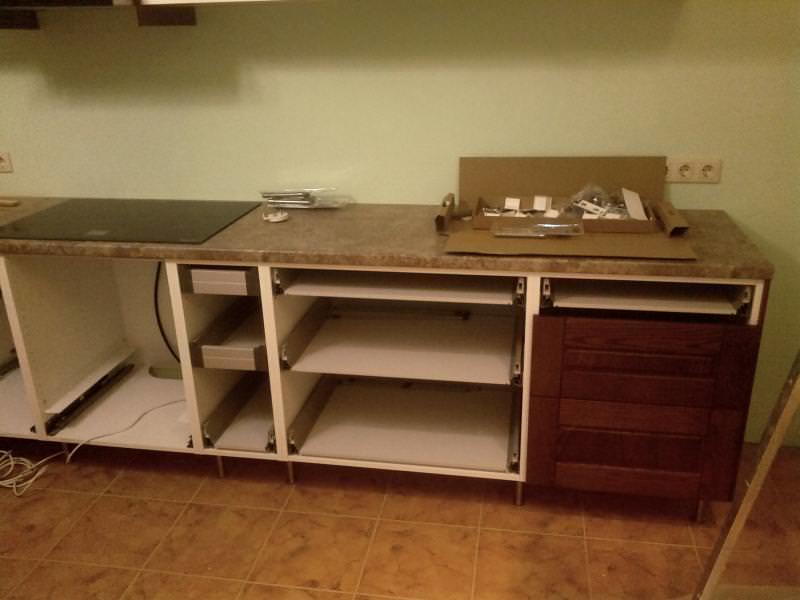
Installing the kitchen in place is considered the second stage, since in the first we create a kind of blanks. But this second stage cannot be considered the final one, since the doors do not need to be hung during it yet: they will only interfere. The first step is to install the side cabinet, in which, as a rule, the sink is mounted. Taking into account that pipes will be run into this cabinet, it will be necessary to make holes of the required sizes in its wall in advance.
Then, before assembling the kitchen with your own hands, you can install all subsequent cabinets designed to be installed on the floor. Immediately they should be adjusted in height, and if necessary, it will be possible to saw off or saw through some space on the back wall, for example, under the same pipes. Once you have all the cabinets in place, you can tie them together using 30mm screws. However, most professionals and amateurs prefer to use an intersection screed, thanks to which individual cabinets connected under one table top look like a single unit.
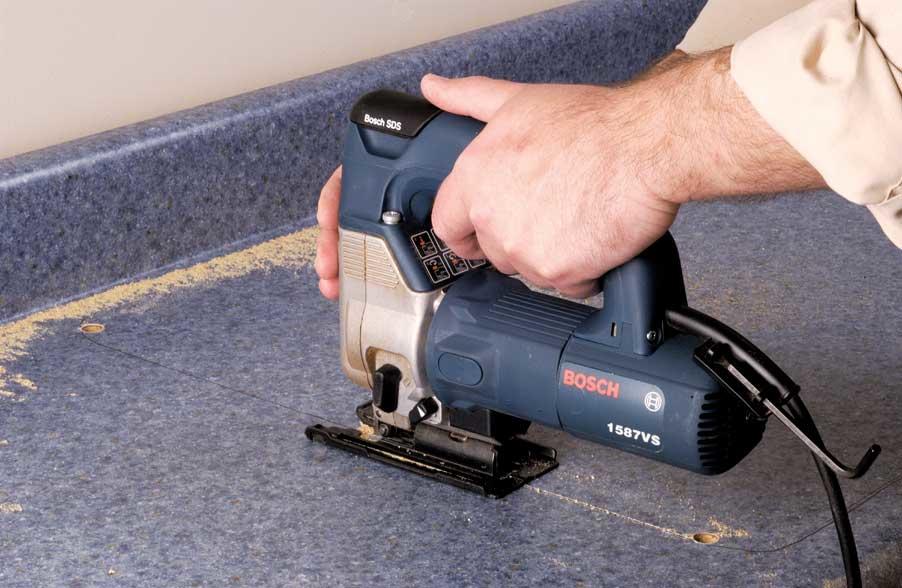
If your new kitchen the built-in sink also comes in, then under it in the countertop you will need to saw through a hole of the shape that corresponds directly to the sink. Before that, you will need to make a markup, according to which you will start cutting. But this work will need to be done very carefully so as not to damage the countertop. For cutting, it is most convenient to use an electric jigsaw, with which you can control the evenness of the arc or cut corners. When the hole is ready, you can safely insert the sink into it. If you are sure of the correctness, then mount the sink on double sided tape, having previously treated the joints with a sealant.
In the same way, the process of installing the built-in stove should proceed. However, experts advise doing this as late as possible so as not to harm the device. Some prefer to purchase an ordinary sink and stove, which will only need to be screwed from below to the floor.
How to fix the tabletop?
When assembling the kitchen with your own hands, you will have to cut the countertop to the size of the existing kitchen frame and add 1-2 mm along the edges. Some owners tend to mount the countertop directly to the wall, but there is nothing fundamental in this, since you can easily hide the gap remaining at the wall with the help of a plinth. Using a jigsaw, cut the material to the desired size. When mounting corner kitchens, it would be rational to use a special metal bracket that will close the gap between 2 tables connected in the corner. It is screwed into the end of the connecting surfaces. The edges of the tabletop, in order to give them a finished look of the table, should be closed either with a metal corner, if we are talking about proximity hobs, or a simple furniture edging. It is glued to a flat saw cut surface cleaned of dust and moisture using a mounting hair dryer. To prevent moisture from entering the gaps, experts recommend treating all joints and end sections. silicone sealant. This approach to business will extend the life of your new kitchen.
The tabletop is fixed from below, here you will just understand why we did not hang the doors on the cabinets right away. You can fix it with a regular screwdriver or a screwdriver with self-tapping screws.
Installation of wall cabinets and doors on them
You will need to retreat from the countertop at least 60 cm; should make a mark - a horizontal line. Measure the distance from the bottom surface of the wall cabinet to the fastener and lay it on the wall, up from the horizontal line. At the level of the newly obtained point, drill holes into which you need to insert the dowels. Screws will be driven into them - holders of wall cabinets. You need to start hanging them from the corner if the kitchen has a P-or L-shape, or from the edge if it is linear.
After all the boxes have taken their places, you can attach doors to them. To do this, use self-tapping screws that fasten round loops on the inside of the facade. Then close the door and check its final state.
Usually companies that make kitchen units offer assembly for a set fee. The price is a percentage of the cost of the product (usually it costs from 6 to 10%). Professionals quickly cope with their task, assembly does not take much time. But if you wish, you can do everything yourself. Many do not know how to assemble a kitchen set, and they think that this is a rather complicated and troublesome process. But it can be dealt with if you follow the appropriate instructions. The main task during installation is to assemble a complete set from different elements that will fit into the prepared room.
Assembling a kitchen set on your own is within the power of everyone
If you decide to install a kitchen set with your own hands, ask the seller if the kitchen comes with accompanying documentation (assembly instructions). Unfortunately, manufacturers do not always apply detailed descriptions assembling and installing each cabinet, so you have to spend time figuring out how to assemble a kitchen set with your own hands.
How to assemble a kitchen set: preparatory work
Before hanging kitchen cabinets, you need to make preparatory work. The walls on which the cabinets will be attached must be perfectly flat, and the corners must be 90 degrees. Before installing the kitchen unit, you must complete all electric installation work, incl. installation of sockets and outlets for connecting overhead lights, hoods, etc. The wall under the cabinets should be wallpapered or painted, as after installing the cabinets, it is rather problematic to glue wallpaper over them.
Installing a kitchen set with your own hands requires care and strict adherence to the instructions
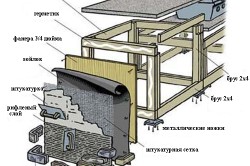
Before you start working with hanging kitchen cabinets, pay attention to the design of their back. If the hardboard (fibreboard) is nailed to the back wall of the cabinet, when hanging by the “hinge-rail” mechanism, the cabinet will not fit snugly against the wall. In order for such a cabinet to hang evenly, you need to achieve a slight indent from the wall at the bottom. Therefore, the lower part of the headset should be 1-1.5 cm on the kitchen apron. Installation of wall cabinets of this type should be carried out only on a finished kitchen apron.
If the hardboard is inserted into the grooves and deepens into the cabinet, the set can be hung either close to the apron or overlapped with it. When installing the cabinet, use a level to check how evenly the kitchen apron is laid. If there is a deviation, it is better to hang the cabinets overlapping on the apron. This will help hide defects. In cases where the kitchen apron is still missing, you need to hang the cabinets, aligning them horizontal position, and then install the apron. This sequence allows you to tightly dock the apron and kitchen set.
How to assemble the bottom of the kitchen set
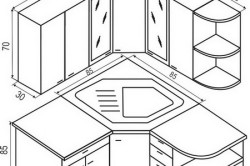
It's over simple work than installing upper cabinets. As a rule, the installation of the lower elements starts from the corner or from the washing pedestal. If you bought a ready-made headset, you just need to arrange its parts in pre-planned places. Keep in mind, if the kitchen has uneven floors, you need to install the cabinets starting from the highest point. After installation and fastening, check the horizontal by pulling the nylon thread along the upper corner. The figure shows the assembly of the kitchen cabinet. Your work is much easier if you bring home ready-made cabinets.
If the cabinets are disassembled, it is better to start the assembly by sorting all the parts, and then select those that are useful in the first place. For example, you decide to assemble a cabinet. To do this, you will need the following parts: bottom - 1 pc., Back wall - 1 pc., Racks - 2 pcs., Side wall - 2 pcs.
Holes in the parts are drilled when the walls are fitted to each other and neatly fixed. Each detail is attached in stages. But it can be assembled in another way, when all mounting holes are marked and drilled in advance, and only then they are assembled. This method requires special precision so that all the holes on the mating parts match and do not move.
The first step is to collect the boxes. Most often they come with a set of roller guides that need to be attached to the sides. After that, proceed to the assembly of the main box. Make markings for holes for fasteners. Usually in cabinets it is 7 cm from the edge, and in cabinets 5 cm. Then mark the holes for the shelf supports and install them. Now you can connect the bottom and two racks, and then screw the upper ribs to which the tabletop will be attached. At this stage, it is recommended to measure the diagonals of the box. They must be equal.
We proceed to the installation of the rear wall. Its size should be slightly smaller than the size of the box. Graft the fiberboard wall to the long side of the box, then check the diagonals again. If necessary, adjust the position of the box and fix the fiberboard wall with a few nails. Now drive nails around the entire perimeter at a distance of about 10 cm. For a stronger fixation, you can use screws. If the cabinet is equipped with legs, turn the box over and install them. The final stage of assembly is the installation of drawers. Your cabinet is ready. The rest of the kitchen set is assembled in the same way.
No need to collect everything at once: cabinets, cabinets, kitchen cabinets, etc., as this will clutter up the kitchen. The assembly must take place strictly in parts. For corner kitchen furniture is assembled first, which is located at one wall, then at the other.
The table top is placed on top. If it consists of several parts, use special connections.
In this sequence, cabinets of kitchen sets are assembled
Installation of wall cabinets
When hanging cabinets, you need to correctly distribute their height. This First stage installation, which determines how comfortable the headset will be in operation. But not only convenience needs to determine the height. Kitchen cabinets are always at eye level, so you need to look at how harmonious their arrangement will be.
The height of the kitchen set is determined by the parameters assumed by users and the height of the hanging elements. Usually cabinets are hung at a distance of 55-60 cm relative to the countertop. This height allows comfortable use of various household appliances, which are usually placed on the countertop: a kettle, microwave oven, food processor etc. The minimum height at which cabinets should be above the countertop, established by GOST, is 45 cm. This value is suitable for small kitchens or tall kitchen cabinets.
Some upper cabinets will require additional holes to be drilled, which should be considered in advance.
Types of wall cabinet fixings
Installation of a kitchen set is carried out using fittings, which are usually included in the package. In order to secure upper cabinets it is recommended to use a special mechanism - a mounting rail (bar). This part is a hinge with a hook, which is fixed on the inner side wall of the cabinet. Installation is carried out in such a way that the hinge with a hook comes out slightly from behind the rear wall of the headset.
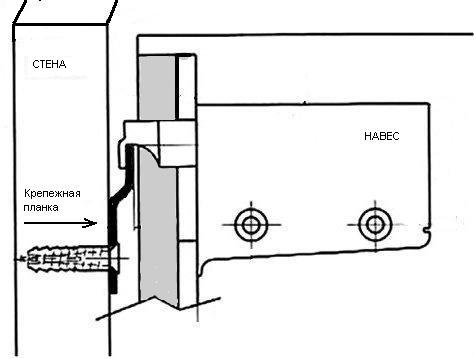
The use of a mounting plate allows you to achieve a tight and reliable fastening of the cabinet to the wall.
A mounting plate is attached to the wall on which the cabinet will be hung, thanks to which it is possible to hook the hinge hook. This type of fastening has a lot of advantages, since one person can assemble a kitchen set. If the installation of wall cabinets is carried out on ordinary hinges, two masters have to be involved: one holds the cabinet, and the second carries out the marking. The "hitch-bar" mechanism allows you to increase the accuracy and speed of work, because. there is no need to constantly hold the cabinet.
The hinge has adjusting screws that allow you to adjust the position kitchen cabinet in two directions: forward-backward and up-down. Thus, the mechanism allows you to align the cabinets, which is very difficult on ordinary hinges (especially in kitchens with uneven walls).
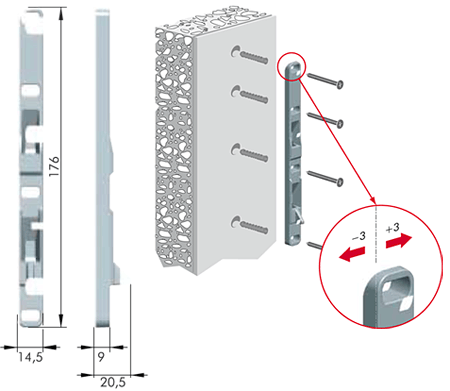
Adjustment screws on the mounting plate make it possible to adjust the position of the kitchen cabinet
Due to the use of the "hinge-bar" fastening, the reliability of the structure is significantly increased. The mounting plate has fracture notches that allow you to adjust its length. If load bearing capacity the walls are large - there is an opportunity to save money by breaking the bar into pieces 10 cm long and fixing them at the locations of the hinges. One piece of the bar is attached with 3 screws. If the wall does not hold fasteners well and “crumbles”, it is recommended not to break the bar, but to completely fix it to all holes. Thus, the cabinets will be mounted on more screws, and the load will be distributed evenly.
If you know how to assemble a kitchen set, you will need only 2-3 hours to work, but it all depends on the number of elements of the set and your building skills. The dismantling of cabinets with such fastening is also carried out easily and quickly. Work can be carried out with a finished kitchen apron. If the cabinets are mounted on ordinary hinges, then for accurate marking it is desirable to fix along the bottom edge hinged headset leveling curb, which is subsequently dismantled. Installing a border usually requires drilling holes, which can be quite problematic with a finished backsplash. Using the "hinge-bar" mechanism, you will not encounter such problems.
Unfortunately, this attachment method has its drawbacks. Firstly, it is a high cost compared to fastening with conventional loops. Secondly, the design of the mechanism is such that the cabinets in the upper part do not fit snugly against the wall, leaving a small gap.
The nuances of assembling a kitchen set with your own hands
In order to install a kitchen set, you will need the following tools: a drill (possibly with a puncher), a long level, a tape measure or a long ruler, a screwdriver, clamps, a hammer. If the mounting plate will be fixed with an anchor, it will also be necessary wrench.
Before assembling the kitchen set, check the presence of fasteners. The screws are usually supplied with the kitchen set. Some manufacturers practice “press” hinges that do not require additional fasteners, which are installed during factory assembly. All screws must be with dowels to secure the hinged rail to the wall. Intersection ties, which are usually included in the kit, are used to connect sections furniture cabinets between themselves.
The set is assembled from a corner or from a washing cabinet, this sequence is considered the most convenient
If the furniture has instructions, carefully study it. The installation of a kitchen set, despite the difference in shapes and models, is done according to the same principle. The first stage - using the adjusting screws on the hinges, set the hook to the middle position. Then fasten the hangers on the inner side walls of the cabinets in such a way that the hook extends a few millimeters beyond the rear wall of the wall cabinet, which will allow it to catch on the mounting rail. Now you need to make markings on the wall for holes to secure the mounted tire. If the height of the hinged headset is determined by the height of the refrigerator or kitchen cabinets, install them first. If the hinge-and-rail mechanism is used as fastening, determine how the cabinets will be installed in relation to kitchen apron: butt or overlap.
The hanging rail should be lower than the top edge of the cabinet. To measure this distance, you need to attach a hinged rail to the back wall of the cabinet as if it were hung on it. Using a level, draw a straight line on the wall that marks the top of the line and the top of the cabinets. It is best to draw from a corner cabinet, while it is not recommended to measure the distance from the ceiling or from the floor, because. there is a possibility that they may not be equal. But, if you are sure that the ceiling or floor line runs strictly horizontally, without the slightest defect, after marking it is better to check the mark made again to avoid inaccuracies. Now you need to make marks for drilling holes by attaching the top edge of the tire to the drawn line.
Drive suitable dowels into the holes made. Fasten the mounting rail with fasteners. After that, you can start hanging the cabinets on the bar. Using the adjusting screws on the hinges, align the position of the cabinets with each other, check the result with a level. Then it is necessary to fix the cabinets in pairs with the help of clamps, starting from the corner. In order not to damage the cabinets, insert a small wooden wedge between the cabinet and the clamp.

Temporary fixation with clamps is necessary in order for all parts of the headset to properly fall into place
Now drill through the connected cabinets for the intersection screed. If the material of the kitchen set is chipboard (laminated chipboard), chipping may occur during drilling. In order to avoid this problem, firmly press a wooden block to the exit point or drill with two drills. The first hole is made thin drill, and then expands on each side with others to desired diameter. Fasten the cabinets together using the tie-down screed. The final stage is hanging the doors using the adjusting screws on the hinges. Your kitchen set is assembled.
The desire to save money on buying some expensive item is quite reasonable and justified, especially since this can be done when ordering a kitchen set. Manufacturers offer the services of their craftsmen, who, to their credit, know their business very well and for a fee (which is hammered into the cost of the headset) they will install it perfectly for you in half a day.
And they don’t charge a very large percentage, but even those seemingly small percentages, when converted into understandable monetary units, make you think about the question of whether it would be cheaper to assemble a kitchen set with your own hands.
And it's cheaper and, by and large, it will turn out no worse for you. Modern fasteners and support elements have the ability to adjust the height and direction of products, and almost every family has a set of tools that is used by craftsmen. Well, as a last resort, you can ask friends or neighbors.
Waiting does not mean idleness
From the moment of ordering to the moment of installation, you have time that is very desirable to spend usefully and prepare your kitchen for meeting new “inhabitants”. The fact is that although the new fixtures have a greater leveling resource than the old hinges, they also have not unlimited possibilities, and leveling the cabinet on the floor when one leg is visually shorter than the other is not very aesthetically pleasing.
Therefore, heeding our advice, we are preparing:
- Perfect as possible flat surfaces walls and floors. Of course, changes in the horizontal level of the floor of a few millimeters will not be so noticeable to the eye, and the legs floor pedestals easily cope with the task of alignment. The base, on the other hand, will perfectly close the product from below, and all questions will disappear by themselves. Otherwise, the floors must be leveled. The same applies to walls - even walls are the key to success.
For your information! Recently, there has been great popularity L-shaped headsets, and when kitchens allow headsets in one line, right next to one of the walls. But at the same time, there is one pitfall that spoiled appearance more than one kitchen set.
This is not a 90 degree angle (the causes of defects are different, but the appearance is always sloppy). If it is not possible to align the angle at approximately 90 degrees, we recommend that you do not corner structures headset, or plan it elsewhere. You have at least three corners that you can snap to.
- The walls must be fully prepared: either the wallpaper is pasted, or the walls are painted, or tile already hanging. Hanging cabinets are the final stage of kitchen work, and not an intermediate one.
- Wiring condition. This subclause assumes that all electrical wiring work must be completed before installation work can begin. If the hood has not yet been installed, then the socket for it is already installed, as well as for another household appliances.
After the completion of the entire cycle of installation work, dismantling for pulling electric wire will be very troublesome and problematic.
- Plumbing condition. The installation of a modern kitchen set involves the construction monolithic construction from cabinets and cabinets, interconnected by special intersectional screeds, under one tabletop.
That's why everything plumbing work will be fraught with difficulties associated with limited space access to equipment. In this case, it is recommended to replace or install taps on pipes with hot and cold water, inspect the drain pipes and, if necessary, replace them.
So, down to business:
- Levels, meters and markers.
Exhibiting the first
So, down to business:
- We assemble a puncher for brick and concrete walls, because conventional drill, and even more so a screwdriver will be powerless here.
- Screwdriver with nozzles - it is suitable for drilling holes in the walls of wooden log cabins and adobe houses, as well as for tightening self-tapping screws and drilling holes in the MDF body of the headset. And in case of an unexpected battery failure, a curly screwdriver and a hammer.
- Levels, meters and markers.
- An electric jigsaw will not be superfluous at all when preparing a hole in the countertop for a sink. And if you don't have one, you can rent one.
- Clamps are devices for temporary tight fastening of products to each other (like a vice), which may also be absent on the farm. Nevertheless, if you like to make crafts, then it is better to buy them, and their price is small.
Exhibiting the first
And immediately the question arises of how to properly assemble a kitchen set, there are a lot of spare parts, a lot of parts, little experience.
In this case, apply the following sequence of actions:
- The scheme for assembling a kitchen set should always be in front of your eyes. The explanation is very simple, you check each step according to the instructions;
- If your floors are fairly even, then the choice of the element from which you start the assembly does not matter in principle. Otherwise, determine the highest point of your kitchen, the type of cabinet that should be there and start installation from there;
- Select all the components of the first-born pedestal indicated in the diagram, as well as all the connectors in the indicated quantities and following the indicated order, assemble the pedestal box;
- Install the cabinet box in its stationary place, while there should be no loose and skewed parts, and the correct assembly of the structure can be determined by measuring the distances along the diagonal of the front and rear planes;
- Align the cabinet with a level in a stationary place, and only after that you can insert partitions and other movable internal elements;
- In the same way, we install all the cabinets on the first floor, aligning them in the same plane with a level, to hoist the countertop;
Note! It is more convenient to make a hole in the countertop for the sink when the countertop is on the cabinets. You will immediately be able to imagine the appearance of the countertop and sink and correct this position already in place.
- And after all this, hang facades.
Second went
P" width="640" allowfullscreen="" frameborder="0">
Installing a kitchen set with your own hands will not only significantly reduce the cost of re-equipping the kitchen, but will also provide an opportunity to ensure the quality of work we need. That is why, when purchasing a kitchen, many of us refuse the services of master assemblers and prefer to do all the work ourselves.
In our article, we will describe in detail all the nuances of assembling the main elements of the headset, and tell you how to install it correctly.
Preparatory stage
Before you install a kitchen set, you need to carefully prepare and stock up on all necessary tools and materials:
- First, we check the complete set of the headset so that at the time of installation we do not accidentally find a shortage of any part or fastener. If something is missing, you need to either buy this element, or contact the company where we purchased the furniture.
- Next, prepare the entire tool that we will use when assembling and installing the headset. Be sure to check the performance of the power tool, and if we use cordless screwdrivers or a screwdriver, then make sure that the batteries are fully charged.
- We check the performance of the sockets to which we will connect the power tool.
- We clear the place for assembly from construction debris, take out of the kitchen all items that can be damaged.
Advice! There is a risk of damage when assembling furniture floor covering, therefore, it should be covered with thick polyethylene, tarpaulin or non-woven material.
You should also prepare all communications necessary to connect to the headset. First of all, these are water supply pipes that will be hidden under the sink, as well as - ventilation tube for connection to the outlet.
When everything is ready, you can unpack the headset and proceed to assemble and install it.
Furniture assembly
Assembling kitchen cabinets
- We hang upper cabinets.
Furniture assembly
Assembling kitchen cabinets
Installation of kitchen sets is carried out in the following sequence:
- First, we collect all the details of the headset.
- Then - we put markings on the walls for installation hinged modules.
- We hang the upper cabinets.
- We collect the lower part, connecting the cabinets with the table top.
It is in this order that our instructions will describe all these operations.
We start the assembly from the bottom pedestals:
- First, using the euro screws included in the kit, we connect the bottom with the side walls.
- We install the upper slats, on which the countertop will then lie. We check the diagonals of the cabinet with a tape measure. If the length of the diagonals differs by no more than 1.5-3 mm, proceed to the next operation.
- We fasten the back wall of a fairly thin fiberboard with small nails or construction stapler. To ensure the reliability of fastening, the step between the brackets should be no more than 8-10 mm.
- We install legs on the lower part of the cabinet, fixing them with self-tapping screws.
- We install hinges in the previously made nests and fix them with self-tapping screws, after which we fasten the lower facades to the hinges.
- By setting the cabinet in vertical position, align the doors with the adjusting screws on the hinges.
The final stage assembly - installation of handles.
Assembling drawers
Assembling drawers
The technology for assembling drawers is somewhat different:
- First on side walls we apply markings for the installation of metal guides.
- According to the markup, we strengthen the guides themselves, after which we connect the side walls to the bottom and upper slats.
- We assemble retractable elements by installing mechanisms on their side surfaces.
Note! Weakness such boxes - the bottom. It must be fastened with a construction stapler, hammering in staples in increments of 5 - 8 mm.
- We install handles on the front of the drawer.
It is better to assemble the cabinet body and sliding elements not immediately, but only after installing the entire headset. This will greatly facilitate all manipulations for you.
Wall cabinet
This element is the easiest to assemble:
- First, we assemble the “cabinet box”, connecting the bottom, upper part and side walls with euro screws.
- Then we attach the back wall to the nails or staples.
- When the base of the cabinet is assembled, we install hinges in the nests and fix them with self-tapping screws. At this stage, it is better not to hang the doors, as they will complicate the installation of cabinets on the wall.
- The final stage of the assembly is the fastening of the suspensions. When we have dealt with this, we can proceed with the installation of our furniture.
Note! The assembly procedure of all parts is clearly shown in the video, in addition, the sequence of all operations should be indicated in the instructions that come with the headset.
We install furniture
Installation of mounted modules
We start assembling furniture with the installation of its upper part, since the assembled lower module with installed worktop may interfere with the installation of hinged elements.
To begin with, we apply markings on the wall for mounting wall cabinets:
- We measure the height of the countertop and add from 50 to 60 cm to the resulting figure, depending on our height. This will be the height of the lower edge of the hinged modules.
- From the line thus obtained, we set aside the distance to the attachment point of the wall cabinet and draw another line. It is on it that we will fix the fasteners.
Advice! If included corner cupboard- start assembling the upper segment from it, and only after it is leveled, proceed with the installation of all other parts.
After marking, we proceed to install the fasteners:
- If we hang the cabinets on loop fasteners, then we drill holes in the wall with a diameter of 8 mm, into which we hammer plastic dowels.
- In the dowels we twist the locking screws with hooks at the ends, after which we hang the cabinets.
- Alternative way is hanging the modules on a special metal rail. To do this, fasteners of a special shape are attached to the cabinet itself, which cling to the wall-mounted metallic profile(see photo).
- Mounting on a tire is considered more reliable, so if possible, use this particular method, especially since the price of the tire itself and the mounts is low.
When the installation of the modules is completed, we hang the facades and align them with adjusting screws.
Mounting the bottom
The floor part is assembled a little easier:
- At the first stage, using an electric jigsaw or a hacksaw with a thin blade, we saw through rear walls pedestals openings for the passage of communications. We treat the edges of the cuts with a silicone-based sealant, protecting the furniture from getting wet and deforming.
- We install the cabinet in the place allotted to it, set it according to the level, after which we connect furniture ties with adjacent cabinets.
When all the cabinets are in place, you need to install the countertop:
- If necessary, we cut the countertop panel to the size of our kitchen, after which we install a protective end cap.
Note! When installing a countertop, there must be a gap of at least 5 mm between it and the kitchen wall to prevent deformation.
- We attach the countertop to the cabinets, and on its lower surface we mark the installation site of the sink.
- Having removed the countertop and laid it on a table or workbench, we make a “genzdo” for washing. The easiest way to do this is to drill several holes with a drill and connect them with a jigsaw.
- We install and fix the sink on the countertop, treating the junction with silicone sealant.
This completes the assembly of all furniture. You can connect the sink to the water supply and sewerage, install household appliances and start using the kitchen in normal mode.
If you carefully study all the above recommendations, then you should not have any questions about how to properly install a kitchen set. And this means that you will cope with this work without turning to the masters for help - and thereby provide yourself with not only a legitimate reason for pride, but also significant savings!
Buying a kitchen set is a responsible and joyful business. A special anticipation is felt after bringing it home - any hostess can imagine what kind of decoration of the kitchen it will become and how convenient it will be to work here now. It remains the case for small - to install a headset. There are two options here - contact the experts or assemble it yourself. Why installing yourself is more profitable and how to do it right.
The advantages of independent work
Of course, if there is no man in the house or working with a tool is not his strong point, then the installation of the kitchen will have to be entrusted to specially trained furniture assemblers, whose services any store selling furniture is happy to provide. But if the hands grow from the right place, then the installation will not deliver special trouble and can be made independently.
Assembling a kitchen yourself entails many advantages:
- there is no need to wait for a specialist - you can assemble the kitchen at any convenient time;
- you can save a lot of money if the assembly is paid;
- assemblers do not install furniture in places immediately as they are assembled and do not connect communications, so it will be necessary to do this work with your own hands;
- assembly independently guarantees the quality of work, which cannot be said about assembly by unauthorized persons, especially when it comes to free assembly.
Important: installation of the kitchen and installation of equipment is ideally carried out on a day off. Then you can have time to install everything in one day.
What tools will be needed
If we assemble the kitchen ourselves, we will need various instrument. As a rule, in the master's house it is a must. For fidelity, we list what is necessary in order to assemble the cabinets on our own by modules:
- screwdriver;
- drill;
- perforator;
- jigsaw;
- hacksaw;
- various drills;
- hex key;
- level;
- pliers;
- roulette.
special instructions
Before you cut the parts and screw them in place, you need to clearly think through everything. All parts of the headset must be disassembled into modules and decomposed into separate parts. Each cabinet has its own fittings. All components of one module must lie together - then the installation and installation of the headset will not cause any special problems and you will not have to waste time looking for the right details and fasteners.
Important: before screwing the parts, you need to make all the markings and work independently exactly on them, without rushing. If the cabinet is assembled incorrectly, then the fasteners will have to be removed and reinstalled. This leads to the fact that the joints become loose and the strength of the cabinets deteriorates.
First steps
Installation of cabinets begins with their assembly. There are subtleties here:
- It is best to fasten the fasteners for the doors first, while the cabinet is not yet assembled. Then it will be easier to hang the doors later;
- Drawer rails for cabinets are also attached before the main assembly and installation takes place - this makes it easier further work on one's own;
- It is necessary to insert dowels into non-through holes - wooden details dowels. They are designed to increase the strength of the frame, in addition, with the help of dowels it is easier to assemble the cabinets evenly on your own.
Next, the assembly and installation of cabinets begins. First of all, the furniture frame is assembled. After that, the back is nailed. Most often it is a sheet of fiberboard. The back of each module is best nailed with small carnations. Inside the cabinets, fasteners for shelves are inserted into the holes.
The next step is screwing the legs. The legs may be different. Expensive headsets have legs that can be adjusted in height. At inexpensive models legs, as a rule, do not have such an option. The role of the height regulator in this case is played by thrust bearings - plastic lining. The last step is to hang the doors. By the way, the hitch can be postponed for a while after the modules are fully installed in place and the countertop is installed - it will be easier this way. By and large, assembling a kitchen with your own hands does not cause trouble if everything is done according to the algorithm.
Important: if there is an assembly instruction, then you must follow it exactly. Then the installation of modules will not cause trouble.
Assembly of boxes
Assembling the boxes should also not be difficult. They are assembled in the same way as the modules themselves and in the same way their frame is tightened with screws for strength.
Lastly, the drawer fronts are attached. Here it is best to use an eccentric screed.
Roller guides are attached at the bottom corners, making sure that the roller is at the back of the guide. The guides are inserted at an angle into each other.
Kitchen installation
After the assembly of the headset is completed, its installation begins.
Mounting the headset is also best done according to a certain algorithm:
- First of all, you need to put a side or corner cabinet. Most often, a sink is located in this module.
- Before installation, it is necessary to cut holes for communications - pipes.
- Then the remaining cabinets are installed, forming working line. Installation goes in parallel with height adjustment. If necessary, cuts are made so that the modules stand up clearly and evenly and do not sway.
- As soon as the modules are installed in a line, it is necessary to tie them together to increase the strength of the structure. For this purpose, an intersectional screed is used. But you can get by simple self-tapping screws 3 cm in size. Screeds are calculated as follows - 4 screeds are needed for floor cabinets, and 2 for wall cabinets.
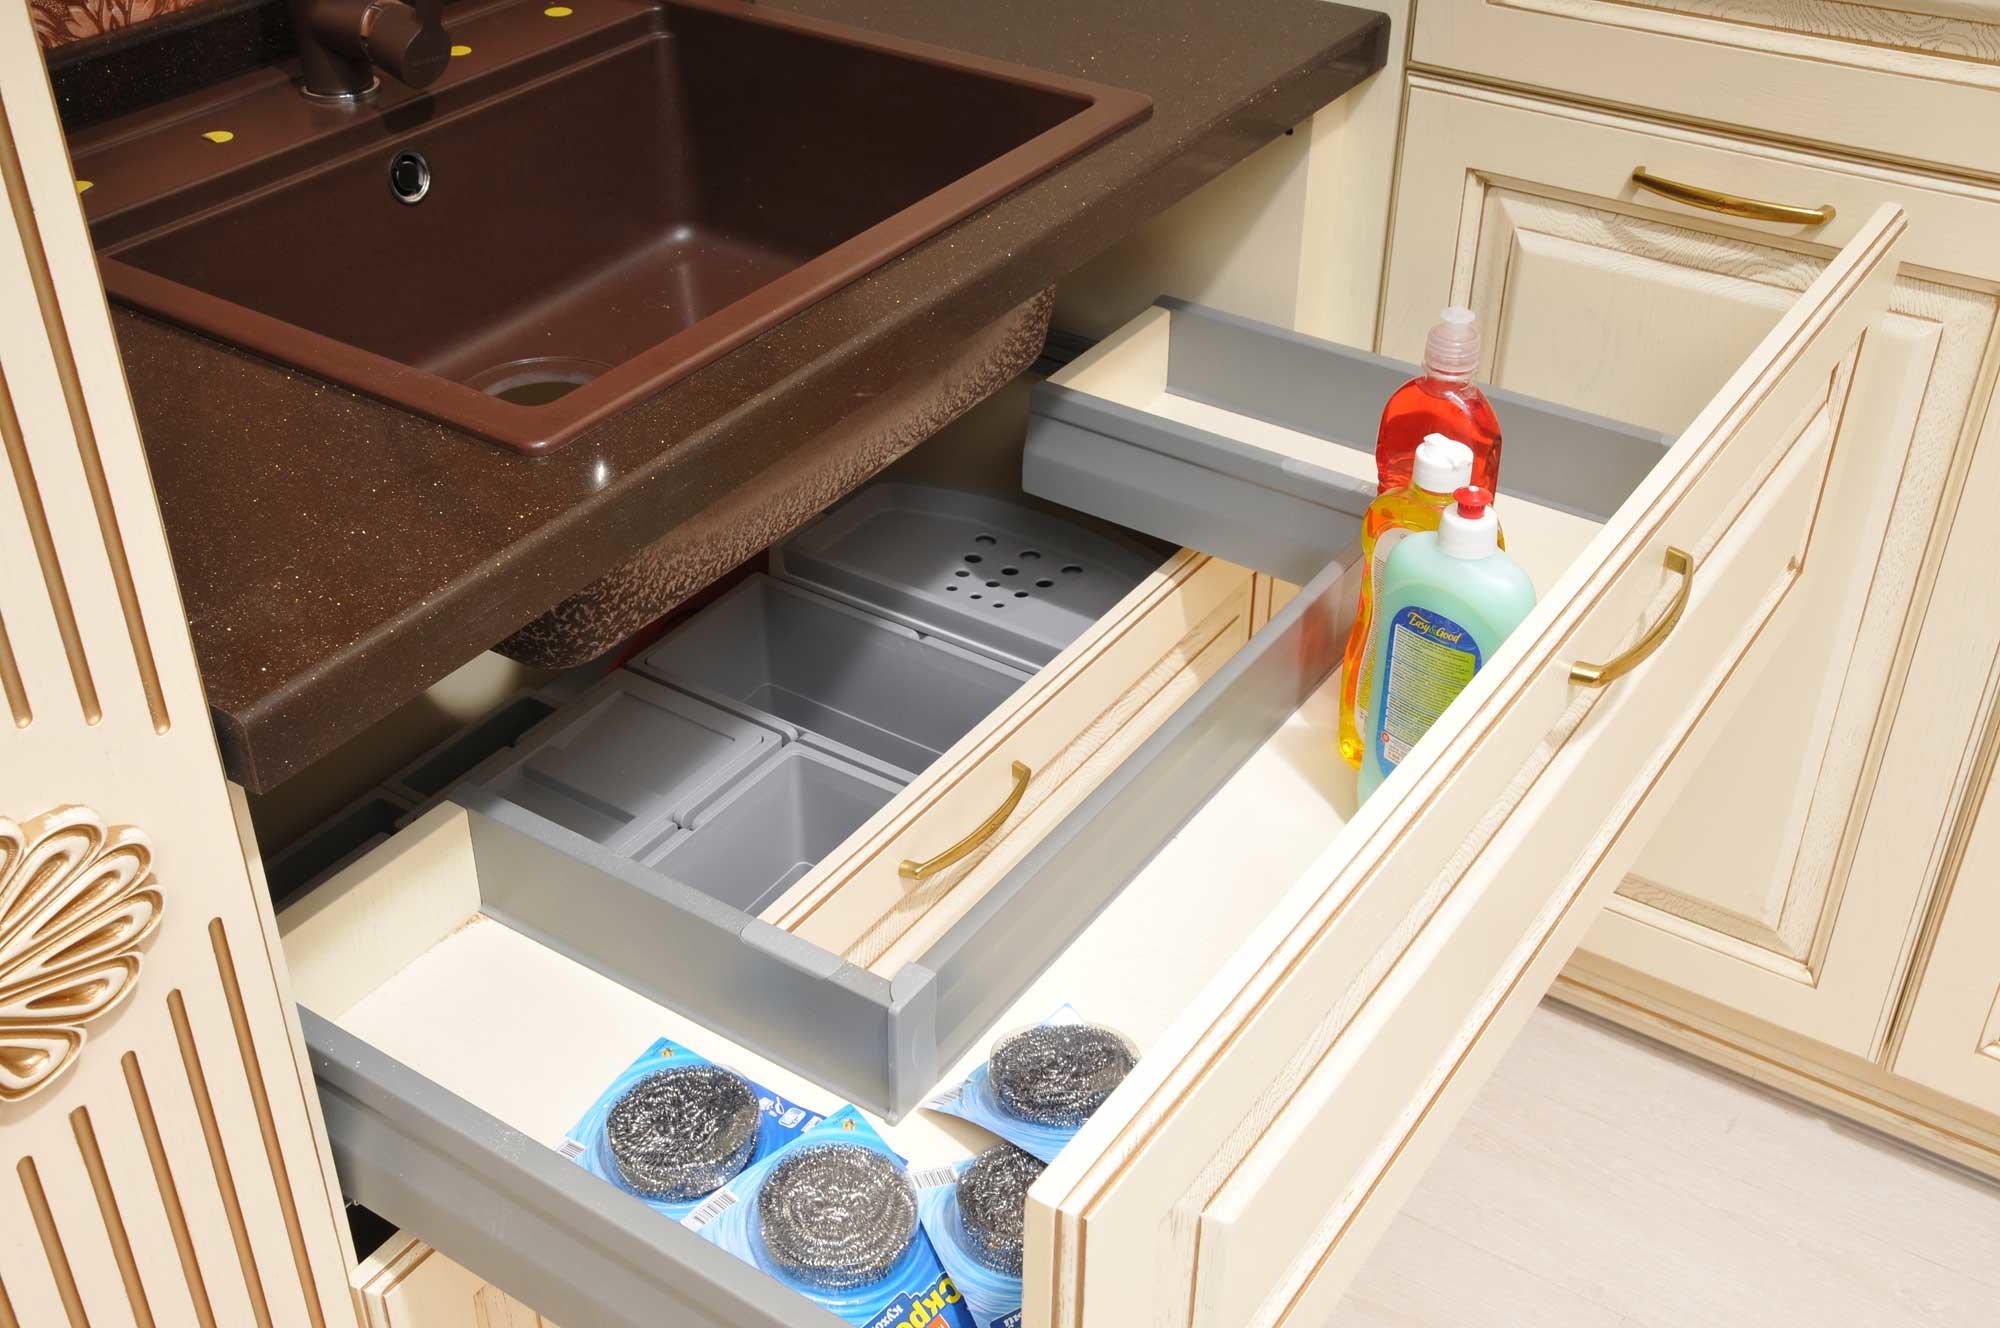
Washing
In the countertop of the module under the sink, a hole is made under it with a jigsaw. After that, a sink is installed in the hole and the joints are coated with a sealant for sealing. Only after this is the installation of the countertop on the module.
Important: it is more convenient to work together. The installation of embedded equipment is carried out according to the same scheme.
Countertop installation
The worktop is marked out based on the dimensions of the length of the line of floor cabinets plus an overlap on both sides. By basting right size the countertop is sawn off with a jigsaw, after which it is installed.
Ideally, the countertop should cover all the cabinets and go all the way to the wall. If this is not the case and each module has its own countertop, then the joints between them are hidden metal bar. This not only gives the design an aesthetic appearance, but also plays practical function- so water and food residues do not get into the joints and there is no deformation of the countertop material.
All edges must be glued with a special furniture edge. In this case, a furniture hair dryer or a simple iron is used.
Wall cabinets
From the level of the tabletop upwards, you need to measure 60 centimeters. This will be the bottom line of the cabinets. Then, from the basting up, set aside the height of the wall cabinets. Mounting points are marked along this line for each cabinet and holes for fasteners are made.
Wall cabinets are hung from the corner. When all cabinets are suspended, they are also pulled together with ties for strength and reliability of the structure.
After all these steps, we get an almost finished kitchen set, standing at the place where it was planned to be placed according to the project. Now it remains only to hang the doors and all work can be considered finished.
Door fixing
- The hinges are fixed with screws in special recesses under them on the doors.
- The doors are put on already attached cruciform plates under them. Fasteners must be well tightened.
- After that, the doors are closed and see how evenly they hang.
Do-it-yourself kitchen assembly (video)
Conclusion
You can assemble your headset without any problems if you follow the instructions. Besides, independent work will save a lot of money and make the quality high.
Attention, only TODAY!