How to make a lamp from a bottle? Manufacturing order. How to make a lamp from a bottle with your own hands Do-it-yourself table lamp from a plastic bottle
Tell me, do you have several in the house, or maybe even one beautiful bottle from any alcoholic drink? We think yes. Like this do-it-yourself bottle lamp it can work out if you try and have some tools and materials on hand:
- bottle;
- shade;
- drill;
- glass drill;
- cartridge and wire.
The lampshade can be bought, but it is also better to make it yourself. We talked about how this can be done in one of the articles, and now look at the table lamp from the bottle with the lampshade that we have chosen.
Here is a glass drill, it will take you 10-15 minutes to make one hole, as the drill just scratches the glass.

Some bottles have seams, it is better not to drill the bottle in this particular place, step back 1-2 cm from the seam. When drilling, you need to have water nearby and periodically lower the drill there and moisten the drilling site. After the drill has passed through the wall of the bottle, several rotations can be made to round and polish the hole somewhat.

The next will be a hole in the cover for installing the cartridge.

We assemble the cartridge, before that we pass the wire through the hole cut in the bottle and connect it, screw it into the cap and into the bottle.

Almost the last step. We try on everything and fasten the cork to the base of the bottle. Having assembled, you can make sure that we did everything right by inserting the light bulb into the cartridge and connecting the plug to the outlet.

And here is the finished lamp from the bottle already shining and delighting its new owners.
These table lamps are easy enough to make, but if you're used to finesse then check out the bedroom table lamps from Camelgroup.
Probably, every person from time to time accumulates glass and plastic bottles. Before throwing them in a landfill, think about whether they can serve you more? craftsmen have long been offering a lot of ideas on how to use such improvised material, it would seem, real rubbish, to good use. Such containers are used to make primitive but effective heaters, air humidifiers, all kinds of decor items and even fences, useful products for garden plot. In this article, you will learn several ways to make a lamp out of a bottle with your own hands.
Hanging bottle chandelier
A chandelier made of glass bottles will always harmoniously fit into your interior. It is also worth noting that hand-made lamps will be exclusive - no one will have exactly the same device as yours.
So, in order to make such a chandelier with your own hands, you will need the following items:
- Three big bottles.
- Gloves, goggles and mask for protection.
- A cutter designed for glass bottles.
- Sandpaper.
- A small light bulb with a long wire and a switch.
- Dark wire.
- Screwdriver.
Now you need to disassemble the procedure, following which you can make a lamp from a bottle with your own hands:
- The first step is to get rid of the labels, then dry the bottle well.
- Wear protective clothing.
- Fix it in the cutter, placing it at the level you want to leave. You need to rotate the bottle carefully so that the cut is as even as possible.
- Pour the bottle first cold water, and then hot, alternating modes until the bottom falls off along the intended line.
- Put the item with the cut bottom on the sandpaper and scroll for about 5 minutes. This is necessary so that the edges become smooth and even.
- Disassemble the prepared light bulb using a screwdriver, then carefully remove the wire.
- Pass the wire through the neck, then reassemble the lamp and check its operation.
- Now, in order for the chandelier to become original, it is necessary to decorate the bottle with dark wire, starting to wind it from the neck. You can wind the design to your liking.
Decorating a lamp from a bottle
You can make a lamp from a bottle with your own hands, which will harmoniously fit into the interior on a balcony or loggia and will not interfere with admiring the night courtyard.
For work, we need the following items:
- Empty glass bottle.
- Propane torch with a thin tip.
- glass cutter
- Protective clothing and goggles.
- Sandpaper.
- Liquid glue designed specifically for decoration.
- Decorative glass stones.
- A light bulb with a long wire and a switch.
- Screwdriver.
- Chopic made of wood.
- Small wire or rope.

Making such a lamp is not so difficult. Below will be described a master class on making a table lamp from a bottle with your own hands:
- Get rid of the labels on the bottle and rinse it well both outside and inside.
- Give her time to dry.
- Carefully draw a line with a glass cutter along which the cut will go. The main thing here is not to rush and make sure that the lines close, otherwise an even cut will not work.
Important! Before this procedure, it is better to practice cutting other glass bottles well, as this activity is not considered easy.
- Take a burner and heat the glass at the cut line, slowly rotating the bottle. After some time, it will split on this very line.
Important! Glass can be cut in another way: after you have drawn a line with a glass cutter, put the bottle in a container of cold water to the intended line, then pour boiling water into the container. Soon the glass will crack evenly.
- Sand the cut line with sandpaper or a sanding block.
- Put a drop of decorative glue on the edge of the bottle, then put a glass stone on it and press it so that it sticks firmly. Next, you need to glue the rest of the pebbles in a circle.
- Leave the item to dry for 24 hours.
- Take a small powerful light bulb, study its structure so as not to harm the structure in the future.
- Disassemble it, then remove the wiring.
- Pass it through the neck, then assemble the structure back.
- Adjust the prepared chopik to the size of the neck so that it does not squeeze the wires. After that, the wooden chopik needs to be painted white.
- Insert it into the neck, pressing down on the wire to secure the light bulb.
- Take the lamp wire and tie it into a loop - this is necessary in order to hang the device where you need it.
Bottle table lamp
In order to make an original table lamp from a bottle with your own hands, you need to arm yourself with the following materials:
- One glass bottle.
- Diamond drill.
- A light bulb with a wire and a switch.
- Patch.
- Shade.
- Protective clothing.
- Towel.
- Screwdriver.
The manufacture of such an accessory is also not difficult. To do this, follow the following algorithm:
- Mark a small hole on the bottle where the wiring will go. A patch must be applied to this place.
- Put the bottle in a towel, use a diamond drill to drill a hole. Take your time - this procedure lasts about half an hour.
- Peel off the patch and other stickers on the bottle, rinse it from all sides.
- Using a screwdriver, carefully disassemble the light bulb.
- Insert wire into drilled hole, stretch it to the neck.
- Also carefully assemble the lamp.
- Attach the lampshade to the neck. The original light bulb is ready.
Master class for children
Many children will be interested in making such a lamp with their own hands. Before you make a lamp for technology for grade 4, you need to prepare the following items:
- Two batteries.
- Miniature light bulb.
- Foil.
- Small glass bottle.
- Sheet of paper.
Having prepared everything you need, you can safely get to work.
This time we will have Master Class for manufacturing plastic bottle lamps. Even from two plastic bottles. Everything is done quite simply with your own hands. As a result, we get an interesting, original and, one might say, a designer lamp.
We will need:
- 5 liter plastic bottle
- plastic shampoo bottle
- sealant
- wires
- metal tube
- bulb
- paint on glass
- polymer clay
AT These are the bottles we need.
Cut off about half of the 5 liter bottle.

From above, under the neck with a marker, we make six serifs. Equidistant, of course.

From these serifs we draw lines vertically down.


With we draw an approximately similar pattern on the bottle. Try to keep it symmetrical.

Below, where the drawing ends, cut out the plastic along the outline of the drawing.

Now, according to the marked drawing, we apply the sealant with thin lines.

Below, where we just cut off the drawing along its contour, we also do not forget to go through the sealant.

Let the sealant dry. After it is completely dry, cover it with silver or gold paint. We need to achieve a metal effect.

Now it is desirable to fill the cavities with paint on glass. Use more than one or two colors. Use three or more colors. The lamp will look richer and brighter.


Now cut off the neck of the bottle. We needed it for convenient application of sealant and paint. We held a bottle for him.

Now let's start cutting a small bottle.

But first, cut out an oval from plywood or thick cardboard.

We make a hole in the middle of it. And we take two caps from such a small bottle and also make holes in them.

At the bottom of the bottle we make three holes in a line. Solder the lid to the bottom. The middle hole in the bottle and in the cap should match.
We insert a hollow metal tube.

We insert the bottle design into a wooden oval.

We fasten with a nut from below.

To hide the traces of the connection, we cover everything with polymer clay.


We cover everything with golden paint or any paint imitating metal.

Top metal tube screw on the bulb holder. We pass the wires just through the tube.
We now return to the top of the lamp. From above, where the bottle had a neck, we make such a cap.

To top part kept on the bottom without additional fasteners, we make such a structure on a light bulb.

Then this structure is inserted into the cap on top of the lamp. The photo shows the inside of the lamp. Because there is polymer clay, everything will harden, after a while.
OK it's all over Now. plastic bottle lamp ready. Everything as you can see was done by hand.
Making a table lamp with your own hands is easy - the main thing is to show imagination
Table lamps are the easiest lighting fixtures to install. Lightweight, compact, they can easily be placed on the bedside table, and on coffee table, and on the windowsill. Despite the fact that the table lamp does not play in the interior leading role, with its functionality and decorativeness, it gives the room an atmosphere of homeliness and comfort.
- A cut is made in each of the keys.
- Then the key must be bent.
- The key of the bottom row clings to the two keys of the top row.
- Thus, continue to fasten the keys to the lower ring of the base.
The interior design of a children's room for a girl can be decorated interesting lampshade in the form of a pineapple. How to make a shade for such a table lamp? You will need plastic spoons, bright yellow and green acrylic paint, a plastic bottle and a table lamp base.
- The bottom and top should be cut off from the bottle, a wire and a light bulb should be mounted in it, and three vertical cuts should be made from the bottom. Then put the bottle with cuts on the base of the table lamp.
- Now you should prepare the scales for the pineapple. To do this, cut off a long part of each spoon. Paint the cut spoons with yellow paint on both sides and let them dry well. Next, in the blank from a plastic bottle, you need to make small cuts with a thin sharp knife. Insert spoons into these cuts, starting at the bottom and ending at the top narrow base of the bottle.
- From another large plastic bottle, cut out the details for the leaves, paint them green and, after they dry, attach the pineapple tail.
- Lamp "Pineapple" is ready.
Ideas for decorating lampshades from beads
Any skillfully made beadwork looks great. A beaded lampshade will look no less beautiful, which, when the light is on, will shine and sparkle, filling the room with multi-colored highlights. There are a lot of options for its manufacture. For example, a similar lampshade can be created based on any cross-stitch pattern:
A little imagination and a handful of multi-colored beads - and the interior of the room will be decorated with such original lamp:
How to make a table lamp from a bottle?
In order to make a table lamp from a bottle, you need to pick up a container original form, preferably from under a fairly expensive drink with high-quality glass.
First you need to drill a hole for the wires in the bottom of the bottle:
- To do this, make a mark with a marker in the center of the bottom (use a ruler).
- Next, you need a deep bucket of sand.
- Fill the bottle with sand, turn it upside down, sticking the neck into the sand. This will balance the pressure on the glass during the drilling process and reduce the chance of it cracking.
- The bottle must be sunk in the sand with rotating movements so that approximately 5 cm of the bottom remains on the surface.
- Pour a little water on top of the bottom of the bottle and drill through the glass (0.95 cm) on minimum speed hole in the center of the mark. In the process of drilling, it is necessary to hold the drill vertically very evenly, with little or no downward pressure. While water will theoretically keep the glass dust from scattering, it is important to prevent it from entering the eyes or respiratory tract. Therefore, be sure to wear a mask on your face and eyes.
- It is very good if someone will help you, continuously pouring a thin stream of water onto the bottle.
- After the hole is ready, its edges must be processed with sandpaper - this will prevent the wire from being cut during the operation of the lamp.
- The same hole should be made in the cork from the bottle, after clamping it in a vise.
If the selected bottle is not beautiful enough, you can decorate it with nail polish.
- Now you need to take a strong lid from under the spice jar and drill a hole in its center. The edges of the hole should also be sanded.
- Then you need to put the cover on the rod, and add a washer and nut on top to fix the support cover. The bottle is put on top with the base to the lid, neck up. The nut is carefully tightened, securely fixing the structure.
- Next, a hole is drilled on the spice jar and the power cord is passed through it, which is then threaded through the rod and brought up. Care must be taken to ensure that the cord in the rod is not twisted.
- Now the base cup is strung on the cord and the rod from above, the set screw is tightened tightly and the wire is tied into a knot.
- The ends of the wire are stripped and the contacts on the cartridge are released (it is recommended to buy it with a switch). Then you should bend the ends of the wires, pass them through the clamp and tighten the screws on the base.
- The cartridge is inserted into the cup on the bottle so that the wires go into the cup, and the light bulb is screwed in.
- To the finished lamp, you can choose a shade to your taste. You can plant it on a wire base.
Lamp in the technique of "Jute filigree" from a bottle
How to make such a table lamp from a bottle? Her lampshade is assembled on the form, which was used as flower pot, from separate fragments of branches. To eliminate the gaps between them, in the process of work, connect them with various curls and leaves. The base-bottle made of blue glass is decorated with the same elements. In addition, for its decoration, you can use a simple bleached jute, marbles and a glass outline. As a backlight, an LED strip is ideal, since this option will give the product brightness and, in addition, the LED strip is practically safe.
- Jute and marbles can be purchased at specialized stores or ordered online.
- It is necessary to prepare branches from which the lampshade will subsequently be assembled.
- Form a lampshade. The finished hat looks like this:
- Decorate the bottle base.
- The bottom and top of the lampshade look like this:
What materials would you use to decorate the lamp? Write your answer in
To create an original table lamp with your own hands, a variety of glass bottles are used, both from alcohol and from other products. The most important thing is that the shape of the bottle is unusual.
Table lamps not only look beautiful, but are also an environmentally friendly way to reuse"household trash". The lighting fixture very reminiscent.
This handmade table lamp will be a unique gift for a wine collector or brandy connoisseur. In this case, it is recommended to keep the labels on the bottles. And if you use bottles of oil or another “non-alcoholic” product for the lamp, then it will become a real gift for parents (mothers and grandmothers). In general, suitable for any connoisseur of handmade items.
As already mentioned above, you can leave a branded sticker as a decoration, as well as fill the interior of the bottle with multi-colored glass balls in accordance with the color scheme of your interior.
For creating table lamp with your own hands you will need:
1. Beautiful bottle.
2. A set consisting of a cartridge, a switch, a cord and a plug. You can use a ready-made kit, or you can buy everything separately.
3. Diamond crown.
4. A small lampshade, which can also be purchased ready-made or made by yourself.

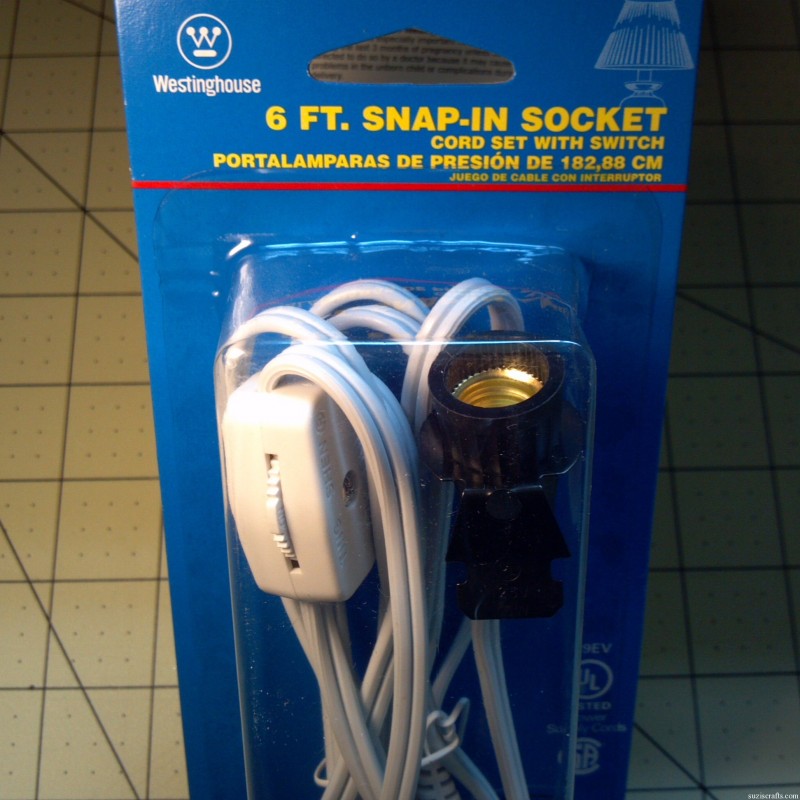
As can be seen from the kit, the costs are the most minimal.
Step 1
The first step is to drill a hole in the bottle, through which the power cord will then be passed. Perhaps this is the most responsible and difficult part of the work.
The place for drilling is selected on the side, which during operation will be located behind the luminaire. Also, the hole for the power cord should be located as close as possible to the base of the luminaire.
Before starting work, it is necessary, by tilting the drill to the side, with the edge of the drill, mark the place of drilling. This is necessary so that the drill does not slip on the bottle and ultimately does not cause harm. After that, you can proceed directly to the drilling process. It should be noted that the drilling site must be constantly watered. This will protect you from glass dust, which will adversely affect your health if it enters the lungs. In addition, the water will not allow the glass to overheat and allow you to complete the difficult work to the end without harming the glass bottle.

Do not forget about protective equipment, such as gloves and goggles. Keep in mind that you perform all drilling work at your own peril and risk. The site site is not responsible for damage caused to your health in the process of manufacturing a table lamp.
The drilling process may take several minutes, depending on the quality and thickness of the glass. Be careful and patient and you will end up with a clean and even cut.

If, however, you do not dare to this work on your own, we recommend contacting glass cutting workshops. There, a master of his craft will cope with this task.
Step 2
Pass the power cord through the hole in the bottle. In this case, it is necessary to install a special rubber ring that will protect the power cord from chafing against the edges of the bottle.
If you are using a separately purchased cord, switch, socket and cartridge, then after passing the power cord, you will mount all the elements together.
In the event that you purchased a ready-made kit, you will have to cut the wire that runs inside the switch in order to be able to pass the cord through the opening of the bottle. After you have passed the cord, solder the wire at the cut and assemble the switch.
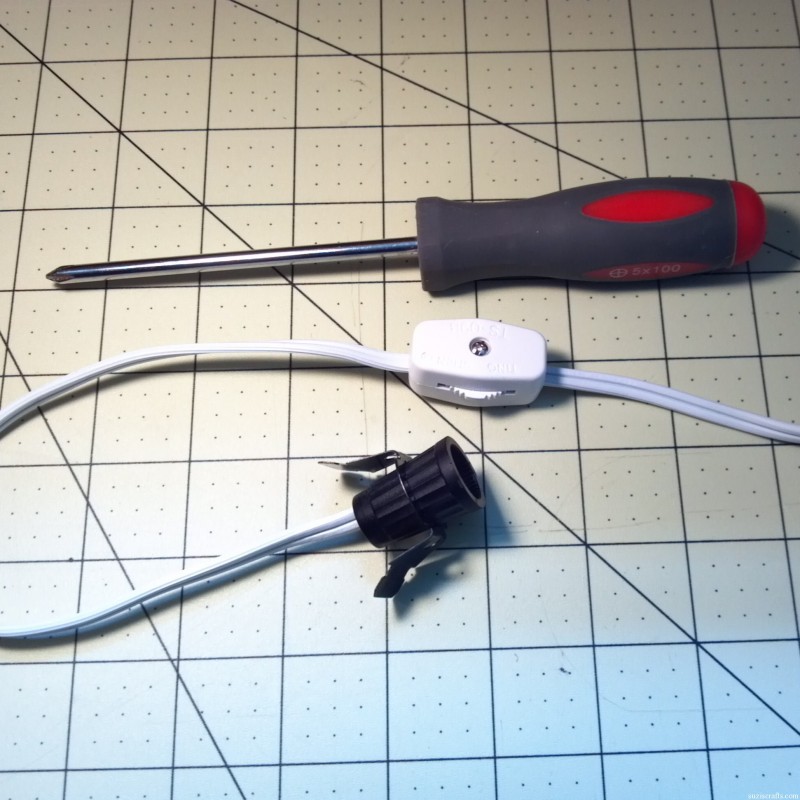


Attach the cartridge to the neck of the bottle and do not connect the plug to the socket until you finish creating the lamp.
Step 3
The next step is decoration. inner space bottles (see description at the beginning of the article), if there is such a desire. Paint the lampshade a color that matches the color of the bottle or the color of your room. Attach the lampshade to the cartridge.
Step 4
Install the light bulb in the socket. A few words about the choice of light bulbs. It is best to use low power or use LED. This requirement proceeds from the fact that to obtain as little heating as possible of the lampshade.

Without special costs you can add a twist to your usual interior of the room and make the design unique. Not everyone has the money to throw away good, but boring things and buy new ones in the house, but you can make changes to the interior of your room if you make a chandelier from plastic bottles with your own hands.
There are quite a few options with which you can realize such an idea and create a unique element of the interior. In addition, if you especially like this kind of activity, you can turn your hobby into your own work, thanks to which you will earn money while doing what you like.
It is not so difficult to create a chandelier from plastic bottles - the main thing is that it will not take you much time, and the results will certainly please you. To do this, you will need some blanks that you will use when creating a unique item for the house.
In addition, this option is a win-win if you make a chandelier out of plastic bottles with your own hands.
Should I make my own chandelier?
In order to properly decorate your home, you should pay attention to lighting. It is very important to choose the right light source and its location, since even a simple lamp or chandelier can ruin the entire interior.
Many people wonder whether it is worth taking on such a thing, or is it easier to go to the store and buy a chandelier? This element decor is a common commodity, and in stores that specialize in the sale of such things, you can choose a chandelier to your taste, as well as for any style of interior.
Those who like to stand out even in small things should ask how to make a chandelier out of plastic bottles. Besides, this cheap and exclusive way to decorate any room in the apartment.
Decor options
One of the decor options for a chandelier that you can make yourself from bottles is colored plastic. The best option - plastic bottles of different or even dark colors: The chandelier will reflect too much light if it is made entirely of clear plastic bottles.
Important! If at hand large quantities no colored plastic bottles, just clear ones, they can be repainted in whatever color you like best.
Undoubtedly, optimal and most suitable form the lamp is a ball.
Blanks for crafts
If you decide to make chandeliers from plastic bottles, first you need to purchase blanks, as well as buy those elements with which you plan to decorate it. Details that may come in handy when creating a chandelier from plastic bottles are wire, satin, plastic, toys, artificial butterflies etc. You will also need wooden slats and wire as fasteners: the whole chandelier will be held on such a frame.
Important! Think over every little thing. You can even draw a sketch and several chandelier design options in order to choose the best one. This will save you time and effort, besides, it will be possible to better understand what exactly you want to see in your room and what will look better in the overall interior.
Petal chandelier

Materials you need to create a chandelier from plastic bottles
In order for you to get to create a chandelier from plastic bottles with your own hands, you will need to prepare:
- clean plastic bottles (cleaned of stickers);
- nail scissors;
- a new light bulb and possibly a socket;
- blowtorch;
- wire (need thin and thick);
- soldering iron;
- ordinary scissors;
- hand protection gloves;
- chandelier frame.
First you need to cut off the top of the bottles, and then cut the resulting ring. So it will be more convenient to cut the leaves out of them. For, to make the edges more beautiful and neat, use not ordinary scissors, but nail scissors: the work is quite painstaking. After that, you need to process the ends of the resulting leaves blowtorch.
Remember! It is very important to use protective gloves in order not to get burned or injured when preparing sheets for a chandelier from plastic bottles.
To create a visual effect of naturalness, it is worth heating with a blowtorch and front side and at the moment when the leaf heats up well, with a knife you can make veins on it.

You can choose the shape of the sheets yourself. The most beautiful look leaves that are similar in shape to maple.
After all the leaves have been prepared, you can proceed to the stage of attaching them to the frame. thin wire should be cut into small pieces. After that, take a leaf and melt its back side. While it's hot, glue the wire to it. After such work done, you should get full-fledged leaves with sticks.
In the next step, you will need a large and long wire so that the leaves can be collected into one branch. All branches can be neatly screwed to a long wire. The resulting chandelier can now be mounted on the ceiling.
Insert the cartridge and screw in the light bulb. Your chandelier is ready!
There is also benefit from unnecessary material
In this way, using unnecessary material, you can easily create an original lamp at home. A DIY chandelier made from plastic bottles will look beautiful and is suitable for decorating any room. It is important to decide what shape you want to give the lamp, as well as choose the right color scheme.
Originality is now in vogue, and therefore you should not limit your imagination. You can, starting from these options, come up with something of your own, more unusual. Thus, not only you will admire the beauty of the chandelier, but also the guests who will come to your house.
Back in 2009, fashion house Maison Martin Margiela presented its interior collection of table lamps with vintage bottle bases. The non-standard design, as well as the conciseness of the form and color (black or white), subsequently gave rise to numerous attempts to repeat the trend. Including - do DIY bottle lamp.
Maison Martin Margiela bottle lamps
If unusual bottles have accumulated in the house, which only take up space, but it’s a pity to throw them away, you can turn them into exclusive interior items. In the same lamps, first of all. Today we will talk about how to make a lamp from a bottle with your own hands. We will also discuss the question of how to avoid cutting and drilling glass at the same time - difficulties that stop many.
DIY bottle table lamp
Of all the interior items that designers now make from bottles, table lamps from a bottle as a base are the most common. And this is understandable - the fashion is set, and the production is simple. Let's try to repeat.

To begin with, we need to wash the bottle well inside. This is especially true of old bottles, in which over the years it is not known what has accumulated. For our purposes, the bottle must shine, and this in this case becomes a whole problem. Especially if the bottle is 10-20 liters and has a narrow neck, into which no brush can fit.
Therefore, several options are useful that will allow you to wash the bottle from the inside:
How to wash bottles
- Pour a quarter liter (250 ml.) of heated table vinegar into the bottle. Add two handfuls of coarse salt and one handful of soda. Vigorously shake the bottle with this mixture for about 10 minutes. If the dirt is not washed off, you can pour hot water to the top and let stand for half a day - a day. Then pour everything out and rinse it repeatedly to wash the bottle to a shine.
- Fine gravel or nails can be added to the same mixture. When shaken, these items will additionally wash the bottle mechanically. Just be careful not to damage the glass. This method is not suitable for containers with thin and fragile glass.
- This option can also be useful as a mechanical cleaning: a metal dishwashing sponge is put inside the bottle. A medium-sized magnet is taken. We drive a magnet along the bottle, and a sponge adhering to it through the glass washes the bottle from the inside. Strongly dried dirt is unlikely to be washed off by this method, but light plaque- completely.
How to clean the label from the bottle? If there is a sticker on the bottle and it is not planned to leave it, the easiest way is to wash the glue from the bottle from the label with white spirit.
Now we dry our future base and proceed to create a lamp.
Preparing the base of a table lamp from a bottle
We need to run an electrical cord through the base. And for this you need to drill a hole in the bottle. If there is no desire to drill, look here. In what cases does it make sense to take up a drill? When an aesthetically wound or straightened wire gives an additional decorative effect to the lamp, since it can be seen through the glass. In this case, you need to think in advance about the quality and color of the power cord. In some cases, ordinary black-and-white ones in a plastic winding are also suitable. But you can take the so-called retro: wrapped in fabric. For example, these are:

So, to pass the electrical wire from the base to the neck of the bottle, you need to drill a hole. This can be done with a drill or a screwdriver with special drill on glass:
 Types of glass drills
We mark the place of the future hole with a marker and start drilling. The most important thing is that the bottle does not crack. Therefore, it is better to drill intermittently so as not to overheat the glass. You can periodically wet the surface with water.
Or make here the design as in the photo below. To do this, fill the bottle with sand (in addition, you can fix the bottle - for this we take a box that is suitable in size, pour sand into it and bury the bottle in it). To the place where the hole is planned, we attach a piece of electrical tape or medical plaster and drill through it - this will reduce the risk of cracking.

We attach the cord and cartridge to the bottle
Here, everything is about the same as in the case of attaching the cartridge to the base of a table lamp from a bottle, and even much simpler, since you do not need to use an adapter tube for a tight connection.
For some types of bottles, especially from light and thin glass, in general, you can do with only one cartridge. You can additionally fix the wire using a cork, as in the photo below:

For greater structural strength, the cork can be lubricated with high-quality glue before inserting.
If the cork of the bottle is screwed on metal, do not rush to remove it. It is enough to drill a hole in it along the diameter of the cord and tie the wire in a knot so that the knot is located under the cork and hides it. Thus, the entire weight of the lamp from the bottle will fall not on the cartridge, but on the assembly.
But the usual simplest forms will also look good, especially for interiors in a minimalist style. If you want something more complicated, you can paint a bottle or a light bulb with glass paints.
Simple lamp - glass bottle lampshade
And finally, let's talk about how to make an easy-to-make lamp from a bottle with your own hands so that nothing needs to be drilled and cut at all. This category of lamps includes all presented in these photos:

The whole principle here comes down to choosing such sizes of a pebble and light bulbs with cartridges so that the latter fit into the bottle without any problems. It can be all kinds of garlands, including solar panels. By the way, the lamps from them will miraculously decorate the garden and, recharged during the day, will light up by themselves in the evening. For the same purpose, you can use pieces of LED strips or small LED bulbs.
Actually, there is only one difficulty in the case of such lamps - how to fix the bulbs in them. This can be done, for example, as follows.
We take a bottle with a wide mouth from under the milk along with metal lid. And with a knife we cut a circle in the lid along the diameter of the upper part of the cartridge (the one into which the light bulb is screwed):
![]()
The next step is to insert our cartridge into the hole and fix it from below with a special mounting ring(sold with a cartridge - by size - E14, E 27, etc.):


We collect the cartridge and screw the light bulb:

Before screwing the lid with a light bulb connected to it, you can first place a decor inside the resulting bottle lamp:

That's all. We enjoy the result:

By the way, about the decor… Very often the labels on the bottles play its role, adding a touch of authenticity and charm. But what if there is no label on the bottle you like, but we like this feature. You can do something like emitting.
We take a piece of a decoupage card with a pattern or text that we like. Cut out right size. And having rolled up the tube, carefully put it inside the bottle. We straighten a piece of paper in it (it is convenient to do this with the help of two long tweezers. We place a light bulb inside.
In this case, you will have to pay attention to ensure that the paper does not come into contact with the light bulb, ideally, purchase a light bulb that does not heat up (led).

Do you want to add charm to your gazebo or balcony to sit in an armchair at night and enjoy the stars, surrounded by intimate twilight? We will help you achieve what you want - for this you need to watch our master class and make a lamp or chandelier from a glass bottle with your own hands.
A glass bottle chandelier will fit perfectly into your home or apartment interior. And most importantly, they will be exclusive!

To make a chandelier from bottles with your own hands, you will need:
- Large bottles - 3 pieces;
- Bottle cutter;
- Sandpaper;
- Screwdriver;
- Dark wire.

- Clean bottles of labels, dry them well.

- Fix the bottle in the cutter, place the glass cutter at the level you want to leave, wear protective clothing. Gently rotate the bottle for a smoother cut line.

- Pour cold water over the bottle then hot. Alternate this for a few minutes, and the bottom of the bottle will fall off along the cut.

- Put the bottle bottom on sandpaper and scroll for a few minutes until the edges are even and smooth.

- Using a screwdriver, carefully disassemble the lamp, carefully remove the wire. We pass the wire through the hole, assemble the lamp and check if it works.

- Now, in order to give the almost finished chandelier originality, we take a dark wire and, starting from the neck, we begin to twist it onto the bottle. You can give the wire any look you want.

Also, the ceiling can be painted and we will get such stylish hanging lamps. To find out how color the bottle - press the button!

Master class number 2: Decorate a lamp from a bottle
A lamp made from a glass bottle will harmoniously fit into cozy balcony without interfering with admiring the sleeping city.

To make a lamp from a bottle, we need:
- Empty glass bottle;
- glass cutter;
- Propane torch with thin tip;
- Plastic safety goggles;
- Sandpaper / sanding block;
- Protective gloves, mask;
- Liquid glue for decoration;
- Glass stones for decoration;
- A small lamp on a long wire with a switch;
- Wooden chop;
- Screwdriver;
- Short wire / rope.
- Let's take a bottle, clean it from the labels. It is best to practice on a couple of others before cutting the desired bottle, as cutting glass is quite difficult.
- Carefully cut with a glass cutter around the circumference of the cut line; take your time - if the lines do not close, you will not be able to cut the bottle evenly.
- Next, we take the burner, best of all - if you fix the bottle on something slowly rotating, but you can just fasten it tightly. Carefully start heating the cut, do not forget to slowly rotate the bottle if you just have it fixed. After a while, the cut line will split.

There is an easier way to cut a bottle: we also draw a line around the circumference with a glass cutter, put the bottle in a container with cold water, so that the cut line is covered. Next, pour a little boiling water into the bottle - the bottle will crack along the cut. If not, repeat with a new bottle.

The cut line turned out to be sharp and uneven - we will sand it with sandpaper. As a precaution, wear goggles, a mask and protective gloves.

Put a drop of glue on the edge of the bottle.

We put a glass stone on a drop of glue and press it for a while so that it is fixed on the bottle.

Try to glue the stones in a circle, under the very neck.

After sealing the entire bottle, leave it to dry for a day.

Let's take a lamp. You can take more powerful lamps to make the light more powerful.

Look at how your lamp is arranged so as not to harm the wiring. We carefully disassemble the lamp, carefully remove the wire.

We pass the cord through the bottle, assemble the lamp back, check if it works. We adjust the wooden chopstick to the size of the neck of the bottle, so that it does not put much pressure on the wire and paint it white.

We insert the chopik into the neck, pressing down the wire with it to secure our lamp.

In order to have something to hang our lamp from a bottle for, we take the lamp cord and fold it, forming a loop. We tightly tie the resulting loop with wire or rope. We glue the glass stones on the neck of the bottle and leave to dry for 2 days.

Here are our bottle lamps that will fit perfectly both in the country house and on the balcony!
Master class number 3: Table lamp from a bottle
How to make an inexpensive table lamp for the living room or bedroom, see the next master class.

We will need the following:
- Glass bottle;
- Patch;
- Diamond drill;
- A small lamp on a long wire with a switch;
- Shade;
- Protective gloves, goggles and mask;
- Unnecessary towel;
- Screwdriver.

The process of making a lamp
- We outline from below bottle hole for wiring. We glue the plaster on this place, put on protective clothing.
- How to drill a hole for the cord: put the bottle in a towel, and start drilling a hole with a diamond drill. Drilling can take up to half an hour.
- Peel off the patch and labels by soaking the bottle in hot water.
- Using a screwdriver, carefully disassemble the lamp, trying not to damage anything.
- We insert the wire into the hole in the bottle, stretch it to the neck. We assemble the lamp back, fix the lampshade on the neck.

Economical original table lamp is ready!

Choose the craft you like, call the kids and give them unforgettable art lessons, when you can create something incredibly interesting from seemingly unremarkable individual items!
Even more Master classes: - see the link!
Bottle Light Ideas
From this master class, you learned only 3 ways to diversify your home unusual lamps from glass bottles, but there are still many different, non-standard and extravagant, chandeliers, lamps and sconces, which you can learn about by looking at a few more ideas. Create for the soul to rejoice and the body to rest.
Do not rush to throw away empty glass and plastic bottles. Many useful things can be made from them. household of things. We invite you to learn how to make a bottle lamp.
simple table lamp
To make you will need:
- a suitable glass bottle for wine, champagne, whiskey or cognac;
- a cartridge with an electric cord, on which there is a socket and a switch;
- finished lampshade;
- bulb;
- rubber stopper stabilizer;
- screwdriver.
The order of the robots for creating a table lamp-lamp:
- Cut the rubber stopper so that it fits easily in the neck of the bottle (picture 1).
- Screw the cartridge to the cork and attach the wires (pictures 2 and 3).
- Make an arc-mount to which the lampshade will be attached and screw in the light bulb (picture 4).
- Insert the plug into the socket and turn on the lamp (picture 5).
DIY bottle lamp is ready!
The principle is the same, but the design is different

Another option for creating a table lamp, but different in execution and design.
Instructions: how to make lamps from bottles (photo below):
- Take glass bottle and do round hole below, closer to the bottom, using a drill on glass.
- Make a hole in the cork and thread an electric cord into it, and screw the thread on one side.
- Screw on the decorative cartridge.
- Place the cord in the bottle and close the neck with a cork.
- Pull the cord out of the hole in the bottle.
- Screw in the light bulb.
The original lamp from the bottle is ready!
Pendant lamps from bottles - disconnect the bottom

Such chandeliers will ideally fit into the interior of the kitchen, living room, bar, country house or cafe.
To make them, first you need to cut off the bottom of the bottle:
- Take a woolen thread, solvent, a bottle, a lighter, sandpaper, a bowl of ice water.
- Cut off a long piece of thread and soak it in solvent.
- Around the bottle, in the place that you want to cut off, knit a few circles of woolen thread.
- Take the bottle so that it is parallel to the ground and light the thread.
- The bottle must be gently scrolled around the axis for several minutes.
- When the fire goes out, instantly dip the bottle into the ice water.
- Remove the bottom carefully.
- Scrape the edges of the bottle with sandpaper.
Making a chandelier

When the bottom is cut off, you can start assembling the lamp:
- Take a cartridge or cork and insert it into the neck.
- Connect the cord.
- Screw in the light bulb.
- Hang a lamp from a bottle from the ceiling with a hook or make a special mount.
Thus, you can make lampshades instead of the usual chandeliers. To do this, simply measure the diameter of the bottle neck and see if it fits the size of the finished cartridge. If not, then cut off the neck in the same way as you got rid of the bottom of the bottle. Hang the finished ceiling in place of the old one.
Possible luminaire design
It is not necessary to make a lamp from regular bottle. It can be used as a basis for implementation interesting ideas and ideas.

Design options:
- Color the bottle acrylic paint. You can draw some kind of picture or make a stained glass window. A lot of lamps made of bottles, identical in shape, but painted in different colors, look very nice.
- You can tightly wrap the bottle with thread or yarn.
- Cover the bottle and engrave.
- If you are making a table lamp, then coffee beans can be poured inside the bottle, colorful salt, condiments, cereals, pasta and so on. Such a lamp will not only fulfill its intended purpose, but will also serve great decor for kitchen.
- You can do a lot more.
- If there are large perfume jars, they will also serve excellent material to create lamps.
- To do hanging lamp, it is not necessary to fix the cartridge or cork in the neck of the bottle. You can completely insert the cord into the container, and place all other parts under the narrow top. Such a bottle will look more like a lampshade. Only then you need to think carefully about fixing the electrical cord.
Lamps from garlands
Do you want a garland to decorate the room? all year round, and not only on New Year? It can be done very simply.

Master class on creating a luminous decor:
- Choose the right glass bottle Christmas garland, sandpaper and a drill.
- Clean the bottle of all labels.
- Fix the bottle and carefully drill a small hole at the bottom. A cord from a garland should pass freely through it. Work carefully, because it is very easy not only to get hurt, but also to break the bottle.
- Use sandpaper to smooth the edges of the hole so you don't get hurt later.
- Push the garland inside the bottle through the drilled hole. It is necessary to place the end where there is no plug and mode switch panel. Try to put the garland so that it twists inside the bottle.
All is ready! If desired, you can somehow decorate the bottle. For example, draw a picture, and attach a ribbon or bow to the neck.
Such a lamp is very safe, because nothing will melt from the garland.
Plastic lampshade

Some will say that such a lamp made of plastic bottles is unsafe and has an unaesthetic appearance. In urban areas, this is true. But on the other hand, it is ideal for a gazebo in the country.
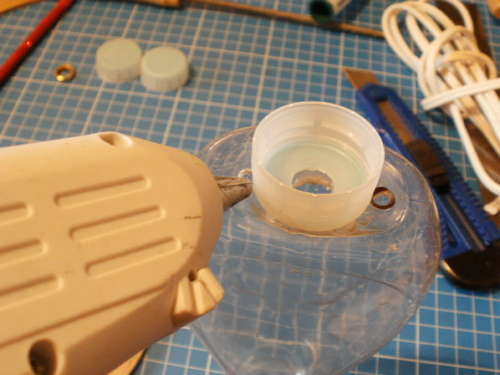
Master class: how to make a lamp from a plastic bottle with your own hands:
- Prepare a cartridge with an electric cord and a switch, a light bulb (you need an LED, a housekeeper or a regular one, but of low power), a five-liter water bottle, a glue gun, pliers, plastic spoons, a screwdriver, a construction knife.
- Using pliers, bite off the entire handle from the spoon so that one oval part remains.
- Cut off the bottom of the eggplant with a utility knife.
- Connect to the network.
- When it's ready, start gluing the spoons. The first row goes from the bottom, and all subsequent rows overlap the previous ones a little.
- Paste, thus, the entire baklaga.
- Glue the spoons together, folding them one into one to make a ring.
- Attach the cartridge and cord to the neck of the bottle.
- Glue a ring of spoons to the neck.
- Screw in the light bulb.
The lamp shade is ready! If desired, it can be painted. In order for the paint to lie evenly, it is better to paint each spoon separately, and then paste over the baklag with them. It is most convenient to use spray paint. So you get less dirty and the layer evenly lies on the surface of the spoons. Plus, it dries faster.