Do-it-yourself bread bins made of fabric. Rustic cloth bread box. Do-it-yourself step-by-step decoupage of a bread box
 Do-it-yourself bread box made of wood: drawings and dimensions.
I wanted to have a wooden bread box for our family.
It’s just that they still couldn’t get it: either there weren’t any on sale, or the money was more needed at the moment when the bread box could be bought for something else.
Then I decided to make a bread box myself - while becoming adept at carpentry and save money at the same time.
Plus, it turned out to be interesting.
How I made my own bread box
Used as material for the breadbasket
- planks of hardwood from crates thrown out of the grocery store.
He carefully sorted out the boxes, and stacked the boards in a pile near the radiator.
After about a week of drying with hand planer more precisely, he adjusted the edges of the boards to each other and, smearing them with PVA glue, rallied three or four pieces into small shields.
He tied the boards in the shields with a cord, and put the shields on a flat table on top of each other and pressed down with a pile of heavy books.
The next day (after work) I planed the surfaces of the shields with a planer and, having marked the contours of all the details of the bread box, sawed them out with an ordinary (children's) manual jigsaw. At that time we lived in a private apartment.
The hostess came and warned that she would be evicted for noise and rubbish. On other evenings, I had to finish the breadbasket secretly and quietly.
Assembling a bread box for glue and nails
I assembled the details of the bread box into a single structure on PVA glue and with the help of small nails. After the glue had dried, all joints and surfaces were carefully “sanded”. The blind-door of the bread box was assembled from lamella-rails with a section of 15 × 10 mm on two pieces of nylon fishing line.
To pass the fishing line in each rail, I drilled two holes. To attach the curtain to the bread box, I also drilled two inclined corresponding holes in its lid - inserting the ends of the pieces of fishing line into them, I tied them tightly.
After that, I attached a handle (with glue and carnations) to the door, and to the bottom, legs, skids. Even at the bottom, inside the bread box, I installed a grate made of the same rails as the curtain. In conclusion, the outside covered the bread box with a colorless varnish.

DIY bread box making ideas
Breadbasket made of bamboo napkins and cardboard
We sew two bamboo napkins.


So, for a bread box with your own hands it will come in handy cardboard box Or just cardboard. It is better to take a large format, but, of course, it is better to build on your own wishes.

The main thing that required size bread fit.

You can process the sides of the cardboard at your discretion - you can apply original drawings and you can make applications.

Simple and good decision- Attach pieces of the fabric you like with a stapler.

This should be done carefully, in the most remote edges, without pulling the fabric. But for the lid you will have to buy a thin bamboo stand for hot dishes - it not only has the ability to acquire the necessary shape, but also keeps the temperature well, which means hot bread will remain so in the breadbasket for a long time.

You can attach the stand for the bread box with your own hands to the glue, to the top of the products. But in order for it to lie down correctly and gradually, falling down, the cardboard must first be cut in a rounded shape at the top.
How to decorate a bread box with your own hands
Walking through supermarkets in the household departments, we often see all kinds of Appliances and functional accessories, such as, for example, cute colored fabric bread bins that we really need - all these are pleasant little things that create comfort in our home. So, how many times I saw this cheerful bread box (and my hands reached for it), as many times I told myself that it’s not worth spending money on such a cute bread box, because I’ll sew it myself in half an hour . But, hands never reached sewing, until finally I had to sit down at sewing machine, because, I promised my friend to give this very bread box.
Of course, there is nothing better for preserving the taste and freshness of bread than a bread box made from natural fabric with your own hands. If you have even a little knowledge of knitting or sewing, you will definitely be able to make such an invaluable accessory. And now we will deal with it.
How to make a bread box from fabric with dimensions of 200 by 200 by 70 mm.

Necessary materials:
1. Cotton fabric 370 by 370 mm, two flaps
2. Cardboard or plastic, 2 mm thick, with dimensions of 180 by 180 mm and 180 by 60 mm.
3. Threads
4. Chalk
5. Ruler
6 .Scotch tape
7. Tailor's pins
8. Sewing machine
9. Iron
10. Ironing board
Preparatory stage:
1) Tape the cardboard parts with adhesive tape on all sides
2) Seam allowances (15 mm.) Iron inside out on all sides of the fabric parts
3) With chalk, draw a line for stitching the bottom of the bread box, a square of 200 by 200 mm.
1) Fold the fabric parts inside out, equalizing the cuts
2) Sew three sides at the 200 by 200 mark, insert the cardboard on the bottom of the bread box and stitch the fourth side
3) With a straight stitch or zigzag, stitch the edges of the bread box with an overlay seam, closing the sections. We insert the cardboard sides in advance, using a one-sided foot, or first stitch the edge, then insert the cardboard (on three sides) and sew the fourth side with cardboard
4) We put marks with chalk at a distance of 60 mm on all sides of each corner
5) We connect the marks so that we get a corner of the bread box and fasten it manually with a stitch stitch.
You can also sew a round bread box according to your size. It's whoever likes it.


Crocheted bread box measuring 200 by 200 by 60 mm.


Materials:
one). 100 g of yarn (it is advisable to choose natural yarn - linen, cotton, folded in several rows)
2). Threads
3). Needle
four). Hook #4 - #5
Stages of work:
1. We knit the side of the bread box in rows consisting of half-columns without a crochet (you can use another dense pattern) 200 by 60 mm.
2. On each side of the product we knit a chain of air loops 60 mm long,
3. We knit the fabric in rows consisting of half-columns without a crochet 320 by 200 mm
4. We knit the last side of the bread box, stepping back from the edge of 60 mm. It turned out a canvas in the form of a cross (See fig.)
5. We form the volume of the corners by folding and stitching the sections.


If desired, you can sew a bread box with open sides.


Here is our work! A self-made bread box will definitely be appreciated by your friends and you will understand that it turns out that you can make a bread box like this in unusual ways and from such environmentally friendly materials.
Sewing master class textile bread box from denim and cotton with a bright print.
Create a cozy warm atmosphere in the kitchen, hand-sewn interior items from natural materials. With the help of our master class, you can sew from denim and cotton with funny lambs.
- a patch of denim dark blue fabric 0.3 m wide 1 m;
- a patch of cotton fabric with a bright print 0.3 m wide 1 m;
- interlining or dublerin 0.3 m;
- synthetic winterizer 0.3 m;
- threads dark blue for denim and light beige for cotton;
- two wooden buttons in the form of hearts;
- decorative patch;
- pins, ruler, scissors.
We sew a bread box:
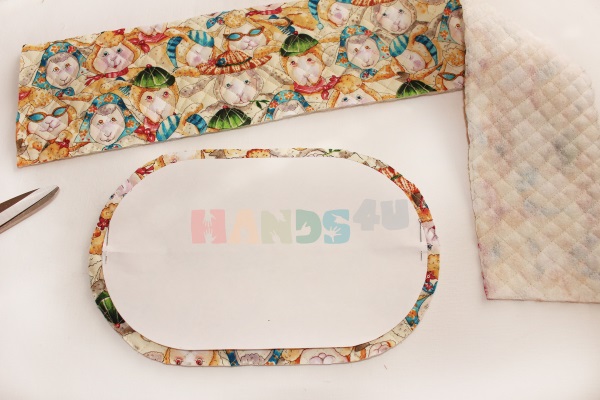
1. Before cutting, natural fabrics are usually washed and then ironed with steam to prevent further shrinkage. Prepare a pattern for the bottom, place it on the denim and cut out the piece with 1 cm allowances. Mark according to the pattern.


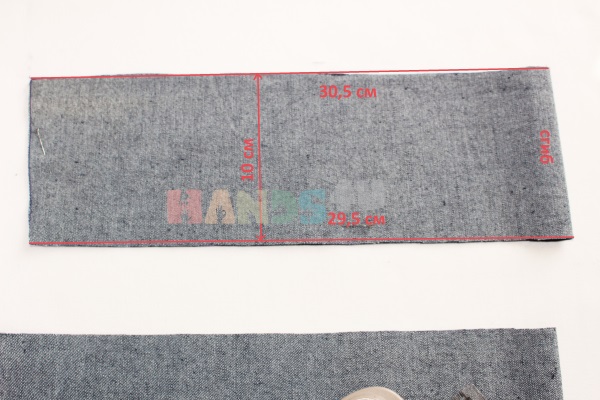
2. Fold the flap in half and cut out a transverse side piece 10 cm wide and 29.5 cm long on one side from the fold, and 30.5 cm on the other.

4. Cut out the side part of cotton and sinpeton with a width of 13.5 cm and a length of 31 cm on one side and 32 cm on the other, as shown in the photo.

5. Glue denim parts with doubler or interlining to give the product additional rigidity. You need to iron with an iron without steam in the “cotton” mode through a thin cotton fabric, paying special attention to the edges of the parts.


8. Stitch the bottom and side piece along its short side. To make it more convenient to control the distribution of fabric on the circles, you need to scribble from the side of the bottom.


11. Sweep cotton and synthetic winterizer parts together to avoid unevenness on the fabric during stitching. In the center of each part at 45 degrees to the shared thread, draw two lines intersecting at right angles. Then, along these lines, lay lines with a stitch length of 3 mm.

12. Set the needle on the sewing machine to the extreme left position and sew parallel lines with an interval of 1 cm. To make the stitch neat, the fabric cannot be pulled or fitted, you need to move from the center to the edges and change the direction of each line. Quilted parts cannot be ironed, since the synthetic winterizer from a hot iron becomes flat.

14. Then sew the side part into a ring and stitch the short side to the bottom. Make notches around the circles.


16. Insert the inside of the cotton bread box into the outer denim. With a blind stitch, sew both parts along the line of the seam of attaching the bottom.


Bread and pastries have long been stored in special wooden containers (boxes). bakery products in the bread box stay fresh longer and do not go stale. A modern, factory-made fixture can be made of wood, plastic, or metal. It corresponds to its purpose, but a hand-made product can become a real decoration of the kitchen interior.
How to make a bread box with your own hands
- sketch a drawing of a household item;
- prepare all the necessary tools;
- choose suitable materials.
A preliminary sketch will allow you to make more precise drawing and imagine what the finished product will look like. 
Materials and tools
The selected material must be environmentally friendly. You can not take toxic plastics and boards painted with non-food paints. For kitchen utensils are best suited:
- plywood;
- birch bark;
- wooden mat;
- bamboo.
Important! For the manufacture of kitchen utensils, only those types of wood that do not have a specific smell are suitable. conifers woods such as spruce and pine are not suitable due to their persistent aroma. Bread quickly absorbs odors.
For fastening individual components and parts you will need:

The doors of bread bins differ in the way they function. They can:
- move apart in different directions;
- open in the usual way;
- go up and fold like horizontal blinds.
Fasteners for doors are selected according to their type.
In addition to the material and fasteners, you need to purchase the right tool. A standard carpentry kit will do.
Forms and types of homemade bread bins
Bread can be stored in bread bins having the shape:
- open deep dish;
- containers with doors;
- boxes with lids.
Breadbaskets can be made from the most unexpected materials. Home craftsmen manage to build these kitchen utensils from:

The most common bread bins in everyday life are made of wood and wicker. There are wicker boxes in almost every home. They differ in shape and size, they are united by a functional purpose.
Some craftsmen create wicker kitchen utensils from plain paper, To do this, the sheets are folded into a tight tube and glued together. Then they are intertwined, creating unusual things. At the final stage of production, the surface of the product is covered with a layer of primer and paint. Paper straws can be dyed to different colors at the very beginning of the manufacture of utensils.
With some woodworking skills, a bread storage container can be hollowed out from a single piece of wood. Clay kitchen dishes can be made by anyone, provided that he has the opportunity to burn the finished molding in a professional oven.
Attention! Things made in the Russian style came into fashion. Birch bark can become a decoration of the kitchen. A stylish and beautiful bread tray is woven quite simply. It is difficult to find and properly prepare birch bark. It must be sufficiently soft at the time of manufacture of the container.
Measurements and drawings
A sketch of the future product is preliminarily made. It must take into account the specifics of the selected material. The drawing is created based on the drawing and the original dimensions.
For such a product, you need to take into account the average amount of bread consumed by the family. In other words, the size of the bread box depends on the amount of bakery products that will be stored in it.
The container must have a depth, height and length. All these parameters should take into account the dimensions of standard bread rolls. In this case, baking should fit freely in the box.
A factory-made bread box with curtain doors can easily fit 3-4 loaves inside.
Drawings for wooden product you can draw immediately on plywood or preliminarily on a sheet of paper. It looks something like this: 
Breadbox on your own: step by step instructions
To make a product according to the given drawing, you need to prepare the following tools and materials:
- small wooden or plywood boards;
- sushi mat;
- jigsaw;
- sandpaper;
- small nails;
- furniture stapler;
- glue for gluing PVA wood;
- door handle.
Work is carried out in the following sequence:
- first of all, a drawing of details is drawn on the surface of the plywood piece;
- all walls and covers are cut with a jigsaw;
- the sides of each plank are carefully sanded;
- the structure is assembled according to the drawing.
In the drawing, the numbers indicate the structural details of the future product:
- two rectangles with units are the bottom of the bread box;
- the third rectangle with the number 1 is the back panel;
- fourth one - top;
- deuces are sidewalls;
- number 3 - front panel.
It is better to round off the upper corners on the side walls, so it will be easier to fix the mat.
The mat in this design works as a door. It is attached with a furniture stapler. The product is ready, it remains to put any suitable rug on the bottom of the bread box. It can be made from food grade plastic or fabric. 
Bread box - a vase can be made of paper and plastic bottle. In this case, a five-liter container is used as a form. Work goes in the following sequence:
- The plastic bottle is cut lengthwise from the neck down. The result should be two equal parts.
- Paper (newspaper) is torn into small pieces.
- The plastic form is coated with vaseline.
- Pieces of paper are glued one after another onto the surface of the mold.
- Each paper layer is abundantly smeared with PVA glue, there should be 5-6 layers in total.
- The glued form is set aside for several days until completely dry.
- After the glue has completely dried and papier mache becomes hard, it can be removed from the base.
- A stand is made in the same way, only a deep plate is taken as the initial form.
The resulting parts of the product are covered with paint. You can decorate the breadbasket in any way possible:
- paint;
- paste over with beads;
- make a mosaic of colored pea halves.
For those who sew and knit, it will be easiest to make a beautiful baking container from patches and threads.
It is easy to make a birch bark braid if you follow the following rules for preparing material:

The type of weaving is chosen according to your own taste. It can be a standard weave of stripes with a rug. This is the most easy way for beginners. It is best to make the details of the product individually, and then connect the entire structure together.
Whatever materials it is made from kitchenware, the main thing is that it be done neatly and tastefully. In this case, the time and effort spent will give the desired result.
Walking through supermarkets in the household departments, we often see all kinds of household appliances and functional accessories for the kitchen, such as, for example, cute colored fabric bread bins that we really need - all these are pleasant little things that create comfort in our home. So, how many times I saw this cheerful bread box (and my hands reached for it), as many times I told myself that it’s not worth spending money on such a cute bread box, because I’ll sew it myself in half an hour . But, my hands never reached sewing, until I finally had to sit down at the sewing machine, because, I promised my friend to give this very bread box.
Of course, there is nothing better for preserving the taste and freshness of bread than a bread box made from natural fabric with your own hands. If you have even a little knowledge of knitting or sewing, you will definitely be able to make such an invaluable accessory. And now we will deal with it.
How to make a bread box from fabric with dimensions of 200 by 200 by 70 mm.

Necessary materials:
1. Cotton fabric 370 by 370 mm, two flaps
2. Cardboard or plastic, 2 mm thick, with dimensions of 180 by 180 mm and 180 by 60 mm.
3. Threads
4. Chalk
5. Ruler
6 .Scotch tape
7. Tailor's pins
8. Sewing machine
9. Iron
10. Ironing board
Preparatory stage:
1) Tape the cardboard parts with adhesive tape on all sides
2) Seam allowances (15 mm.) Iron inside out on all sides of the fabric parts
3) With chalk, draw a line for stitching the bottom of the bread box, a square of 200 by 200 mm.
1) Fold the fabric parts inside out, equalizing the cuts
2) Sew three sides at the 200 by 200 mark, insert the cardboard on the bottom of the bread box and stitch the fourth side
3) With a straight stitch or zigzag, stitch the edges of the bread box with an overlay seam, closing the sections. We insert the cardboard sides in advance, using a one-sided foot, or first stitch the edge, then insert the cardboard (on three sides) and sew the fourth side with cardboard
4) We put marks with chalk at a distance of 60 mm on all sides of each corner
5) We connect the marks so that we get a corner of the bread box and fasten it manually with a stitch stitch.
You can also sew a round bread box according to your size. It's whoever likes it.


Crocheted bread box measuring 200 by 200 by 60 mm.


Materials:
one). 100 g of yarn (it is advisable to choose natural yarn - linen, cotton, folded in several rows)
2). Threads
3). Needle
four). Hook #4 - #5
Stages of work:
1. We knit the side of the bread box in rows consisting of half-columns without a crochet (you can use another dense pattern) 200 by 60 mm.
2. On each side of the product we knit a chain of air loops 60 mm long,
3. We knit the fabric in rows consisting of half-columns without a crochet 320 by 200 mm
4. We knit the last side of the bread box, stepping back from the edge of 60 mm. It turned out a canvas in the form of a cross (See fig.)
5. We form the volume of the corners by folding and stitching the sections.


If desired, you can sew a bread box with open sides.


Here is our work! A self-made bread box will definitely be appreciated by your friends and you will understand that it is possible to make a bread box in such unusual ways and from such environmentally friendly materials.