How to set the correct profile for drywall. Installation of a profile for drywall - we adopt the experience of professional master finishers
The quality of the construction from GKL or GKLV directly depends on how competently it is made drywall profile installation. We will tell you in today's article how to mount a frame made of metal guides and what is required for this.
Drywall profile - do-it-yourself installation
What do we need in order to make a strong and reliable "skeleton" on which drywall sheets will be attached. First, themselves. Since today we will talk about wall structures, we note that they can be erected both from CD profiles with a section of 27x60 mm, and from their more serious "brothers" with a section of 50x50 mm (CW profiles). In addition, for structures on which a significant load is planned in the future, profiles 50x75 and even 50x100 mm (CW profiles) can be used. However, such reinforced profiles are mainly used to create.
If to create a frame are used CD profiles, then UD profiles (27x28 mm) should be used as guides; in the event that you mount the structure on CW racks, then UW profiles (40x50, 40x75 and 40x100 mm, respectively).
In addition to the profiles themselves, you need to stock up on suspensions, “crabs”, a screwdriver, a puncher (if you have a concrete or Brick wall) or a drill. In addition, you need to “arm yourself” with metal screws 50-55 mm long and small self-tapping screws with a press washer (the so-called “bugs”), dowel-nails or anchors for attaching suspensions to the wall, a laser level and a tape measure.
Installing profiles for drywall or how to markup
Before you start working with a drywall profile, you need to draw a markup for the future frame. This stage is one of the most important in the construction of a structure made of drywall sheets, since the slightest distortion in the "skeleton" will significantly complicate the work with GKL or. We will not talk in detail about the markup, since we have already talked about it in an article on installing drywall on walls, we will dwell on only a few nuances. So, first of all, we draw a line on the ceiling, which will indicate the place of attachment of the UD-profile, and with the help of a plumb line we transfer it to the floor, repeating the procedure for all walls in the room.
After that, markup is made for suspensions on which CD profiles will be fixed. They are also made using a plumb line. After all the markup is completed, you need to drill holes for the suspensions and fix them with dowel-nails. They also fasten the guides to the ceiling and floor.
How to install profiles and install drywall
Now it's time to talk about how to install rack profile under drywall. It is attached to the hangers, and also fixed at the junction with the guides with the help of "bugs". The main thing to pay attention to when installing racks is that the angle at the points of their connection with the rails must be strictly 90 °. To achieve this result, the correctness of their installation is checked using the usual level with "eyes". In the event that the profile is installed unevenly, it will not be possible to properly fix the drywall sheet on it and in any case you will have to re-make the frame.
The resulting structure should be as rigid as possible. If, in your opinion, it came out not very strong, you can reinforce it with horizontal jumpers from the 27x60 profile, connecting them to the racks using "crabs".
This completes the installation of the drywall profile, and we proceed to the installation of drywall sheets. For their fastening to the racks, black metal screws are used, which are screwed into the sheet so that their head “drowns” in drywall by no more than 0.5 cm. Sheets must be attached to all racks, the distance between the fasteners should be no more than 20 centimeters. Since the rack profiles are installed at a distance of 0.6 m from each other, and the width of the GKL or GKLV is 1.2 meters, the joints of two adjacent sheets of drywall will be located on them.
It is necessary to fasten the sheets to the rack profiles in such a way that the heads of the screws are located at some distance from the edge of the sheet, otherwise it will not be possible to chamfer it in the future. In addition, the attachment points of self-tapping screws at the edge of adjacent sheets should not be symmetrical, that is, the hardware should be fixed apart.
After the sheets are fixed, you need to check all the twisted screws. If any of them is “drowned” by more than 5 mm, it must be unscrewed and a new one carefully screwed in at a distance of at least a few centimeters from it. Then, a chamfer is removed from the edge of each of the sheets, dust is carefully removed and the drywall is coated with a primer, paying special attention to the seams. When the primer dries, it will be possible to proceed to the caps of the self-tapping screws.
We hope that our article will help you correctly make a frame from metal profiles. However, if you still have any questions about how the installation of drywall profiles is done, the video instruction that supplements the article will help you find answers to them.
Do-it-yourself plasterboard structures are almost always attached to metal carcass. When installing profiles, you need to focus on the markup that is carried out at the very beginning of the repair.
To properly markup, arm yourself with some tools.
For marking you need:
- Marking cord (you can find it at any building materials store);
- Marker (for drawing on any surface);
- Square;
- Special construction roulette;
- Laser level.
First of all, a line is drawn along which the new drywall construction. If at the same time smoothing work is underway uneven walls, find the protruding point of the wall, set a mark along the perpendicular from it.
The distance between the wall and the mark will be equal to the width of the profile, plus another three mm. After that, you select one of the corners, another mark is already deposited in it at a similar distance from the wall. Then you take a tape measure and a chalk line, and lay a line on the floor. At the same time, the reference point is on these two marks.
On the ceiling, the lines are marked in the same way. Lines are applied directly to the wall, against which there will be rack profiles. The distance between these profiles is 60 cm.
This work requires precision, since the subsequent installation of profiles depends on it.
Connecting a profile to each other
Connection types:
- Guide connections at the inner corner. With sharp scissors at one of the profiles, cut off the shelf to a length, it will be equal to the width of the profile with a margin of 20 mm, for ease of entry drywall sheet. The second profile, which forms an angle, you lay and fasten on top of the first.
- Ear profile fastening. Sometimes a profile segment needs to be attached to the base. To do this with your own hands, he needs to remove the shelves. Cut the profile of the desired length with a margin of 50 mm, which will fall "in the ear". After that, shelves are cut on the border line of the allowance to the back. Bend the allowance, shelves, cut them off at a small angle, with access to pre-made cuts.
- Slit connections. Along the profile fold line, make cuts to a depth of 40 mm. If you need to get smooth edge, cut not along the line, but along the shelf. Bend, and then cut off the back of the profile. Then you connect the profiles.
The angle that is obtained during the connection is fixed with self-tapping bugs.
How to bend a profile
Mounting a profile for drywall sometimes suggests that it needs to be bent.
Profile bending methods:
- First way. You cut two side parts of the profile, but its base remains intact. The smaller the radius of the future structure, the more often you need to make cuts.
- Second way. In this case, the base and one side shelf of the profile are incised. This profile is suitable for the production of elements in the form of a wave, oval elements.
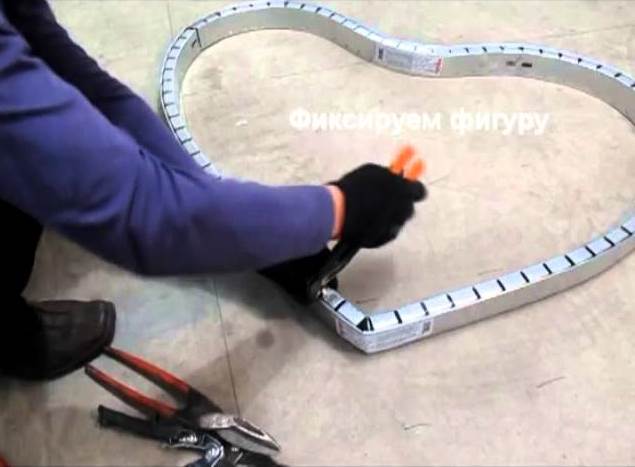
It is often necessary to bend the profile in the manufacture of arches. When doing this with your own hands, be careful not to rush so that the profile bends symmetrically.

Curved profile
Bending the profile is a must if you are making a figured ceiling with your own hands. The more complex the idea, the more difficult the installation of the profile for drywall.
The easiest way to bend a metal profile is by notching. Do not forget that you need to make cuts at equal distances, this work is done with great care so as not to break the profile.
Metal shears - best tool in order to bend the profile correctly.

Profile construction
Whatever design you do, the work is based on a certain algorithm.
Action plan for the construction of the structure:
- Preparation of profiles and sheets of drywall;
- markup;
- Profile cutting;
- Compound;
- Checking the level of all points of the frame.
If communication is carried out in the design, then it is better to mount a corrugated sleeve here, where the wires and pipes will hide.
Mounting without profiles
Usually this means the adhesive method. If for some reason it is not possible to assemble the frame, or if you think that this is extra work, you can fix drywall with glue.
This is done by hand, the work is simple, but this method is good only with flat walls. With visible irregularities, the sheets will be glued to a bumpy surface, and the aesthetics of such a picture is doubtful. Of course, gluing sheets is easier than building a frame.
This installation is carried out in several stages:
- Studying the configuration of the walls;
- Wall preparation;
- Marking places for glue;
- Transferring markings to drywall sheets;
- Drilling mechanical fixation;
- Installation of drywall on glue;
- Adjustment of sheet levels;
- Mechanical fixation.
Putting sheets on glue or still making a frame - in each case it is decided individually, it all depends on the evenness / unevenness of the walls. Adhesive connection, made by hand, can be no less strong.
Profile frames are constructed with the expectation that they can withstand a large load under mirrors, chandeliers, lamps. Therefore, the connections must be strong so that the frame is ready for any load.
Features of installing a profile for drywall with your own hands (video)
Attention, only TODAY!
- Ordinary - the most common option. It is used in civil engineering, for arranging offices and residential buildings.
- Waterproof - unaffected humid air, respectively, is used in the conditions high humidity. Prevents the occurrence of mold or fungus on the surface of the material.
- fire retardant - used on industrial premises, at enterprises with an increased risk of fire.
- Combined - is a universal modification that combines the characteristics of the two previous types.
Profile types for drywall
Mounting this material can be carried out different ways. It is possible to glue sheets to the wall using special mixtures, followed by surface finishing. A more popular way is to install drywall on special frame, in the role of which the metal profile acts.
This technology has several weight advantages. Installing profiles under drywall allows you to hide utility networks and any wall irregularities. Depending on the purpose, the following types of drywall profiles are used:
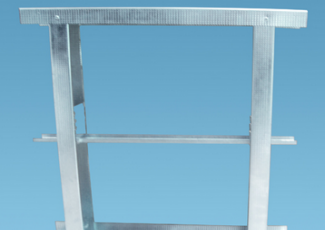
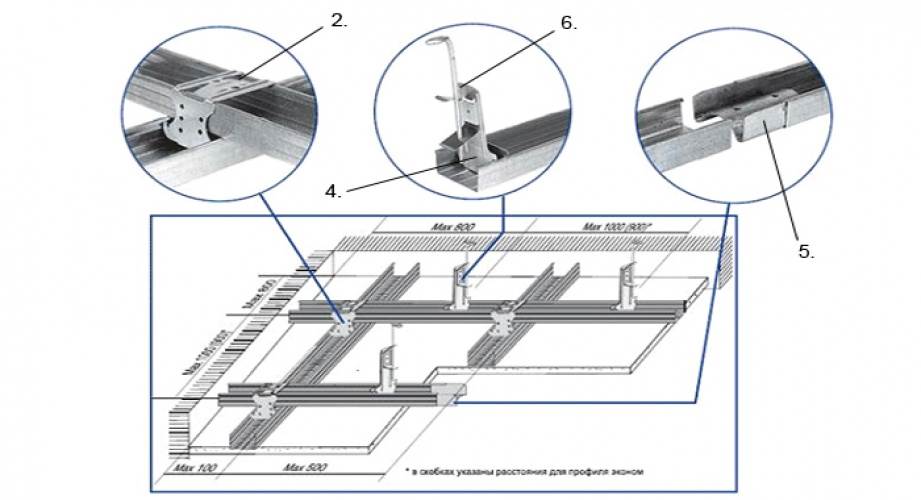
- Guide: UD-ceiling (PNP profile) and UW ( PN profile). It is a strip with a section in the form of the letter P. It is made of galvanized steel and is used as guides on which the rack profile (CD, CW) is mounted.
- Angular . Galvanized metal tape, bent at an angle of 90 °. Used to seal corners to prevent their deformation.
- Rackmount: CW (PS profile) . Galvanized steel with a channel-type section. Special grooves are placed along the material, they give the profile additional rigidity. It is used for wall cladding and for.
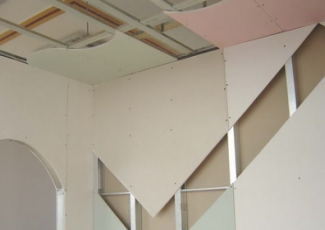
- Ceiling: CD (PP profile) . Its design resembles a rack profile. It is used for the construction of both single-tier and two-tier ceilings.
Installation of a profile for drywall carried out using special brackets. The connection of all structural elements is carried out with self-tapping screws and dowels, using connectors. When arranging large areas, to give additional rigidity, the frame is connected by special cross-shaped brackets.
How to fix a drywall profile in the first place depends on the specific conditions, including the base and type of profile. Below we will separately consider the features of installing drywall on walls and ceilings.
Wall covering
As mentioned above, traditionally, the installation of gypsum sheets is traditionally performed in 2 ways: using adhesive mixtures and on metal profiles. Since the first method is practically not used, we will analyze the technology of installing drywall on a metal frame.
The work process begins with markup. Before you install the drywall frame, you need to draw a plan. The guides are fastened with dowels in increments of 60 cm. After installing the guides, suspensions are mounted, with an interval of 80 cm vertically. Next, vertical profiles are fixed.
After their arrangement, horizontal installation is carried out. On horizontal profiles, the joints of the sheets must converge, so their location must be chosen depending on the size of the drywall sheet and the height of the room.
After installing the profiles for drywall, the installation of paintings is carried out. For walls, it is recommended to use canvases with a thickness of 12-12.5 mm. Fastening drywall to the profile is carried out using self-tapping screws or dowels.
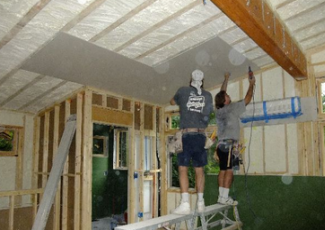
Ceiling mounting
Installing drywall on the ceiling begins with the construction of the frame. First of all, you need to determine the height of the mount.
From the base of the ceiling, it is necessary to retreat at least 25 mm, by the thickness of the ceiling profile. Then, using the level, you should transfer the marks to the corners of the room and connect them with a solid line.
Ceiling markings for suspensions . After 50 cm, it is necessary to mount the suspensions on which the frame will be attached. All markings should be made in the form of a grid with a step of 50 cm.
Frame installation . Work begins with the installation of suspensions, all elements are mounted on pre-marked places. The holders are connected to the profile using self-tapping screws.
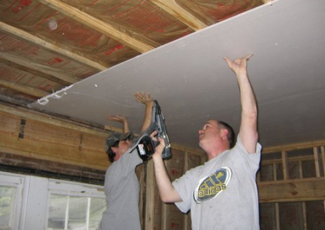
After completing the assembly of the entire structure, the drywall is fixed to the ceiling. Pre-marking is made for the fastening elements on plaster. Self-tapping screws are screwed in at a distance of 2-25 cm. At the end, cosmetic surface treatment is performed.
Which plasterboard for the ceiling to choose? For, it is not recommended to use thick sheets. They make the structure heavier and difficult to work with without helpers. Ceiling drywall with a web thickness of 8-9.5 mm is considered optimal.
Benefits of using drywall
- Perfect Smooth surface, subject to the installation technology.
- High technology. For cutting necessary elements no special equipment is needed, drywall is easily cut with an ordinary construction knife.
- Light weight does not exert serious pressure on the supporting structure.
- Good insulating characteristics.
- Ecologically pure material does not contain harmful substances and does not harm environment and man.
- Gypsum sheets are able to absorb excess moisture and give it away by adjusting the level of humidity in the room.
- Low cost compared to alternative finishing materials.
- The installation process takes place in a dry mode. After processing, there is no need to dry the room, which is a prerequisite for the treatment of walls with plaster.
Convenient arrangement of communications.