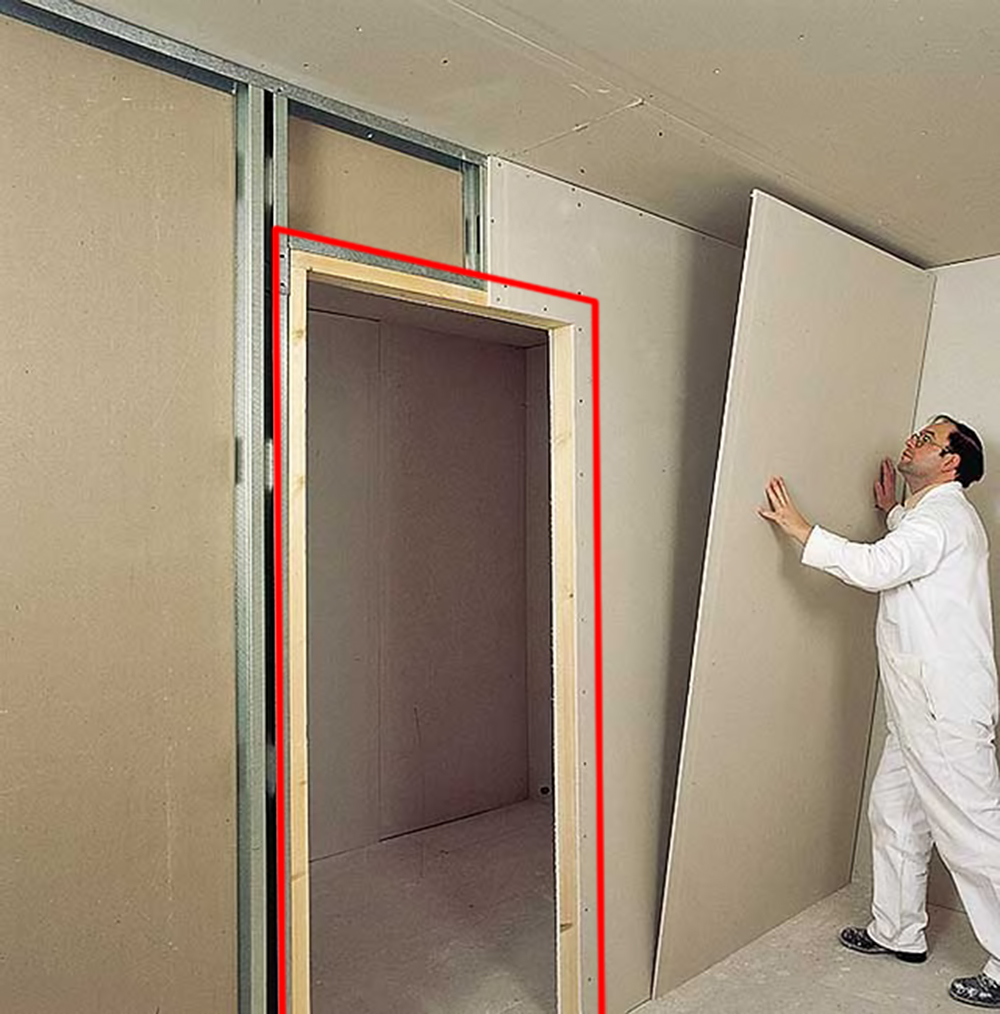
Opening in plasterboard partition. How to make a drywall doorway: basic principles
During the repair process in your house, a situation may arise when you need to create a doorway from drywall with your own hands. How to do it right, we will tell in this article.
Doorway: its types and functions
Under the general name of the doorway, not only the passage between rooms with a door falls, but also arches of various sizes, which play the role of space zoning. It can be both purely decorative and functional (having a door). Depending on what function it performs, the method of performing a drywall construction also differs.
Drywall allows not only to build up the door frame, but also to make an arch instead.
It is convenient to use drywall when forming or changing an existing passage between rooms. It is practical and easy to install. Knowing the basic principles of working with this material, it will not be difficult to make an opening under a drywall door. However, there are certain nuances that should not be neglected.
- opening with a door on a stationary wall using plasterboard;
- a door in a plasterboard structure (rewall);
- arch instead of a door.
We build up the frame for installing the door
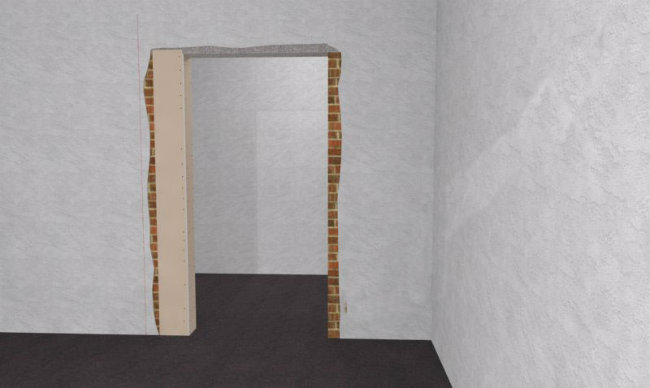
In conditions of space saving and the absence of bulky furniture that cannot be disassembled, you can resort to reducing the passage between rooms. For example, in place big door 90 cm to put more compact 80 or 70 cm. But for this it is necessary to reduce the opening. Laying a brick with the current level of technology is not necessary for this purpose. But how to make a drywall doorway? This requires a metal frame.
Before proceeding with the assembly of the frame for the GKL, you need to remove old door together with the box, remove the protruding parts of the wall and, if possible, trim the slope to the level, knocking down the excess.
The procedure for "building" the doorway
There are two ways to build a wall with drywall:
Method 1. Install vertical metal racks for the door frame and cover the resulting space with drywall. This method can be used if:
- the slopes are badly damaged, they are uneven, it is impossible to nail a profile to them;
- a layer of plaster allows you to align the drywall with the wall without a difference in the level of the wall plane;
- you need to reduce the passage by only 5 - 10 cm.
First of all, it is necessary to remove a layer of plaster from the wall on the side where the frame will be mounted, at a distance of 10 - 15 cm from the corner. Then mark the plane of the wall on the floor and measure the required dimensions of the future frame, set the profiles so that they are perfectly vertical in two planes, and at all points in height the opening distance is sufficient to mount the door frame.
GKL elements cut to size are glued to the wall special glue for drywall and are screwed to vertical profiles, which must be fixed to each other with jumpers for rigidity and distance control.
If you picked up a door smaller than the doorway - it doesn't matter, it can be reduced to required dimensions using drywall.
Method 2. Installation of a small plasterboard structure. This method is used if necessary to increase large plot walls, aligning it with the opening, for zoning a large room into several small ones. This method partially repeats the installation of a plasterboard partition.
- Having outlined on the floor and, if necessary, on the ceiling, the plane of the future wall of the required dimensions, one should retreat from this line a distance equal to the thickness of the plasterboard.
- We mount the frame, not forgetting about the precise control of the verticals. Metal profiles must be fixed to the floor and neatly to the end of the wall.
- The guides must be interconnected with horizontal jumpers, which will provide the structure with the necessary rigidity.
It should be remembered that, reducing the doorway, mount drywall construction better from the side of the door lock. It can also be used from the side of the canopies, however, for this it is necessary to significantly strengthen the structure. There is also a high probability of cracks in the finish from the load on the frame.
GKL partition with a door
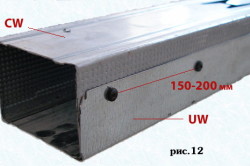
To assemble a plasterboard partition, special guide profiles with a width of 55 mm or 75 mm are used. Of these, racks under the door are also formed. The peculiarity of the installation is that it is necessary to correctly observe the distance between uprights. It is equal to the width of the door frame in assembled condition+ 1.5 - 2 cm per layer of mounting foam + drywall thickness on the slope. In this case, it is necessary to measure the vertical of the horizontal guides very accurately.
Installation of partitions and openings
The procedure for installing such a structure is as follows:
- We apply markings on the floor and ceiling, checking the vertical coincidence with a plumb line.
- We fasten the guides according to the marking and insert vertical profiles into them in increments of 60 cm.
- In the place where it is planned to put the door, we also expose vertical profiles, connecting them with each other with a horizontal jumper strictly in level with the same gap as described above for the side racks.
After you can install horizontal wooden bars or metallic profile to increase the rigidity of the structure, lay thermal insulation and sheathe everything with plasterboard sheets.
It is recommended to make a frame and sheathe the doorway with drywall in such a way that the GKL sheets are joined above the door. This will help minimize the impact of vibration on the seams between the sheets and prevent cracking.
Arch installation
In order to create a drywall arch, you need to follow these steps:
To install the arch, you will need special material - this is an arched profile and arched drywall.
- Set the side posts and the upper horizontal lintel in the same way as for a conventional doorway.
- Calculate the size of the arch and mark the place where the side begins to merge into the arch.
- Cut out a piece of drywall so that it covers the space above the door and creates an arch. This procedure should be performed on both sides of the frame. When mounting both sides of the arch, you need to check their symmetrical arrangement, otherwise it will be impossible to sew the end evenly.
- We fasten the received elements into place.
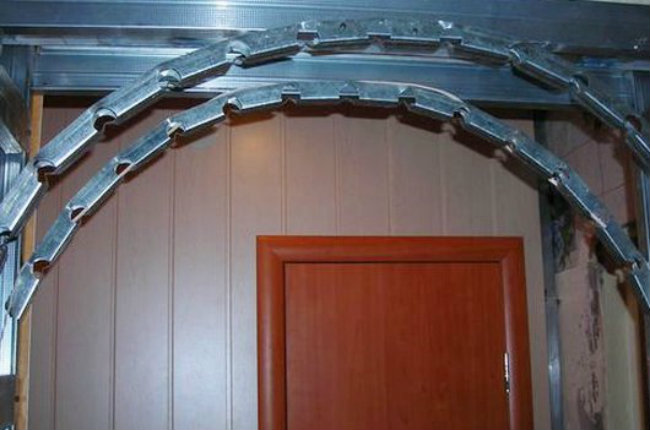
- From a U-profile 3 cm wide we cut a “snake”. To do this, it is necessary to make incisions on the side ribs in increments of 5 cm and slightly break the base of the profile.
- So obtained hard metal element it is necessary to attach from the inside with self-tapping screws along the edge of the arch.
- We sew up even side parts with a sheet of gypsum, not forgetting to correctly calculate the width, taking into account the overlap on the thickness of the drywall.
- Cut out the strip for mounting the arch.
- To make a rigid strip suitable for mounting on the concave surface of the arch, you need to cut the cardboard perpendicularly on inside strips in 5 cm increments and gently break the plaster.
- We fasten the resulting workpiece to the previously fixed "snake".
If everything is done correctly, drywall displacements, extra gaps and holes do not form at the end of the arch. After installation, perforated corners for putty must be placed at the corners of the arch, if necessary, a reinforcing mesh (“serpyanka”) can be applied to the seams.
Now, knowing how to sheathe a doorway with drywall, everyone can do this part of the repair in their home.
IN modern construction it has become popular to use plasterboard partitions to divide the room. At large selection building materials most owners cope with the work of installing partitions on their own, since this process is not laborious enough. But installing a door in a plasterboard partition is an issue that requires consideration of the sequence of work.
The process of installing doors in a partition is also not difficult, and even a non-professional can do this work. But it is important to remember that the design of the plasterboard partition is attached to metal frame and requires compliance with special rules when installing the door.
If done correctly preparatory work, then the doors can be installed in any modification:
- swing;
- sliding.
But not only, keep in mind that the structure can be made from any building material.
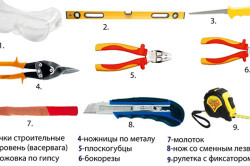
Tools needed when installing a door in a drywall partition
In addition to the door frame itself and the canvas, you need to prepare:
- platbands;
- door fittings;
- loops;
- saw and chisel;
- water level and miter box;
- screwdriver, electric drill and all necessary nozzles;
- tape measure and a simple pencil;
- assembly foam;
- fasteners.
Making a doorway in a plasterboard partition
When making a plasterboard partition, there is always an installation problem. door leaf, since the installation hinged structures in such walls requires a reinforced frame, so that with frequent opening and closing of doors, the wall structure can withstand the load.

If you need to install the door yourself, you need to prepare the material:
- wall drywall;
- metal profiles;
- facing aluminum profiles.
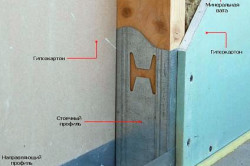
When making a partition, rack profiles are installed under the doorway, reinforcing the structure and withstanding the load of the door frame. The profiles are mounted in the frame on self-tapping screws in the usual way, but subsequently they must be reinforced with a wooden beam. It is installed inside the profile and fixed.
Also, above the doorway, made in a metal frame, a jumper is installed under the drywall, which serves top door frame. An additional vertical profile can be installed above the opening, which should be fixed and reinforced with a wooden beam. So, an auxiliary frame structure will be performed U-shaped, also an additional vertically located profile is installed in it.
Preparatory work
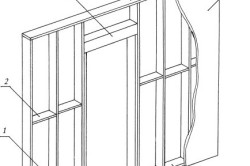
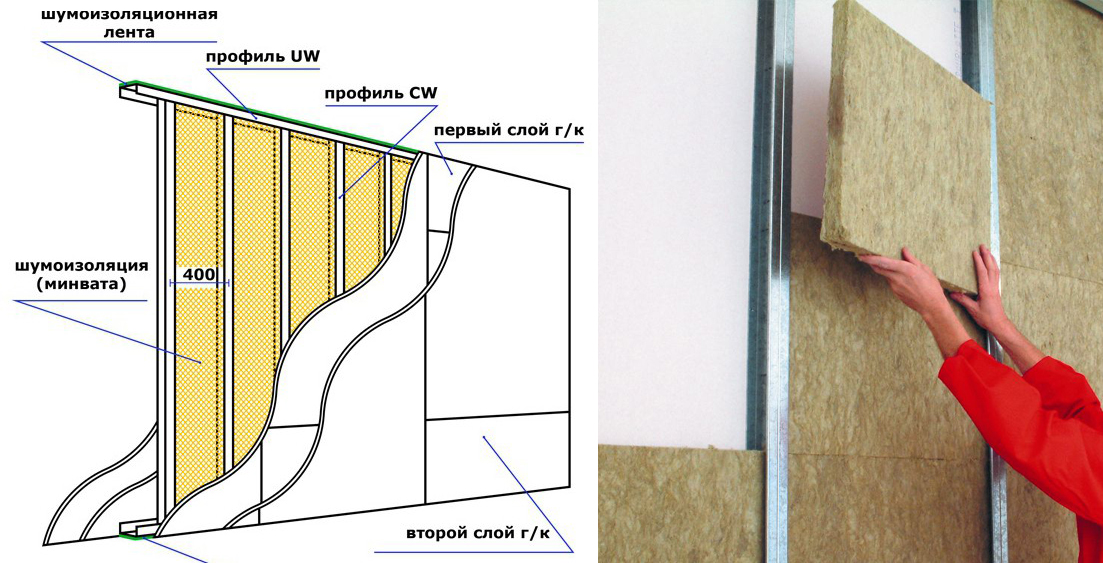
Scheme of the installation of a plasterboard partition with a doorway: 1 - vertical bar; 2 - horizontal strut; 3 - door beam; 4 - ceiling beam; 5 - drywall; 6 - floor beam.
Installation of the door into the plasterboard partition is planned for another initial stage renovation or construction. The doorway must be laid when installing the frame for attaching drywall.
Before performing the partition, a diagram should be drawn with all the calculations and the location of the opening.
To increase sound insulation between the profile, which is adjacent to the walls, floor and ceiling, a sealing layer is laid.
It is most common to install sliding models, as they are light and do not protrude beyond the opening, which cannot be said about classic doors. Well, if it was nevertheless decided to install a simple swing door, then you should not forget to set the stop: since such models open 180 degrees, then there is a chance door handle punch drywall. After the installation of drywall, you can install the door.
How to install doors
When installing the door leaf in a plasterboard partition, the sequence must be observed. First, assemble the box. Depending on the chosen door, the box can be either plastic or wooden. The door frame must fit under the finished opening, while maintaining a gap between the wall and the door of no more than 5 mm. To do this, measure the exact dimensions of the sidewalls of the box, the upper and lower crossbars and screw them on with self-tapping screws.
In case it is installed wooden door into a plasterboard partition, it is necessary that the wood is not wet.
The box is mounted in assembled, and you need to immediately embed the loops.
When installing the door frame, care must be taken.
Having inserted the box, it is leveled and fixed with wedges.
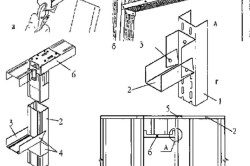
Scheme of installation of the frame of the doorway: a - manufacture of the sidewall of the crossbar; b - crossbar with sidewalls; in - a doorway post with plug-in corners and a crossbar with a sidewall: 1 - PS-profile, 2 - PN-profile, 3 - crossbar, 4 - screw, 5 - plug-in corner for door jamb lower, 6 - plug-in corner for the door jamb upper; g - crossbar with sidewall: 1 - stand, 2 - crossbar, 3 - screw; e - frame of the doorway with plug-in corners and a crossbar with sidewalls: 1 - lower guide, 2 - top rail, 3 - door jamb stand, 4 - lower insert corner for the door jamb, 5 - insert corner for the upper door jamb, b - crossbeam .
The next step after it needs to be fixed. Fastening is carried out using anchors that burst in the profile and will firmly hold the finished structure.
The gaps between the walls and the box are closed mounting foam. But, when working with mounting foam, it is important to remember that when it dries, it has the ability to increase, and its excess can simply warp the structure. To prevent the frame from bending, before working with foam, spacers are installed in the box in several places.
While the foam is drying, you can start preparing the door leaf, that is, install hinges, locks and handles. Fastening of accessories is carried out using self-tapping screws and a screwdriver. To attach the hinges to the door leaf, a distance of about 20 cm is marked above and below, this distance should correspond to the attached hinges on the box.
Before installing the door leaf (and this is done in a day or two), you need to make sure that the frame is firmly attached to drywall partition, and also, using a level, check the evenness of the installation vertically and horizontally. Protruding foam is carefully removed sharp knife.
After hanging the door, the evenness of the structure is checked again, and, if necessary, adjustment is made. But the installation work does not end there, since it is necessary to finish the opening. To do this, trims are purchased that match the color of the door, but if a finished door was purchased, then they are included in the kit.
The platbands are fastened with nails with a solid head, directly to the box, observing a step of 20-25 cm, but in such a way as to hide the foamed gap. To connect the planks end-to-end, they are cut at an angle.
Installation sliding doors produced in a similar way, but with one difference, that the box is attached first, and then the guide rails for sliding the rollers of the structure.
The profiles are fastened to each other using self-tapping screws.
- When installing drywall electric wires it is better to lay through the holes in the racks.
- It is not recommended to lay wiring in the inside of the profiles, as there is a risk of damage by self-tapping screws.
- In the places where the door fasteners are planned, it is necessary to lay a wooden beam.
For the correct installation of the door leaf in a plasterboard partition, it is necessary to exclude the presence of material joints on the profiles in the places where the frame is attached. The best option will use a solid sheet in the place where the doorway will be. It would be best to arrange the rack profiles so that, having measured an equal distance from the center of the opening on both sides, the distance between the profiles was 15 cm more than the door frame.
When preparing the opening, it is necessary to pay attention to the connection and strengthening of the profile so that in the future the canvas does not sag, and cracks do not form at the joints. The profiles can be connected "in the box" by inserting the rack profiles into each other and fastening with self-tapping screws and cutters. The most common method of reinforcement is the fastening of a pine beam located inside the profile.
Installing doors in a drywall partition is a crucial moment, and in this regard, if there is even the slightest doubt, it is best to seek help from a specialist. Since only a professional can accurately calculate the dimensions of the structure and take into account all the nuances associated with correct installation doors.
It's not uncommon for people to remodel their homes. Especially in modern new buildings, where space is not as problematic as, for example, in Khrushchev. And if you remember the options for boxes with open plan, so it immediately becomes clear how widely you can swing in your "architectural" ideas. However, when planning to block off too large an area, you should immediately think about a drywall doorway. Otherwise, you can get into a situation where two rooms are not communicated in any way, and it is easy and simply not possible to move from one to another.
Another situation is also likely, especially in old houses: there is a huge and uncomfortable passage between the rooms. In this case, you need to think about how to reduce the doorway - and drywall is the easiest and most convenient way to do this.
Redevelopment and marking of the doorway
Let us first consider a more complex and time-consuming process, in which it is supposed to install a partition that divides a room into two rooms, with a doorway made of plasterboard placed in it.
When calculating, do not forget to lay an additional 2 cm in the width of the opening: they are hidden when sheathed with sheets.
If you decide how to ennoble and reduce the doorway with drywall, then the steps will be the same, only the frame is set to the dimensions in which you see the passage between the rooms. If there is no intention to close up the GKL of the entire room, the rack profiles are attached directly to the sidewalls of the existing opening.
Finishing stage
The general principles of sheathing remain traditional, with minor additions.
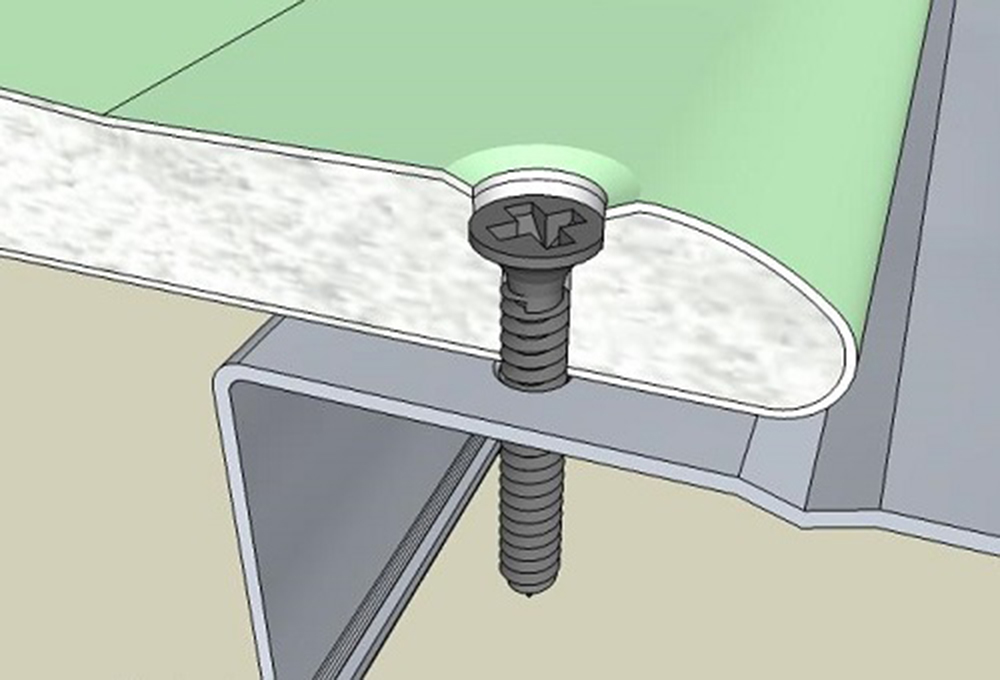
The step between the fasteners in the sheets is recommended to be done within 20-30 cm. Self-tapping screws are screwed into drywall with a head deepening of 1 millimeter. If you overdid it, and the hardware went too deep (this is well determined by the fingers to the touch: a hole is felt, not a smooth area, which means that the fastener is too deep), it is unscrewed, an indent of 5 cm is made, and the screw is screwed in again. An unnecessary hole is puttied when the doorway is finished - this is also done by hand. The joints of adjacent sheets must fit on one rack profile- this must also be taken into account when erecting the frame.
Before installing the door, the usual finishing work is carried out:
- The corners of the drywall doorway are reinforced with a perforated metal corner, planted on the starting putty with a mandatory check of the geometry of the entire structure.
- Fasteners are sealed with the starting composition; when processing joints, a sickle is added to it.
- After priming and drying, a finishing putty is applied.
When it dries too, the slopes are sanded. Since you are unlikely to paint them (or finish them in another way) under the door frame, you do not need to prime the surface again.
Door installation
The approach to solving the issue is similar to installing a door in any other material.
- going to door frame: the canvas is not hung on it.
- The jamb is inserted into the opening. The level is carefully controlled by its strict verticality.
- The box is temporarily fixed with spacer wooden wedges.
- After the next check, if you are sure that the jamb is not skewed, the box is fastened with long self-tapping screws into the appropriate racks.
- Spacers are inserted into the sidewalls of the door, designed to hold the geometry in the last step.
- The cracks are filled with foam.
After the installation hardens, the excess is cut off with a sharp knife, the pegs are removed, and the final plastering and finishing. And those who are looking for ways to ennoble the doorway without closing it with doors, just for visual zoning of the room, can make it in the form of an arch without a canvas.