Do-it-yourself drawings of wooden stools. Putty and finishing. Of three parts
Everyone can make a stool with their own hands. This is a simple task that even schoolchildren can cope with in labor lessons. The main thing in work is to adhere to safety rules, strictly observe all dimensions and follow the technology.
Stools can be different in size, appearance. Those who have experience with solid wood, can implement various ideas, make rounded legs and an unusual seat. If the chair is the first work, then it is better to start small: make a product from rectangular beams and boards. A similar process will help to master the basics of creating furniture, learn how to use various tools.
Instructions for creating a stool
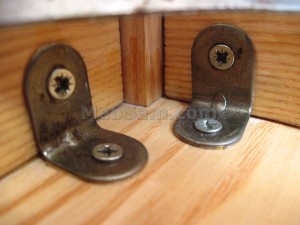
General view of a wooden stool and the names of its parts:
Before you make a stool, you need to prepare tools and materials. Their success largely depends on them.
There are various product drawings that differ in some features. But toolkits Supplies and the order of work is practically the same, regardless of what kind of chair is planned to be produced.
Tools:
- construction stapler (if a chair with a soft seat is planned);
- saw;
- conductors for making holes (they are not required, but they allow you to speed up work and reduce the likelihood of error);
- plane;
- chisel;
- mallet;
- jigsaw;
- clamp, vise;
- screwdriver;
- a hammer;
- roulette.
Materials:
- Beams. Legs and prolegs are made of them. See drawings for specific size and quantity. For example, a chair needs 4 legs 40x40 mm, each 300 mm long, that is, one beam of 1.5 meters will be enough.
- Boards. Also selected in accordance with the drawings. They are necessary to create a tsarg and a seat. These parts can be made from chipboard.
- Paints and varnishes. Lacquer or paint required. You can also purchase a special primer, but not required. It is made from varnish or paint by diluting large quantity solvent. You can use alkyd coatings or substances on water based. The former are more resistant to atmospheric factors, but have persistent odor, which will weather for several days.
- Nails or screws. The first ones are easier to work with, but the self-tapping screws are more durable, and if necessary, the chair will be easier to fix.
- Sandpaper with different grain sizes.
- Furniture edge. It is used if the seat is made of chipboard.
- Foam rubber and dense fabric. Used to create a soft seat.
- Dowels. You can make your own from wood or purchase plastic products.
- Furniture glue or PVA.
When choosing wood, pay attention to its moisture content: the indicator should not exceed 10-12%. Making wood furniture with more high humidity it is impossible, since it is deformed in a couple of weeks after creation. For chipboard, humidity is not standardized, since this composite material made from pressed wood shavings.
The principle of creating a stool from wood and chipboard or only from wood is the same regardless of which drawings are used. There are several stages:
- Preparing details.
- The legs are made of wood, chipboard in most cases is not suitable for this purpose. In the upper part, at the end, holes are made for dowels. They should be slightly smaller than the dowels themselves so that the latter fit tightly. The depth of the hole is half the length of the dowel. It is better to carry out recesses through the conductor - so the holes on the seat will exactly match the holes on the leg. The beam needs to be processed - sanded with sandpaper or angle grinder, chamfered with a planer. All operations are performed with parts clamped in a vice. Otherwise, you can harm not only the quality of the final product, but also yourself. You can also make not holes, but spikes that will be inserted into the grooves of the seat. It's over difficult option but more reliable. In addition, holes are made in the legs for fastening the prolegs and the tsarg.
- Seat. It is made from boards or chipboard. In the first case, you need to prepare boards of a certain length, process them in the same way as legs, create either grooves or holes for dowels. Chipboard does not need preparation - you just need to cut the canvas of the required size.
- Prolegs. They are made from beams of the same or slightly smaller dimensions as the legs. In addition to processing, they need to be prepared for attachment - to make holes for hardware (smaller in diameter than a self-tapping screw) or spikes.
- Tsargi. Pieces of boards are processed like other parts. Dowels are attached to them. The hole is pre-lubricated with glue. It is also recommended to make a cracker on the drawers - attach a small piece of board exactly in the middle, so that a seat (board or chipboard) can be nailed to it.
- Lacquer opening. First, a primer is applied, then varnish is applied in several layers with a break of several hours (read more in the instructions for using a particular product - it is always printed on the label). You can also use wood stain to give the wood certain color. The substance is applied before the primer, also in several layers. Before work, you need to close all holes and grooves.
- Assembly. First, the legs with prolegs are assembled, then the collets are fastened, then the seat is installed. The connections of elements that are fastened together with dowels are made using a mallet. Holes are pre-lubricated with glue. The chair is ready for use.
- Making a soft seat. It is made of foam rubber and dense fabric. You can either simply sheathe the foam rubber with cloth and attach elastic bands to the product, or wrap the seat with foam rubber, on top with a cloth and fix them with a construction stapler under the seat.
- Final work. Hardware hats can be hidden by mixing wood dust with PVA and applying the resulting mixture to them. After drying, open with varnish.
Opening with varnish can be done when the chair is assembled, but it is recommended to do this using an airbrush. It is almost impossible to process the product with a brush, avoiding the formation of streaks, since varnish is a very thick material.
Schemes of various stools and comments on them
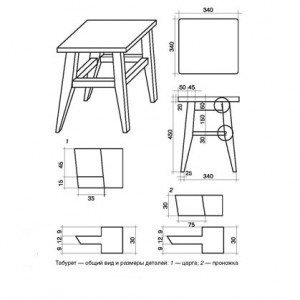
The simplest chair, the creation of which is within the power of everyone. It does not have rounded parts, it is made from beams, boards or chipboard. Recommended for those who have never created pieces of furniture before.
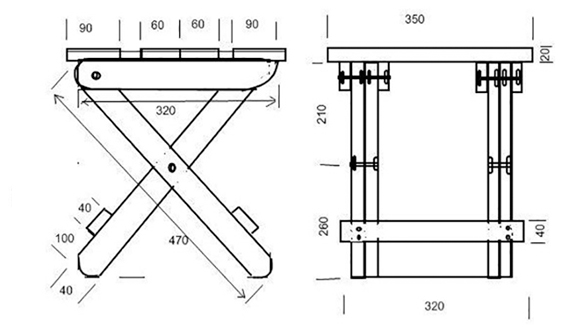
Folding chair. The legs are made of boards and fastened together with a screw with a nut or rivet. Also a fairly simple option. This item is convenient to carry.
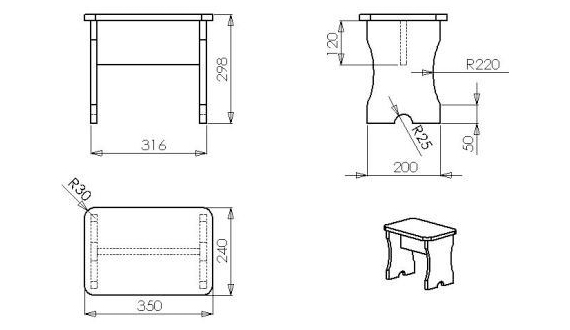
Comfortable stool. Similar products are often made for elementary school students. In the house, such an item is also very useful. Rounded notches of the legs are made using a jigsaw. The seat is covered with fabric, which is attached to the bottom with brackets - the work is done using a construction stapler.
original ideas
Creating a stool is a good space for imagination. You can invent your own original ways for the manufacture of a seat or even go beyond the usual ideas about a stool, completely changing its appearance.
If you love solid and beautiful things made of wood, dream of getting in touch with carpentry, then making a stool with my own hands will become for you the most exciting activity, the fruits of which you will be proud of for a long time. So let's get started.
Create a Sketch
First of all, it is necessary to create a working drawing, on which a stool will be drawn on a scale and dimensions will be applied. The drawing will serve as a design project and work plan for assembling the stool. Be sure to think over and draw the configuration of the legs, because they are decorative elements, giving an aesthetic appearance to the product and defining its style. They can be laconic rectangular or chiseled.
Turning the legs
Since the legs of the stool are most subject to stress, they need to be made only from hard rock wood such as ash, oak or beech. Curly legs are machined on a woodworking machine in accordance with the prepared drawing. If it is planned to produce several stools, then it is better to perform these manipulations on a machine with a copier, this will save time and effort.
The principle of manufacturing legs on milling machine shown in the video below:
We make a seat
For the seat of the stool, boards with a thickness of 15-20 mm are used, which are glued special glue. After the glue dries, a blank is cut out with a width equal to the width of the future seat (with a tolerance for processing). This workpiece is processed from all sides on a planer (preferably a planer) and sawn into the required number of seats.
Even if you planned to make only one stool, it is better to glue and process the boards whole, and not their pieces. In order to avoid injuries during the operation of the stool and in order to give it a noble appearance, the ends of the seat are rounded with a cutter or planer.
We make tsars and fasten them together
First of all, we make a blank for the drawer side in accordance with the drawing. Then we cut it, having previously determined the length of the tsarg: from the size of the side of the seat we subtract two lengths of the protrusion of the seat above the tsarga and two thicknesses of the legs at the points of their attachment. Next, the places of attachment of the brackets connecting the sides are marked. Be careful, ideally, the sides should rest against the middle of the legs, and the lower edges of the brackets should coincide with the lower ends of the sides, this will increase the strength of the stool. The drawers are fastened together with the help of furniture metal brackets and self-tapping screws.
We fasten the legs
We attach the legs to the drawers and mark the places of the holes for the anchor bolts. Next, drill holes with a slightly smaller diameter than the diameter of the bolts. We fasten the legs to the kings. We attach the resulting structure to the seat using metal corners and self-tapping screws.
Finishing
To give the product a finished look, the stool is polished: first with coarse-grained sanding paper, then with fine-grained sanding paper. In order to preserve the wood pattern as much as possible, the final grinding is carried out along the fibers, and in order to emphasize it, the product is coated with a special pigmented impregnation or azure. If desired, the stool can be painted with paint, alkyd, acrylic or polyurethane is best suited. But of course, best coverage for wood is varnish, which is characterized by plasticity and high protective properties, it is also able to favorably emphasize the natural color and structure of wood. There are anti-shock varnishes and varnishes with UV filters.
Decide on the composition and apply it on the stool in several thin layers before allowing the previous layer to dry. By the way, after each application of varnish / paint, except for the finish, it is recommended to sand the surface with fine-grained sandpaper. Apply paint composition it is possible both with a spray gun and with an ordinary brush. For the first option, you need to get hold of special equipment and a large working area.
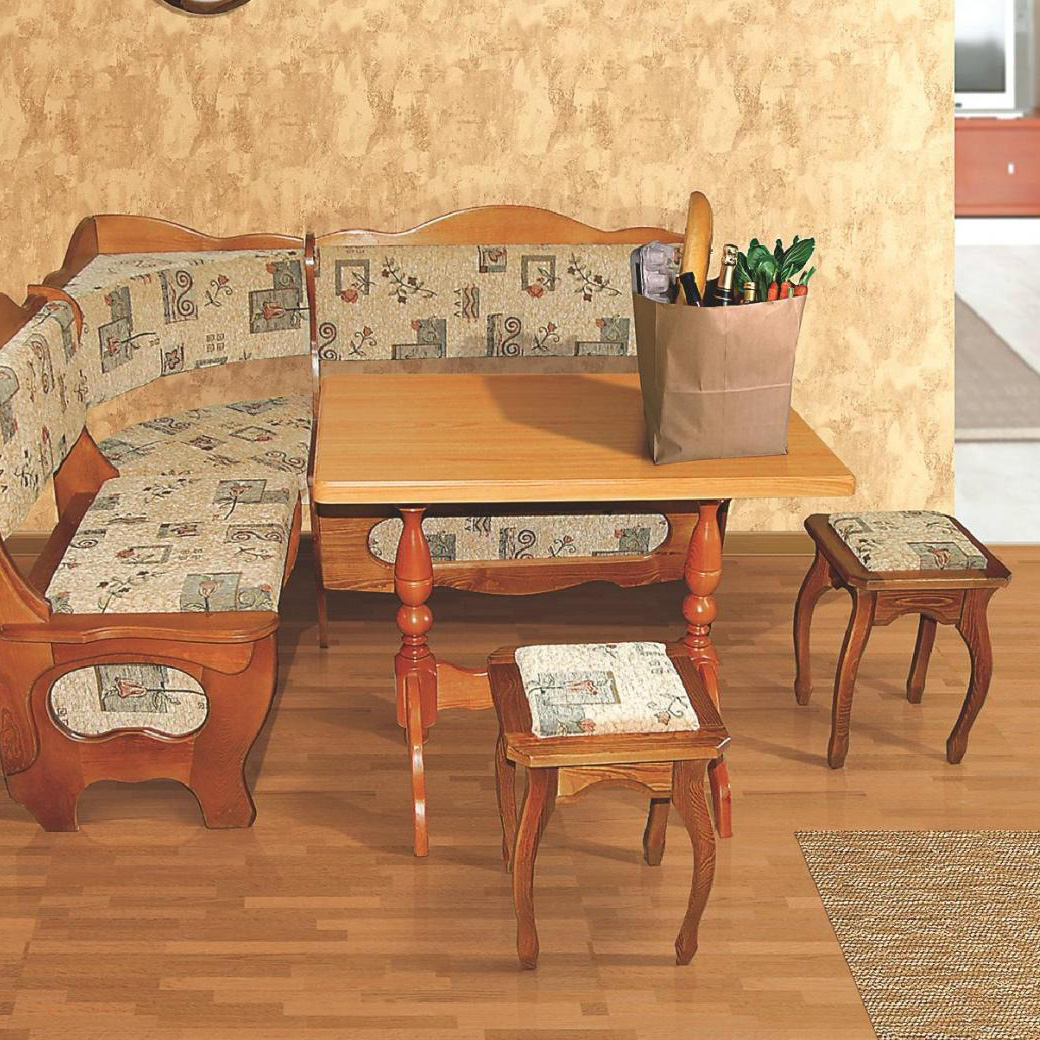
As you know, the kitchen is the "heart" of the house, its soul. And a place that gathers all the inhabitants in friendly company. That is why it is so important to equip the dining area with special comfort. And help with this can be comfortable stools placed around the table.
Despite the fact that the stool is taken for granted, any housewife will say that good furniture gives the kitchen a special coziness, warmth and good mood the inhabitants of the house. Therefore, the choice of chairs and stools should be approached very responsibly, taking into account the general style of the kitchen interior, and color tones, and even kitchen furniture.
Advantages of wooden furniture
Modern technologies can significantly reduce the negative impact from the use of items made from such "fashionable" products. polymer materials(they look lighter and more fun, and cheaper at cost), but no one has canceled the good old wood, and comparing other materials with it is unthinkable. And all because wooden furniture is environmentally friendly building material.
Another advantage wooden furniture is what she is high quality and long service life. And no matter what the manufacturers of fashionable "ecoplast" say, that it is "no worse", the tree will always be in price (of course, if it is not chipboard sheets or MDF, and natural wood with antiseptics).
The third quality impact resistance, resistance to mechanical damage(scratches, small bumps, chips). Of course, this does not mean that furniture from natural array, for example, you can hit with a hammer, and nothing will happen to her. But the probability of noticeable deformations on the surface is quite small when compared with the same plastic furniture.
Carved wooden stools (photo)
Purchased wooden stools
pros
- The product is completely ready for use. This means that if you do not want to bother with making your own seats, wasting materials and your precious time, then you can buy wooden stools for any kitchen furniture store. And there are often held various promotions, sales, discounts, etc.
- You can also get acquainted with the assortment through the catalogs of online stores - today it is very convenient, because it will immediately orient you in financial terms, and in the matter of delivery, besides, almost all issues can be resolved literally without leaving home. Yes, and order furniture in the same way, online, by filling out the required order form.
- Still, as an option, you can purchase a ready-made classic stool of the simplest design and decorate it with the general interior of the kitchen.
Minuses
- Sometimes the goods posted on the site do not correspond to those brought by the delivery service. There may be inconsistencies in color shades, dimensions and even material (for example, instead of aspen they bring pine, instead of oak - birch, etc.). In this case, the delivery, as a rule, is paid and the costs for it are not reimbursed by the manufacturer in case of refusal to purchase. Therefore, it is advisable to check the product yourself.
- As for sales, everything is not so smooth here either - often such promotions refer to furniture that has already gone out of fashion, or is a stale product. Although stools as a piece of furniture are always relevant, but their design can also change and even go out of fashion. But a discount on a product most often happens when the product comes with any defects. Therefore, before purchasing a “discounted product”, you should think about whether you need a defective seat in the kitchen?
Creative wooden stools for the kitchen (photo)
- stool sizes- it is advisable to select seats with such dimensions that will fit all the stools under the table. Most perfect size- 300-400 mm wide, 290-350 mm deep (quadrangular seats), from 300 mm in diameter - for round seats. Height can vary from 400 to 500 mm.
- table shape- this must be taken into account without fail. Agree rectangular table unlikely to look against the background of round stools.
- seat type- soft or hard. Here the options for the "model" can be very different - whoever likes what. Someone picks up a hard seat, changes the soft bedding every month and enjoys regularly updating the interior with minimal financial costs. And someone wants constant comfort - so the choice is in favor of seats with soft upholstery.
- upholstery type- as a rule, washable upholstery is selected (leatherette, eco-leather, fabric upholstery with soft washable pile).
If you want to buy stools with a depth of 350 mm or more, then you will have to stop only at “soft” options, and all because such models do not cause discomfort when sitting at the table (this is especially true for stools rectangular shape) and do not “cut” into the skin.
Prices for wooden stools start from 450 rubles per piece - such price fluctuations depend on the type of wood, design, upholstery, manufacturer, type of construction and even decor.
DIY wooden stools
pros
Own is always best, because it is produced “for itself”. The advantage of do-it-yourself wooden stools is obvious: you get a product of the “right” size, with a comfortable and practical design and the simplest design. Moreover, it costs less Money(well, except for the material for manufacturing), there is the possibility of decorating and a wide scope for creativity.
It is equally possible to paint the seat, and paint in solid color according to your own taste. And most importantly - such seats will always fit any kitchen interior, as they will be made "exclusively". Yes, and you can choose the upholstery yourself, soft or simple, to match the curtains and the general kitchen set.
The price of handmade wooden stools, as a rule, turns out to be significantly lower than the market price.
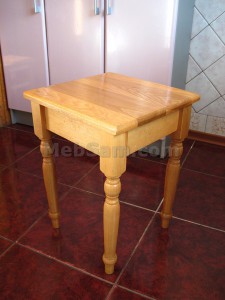
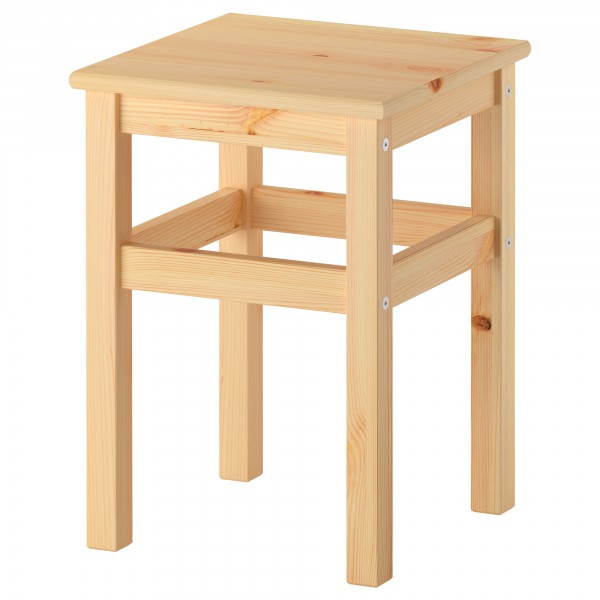
Classic solid wood stool
Minuses
The disadvantage of the production of wooden stools is the significant time costs for their manufacture. This statement is more suitable for those who have practically no free time. And also for those who are not used to handling a hammer and nails. However, today in the construction departments you can find anything - and lumber, and carpentry tool, and means for finishing / decorating finished stools. And following the instructions for making "seats" yourself, you can quickly learn how to make wooden stools for the kitchen.
Drawings of stools
How to make a stool out of wood? Since the manufacture of a classic stool is independently reduced to several stages, we will consider each of them in in general terms(on the illustrative examples drawings of wooden stools).
Scheme 1. On straight legs
Material: bars 60x60x400 mm in size - for legs (4 pcs), bars with spikes (sides) 25x60x260 mm in size (4 pcs), seat - plywood sheet 300x300x10 mm in size (1 pc). For upholstery you will need a piece of foam rubber the same size as the seat, fabric for finishing.
Tools: pencil with ruler, jigsaw, wood saw, glue, construction stapler.
Drawers are made as follows: distances of 30 mm are measured from both ends - for spikes, then the ends are sawn so that the height of one spike is 50 mm. Drawers are ready (these are the so-called connecting stiffeners for a stool).
In the bars-legs, grooves should be cut for installing the tsargs with spikes in them (the grooves are first marked with a pencil), then the tsargs with legs are fastened. The length of one groove should be 50 mm, depth - up to 30 mm, width - 10-13 mm. The distance from the edge of the groove to the edge of the leg is 20 mm from above, from the sides - 10 mm.
After preparing all the parts, their assembly begins. Before planting the drawers in the grooves, it is necessary to coat both the spikes and the grooves with PVA glue - for better bonding, and then tightly connect. For greater strength, you can fix the parts with screws. In this sequence, all the legs of the stool are interconnected.
The frame is ready, now it remains to put the seat on top and secure it. A sheet of plywood is planted on self-tapping screws.
Followed by finishing- you can simply cover it with a special varnish on wood in several layers, or you can paint it with water-based acrylic paint. If you want to upholster the seat with fabric or leatherette, then before fixing the plywood sheet is first upholstered, the upholstery material is fastened with a stapler or glue, and then planted on the frame.
This is the most simple circuit self-manufacturing stools made of wooden bars and plywood.
Scheme 2. On bending legs
The principle of the design is the same, with a difference in the shape of the legs. Naturally, such legs are not bent, but cut out of bars with an electric jigsaw. You can shape the legs of the stool if you use a stencil made of thick cardboard.
Wooden stools with curly legs in the interior (photo)
Scheme 3. From thick sheets of plywood
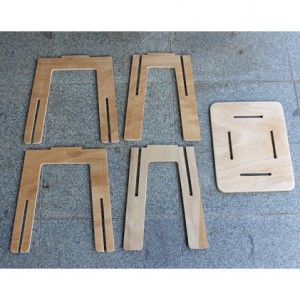 This stool is notable for being fully prefabricated. First, templates are made on a sheet of thick cardboard (you can take whatman paper in A1 format), with exact dimensions on a 1: 1 scale. Then the templates are cut out with scissors, superimposed on plywood (the thickness of plywood is taken according to the principle “the thicker, the more reliable”, but one should not forget about the complexity of processing sheets!), Circled in pencil.
After transferring the markings from the plywood sheets, the parts of the prefabricated structure are cut out, which are then assembled like children's constructor. Everything is pretty easy!
At the end of the assembly, file the ends of the legs and sand the seat again.
Decorating stools for the kitchen
Are the stools ready but no finishing touches? Here you can recoup plenty, giving scope to your imagination! You can paint the seats with legs in bright colorful colors (we use only acrylic paints water-based), or you can varnish it - such stools will look just as good as the “painted” ones. You can sew the original to match general style rooms.
You can develop your imagination even more and apply stencil drawings (these are sold in construction stores, in furniture decoration departments). And you can paste over the stools with cloth or wallpaper - if you have "unused extra material" left. The main thing here is fantasy, inspiration and the presence of taste, so that the result pleases the owners, and such decor is in harmony with common interior your kitchen!
Master class decorating a wooden stool from Ikea (video):
In contact with
Classmates
FROM
we hear "kitchen", we mean "stool". In our tiny kitchens, the stool perfectly fulfills the tasks assigned to it, taking up almost no space. It is the stools we are looking for for the kitchen, not the chairs in the Gothic style. Well, if you have to save space, let's save finances at the same time, and we'll figure it out, how to make a stool with your own hands.
If you have no experience with wood and tools for its processing, heed the following tips:
1) Avoid joints "groove-thorn", their manufacture requires precision and certain skills, otherwise we will get not a stool, but something shaky, unstable and creaky.
2)
A stool is “mobile” furniture, prone to “travelling” around the house, so chipboard should not be used: its edges are prone to rapid destruction, especially if exposed to moisture, and besides, chipboard does not hold screws and other fasteners well.
DIY materials for making stools
Modern markets abound with furniture various kinds and forms. The materials are also diverse: from wood and its derivatives (plywood, chipboard, OSB), to metal, plastic and a couple of other quite exotic materials, such as glass and stone. We will take the old, good tree as a basis!
Our simple but reliable wooden stool will consist of only three elements: seat, legs and connecting plates. We will need:
1.
Beam with a section of 30x30 mm, for legs
2.
Board, size 145x300 mm and thickness 20-25 mm - 2 pcs.
3.
Plywood, 12 mm thick.
4.
Glue.
5.
Sandpaper.
6.
Acrylic varnish
7.
Two dozen screws, 40mm long.
Tools needed to make a stool
 Convenience + speed = quality results. This formula fully characterizes the result of using suitable tools and devices in the work, so we will prepare:
1)
a hacksaw with a small tooth;
2)
screwdriver "cross";
3)
drill;
4)
corner and ruler (carpenter's meter);
5)
pencil;
6)
drill;
7)
soft brush for applying varnish.
Tools are a whole different story. A convenient, high-quality, “beautiful” instrument in itself inspires creativity. Work good tool- pleasure…
But we digress, let's return to our stool, and finally tell you how to make a stool with your own hands.
From wooden block saw off 4 pieces 430 mm long. These are the future legs of our stool. From a board with a thickness of 20-25 mm we make two blanks for sitting with a width of 145 mm and a length of 300 mm. You can, of course, make the seat one-piece, but it is not always possible to find a board 30 cm wide. Yes, and it is tempting to use cutting boards - waste products and give them a second life. And the quality and appearance of the stool will not suffer.
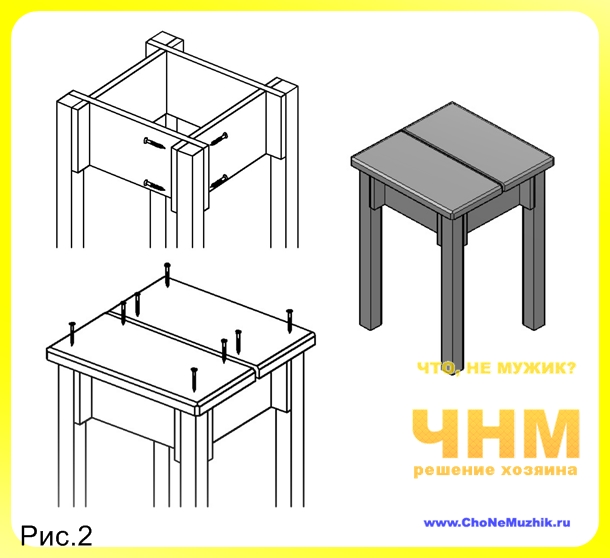
From plywood we make 4 connecting plates 100x270 mm. On the wide side of each we cut out 2 grooves measuring 12x50 mm. Each groove should recede from the edge of the part by 30 mm (foot thickness). We assemble the manufactured parts into a box - the connecting frame of our stool (Fig. 1)
We fasten the legs and seat to the frame with screws, having previously drilled the guide holes. Before screwing the screws, the joints, for reliability, we coat with glue (for example, PVA). It will not be superfluous to smooth out the edges of the parts by chamfering, this will give the stool a more stylish look.
 We carefully process the assembled structure with sandpaper (manually or with a grinder), first larger, No. 100-120, and then fine No. 300-320.
Why not every detail separately? Because in assembled we will grind and smooth out minor inconsistencies in parts that are inevitable during assembly.
After grinding, the stool is covered with two, three layers of transparent varnish. Before applying the next layer of varnish, we wait for the complete drying of the previous one. (Fig. 2).
Also on our website you can find out and.
In conclusion, do-it-yourself stool
Stool - simple furniture. But it also gives a flight of fancy for new creative solutions. You can solve the question of how to make a stool with your own hands using our example. You can come up with your own version. Do it and you will succeed!
In work don't forget about safety. So that the pleasure of work is not overshadowed by cuts and splinters, work carefully, slowly, do not be lazy to wear gloves.
- Varieties of stool
- Making a simple product
- Figured stool
For small kitchens stools are most suitable: they are compact, light, transportable, and now they have an elegant design.
Scheme of a stool made of chipboard.
If there are a lot of people in the house or relatives and friends often visit you, then with the help of stools they can easily be placed at the table. But if you buy a new one kitchen set expensive, then you should know yourself.
You can make a stool on your own without much difficulty, the main thing is that there is a desire and all essential tool and material. Despite the simplicity of the design of the stool, it is still necessary to prepare a drawing at the very beginning of work. Many neglect this stage of work, and as a result, you have to redo the furniture, because. this design unsuitable for use.
Varieties of stool
Stools in their form and design are different. The seat of the stool can be square, round, octagonal or custom in shape. The legs of the stools also have a variety of shapes, there are standard rectangular ones, there are carved, twisted, solid ones, which, when connected, form a cross. And there are solid stools that are made of logs in the form of an hourglass.
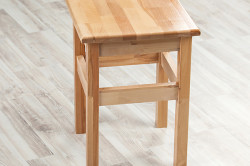
Image 1. A simple stool consists of a seat measuring 300 x 300, and legs fastened to them.
There are stools that combine boxes for storing various little things, but such stools are not very comfortable. You can also select stools with a soft comfortable seat and just a seat made of boards.
The material from which kitchen stools are constructed can be different: metal, plastic or wood. Each material has its own advantages and disadvantages. When choosing stools, first of all, the place where they will be used (whether it be a kitchen, a summer house or a gazebo), the interior already available there and financial resources, which can be spent on the purchase of a stool or on construction material to make, for example, stools for the kitchen on your own.
Back to index
Making a simple product
So, to make a simple stool, which is shown in the figure above (image 1), you need to prepare the following tool:
- Pencil
- Ruler and square
- Drill or screwdriver
- Hacksaw
- hex key
- Sandpaper
- Drills 6 mm, 5 mm and 10 mm
- Lacquer brush
- Set of furniture screws
- Electric jigsaw
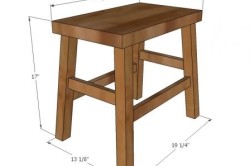
Image 2. Diagram of a curly stool.
- Wooden beam for legs and crossbars with a section of at least 30 x 30 mm
- Piece of laminated chipboard 300 x 300 mm
- Varnish for wood
- Birch plywood 20 mm thick
Now you can start creating furniture for the kitchen with your own hands. The seat of the stool should be comfortable, so you need to determine its dimensions. Optimal size seats 300 x 300 mm, this size is determined by convenience and compactness. But you can choose the size according to your dimensions. For simplicity it is better to use laminated chipboard, it is easy to cut, and besides, it can be pasted over with edging tape, the shade of which can be chosen as desired.
Using a hacksaw, you need to cut a square measuring 300 x 300 mm. To give strength to the seat, it is necessary to cut off the corners, the sides of which are 30-40 mm, or use sandpaper to round off the corners, where the rounding radius will be 5 cm.
After the seat is ready, you need to ennoble it with the help of an edge tape. To do this, with sandpaper, you need to remove all the bumps and roughness, stick the tape, lay a piece of fabric on top of it and iron it with a hot iron. Any remnants of tape that remain outside the seat must be cut off with a clerical knife at an angle of 45 °.
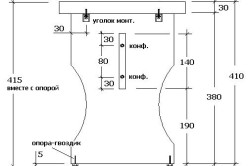
Image 3. Scheme of the side part of the curly stool.
Now, on the underside of the seat, you need to make markings, mark the places where the legs of the stool will be attached. It is necessary to step back 30 mm from the edge of the seat and mark the attachment points with a pencil. Next, you need to prepare the legs of the stool. To do this, on a wooden beam, it is necessary to mark the length of the legs, it can be different, it all depends on your own preferences, but the standard length of the legs is 430 mm.
Once the stool legs are ready, you need to drill holes in the seat, and it is best to do this from the top side of the seat to avoid unnecessary burrs. Holes also need to be drilled on the legs, the total depth of the hole, together with the seat cover, should be 50 mm, a little more.
Next comes the assembly of the stool, for this, legs are inserted into the intended places and fastened with furniture screws. Furniture screws are screwed in very tightly, so at this stage it is necessary to control their parallelism relative to each other. You should not replace furniture screws with self-tapping screws, because. stools on self-tapping screws loosen very quickly, and they will need to be constantly tightened.

Image 4 . Detail of a stool seat.
Now, in order for the stool to become strong and reliable, you need to fix the crossbars between the legs. The crossbars are made from a wooden beam, and the first two crossbars are attached 50 mm below the seat, the next two 70 mm from the seat. This is done in order to avoid crossing the screws inside the legs.
It remains only to cover the legs of the stool with varnish, and pour a little colorless sealant into the holes, but before coating the varnish, you need to go over the surface of the legs and crossbars with sandpaper. In this way, you can design stools for the kitchen.