Do-it-yourself candlestick from a jar. Candlesticks from cans - an economical solution for any occasion Candlestick from an iron can with your own hands
Sometimes it is quite difficult to find the right accessories for serving. holiday table. This is especially true of candlesticks, which do not always fit harmoniously into home interior. But why not try to make a candlestick from a jar with your own hands on New Year 2019 is exactly what you need to create the final look.
The decision to decorate New Year's table homemade accessories are not always easy. Someone is not confident in their abilities, but for someone the main problem is in search suitable materials. But it is for this candlestick that you will need a simple glass jar, which has long been gathering dust in the kitchen cabinet. At the same time, containers can be of absolutely any size - from the smallest to baby food, up to a liter from under the cucumbers.
Candlestick from glass jar
To decorate a candlestick from a jar with your own hands, you will need:
- pieces of wax;
- pot;
- wooden stick;
- aroma oils;
- dyes;
- wick;
- jar itself.
Work process:
- The first step is to prepare the wax. To do this, cut it into small pieces and put them in a small saucepan or iron bowl.
- We put the container on water bath and melt the wax. Stir the content wooden spatula or a skewer until the wax is completely liquid.
- Turn off the stove and add aromatic oils and dyes to the wax to give the candle an original and unique look.
- We take a jar, lower a wick into it, to the end of which you can tie a nut. The main thing is that the upper tail does not run away when it pours wax into the container. It is very convenient to use a wooden stick, on which the wick is simply wound.
- Pour the melted wax into the jar, and watch it so that the wick does not move from its place.
- We are waiting for the wax to harden, and cut the wick to the desired length.

You can make candlesticks from a jar with your own hands for the New Year in different ways. Some may be in a multi-colored strip, if you paint the wax in more than one color, and pour it in turn. Another candlestick can be hung in a string pot and not decorated at all.
Dried lavender flowers or other aromatic herbs can be added to the wax to give the candle not only an incredible aroma, but also an original look.

The jar can also be decorated with stained glass paints or ordinary gouache. Just before that, it is advisable to apply a layer of PVA glue to the surface so that the paint fits better.
Candlestick from a jar and decorative stones

Candlestick from a jar decorated with pebbles
A do-it-yourself candlestick from a jar for the New Year, decorated with multi-colored glass stones, will look very original.
For work you will need:
- silicone glue;
- decorative stones;
- glass jar;
- candle.
Operating procedure:
- We clean the jar from the label, if it remains.

- Alternately apply glue to the stones and apply them to the glass surface.

- It is better to start from the top of the can and stick in a checkerboard pattern.

- We put a candle inside the jar and set fire to it.
Such an original candlestick scatters light, filling the room with multi-colored highlights. Instead of colored decorative pebbles, you can also take ordinary sea pebbles and shells, as well as artificial stones for flowers.
Candlesticks from tin cans
tin, cans Also great for decorative candle holders. They do not burn, so you can put a real candle in them without fear. Original colors, unusual and cute decorations are made from an ordinary tin - a real work of modern art.

Candlesticks from tin cans
Some craftsmen use the decoupage technique in the manufacture of candlesticks. The tin can must first be coated with glue, which in this case will replace the primer. The choice of pattern can be any.

Both a napkin with flowers and a musical sheet will do, the main thing is that the candlestick fits into the interior. Outline paints are also actively used in decoration, with which you can draw various patterns and ornaments.

You can make a candlestick from a tin can with your own hands for the New Year 2019 and in this way. First, the container must be painted in a color that suits the design. This can be done as normal acrylic paint, and aerosol. After the surface has completely dried, attach a lace ribbon to the jar and stick it to it. beautiful flower or other decoration. The result is a very delicate candlestick that will decorate the room.
Patterned candlestick from a tin can
In order not to accumulate mountains of tin cans, just because it's a pity to throw them away, you can make accessories out of them for the New Year's table. Such an openwork candlestick from an old can of stew can be made quite quickly.

Patterned candlestick from a tin can
For him you will need:
- can;
- spray paint;
- hammer with a nail;
- ready-made stencil for applying a pattern.
Operating procedure:

Stencil for making a candlestick
- On the White list paper we apply the drawing that we want to see on the future candlestick. It can be snowflakes, flowers, snowmen and so on. You can also apply a stencil directly to the jar itself.
- We fill the jar with damp earth to make the holes smoother.
- We begin to drive a nail along the lines indicated on the stencil. As a result, a conceived pattern will appear on the surface of the can with holes. After that, shake the earth well.
- We paint the jar with spray paint.
- Insert a candle inside.
How to cut a glass bottle with a thread
Surely many liked the candlesticks made of glass bottles, in which a window for a candle is cut out. But how to do this at home is not entirely clear. It turns out that this does not require special and expensive devices, and you can make an even cut with a simple thread.

How to cut a glass bottle with a thread
For work you will need:
- Glass bottle;
- woolen threads;
- solvent (you can kerosene, alcohol, cologne, acetone);
- scissors or stationery knife;
- gloves (will protect the skin of the hands from exposure to the solvent);
- lighter or matches;
- to protect the eyes, just in case, goggles (in fact, there are no fragments, but caution is never superfluous);
- a deep basin filled with cold water.
Work process:
- We measure the thread of such a length that it is enough for several girths of the bottle and the knot.

- Immerse it in acetone or another solvent so that it is completely saturated with a combustible mixture.

- We wrap the bottle with a thread in the place where it is necessary to cut it. At the same time, we make several turns and tightly tie it into a knot. Cut off unnecessary tails.

- We tilt the bottle so that it is parallel to the ground, and set fire to the winding thread with matches or a lighter.

- After a few seconds, when the thread goes out, we lower the bottle into a previously prepared basin with cold water.


- Immediately, the sound of cracking glass will be heard and the bottle will split into two halves.
After the bottle has broken off from the second part, the edge remains dangerous, so you need to go over it with sandpaper.
Do it better in the water. For more information on how to carefully cut a bottle at home, you can see in the video.
worries, work, public transport, crises - all this overcomes modern man. Depression strikes back. And what is the result? As a result, people stopped rejoicing in the little things, although what kind of “rejoice” is simply to notice them. There is a Handmade Therapy that will help you relax, create coziness in your home or work, and most importantly, bring a sense of celebration to your world. New Year in the house thanks to their own efforts.
In this article:
What and how - a step-by-step master class
Handmade decor will make you a little happier, because you literally bring the New Year holidays closer with your own hands. A New Year's candlestick from a jar will create coziness in the house due to soft lighting. The most important thing - do not throw away the jar of jam or honey - it does not matter what was in it before, the main thing is that now there will be light.
For a salt candlestick you will need:
- varnish, acrylic medium (it will reduce the color intensity when mixed with varnish);
- glue (if there is no thermal gun, then strong fixation glue will do);
- any sponge or sponge, as well as a hard brush;
- salt (you can take rice or semolina);
- adhesive tape and wire;
- ribbon, twine;
- decorative elements - fir branches, cones, berries, etc.

We start by applying the medium to our future New Year's candlestick, and let it dry (about an hour) - look at the photo.

Then apply varnish with a sponge, also let it dry. The number of applications depends solely on the desired result.

Next, we seal with adhesive tape the place where we want less snow, or where we don’t want it at all. And varnish again the remaining space. So even if the weather for the new year is not very good, the atmosphere of winter will be present.


While the varnish has not had time to dry, we quickly sprinkle salt, and dip the wet layer. Small crystals will make the light softer.

When all the layers are dry, you can start decorating the candlestick. Take the wire and wrap the neck of the jar several times. Then make a handle and attach it to the neck as in the photo below. Wrap it with twine and attach spruce branches to it. By the way, if you make this fake with your child, then you will have another an exciting activity- search for "live" forest material for future New Year's decorations.


The New Year's candlestick from the jar is almost ready - there is very little left. Use hot glue or instant glue to attach the bow to the twine for a more festive feel.


How to create magic with your own hands?
With the help of such a decor element, you can decorate not only shelves and cabinets, but also walls. You will need:
- tin;
- wrapping;
- twine;
- small candle.

You can connect your imagination and make holes in the walls with a drill, then the light will pass through beautifully. And also instead of wrapping paper, use cans of paint or artificial snow. Just do it on the newspaper. This photo shows the result of the work:

But an option for those who do everything at the last moment - you need a jar, any rope, glue, paint and a brush. First, wash the jar, then dry it well. Dip the rope in glue and wrap your future candlestick from the jar - wait until it dries. Paint, and then remove the rope. Voi la! Candlestick at home, as they say, without registration and download.

For those who want to make something new out of the old - if there are hydrogel balls at home, then you can use them to create coziness. All you need to do is just decorate the jar with them. and soft lighting.


Tired of the old press, or found unnecessary records - do not throw it away. Twine, a jar and paper will make a great Christmas candle holder. You can age the paper yourself - pour water into a container, brew a couple of black tea bags in it, lower the paper, then dry it. The time during which the paper must be kept in tea depends on its density.

If you do not succeed at all, but christmas decor will not decorate itself - buy multi-colored candies and just pour them into a jar, tie the neck with a ribbon of the same color, light a candle and the New Year is already outside the door.
New Year's candlestick as an idea for co-creation with a child
Creating a New Year's atmosphere together with the baby will bring maximum benefit and positive emotions to both parents and the child. There are a lot of options for creating a candlestick from a jar, here are some of them.
Content
Candlesticks are a pleasure to create and even more pleasant to enjoy the flame of a candle, original thing in the house, which can bring a touch of soulfulness, style, originality to the home.
It is not a shame to present a candlestick from a jar as a gift or an additional souvenir. It takes not so much time and not so much money for such a craft, especially if you have in your arsenal necessary materials. We offer to consider 10 interesting ideas.

Option number 1
Pretty simple, but very interesting result. We need a glass jar: it can be a regular seaming container, a baby food jar or a special jar beautiful shape with an embossed inscription, which can be bought at any store of tableware.
For decor, use decorative ropes, braid, lace and transparent multi-colored stones. For fastening it is better to use a glue gun. See the result in the photo:

Stones can be attached very close to each other, or can be distributed in the form of an ornament over the entire area. They can also be put on the bottom of the container and pour water. To do this, use a floating candle.
Candlesticks from glass jars can be dotted with acrylic paints, wrapped with bright threads, painted with stained glass paints, decorated with foam, plasticine and other available means, do not forget about it!

Option number 2
We propose to make a candlestick from a tin can. A tin can can be decorated using the decoupage technique, it can also be decorated with material, painted with acrylic paints or painted using spray paint.
Try also to use clothespins as a decor, they can be left in their original form or painted in interesting and bright colors. If there are tools, then a pattern can be applied to the tin using perforation, then the light of the candle will appear through the holes. Let's take a look at some photos:


And here is a peculiar version of Aladdin's lamp.

The good old version looks original, when a tin can was cut into thin strips, and then twisted into beautiful patterns with the help of round-nose pliers. Tinplate is easy to use and durable as a candle holder.


Option number 3
In this version, we are talking about glass bottles of champagne and wine. Did you know that cutting a glass bottle with your own hands is not so difficult? Below we will offer a video tutorial on creating a candlestick from ordinary glass bottle. It is worth noting that it turns out very stylish and original, especially if you use colored transparent bottles. But colorless ones are also suitable, they can be decorated, decorated with different materials, decoratively pour wax, use decoupage and other techniques. We offer several options for creating a candlestick or chandelier, see the photo:


Option number 4
How to make a candlestick from a jar and wax. We are talking about creating candles from jars with your own hands. For this you will need:
- glass jar;
- wax;
- pot;
- stick is long;
- aroma oils;
- sprigs of lavender or other herbs;
- wick;
- dye.
Take a bar of wax, cut it into small pieces and place it in a saucepan. Now you need to melt the wax using a water bath. When the wax melts, you can add some dyes and aromatic oils to it. Wax hardens very quickly, so it must be quickly poured into a jar.
And you need to pre-prepare the jar: lay out the sides with twigs, place the wick there, after winding it on a wooden stick.
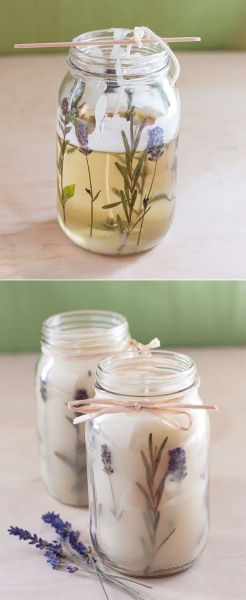
Such a candlestick from a jar with your own hands turns out to be very original, delicate, natural.
Option number 5
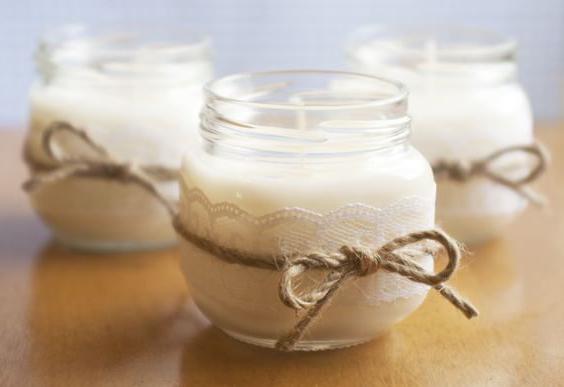
To create the next candle, we use the previous version, only as a base for a candle we will use a small glass container from a cream or other cosmetic product. Leaves or flowers of herbs can be added to melted wax, the jar is decorated with ribbon or lace.

Option number 6
As a decor regular can you can use burlap, fishing net, shells, sea pebbles, sand. It will turn out like this marine option. Pour water inside the jar and use a floating tablet candle. You can create a whole composition of these sea candles.

Option number 7
Bank-candle in a cache-pot. This option, of course, is suitable for those who are familiar with planters and know how to make it, but it turns out, believe me, very beautifully. Especially if you make several of these candlesticks, using jars of different sizes, placing them somewhere under a canopy at different lengths. It looks amazing and attracts the eye from afar.


Option number 8
We use cans from under the pate or canned cat food. Take several jars of different sizes. They can be decorated with fabric, decorated with different bright colors, sprinkle with sparkles - this is at your discretion. But we suggest you the method of placing candlesticks:
Option number 9
We do not use a candle, but use a garland. Such a lamp can not only be lit for the New Year, but also all year round. Well, just a very simple option, but what a beautiful one!
For such a craft, use and three-liter jars, and cans of half a liter, and bottles of champagne, wine, massive and beautiful bottles out of gin or rum. In general, what is in the house, then use it. You can make a special hole in the container, or you can use small battery-powered garlands.

Look what a beauty! It's impossible to take your eyes off!

And this is a whole variant table lamp, such a hybrid. It looks very decent and can be used in an expensive interior.

The option with a glass jar is more suitable for a themed interior or cottage.

Use a small container and colored lights. Such jars can visually divide the room, highlight one of the zones in the evening.
Option number 10
Just don't throw away baby food jars. Of course, at some point, if they are not used, they can fill the whole house, but just such small and pretty containers are suitable for creating beautiful candlesticks. Then they can be given for the New Year or Christmas, especially when you don’t know what to give to a person who has everything and is difficult to surprise. Use any decor that is in the house: dried flowers, pebbles, shells, rhinestones, fabric remnants, colored sand, cereals, plasticine and other materials.

The principle of creation is the same as described in option No. 4. Small jars will require a little less wax, so the process will go faster, and the result will be almost instantaneous.

Children will be very happy if they have such nightlights. Of course, they should only be used in the presence of adults, do not leave children alone with open fire.
And now, as promised, a master class on cutting a glass bottle and creating an interesting candlestick:
Post Views: 383
Today, electricity is in every home and there is no need to constantly use candles. But they remain popular in various countries and the manufacturing industry is constantly evolving. Today, candles symbolize the holiday, help create a romantic atmosphere, aroma candles soothe, use as decorative elements, and most importantly, that bring coziness and comfort to the house. Candlesticks can now be seen from the most various materials, sizes and colors. Sometimes such creations cost a lot of money, and if you want to make something fabulous and unusual on your own, then today we will tell you how to make a candlestick from a jar with your own hands.
Consider several options
If you have several glass jars available, then you will definitely pick up several options for yourself. Jars of baby food or spices look very good, you can make a whole series of candlesticks of the same size. You can use a candle holder or pour wax inside and add various ingredients for fragrance and decoration.
Here, for example, a chandelier from such small jars. Requires the most common materials, you can see an example of manufacturing in the photo.

Or such lanterns will be a good decoration for the institution.

For the stability of the candle inside the candlestick, you need to add sand, grains to the bottom, with the addition of small gravel and salt it will also look good.

Such lamps will fit well into the interior of the gazebo.


Winter version of the candlestick. Salt was poured tightly at the bottom, the top was decorated with twine, and you're done.

You can add just color illustrations.

Small glass cups instead of jars are also a good option.

And to make such a magic candle with your own hands, you will need:

- wax;
- a container for heating wax;
- wooden stick;
- aroma oils;
- dye;
- wick;
- jar.
Cut the wax into small pieces and set to warm up in a water bath.
We stir the wax well until all the pieces are completely dissolved and add various aroma oils and dyes. You can add spices, such as cinnamon or star anise.

Various decorated elements can be added to the walls of the jar.
Wax hardens very quickly, so you need to immediately pour it into the mold.

We fix the wick with a stick and gently hold it. All details can also be fixed with wax. When the wax has completely cooled, you can remove top mount and cut off the excess thread.
To make multi-colored layers, you need to wait until each filled layer hardens, only then fill in the next one.

Small jars especially do not need to be decorated, their shape already gives an unusual look.


It all depends on your mood, you can come up with different decorations on different topics.
Here, for example, sea beauty with the help of ordinary semolina.

Banks decorated with glitter.

If you wrap a jar with a rope or threads, and then cover it with paint of one tone or several, then you get such a structural candlestick.

Fantasy will always tell you the best. The main thing is to have the desire and mood, then such wonderful works are obtained.


Decorative pebbles are sold in every needlework store. They can also be used to create mesmerizing beauty.


You can't take your eyes off this beauty.

A homemade candle or candlestick looks unique and interesting. This addition to the design adds coziness and warmth to the room. Making a candlestick from a jar, no matter what material it is made of, is not so difficult. And such a craft will easily become beautiful decoration or a nice gift for loved one. Check out the master classes and, following the instructions, join the creation of something beautiful and new.
Candlestick from a glass jar or bottle
To make a transparent candlestick, prepare:
- pieces of wax;
- saucepan;
- wooden or orange stick;
- aromatic oils to your taste;
- food coloring (they are harmless);
- wick;
- glass container.
Master class on making a lamp with your own hands
How to make a candlestick from a jar? Brief step-by-step instruction succinctly and clearly describes the process of making jewelry. To make a lamp:
- Grind the wax and melt it in a water bath.
- In the liquid mass, add dyes, sparkles, aroma oil, mix thoroughly.
- Do not forget that the wax quickly cools and hardens. Therefore, prepare clean, dry dishes.
- Gently insert the wick by dropping the end with the pre-attached clip tablet into the bottom of a glass or tin jar.
- The second, free end of the wick is fixed on a toothpick or plastic skewer so that it does not fall into the wax, and wait until the candle has cooled.
- Being careful not to move the wick, pour the hot wax into the jar.
- After the candle has cooled, the clip is removed from the rope.
Important! If a hollow has formed in the center of the candle, pour the rest of the wax into it to fill it.
Look interesting colorful candles. To make striped lamps, wax is poured into transparent containers, dyed in different colors. Before adding a new layer, you must wait until the previous one dries, otherwise the colors will mix.

DIY candle design options
In addition to the luminaire design option described above, there are others, no less interesting ideas candlesticks from cans with their own hands. Lanterns that are hung on hooks, nailed to the fence, hung in the form of a garland on the veranda look spectacular. Hanging candlesticks in glass jars in the garden create a sense of magic and give the garden a marvelous atmosphere. Candlesticks from baby food cans look interesting.
Important! Sand, grain, fine gravel are poured into the jars where it is planned to place the candles to give them stability.
Mayonnaise jars can be used not only for storing cereals or other small things, but also beaten as a decorative decoration. Labels are removed from containers, washed and dried. Spruce branches are placed inside the container, sprinkled with sea salt crystals on top. Such candlesticks are ideal for decorating paths and paths leading to the house in winter.
Glitter-decorated containers with candles inside are the best thing you can think of to decorate a wedding or New Year's celebration.
Master class on making a candlestick from a jar and decorative stones
To make a unique decor item, prepare:
- a glass jar or other transparent container that is suitable for making a candlestick;
- silicone glue for glass;
- decorative stones of different sizes;
- candle.
Work begins with the preparation of the container. jar cover decorative stones, seating them on hot glue. You can lay out the pebbles in a checkerboard or random order. In any case, it will turn out spectacularly due to the variety of sizes, structures and colors of the decor. A candle is inserted inside the jar and lit. It remains only to enjoy the play of light breaking through the cracks of the attached stones.
Important! Decorative damask can be replaced with sea or glass for decorating flowers.
Master class on making a jar with a window
One name causes a lot of emotions and interest. What will a candlestick from a jar with a window look like? Prepare to be amazed and stock up on:
- glass jar;
- masking tape;
- paint (acrylic, spray twine);
- candle;
- ribbons.
Work on the manufacture of a candlestick from a jar is carried out in stages:
- A small piece is glued onto the prepared surface of the glass jar. masking tape. If necessary, adhesive strips are glued in several layers.
- Masking tape or adhesive tape is glued in the desired shape: circle, heart, star. A silhouette is cut out of it.
- The extra tape is removed, leaving only the outline.
- The entire surface of the jar is painted with an aerosol can. To do this, several newspapers are twisted into a tube and a jar is put on them, turning it over. Glass containers are evenly coated with paint. It is most convenient to use a spray can. Although acrylic paint also lays down well. If necessary, apply another layer of coating.
- The jar is left for several hours, and when it dries, remove the masking tape.
- The neck of the jar is decorated with a ribbon or string.
- Inside the jar put a candle-tablet.

On this, the manufacture of a candlestick from a jar of individual design completed.
Master class on making a candlestick from an iron can
Have you thought about how you can use tin cans and how impressive candlesticks made from them look? For the purpose of manufacturing the latter, stainless containers are used from coffee, paint, honey, jam, baby food, and preservation. Just like glass is obtained original candlesticks from beer cans.
Stainless steel candlesticks are great for decorating a house, porch, terrace. These products look amazing. Especially if their surface is covered with holes that create a flickering effect while the candle is burning.
To create a patterned candle holder from a tin can, you will need minimum set tools: stainless can, hammer and nail.

A step-by-step guide to making a lamp
Work begins with drawing a pattern. To do this, use a marker or pencil. A stencil can be a floral or natural ornament, stars or constellations.
To cope with the task, earth is densely poured into the jar. This will allow you to more accurately make holes in the surface of the can. Holes are punched along the contour of the drawing with a nail and a hammer.

In the future, the jar can be decorated or painted with spray paint to match the style of the interior. They put a candle inside the jar and enjoy the beautiful silhouettes that reflect on the wall.
Important! The more you take a jar with a candle, the brighter the effect will be.
Making a candlestick in country style
First, the tin container is painted with acrylic paint. Paper lace is glued onto the surface of the jar, the composition is decorated with thin fabric strips that are glued to the tin surface. After waiting until the composition dries, the jar is decorated at its discretion. As additional decor use rhinestones, stones, buttons, old keys.
Small cans - great material for beautiful New Year's candlesticks from cans. decorative ornaments no worse than from the store, you can do with my own hands absolutely free.

The resulting lamp - great addition for the holiday table. Such a product creates a bright contrast against the background of a snow-white tablecloth. Candlesticks also look impressive against the background of the wall, being attached to a vertical surface or placed on improvised shelves as wall decor.