Car alarm starline a6 instruction manual. Instructions for using the starline a6 alarm. Overview of alarm key fobs Starline A6. Checking the health of limit switches
The StarLine Twage A6 car alarm kit, in addition to everything you need, includes two key fobs, one main with an LCD display and feedback support, the second is additional, without two-way communication. The main one has a working radius of up to 600 meters, but the range can decrease, and significantly, it all depends on where the transceiver is installed in the car, as well as on the weather, the parking lot, the amount of radio interference (the more radio devices around, the more interference there may be) , battery status. Auxiliary can only work at a distance of up to 15 meters.
The twage a6 car alarm can work in automatic mode, which will be set by the program, or maybe by signals. Some features can be modified or reconfigured through programming.
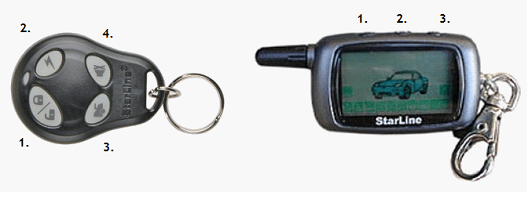
StarLine Twage on the main key fob has 3 control buttons and a liquid crystal display to show the status of the car. The first button is programmable, the second without a function, it can be selected using button three, which is responsible for moving the cursor around the display. Each press illuminates the display backlight. Each function that is performed between the key fob and the car is accompanied by a sound signal, and the corresponding information is shown on the display. The average life of one AAA battery is 4-6 months. When the battery starts to run low, the system will notify you.
The additional one has four buttons on the case, there is no LCD display. It also supports all functions, but does not display them and there is no sound, and the range is much lower. So do not lose the main one.
When using two key fobs at the same time, all information will be displayed on the main display with sound. So being at a distance of 400 meters, you can see that someone opened the car using the second key fob.
How to register a keychain
To learn how to write new keychain signaling in the block starline a6 watch the video:
Button assignment
There are three buttons on the main. Each of them has two or three functions, as well as the possibility of combining. So the first responds by turning the guard on / off (it is necessary to hold it for 3 seconds) and programs the command (0.5 seconds). The second button opens the trunk (3 sec) and executes the command to which the display cursor is directed (0.5 sec). The third one controls the cursor itself (0.5 sec), interrupts alerts (0.5 sec), starts and stops the clock, timer, alarm clock, power saving mode (3 sec), and also programs the first button (6 sec).
You can combine them like this:
Otherwise, they don't work with each other. 1+2 turns on the car search mode (3 sec) and control over the temperature data in the cabin and the state of the car as a whole (0.5 sec). 3+1 selects the alert mode (0.5 sec). 3+2 urgent timer setting (0.5sec).
On the additional there are four buttons. It also has several functions per button. The first one turns the burglar alarm on and off without sound. The second one searches for a car (0.5 sec) and turns on the alarm mode (3 sec). Third, opens the trunk (3 sec), turns on channel 3 (0.5 sec). Fourth, channel 2 (3 sec) and on / off the silent operation of the guard (0.5 sec). You can combine in the following order:
- 1+3 (switch off the sensor by levels);
- 1+4 (inclusions service mode Valet);
- 3+4 (anti-robbery mode (ignition must be on), recording in programming mode).
Programming the first button on the main key fob

The functionality of button 1 can change according to the wishes of the owner; it is necessary to register this in the program, you can do this without restrictions. To program a button, you must follow a certain procedure:
- In order to move the cursor, it is necessary to quickly press button 3;
- After selecting the required function, it is necessary to stop the cursor on it;
- It is necessary to hold down button 3 for 6 seconds and wait for three beeps;
- Press button 1 to confirm your selection.
After this procedure, one press of the button is enough to activate the selected function. To reprogram the button, you need to do the same.
Clock setting
On the main key fob, the LCD display shows the clock. To set them, you need to hold down the 3rd button, wait for 2 short signals to appear, after which the hour indicator will flash. To increase the hour, use button 1, to decrease, use button 2. To change the minutes, you need to briefly press button 3, to increase and decrease, use buttons 1 and 2. To exit programming, hold button 3 until one beep is heard.
Enabling Power Saving
In order for the battery to last longer, you need to activate the power saving mode. Energy savings occur due to the receiver being turned off, or rather, its electrical circuit. To enable this mode on the starline twage a6 keychain, you need to hold down button 3 and wait for two short beeps, after that, calmly, successively press the same button, the “save” icon should appear, button 1 will turn on the mode, button 2 will turn it off.
Protective functions
Many modern security systems provide a wide range of possibilities for their creations. The team from StarLine, in addition to the functions of the organizer, gave a large number of protective functions, all of which fit into the starline a6 keychain. Each of them has its own individual alarm signal.
Whenever the sensor is triggered, all information will be sent to the display of the main key fob with sound and light accompaniment. It can be positively noted that when the alarm is triggered, the car's engine will be automatically blocked, and it will not go anywhere, except in the case of a tow truck.
The alert continues for one cycle, which includes vibration, sounds, and screen flashing. So, if during one such cycle, the cause of its occurrence has not been eliminated, then this cycle will be played again, until the cause of the operation is corrected. The most common cause is a car door that is not fully closed. In addition to the fact that the pager will notify you of the operation, the car will flash its dimensions, headlights, and also make a sound.
The system may work for the following reasons:
- The car was hit;
- The door is not fully closed;
- The hood is open;
- The trunk was not tightly closed;
- The ignition worked.
All of them have their individual cycles. If the system is in silent mode, there will be no sound!
If you just checked the operation of the system sensors and the car began to “make noise”, then in order to turn it off, you need to press the first button, but the alarm will still be active.
StarLine twage A6 has an interesting functionality, is called "anti-robbery mode". You can enable it in a couple of ways. Let's focus on the first one, as it is more convenient and simple. And so, it is necessary that the car be with the ignition on, select the appropriate icon on the key fob (it looks like a crossed-out gun) and press button 2. To turn off this mode, turn off the ignition and follow the same steps as when turning on this function.
Engine lock
Every time the car is armed, the engine is blocked, which makes it impossible to steal it. It will be blocked for the entire period of time until the alarm is removed. Any attempts by the hijackers will be even, even if they can open the car and turn off the alarm, the engine will still be blocked. All because you need a return code that the key fob will send to the car when it is unlocked.
Vehicle search
In large metropolitan areas, unfortunately, it is possible to “lose” your car in a large parking lot, in order to facilitate the search procedure, you can use the “search” function. When activated, the system will give the car sound and light signals that will help you find the car. In total, 6 light and 6 sound cycles will sound. The easiest way to activate the "search" is to simultaneously press the first and second buttons on the key fob, wait for the signals to appear.
Condition and temperature monitoring
The system has special sensors that monitor various indicators. There are two options for enabling the check, the first is to select the appropriate mode with the cursor in me, the second requires simply pressing buttons one and two on the key fob. After that, the headlights will flash three times, and the display will show information about the temperature in the cabin and the status security system.
Reset to zero
In order to reset all settings to factory settings, you must turn on the ignition of the car and press the service button 10 times. After that, turn off the ignition, it is accompanied by a siren signal (also 10 times), which means entering the reset mode. We press the service button once, and the key fob button 1, a signal will sound, which will confirm the function and reset to standard settings. The system will then exit automatically.
Instructions for use and installation
Components included in the car alarm kit
Included in the kit StarLine car alarms Twage A6 includes:
1 main remote control with LCD display and two-way communication, 1 additional remote control without feedback, central processing unit, transceiver module with antenna and temperature sensor, 2-level shock sensor, LED indicator, Valet service button, anti-theft button, hood button, cable set.
Technical characteristics of the car alarm
| Control radio carrier frequency | 433.92 MHz |
| Maximum range of the main key fob | 600 m* |
| The maximum range of the pager | 1200 m* |
| Maximum range additional keychain | 15m* |
| Shock sensor type | piezoelectric |
| Working temperature | from -40 to +85 °С |
| Supply voltage direct current | 9-18V |
| The current consumed by the alarm in armed mode | 20mA |
| Maximum admissible current at the exits: | |
| siren connection circuits | 2A |
| connection circuits parking lights | 2x7.5A |
| control circuits for electric drives of door locks; | 15A |
| engine lock circuits | 40A |
| chains additional channels management | 300 mA |
| Power supply of the main key fob | 1.5V (1 AAA battery) |
| Power supply for an additional key fob | ZV (1 battery type CR2032) |
* The range of the key fob and pager may be reduced depending on the location of the transceiver in the car, the location of the car and the user, radio frequency interference, weather conditions, voltage of the car battery and key fob battery.
Car alarm features
Protected areas of the car and ways to protect them
- Engine - from start (electric blocking relay)
- Doors, hood, trunk - from opening (push-button switches)
- Body, wheels, windows - from shocks and shocks (two-level shock sensor)
- Ignition - from switching on
car alarm security
- Dynamic control code, protected from selection and interception
- Limiting the number of alarm cycles
- Interruption of alarms without disarming
- Remembering the state when the power is turned off and return to the same state when the power is restored
Protective functions of car alarms
- Enabling sound and light alarms when sensors are triggered in armed mode
- Sending alarm alerts to a key fob with an LCD display
- Immobilizer mode
- Anti-robbery mode, activated remotely by key fob
- Anti-robbery mode activated by a special button
- Engine blocking and its preservation when dismantling the alarm
Self-diagnosis and indication of operating modes
- Indication of the alarm status by the LED and on the key fob display
- Indication of the reason for the last alarm operation for 6 security zones
- Indication faulty zone when the security mode is turned on
- Sound indication of the fact of alarm operation
- Automatic control security sensors with disconnection of faulty ones and a message about it
- Indication of open doors when the security mode is off
- LED indication of the serviceability of the limit switches when the ignition is on
Service functions of the car alarm
- Mode silent security
- Guard mode with running engine
- Switching on the security mode without a key fob
- Automatic return to armed mode in case of accidental shutdown (switching)
- Auto power on guard mode
- Delay arming for the time when the interior light goes out
- Self-diagnosis when arming / disarming
- Silent arming with a disabled shock sensor
- Remote disable / enable shock sensor by levels in armed mode
- Remote control of the central lock
- Control of the central lock from the ignition switch
- Two-pulse unlocking of door locks
- Ability to implement the "comfort" function
- Service mode Valet
- Emergency disarming by personal code
- 4 additional channels for controlling car devices
- Car interior lighting control
- Vehicle search mode
- Remote programming mode for new key fobs and erasing lost ones
- Possibility to reset the values of programmable functions to factory presets
- Call mode from car
- Indication of temperature in the passenger compartment
- Time indication, timer, alarm clock
- Battery discharge control of the main remote control on the LCD display
- Fluorescent illumination of the display of the main key fob
Keyfobs
The car alarm performs its functions either automatically or by remote control signals when the buttons are pressed. Some of the provided functions and some parameters of the system operation can be changed by programming.
The StarLine Twage car alarm has a 3-button remote control with a liquid crystal display. The purpose of button 1 of the key fob is programmable. The purpose of button 2 is selected by quickly moving the cursor on the remote control display using button 3. When you press the remote control buttons for a few seconds, the fluorescent backlight display. When the signaling executes the key fob command, the corresponding information is displayed on the display and a melodious tone sounds. sound signal.
When the alarm performs any actions automatically, the corresponding information is also displayed on the key fob display and is accompanied by sound signals or vibration. If more than one key fob is used to control the alarm, then the state of the car and the car alarm will be displayed only on the display of the key fob from which the last command was issued.
In case of inoperability or loss of the main key fob with two-way communication and liquid crystal display, the system comes with an additional 4-button remote control. Most functions and modes of operation of the alarm can be activated from this key fob as well, but the following operating instructions are written for the case of using the main key fob with an LCD display.
Purpose of the buttons on the main key fob
Button 1
- Programmable command (0.5 sec)
- Arming / disarming with loud confirmation signals (3 sec)
Button 2
- Command corresponding to the current position of the cursor on the keyfob display (0.5 sec)
- Unlocking the trunk (3 sec)
Buttons 1+ 2
- Search mode (3 sec)
- Monitoring the state of the car and the temperature in the cabin (0.5 sec)
Button 3
- Cursor position control on the remote control display (0.5 sec)
- Key fob alert interruption (0.5 sec)
- Turning on and off the clock setting, alarm clock, timer, power saving mode (3 sec)
- Button programming 1 (6 sec)
Buttons 3 + 1
- Key fob notification mode selection (0.5 sec)
Buttons 3 + 2
- Quick setting of the keychain timer (0.5 sec)
The keychain with an LCD display uses an AAA, 1.5V battery. The operating time of the battery depends on: the frequency of using the key fob, the frequency of the pager operation, the selected notification mode, the type of battery installed. The capacities of commercially available batteries may vary by several times. Accordingly, the average operating time of one key fob battery can be from 3 to 6 months.
When the battery is low, an icon will appear on the display to indicate that it needs to be replaced.
The battery of the main key fob is replaced in the following order:
- Open the cover on the back of the key fob and remove the old battery.
- Briefly press button 1 on the key fob.
- Install new battery, observing the polarity, and close the cover. ( Correct position battery is indicated on the key fob case under the cover).
- After replacing the battery, correct the clock and alarm settings.
Re-programming button 1 of the key fob is not required.
Purpose of the buttons of the additional key fob

Button 1
- Arming / disarming with sound confirmation signals
Button 2
- Search mode (0.5 sec)
- Panic mode (3 sec)
Button 3
- Channel 3 (0.5 sec)
- Unlocking the trunk (3 sec)
Button 4
- Silent guard on/off (0.5 sec)
- Channel 2 (3 sec)
Buttons 1 + 3
- Disabling the sensor by levels
Buttons 1 + 4
- Service mode Valet
Buttons 3 + 4
- Anti-robbery mode (ignition on)
- Keyfob entry in programming mode
The four-button key fob without feedback uses a lithium battery CR2032, 3B. The battery life depends on how often the key fob is used and on the type of battery installed.
To replace the battery, unscrew the screw on the back of the key fob and open the cover. Remove the old battery and install a new one in its place, observing the polarity. Then close the key fob cover and tighten the fixing screw.
LCD display of the main key fob

Icons with letter designation- indication of commands, modes and alarm functions
- Anti-robbery mode (on/off)
- Additional channel 3 (on/off)
- Panic mode (on/off)
- Search mode (on/off)
- Loud confirmation tones
- Silent guard mode (on/off)
- Silent Acknowledgment Tones
- Remote shutdown of the shock sensor (on / off)
- Service mode Valet (on / off)
- Vehicle status and temperature indication
- Additional channel 2 (on/off)
- Remote trunk release
Icons with digital designation - indication of the state of the alarm and the car
- Silent guard mode
- Security mode with sound signals
- Light signals alerts
- Hood open
- The shock sensor has worked
- Door locks locked
- Key fob receiver included
- Door locks open
- Call from the car
- Confirmation of communication with the car
- Energy saving key fob mode
- Ignition on
- Alarm mode
- Second half of the day (PM)
- First half of the day (AM)
- Shock sensor off mode
- Time and temperature indication
- Temperature scale
- Timer mode
- Battery monitoring
- Channel 2 on
- Channel 3 enabled
- running engine
- The doors are open
- Vibration alert mode
- Auto switch mode
- Trunk open
- Valet service mode enabled
Programming button 1 of the main key fob
The purpose of button 1 of the main key fob is programmable and can be changed by the owner of the car an unlimited number of times. For the convenience of using the alarm, it is recommended to program this button to turn on / off the armed mode.
Programming is done in the following order:
In the future, when using the alarm, a short press of button 1 on the key fob will lead to the execution of the command assigned to it (arming and disarming). When the button is pressed, the icon corresponding to the programmed function will light up.
Note. To reprogram the assignment of button 1, you need to do the described procedure again. Button assignment 1 will be changed to the new one. Further, the operating instructions are written taking into account the fact that button 1 is programmed to turn the protection mode on and off.
Purpose of button 2 of the main key fob
The purpose of button 2 of the main key fob is determined by the current position of the cursor on the key fob display. The cursor is moved by pressing button 3 of the remote control in the following order:
- Quickly press keyfob button 3 two or more times to start cursor movement.
- When button 3 is pressed, the cursor will cycle through the icons indicated by letters in the display diagram shown below.
Set the cursor to the position corresponding to the desired command by successive pressing of button 3 on the remote control.
Subsequent short pressing of button 2 on the key fob will execute the selected command.
Setting the clock
For ease of use, the main alarm key fob has a built-in clock. To set the clock, press keyfob button 3 and hold it pressed until 2 short beeps appear. The clock indicator will flash.
To increase the clock readings, use button 1 of the key fob, to decrease - button 2 of the key fob. To quickly increase or decrease the clock readings, hold down the corresponding button on the key fob. To switch to setting minutes, briefly press button 3 on the remote control. To increase the minutes, use button 1 of the key fob, to decrease the readings, use button 2 of the key fob. To quickly increase or decrease the minutes, hold down the corresponding button on the key fob.
To exit the time setting mode, press and hold keyfob button 3 until one short beep appears or wait for automatic exit.
Setting an alarm
The main alarm key fob has a built-in alarm clock. To set an alarm, press button 3 of the remote control and hold it pressed until 2 short beeps appear.
Press keyfob button 3 in succession until the alarm indicator appears on the display. The alarm clock indicator will flash.
To increase the value of the parameter, button 1 of the remote control is used, to decrease the value - button 2 of the remote control. To quickly increase or decrease the alarm clock, hold down the corresponding button on the key fob.
To switch to setting the alarm minutes, briefly press button 3 on the key fob.
After setting the hours and minutes of the alarm clock, briefly press button 3 on the remote control to set the alarm mode (ON-on / OFF-off). To turn on the alarm, press button 1 of the remote control (ON indication), to turn it off, press button 2 of the remote control (OFF indication).
To exit the alarm setting mode, press and hold button 3 of the key fob until one short beep appears or wait for automatic exit.
The activated alarm mode on the key fob display is indicated by an icon.
When the alarm goes off, a melodic signal will sound, to terminate it early, press button 3 of the key fob.
Setting the timer
In addition to the clock and alarm clock, the main alarm key fob has a built-in countdown timer. To set the timer, press button 3 of the remote control and hold it pressed until 2 short beeps appear.
Press keyfob button 3 in succession until the timer indicator appears on the display. Setting the time and turning on the timer is similar to an alarm clock.
The maximum timer value is 19 hours 59 minutes. When the timer is on, the display shows it Current state and flashing indicator. After the set time has elapsed, 8 beeps will follow and the timer indication will disappear. To interrupt the sound signals, press button 3 of the key fob.
Quick timer setting
To quickly set the timer, press buttons 3 and 2 on the remote control simultaneously. The display will show a blinking indicator and the value of the timer time. To change the timer value, press buttons 3 and 2 of the remote control simultaneously. Possible values for quick timer setting are 10 minutes, 20 minutes, 30 minutes, 1 hour, 1 hour 30 minutes, 2 hours.
When the timer is on, the display shows its current status and a blinking indicator. After the set time has elapsed, 8 beeps will follow and the timer indication will disappear.
Selecting an alert mode
The main remote control has 2 notification modes: sound signals or vibration. To select the type of alerts, press buttons 3 and 1 at the same time.
When the vibration alert mode is activated, 2 vibration signals will follow, the indicator will appear on the display.
When you turn on the sound notification mode, a melodic signal will follow, the indicator will disappear.
Note. Further, the operating instructions for the alarm are written taking into account the enabled alert mode with sound signals. When the vibration alert mode is on, vibration signals will follow instead of the sound signals of the key fob.
Power saving mode
To increase the battery life of the main key fob, a special power saving mode is provided. In this mode, the consumption of the key fob is reduced to a minimum 2 minutes after each disarming of the car alarm. When the security mode is turned on, the energy-saving mode of the key fob is automatically turned off. Reducing consumption in power saving mode occurs by turning off the electrical circuit of the receiver.
To enable the power saving mode, you must do the following procedure:
When the power saving mode is on, the indicator will constantly be displayed on the keyfob display. 2 minutes after disarming, the icon will turn off on the keyfob display, confirming that the power saving mode is activated.
Note: In the power saving mode, the keyfob receiver will automatically turn on for 2 minutes each time to receive a confirmation signal that the alarm has completed the command sent from the keyfob. For example, if a command to unlock the trunk is given when the security mode is off, the key fob will confirm the execution of the command with sound signals, after which it will switch back to the power saving mode.
Arming with sound signals
Before turning on the security mode, make sure that the ignition is off, the doors, hood, trunk are securely closed. Press button 1 of the key fob, having previously programmed it to turn on / off the armed mode with quiet confirmation signals.
1 beep and 1 flash of dimensions will confirm the arming mode. Automatic locking of door locks will occur if they are connected to the alarm. The LED indicator will start flashing to indicate that the vehicle is guarded.
Icons will appear on the keyfob display and a short beep will follow.
The security mode can also be turned on by long pressing button 1 of the key fob. In this case, the siren will give loud confirmation signals, regardless of the programmed function for button 1.
Attention! If the doors, hood, trunk turn out to be poorly closed, or one of the push-button switches of the doors, hood, trunk is faulty, then the alarm will warn about this with 4 beeps and 4 flashes of dimensions. See item "Self-diagnosis when arming".
Enabling Silent Arming
Before turning on the security mode, make sure that the ignition is off, the doors, hood, trunk are securely closed. To enable the silent security mode, place the cursor on the icon and press button 2 on the remote control.
1 flash of dimensions will confirm the arming mode. Automatic locking of door locks will occur if they are connected to the alarm. The LED indicator will start flashing to indicate that the vehicle is guarded. Icons will appear on the keyfob display and a short beep will follow.
Attention! If the doors, hood, trunk turn out to be poorly closed, or one of the push-button switches of the doors, hood, trunk is faulty, then the alarm system will warn about this with 4 beeps of the key fob and 4 flashes of dimensions. See item "Self-diagnosis when arming".
Switching on the protection mode with the engine running
The alarm provides the ability to turn on the protection mode when the engine is running. This may be necessary during a short stop or when parking in the cold season.
Leave the vehicle with the engine running and close all doors, hood and trunk. Press and hold button 1 of the key fob until 1 beep and 1 flash of dimensions appear, which will confirm the arming mode with the engine running. Automatic locking of door locks will occur if they are connected to the alarm. The shock sensor will be disabled from the security circuit to avoid false alarms from a running engine.
The key fob will give a short beep. Icons and will be displayed on its display, the disabled shock sensor will be indicated by icons and the ignition on and the engine running will be indicated by icons and.
Auto arming (programmable function)
If the automatic arming function is enabled, then after turning off the ignition and closing the last door, a siren warning signal and 1 flash of dimensions will follow. After 10 seconds, the alarm will automatically turn on the armed mode. The activation will be confirmed by 1 beep and 1 flash of dimensions. The door locks are locked. Icons will appear on the keyfob display, and.
Attention! If one of the door push-button switches is faulty, then automatic arming will not occur. See the section "Checking the health of the limit switches".
If the hood or trunk turn out to be poorly closed, or one of the push-button switches of the hood, trunk is faulty, then the alarm system will warn about this with 4 beeps and 4 flashes of dimensions. See item "Self-diagnosis when arming".
Emergency arming without a key fob
To turn on the armed mode in emergency cases, for example, in case of loss or inoperability of the remote control key fob, you must:
- Turn on the ignition and press the service button 4 times.
- Switch off the ignition. In confirmation, 1 siren signal and 1 flash of dimensions will follow.
- Get out of the car within 20 seconds and lock all doors with the key. First, 1 siren signal will follow, then 1 key fob beep.
20 seconds after the ignition is turned off, regardless of the state of the doors, the system will arm the system. In confirmation, 1 flash of dimensions will follow. The LED indicator will start flashing to indicate that the vehicle is guarded.
Attention! If the automatic arming function is programmed, then after closing the last door, 1 siren signal and 1 flash of dimensions will additionally follow. 20 seconds after arming, 1 additional siren signal will follow.
If the security mode is turned on urgently (without a key fob), then in the event of any of the security sensors being triggered, only warning alarms will first follow - 4 beeps and 4 flashes of dimensions. Then, if the security mode is not turned off, after 20 seconds it will turn on full cycle anxiety.
Delay activation of sensors after arming (programmable function)
The alarm has the ability to program a delay in the activation of sensors after arming 5,15,30 or 45 seconds. When the security mode is activated with a key fob, the door locks are locked immediately, and the zones of limit switches and sensors are armed after a programmed time. This delay may be necessary for the car's interior lights to fade out smoothly, or for the shock and volume sensors to calm down.
After the programmed delay time has elapsed, 1 flash of dimensions follows, and all zones are armed.
Self-diagnosis when arming
If, when the security mode is turned on, 4 beeps and 4 flashes of dimensions appear, this means that the doors, hood, trunk may not be closed properly, one of the door, hood or trunk push-button switches is faulty. The keyfob will give a short beep and the display will show the faulty zone. This zone will be temporarily excluded from the security loop.
It is necessary to close the doors, hood and trunk, and the system will automatically arm this zone. In confirmation, a short sound signal from the key fob will follow, and the image of the faulty zone will turn off on the display.
If the cause of a malfunction of the pushbutton switches cannot be eliminated on site, the system will arm and bypass the faulty zone. In case of spontaneous elimination of a malfunction with the armed mode on, the alarm system will immediately automatically arm this zone.
Disarming with sound signals
To disarm the security mode, press button 1 of the remote control, having previously programmed it to enable / disable the security mode with quiet confirmation signals.
2 short beeps and 2 flashes of dimensions will confirm switching off. The automatic unlocking of the door locks and the inclusion of the interior light will occur if they are connected to the alarm. The engine block is turned off. The LED indicator will turn off. The icon will be displayed on the keyfob display and 2 short beeps will follow.
The security mode can be turned off by long pressing button 1 on the remote control. In this case, the siren will give loud confirmation signals, regardless of the programmed function for button 1.
Attention! If 4 beeps and 4 flashes of dimensions sound when the security mode is turned off, this means that security sensors were triggered in the security mode. See "Self-diagnosis when disarming".
Silent disarming
To disarm without sound confirmation signals, place the cursor on the icon and press button 2 of the remote control.2 flashes of dimensions will confirm disarming. The automatic unlocking of the door locks and the inclusion of the interior light will occur if they are connected to the alarm. The engine block is turned off. The LED indicator will turn off.
The icon will be displayed on the keyfob display and 2 short beeps will follow.
Note. When the security mode is silently disarmed, the fact that the alarm is triggered is indicated by 4 beeps of the key fob and 4 flashes of dimensions.
Disabling security mode when the engine is running
Disabling the security mode with the engine running is done by pressing and holding button 1 of the key fob until 2 beeps and 2 flashes of dimensions appear. Automatic unlocking of door locks will occur if they are connected to the alarm. The engine will continue to run.
The keyfob display will show an icon and 2 short beeps will follow. The switched on ignition will continue to be indicated by the icon
Emergency disarming (entering a personal code)
For emergency disarming, for example, in case of loss or inoperability of the remote control key fob, it is necessary to enter a personal code using the ignition key and the service button:
Note. There will be no indication of the disarmed mode on the key fob display.
Automatic return to armed mode in case of accidental shutdown (programmable function)
If within 30 seconds after disarming the car doors were not opened, the alarm will automatically re-enable the armed mode. This protects against disabling the security mode by accidentally pressing the key fob button, as well as if you, by disabling the alarm, change your intention to get into the car and forget to turn on the security mode. The alarm will do it itself.
If the security mode was turned off with sound confirmation signals, then the re-arming of the security mode will be confirmed by 1 siren signal and 1 flash of dimensions. Icons will appear on the keyfob display, and. 1 short beep will follow.
If the security mode was turned off silently, then the switching of the security mode will be confirmed only by 1 flash of dimensions. Icons will be displayed on the keyfob display, and indicating the switched on silent security mode. 1 short beep will follow.
Automatic locking of door locks will occur if they are connected to the alarm. The engine is blocked. The LED indicator will start flashing to indicate that the vehicle is guarded.
Self-diagnosis when disarming
If the alarm was triggered in the security mode in the absence of the owner (doors, hood, trunk were opened) and the alarms were not interrupted from the key fob, then when the security mode is turned off, 4 siren signals, 4 flashes of dimensions and 4 sound signals of the key fob will follow. The display will show icons corresponding to the reasons for the alarm.
If the alarm signals were interrupted from the key fob, then when the security mode is turned off, only 2 siren signals and 2 flashes of dimensions will follow. In this case, there will be no indication of a triggered security zone on the display.
Protective functions
Alarms
If any of the security sensors are triggered in the security mode, this will automatically turn on the alarms, the siren sounds, the parking lights will flash and the interior light will turn on; the engine will be instantly blocked. The keyfob will sound alarms, and the display will show the reason for the alarm. While the alarm siren is sounding, the icon will flash on the display; while the dimensions are flashing, the vehicle's headlights will flash on the display. Alarms are given in cycles. The duration of one alarm cycle and the maximum possible number of cycles for various reasons alarms are indicated in the table.
If, after the end of the alarm cycle, the cause of the alarm has not been eliminated (for example, the doors remain open), then the corresponding security zone is temporarily excluded from the security circuit until the cause of the alarm is eliminated (until the doors are closed), but the indication continues on the key fob display.
| Cause of alarm | Display Icon | Duration of one alarm cycle | Max, number of cycles with a continuously operating sensor | Max, number of cycles with intermittent sensor |
|---|---|---|---|---|
| 1 level shock sensor | 3 signals 6 flashes |
1 | 8 | |
| Level 2 shock sensor | 20 sec. sound 20 sec. light |
1 | 8 | |
| doors | + | 30 sec. sound 35 sec. light |
1 | 4 |
| Hood | 30 sec. sound 35 sec. light |
1 | 4 | |
| Trunk | 30 sec. sound 35 sec. light |
1 | 4 | |
| Ignition | 30 sec. sound 35 sec. light |
4 in a row | 4 |
Note. If there was an interruption of alarm signals from the key fob, then the count of the number of alarm cycles with a periodically triggered sensor starts anew.
If the silent armed mode is enabled, then when the alarm is triggered, there will be no audible alarms.
Interruption of alarms
If you want to interrupt the alarms without disarming, for example, you checked the operation of the sensors, press button 1 of the key fob. In this case, the alarm will remain in armed mode.
If at the time of interruption of the alarm the cause of the alarm has been eliminated, then the sound signals and the indication on the key fob display will stop.
If, at the time of interrupting the alarm, the cause of the alarm is not eliminated, then the corresponding icon will continue to be displayed on the keyfob display. The guard zone will be temporarily excluded from the security loop. The icon on the display will go out only after the cause of the operation has been eliminated, 1 siren and 1 beep from the key fob will sound in confirmation.
To interrupt only the alert signals of the key fob, press button 3 of the key fob. In this case, the alarm signals and the indication on the key fob display will continue.
Remote activation of the "panic" mode
To turn on the "panic" mode with the ignition off, place the cursor on the icon and press button 2 on the remote control.
There will be 3 beeps of the siren and 3 flashes of dimensions. The key fob will beep.
If the security mode was previously turned off, then when the "panic" mode is turned on, the door locks are locked. After the alarms are turned off, the armed mode is automatically turned on. In this case, there will be no indication on the key fob display.
Anti-robbery mode
Enabling anti-robbery mode
Anti-robbery mode can be enabled in two ways:
Method 1 - with the ignition on, use the key fob button 3 to place the cursor on the icon and press the key fob button 2. An icon will appear on the keyfob display and a short beep will sound.
Method 2 - with the ignition on, press the special button to turn on / off the anti-robbery mode.
After activating the anti-theft mode, the alarm will first turn on the 30-second warning lights, then the siren sounds will turn on. The door locks will close. The engine will be blocked. Icons will flash on the keyfob display and the keyfob's audible alarms will turn on.
Disabling anti-robbery mode
During the first 30 seconds from the moment the anti-robbery mode is activated, it can be turned off using a special button to turn on / off the anti-robbery mode. To do this, first turn off the ignition, then press and hold the button until the siren sounds 3 times. The warning lights will turn off.
When the engine is stopped and the audible alarms sound, the anti-robbery mode can be disabled in two ways:
Method 1 - turn off the ignition, place the cursor on the icon and press button 2 on the key fob. The alarms will stop. The system will enter armed mode. The LED indicator will start flashing. After disarming, the engine will be unlocked.
Method 2 - Enter your 2-digit personal emergency shutdown code. After a successfully dialed code, the alarms will stop, the engine lock will turn off. The door locks will remain closed. The door locks will open after switching the security mode with the key fob. The icons and on the key fob display will disappear.
Immobilizer mode (programmable function)
If the immobilizer function is programmed, the engine will be automatically blocked 30 seconds after each ignition is turned off, regardless of whether the armed mode was turned on or not. Immobilizer mode is indicated by double flashes LED indicator.
To turn off the immobilizer mode, press the Valet service button once with the ignition off. The LED indicator will turn off. The engine is unlocked.
The immobilizer mode can also be turned off by pressing twice on the button 1 of the key fob with an interval of 2 seconds; in confirmation, after the second press, 2 beeps of the key fob and 2 flashes of dimensions will follow.
Engine lock
Reliable blocking of the engine by one or two circuits is maintained during the entire period of protection. Attempts by hijackers to start the engine, despite the alarms, will be useless. Even if the central signaling unit is detected and disconnected from the cable connectors, the engine will remain blocked.
Power failure alarm protection
When the power is turned off, for example, the battery terminal is reset, the alarm remembers its state. When the power is restored, the alarm will again be in the same mode (see the status table below), the key fob will give a melodic sound signal.
Service functions
Remote disable and enable shock sensor
The alarm provides the ability to remotely turn off / turn on the shock sensor by levels an unlimited number of times during one security cycle.
If it is necessary to disable only the preliminary level of the shock sensor, place the cursor on the icon and press button 2 of the remote control. Icons will appear on the remote control display, followed by 2 beeps and 2 flashes of dimensions. The first level of the sensor will be disabled.
If it is necessary to disable both levels of the shock sensor, place the cursor on the icon and press button 2 of the remote control a second time. Icons will be displayed on the key fob display and followed by 3 beeps and 3 flashes of dimensions. Both levels of the shock sensor will be disabled.
If it is necessary to re-enable the shock sensor, place the cursor on the icon and press button 2 of the remote control for the third time, 1 beep and 1 flash of dimensions will follow. The icons and will disappear from the keyfob display. Both shock sensor levels will be enabled again.
Control of the central lock from the key fob with the ignition on
With the ignition on, successive short presses on button 1 of the key fob will lead to alternately closing and opening the door locks.
Icons are displayed on the key fob display:
When closing locks;
When opening locks.
The switched on ignition is indicated by an icon.
Automatic control of the central lock from the ignition key (programmable function)
You can add a function if you wish. automatic control door locks when the ignition is turned on and off. If this function is enabled, then when the ignition is turned off, the door locks will automatically open.
You can program 3 options for controlling the locks when the ignition is turned on:
- locks are not locked;
- are locked 10 seconds after the ignition is switched on;
- are locked 30 seconds after the ignition is switched on.
Attention! If one of the doors is opened when the ignition is switched on or within 10 or 30 seconds after the ignition is switched on, the door locks will not be locked.
Open door alarm (programmable function)
At your request, the function of warning about open doors when the security mode is off can be introduced. When opening any of the doors, the dimensions will flash for 10 seconds or until the doors are closed.
Checking the health of limit switches
The alarm provides the ability to control the serviceability of the door, hood and trunk limit switches when the security mode is off. Opening the doors, hood and trunk with the ignition on should be accompanied by flashes of the LED indicator. If the LED indicator does not light up when they are opened, then the corresponding limit switch is defective.
Vehicle search mode
In this mode, the system gives 6 beeps and 6 flashes of dimensions, making it easier to find a car in the dark. The key fob will give a melodic sound signal.
There are two options for enabling search mode:
Option 1- simultaneously press and hold buttons 1 and 2 of the key fob for the appearance of sound and light signals.
Option 2
Vehicle health and temperature monitoring
To control the state of the car, the temperature in the cabin and the alarm mode, a special mode.
There are two options for enabling this mode:
Option 1- simultaneously press buttons 1 and 2 of the remote control.
Option 2- place the cursor on the icon, press the button 2 of the remote control.
3 flashes of dimensions will follow. The key fob display will show the temperature in the car interior and the state of the alarm mode, a melodious signal will sound.
Note. The temperature display scale (Celsius or Fahrenheit) is programmable. The temperature value indicated by the remote control may differ from real value depending on the location of the transceiver module in the car (for example, when the module is in the sun, the displayed temperature value may be higher than the real one).
Call from the car
To send a call signal from the car to the alarm key fob, you need to press the button located on the body of the transceiver module.
3 flashes of dimensions will follow. The keyfob display will show an icon and 20-second ringing tones will sound. To interrupt the sound signals and indication on the display, press button 3 of the remote control.
Control of additional channel No. 1 (remote unlocking of the trunk)
Additional channel No. 1 (yellow-black wire) can be activated regardless of the alarm condition and used for remote unlocking of the trunk. If the channel is activated when the security mode is on, then the trunk and shock sensor zones are temporarily disabled.
If at the time of closing the trunk the alarm is armed, the trunk and shock sensor zones will be armed again after 5 seconds. In confirmation, 1 siren signal and 1 key fob sound signal will sound. The flashing trunk open and shock sensor icons will disappear.
Control of additional channel #2 (programmable function)
The operation algorithm of the additional channel No. 2 (blue wire) is programmed when the alarm is set (function 7):
Algorithm 1- the channel is automatically activated for 30 seconds when the armed mode is turned off and simultaneously with the appearance of alarm signals in the armed mode. This algorithm can be used, for example, to turn on the "polite" interior lighting.
Algorithm 2- the channel is automatically activated for 30 seconds when the security mode is turned on. During the operation of the channel, the shock sensor is disabled. This algorithm can be used, for example, to automatically raise car windows.
Turning on the "emergency" light signaling of the car
If additional channel No. 2 is programmed to work according to algorithm 1 or 2, then the alarm user has the ability to turn on and off the "emergency" light alarm of the car with a key fob. To do this, place the cursor on the icon and press button 2 on the key fob. The first press turns on the 10-minute flashing of the parking lights, the second press leads to the early switching off of the flashes of the dimensions. The activation of the "emergency" alarm is accompanied by the appearance of an icon and 4 sound signals of the key fob on the key fob display. Early shutdown is accompanied by the disappearance of the icon and the appearance of 2 beeps from the key fob.
Control of additional channel #3 (programmable function)
The algorithm and duration of the signal of the additional channel No. 3 (yellow-red wire) are programmed when the alarm is set (function 1). This channel can be used for remote control additional equipment vehicle or to implement the function of step-by-step unlocking of door locks.
To turn the channel on and off, place the cursor on the icon and press button 2 on the remote control. In confirmation, 1 siren signal, 1 flash of dimensions and 1 sound signal of the key fob will follow. Channel activation duration 0.8; ten; 30 seconds or until key fob turns off (programmable).
Two step door unlocking
When installing an alarm on a car, additional channels No. 2 and No. 3 can be used to implement the function of 2-step unlocking of door locks when the security mode is turned off. To do this, you must program the duration of the selected channel 0.8 seconds. Connect the driver's door lock and the locks of other doors in accordance with the diagrams below. In this case, when disarming, only the driver's door will be unlocked. To remotely unlock the remaining doors, you need to activate an additional channel.
Choice of duration of confirmation sounds and type of alarm sounds (programmable)
It is possible to set the duration of confirmation sound signals when arming/disarming: 100 ms, 20 ms, 15 ms or 20 ms when arming and no signals when disarming.
When programming the duration of the signals to 100 ms, the siren in the alarm mode will sound continuously. In other cases, the audible alarms will be intermittent (6 seconds sound, 2 seconds pause). The intermittent type of signals must be programmed when connecting the alarm to the car horn.
Service mode Valet
To temporarily disable the anti-theft and security functions of the car alarm, for example, when transferring the car to a service station, it is recommended to enable the Valet service mode.
In office Valet mode the function of remote control of locking and unlocking of door locks, control of additional channels continue to work.
To turn on the service mode, place the cursor on the icon and press the button 2 of the remote control, 4 siren signals and 4 flashes of dimensions will follow. A blinking icon will appear on the keyfob display and a melodic keyfob signal will sound. The LED indicator will flash in series of 5 flashes.
To turn off the service mode, place the cursor on the icon and press the keyfob button 2, 3 siren signals and 3 flashes of dimensions will follow. The icon on the keyfob display will go out, the melodic signal of the keyfob will sound. The LED indicator will turn off.
Alarm Status LED
AT various modes car alarm operation, the LED indicator flashes in different ways. If you do not have a key fob with a liquid crystal display that indicates the status of the alarm and the car, then you can determine the current mode of operation of the car alarm by the type of LED flashing.
Personal emergency shutdown code
A personal code is required for emergency disarming and exit from the anti-robbery mode.
The secret code of the car alarm consists of two numbers, each of which can take a value from 1 to 4 inclusive. During the operation of the car alarm, the code can be repeatedly reprogrammed. Car alarms are supplied with factory personal code -11. After installing the alarm on the car, it is recommended to enter into the system memory secret code known only to you.
How to install a new personal code next:
- Turn on the ignition.
- Press the service button 8 times. Each press of the button is accompanied by the lighting of the LED indicator.
- Switch off the ignition. 8 short ones will follow siren signals, indicating entering the mode of setting a new code.
- Press the service button 1 time. 1 siren will sound.
- Within 5 seconds, using the main LCD key fob, enter the first number of the new personal code. A short press of button 1 corresponds to - the number 1; short press button 2 - number 2; long press of button 1 - number 3; long press of button 2 - number 4. The key fob will give the appropriate number of beeps.
- Press the service button 1 time. 2 siren sounds will follow.
- Within 5 seconds, using the main LCD key fob, enter the second number of the new personal code. A short press of button 1 corresponds to - the number 1; short press button 2 - number 2; long press of button 1 - number 3; long press of button 2 - number 4. The key fob will give the appropriate number of beeps.
The car alarm exits the code setting mode automatically after 5 seconds or immediately when the ignition is switched on. In confirmation, 5 flashes of dimensions will follow.
Programming functions and operating parameters
Some functions and parameters of the alarm operation can be changed using the service button and key fob without the need to access the central unit. The list of functions is shown in the table below.
The programming order is as follows:
- Turn on the ignition.
- Press the service button 6 times.
- Switch off the ignition. There will be 6 flashes of the LED and 6 beeps of the siren, indicating the entry into the programming mode.
- Press the service button as many times as necessary, equal to the number of the selected function. Each press of the service button will be accompanied by the lighting of the LED indicator and short beeps indicating the number of the currently selected function. Every fifth press - long beeps.
- Within 10 seconds, press button 1 or 2 of the remote control shortly (0.5 sec) or long (3 sec), depending on desired state selected function. In confirmation, 1,2,3 or 4 short beeps of the siren and key fob will follow, depending on the set value of the function.
- To go to the next function, press the service button, and then, by pressing the key fob button, set desired value functions. Repeat this procedure for all features that need to be changed.
- To exit the programming mode, switch the ignition on or wait for the system to exit automatically. In confirmation, 5 flashes of dimensions will follow.
Reset to factory settings
It is possible to reset the values of all programmable functions to factory presets. For this you need:
- Turn on the ignition and press the service button 10 times.
- Switch off the ignition. 10 siren chirps will sound indicating entering the factory reset mode.
- Press the service button 1 time. 1 siren will sound.
- Press button 1 on the key fob. There will be 1 short beep from the key fob, confirming the reset to factory settings.
- To exit the reset mode, switch the ignition on or wait for the system to exit automatically. In confirmation, 5 flashes of dimensions and a melodic key fob signal will follow.
| № | Function | Short press button 1 | Short press button 2 | Long press button 1 | |
|---|---|---|---|---|---|
| 1 signal | 2 signals | 3 signals | |||
| 1 | Pulse duration of additional channel No. 3 (yellow-red wire) | 0.8 sec | 10 sec | 30 sec | |
| 2 | Confirmation Beep Duration and Alarm Type | 100ms continuous | 20 ms intermittent | 15 ms intermittent |
|
| 3 | Pulse duration for central locking | locking | 0.8 sec. |
Davydov Alexander Advantages: Not the first time I work with this store. Everything is top notch as always! |
|
Security Starline system A6 is equipped with four control outputs. One of them, moreover, can be used to control the autorun module. We are talking about the Starline 02-12 module, which can be controlled from any external devices. We note right away that when setting up the module, the automatic transmission mode is selected, and not the manual transmission mode. And in order to provide additional security, the connection is carried out according to a special scheme, where the control of the "handbrake" is used. Consider all the nuances in order.
Dealing with blocking
It is known that the Starline Twage A6 signaling can block one of the following lines - the starter or ignition power circuit. The bottom line is that the “02-12” module is included in the break in the starter line, so you will have to get rid of the first type of blocking. It is implemented according to one scheme:
Starter blocking signaling, diagram
The wire that comes from terminal 50 must be connected to the black and yellow cord of the autorun module. Here we were talking about a "thin" cord coming out of a 6-pin connector. A "thick" wire of the same color will go to the starter.
The relay is removed from the structure. The signaling control wire shown in the diagram is disconnected.
Now let's deal with the blocking of the ignition circuit. It, if we talk about the Starline A6 model, can be implemented according to the scheme:

In this case, one thing is required - to make a T-shaped outlet from the power cable (marked in red). The outlet is then connected to yellow wire coming from the terminal block of the autostart module. Nothing complicated.
Consider the third case - the blocking relay is not connected to the alarm. Then you need to implement the lock according to the second scheme. She is brought to basic instruction, and there shouldn't be any problems. Remember that the alarm itself in this case is programmed:
- Function 11 is left at 1 if power wires connected to pins 30 and 87a (as in the diagram);
- If it is decided to use normally open contacts (30 and 87), the functions are given a new value - 2, 3 or 4.
Connection and programming
It is clear that the alarm itself will control the autorun module. Use one control output - yellow-red signal cord:

Connecting the module "02-12"
The main connector of the module in question will have six wires:
- Red - connect this wire to the 30th contact of the lock;
- Yellow - connected to the ignition line outlet (see above);
- Green - in a car with two ignition lines, the cord is connected to terminal 15/2;
- Blue - if necessary, this wire is connected to the ACC contact of the lock;
- Black and yellow (thin) - connected to the lock terminal 50 (discussed above);
- Black and yellow (thick) is starter power (see above).
During operation, this is what happens: the potential "+12" appears on terminal 50, and the relay built into the module supplies power to the starter. That is, the built-in relay closes the 30th and 50th contacts. In general, this happens in two cases:
- When an autorun command is given;
- When the black-yellow cord (thin) receives a positive potential.
The wiring for the ignition lock is shown below.

As stated in the instructions, in any case, it is impossible to connect the module without breaking the starter circuit. But the module is controlled by both the alarm and the potential at the 50th terminal. This means that the owner will not be left without the ability to start the engine “from the key”.
Now let's look at how the "low-voltage" connector is connected:
- Black wire - "minus" power supply of the module;
- Gray-black - engine control input (to the tachometer or to the battery charge lamp);
- Orange-violet - to the hand brake limit switch (see diagram);
- Pink - connected to the alarm control output;
- Black and red - this is the exit to the "crawler", which works only during the autorun process;
- Orange-gray - you can not connect;
- Yellow-black - output that works when the ignition is on and the starter is not working.
During the "normal" operation of the car, "exit 5" does not work. And by rolling the lock, the car will not be stolen. The connection method discussed above is given in the basic instructions. That is, there are no contradictions here.
 Device named "Starline 02"
When connecting to a Starline A2 or A4 alarm, a 3-pin connector is used. But, unfortunately, this connector is not compatible with the Starline Twage A6 model. And you have to use the control input (wire 4). What has already been said.
Having opened plastic cover, you can see a set of radio buttons. Each toggle switch is set to one position:
- Starter operating time: OFF - 0.8 seconds, ON - 1.8;
- Engine control method: OFF - by tachometer, ON - by a contact that receives the potential "+12" after starting;
- Power-on algorithm on terminal 15/2: OFF - when the starter is running, power remains on, ON - power is turned off (common option);
- Gearbox type: OFF - automatic transmission, and this option should be left;
- Ignition holding time before start: OFF - less than a second, ON - several seconds;
- Service switch, which is left in the OFF position.
Usually, during operation, auto switching is not done. So, you need to set everything right right away.
Let's say tachometer control is used. This means that the gray-black cable is connected to the high-voltage input of the tachometer, and toggle switch 2 is set to the OFF position.

Be sure to test:
- Switch 6 is temporarily set to the ON position;
- For a second, you need to press the START button located under the module cover;
- The engine will start, the LED should start flashing;
- If the start did not occur or the diode does not flash, the connection of the control wire was not done correctly.
For further operation, do not forget to return the toggle switch 6 to the OFF position.
In practice, voltage control can also be used. In this case, the gray-black cord is not connected, and selector 2 is switched to the ON position. This method is the least reliable of all.
Additional alarm setting
As mentioned above, the signaling will control external module via programmable output 3. Using a key fob with 4 buttons, it will be possible to start. A three-button key fob, which is equipped with a display, will allow you to do the same and in addition it shows the temperature.

In order for the display to show the temperature, keys 1 and 2 are pressed simultaneously. The duration of pressing is 0.5 seconds.
In the signaling itself, if we talk about the Starline A6 model, you need to correctly set three parameters:
- Function 11 - blocking relay connection type (normally closed or open contacts);
- Function 1 - set it to 2 if you want to use autorun, or set it to 1 to disable this option;
- Function 8 - setting the temperature scale (Celsius or Fahrenheit).
All these functions are indicated in the instructions:

How to enter the programming mode, consider now. You will need one keychain, primary or secondary.
- The programming order will be as follows:
- The ignition is turned on "from the key";
- The service button connected to the main module is pressed 6 times;
- The ignition is turned off, then 6 beeps of the siren and 6 flashes of dimensions follow;
- The service button is pressed 1, 8 or 11 times;
- Taking the key fob, press key 1 or 2 for 10 seconds (see table);
- The siren signals should confirm that the value has changed.
The Starline Twage A6 system switches options cyclically: after the 11th, the first one will go, then the second, etc. That is, at the "seventh step" you can continue to press the service button. To exit the setup mode, just turn on the ignition.
The Starline 02 module initiates a start if the duration of the control signal exceeds a second. This means that by assigning the value 4 to function 1, during operation, you can call a "cyclic start". What is unacceptable, although standard instruction this warning is not given.
100% car theft protection is guaranteed by a specialized car alarm Starline twage a6. Unique Features This alarm allows you to control it from a distance using a key fob.
It's no secret that in big cities quite a few sources of interference. Since you will need a key fob to use all the service functions of the car, the question arises: “Will the pager work well in conditions big city? Starline developers will not hesitate to answer this question - "Yes!".
ATTENTION! Found a completely simple way to reduce fuel consumption! Don't believe? An auto mechanic with 15 years of experience also did not believe until he tried it. And now he saves 35,000 rubles a year on gasoline!
Due to the fact that each transmitter has its own frequency, the code is also transmitted in an encrypted signal. At the same time, a spare is also supplied in the kit. It, of course, is weaker in parameters than the main one, but it will still serve as a help in the event of a breakdown or loss of the main transmitter.
If for some reason the pager was lost or broken, you can buy a new one and under the central control unit of the alarm. At the same time, you should not be afraid that the code can later be stolen by a “code grabber”. Such cases are almost completely excluded due to the fact that the code is transmitted at "jumping frequencies". In other words, buying a Starline a6 car alarm is impossible to miscalculate. It will provide the maximum possible protection against theft or burglary.
You can install the alarm yourself or contact those. service. But with this, it should be borne in mind that not every employee will undertake the installation. Therefore, one should choose such services that are known to friends, acquaintances or relatives. Well, if the choice fell on the independent installation of a car alarm, then you need to stock up on time, tools, measuring equipment and, of course, a user manual. The most important thing is to connect the wires correctly, as an incorrect connection will lead to a short circuit. And it in turn will disable the entire system.
What's inside the alarm box
- Wires are needed in order to supply power to the central alarm unit and connect the rest of the system.
- Remote control is carried out using a key fob. It is also called a transmitter or pager. There are two of them - main and spare. The second comes without an LCD screen. Of course, this is not always convenient, but it will be a great help in case of loss or breakage of the main key fob.
- The Central Signaling Unit (CBS) is the "brain" of the entire system. All encrypted codes come to it. And on it, they are decoded and the signal is transmitted to the corresponding parts of the car in order to perform the desired function.
- The transceiver receives the signal and sends it to the CBS. Usually attached to windshield, since there must be direct access to it, otherwise the signal from the key fob will not work.
- trailer. This thing is needed in order to send a signal to the pager about unauthorized opening of the hood. It is installed above the left headlight.
- Also included is an LED. It is needed in order to inform the owner that the system is working and working.
- Service button, which is installed in the car.
- To simplify the process of operation and installation, instructions and user manuals are supplied in the kit.

A key fob that transmits an encrypted signal to the CBS in order to control all the service functions of the car. A keychain is a thing of frequent use, so a comfortable position in the hand is not the last thing that was paid attention to in development. Also, the keychain is made with the expectation that the owner will look for it in his pocket by touch. Therefore, the buttons and their location are easy to remember and subsequently easily found blindly. The buttons are convenient and contain graphic images, which only increases their information content. In addition, pressing responds with a slight click. This is necessary in order for the owner to be completely sure that the signal has been sent and the required action is being performed.
Characteristics
Alarm Stalin a6 performs many functions, including:
- You can turn car protection on or off with one button.
- Silent mode - turn the alarm on and off without sound.
- Disabling (temporary or not) siren signals when setting the car to protection.
- Panic mode and reset button.
- Confirmation by means of a sound signal about arming the car.
- Notification of an attempt to enter the car.
- Opening and closing doors.
- Search mode for a car in a parking lot.
- Trunk opening with key fob.
- Anti-Hi-Jack function, activated from the key fob or a special button.
The carrier frequency at which the signal is transmitted is 433.92 MHz. At the same time, using a key fob, you can control the alarm at a distance of 600 m. The pager works at a distance of more than 1 km. Additional key fob - 15 m. The key fob is able to operate smoothly at temperatures from −40 to +85°C.
Self-installation of the alarm

If the motorist wants to install the alarm on his own, then with the help of the instructions this can be done relatively quickly. But there are times when the driver is not very well versed in electrics and he will need the help of an electrician.
What is needed to implement self installation star line alarm a6:
- The alarm itself
- driver's door activator (I didn't have one);
- soldering iron, solder, rosin;
- Screwdriver;
- Insulating tape;
- additional protective diode (1N4007) (only 4 diodes for the limit switches are included, but one more is needed to connect the handbrake to the lamp in the instrument panel).
- And, of course, the installation instructions that come with the car alarm.
The Starline A6 security system is equipped with four control outputs. One of them, moreover, can be used to control the autorun module. We are talking about the Starline 02-12 module, which can be controlled from any external devices. We note right away that when setting up the module, the automatic transmission mode is selected, and not the manual transmission mode. And in order to provide additional security, the connection is carried out according to a special scheme, where the control of the "handbrake" is used. Consider all the nuances in order.
Dealing with blocking
It is known that the Starline Twage A6 signaling can block one of the following lines - the starter or ignition power circuit. The bottom line is that the “02-12” module is included in the break in the starter line, so you will have to get rid of the first type of blocking. It is implemented according to one scheme:
Starter blocking signaling, diagram
The wire that comes from terminal 50 must be connected to the black and yellow cord of the autorun module. Here we were talking about a "thin" cord coming out of a 6-pin connector. A "thick" wire of the same color will go to the starter.
The relay is removed from the structure. The signaling control wire shown in the diagram is disconnected.
Now let's deal with the blocking of the ignition circuit. It, if we talk about the Starline A6 model, can be implemented according to the scheme:

Ignition circuit lock
In this case, one thing is required - to make a T-shaped outlet from the power cable (marked in red). The tap is then connected to the yellow wire coming from the terminal block of the autostart module. Nothing complicated.
Consider the third case - the blocking relay is not connected to the alarm. Then you need to implement the lock according to the second scheme. It is given in the basic instructions, and there can be no problems here. Remember that the alarm itself in this case is programmed:
- Function 11 is left at 1 if the power wires are connected to pins 30 and 87a (as in the diagram);
- If it is decided to use normally open contacts (30 and 87), the functions are given a new value - 2, 3 or 4.
Connection and programming
It is clear that the alarm itself will control the autorun module. Use one control output - yellow-red signal cord:
Twage A6 Kit Items
Connecting the module "02-12"
The main connector of the module in question will have six wires:
- Red - connect this wire to the 30th contact of the lock;
- Yellow - connected to the ignition line outlet (see above);
- Green - in a car with two ignition lines, the cord is connected to terminal 15/2;
- Blue - if necessary, this wire is connected to the ACC contact of the lock;
- Black and yellow (thin) - connected to the lock terminal 50 (discussed above);
- Black and yellow (thick) is starter power (see above).
During operation, this is what happens: the potential "+12" appears on terminal 50, and the relay built into the module supplies power to the starter. That is, the built-in relay closes the 30th and 50th contacts. In general, this happens in two cases:
- When an autorun command is given;
- When the black-yellow cord (thin) receives a positive potential.
The wiring for the ignition lock is shown below.

Standard lock, diagram
As stated in the instructions, in any case, it is impossible to connect the module without breaking the starter circuit. But the module is controlled by both the alarm and the potential at the 50th terminal. This means that the owner will not be left without the ability to start the engine “from the key”.
Now let's look at how the "low-voltage" connector is connected:
- Black wire - "minus" power supply of the module;
- Gray-black - engine control input (to the tachometer or to the battery charge lamp);
- Orange-violet - to the hand brake limit switch (see diagram);
- Pink - connected to the alarm control output;
- Black and red - this is the exit to the "crawler", which works only during the autorun process;
- Orange-gray - you can not connect;
- Yellow-black - output that works when the ignition is on and the starter is not working.
During the "normal" operation of the car, "exit 5" does not work. And by rolling the lock, the car will not be stolen. The connection method discussed above is given in the basic instructions. That is, there are no contradictions here.

Device named "Starline 02"
When connecting to a Starline A2 or A4 alarm, a 3-pin connector is used. But, unfortunately, this connector is not compatible with the Starline Twage A6 model. And you have to use the control input (wire 4). What has already been said.
Opening the plastic cover, you can see a set of switches. Each toggle switch is set to one position:
- Starter operating time: OFF - 0.8 seconds, ON - 1.8;
- Engine control method: OFF - by tachometer, ON - by a contact that receives the potential "+12" after starting;
- Power-on algorithm on terminal 15/2: OFF - when the starter is running, power remains on, ON - power is turned off (common option);
- Gearbox type: OFF - automatic transmission, and this option should be left;
- Ignition holding time before start: OFF - less than a second, ON - several seconds;
- Service switch, which is left in the OFF position.
Usually, during operation, auto switching is not done. So, you need to set everything right right away.
Let's say tachometer control is used. This means that the gray-black cable is connected to the high-voltage input of the tachometer, and toggle switch 2 is set to the OFF position.

Tachometer input, tidy VAZ
Be sure to test:
- Switch 6 is temporarily set to the ON position;
- For a second, you need to press the START button located under the module cover;
- The engine will start, the LED should start flashing;
- If the start did not occur or the diode does not flash, the connection of the control wire was not done correctly.
For further operation, do not forget to return the toggle switch 6 to the OFF position.
In practice, voltage control can also be used. In this case, the gray-black cord is not connected, and selector 2 is switched to the ON position. This method is the least reliable of all.
Additional alarm setting
As mentioned above, the signaling will control the external module through programmable output 3. Using a key fob with 4 buttons, it will be possible to start. A three-button key fob, which is equipped with a display, will allow you to do the same and in addition it shows the temperature.

Interior temperature display area
In order for the display to show the temperature, keys 1 and 2 are pressed simultaneously. The duration of pressing is 0.5 seconds.
In the signaling itself, if we talk about the Starline A6 model, you need to correctly set three parameters:
- Function 11 - blocking relay connection type (normally closed or open contacts);
- Function 1 - set it to 2 if you want to use autorun, or set it to 1 to disable this option;
- Function 8 - setting the temperature scale (Celsius or Fahrenheit).
All these functions are indicated in the instructions:

Custom Option Table A6
How to enter the programming mode, consider now. You will need one keychain, primary or secondary.
- The programming order will be as follows:
- The ignition is turned on "from the key";
- The service button connected to the main module is pressed 6 times;
- The ignition is turned off, then 6 beeps of the siren and 6 flashes of dimensions follow;
- The service button is pressed 1, 8 or 11 times;
- Taking the key fob, press key 1 or 2 for 10 seconds (see table);
- The siren signals should confirm that the value has changed.
The Starline Twage A6 system switches options cyclically: after the 11th, the first one will go, then the second, etc. That is, at the "seventh step" you can continue to press the service button. To exit the setup mode, just turn on the ignition.
The Starline 02 module initiates a start if the duration of the control signal exceeds a second. This means that by assigning the value 4 to function 1, during operation, you can call a "cyclic start". Which is unacceptable, although this warning is not given in the standard instructions.
A6 with autorun - quite possible!
Car alarm STARLINE TWAGE A6 Starline a6 user manual and installation
Instructions for use and installation
Components included in the car alarm kit STARLINE TWAGE A6
The StarLine Twage A6 car alarm kit includes:
1 main remote control with LCD display and two-way communication, 1 additional remote control without feedback, central processing unit, transceiver module with antenna and temperature sensor, 2-level shock sensor, LED indicator, Valet service button, anti-robbery button , hood button, set of cables.
Specifications
| Control radio carrier frequency | 433.92 MHz |
| Maximum range of the main key fob | 600 m* |
| The maximum range of the pager | 1200 m* |
| Maximum range of additional key fob | 15m* |
| Shock sensor type | piezoelectric |
| Working temperature | from -40 to +85 °С |
| DC supply voltage | 9-18V |
| The current consumed by the alarm in armed mode | 20mA |
| The maximum allowable current at the outputs: | |
| siren connection circuits | 2A |
| circuits for connecting marker lights | 2x7.5A |
| control circuits for electric door locks; | 15A |
| engine lock circuits | 40A |
| circuits of additional control channels | 300 mA |
| Power supply of the main key fob | 1.5V (1 AAA battery) |
| Power supply for an additional key fob | ZV (1 battery type CR2032) |
* The range of the key fob and pager may be reduced depending on the location of the transceiver in the car, the location of the car and the user, radio frequency interference, weather conditions, vehicle battery voltage and key fob battery.
Car alarm features STARLINE TWAGE A6
Protected areas of the car and ways to protect them
- Engine - from start (blocking relay)
- Doors, hood, trunk - from opening (push-button switches)
- Body, wheels, windows - from shocks and shocks (two-level shock sensor)
- Ignition - from switching on
Security car alarm STARLINE TWAGE A6
- Dynamic control code, protected from selection and interception
- Limiting the number of alarm cycles
- Interruption of alarms without disarming
- Remembering the state when the power is turned off and return to the same state when the power is restored
- Personal emergency shutdown code
Protective functions of car alarm STARLINE TWAGE A6
- Enabling sound and light alarms when sensors are triggered in armed mode
- Sending alarm alerts to a key fob with an LCD display
- Immobilizer mode
- Anti-robbery mode, activated remotely by key fob
- Anti-robbery mode activated by a special button
- Engine blocking and its preservation when dismantling the alarm
Self-diagnosis and indication of operating modes
- STARLINE TWAGE A6 alarm status indication by LED and key fob display
- Indication of the reason for the last alarm operation for 6 security zones
- Indication of a faulty zone when arming
- Sound indication of the fact of alarm operation
- Automatic control of security sensors with disconnection of faulty ones and a message about it
- Indication open doors when the security mode is off
- LED indication of the serviceability of the limit switches when the ignition is on
Service functions of car alarm STARLINE TWAGE A6
- Silent guard mode
- Guard mode with running engine
- Switching on the security mode without a key fob
- Automatic return to armed mode in case of accidental shutdown (switching)
- Automatic arming
- Delay arming for the time when the interior light goes out
- Self-diagnosis when arming / disarming
- Silent arming with a disabled shock sensor
- Remote disable / enable shock sensor by levels in armed mode
- Remote control of the central lock
- Control of the central lock from the ignition switch
- Two step door unlocking
- Two-pulse unlocking of door locks
- Ability to implement the "comfort" function
- Service mode Valet
- Emergency disarming by personal code
- 4 additional channels for controlling car devices
- Car interior lighting control
- Vehicle search mode
- Remote programming mode for new key fobs and erasing lost ones
- Possibility to reset the values of programmable functions to factory presets
- Call mode from car
- Indication of temperature in the passenger compartment
- Time indication, timer, alarm clock
- Battery discharge control of the main remote control on the LCD display
- Fluorescent illumination of the display of the main key fob
Keyfobs
The car alarm performs its functions either automatically or by remote control signals when the buttons are pressed. Some of the provided functions and some parameters of the system operation can be changed by programming.
Car alarm STARLINE TWAGE A6 has a 3-button remote control with a liquid crystal display. The purpose of button 1 of the key fob is programmable. The purpose of button 2 is selected by quickly moving the cursor on the key fob display using button 3. When the key fob buttons are pressed, the fluorescent backlight of the display turns on for a few seconds. When the signaling executes a key fob command, the corresponding information is displayed on the display and a melodic sound signal is given.
When the alarm performs any actions automatically, the corresponding information is also displayed on the key fob display and is accompanied by sound signals or vibration. If more than one key fob is used to control the alarm, then the status of the car and the STARLINE TWAGE A6 car alarm will only be displayed on the display of the key fob from which the last command was issued.
In case of inoperability or loss of the main key fob with two-way communication and liquid crystal display, the system comes with an additional 4-button remote control. Most of the functions and modes of operation of the STARLINE TWAGE A6 alarm system can also be activated from this key fob, but the following operating instructions are written for the case of using the main key fob with an LCD display.
Purpose of the buttons on the main key fob
Button 1
- Programmable command (0.5 sec)
- Arming / disarming with loud confirmation signals (3 sec)
Button 2
- Command corresponding to the current position of the cursor on the keyfob display (0.5 sec)
- Unlocking the trunk (3 sec)
Buttons 1+ 2
- Search mode (3 sec)
- Monitoring the state of the car and the temperature in the cabin (0.5 sec)
Button 3
- Cursor position control on the remote control display (0.5 sec)
- Key fob alert interruption (0.5 sec)
- Turning on and off the clock setting, alarm clock, timer, power saving mode (3 sec)
- Button programming 1 (6 sec)
Buttons 3 + 1
- Key fob notification mode selection (0.5 sec)
Buttons 3 + 2
- Quick setting of the keychain timer (0.5 sec)
The keychain with an LCD display uses an AAA, 1.5V battery. The operating time of the battery depends on: the frequency of using the key fob, the frequency of the pager operation, the selected notification mode, the type of battery installed. The capacities of commercially available batteries may vary by several times. Accordingly, the average operating time of one key fob battery can be from 3 to 6 months.
When the battery is low, the icon appears on the display, indicating that it needs to be replaced.
The battery of the main key fob is replaced in the following order:
- Open the cover on the back of the key fob and remove the old battery.
- Briefly press button 1 on the key fob.
- Install a new battery, observing the polarity, and close the cover. (The correct position of the battery is indicated on the key fob body under the cover).
- After replacing the battery, correct the clock and alarm settings.
Re-programming button 1 of the key fob is not required.
Purpose of the buttons of the additional key fob

Button 1
- Arming / disarming with sound confirmation signals
Button 2
- Search mode (0.5 sec)
- Panic mode (3 sec)
Button 3
- Channel 3 (0.5 sec)
- Unlocking the trunk (3 sec)
Button 4
- Silent guard on/off (0.5 sec)
- Channel 2 (3 sec)
Buttons 1 + 3
- Disabling the sensor by levels
Buttons 1 + 4
- Service mode Valet STARLINE TWAGE A6
Buttons 3 + 4
- Anti-robbery mode (ignition on)
- Keyfob entry in programming mode
The four-button key fob without feedback uses a lithium battery CR2032, 3B. The battery life depends on how often the key fob is used and on the type of battery installed.
To replace the battery, unscrew the screw on the back of the key fob and open the cover. Remove the old battery and install a new one in its place, observing the polarity. Then close the key fob cover and tighten the fixing screw.
LCD display of the main key fob

Icons with letter designation - indication of commands, modes and alarm functions
- Anti-robbery mode (on/off)
- Additional channel 3 (on/off)
- Panic mode (on/off)
- Search mode (on/off)
- Loud confirmation tones
- Silent guard mode (on/off)
- Silent Acknowledgment Tones
- Remote shutdown of the shock sensor (on / off)
- Service mode Valet (on / off)
- Vehicle status and temperature indication
- Additional channel 2 (on/off)
- Remote trunk release
Icons with a digital designation - indication of the status of the STARLINE TWAGE A6 alarm and the car
- Silent guard mode
- Security mode with sound signals
- Warning lights
- Hood open
- The shock sensor has worked
- Door locks locked
- Key fob receiver included
- Door locks open
- Call from the car
- Confirmation of communication with the car
- Energy saving key fob mode
- Ignition on
- Alarm mode
- Second half of the day (PM)
- First half of the day (AM)
- Shock sensor off mode
- Time and temperature indication
- Temperature scale
- Timer mode
- Battery monitoring
- Channel 2 on
- Channel 3 enabled
- running engine
- The doors are open
- Vibration alert mode
- Auto switch mode
- Trunk open
- Valet service mode enabled
Programming button 1 of the main key fob
The purpose of button 1 of the main key fob is programmable and can be changed by the owner of the car an unlimited number of times. For the convenience of using the alarm, it is recommended to program this button to turn on / off the armed mode.
Programming is done in the following order:
In the future, when using the alarm, a short press of button 1 on the key fob will lead to the execution of the command assigned to it (arming and disarming). When the button is pressed, the icon corresponding to the programmed function will light up.
Note. To reprogram the assignment of button 1, you need to do the described procedure again. Button assignment 1 will be changed to the new one. Further, the operating instructions are written taking into account the fact that button 1 is programmed to turn the protection mode on and off.
Purpose of button 2 of the main key fob
The purpose of button 2 of the main key fob is determined by the current position of the cursor on the key fob display. The cursor is moved by pressing button 3 of the remote control in the following order:
- Quickly press keyfob button 3 two or more times to start cursor movement.
- When button 3 is pressed, the cursor will cycle through the icons indicated by letters in the display diagram shown below.
Set the cursor to the position corresponding to the desired command by successive pressing of button 3 on the remote control.
Subsequent short pressing of button 2 on the key fob will execute the selected command.
Setting the clock
For ease of use, the main alarm key fob STARLINE TWAGE A6 has a built-in clock. To set the clock, press keyfob button 3 and hold it pressed until 2 short beeps appear. The clock indicator will flash.
To increase the clock readings, use button 1 of the key fob, to decrease - button 2 of the key fob. To quickly increase or decrease the clock readings, hold down the corresponding button on the key fob. To switch to setting minutes, briefly press button 3 on the remote control. To increase the minutes, use button 1 of the key fob, to decrease the readings, use button 2 of the key fob. To quickly increase or decrease the minutes, hold down the corresponding button on the key fob.
To exit the time setting mode, press and hold keyfob button 3 until one short beep appears or wait for automatic exit.
Setting an alarm
The main alarm key fob has a built-in alarm clock. To set an alarm, press button 3 of the remote control and hold it pressed until 2 short beeps appear.
Press keyfob button 3 in succession until the alarm indicator appears on the display. The alarm clock indicator will flash.
To increase the value of the parameter, button 1 of the remote control is used, to decrease the value - button 2 of the remote control. To quickly increase or decrease the alarm clock, hold down the corresponding button on the key fob.
To switch to setting the alarm minutes, briefly press button 3 on the key fob.
After setting the hours and minutes of the alarm clock, briefly press button 3 on the remote control to set the alarm mode (ON-on / OFF-off). To turn on the alarm, press button 1 of the remote control (ON indication), to turn it off, press button 2 of the remote control (OFF indication).
To exit the alarm setting mode, press and hold button 3 of the key fob until one short beep appears or wait for automatic exit.
The enabled alarm mode is indicated by the icon on the key fob display.
When the alarm goes off, a melodic signal will sound, to terminate it early, press button 3 of the key fob.
Setting the timer
In addition to the clock and alarm clock, the main alarm keychain STARLINE TWAGE A6 has a built-in countdown timer. To set the timer, press button 3 of the remote control and hold it pressed until 2 short beeps appear.
Press keyfob button 3 in succession until the timer indicator appears on the display. Setting the time and turning on the timer is similar to an alarm clock.
The maximum timer value is 19 hours 59 minutes. When the timer is on, the display shows its current status and a blinking indicator. After the set time has elapsed, 8 beeps will follow and the timer indication will disappear. To interrupt the sound signals, press button 3 of the key fob.
Quick timer setting
To quickly set the timer, press buttons 3 and 2 on the remote control simultaneously. The display will show a blinking indicator and the value of the timer time. To change the timer value, press buttons 3 and 2 of the remote control simultaneously. Possible values for quick installation timer -10 minutes, 20 minutes, 30 minutes, 1 hour, 1 hour 30 minutes, 2 hours.
When the timer is on, the display shows its current status and a blinking indicator. After the set time has elapsed, 8 beeps will follow and the timer indication will disappear.
Selecting an alert mode
The main remote control has 2 notification modes: sound signals or vibration. To select the type of alerts, press buttons 3 and 1 at the same time.
When the vibration alert mode is activated, 2 vibration signals will follow, the indicator will appear on the display.
When you turn on the sound notification mode, a melodic signal will follow, the indicator will disappear.
Note. Further, the operating instructions for the alarm are written taking into account the enabled alert mode with sound signals. When the vibration alert mode is on, vibration signals will follow instead of the sound signals of the key fob.
Power saving mode
To increase the battery life of the main key fob, a special power saving mode is provided. In this mode, the consumption of the key fob is reduced to a minimum 2 minutes after each disarming of the STARLINE TWAGE A6 car alarm. When the security mode is turned on, the energy-saving mode of the key fob is automatically turned off. Reducing consumption in power saving mode occurs by turning off the electrical circuit of the receiver.
To enable the power saving mode, you must do the following procedure:
When the power saving mode is on, the indicator will constantly be displayed on the keyfob display. 2 minutes after disarming, the icon will turn off on the keyfob display, confirming that the power saving mode is activated.
Note: In the power saving mode, the keyfob receiver will automatically turn on for 2 minutes each time to receive a confirmation signal that the alarm has completed the command sent from the keyfob. For example, if a command to unlock the trunk is given when the security mode is off, the key fob will confirm the execution of the command with sound signals, after which it will switch back to the power saving mode.
Arming with sound signals
Before turning on the security mode, make sure that the ignition is off, the doors, hood, trunk are securely closed. Press button 1 of the key fob, having previously programmed it to turn on / off the armed mode with quiet confirmation signals.
1 beep and 1 flash of dimensions will confirm the arming mode. Automatic locking of door locks will occur if they are connected to the STARLINE TWAGE A6 alarm. The LED indicator will start flashing to indicate that the vehicle is guarded.
Icons and will appear on the keyfob display, followed by a short beep.
The security mode can also be turned on by long pressing button 1 of the key fob. In this case, the siren will give loud confirmation signals, regardless of the programmed function for button 1.
Attention! If the doors, hood, trunk turn out to be poorly closed, or one of the push-button switches of the doors, hood, trunk is faulty, then the alarm will warn about this with 4 beeps and 4 flashes of dimensions. See item "Self-diagnosis when arming".
Enabling Silent Arming
Before turning on the security mode, make sure that the ignition is off, the doors, hood, trunk are securely closed. To enable the silent security mode, place the cursor on the icon and press button 2 on the remote control.
1 flash of dimensions will confirm the arming mode. Automatic locking of door locks will occur if they are connected to the STARLINE TWAGE A6 alarm. The LED indicator will start flashing to indicate that the vehicle is guarded. Icons and will appear on the keyfob display, followed by a short beep.
Attention! If the doors, hood, trunk turn out to be poorly closed, or one of the push-button switches of the doors, hood, trunk is faulty, then the alarm system will warn about this with 4 beeps of the key fob and 4 flashes of dimensions. See item "Self-diagnosis when arming".
Switching on the protection mode with the engine running
The alarm provides the ability to turn on the protection mode when the engine is running. This may be necessary during a short stop or when parking in the cold season.
Leave the vehicle with the engine running and close all doors, hood and trunk. Press and hold button 1 of the key fob until 1 beep and 1 flash of dimensions appear, which will confirm the arming mode with the engine running. Automatic locking of door locks will occur if they are connected to the STARLINE TWAGE A6 alarm. The shock sensor will be disabled from the security circuit to avoid false positives signaling from a running engine.
The key fob will give a short beep. Icons and will be displayed on its display, the disabled shock sensor will be indicated by icons and the ignition on and the engine running will be indicated by icons and .
Auto arming (programmable function)
If the automatic arming function is enabled, then after turning off the ignition and closing the last door, a siren warning signal and 1 flash of dimensions will follow. After 10 seconds, the alarm will automatically turn on the armed mode. The activation will be confirmed by 1 beep and 1 flash of dimensions. The door locks are locked. The keyfob display will show icons , and .
Attention! If one of the door push-button switches is faulty, then automatic arming will not occur. See the section "Checking the health of the limit switches".
If the hood or trunk turn out to be poorly closed, or one of the push-button switches of the hood, trunk is faulty, then the alarm system will warn about this with 4 beeps and 4 flashes of dimensions. See item "Self-diagnosis when arming".
Emergency arming without a key fob
To turn on the armed mode in emergency cases, for example, in case of loss or inoperability of the remote control key fob, you must:
- Turn on the ignition and press the service button 4 times.
- Switch off the ignition. In confirmation, 1 siren signal and 1 flash of dimensions will follow.
- Get out of the car within 20 seconds and lock all doors with the key. First, 1 siren signal will follow, then 1 key fob beep.
20 seconds after the ignition is turned off, regardless of the state of the doors, the system will arm the system. In confirmation, 1 flash of dimensions will follow. The LED indicator will start flashing to indicate that the vehicle is guarded.
Attention! If the automatic arming function is programmed, then after closing the last door, 1 siren signal and 1 flash of dimensions will additionally follow. 20 seconds after arming, 1 additional siren signal will follow.
If the security mode is turned on urgently (without a key fob), then in the event of any of the security sensors being triggered, only warning alarms will first follow - 4 beeps and 4 flashes of dimensions. Then, if the armed mode is not disarmed, after 20 seconds, a full alarm cycle will turn on.
Delay activation of sensors after arming (programmable function)
The alarm has the ability to program a delay in the activation of sensors after arming 5,15,30 or 45 seconds. When the security mode is activated with a key fob, the door locks are locked immediately, and the zones of limit switches and sensors are armed after a programmed time. This delay may be necessary for the car's interior lights to fade out smoothly, or for the shock and volume sensors to calm down.
After the programmed delay time has elapsed, 1 flash of dimensions follows, and all zones are armed.
Self-diagnosis when arming
If, when the security mode is turned on, 4 beeps and 4 flashes of dimensions appear, this means that the doors, hood, trunk may not be closed properly, one of the door, hood or trunk push-button switches is faulty. The keyfob will give a short beep and the display will show the faulty zone. This zone will be temporarily excluded from the security loop.
It is necessary to close the doors, hood and trunk, and the system will automatically arm this zone. In confirmation, a short sound signal from the key fob will follow, and the image of the faulty zone will turn off on the display.
If the cause of a malfunction of the pushbutton switches cannot be eliminated on site, the system will arm and bypass the faulty zone. In case of spontaneous elimination of a malfunction with the armed mode on, the alarm system will immediately automatically arm this zone.
Disarming with sound signals
To disarm the security mode, press button 1 of the remote control, having previously programmed it to enable / disable the security mode with quiet confirmation signals.
2 short beeps and 2 flashes of dimensions will confirm switching off. Automatic unlocking of the door locks and switching on the interior light will occur if they are connected to the STARLINE TWAGE A6 alarm. The engine block is turned off. The LED indicator will turn off. The icon will be displayed on the keyfob display and 2 short beeps will follow.
The security mode can be turned off by long pressing button 1 on the remote control. In this case, the siren will give loud confirmation signals, regardless of the programmed function for button 1.
Attention! If 4 beeps and 4 flashes of dimensions sound when the security mode is turned off, this means that security sensors were triggered in the security mode. See "Self-diagnosis when disarming".
Silent disarming
To disarm without sound confirmation signals, place the cursor on the icon and press button 2 of the remote control.2 flashes of dimensions will confirm disarming. The automatic unlocking of the door locks and the inclusion of the interior light will occur if they are connected to the alarm. The engine block is turned off. The LED indicator will turn off.
The icon will be displayed on the keyfob display and 2 short beeps will follow.
Note. When the security mode is silently disarmed, the fact that the alarm is triggered is indicated by 4 beeps of the key fob and 4 flashes of dimensions.
Disabling security mode when the engine is running
Disabling the security mode with the engine running is done by pressing and holding button 1 of the key fob until 2 beeps and 2 flashes of dimensions appear. Automatic unlocking of door locks will occur if they are connected to the STARLINE TWAGE A6 alarm. The engine will continue to run.
The keyfob display will show the icon and 2 short beeps will follow. The switched on ignition will continue to be indicated by the icon
Emergency disarming (entering a personal code)
For emergency disarming, for example, in case of loss or inoperability of the remote control key fob, it is necessary to enter a personal code using the ignition key and the service button:
Note. There will be no indication of the disarmed mode on the key fob display.
Automatic return to armed mode in case of accidental shutdown (programmable function)
If within 30 seconds after disarming the car doors were not opened, the alarm will automatically re-enable the armed mode. This protects against disabling the security mode by accidentally pressing the key fob button, as well as if you, by disabling the alarm, change your intention to get into the car and forget to turn on the security mode. The alarm will do it itself.
If the security mode was turned off with sound confirmation signals, then the re-arming of the security mode will be confirmed by 1 siren signal and 1 flash of dimensions. The keyfob display will show icons , and . 1 short beep will follow.
If the security mode was turned off silently, then the switching of the security mode will be confirmed only by 1 flash of dimensions. Icons , and will be displayed on the keyfob display, indicating that the silent security mode is on. 1 short beep will follow.
Automatic locking of door locks will occur if they are connected to the alarm. The engine is blocked. The LED indicator will start flashing to indicate that the vehicle is guarded.
Self-diagnosis when disarming
If the alarm was triggered in the security mode in the absence of the owner (doors, hood, trunk were opened) and the alarms were not interrupted from the key fob, then when the security mode is turned off, 4 siren signals, 4 flashes of dimensions and 4 sound signals of the key fob will follow. The display will show icons corresponding to the reasons for the alarm.
If the alarm signals were interrupted from the key fob, then when the security mode is turned off, only 2 siren signals and 2 flashes of dimensions will follow. In this case, there will be no indication of a triggered security zone on the display.
Protective functions
Alarms
If any of the security sensors are triggered in the security mode, this will automatically turn on the alarms, the siren sounds, the parking lights will flash and the interior light will turn on; the engine will be instantly blocked. The keyfob will sound alarms, and the display will show the reason for the alarm. While the STARLINE TWAGE A6 alarm siren is sounding, the icon will flash on the display; while the dimensions are flashing, the vehicle's headlights will flash on the display. Alarms are given in cycles. The duration of one alarm cycle and the maximum possible number of cycles for various alarm triggering causes are shown in the table.
If, after the end of the alarm cycle, the cause of the alarm has not been eliminated (for example, the doors remain open), then the corresponding security zone is temporarily excluded from the security circuit until the cause of the alarm is eliminated (until the doors are closed), but the indication continues on the key fob display.
| Cause of alarm | Display Icon | Duration of one alarm cycle | Max, number of cycles with a continuously operating sensor | Max, number of cycles with intermittent sensor |
|---|---|---|---|---|
| 1 level shock sensor | 3 signals 6 flashes |
1 | 8 | |
| Level 2 shock sensor | 20 sec. sound 20 sec. light |
1 | 8 | |
| doors | + | 30 sec. sound 35 sec. light |
1 | 4 |
| Hood | 30 sec. sound 35 sec. light |
1 | 4 | |
| Trunk | 30 sec. sound 35 sec. light |
1 | 4 | |
| Ignition | 30 sec. sound 35 sec. light |
4 in a row | 4 |
Note.
If there was an interruption of alarm signals from the key fob, then the count of the number of alarm cycles with a periodically triggered sensor starts anew.
If the silent armed mode is enabled, then when the STARLINE TWAGE A6 alarm is triggered, there will be no audible alarms.
Interruption of alarms
If you want to interrupt the alarms without disarming, for example, you checked the operation of the sensors, press button 1 of the key fob. In this case, the alarm will remain in armed mode.
If at the time of interruption of the alarm the cause of the alarm has been eliminated, then the sound signals and the indication on the key fob display will stop.
If, at the time of interrupting the alarm, the cause of the alarm is not eliminated, then the corresponding icon will continue to be displayed on the keyfob display. The guard zone will be temporarily excluded from the security loop. The icon on the display will go out only after the cause of the operation has been eliminated, 1 siren and 1 beep from the key fob will sound in confirmation.
To interrupt only the alert signals of the key fob, press button 3 of the key fob. In this case, the alarm signals and the indication on the key fob display will continue.
Remote activation of the "panic" mode
To turn on the "panic" mode with the ignition off, place the cursor on the icon and press button 2 on the remote control.
There will be 3 beeps of the siren and 3 flashes of dimensions. The key fob will beep.
If the security mode was previously turned off, then when the "panic" mode is turned on, the door locks are locked. After the alarms are turned off, the armed mode is automatically turned on. In this case, there will be no indication on the key fob display.
Anti-theft mode STARLINE TWAGE A6
Enabling anti-robbery mode
Anti-robbery mode can be enabled in two ways:
Method 1 - with the ignition on, use the key fob button 3 to place the cursor on the icon and press the key fob button 2. The icon will appear on the keyfob display, and a short beep will sound.
Method 2 - with the ignition on, press the special button to turn on / off the anti-robbery mode.
After activating the anti-theft mode, the alarm will first turn on the 30-second warning lights, then the siren sounds will turn on. The door locks will close. The engine will be blocked. Icons and will flash on the keyfob display, and the keyfob's audible alarms will turn on.
Disabling anti-robbery mode
During the first 30 seconds from the moment the anti-robbery mode is activated, it can be turned off using a special button to turn on / off the anti-robbery mode. To do this, first turn off the ignition, then press and hold the button until 3 siren sounds. The warning lights will turn off.
When the engine is stopped and the audible alarms sound, the anti-robbery mode can be disabled in two ways:
Method 1 - turn off the ignition, place the cursor on the icon and press button 2 on the key fob. The alarms will stop. The system will enter armed mode. The LED indicator will start flashing. After disarming, the engine will be unlocked.
Method 2 - Enter your 2-digit personal emergency shutdown code. After a successfully dialed code, the alarms will stop, the engine lock will turn off. The door locks will remain closed. The door locks will open after switching the security mode with the key fob. The icons and on the key fob display will disappear.
Immobilizer mode (programmable function)
If the immobilizer function is programmed, the engine will be automatically blocked 30 seconds after each ignition is turned off, regardless of whether the armed mode was turned on or not. The immobilizer mode is indicated by double flashes of the LED indicator.
To turn off the immobilizer mode, press the Valet service button once with the ignition off. The LED indicator will turn off. The engine is unlocked.
The immobilizer mode can also be turned off by pressing twice on the button 1 of the key fob with an interval of 2 seconds; in confirmation, after the second press, 2 beeps of the key fob and 2 flashes of dimensions will follow.
Engine lock
Reliable blocking of the engine by one or two circuits is maintained during the entire period of protection. Attempts by hijackers to start the engine, despite the alarms, will be useless. Even if the central signaling unit STARLINE TWAGE A6 is detected and disconnected from the cable connectors, the engine will remain blocked.
Power failure alarm protection
When the power is turned off, for example, the battery terminal is reset, the STARLINE TWAGE A6 alarm remembers its state. When the power is restored, the alarm will again be in the same mode (see the status table below), the key fob will give a melodic sound signal.
Service functions STARLINE TWAGE A6
Remote disable and enable shock sensor
The STARLINE TWAGE A6 alarm system provides the ability to remotely disable / enable the shock sensor by levels an unlimited number of times during one security cycle.
If it is necessary to disable only the preliminary level of the shock sensor, place the cursor on the icon and press button 2 of the remote control. Icons and will be displayed on the keyfob display, followed by 2 beeps and 2 flashes of dimensions. The first level of the sensor will be disabled.
If it is necessary to disable both levels of the shock sensor, place the cursor on the icon and press button 2 of the remote control a second time. Icons and will be displayed on the keyfob display, followed by 3 beeps and 3 flashes of dimensions. Both levels of the shock sensor will be disabled.
If it is necessary to re-enable the shock sensor, place the cursor on the icon and press button 2 of the remote control for the third time, 1 beep and 1 flash of dimensions will follow. The icons and will disappear from the keyfob display. Both shock sensor levels will be enabled again.
Control of the central lock from the key fob with the ignition on
With the ignition on, successive short presses on button 1 of the key fob will lead to alternately closing and opening the door locks.
Icons are displayed on the key fob display:
When closing locks;
When opening locks.
The switched on ignition is indicated by the icon
Automatic control of the central lock from the ignition key (programmable function)
At your request, the function of automatic control of door locks when the ignition is turned on and off can be introduced. If this function is enabled, then when the ignition is turned off, the door locks will automatically open.
You can program 3 options for controlling the locks when the ignition is turned on:
- locks are not locked;
- are locked 10 seconds after the ignition is switched on;
- are locked 30 seconds after the ignition is switched on.
Attention! If one of the doors is opened when the ignition is switched on or within 10 or 30 seconds after the ignition is switched on, the door locks will not be locked.
Alarm STARLINE TWAGE A6 open doors (programmable function)
At your request, the function of warning about open doors when the security mode is off can be introduced. When opening any of the doors, the dimensions will flash for 10 seconds or until the doors are closed.
Checking the health of limit switches
The STARLINE TWAGE A6 alarm system provides for the possibility of monitoring the serviceability of the door, hood and trunk limit switches when the security mode is off. Opening the doors, hood and trunk with the ignition on should be accompanied by flashes of the LED indicator. If the LED indicator does not light up when they are opened, then the corresponding limit switch is defective.
Vehicle search mode
In this mode, the system gives 6 beeps and 6 flashes of dimensions, making it easier to find a car in the dark. The key fob will give a melodic sound signal.
There are two options for enabling search mode:
Option 1- simultaneously press and hold buttons 1 and 2 of the key fob for the appearance of sound and light signals.
Option 2
Vehicle health and temperature monitoring
To control the state of the car, the temperature in the cabin and the mode of operation of the STARLINE TWAGE A6 alarm, a special mode is provided.
There are two options for enabling this mode:
Option 1- simultaneously press buttons 1 and 2 of the remote control.
Option 2- place the cursor on the icon, press the button 2 of the remote control.
3 flashes of dimensions will follow. The key fob display will show the temperature in the car interior and the state of the alarm mode, a melodious signal will sound.
Note. The temperature display scale (Celsius or Fahrenheit) is programmable. The temperature value indicated by the remote control may differ from the real value depending on the location of the transceiver module in the car (for example, when the module is in the sun, the displayed temperature value may be higher than the real one).
Call from the car
To send a call signal from the car to the STARLINE TWAGE A6 alarm key fob, you need to press the button located on the transceiver module case.
3 flashes of dimensions will follow. The keyfob display will show the icon and 20-second ringing tones will sound. To interrupt the sound signals and indication on the display, press button 3 of the remote control.
Control of additional channel No. 1 (remote unlocking of the trunk)
Additional channel No. 1 (yellow-black wire) can be activated regardless of the alarm condition and used for remote unlocking of the trunk. If the channel is activated when the security mode is on, then the trunk and shock sensor zones are temporarily disabled.
There are two options for enabling additional channel #1:
Option 1- press and hold button 2 of the remote control until confirmation light signals appear.
Option 2- place the cursor on the icon, press the button 2 of the remote control. In confirmation, 3 beeps of the key fob and 3 flashes of dimensions will follow. A negative pulse lasting 1 second will appear at the channel output - the trunk will open.
When the armed mode is off, the flashing icon of the open trunk will appear on the keyfob display.
When the security mode is on, flashing icons will appear on the key fob display, and indicating an open trunk and a disabled shock sensor.
If the trunk does not open when the channel is activated, there will be no indication of an open trunk on the display.
If at the moment of closing the trunk the STARLINE TWAGE A6 alarm is armed, the trunk and shock sensor zones will be armed again after 5 seconds. In confirmation, 1 siren signal and 1 key fob sound signal will sound. The flashing trunk open and shock sensor icons will disappear.
Control of additional channel #2 (programmable function)
The operation algorithm of the additional channel No. 2 (blue wire) is programmed when the STARLINE TWAGE A6 alarm is set (function 7):
Algorithm 1- the channel is automatically activated for 30 seconds when the armed mode is turned off and simultaneously with the appearance of alarm signals in the armed mode. This algorithm can be used, for example, to turn on the "polite" interior lighting.
Algorithm 2- the channel is automatically activated for 30 seconds when the security mode is turned on. During the operation of the channel, the shock sensor is disabled. This algorithm can be used, for example, to automatically raise car windows.
Algorithm 3- the channel is activated for 0.8 seconds remotely from the key fob, regardless of the state of the armed mode. Place the cursor on the icon and press button 2 on the key fob. 3 flashes of dimensions and 3 beeps of the key fob will follow.
Algorithm 4- the channel works in the "latch" mode, regardless of the state of the armed mode. Place the cursor on the icon. The first press of button 2 on the keyfob activates the channel, the second press turns it off. When the channel is turned on, the icon is displayed on the keyfob display, followed by 3 flashes of dimensions and 3 beeps of the keyfob. When the channel is turned off, the icon disappears, followed by 2 flashes of dimensions and 2 beeps of the key fob. If an alarm was triggered in the armed mode, the channel is automatically turned off.
Turning on the "emergency" light alarm STARLINE TWAGE A6 car
If additional channel No. 2 is programmed to work according to algorithm 1 or 2, then the alarm user has the ability to turn on and off the "emergency" light alarm of the car with a key fob. To do this, place the cursor on the icon and press button 2 on the key fob. The first press turns on the 10-minute flashing of the parking lights, the second press leads to the early switching off of the flashes of the dimensions. The activation of the "emergency" alarm is accompanied by the appearance of an icon and 4 sound signals of the key fob on the key fob display. Early shutdown is accompanied by the disappearance of the icon and the appearance of 2 beeps from the key fob.
Control of additional channel #3 (programmable function)
The algorithm and duration of the signal of the additional channel No. 3 (yellow-red wire) are programmed when the alarm is set (function 1). This channel can be used to remotely control additional vehicle equipment or to implement the step-by-step door unlocking function.
To turn the channel on and off, place the cursor on the icon and press button 2 on the remote control. In confirmation, 1 siren signal, 1 flash of dimensions and 1 sound signal of the key fob will follow. Channel activation duration 0.8; ten; 30 seconds or until key fob turns off (programmable).
Two-step unlocking of door locks STARLINE TWAGE A6
When installing the STARLINE TWAGE A6 alarm on a car, additional channels No. 2 and No. 3 can be used to implement the function of 2-step unlocking of door locks when disarming. To do this, you must program the duration of the selected channel 0.8 seconds. Connect the driver's door lock and the locks of other doors in accordance with the diagrams below. In this case, when disarming, only the driver's door will be unlocked. To remotely unlock the remaining doors, you need to activate an additional channel.
Choice of duration of confirmation sounds and type of alarm sounds (programmable)
It is possible to set the duration of confirmation sound signals when arming/disarming: 100 ms, 20 ms, 15 ms or 20 ms when arming and no signals when disarming.
When programming the duration of the signals to 100 ms, the siren in the alarm mode will sound continuously. In other cases, the audible alarms will be intermittent (6 seconds sound, 2 seconds pause). The intermittent type of signals must be programmed when connecting the alarm to the car horn.
Service mode Valet
To temporarily disable the anti-theft and security functions of the car alarm, for example, when transferring the car to a service station, it is recommended to enable the Valet service mode.
In Valet service mode, the function continues to work remote control locking and unlocking of door locks, control of additional channels.
To turn on the service mode, place the cursor on the icon and press the button 2 of the remote control, 4 siren signals and 4 flashes of dimensions will follow. A blinking icon will appear on the keyfob display and a melodic keyfob signal will sound. The LED indicator will flash in series of 5 flashes.
To turn off the service mode, place the cursor on the icon and press the keyfob button 2, 3 siren signals and 3 flashes of dimensions will follow. The icon on the keyfob display will go out, the melodic signal of the keyfob will sound. The LED indicator will turn off.
LED indication of alarm status STARLINE TWAGE A6
In various modes of operation of the car alarm, the LED indicator flashes differently. If you do not have a key fob with a liquid crystal display that indicates the status of the alarm and the car, then you can determine the current mode of operation of the car alarm by the type of LED flashing.
Personal emergency shutdown code STARLINE TWAGE A6
A personal code is required for emergency disarming and exit from the anti-robbery mode.
The secret code of the car alarm consists of two numbers, each of which can take a value from 1 to 4 inclusive. During the operation of the car alarm, the code can be repeatedly reprogrammed. Car alarms are supplied with factory personal code -11. After installing the STARLINE TWAGE A6 alarm on the car, it is recommended to enter into the system memory a secret code known only to you.
The procedure for setting a new personal code is as follows:
- Turn on the ignition.
- Press the service button 8 times. Each press of the button is accompanied by the lighting of the LED indicator.
- Switch off the ignition. 8 short siren signals will follow, indicating entering the new code setting mode.
- Press the service button 1 time. 1 siren will sound.
- Within 5 seconds, using the main LCD key fob, enter the first number of the new personal code. A short press of button 1 corresponds to - the number 1; short press button 2 - number 2; long press of button 1 - number 3; long press of button 2 - number 4. The key fob will give the appropriate number of beeps.
- Press the service button 1 time. 2 siren sounds will follow.
- Within 5 seconds, using the main LCD key fob, enter the second number of the new personal code. A short press of button 1 corresponds to - the number 1; short press button 2 - number 2; long press of button 1 - number 3; long press of button 2 - number 4. The key fob will give the appropriate number of beeps.
The car alarm exits the code setting mode automatically after 5 seconds or immediately when the ignition is switched on. In confirmation, 5 flashes of dimensions will follow.
Programming functions and operating parameters
Some functions and parameters of the STARLINE TWAGE A6 alarm can be changed using the service button and key fob without the need to access the central unit. The list of functions is shown in the table below.
The programming order is as follows:
- Turn on the ignition.
- Press the service button 6 times.
- Switch off the ignition. There will be 6 flashes of the LED and 6 beeps of the siren, indicating the entry into the programming mode.
- Press the service button as many times as necessary, equal to the number of the selected function. Each press of the service button will be accompanied by the lighting of the LED indicator and short beeps indicating the number of the currently selected function. Every fifth press - long beeps.
- Within 10 seconds, press button 1 or 2 of the remote control briefly (0.5 sec) or long (3 sec), depending on the desired state of the selected function. In confirmation, 1,2,3 or 4 short beeps of the siren and key fob will follow, depending on the set value of the function.
- To go to the next function, press the service button, and then, by pressing the remote control button, set the desired function value. Repeat this procedure for all features that need to be changed.
- To exit the programming mode, switch the ignition on or wait for the system to exit automatically. In confirmation, 5 flashes of dimensions will follow.
Reset to factory settings
It is possible to reset the values of all programmable functions to factory presets. For this you need:
- Turn on the ignition and press the service button 10 times.
- Switch off the ignition. 10 siren chirps will sound indicating entering the factory reset mode.
- Press the service button 1 time. 1 siren will sound.
- Press button 1 on the key fob. There will be 1 short beep from the key fob, confirming the reset to factory settings.
- To exit the reset mode, switch the ignition on or wait for the system to exit automatically. In confirmation, 5 flashes of dimensions and a melodic key fob signal will follow.
| № | Function | Short press button 1 | Short press button 2 | Long press button 1 | |
|---|---|---|---|---|---|
| 1 signal | 2 signals | 3 signals | |||
| 1 | Pulse duration of additional channel No. 3 (yellow-red wire) | 0.8 sec | 10 sec | 30 sec | |
| 2 | Confirmation Beep Duration and Alarm Type | 100ms continuous | 20 ms intermittent | 15 ms intermittent |
|
| 3 | Pulse duration for central locking | locking | 0.8 sec. | 3.6 sec. | 0.8 sec. |
| unlocking | 0.8 sec | 3.6 sec | 2x0.8 sec. | ||
| 4 | Control of door locks from the ignition key | turned off | unlock only | locking delay 10 sec | |
| 5 | Automatic arming and switching of the protection mode | inclusion | turned off | included | included |
| switching on | included | turned off | included | ||
| 6 | Sensor activation delay when arming | 5 sec | 15 sec | 30 sec | |
| 7 | Algorithm of operation of additional channel No. 2 (blue wire) | 30 sec when disarming | 30 sec when arming | pulse 0.8 sec from key fob | |
| 8 | Temperature display scale on the keyfob liquid crystal display | Celsius | Fahrenheit | Fahrenheit | |
| 9 | Alarm STARLINE TWAGE A6 open doors with dimensions when disarmed | off | on 10 sec | on 10 sec | |
| 10 | Immobilizer mode | switched off | switched on | switched on | |
| 11 | Type of output to block the engine | NZ | HP | HP | |
The gray color in the table indicates the factory preset of the functions and parameters of the system.
Recording keyfob codes
In total, 4 key fobs can be stored in the STARLINE TWAGE A6 alarm memory. Key fob codes are recorded when the security mode is off in the following order:
- Turn on the ignition.
- Press the service button for 6 seconds and release it after 4 beeps of the siren.
- Press buttons 1 and 2 of the keyfob with an LCD display simultaneously until one siren signal appears, confirming the entry of the first keyfob into the system memory. (To record an additional key fob without a display, press buttons 3 and 4 at the same time).
- Repeat step 3 for all writable keyfobs. The recording of each key fob is confirmed by the corresponding number of sound signals. If within 6 seconds the system does not receive a key fob signal, it will automatically exit the recording mode, followed by 5 flashes of dimensions.
- Switch off the ignition.
Attention! When writing new keyfobs, you must also overwrite the old ones, otherwise they will be deleted from the system memory.
The StarLine Twage A6 system can be installed on vehicles with a 12V battery voltage and a negative pole on the body.
Place the central unit in the cabin in hidden place, preferably under dashboard- in this case, the length of the connecting wires will be minimal. To prevent moisture from entering the unit, it is recommended to install it in such a way as to prevent water drops from dripping along the wires into the case. Secure the unit to a flat surface with self-tapping screws or double-sided tape so that it does not move due to vibrations.
Mount the transceiver module with the antenna on the windshield of the car so that there is at least 5 cm from the antenna to the metal parts of the body. In this case, the maximum range of the key fobs is ensured. Also, during installation, it should be taken into account that the temperature meter is located in this module, so you need to place the module as far as possible from heat sources and avoid getting on it. sun rays. Otherwise, the temperature readings may be incorrect.
Point the horn of the siren downwards to avoid the constant accumulation of water.
Make sure the siren and wires are out of reach from under the car.
Rigidly fasten the shock sensor in the car interior, providing access to its adjustments.
Fix the LED indicator in a visible place on the dashboard.
Install the Valet service button and the anti-robbery mode activation button in hidden but user-accessible places.
When installing pushbutton switches under the hood and in the trunk, check that they work correctly. With the hood or trunk closed, the gap between the contacts in the switch must be at least 3 mm. Incorrect installation of pushbuttons is often the cause of false alarms.
Lay wires as far as possible from sources of electrical noise - ignition coils, high voltage wires etc. Pay attention to the fact that the wires do not come into contact with moving parts of the vehicle structure - pedals, steering rods, etc.
The installation of wiring connections for the STARLINE TWAGE A6 alarm system must be carried out with the car battery disconnected.
Attention! If the vehicle is equipped with an airbag or has a coded receiver, refer to the vehicle or receiver's instruction manual when turning off the power.
All permanent connections should be soldered and well insulated.
Connect the central unit and other components of the STARLINE TWAGE A6 signaling to the cable connectors only after the installation is completed. Install the alarm in accordance with the wiring diagram.
Connecting a transceiver
The transceiver module with an antenna is connected to a five-pin connector located in the central unit under a hinged cover using the cable included in the alarm kit.
Connecting a two-level shock sensor
The shock sensor is connected to the central unit using a four-wire cable included in the alarm kit. The sensitivity of the sensor by levels is regulated by potentiometers on the sensor body.

Connecting the LED indicator
Connect the LED plug to the two-pin connector located in the central unit under the hinged cover.
Connecting the service button Valet STARLINE TWAGE A6
Connect the Valet service button connector to the two-pin connector located in the central unit under the hinged cover.
Connecting the button to turn on the anti-robbery mode
Connect the plug of the anti-robbery mode activation button to the corresponding two-pin connector of the central unit.
Connecting the 14-pin connector of the central unit
Red wire (#1)- +12V power supply, connect to the positive terminal of the battery.
Black wire (#2)- power minus, connect to the car body, ensuring good contact.
Yellow wire (#10)- connect to the ignition lock terminal, where +12V appears when the ignition is turned on.
Green-black wire (#8)
Green-yellow wire (#9)- connect to the lamps of side lights or direction indicators. The maximum output load current is 7.5A.
Gray wire (#11)- positive output for connecting to a siren. The maximum load current is 2A.
Blue-black wire (#13)- connect to push-button door switches that close to the housing when the doors are opened.
Blue-red wire (#6)- connect to push-button door switches that close to +12V when doors are opened.
Orange gray wire (#14)- connect to the push-button switches of the hood, which close to the body when the hood is opened.
Orange-white wire (#7)- connect to the push-button switches of the trunk, closing on the body when the trunk is opened.
Yellow-black wire (#12)- negative output of additional channel No. 1. The duration of the control signal is 0.8 seconds. The maximum load current is 300mA. The channel can be used to control the trunk release solenoid. An additional relay is required for connection. An example of a connection diagram is shown in the figure.
Yellow-red wire (#5)- negative output of additional channel No. 3. The maximum load current is 300mA. An additional relay is required for connection. The duration of the output signal pulse is programmable 0.8, 10, 30 seconds or until the channel is turned off by the key fob ("latch").
Blue wire (#3)- negative output of additional channel No. 2. The maximum load current is 300mA. An additional relay is required for connection. The pulse duration and the channel operation algorithm are programmable.
Black and yellow wire (#4)- negative programmable alarm status output. The maximum output load current is 300mA. The output is designed to connect an additional external blocking relay, the type of relay contacts (NC or HP) is programmable.
Connecting an external engine blocking circuit using the StarLine universal wireless blocking kit
This method of blocking the engine significantly increases the anti-theft properties of the STARLINE TWAGE A6 alarm. To control the module included in the universal StarLine wireless blocking kit, use the black-and-yellow signaling wire, having previously programmed it for the HP type of contacts. Possible engine blocking schemes are given in the installation instructions for the StarLine universal wireless blocking kit.
Connecting an external engine blocking circuit using conventional relays
Break one of the regular engine start circuits and connect an additional relay to the circuit break. The type of lock relay contacts HP (normally open) or NC (normally closed) is programmable (function 11). Initially, the NC type of relay contacts is programmed at the factory. An example of a starter interlock connection diagram is shown in the figure.

Connection to trunk release solenoid
Alarm STARLINE TWAGE A6 has an output for remote unlocking of the trunk (yellow-black wire). An example of a connection diagram is shown in the figure.

Connection to interior lighting STARLINE TWAGE A6
The alarm has an output (blue wire) that can be used to connect to the car's interior lighting and implement the "polite interior lighting" function. To do this, additional channel No. 2 must be programmed into the activation mode when disarming (option 1). An example of a connection diagram is shown in the figure.

Connecting to low beam headlights
Additional channel No. 3 (yellow-red wire) can be used to connect to the low beam headlights and implement the "light path" function. To do this, the duration of the signal of additional channel No. 3 can be programmed for 10 or 30 seconds or until the channel is turned off by the key fob (function 1). An example of a connection diagram is shown in the figure.

Connection to the central locking system
The StarLine Twage A6 alarm system has built-in 15-amp central lock control relays. The relay contacts are routed to a 6-pin connector. The duration of the control pulses is programmable.

Wiring diagram for activators for two-step unlocking of door locks
To implement the function of 2-step unlocking of doors, 2 or 3 additional channels can be used. The signal duration of the selected channel must be programmed to 0.8 seconds.


Anti-theft system A6 Starline is no longer available today. Despite this, the security complex has advanced functionality, including the presence of two-way communication and the ability to automatically start the engine.
[ Hide ]
Features of the Starline A6 alarm
The main feature of this model is the presence of a dialogue encoding used in the transmission of signals. This ensures maximum reliability and complexity of their interception.
Specifications
The main properties of this model of the security system:
- transmission of pulse data via two-way communication channels from the remote control to the microprocessor module is carried out at a frequency of 433.92 MHz;
- the maximum range of the communicator in the mode of sending commands is 600 m;
- the largest radius of operation of the key fob when receiving signals is 1.2 km;
- the operating range of the spare key fob for driving the car is 15 m;
- anti-theft system with automatic start the engine can operate in the temperature range from -40 to +85 degrees Celsius;
- installation and use of signaling is possible on cars, the voltage in the mains of which is 9-18 volts;
- when the protection mode is on, the security complex should consume no more than 20 mA of current;
- to power the circuit through which the siren is connected, 2 amperes of current will be required;
- the current that the power unit blocking line consumes varies around 40 amperes;
- the main communicator is powered by a AAA class power supply rated at 1.5 volts;
- The spare key fob is operated using 3 V CR2032 batteries.
Equipment
Components and devices that are included in the Starline Twage package:
- Technical manual that allows you to properly connect and operate the security complex after installation.
- Microprocessor module with a set of elements for installation and fastening.
- The main communicator for control and programming of options is equipped with a display.
- Spare pager.
- Shock sensor of two-level type.
- Antenna adapter with transceiver.
- LED bulb designed to determine the operating mode of the A5 Starline signaling.
- Service mode button, can be used for emergency shutdown.
- Toggle switch to enable the anti-robbery function.
- A relay designed to configure and control the autostart function of the power unit.
- Two holding mechanisms equipped with 30 A fuses.
- Limit switch for installation on the hood or tailgate.
Photo gallery
Photos of the elements of the security complex are given in this section.
Complete set of alarms Communicator for system management
Main functionality
All system options can be divided into two categories - protective and service. The first are designed to configure security settings vehicle. The latter must be used when servicing and adjusting control options.
Protective functions
Functional:
- the ability to activate sound and light alarm signals, if the security controller is activated;
- transmission of pulse signals of notification about the inclusion of a siren to a communicator equipped with a screen;
- remote activation of the Panic function, which allows you to temporarily turn on the alarm mode on command;
- power unit lock mode;
- the anti-robbery option can be enabled using a special toggle switch or button, as well as by a command from a pager;
- the possibility of blocking the power unit with its further preservation when the anti-theft system is removed.
Service
Description of service options:
- silent car protection;
- protection of a vehicle with a running engine;
- the ability to activate the protection mode without a communicator;
- options for automatic activation of protection in case of accidental disabling, if not a single car door was opened;
- the ability to activate protection in automatic mode;
- the option of self-checking by the system of all its components when protection is disabled or activated;
- the ability to activate protection with a disabled sensitivity controller;
- silent shutdown of the protective function;
- remote activation or deactivation of the sensitivity controller by levels;
- remote control of the standard central lock;
- control option door locks from ignition activation;
- two-stage opening of door locks;
- the Comfort option, which allows automatic raising of windows and closing the hatch when the guard is turned on;
- service mode Valet;
- emergency shutdown protective mode using a personal password;
- the presence of four additional channels for controlling electronic devices and car equipment;
- management capability lighting fixtures in the cabin;
- vehicle search function;
- the consumer can remotely program the key fob and delete information about old communicators from the microprocessor memory;
- delete option installed settings to factory settings;
- car owner call function;
- determination of the temperature level in the car;
- the remote control displays information about the current time;
- the presence of an alarm clock and a timer;
- the function of monitoring and controlling the discharge of the battery of the main remote control;
- illumination of indicators on the display of the communicator.
How to set an alarm
The installation of the security system is carried out in accordance with the requirements specified in the service manual.
Mounting anti-theft complex must be done with the battery disconnected.
This will avoid failures in the operation of standard equipment. It is recommended to protect all alarm circuits with safety devices.
Wiring diagrams
Wiring diagrams for connecting elements are given in this section.
Designation of buttons on the key fob
Key fob programming
To bind the communicator, you need to configure the operation of the first key:
- Button 3 is pressed several times, the user must move the cursor on the remote control screen to the position of the required command. If the key will be used to control the protection mode, it must be set to the appropriate position of the indicator. To change the direction of the cursor, you need to make a short pause between clicks.
- After selecting an option, the button must be held down for 6 seconds. You need to wait for a double, and then a triple beep.
- To enable the function, the first key is pressed.
The second key is configured in the same way:
- By clicking on the third button, the cursor is moved across the display to the desired position.
- After selecting an option, the second button is clicked.
After binding, the clock parameters are configured:
- To complete the task, the third key is clicked. It must be clamped until the key fob emits two short beeps.
- The clock indicator on the display will flash. The first key is used to increase the parameters, the second key is used to decrease. To change values quickly, this button must be held down.
- After changing the settings, the minutes parameters are adjusted identically. To do this, click on the third button.
- To exit the settings mode, the third key is pressed. It must be held until the communicator beeps.
Programming alarm parameters:
- The third key is pressed to complete the task. It must be held until the communicator plays a double beep.
- The third button is pressed to move the cursor on the screen to the alarm position. The clock indicator will flash. To increase the parameters, the first button is used, to decrease - the second.
- After setting the hours, the minutes are set. To do this, click on the third button.
- When the parameters are set, you must press the third button, so the system will enter the menu for activating or deactivating the option. Turning on is done by clicking on the first key, and turning off - on the second. To exit the setup menu, use button 3, the communicator should emit a beep.
Writing codes
Programming new remote control codes is done as follows:
- The key is installed in the lock and scrolled to turn on the ignition.
- The service key is pressed for six seconds. You can release the button after the siren sounds four times.
- Keys 1 and 2 of the Display Master Communicator are held until the siren beeps. This indicates that information about the first remote control has been added to the system. To bind a spare communicator, click buttons 3 and 4.
- The previous step is repeated for each added communicator. The siren will sound to confirm the recording. You need to have time to bind each key fob within six seconds after recording the last device. Otherwise, the alarm will exit the programming menu, which will be indicated by five flashes of the headlights.
- When the procedure is completed, the ignition is turned off.
User Viieer Aleks spoke about self-writing key fob codes in the memory of the Starline A6 microprocessor module.
Autorun settings
This model does not provide the option of automatic engine start, but the consumer can implement it independently. To do this, he needs to additionally purchase and install the Starline 02-12 module.
Description of the contact elements on the main block of the device:
- the red contact is for connection to output 30 on the ignition switch;
- yellow is used to connect to the ignition line branch;
- green is for connection to terminal 15/2 if the car is equipped with two ignition lines;
- contact of blue color used to connect to the ACC output on the lock;
- the thinner yellow-black wire is needed to connect with contact element 50 on the switch;
- a thick cable in a similar sheath is designed to power the starter mechanism.
A 12-volt voltage is generated at the output 50 of the ignition switch. The relay installed inside the autorun module starts to power the starter mechanism. It closes the contact elements numbered 30 and 50. It is not allowed to connect the module without breaking the electrical circuit of the starter device.
Pinout of the low-current block:
- the black contact is used as a negative to power the unit;
- a wire in a gray-black sheath is an input for monitoring the operation of the power unit, it must be connected to a battery charge indicator or a tachometer;
- the lilac-orange output must be connected to the parking brake lever limit switch;
- the pink contact must be connected to the control output of the anti-theft system;
- red-black contact is an output on the immobilizer bypass device, it is activated only during automatic start;
- the wire in the gray-orange sheath can be left untouched;
- the black/yellow contact is an output activated when the ignition is on and the starter is disengaged.
Inside the body of the autorun module there is a set of toggle switches and switches, each of which must be set to a specific position:
- Operating time of the starter mechanism. If the toggle switch is set to Off, then this indicator will be 0.8 seconds, if it is On, then 1.8 seconds.
- The way to control the power unit. If in the Off position, then according to the tachometer, if in On, then according to the contact element, which is supplied with 12-volt voltage after the start of the internal combustion engine.
- Power activation algorithm for terminal 15/2. If in the Off position, then when the starter mechanism is operating, the power will remain on the device. If On - then the power supply stops. The second option is the most common.
- Transmission type. Initially, this toggle switch is set to Off, this automatic transmission gears. It should be left like that.
- Ignition delay time before starting the power unit. If the toggle switch is set to Off, this indicator will be less than one second, if On, then a few seconds.
- The service switch must be left in the Off position.
Armed mode activation
In the Twage model, the user himself assigns buttons to enable the protection function. Therefore, activation is performed taking into account which key was selected to control this mode.
In case of breakage or loss of the communicator, protection can be enabled using the service key:
- The key is inserted into the lock, the ignition is activated. The button to enter the service mode is clicked 4 times.
- Then the ignition is turned off. The siren should play one signal, after which it will blink lighting fixtures auto.
- Within 20 seconds, the driver must exit the vehicle and lock all doors with the key. The siren will work once, the communicator will play a melodic signal.
- 20 seconds after the performed actions, the protection mode is activated. The vehicle's headlights will flash once and the status LED will flash.
Disarming
One of the control buttons can be used to disable the protection function. The purpose of this option is user-selectable. If the remote control is lost or broken, the Valet service button can be used to disable the armed mode.
The deactivation procedure is as follows:
- The car doors must be unlocked with the key. The security complex will start the siren. The key fob display will show an open padlock icon.
- The key is inserted into the lock and rotated. After activating the ignition, it is not necessary to start the engine.
- To disable the protection mode, the user needs to know the personal pin code. To enter the first digits of the password, the Jack button is pressed several times. The number of clicks corresponds to the first character.
- The key is turned to turn off the ignition. Then it turns on again.
- The steps for entering the PIN code are repeated, only now you need to enter the second digit.
- The ignition is switched off. If the password is correct, the siren will stop working. Protect mode will be disabled.
The channel "AVTOservis Nikitin" talked about deactivating the protective function using the service key.
Download the installation and operating manual in PDF format
You can download service documentation for setting up and controlling the alarm system using the links from the table.
Advantages and disadvantages of the system
The advantages that this model has:
- Ability to implement the automatic start function. At correct connection additional module Starline 02-12, the user will be able to control this option through a command sent from the communicator. It is also possible to implement the function by alarm clock, timer and temperature in the car.
- Convenience and ease of installation. If you use the service manual, the user will be able to independently install the security complex.
- Affordable cost. Today this model is not produced, but you can find stores where it is available on the balance.
- Good working radius of the communicator. The presence of long-distance communication will allow the user, being at a decent distance from the car, to find out about the status of the alarm.
- Two blocking of the power unit. Thanks to this, the engine will be stopped if an unauthorized attempt to start the internal combustion engine occurs.
Disadvantages:
- High sensitivity shock controller. To prevent false positives of the system, this parameter must first be configured correctly.
- The microprocessor module may not work correctly or fail if it overheats. High temperatures can be detrimental to the bloc. Therefore, it must not be installed in such a way that it is exposed to sunlight.
- The system package does not include a siren.
- Fragile keychain. With prolonged and inaccurate operation, the key fob housing may fail.
What is the price?
The approximate price of the security complex is given in the table.
Video "Overview of the capabilities of the Twage A6 anti-theft system"
User Yaroslav540 spoke briefly about the main features security installation Starline.