How to unscrew the faucet from the sink in the kitchen. How to change the faucet in the kitchen without the help of a plumber: self-replacing the old and installing a new faucet. How to remove a kitchen faucet
How to change the faucet in the kitchen? First of all, it all depends on the type of mixer chosen and on the method of supplying hot and cold water pipes. In any case, these works are for everyone.
Regardless of the design, any mixer performs the same function - it mixes hot and cold water, supplied by pipes suitable for it, in a certain proportion and regulates the pressure of the resulting flow.
The most common types of mixers are:
- single-lever, or ball;
- two-valve;
- thermostatic;
- sensory.
Single lever
Bali developed in the second half of the 20th century and quickly gained well-deserved popularity. Both the temperature and the pressure in them are regulated by a single handle-lever, which can move up and down, adjusting the pressure, and left and right, adjusting the temperature. The design is based on a ceramic ball with shaped holes for hot and cold water and for the outlet stream. By turning the ball by the lever, the owner aligns these holes with the corresponding windows in the body, creating more or less clearance.
Design advantage:
- long service life;
- ease of use with one hand.
Disadvantages:
- work only with water free from mechanical impurities, which requires the installation of additional filters;
- high price.
Replace single lever mixer simply and easily.
Two-valve
This design is over two hundred years old. Traditional faucets were invented in the UK by Lord Cavendish, a famous scientist. The design still retains popularity due to its simplicity and affordable price.
The pressure of hot and cold water is regulated by separate valves. They mix in the outlet pipe.
The valve is controlled by a flywheel-handle, its rotation through the worm gear is converted into the translational movement of the poppet valve, increasing or decreasing the gap between the gasket and the seat.
Advantages:
- undemanding to water quality;
- cheap mixer
- cheap gaskets
The disadvantages of such mixers include:
- inconvenience of use
- the need for frequent gasket replacement.
The improved design of the two-valve mixer uses ceramic discs instead of rubber gaskets. The faucet opens completely in half a turn of the handle. However, these mixers are sensitive to water quality.
thermostatic
A mechanical temperature sensitive element regulates the proportions of mixing hot and cold water so that the temperature of the outgoing stream corresponds to the set one. User installs once comfortable temperature and then he only needs to turn the water on and off, adjusting its pressure.
Touch
In such mixers, a proximity sensor is added to the thermostat. It is enough to bring your hands or any to the faucet - it will turn on the water of a given temperature and pressure. When hands or an object are removed from the sensor area, the water is turned off. Such faucets have long been used in public toilets, recently they have begun to spread in private households. The device is powered by a battery that lasts at least a year.
The advantages of the design include:
- ease of use, after the initial setting, the mixer works automatically
- saving water, it is supplied only when hands are in the sensor area;
- safety, the risk of flooding neighbors due to a forgotten tap is eliminated.
The disadvantages of the device are as follows:
- the complexity of the design excludes self-repair;
- the need for periodic battery replacement;
- very high price.
As the popularity of the device grows, experts predict price reductions for sensor faucets.
Necessary tools and mounting kits for the job
To replace the mixer with your own hands, you will need the following tools:
- horn set wrenches, for most mixers, 10, 11, 22 and 24 mm wrenches are enough;
- pliers or adjustable pliers;
- flat and Phillips screwdrivers;
- gas wrench (medium)

When installing on a new sink or countertop, you will also need a drill with a 35 mm core drill bit. For better visibility in tight spaces, a headlamp will come in handy, allowing you to free your hands for work.
You will need the following materials:
- thread seal: FUM tape or plumbing thread;
- silicone sealant;
- spray WD-40 for soured threads;
- a flat container (basin, jar, container) for collecting water residues wiping from pipes.
It is also necessary to study the mixer connectors in advance and compare them with the connections on the pipelines. If they do not match, or the length of the hoses from the mixer kit is not enough, you should buy flexible hoses with the appropriate connections. Sometimes adapters are used from one thread size to another. At the same time, it must be remembered that each extra connection is a place of potential leakage.
The nuances of dismantling the old mixer
Before starting work, turn off hot and cold water with the valve closest to the mixer. If they were not installed during the distribution of the water supply, then you need to block the riser at the entrance to the apartment. Further, the sequence of operations is as follows:
- open the mixer tap completely to relieve pressure;
- let the water drain completely;
- substitute a water tank under the mixer connections with pipes;
- unscrew the connection, allow the remaining water to flow into the container.
Now you can start removing the old mixer. If its lower part is between the sink and back wall washing module - it will be inconvenient to work in such a cramped space, and it will be hard to see. If possible, the washing module must be moved away from the wall. To do this, you will have to disconnect the sink drain from sewer pipe. If a modern corrugated flexible pipe is used, it will be easy and convenient to do this. with vintage cast iron pipes better not to get involved.
The time spent moving the wash module away and back into place will definitely pay off. If convenient access to the installation site of the mixer is provided, the old one will be easy to remove, and the new one will be installed quickly and without errors, the first time.
If the sink is embedded in a single countertop, then experts suggest dismantling the sink. After installing the mixer, the sink is put back, lubricated along the contour silicone sealant.
When trying to remove old faucet House master may encounter an unpleasant situation: the nuts and studs that fasten the device to the sink or countertop are oxidized, coated with mineral deposits. To unscrew such a “soured” threaded connection, you will have to spray it with WD-40 liquid. If the connection is running and the first time it was not possible to unscrew the nut (or a stud with a slot for a screwdriver slot), the processing must be repeated.
If re-processing does not work, you can try to tap the nut with different parties frequent light blows with a small hammer or wrench.
Well, and, finally, if nothing helps, you will have to cut off the pipe before the hopeless connection, cut a new thread on it (or put on a new fitting if the pipe is plastic).
After dismantling the mixer, it is useful to inspect all threaded connections and fittings, evaluate their condition. Parts and elements with signs of wear, corrosion, partially damaged rubber gaskets should be replaced while everything is disassembled and easily accessible. Otherwise, you will have to disassemble everything again after a while, but already in the conditions of a local flood.
Installation technology of a new mixer
Before you start installing the faucet in the kitchen with your own hands, you should familiarize yourself with its design and installation instructions. New faucets are available with two mounting methods.

In some, fixing to the sink or countertop is carried out by one or two studs with nuts screwed into the faucet body. These models fit better in thick worktops, from 22 to 50 mm thick.
Others are fastened with a wide nut screwed onto the body of the device. This fastening is preferred when installing in thin sheet metal sinks. of stainless steel.
The hole for the mixer is selected with a 28 or 32 mm crown. AT wooden tabletop it's easy to do it yourself. For metal, high-precision equipment is required. It is better not to mess with a ceramic sink on your own, so as not to spoil expensive equipment. Leading manufacturers provide a hole for the mixer in the manufacture.
Washer mounted
Such a design can be immediately attached to the sink, since the long cylinder at the bottom will allow flexible connections to be freely connected without interference.
- in the box with the mixer you need to find a rubber sealing ring, and place it in a specially provided groove at the bottom of the wide part of the body;
- carefully, so as not to knock down the threads on the cylinder, insert it into the hole in the sink or countertop;
- check that the sealing ring does not fall out of the groove and is not warped;
- from below, put a sealing gasket made of rubber or elastic plastic on the cylinder;
- screw a wide nut onto the thread with the wide part to the sink or countertop, make sure that it is not warped;
- screw the nut all the way into the countertop, on high-quality mixers this can be done by hand;
- with a wrench or adjustable pliers, carefully tighten the nut until it stops, holding the mixer in the desired position by the upper part;
- if the position of the spout needs to be corrected, the nut should be given half a turn, tighten the mixer and tighten the nut again.
Do not overtighten the nut - the reliability of fastening will not increase from this, but the risk of thread breakage increases.
After the mixer is securely fixed to the sink, it is time to screw flexible hoses into its body. Their threads do not need to be wrapped with sealing material - tightness provide rubber rings placed at the ends of the fittings. Here, too, care must be taken when tightening the thread - the fitting is screwed in manually, after which one and a half turns are made with a key.
With stud fastening
How to install such a model? For them, the nuance lies in the need to first screw the flexible connections, and then the mixer mount. If you try to do the opposite, then the studs will interfere with wrapping the fitting of the eyeliners.
The installation sequence is as follows:
- unscrew the studs;
- twist with your hands and tighten the flexible eyeliners with a key;
- twist elongated brass nuts from the studs;
- screw the studs into the housing by hand and tighten with a flat screwdriver by the slotted slot at the end;
- put a sealing ring on the bottom of the mixer;
- skip into the hole of the sink or countertop, first the eyeliner, and then the studs;
- put on the ends of the studs an elastic gasket and then a fastening shaped semi-ring from the kit;
- screw the elongated nuts from the kit onto the studs, tighten them manually;
- after making sure that the faucet is correctly oriented relative to the sink, tighten the nuts on the studs alternately, in several turns, achieving their equal load and the absence of distortions.
Mount the sink on the countertop or in the sink unit.
Connecting the mixer to the water supply
When connected flexible hoses mixer to water pipes try to do it so that hot water is on the left, and cold right.

Before making a test run of water, unscrew the aerator nozzle so that it does not clog with agitated particles of rust and other mineral deposits. It is better to drain 20-50 liters of water into the drainage, and then put the aerator in place.
During the test run, you must be ready to close the riser immediately if a mistake was made during installation.
Replace kitchen faucet on its own is a fairly simple operation. It requires the initial skills of owning a metalwork tool and is quite within the reach of a home master.
Probably, there is no such person who at least once in his life had to deal with a crane failure. If you decide to fix the mixer yourself, then before you replace the tap, you need to find out the reason for its breakdown.
About what are the reasons, how to fix them, and how much it costs to change the tap - you will learn in our article.
There may be several of them:
1) 2) This faucet may need to be replaced 3) 4) 5) 6)You need to know what type of faucet you have installed. Then it will be easier for you to change the faucet in the kitchen or, for example, in the bathroom.
 Kitchen faucet replacement
 Crane device - general characteristics
A tap (otherwise a mixer) is designed to adjust the water supply of the required temperature. The desired temperature of the water in the tap is achieved by mixing cold and hot water. There are several common types of faucets:
1. Valve cock 2.
  lever faucet
 The device of a crane with two valves is quite simple, which consists of:
- main body,
- Two crane boxes,
- spout,
- Two valves.
The valves are located on both sides of the faucet and are screwed into special holes. These valves regulate the height of the crane box. The latter, with the help of a rubber gasket at the end, opens and closes cold and hot water through special holes inside the tap.
A crane with one lever can be of the following types:
1) Ball valve in the bathroom 2)
  Ceramic faucet in the process of being dismantled
 How to change the faucet in the bathroom or in the kitchen - with valves
Let's say you've experienced damage. And it doesn't matter if you need to change kitchen faucet, and the faucet in the bathroom - the repair must begin with shutting off the water. Your actions should be the following:
1. Valve valve replacement 2.
 - Remove the valve and unscrew the corresponding valve box.
- Change the gaskets and seal the threads with fum tape.
- Carefully and completely screw the bushing into place.
Important!
If the crane box has become unusable, replace it
How to change the crane box?
For this:
 This is how the crane box is replaced
 - Turn off the water and remove or unscrew the button (depending on which model).
- Loosen the screw. If it is very sticky, then lubricate with machine oil.
- Unscrew the faucet counterclockwise.
- Install the gasket.
- Install the crane box back.
If you have a question about how to change a ceramic axle box faucet, then this is also done according to the instructions described above.
 Replacement of a ceramic faucet (mixer)
 How to change the crane box, the video instruction can be found here:
If water flows from under the water supply valve
- Check how tightly the faucet box is fixed to the mixer. If necessary, tighten it up.
- If everything is in order, unscrew the crane box. Seal the threads with fum tape and screw the bushing into place.
How to fix a leaky faucet? at your disposal on our website
 Replacing gaskets in faucets
 If the faucet is leaking at the point where the spout is fixed
- Unscrew the spout.
- Change gasket.
- Replace the spout carefully.
If the faucet is leaking at the point where the hoses are fixed to the mixer
Check integrity gaskets. If necessary, replace them, as well as the hoses.
If the faucet is leaking at the sink fixing point
Replace the gasket or "plant" the faucet on silicone.
If the faucet itself is damaged
It also needs to be replaced
1) Shut off hot and cold water valves.
2) Remove the flexible hoses from the valves with which the faucet is attached to them.
 Removing flexible hoses
 3) Unscrew the large nuts that secure the faucet.
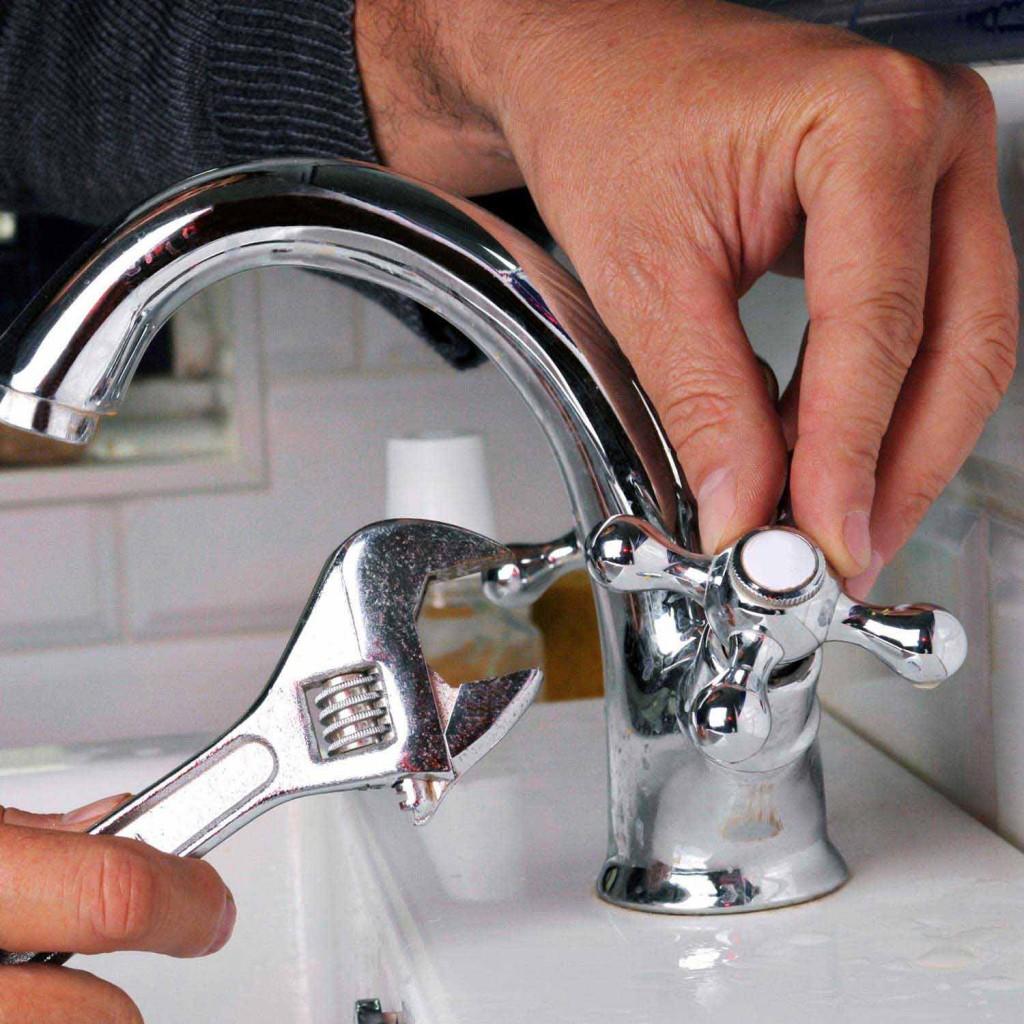
4) Carefully remove old faucet with a wrench.
5) Thoroughly clean the place where the old product used to be and install a new faucet. But before that, attach new hoses to it.
6) Tighten the nuts on the underside of the sink.
 Nut tightening
 7) Connect the hoses to the valves and secure them.
8) Turn on the water and check if the faucet is leaking now. If necessary, tighten the nuts again.
 Checking the faucet for leaks
 So, now you know how to change the faucet in the sink with your own hands. For this special efforts not necessary. Clearly, how to change the tap, video instructions can be viewed here:
In addition, on how to change the faucet in the bathroom, a video from detailed instruction can be viewed here:
How to replace a lever faucet?
If the faucet with a lever began to leak at the place where the hoses were fixed to the faucet or attached to the sink, then in these cases the instructions for replacing it are no different from those given above.
 Lever Valve Replacement
 How to change a ball valve?
If the faucet leaks from the spout when the water lever is turned off or it pours out from under it:
 Replacement ball valve do it yourself
 - Disassemble the faucet with a screwdriver or a hex wrench into its component parts, which are then cleaned of lime deposits.
- If the gaskets are worn out, replace them after treating them with silicone grease.
- Reassemble the faucet in reverse order.
How to change a ceramic faucet?
- Disassemble the faucet.
- Take out the ceramic cartridge and replace it with a new one.
- If the integrity of the tap is damaged, then change it to a new one.
How to change the tap on the riser with water shut off?

- Shut off the riser water supply.
- Drain the water from the piping system. Having previously obtained the consent of the management company.
- Wrap tape with a sealing agent or fum-tape around the tap thread.
Important!
Wind in the direction of twisting the tap onto the pipe. - Screw the tap onto the pipe. If it twists easily, then add more fum tapes, but do not overdo it! The twist of the product should be with some effort.
How to change the faucet without shutting off the water?
- In a high-rise building (flooding of neighbors or basement is possible),
- At the heating stand
- And hot water.
So, the order of work is as follows:
1) Prepare buckets, some rags and ask someone to help you. One can't do it here.
2) Seal the threads on the new faucet and open it.
 Thread sealing on a faucet: steps
 3) Unscrew the broken faucet.
4) Run water through the new faucet.
5) Tighten the valve about 2 turns.
6) Close the new faucet and screw it on completely.
How much does it cost to change a faucet?
The cost of replacing a faucet depends on its type.
If you decide to entrust the plumber to change the faucet in the bathroom, the price “does not bite” is 700–1,500 rubles. And if you want to change the faucet in the kitchen. Reasonable price - from 800 rubles. up to 2 thousand rubles
Over time, any plumbing fixtures become unusable. This also applies to the faucet in the kitchen - it wears out the fastest. There are quite objective reasons for this: too frequent use, abundance detergents. Not everyone seeks to repair failed equipment - sometimes at a cost it comes out as a full replacement. But even without a tap in kitchen area not enough. There is only one way out - to change the mixer. For this, it is not necessary to call a professional plumber. How to change a faucet in the kitchen: it is important to first prepare the equipment, then dismantle the old device and proceed with the installation of a new faucet.
An old unit may require replacement because it has ceased to look attractive, leaks and fistulas have appeared, rust on the body, rubber gaskets have become thinner, threads have worn out.
To change the tap, you will need the following materials and tools:
- directly new mixer;
- flexible hoses;
- open-end wrench for 11;
- tubular key;
- pliers;
- FUM tape;
- screwdriver.
A new faucet in the kitchen will even save water. It's no secret that old units often leak liquid when the valves are closed.
New tools, of course, do not have to be purchased. You can use those that are at home or with friends. As for flexible replacement hoses, they are usually already included with the new faucet, but are not always different. high quality. Take care of this issue in advance: choose hoses for replacement (before you change plumbing fixture), made of corrugated stainless steel. The length of each product is at least 30 centimeters. It should be such that during operation the hose is not stretched - this can lead to the formation of leaks.
Corrugated stainless steel hoses are inexpensive, about 200 rubles.
You will need two of these - for hot and cold water. By appearance products are no different.
FUM tape is needed to seal connections when replacing equipment. You can do without it, but it's better to play it safe. Proven in practice: FUM tape helps prevent leaks and gusts if the connection is loose.
The coil costs about 40 rubles.

FUM-tape for a mixer is the easiest way to make joints airtight, which means strong. It's easy to use and inexpensive
Important: some experts recommend using linen tow or hermetic paste instead of FUM tape for sealing. Of course, you choose, but keep in mind that tow is an outdated and not the most reliable method, but costs 10 times more than FUM tape and requires careful handling - it can cause a chemical burn if it gets on the skin or eyes.
The following video will tell you more about FUM tapes:
So that there is no trace left: we remove the old unit in the kitchen
Replacing the faucet in the kitchen begins with the dismantling of the old fixture. The process is pretty fast. If you work consistently and accurately, then there will be no problems. The instructions for dismantling a used device are as follows:
- turn off the water;
- normalize the pressure in the system. To do this, simply open the valves in the kitchen and wait until all the liquid drains into the pipe;
- now remove carpets or rugs, lay a soft and wooden furniture oilcloth - if installed incorrectly during the verification process, the crane may break;
- put a basin under the sink. If you have to remove the siphon during dismantling, then the liquid from the siphon will drain into the basin, and the floor will remain dry and clean.
Important: the siphon must be removed if, when installing the mixer, it was tied and intertwined with hose pipes (so that the latter do not sag or if they are too long). It is impossible to remove them without removing the siphon. But most often the siphon and the mixer work, albeit in the same “direction”, but independently of each other.
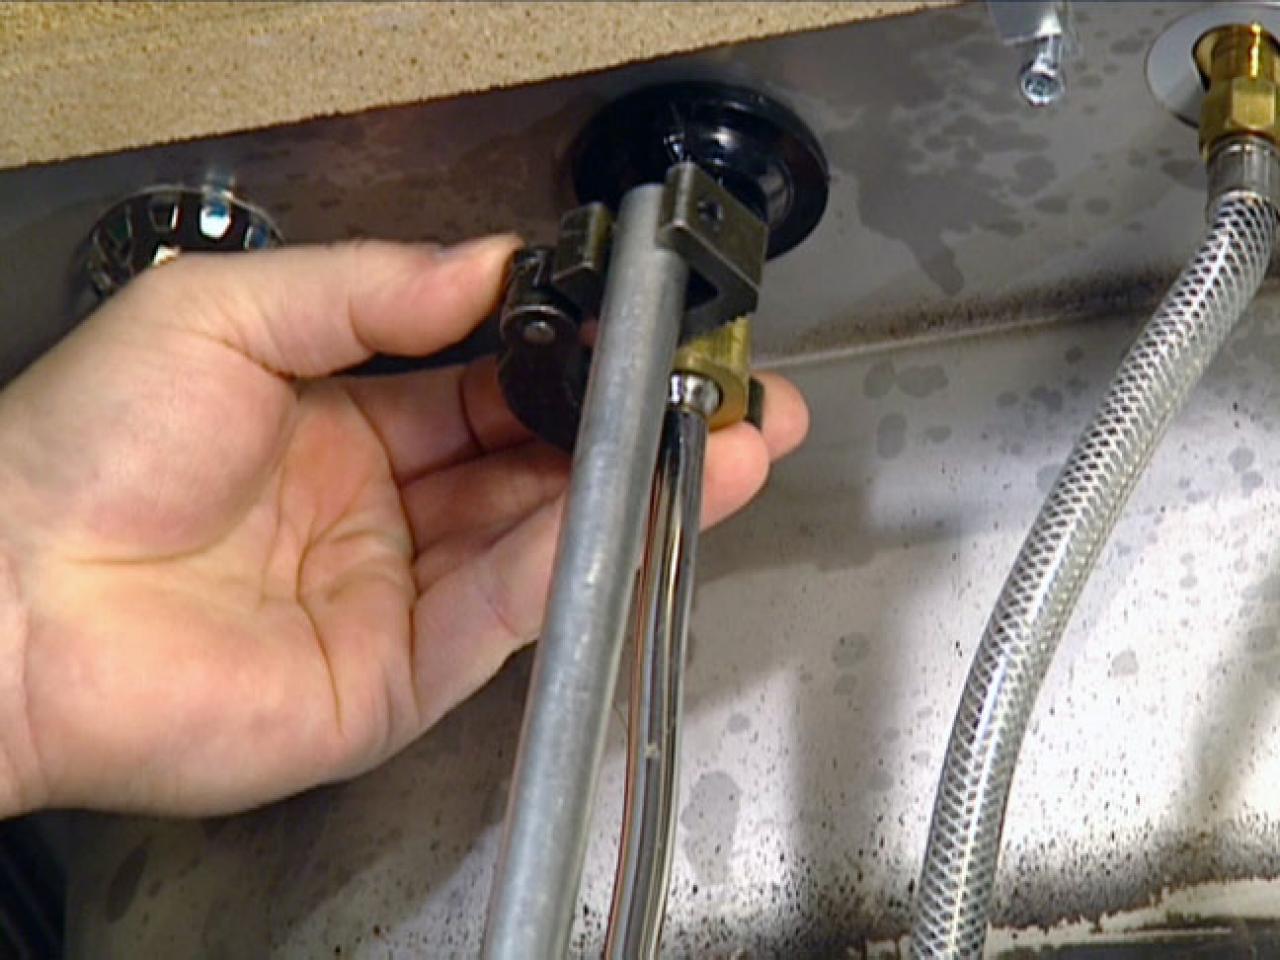
To unscrew the old mixer hoses, you will have to make an effort - over time they rust and are poorly removed from the “legitimate” place
- Take the key and first unscrew the hoses in the kitchen in order to change them;
- now, using a tubular wrench, unscrew the tap from the old place;
- carefully pull the structure up - it will come out together with the hose pipes.
That, in fact, is all, at this stage of replacement, the equipment that has served its purpose should remain in your hands, and a round hole “flaunts” in place of the new device.
Difficulties may arise with unscrewing hose pipes. Usually the connections are located under the sink near the wall. Reaching them is no easy task. You will probably have to lie on your back or show miracles of flexibility. If such experiments with own body you are not ready, call for a helper.

Removing the old mixer is not always easy and fast, the pipes do not want to unscrew, and the tap does not want to leave its place. Sometimes you need to be flexible literally this word
Important: what to do if the threaded connections are rusted and do not want to “get off” from their place, which makes it unrealistic to remove the faucet from the sink? Take the ordinary sunflower oil and lubricate the parts with them. This method is called emergency, but it really works in the kitchen. Using the method to defeat rust in other areas of the house is not recommended. For this, special lubricants are used.
Our video instruction will tell you about removing the old faucet in the kitchen:
A place for a “rookie”: we install a faucet in the kitchen with our own hands
To change the faucet in the kitchen, first carefully read the instructions on the packaging of the purchased product - nothing complicated if you act strictly according to the plan.
The next step is to connect the hose pipes to the mixer. On the bottom of the tap itself, there are two entrances that lead to levers - “openers-closers” of the liquid. The hoses are connected to these holes. At the ends of the hose for this there is a metal fitting with a thread. For reliability during operation, the entrances are wrapped with FUM tape, then hose pipes are put on them.
Now lower the faucet with hoses into the hole on the sink. To secure, use the ring and spacer, which are also included in the kit.
It is impossible to install a new mixer without a ring and a gasket. they must come with the faucet
Important: if suddenly there are no gaskets in the kit, then you can make it yourself. Take a rubber tire from a bicycle and cut out a circle. The diameter is 1-2 mm larger than the diameter of the hole for the mixer. In the circle, cut out another circle with a diameter 2-3 millimeters smaller than the previous one.
It is impossible to replace the faucet in the kitchen with your own hands without installing a gasket. The structure will not be securely fixed.
Now connect the hose pipes from the faucet to the hot and cold water. For this, the pipes themselves have special inlets.
Important: do not try to tighten the connections with all your might - you risk stripping the threads. In this case, you will have to buy new hose pipes or a complete mixer.
See how to consistently do this job:
Finishing touch: verification and commissioning
You have already replaced the faucet. Before congratulating yourself on a successfully completed "mission", check the equipment for operability. Open the valves that shut off the water in the pipes, then open the hot and cold water levers and watch. Look under the sink. Take a paper towel and go over the hose connections. The napkin must be dry. A small amount of moisture is allowed (literally a couple of drops) - this may be condensation.

Before commissioning, check the mixer. If the hoses or connections are wet, check the installation quality of the unit
Now open only cold water and make sure that it is cold that flows. Do the same with hot. If you did not find fistulas and gusts, everything is working fine, then feel free to put the unit into operation and accept praise from household members.
Otherwise, you will have to unscrew the faucet from the sink, check the integrity of the threads and connections, and reinstall the structure according to the instructions.
In conclusion
In general, replacing a faucet in the kitchen is not difficult. Start by preparing materials and tools. Then dismantle the old unit and install a new one. Pay special attention to the choice of hose pipes - it is good if they are made of corrugated stainless steel. The tubes come with the mixer in the kit. But using the ones that come with the faucet is not always rational. Their quality often leaves much to be desired, even if the faucet itself is very expensive.
Why can't old hose pipes be used? The threaded connection on them eventually becomes unusable. It is better to replace than to hope for a chance.
By the way, about the choice of unit for: modern devices are lever, valve and touch. There are no special differences when connecting. Choose the one that is affordable for you. Remember good product can't be too cheap. Reasonable price for good unit for the kitchen - 2-4 thousand rubles. The service life is approximately 10-15 years.
Do-it-yourself faucet replacement does not require special skills or experience. Regardless of the design of this plumbing device the replacement process itself takes place in the same way: it is not at all necessary to know the internal structure of the mixer.
The faucet in the kitchen is as important as the stove
How to change the faucet in the kitchen:
Work order
- The dismantling of the old mixer begins with unscrewing the supply hoses from the pipes. After that, using a wrench of the appropriate size, the mixer mount is unscrewed.
- Pay attention to the sequence of fasteners: the rubber O-ring is installed on top, between the faucet and the sink. The "moon-shaped" elements are attached from below, while first a rubber gasket is placed, then a metal one, after which the structure is fixed with nuts.
- When tightening nuts, do not do it "tightly". There is a risk of breaking the thread, which will result in the purchase of new parts.
- When connecting flexible hoses, their threads must be wrapped with fum tape or tow, you must do this clockwise. Also, the winding must be done on the pipe threads.
- Followed by control check all connections under to make sure all nuts are securely tightened.

Valve mixers are slightly different in design from valve mixers.
How to install the smell in the kitchen from the sink,.
Many specialists currently use both tow and fum tape. Each of these means has no obvious advantages over each other, but the fum tape is considered more modern. At the same time, plumbers of the “old school” claim: tow is more durable material which does not rot or deteriorate over time. Speaking objectively, both of these materials are approximately the same in quality, and the fum tape is the “incarnation” of the old tow, which will eventually replace it anyway.
It remains only to turn on the water, but this simple step requires great care. Since the hot and cold water valves are located in the bathroom, it is advisable to send an assistant there who by and large only needed at this stage. You yourself need to stay in place and control the situation, but dry all joints with a rag beforehand. There are three such places:
- Between faucet and sink
- At the junction of the eyeliner with;
- At the junction of the eyeliner with pipes or with.
Faucet replacement work process:

The main thing is to check the tightness of the connections
While the assistant slowly (this is important) opens the cold and hot water valves alternately, You need to open hot and cold water, carefully watching for leaks. This can be detected visually, but sometimes the water does not flow, but quietly seeps, which is not immediately noticeable. Therefore, while the assistant is at the valves, Your task is to feel with dry hands the places of these joints, highlighting them with a flashlight. If there are no leaks, everything is in order.

Finishing touch
If you change the mixer in own apartment and you can easily endure without water in the kitchen for a day, all joints can be treated with silicone sealant to fully guarantee the absence of leaks. The sealant dries within a day, but it is better to wait 48 hours. If necessary, in the future to dismantle the mixer, silicone will not interfere with this.

Good faucets are expensive
Otherwise, two options are possible: try tightening the nuts more tightly at the leaks. If this does not help, you will have to turn off the water again, unscrew all the nuts and wrap several more layers of fum tape or tow on the thread.
Plumbing arrangement in the kitchen:
Regardless of how open the water supply valves were before replacing, your task is to do it right, ensuring optimal pressure. Don't open the valves all the way. It is recommended to open them approximately 70%. When fully opened, the water pressure on the mixer cartridge will be very strong, as a result - such large loads will shorten its life. . By the way, water consumption is not justified, since medium pressure is enough for washing dishes. But if the valves cannot provide sufficient pressure when 70-80% open, adjust it at your discretion, since sometimes in old houses the water pressure is rather weak.
Valves are safe and beautiful
Replacing the mixer can be attributed to unskilled work: you do not need to have any skills for this. It is only important to follow the sequence of actions, use the appropriate tools and high-quality components (especially for various gaskets and water supply hoses). In this case, leaks and malfunctions of a different nature are excluded, the new mixer will serve for a long time, and you will have every right to be proud that you have completed such a responsible task on your own.

If you have a faucet in your kitchen out of order, then in most cases it is much easier to change it than to make a lengthy repair. You can change the mixer with the help of a plumber, however, if there is no desire to use their services or it is a pity for money for them, then you can do it yourself.
Fortunately, this is not very difficult, the main thing is to strictly follow the installation rules and your outdated device will be replaced without any problems.
Replacing a faucet in the kitchen and the nuances of the process
 Each owner of kitchen plumbing prefers to use everything that is most convenient and serviceable. The mixer needs to be replaced periodically. It is changed for aesthetic reasons if the faucet starts to leak over time. If you have the skills, you can do it yourself.
The procedure for replacing a sanitary mixing product is relatively simple, you need have a range of skills, it is not so easy to do it with your own hands if there is no experience. You need to be familiar with the water supply system, where water is under pressure.
Every wrong move can flood the room and damage property, it is also possible to damage a neighbor's home. If you know how you can change the faucet in the kitchen with your own hands, then you can do without calling a specialist.
 You need to be able not only to install the mixer correctly, but also to choose it correctly. The range of cranes on the market is presented large quantity models, and making a choice can be extremely difficult.
Before you want to remove the old faucet in the kitchen and change it, you need to look for reviews and descriptions of models in order to choose the most suitable option for yourself.
Cranes are classified according to internal device and are divided into the following categories:
- A faucet with a two-valve system - this faucet design has a classic structure and includes a spout located between two faucet boxes. Water is supplied through valves. This design is relatively inexpensive, but not particularly popular. The problem is that some components of the crane, in particular, its gaskets, do not last long.
- Single lever system - such cranes are now the most popular among buyers. They are good because the required temperature and water pressure can be set with a single movement of the hand with the help of the little finger or elbow.
- A faucet with a non-contact system - such designs are convenient, modern and stylish. The faucet is activated when hands are brought close to the sensor built into the housing or sink. Naturally, such a mixer will be very expensive.
Materials for the production of mixers
The service life of a water mixing product depends directly on the material of its manufacture. Most often, mixers are made on the basis of metal, plastic and material under the stone. These models are characterized by the following properties:

Preparation and tools for work
To change the tap, you will need the following tools:

From the new faucet set, the hoses are short and may not match in appearance and size in their threads when connected to the water supply system. The best thing pick up hoses separately of the required length, and their connecting elements must correspond to the threads on the pipes.
On pipes cut should be straight, otherwise it will be necessary to put an adapter between the pipe and the flexible hose. When choosing a hose, you need to consider whether an internal or external thread is required.
Before replacing the structure, you need block risers with cold and hot water or wiring, pressure relief valves open. When removing the old faucet, the water remaining in the system will pour out, you need to put a rag under the sink.
How to remove an old mixing tap
Before removing the old mixer, be sure to check whether the wiring inside the room is blocked. Actions will be as follows:

How to install a new faucet
 First, unpack the new faucet. If it has a valve design, then assemble it according to the instructions. Adjust the tightening torques of the faucet spout and valve. During tightening, a rag should be placed between the tools and the faucet surface so as not to damage the chrome surface.
The faucet attachment point on the sink must be cleaned of dirt, and the threaded connections on the pipe should be get rid of dirt and rust. You can install ball shut-off valves on the pipe bends, thanks to which it will be possible to change or repair the faucet in the kitchen without having to turn off the water in the whole house.
It is best to install valves of such a design that the thread at the outlet is external. Flexible metal braided hoses with fixing nut and internal thread fit best. The silicone gasket will ensure tightness.
If the hose has external thread, then the tightness of the connection will depend on how you correctly wind the synthetic linen or tow. Synthetic linen is great alternative fum tape, since flax tends to expand when wet and self-repairs leaky joints.
Screw the hoses to the mixer. At the sink, the holes for hoses are most often small, if the hoses are screwed to the mixer in advance, then they may not go into the hole, because the parameters of the nuts for attaching to the pipes are much larger than the diameter of the hoses.
Screw in the faucet studs. Pull the flexible hoses through the sink opening to the pipe outlets. The tightening should not be strong so that the rubber gasket is not damaged.
Before placing the faucet, make sure that the O-ring between the faucet and the sink surface is correctly positioned. With inside(under the sink) you need to pull on the studs rubber gasket and the valve washer, tighten the nut, but before final tightening, you need to put the mixer in the required position.
If the sink was previously removed, then you need to put it in place and attach the siphon there. The taps on the mixers are closed, the correct installation and connection of the hoses with the pipes of hot and cold water supply is checked. Intra-apartment wiring must be opened and check connections for possible leaks.
How to connect the mixer to the water supply
When you connect the mixer to the water supply, then be guided by the generally accepted scheme for this work:

All actions must be performed slowly and very carefully, not in all cases everything works out the first time, but you should not despair.
As you can see, you can change the mixer in the kitchen with your own hands if you wish, especially if you have experience in such matters. Moreover, a leaking faucet can pose a danger to your home and other premises.
The main thing is change a non-working mixer in time on new. And sometimes replacement is needed for aesthetic reasons when you want to change the plumbing in the kitchen.