Installing a sink above a washing machine. Determination of the installation height of the plumbing device. Installing a sink on a suspended shelf
Installing a bathroom sink is the final step in a renovation. The installation of the washbasin itself and the connection of the water supply and sewer siphon to it is carried out after completion finishing works, so you need to be careful. The assembly of components, installation and related fittings are not something difficult, but it is important to observe the sequence of all stages of the process.
What is important to consider when installing a sink yourself?
In most city apartments, the bathroom and the combined bathroom are too small. And in a cramped room, almost end-to-end, you have to place:
- a tank for taking water procedures (jacuzzi, bath, shower tray);
- sink (washbasin, sanitary ware);
- for a bathroom - a toilet bowl;
- occasionally - bidet.

Each personal care item has its own installation method, but installing a bathroom sink is the simplest example.
The construction market offers big choice shells different design, but when buying it is important to consider:
- the ratio of the dimensions of all existing tanks and those installed;
- the washbasin and all accessories must comply with the piping and sewerage layout;
- flexible hose and siphon should be enough in length to drain into the sewer pipe.
Sinks come in different materials:
- ceramics;
- porcelain;
- faience;
- marble (another ornamental stone);
- fake diamond;
- strained glass;
- metal (more suitable for the kitchen as a sink).
At the first stage, it is important to understand the type of fastening of sanitary ware. The faucet is mounted on the sink through a special inlet, when the water supply is brought through the container itself. When the faucet is installed above the sink from the wall, it makes no sense to purchase a product with a hole in the center (side), which will have to be covered with something.
All sanitary ware differs in the installation method:
- hanging sinks - mounted on the wall;
- built-in washbasin, part of a cabinet or cabinet;
- tulip shell (on a high narrow stand, behind which is hidden drain hose and entrance to the sewer)
- sink-pedestal (on a stand that hides pipes;
- a sink with a semi-pedestal (the same stand, but attached to the wall, arbitrarily choosing a height);
- overhead sink;
- mortise sink with countertop;
- sink combined type With special design where features of several types are combined.

Install the sink yourself or contact the experts?
Each variety assumes its own type of installation, which is indicated in the instructions for the tank. Of course, the installation of a washbasin with a pedestal is different from a conventional wall-mounted washbasin. And if this or that type raises doubts whether it is possible to install it yourself, then it is better to choose a product with a simple installation scheme.
Is installation worth it? sanitary sink do it yourself or entrust it to specialists? If you already have experience in such a business, then it makes no sense to overpay those who decided to master it a little earlier. And the prices for simple services are clearly too high to make it profitable. If you look at search queries of your region, how much it costs to install a sink in the bathroom, taking into account home visits - it turns out to be expensive. Sometimes the cost of installing a simple washbasin is more expensive than its price.

If desired, any independent man (or economic woman) will cope with such work without the involvement of specialists. Required to have:
- basic knowledge about connecting water communications;
- tools for assembly and installation;
- detailed instructions for installing the selected type of sink;
- tips from experts from the article.
Attention: It is advisable to purchase a new sink faucet that matches its type! When buying a faucet and washbasin, feel free to find out all the details of the assembly and review the components if you intend to do it yourself.
Helpful Hints:
1. A built-in sink is easiest to install if its dimensions fully correspond to the cabinet on which the product should be located. It remains to assemble the siphon and connect it to the sewer.
2. Mounting a wall-mounted or wall-hung sink requires strong brackets or other accessories, which are often included with it.

3. The installation of a countertop sink is made on top of a countertop or another plane and is similar to the installation of a built-in washbasin on a cabinet. Only the tank is fixed on top of the countertop in a hole that matches the configuration. Sometimes this cutout has to be adjusted by contacting a carpentry workshop.
4. There are also semi-built-in washbasins, which require the installation of a washbasin with a cabinet, but partially protrude beyond the edges of the support.
5. It is very convenient to install the tulip sink. Here, the back surface is attached with brackets to a wall or other vertical surface, and partially stands on a leg support. But for some “tulip” models, the weight completely rests on the leg, and additional fixation is carried out by a mixer that comes out from below and is attached to a hidden water pipe.
To simplify fixing and understanding, a simple technology for installing a sanitary sink of any type is sufficient
It should be broken down into main steps:
- mixer assembly;
- sink installation;
- siphon output to the sewer;
- plumbing connection.

The first stage: assembling the sink or washbasin
AT in general terms installation of a sink with a pedestal or on a curbstone
involves fixing the mixer and draining the drain siphon from the hole, which causes major difficulties for some beginners. But mixers are mounted in 2 ways:
- horizontally (above the sink);
- vertically (from the washbasin opening).
Tip: Carefully read the instructions for assembling and connecting the purchased sink and faucet. The faucet must have seals, end fittings for connecting to the water supply, flexible and rigid piping. These are rubber or flexible hoses with a metal braid, a corrugated sleeve or special adapters. Flexible rubber hose it is better to replace with a metal braid in the form of a spiral, which will increase the service life of the connection.
The type of attachment for each model of the washbasin is different, but how less details, all the better. And fixing with one large washer or nut is better than other standards, because it does not bend or deform during operation. Due to unbalance vertical mixer often "spread out".
When installing the sink, we connect the mixer strictly according to the instructions supplied by the manufacturer. Usually it is required to screw it into the base and secure it with studs. It is important to be sure to put a gasket in the hole so that water does not seep and flow through the pipe or pedestal. After that, the washer and gasket are screwed with inside tank to finally fix the mixer.

The second stage: connecting and assembling the drain siphon
In the assembly of the drain siphon, there is also nothing difficult when you have on hand:
- all equipment;
- detailed instructions;
- installation diagram in the illustrations in the package.
However, there are some nuances that are important to consider when installing a washbasin. For example, if this is a sink installation with a semi-pedestal, then the sewer inlet is usually on the side of the wall, and not on the floor. All parts of communication must be hidden.
The siphon does not always work flawlessly after installation. And in order not to deal with it after installation in search of the cause of the leak, experts check all areas where there are rubber seals. All irregularities and burrs that interfere with the tightness of the seal are cleaned. In the same way, all burrs work out on gaskets.
On closer examination of the rubber gaskets, it is noticeable that they are not the same on both sides. It is important to put them on correctly - with a cone in the opposite direction from the nut.

Tip: If the gaskets are old (dried, inelastic), you should not be too lazy and buy the same, better ones, otherwise they do not fulfill their main function - ensuring tightness. Sometimes the problem of a small leak can be fixed with a sealant or silicone, but these are temporary measures.
After installing the siphon and mixer, the installation of the base or the washbasin tank itself is completed. On the pedestal, if the dimensions of the sink match the configuration of the hole or the upper horizontal, then no cuts or adjustments are made. The main condition is the observance of the horizontal and strong fixation. The curbstone usually has screw adjustable legs. Sometimes required additional adjustment sink installation height.
If the sink is fixed to the wall, and not to the cabinet, then it is necessary to fix the brackets or anchor screws, marking the horizontal line according to the universal building level. If this is a tulip sink standing on a leg, behind which the siphon is hidden, then the tank with the mixer is simply glued to the wall (tile) with silicone. It will turn out quite firmly and reliably if the sink itself stands on a support, and not on weight.
Tip: It is better to check the operation of the siphon even before connecting the water supply, pouring clean water in small portions. If everything is dry, pour another bucket of water - for a control check.

Final step: connecting the water supply
Correctly installed faucet does not cause difficulties, but it is important not to confuse where cold water, and where is hot, if it is supposed to be. The mixer is usually connected directly to water pipes- by connecting a flexible hose.
The most convenient adapter is a corrugated sleeve, fixed with a union nut with rubber gaskets. It is important not to overtighten the nuts so as not to damage the seals.
Installation of a kitchen sink with a curbstone (sinks)
The kitchen sink on the cabinet is installed in the same way. But usually we are not talking about faience or tiled containers, but about a metal sink. In most cases, its dimensions coincide with the cabinet. But sometimes it is mounted on top - like an overhead sink, that is, on top of a common countertop for the entire work plane. If necessary, they turn to specialists who, by machine or special tool cut a hole of the required configuration.
Sealing is the main condition, since water and excess moisture are everywhere in the kitchen. Sealing joints and sealing gaskets is important to do most carefully. And the wider the overhead sink or sink, the less water splashed on the tabletop.

Step-by-step instructions for replacing an old sink:
- turn off the water supply;
- disconnect the old container from the siphon and mixer and remove from the cabinet;
- try on a new container to a countertop or cabinet and make the necessary fit;
- install the mixer according to the instructions;
- connect the siphon and check the tightness;
- open the blocked water supply and turn on the water - at first a small trickle.
Tip: When installing the pedestal, be sure to align the horizontal. Once again, make sure that everything is connected tightly, and water does not ooze.
Complex varieties of shells can be difficult, and then you should turn to the services of specialists. If the countertop is stone or from another solid material, then abrasive cutting is required to obtain a hole of a certain size and configuration. It is not made in a carpentry workshop, but in a porcelain stoneware cutting workshop, tiles and stone.
In any functional bathroom, in addition to the bath itself, there should be a sink. And this is not only for convenience, but also for aesthetic purposes. The installation of the sink should be carried out with high quality, because your safety will depend on it, and you don’t need to quarrel with neighbors from below about flooding. For this reason, pay due attention to the installation of the sink, so that in the future you will not encounter unforeseen financial difficulties.
Shell classification
Modern sinks have the most various designs. They can consist of one or two sinks, installed on a countertop or pedestal, where communications and a siphon “hide”. There is also a semi-pedestal in which the drain outlet is fixed. Some sinks are equipped with fasteners, so the choice of one or another installation method largely depends on the characteristics of the product.
You may be interested in information on how
We are interested in a classification based on installation technology, it looks like this:
- attached to pedestal;
- products installed on brackets;
- on the pedestal;
- on the special hanging shelf, attached to the wall.
When buying a sink in a store, pay attention to its dimensions (they range from 30 to 300 centimeters wide), as well as how a particular model fits general style bathroom. Another important criterion is strength.
What will be required in the work
- Actually, a shell.
- Silicone based sealant.
- Adjustable wrench, wrench.
- Dowel.
- Screwdriver.
- Screwdriver (if not, then use a regular drill).
- Self-tapping screws (if possible, with anti-corrosion coating).
- Pencil.
- Winding.
Dismantling the old sink
The first stage of work will be the removal of the old sink.
Important! Before proceeding with the dismantling procedure necessarily water should be turned off.
First, unscrew the nuts with which the mixer was fixed. Then disconnect the eyeliner, remove the mixer. Remove the siphon connecting the sink to the sewer system - unscrew the nuts (they are located below), remove the siphon itself and pour water out of it. If you plan to change it to a new one, then disconnect it from the drain, then temporarily plug the hole with something (a rag, for example) so that unpleasant odors do not penetrate into the apartment. Finally, remove the sink from the fixtures.
Bracket mounting technology
Today, brackets are considered the most popular method of mounting a sink. Consider the technology of such installation.

Stage 1. Draw a line parallel to the floor surface at a height of about 80 centimeters. This is the base mark on which you will make further calculations. It is at this height that sinks are often installed.
Stage 2. Measure, using a tape measure, what is the thickness of the shell wall that will be adjacent to the wall surface. The resulting figure is the distance that you need to measure down from the baseline and draw another line there. This is where the brackets will be attached. Measure the distance between the brackets, mark their position on the line. The resulting markup is projected onto the baseline on the wall.
Stage 3. Attach brackets to the baseline, designate where they will be attached and drill holes there. Insert the dowels into the holes, fasten the brackets to the wall.

Stage 4. The sink is attached to the installed brackets according to the manufacturer's instructions.

As we can see, there is nothing complicated here if everything is available necessary tools and natural "eye". Now all that remains for you is to connect the remaining elements - the mixer and the siphon, but we will talk about this later.
Installing the sink on the cabinet
An equally well-known method of installation can be called the installation of the product on the cabinet. This method is characterized by the fact that the installed shells have a wide variety of shapes and designs. It's practically universal way hence its popularity.

To begin with, you make a cutout in the countertop, but further installation depends entirely on the features of the model, as well as on your wishes. So, you can install your sink on the countertop itself, or deep into the cutout.
Place the product in the resulting cutout and mark the points of future fasteners. Remove the sink and drill holes according to the marks, then put the product back and fasten it with bolts. As you can see, the technology is simple, we only note the ways of attaching the mixer. It can be attached:
- to the cabinet;
- to Wall;
- to the sink;
- to a special stand.
Important! If you wish, you can decorate the sink yourself, using real stone or smalt for this. The only limit will be your imagination.
Installing a sink on a suspended shelf

Hanging shelf is designed not only to distribute the load from plumbing, but also to hide all elements of the system, additionally serve as a place for storage detergents. In a word, the function of the hanging shelf is the same as that of the brackets, there are only a few additional features.
Installation technology
Stage 1:
- Mark the level where the sink will be located.
- Attach a sink to it and indicate where the fasteners will be. Drill mounting holes.
- Insert plugs for dowels into them, put the sink and fasten it.
Stage 2. Mark the fasteners under the shelf. Without removing the shelves, mark on it where it will be drainer. Also make holes for all necessary pipes plumbing.
Important! The mixer in this case is installed before the shelf is installed.
Stage 3. Drill holes in the wall and attach the shelf, with the drain hole aligned with the corresponding hole in the shelf. For fastening use dowels.
Mounting a sink on a pedestal

Mounted on a pedestal, the beautiful sink is very comfortable to use and looks amazing. The installation procedure for the duet pedestal + sink is easy, but requires some conditions.
- Sewer pipes should be hidden in the wall.
- The height of the drain socket must be at least 50 centimeters.
Here you also install the sink, siphon and faucet, only after that attach the pedestal to special studs, pre-mounted in the wall.
Important! If the sink is glass, then be extremely careful when installing it so as not to break it!
Installing a corner sink
If the area of the bathroom is small, then it is more advisable to install corner sink. This is how you make the most of free space. The corner sink installation technology consists of several stages.

Stage 1. Take a corner sink and put it in the place of future installation. If the sink will stand on the pedestal, then first put the pedestal, and the sink on it. If there is no stand, then install on standard height 80 centimeters from the floor. Lean the sink and mark with a marker where the fasteners will be. You can play it safe and measure everything with a tape measure in order to make sure that the dimensions are correct.
Stage 2. Focusing on the markup, drill mounting holes and place plastic plugs in them. Then lean the product again and twist the dowels.
Stage 3. Connect the siphon, mixer.

Mixer and siphon connection
Now, as mentioned above, we will take a closer look at the installation features of these components. They are connected to sewerage and water supply (both hot and cold).
Important! A siphon is a special valve designed to remove water from the sink and prevent unpleasant odors from the sewer from entering the apartment.
Siphon connection procedure is simple: first connect the drain to the sink, then lead it into the drain hole. After that, cover all joints with sealant so that an unpleasant sewer smell does not seep into the room.

The only thing that can cause problems is the installation of the mixer, but this can be dealt with without the help of specialists. At work you will need:
- hose for connection to water supply;
- fum tape as a sealant.
Stage 1. At the ends of the hoses, attach special rubber rings, the so-called gaskets, which completely exclude the possibility of leakage.
Stage 2. Connect the hoses to the mixer. Do it carefully, with the utmost care. Screw the hoses into the mixer until the end.
Stage 3. After connecting the hoses, mount the faucet on the sink. All fastenings are carried out using special clamps, which are often attached to the mixer (if there were none in the kit, then buy them in one of construction stores). There are models that are fastened with nuts, clamps are not required for them.

This is followed by the installation of the sink itself, we have already talked about this.
Conclusion
If you decide to install the sink yourself, then you will have the opportunity to decide for yourself how the design and each of its elements in particular will look like. And a wide range of shapes will allow you to create a true miracle in the bathroom, which will please the eye of everyone who enters it.
One of the last steps in overhaul the bathroom is to equip it with plumbing fixtures. When all facing works done, the owner will have to think through everything to the smallest detail (how to arrange the bath and washbasin, where the mirror will hang, where personal hygiene items will be, etc.).
Attaching the sink to the wall and bringing it to the water supply is very simple. This is how the process of installing a sink in a bathroom may seem at first glance.
Today you can choose a device for morning washing different size, shape, color, quality and price range. This is the first problem that the user will face when choosing a sink.
Difficulties may arise when installing the sink. The installation principle for all types and sizes of sinks is almost the same. However, before that, the most important thing is to decide on the size and location of the ceramic product. About how to install acrylic bath with your own hands, you can read.
Choosing a place to place the sink
IMPORTANT: in pursuit of an extraordinary design, you need to not miss the most important detail– functionality!
Before buying a plumbing product, it is imperative to take measurements of the bathroom and (highly desirable!) Sketch its layout on a piece of paper. This will help you choose the size of the sink, determine its location.
If you choose any compact model, then splashes of water, one way or another, will always be on the walls and floor near the sink. Optimal width for a sink, a size of 50-65 cm is considered, but the choice still remains with the owner. If you buy a sink that is wider than the standards, then such a device will cause more inconvenience than benefit.
If the bathroom space is quite extensive, then you can even install a double sink. In this case, it must be taken into account that the distance between the central points of the sinks should not be less than 90 cm. Only with this arrangement, people using the washbasins at the same time will not interfere with each other.
Another important point is such a parameter as the height of the sink. Since in most cases family members are of different heights, this also has to be taken into account when choosing a place.
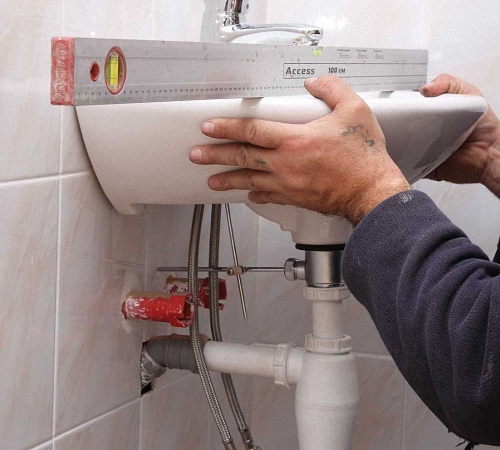
It will not be possible, for example, to place the sink over washing machine because small children will not be able to use it. According to regulatory documents, the installation height of the sink for an adult should be 80 cm, for a child - 60 cm, for a teenager - 70 cm. The standard height for installing this ceramic appliance is considered to be a distance of 80-85 cm from the floor to the side.
Hanging sink installation
Before you start installing the sink, you still need to decide how far from the floor it will be.
Stage one. At the selected height, applying a level, you need to draw a horizontal line - this will be the top of the sink. On the side where the bowl will be in contact with the wall, there are mounting holes. Having attached the sink to the wall parallel to the drawn horizontal line, you need to outline where the mounting holes will be located.
Stage two. In the marked places on the wall, you need to drill holes, hammer in the dowels and carefully screw the mounting pin into them. Mounting studs, dowels, nuts and plastic inserts must be supplied with the sink.
IMPORTANT: the fastening studs must be screwed in such a way that the protruding part is more thickness sinks (plus 15-20 mm for tightening the fixing nut).
Stage three. Before fixing the sink on the wall, you need to do. When the device is firmly screwed to the wall, it will be much harder to do.
1 - fixing pin,2 - hose for hot water, 3 - cold water hose
To do this, you need to carry out some preparatory work:
- in the mixer you need to screw the hose for supplying cold and hot water, the mounting pin (in some mixers there are several such pins);
- using an open-end wrench, tighten the water supply hoses to the end (after fixing the mixer, it will not be possible to tighten them);
- after threading the hoses through special holes in the sink, the mounting studs must be secured with a rubber band, tightened with a washer and tightened the mounting nuts;
- before tightening the nuts, it is imperative to adjust the direction of the mixer spout (it must be at an angle of 90 0 to the fixing wall).
Stage four. Now it remains only to fix the sink with the faucet already screwed on. To do this, you need to put the sink on the mounting studs that protrude from the wall, insert the plastic inserts and tighten the nuts tightly.
IMPORTANT: to avoid emergency, necessarily after all operations, before connecting the hoses of cold and hot water, it is necessary to check the entire structure for strength.
Stage five. When the sink is securely fixed, you need to connect the cold and hot water hoses to plumbing system. It is recommended to use a rubber gasket between the faucet and the nut to prevent water from leaking.
Stage six. Installation and connection to sewer system drain siphon. First you need to assemble the siphon, since it is recommended to connect all types of siphons as a rigid assembly. It is allowed to use sinks with soft corrugated pipe(there are branch pipes with a diameter of 32, 40 and 50 mm), however, in the first case, the connection will be more reliable.
When connecting a soft cuff of a conical shape with an outlet pipe, it is imperative to seal the joint between the siphon, the lining and the pipe. After installing the outlet valve, the remaining sealant is carefully removed.
The plastic nut, which is located on the upper side of the outlet pipe, is hand-tightened until it stops. The siphon itself is set at the desired angle to the sewer system, after which it is fixed at the desired height.
Installation of a sink with a pedestal (tulip)
If purchased ceramic product has a support leg or is fixed on the nightstand, you do not have to choose the height of its placement.
First you need to install all the supporting elements (bedside table, support leg) on your permanent place, after which it will be possible to start connecting to the sewer system.
With a pedestal, it will not be difficult only when the drain socket is placed at a height of at least 0.5 m, and the sewer pipes are hidden in the wall. Otherwise, you will need to use additional materials (adapters, seals, corrugated pipes).
As in the case of a wall-hung sink, you first need to install the faucet and drain system, and only then install the device. The pedestal is attached using the same mounting studs, sealing washers and nuts.
After installing the sink in the bathroom (regardless of shape, type and size), it is necessary to turn on the water and check the entire structure for leaks. If water oozes somewhere, then this place needs to be treated with a sealant again.
One of indispensable attributes any kitchen is a sink. It is required to the same extent as a stove (gas or electric). But installing a sink in the kitchen with your own hands is much easier than connecting a stove, if you know basic instructions and characteristic secrets of such work.
Different sinks are needed, different sinks are important
Indeed, kitchen sinks are produced in the widest range, from which in a specialized plumbing store "eyes run wide". Kitchen sinks can be divided into at least six categories:
- Sinks hinged, cut-in and laid on. Mounted option is now rare, it is more relevant for communal apartments and government institutions than for modern renovation. But mortise and overhead sinks compete with each other in popularity, their long-term reliability and aesthetic appeal are comparable;
- Sinks made of stainless steel alloys, chrome-plated or nickel-plated, sinks made of natural granite or porcelain stoneware artificial stone, acrylic and even glass (!). However, due to practicality, 90% of all models are made of stainless steel and representative porcelain stoneware.;
- Sinks angular and standard, round, oval, square, rectangular and curly. The more intricate the shape of the sink, the more difficult it is to give it impeccable cleanliness and maintain a sparkling shine daily. After all, the sink is used not for beauty in the living room, but for mundane household needs in the kitchen;
- By design, ordinary single sinks and sinks with two bowls (of the same or different sizes, the same or various shapes etc.). Available comfortable models with overflow of water from one bowl to another;
- By the location of the mixer - on the wall or on the sink itself (the first option is rare);
- Availability additional options– the possibility of installing a water filter, outlets for connecting a washing machine, automatic valves for regulating the drain, additional taps for connecting garden hoses, etc.
Sinks from of stainless steel gained overwhelming popularity due to acceptable price, durable functionality, compatibility with the most various repairs kitchen area and ease of sanitation.
You can check the quality of the steel alloy of the sink right in the store - an ordinary flat magnet will stick to it very firmly, with bad steel the magnet will “fly off” at the slightest hesitation.
Granite and steel sinks are available in overhead and mortise versions, do-it-yourself installation of a sink in the kitchen is possible for both. However, we must first take care of the furniture basis of our assembly efforts.
How to assemble a sink in the kitchen - we mount the cabinet
Mortise and overhead sinks are installed in bedside tables and cabinets, with opening (less often sliding) doors in front and an empty opening in the back. Assembly of these elements kitchen set has its characteristics. The fact is that they do not provide for internal bulkheads, they can interfere with the connection of sewers and water pipes. This means that there will be no additional stiffening ribs inside the cabinet. If an overhead sink is installed, even the countertop is missing, it is replaced by a steel sink panel.
The assembly of the cabinet under the sink should be much more reliable and durable than other parts of the kitchen set.. It must be installed on special linings, because. with the best tightness, water leaks are possible. The material itself will not interfere with the treatment with water-repellent compounds. Inside the nightstand, it is necessary to provide fasteners for tightening jumpers - they are installed after connecting the sink to communications for the strength of the entire structure. The jumpers themselves can be made from flat and thick planks, which will serve as additional mini-shelves inside the cabinet.
How to install an overhead sink on a cabinet - a quick guide
Overhead installation option kitchen sink happens ordinary and "retractable". In the latter case, the sink itself is equipped with curved slides on the side and front sides, while special grooves are provided on the nightstand. After successfully assembling the sink in the kitchen, it remains to push the sink into these grooves, move the structure against the wall - and you can connect communications.
If you use the direct version of surface mounting, you will have to seal all joints. Qualitative waterproof sealant combines the properties of adhesive and protective waterproof composition. Upper perimeter open pedestal generously smeared with this composition, it remains to accurately plant the sink itself on top.
A large and heavy surface sink must not be installed only on sealing adhesive!
Otherwise, one day, it will fall into the cabinet along with the dishes, destroying the sewer and breaking off the water hoses under pressure. Negative impressions from such an accident will be available to both you and the neighbors below. As well as the elimination of a plumbing collapse and the repair of two rooms already from the personal budget. How to install an overhead sink on a cabinet without the danger of such an opportunity? With the help of auxiliary bars or internal crates.
It is customary to supply simple overhead sinks with additional fasteners. As such, massive bars, precisely screwed from the wrong side of the cabinet, are suitable. It is necessary to accurately mark the lower edge of the pre-installed (without glue!) Shell and build an internal crate along this line. Then the sink will rely on auxiliary bars, and not on the thin end of the nightstand. The operation is similar to hidden lathing installation, only in final stage supplemented with adhesive sealing of the junction of metal and wood.
Installing a sink in the kitchen - do-it-yourself mortise installation
Before attaching a metal sink to the pedestal using a mortise method, you need to make sure that the pedestal is strong and that the entire structure can be accurately installed in the mounting opening. Experiment with the movement of the bedside table in advance - after fixing the sink, this will have to be done only once. After connecting the sewerage and water supply, the bedside table with the sink should stand “like a glove”, without distortions and vibrations.
How to install a sink in the kitchen with your own hands - a step by step diagram
Step 1: Markup
Most mortise sinks are sold with a ready-made template, it plays the role of a packaging container. It is enough to cut out such a template from cardboard and attach it to the countertop at the location of the sink - and the contour of the seat is ready.
If there is no template, you will have to make it yourself. To do this, it is better to use thick cardboard (for example, from a TV or monitor). After measuring the inside of the sink, transfer this measurement to the cardboard surface and cut off a few centimeters more. It is better to cut a piece of cardboard several times than to look for a new piece.
Step 2: Location
The proverb about the need to measure seven times before the first cut is very relevant for our work. You can move the finished template on the countertop easily and freely - until you start to cut it through. So consider how the tap will open, where the filter will be, how it will be located kitchenware etc.
outline cardboard template follows as smoothly and accurately as possible. To do this, it is attached to the countertop with ordinary tape and draw one thin line with a pencil. After that, the "cardboard assistant" is peeled off and sent to the waste paper, it will no longer be useful to us. The perimeter of the future hole with outer side paste over masking tape by 8-12 cm in order to prevent damage from mechanical tools.
Step 3: Drill and saw
Yes, yes, the first mechanical tool will be a drill, not a saw. A drill with a diameter of 2 mm is selected and several closely spaced holes are drilled in the place where it is convenient to start cutting out the contour. The holes are connected into a single groove with a chisel.
Sawing the tabletop is convenient jigsaw for wood. Just do not forget to stock up on extra canvases - thick tabletops are difficult to saw, the canvas is likely to break with a slight deviation from the vertical. Take your time and drive the jigsaw confidently - it is more difficult to correct a curved cutout than immediately cut a hole along a plumb line, with a strictly perpendicular cut.
Step 4: Finishing the installation
Apply sealant to the end of the fresh mounting hole and firmly insert the sink. We hold the sink under load from 10 to 60 seconds (depending on the type of sealant). Carefully remove excess glue from the outer and inner sides of the sink and wait several hours until the sealant is completely cured. We connect hoses, pipes, sewers, install a faucet and use the new sink for our pleasure.
The arrangement of the bathroom is a responsible event that raises a lot of questions from the owners who install the equipment on their own. A rich selection of sinks provides consumers with the opportunity to select equipment for any interior.
We will tell you how to install the sink in the bathroom in accordance with building codes and sanitary and hygienic requirements. In the article presented by us, examples of mounting the built-in and console versions are considered. Based on our recommendations, you can easily cope with the work yourself.
The method of installation of sanitary equipment is determined by the type of sink. Leading manufacturers produce several types of sinks.
The most widespread are four types of sinks, differing in the method of installation:
- Embedded. They are installed in the countertop cabinets, tables or any other flat surface. Such models are convenient in that they allow you to completely hide unattractive communications behind the furniture doors.
- Console. They represent suspended structures, which are fixed on the wall with finished system installations. Models of this type look stylish and modern.
- With a pedestal Models of the "tulip" series have decorative element in the form of a pedestal on which a massive bowl rests. The drain fitting is hidden inside the support.
- With half pedestal. Models of this type are also equipped with a pedestal. But he does not rest on the floor, but on the wall. Thereby wall models look more elegant. The installation of such equipment is complicated by the need to bring the drain to a given height.
Built-in sinks can be mounted on top of the countertop, fixed with sides around the perimeter of the base, or built into the structure from below.
Regardless of the installation method, the bathroom sinks on sale are very diverse in shape and configuration: oval, round, cubic
In bathrooms where it is not possible to install a countertop standard width, it is convenient to use semi-embedded models that simply go around the edge of the countertop.
Image gallery


The only caveat - when installing such plumbing, you will need to install an improvised cabinet, behind the walls of which all communications will be hidden.

Console and built-in models are chosen by the owners of small-sized bathrooms, in which every centimeter of area is “under calculation”
How to dismantle old equipment?
To dismantle a device that has served its time, you must first turn off the water, then loosen the mixer. To do this, unscrew the nut fixing it. The equipment is disconnected from the supply pipes, carefully removed and cleaned.

Having unscrewed the taps, it is necessary to make sure that stagnant or water coming from the pipeline does not leak through the control valve
After that, the drain elements are dismantled:
- Nuts are unscrewed from the lower outer part of the plumbing element.
- Disconnect the siphon glass from the drain outlet, free it from water and clean it from accumulated dirt.
- Remove liquid from drain and manually unscrew the lock nut by turning it counterclockwise.
If the siphon is to be replaced during the dismantling of the equipment, it must be separated from the drain pipe. To do this, unscrew the lock nut located at the junction of the drain and the water seal, carefully lift the drain and drain the siphon.
Before removing the drain with the installed gasket, the wedge-shaped spacer washer must be pushed aside. At the final stage, it remains only to pull out the outlet pipe with the attached siphon from the sewer socket.

So that the accumulated water does not drain to the floor when disassembling the elements, it is advisable to install a bucket or any storage container under the siphon
After completion of work, to prevent the spread bad smell, hole sewer pipe carefully close with a cork or a piece of fabric folded several times.
If you have to dismantle a sink attached to the wall using combined stands, you should look for attachment points on the sides, closer to the bottom of the washbasin. If the bowl does not have a floor support, when unscrewing the nuts, the sink should be held with your hands so that it does not fall to the floor under its own weight.
Cantilever washbasin installation procedure
There is nothing complicated in installing a sink in a bathroom without resorting to the services of professionals. The main thing is to strictly adhere to the installation technology, which includes several main stages.

Properly installed sink installation is the key to the normal functioning of plumbing equipment and ease of use by households, as well as the absence of regular repair work
To perform the work you will need the following tools:
- electric drill;
- drills for concrete;
- building level;
- tape measure and a simple pencil;
- spanners;
- expansion dowels;
- building glue;
- self-tapping screws;
- FUM tape.


Making holes for fasteners
For installing brackets in outdoor supporting walls bowls with back side turn the item upside down. plumbing fixture with brackets installed, move to the horizontal line drawn. Along the drawn line, the places for mounting the fasteners are marked.
At the intended points of future fasteners, holes with a diameter of 1-2 mm are made using an electric drill. smaller size prepared dowels. The fixing screw should be difficult to enter into the “nest” made.

Small portions of glue are poured into the holes to strengthen the strength of the joints, then bushings are driven in and support brackets are installed for mounting the bowl
Expansion dowels of nylon or other polymeric design are driven into the prepared holes, self-tapping screws of the appropriate diameter are screwed into them. Then screw the brackets themselves.
A little trick: so that at the time of making holes, the drill bit does not slip on the tile, sticky mounting foam is glued to the treated area.
Mounting the sink bowl
After tightening the self-tapping screws, check the strength of the fasteners. A sink is put on top of the mounting studs. Sealing inserts and washers are put on the screws, and then the structure is carefully tightened. The washbasin is additionally fixed with a sealant or clips.

When tightening self-tapping screws, it is not necessary to apply special efforts, otherwise the surface of the washbasin may be covered with a scattering of cracks or split
The task of the master when twisting the washers is to achieve an effect so that the bowl does not sway. The attachment points are decorated by putting on plugs. To prevent the appearance of mold when water enters the gap between the sink and the wall, this place must be additionally coated with silicone plumbing sealant.
Connecting the siphon to communications
Installation of the siphon begins with fixing the release. To do this, a grid, a rubber or silicone gasket and a clamping screw are installed in the drain hole. The presence of a gasket is mandatory, since it ensures the tightness of the connection.

When installing gaskets, it is important to control that they fit as tightly as possible, without any gaps and displacements, fit the washbasin drain
After making sure that the gasket is installed correctly, tighten the clamping screw, thereby connecting the outlet to the siphon. After that, the end of the outlet pipe, made of hard plastic or corrugated hose, is connected to the sewer socket.
When connecting to the sewer, it is mandatory to use seals, which can be rubber gaskets or cuffs for corrugations.
Faucet installation process
It is better to install a plumbing fixture before fixing the washbasin to the wall. After installing plumbing, connecting it will be much more difficult. For this purpose, the mounting studs and flexible hoses that come with the kit are screwed into the mixer.
With the help of this eyeliner, they connect to the water supply. To seal the joints in order to prevent possible leaks, the FUM tape is wound.

Water supply hoses are inserted into the hole, having previously put moon-shaped gaskets and washers on them from the underside.
One end of the hose, equipped with fittings or fasteners, is connected to the mixer, and the other to the water pipes. If the diameters of the pipe and the outlet differ, a sealing cuff is put on.
At the final stage of the connection, it remains to check the operability of the system and make sure that there are no leaks at the junctions of the pipes and cuffs.
You will find a step-by-step guide for installing a faucet on a sink in, which we strongly advise you to read.
Assembly and connection of the tulip sink
The bulk of the sink with a pedestal is distributed on a decorative support leg, however, the bowl itself is still attached to the wall. The process of installing and connecting this plumbing includes a number of traditional steps. The following photo gallery will help you get acquainted with it:
Image gallery


With the details of installing a tulip-type sink, the contents of which are completely devoted to this issue.
Features of mounting a built-in sink
Built-in models are cut into the countertop from below or from above.
Each installation method has its own nuances:
- When the bowl is placed on top, it will protrude from one to three centimeters above the surface.
- The lower tie-in method is preferable because during operation it is convenient to collect splashes with just one movement.
Regardless of whether the sink is completely recessed into the cabinet, or whether it will partially rise above the surface, drain valve will still be located inside the cabinet.

If you plan to mount a built-in sink, be prepared for the fact that you will need to perform the perfect processing of all joints
To implement the insert from below, L-shaped fasteners are used, and fixation is performed to the base of the support.
Marking the installation site
To simplify the marking of the countertop for the installation of a recessed sink, the use of a template will help. Many leading manufacturers include it in the kit with most built-in models.
When determining a place for installing a washbasin, two conditions are guided:
- The sink should not be on the very edge or right up against the wall.
- It should provide free access and ease of use.
The meaning of creation correct markup is that the washbasin is firmly fixed in the countertop, but at the same time does not fall through the hole in it.
For lack of a template, the shell is turned upside down and applied to the surface. Draw a contour with a simple pencil.

The line of the inner contour traditionally recedes to the center by 1.5-2 cm relative to the outer line; it serves as a guide when cutting a hole for the bowl
In order to correctly calculate the distance from the edges of the plumbing to the eyelets of the fasteners, measurements are taken and transferred to the circled contour. The resulting size determines the distance that should be retreated from the line in order to create an internal contour that acts as a support for the sides of the bowl.
Sawing and edging
The hole for installing the bowl is made using a jigsaw. If you have to work with a hacksaw, be prepared for the fact that you need to trim the edges.
When working with a hacksaw, in order to get a neat cut, first a hole is drilled in the region of the marking line inside the outlined contour. Its diameter should be such that the hacksaw blade fits freely.
Important! To minimize the risk of chipping on decorative coating countertops, sawing should be done slowly and without excessive effort.
The end surfaces of the created hole are treated with fine-grained sandpaper or grind with a file.

To avoid problems with leakage during operation of the equipment, the cleaned edges of the tabletop cut in 2-3 layers are covered with a sealing compound.
When choosing a sealant, it is important to focus on the type of material used in the manufacture of countertops. So for plastic and wood flooring alcohol-based sealants are used.
Installing the bowl and connecting equipment
The bowl is installed in the countertop and deepened. To ensure a tight fit, the product is rotated slightly back and forth. After that, it remains only to tighten the installed fasteners and remove the silicone with a napkin, which is squeezed out when the bowl is seated in place. The assembled and fixed structure is left for a day until the adhesive composition dries completely.
To connect the equipment, a mixer is installed in the hole, connected to the hoses and fixed with fasteners. The outlet of the siphon is brought into the sink, a pipe is attached to it, which is led out into the sewer socket.
In general, the technology and siphon of the built-in sink is almost identical to that described when installing the console model.
The specifics of assembling a complex from a countertop and an overhead sink, we recommend that you familiarize yourself with a very useful material.
When planning to install a washbasin located below the level of the table, it is better to use the services of a professional plumber. After all, this installation method is often chosen for expensive models made of natural or artificial stone.
And this requires not only to have at your disposal special equipment for cutting stone, but also to know the intricacies of working with capricious material.
Please write your comments in the box below. Tell us about how you assembled and installed the sink in the wash area in the bathroom. Ask questions, share what you know technological nuances, publish photos on the topic of the article.