How to unscrew an old faucet in the kitchen. Fastening of a flexible eyeliner to the mixer. Getting Started
The kitchen is one of the rooms in the house or apartment, which is operated in intensive mode. kitchen faucet subjected to significant daily stress, so it is desirable to choose a quality product. After the choice is made, you need to figure out how to install the faucet in the kitchen, having fulfilled all the engineering requirements for installation.
First you need to decide on the installation method: the mixer can be mounted on a countertop, a sink body or on a wall. In advance, it is necessary to outline the routes for the location of pipes for hot and cold water supply. At the same time, the connection points must be accessible in case of subsequent repair or maintenance. If you plan to install a filter, then the place for its installation must be provided in advance.
The mixer is invariably used in tandem with the sink, so when choosing a product, you need to proceed from its size and depth, as well as:
- the distance between the wall and the hole for the mixer;
- diameter of the hole for the mixer insert;
- drain points.
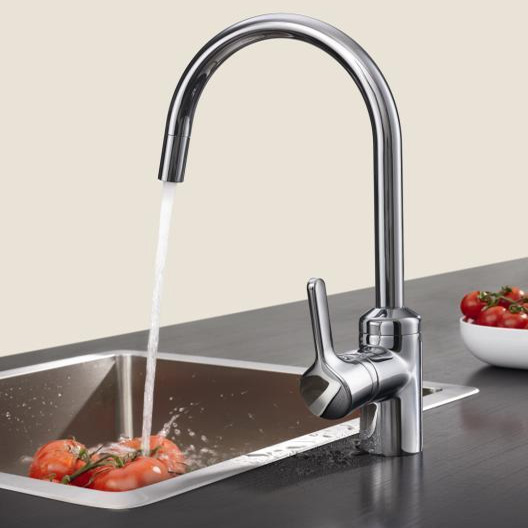
In this case, the mixer must be of sufficient length so that the end of the spout after installation falls on the center of the sink or sink.
The length of the spout should be equal to half the width of the sink bowl. The most ideal case is when a jet of water hits directly into the drain
The height of the spout should be enough so that you can put a tall pot under the tap. But, do not go to extremes and get too high a mixer. Otherwise, splashes are created that scatter outside the sink.
Another important parameter regarding the geometry of the mixer, this is the angle of rotation. If the sink is close to the wall, then it is enough to install the mixer with a rotation angle of up to 90 degrees. If you are using a sink with two bowls, then you need to pay attention to models with an angle of rotation of 180-360 degrees.
Variety of styles of plumbing fixtures
Finished with technical part, you need to decide on the appearance. Today, the choice of faucet styles is so huge that even the most spoiled owner will be able to find a model to his liking. Classic, hi-tech, loft, minimalism, chopped and streamlined shapes, chrome, copper or black - you can choose an option for any kitchen.
At the same time, unfortunately, the rule applies: the more expensive, the better - especially true for plumbing and faucets in particular. There is a limit to everything, but high-quality European-made plumbing is much more expensive than domestic products.
What kind of device is better
When choosing, you need to take into account the design features of the mixers. Most practical models- these are single-lever, in which the flow rate and temperature can be adjusted using one handle. Models with two valves are less practical, but go well with classic interior kitchens.

Single lever mixer - the most practical option in the kitchen. With one hand movement, you can adjust both the strength of the jet and the temperature of the water
Manufacturers also produce non-contact products that are equipped with a motion sensor. When you raise your hands, the sensor is triggered and the mixer starts to supply water. For the kitchen, this is also not the most practical option, since you often have to change the temperature and collect water in containers.
Prices for mixers depend on the type of alloy used and the brand of the manufacturer. The cheapest models are made of silumin, have a beautiful appearance, but quickly wear out and become unusable. Silumin and other cheap alloys crumble and crack quite quickly.
Most quality products are made from brass. A layer of nickel, aluminum or chromium is applied to the surface to give the mixer beautiful view. Chrome-plated products are the most wear-resistant.
Faucet installation instructions
Brief step by step instructions will help you quickly and correctly install plumbing fixture into place and avoid common mistakes.
What is included in the preparatory stage
Before starting any work, you need to turn off the water supply to the house / apartment from the central riser. If this is not done, then pressurized water will create a lot of trouble when unscrewing the connections. Next, you need to open the mixer so that the remaining water flows out of the system.
It is also necessary to stock up on all consumables and tools.

Prepare everything you need before starting work. Some of the tools can be found at home, and the rest, like consumables, can be purchased at the supermarket
It is advisable to read the instructions for the mixer before starting work. To do most of the work, you do not need to look for any specialized devices. The following set of materials and tools will suffice:
- Phillips screwdriver;
- flat screwdriver;
- wrench;
- flashlight;
- sandpaper;
- a set of flexible hoses (if they are not included with the mixer);
- water container;
- aerosol WD-40;
- tow;
- end keys.
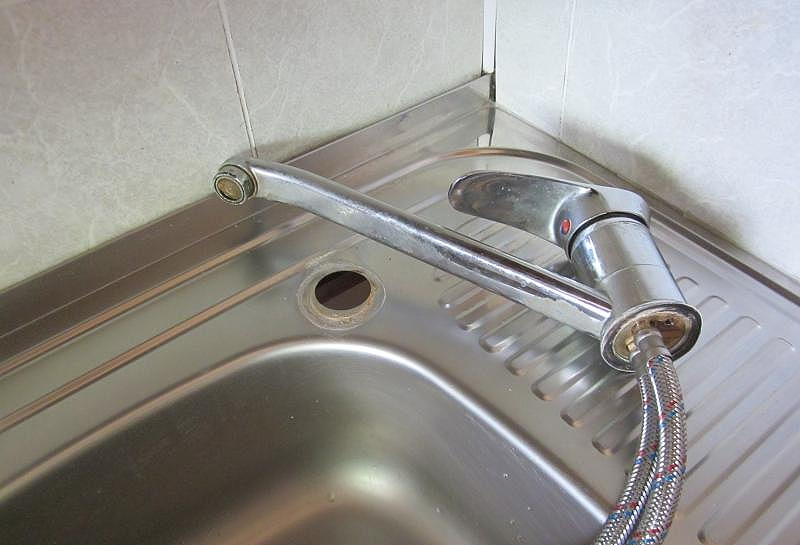
It is better to replace the hose to the old mixer with a new one. It is inexpensive, and besides, it will be the key to the most tight and durable connections.
Dismantling the old mixer
If you are making repairs, then first you need to dismantle old faucet. So, having completed all the preparatory procedures, it is necessary to find the connection points of the mixer with water pipes. Next, you need to find the places where the mixer is attached to the sink. Using an adjustable wrench, disconnect the flexible connection of the mixer and pipes. It is important not to forget to substitute the container in time, as residual water may leak from the water supply.
If the sink is consignment note, then it must be carefully removed. Before doing this, you must disconnect the lower part of the siphon. Only then can the sink be removed. The sink should be turned over so that it is convenient to unscrew the faucet mount. Rust could accumulate in these places, and the joints could stick to each other, so they should be treated with WD-40.
After waiting 10-15 minutes, you can try to unscrew the connection nuts with an adjustable wrench. First you need to slightly loosen the nuts that are on the threaded pin. Now, using a screwdriver, you need to unscrew the threaded pin. During this operation, you need to hold the mixer with your hand so that it does not fall.

To loosen the nuts, use wrenches, the threaded pins are easily unscrewed with a screwdriver, then by hand. At the same time, analyze the condition of fasteners and flexible hoses
Next, the mixer is removed along with the clamp. If it was decided to change the old hoses to new ones, then they are freely pulled out together with the mixer through the mounting hole. The mounting hole itself must be cleaned of accumulated dirt. The old faucet can be disposed of and the new faucet can be installed.
Installing a new sink appliance
Before installation single lever mixer in the kitchen, you need to attach an eyeliner to it. Tow must be wound on all connections - it can be used to seal the system as much as possible. Tow is wound on the thread of flexible hoses before connecting them to the mixer. On the tow, you can add a drop of drying oil so that when twisting it does not stray to the base of the thread.
Complete with the mixer there is an annular decorative laying. It is made of metal and has a rubber layer. It is necessary to ensure that the rubber insert is installed exactly in the grooves of the ring. Pass the ring through the hose to the base of the faucet.
Now you can install the mixer on the sink by stretching the flexible hoses through the mounting hole. It will be useful to have someone help from outside to hold the faucet while you screw it to the sink. You need to pass a spacer through the eyeliner.

After you put the spacer on the faucet, you need to carefully pull the flexible hoses through the mounting hole in the sink
Next, screw the threaded pins through the spacer (pressure plate) into the base of the mixer, thread the nuts onto the pins. Your partner should now lock the faucet in position so that you can tighten the nuts with socket wrench(in most cases this is the key to 11).
Now the mixer has taken the position in which it will be used in the future. Before the final efforts to tighten the nuts, you need to make sure that all seals have not shifted and are in place.
The sink can be put in place and then connected to the appropriate fittings plumbing system. Pipe fittings must be cleaned with sandpaper and apply a layer of winding. It can be linen thread or roll waterproof sealant in the form of a ribbon.
If you have chosen a tape, then it must be wound with an overlap. If you decide to resort to using linen thread, then you need to lubricate the thread with a paste-like sealant and only then wind the thread.

We connect the underwater hoses to the pipe, while each connection is clamped with an adjustable wrench. No need to use excessive force when clamping, so as not to strip the threads
We attach the siphon to the sink to start testing the plumbing. After that, you can open the water supply from the riser and check all the connections under maximum pressure. If water drips, then it is necessary to tighten threaded connection tighter and test everything again.
What nuances must be considered during installation
Now you know how to install and connect the faucet in the kitchen, but there are some difficulties that may prevent you from doing it. quality installation. There are situations when it is impossible to unscrew the old flexible hoses, because the joints literally stick to each other. There are also times when you need to adjust the diameter of the cut-in hole or mount on complex surface, for example, on the countertop.
In such cases, you will need electric jigsaw, with which you need to cut a hole in the countertop. If the condition of the pipes and their wiring is deplorable, then it is necessary to change and modify the entire plumbing. In such cases, you can resort to the help of a specialist or delve into the study of the installation of plumbing systems.
How to install a countertop faucet
For this method, in addition to the devices described above, you will need the following:
- electric jigsaw;
- drill;
- set of drills.
The installation method is practically no different from the previous one. Only in this case it is not necessary to dismantle the sink. Installing the faucet in the countertop is different, the need to make a hole in the countertop itself.

For installation in the countertop, it is necessary to make a hole that is suitable in size. Outwardly, it should look like a similar hole in sinks.
The choice of location for the hole should be based on practical recommendations:
- water should not fall on the countertop while using the mixer;
- it should be convenient to use the valves / lever;
- the spout should be located relative to the sink in accordance with the recommendations presented at the beginning of the article.
First you need to make markings along the contour of the base of the mixer, using a pencil. Using a drill, drill four holes at the corners of the drawn perimeter. Then saw through a hole with a jigsaw through which it will be possible to stretch the eyeliner and insert the threaded pins. The cut must be cleaned of sawdust and clean the edges with sandpaper.
It is important not to make the hole too big. Otherwise, the size of the clamping ring may not be enough to block the entire hole. Further, the sequence of actions remains the same as when installing the mixer on the sink.
Mounting the device on the wall
Mounting the faucet in the wall is quite original solution for kitchen interior. In this case, the crane will occupy a minimum of working space. Appropriate cutouts are pre-made in the tile or wall through which the connection will be made. This type installation looks quite aesthetically pleasing. In some cases, pipes from the wall are brought out, but this option is detrimental to the interior of the kitchen, it is better to hide all pipes behind the wall.

Wall mount does not require the use of flexible piping. The main difficulty is to bring the pipes out and close them behind a layer of finish
Installing the faucet on the wall requires an appropriate water supply with the output of elements for connection to the outside. The connection method is the same for iron, plastic, copper or metal-plastic pipes except for the use of adapters and fittings.
The connection method is also not affected by the type of mixer (valve, cartridges, etc.). A prerequisite is the selection of a wall mixer, the design of which involves installation in the wall.
For installation to iron pipes, tees and corners are used. If the axes of the connectors for connecting the mixer coincide with the axes of the pipes, then it is enough to use couplings. To connect to other types of pipes, special fittings are used, which are also called water sockets.
Features of wall mixers
These models can be mounted to any height. Faucets are available with flexible and rigid spouts. In flexible, there are many position variations that allow you to perform any action in the kitchen. Products with a rigid spout suggest a limited stroke and rotation of the mixer.

The design of wall mixers is varied, as well as their external design features. In the photo - a chrome-plated device with a flexible spout and aerator
For most kitchens wall models- This is a fairly convenient and practical solution.
Connection sequence
First you need to screw the eccentrics with which the mixer is connected to the pipes. To avoid increased formation of condensate, the distance between the axes of the pipes should be 150 mm. Most wall mixers are produced with this distance between the eccentrics. Tow must be wound on the threads (linen or synthetic).

Threaded connections wrapped with tow or linen thread, and then treated with sealant, last longer and do not let water through
Next, we screw the crane nuts onto the eccentrics and install a decorative screen (overlay). It is carefully screwed by hand, as it should fit snugly against the wall surface. If the gap is no more than 5 mm, then you can disconnect the mixer and cut the eccentrics to the appropriate length. decorative panel hides all imperfections on the wall.
Next, you should install the gaskets that are included with the mixer and can be made of silicone, paronite, rubber and others. polymer materials. Gaskets are inserted into the nuts of the body, ensuring that it fits snugly against the eccentrics. For maximum density, there should be no cracks on the eccentric. An uneven cut surface can be sanded with sandpaper.
The last stage is tightening the nuts: first with your hands, and when your own efforts are no longer enough, you need to tighten the connections with an adjustable wrench. Efforts should not be excessive, so as not to damage the threads.
Video installation instructions
A few useful video tips will help you install the mixer quickly and without errors.
Installation and connection of a single-lever device:
Now you know how to install a faucet in your kitchen or bathroom. Regardless of the type of installation, this is not too difficult to do. It is enough to have the right set of tools with you, Supplies and theoretical savvy. Of course, the task can be complicated by old worn-out pipes or the need to modify plumbing.
Someone in this case seeks the help of professionals, but even a person without experience can correctly install the mixer in the kitchen. It is only important to follow the instructions and observe correct order actions.
Replacing a faucet in the kitchen yourself is not at all difficult.Selection of a water distribution unit
Before changing the mixer, you must select a new device. In order for the crane to serve for a long time and not tire you with constant malfunctions, take the purchase responsibly.
Manufacturers who value their reputation produce the unit from brass or bronze. It is not difficult to recognize such a device - its insides yellow color. The gray filling "speaks" about the silumin product. This material is completely unreliable and subject to rapid corrosion processes.
Seals must be rubber.
Split spacer so that the crane does not stagger and does not flow.
Lever shutoff valves in all respects are preferable to valve valves:
- saves water because it does not require constant adjustment;
- Easy to open and close with dirty hands. This is especially true in the kitchen.
Workplace organization
Before installing the faucet in the kitchen, you need to prepare the place for work.
Faucet gaskets - a necessary consumableSelect the surface to which the faucet will be attached. Usually the mixer is attached to, but in some cases it is convenient to mount it on a countertop or even on a wall.
Determine the location of the hot and cold water.
ADVICE! For convenience, mark the source of cold water with electrical tape. Otherwise, a non-critical, but still unpleasant situation with valve confusion may occur. To hot water coming from a faucet with a blue mark, you will have to get used to it or perform the installation again.
Consider the future use of the device. On which side is it more practical to place the crane lever, is it convenient to turn. Consider, for example, changing the filter or installing an aerator.
Prepare the tools you'll need to replace your kitchen faucet.
Replacement tools
To remove the old faucet in the kitchen and install a new one, you need tools that can be found in any home or the nearest hardware store:
- adjustable or wrench suitable size;
- two screwdrivers: flat and Phillips;
- insulating tape;
- FUM tape for waterproofing.
Optional but useful device, whichreplacing a faucet in the kitchen with your own hands will become much easier - a flashlight.
Tools needed for the job of replacing the faucetPreparatory stage
Turn off the water before starting plumbing work. In typical apartments, the override handles are located in the bathroom or toilet above the water meter.
Open the valves or lever on the old mixer to drain the liquid that is already in the pipes.
To make sure that there is no marriage and the correct completeness of the new mechanism, assemble the device completely and check. In addition, after the training assembly, installing a faucet in the kitchen with your own hands will take less time, because you will already be familiar with the nuances of a particular model. When workplace, tools and a new crane are ready, proceed to direct work.
Dismantling a broken mixer
Before installing the mixer in the kitchen, you need to dismantle the old device:
- Disconnect the flexible hose coming from the sink from the water pipe with an adjustable wrench.
- Pour out the rest of the liquid.
- Loosen the nut on the threaded rod.
- Holding the structure, unscrew the threaded pin with a screwdriver and remove the faucet together with the hot and cold water hoses.
- It is necessary to unscrew the hose from the mixer if you plan to use it for a new mechanism.
- Remove the dirt on the hole where the faucet "sat".
ADVICE! In order not to break anything if the base sticks to the sink, fill the joint with kerosene and wait 20 minutes. Disconnection will proceed without problems.
As you can see, removing the faucet in the kitchen is not difficult at all.
This is how faucets were repaired 40 years ago, now it’s easier to throw out the old one and install a new oneInstalling a new faucet
Now everything is finally ready in order to change the faucet in the kitchen.
ADVICE! It is more convenient to carry out work on a dismantled and inverted sink.
Installing a sink faucet:
- To prevent water from leaking into the slot, a rubber ring gasket is placed in the groove under the base.
- Flexible hoses are lowered through a hole in the sink.
- The rubber seal together with the pressure plate must be mounted on the base.
- Threaded pins are screwed in to secure the structure. Professionals recommend doing this with your fingers so as not to overtighten the fasteners.
- Installation of flexible hoses to water pipes. It is important not to forget to seal the threads with FUM tape by winding 10-15 turns clockwise.
To check how well the mixer is installed, turn on the general water supply and open the tap. Let the pressure run for one to two minutes to make sure there are no leaks.
Installing a faucet in the kitchen is easy, and helpful tips from professionals will help to cope even faster.
Not worth buying cheap faucet the consequences can be direFirst of all, when choosing a crane, do not chase cheapness. The average price of a kitchen faucet should not be less than 2000-2500 rubles. Otherwise, permanent repairs and replacement of the mixer are guaranteed to you.
Place a spacer between the part and the tool so as not to damage the body finish with the wrench. Remember that scratches and chips not only reduce aesthetics, but also cause rust.
Change gasket and flexible pipes even if they have good view. In any case, they will last less than a quality faucet. Spare yourself the hassle of a new renovation in advance.
Summing up
Connecting a faucet in the kitchen is not as difficult as it might seem at first glance.
Responsibly treat the choice of a new unit. Pay attention to the material of the tap and the type of valves. The reliable faucet is made of brass or bronze and has a lever type of opening.
Prepare the workplace: choose the installation method, bring the necessary tools. Shut off the water supply.
Dismantle the mixer in the kitchen, follow the instructions strictly. Remember the tricks that will make the process easier.
WATCH VIDEO
Installing new mixer, do not forget about waterproofing.
Useful tips from professionals help to facilitate the installation procedure.
Before installing the mixer, it is better to read about the rules for its installation. Otherwise, you may end up with a leak in the bathroom or toilet if you have a sink there.
We carry out the fastening of the mixer to the sink
You can fix the faucet to the sink yourself without calling a plumber. The very first rule in the installation of the mixer, which must be applied, is to remove the sink from the cabinet on which it stands. Also, you need to have plumbing tools with you for work.
To fix the mixer, it is necessary to screw the connecting hoses into it. Screwing should be done by hand, and then tighten the hoses that are already screwed in half a turn. To do this, use a wrench. In general, you will need a number of tools.

To change the mixer you will need:
- Screwdrivers;
- adjustable wrench;
- Spanners;
- Lubricant;
- Dry rag.
Further process gaskets. Then install the seal, insert connecting hose into the hole in the sink and put the faucet. But do not forget that you need to put a seal on the needles from the bottom of the sink.
Be sure to put the seal on the hairpin or needles.
Install a metal washer and tighten the nut as an additional fastener. Now you can put the sink on the cabinet and screw on the fixture.
As you can see, the mixer is easy to assemble. It attaches without any problems. Always keep tools close to you that you may need at any time. Do not forget about the installation of seals that will prevent leakage. And then your mixer will work for many years.
We disassemble how to connect the mixer to the water supply
To connect the mixer to the water supply, it is enough to have ingenuity and the tools necessary for this. If you have had experience with such an installation before, great, if not, then it's okay. Connection is not difficult.
Installation of the mixer to the wall is carried out using the FUM tape. Connection to the water supply occurs using eccentrics. They are screwed to the fittings that are found on the water pipes. Eccentrics shift the distance between the water pipes to the desired distance between the mixer inlets.
Scheme of installing a mixer to water pipes:
- Put the eccentrics to the fittings;
- Screw the mixer block;
- Put decorative eccentrics;
- Screw the complete block;
- Checking faucets.

Once you have finished placing the eccentrics, you need to attach the mixing block to them. We fasten it to the eccentrics.
In the case when both sides of the mixer block go easily and do not spin without problems, you have set everything correctly.
Then you need to remove the block and install decorative eccentrics, then the entire block with seals. This installation is completed.
Installation of the mixer to the water pipes takes place in just one hour. Follow the instructions and then you will put the mixer correctly. The main thing to remember is that all scrolling should go without problems and stupor. This means that you are doing everything right.
What is a flexible connection for cold and hot water
Connections made from flexible materials- this is an excellent attribute for connecting not only faucets in the kitchen, but also toilets and showers. This is an indispensable eyeliner for connections, as it is reliable and both cold and hot water can flow through it.
A flexible connection is a rubber hose, which is covered with a metal braid, secured with fittings, nuts and gaskets. The hose is often made of rubber, which is used in Food Industry. It bends well and is durable in use. The diameter of such hoses can be different.
A rubber hose covered with a metal braid is what a flexible connection is.

Flexible connection includes:
- Rubber hose;
- metal braid;
- Fittings;
- nuts;
- Gaskets.
The material for the braid is aluminum, stainless steel or nylon. They protect the connection from external environments. Aluminum braid, as a rule, lasts 3-4 years. The stainless steel braid has been in operation for 8 years. Nylon - more than 15 years.
Flexible connection is often used in plumbing. Lasting rubber hose allows the connection to bend under different loads. The metal braid protects it from external influences and aggressive environments. And fittings with nuts perfectly fasten connections with conductive parts of the pipeline.
Proper installation: how to install a faucet on a stainless steel sink
AT correct installation The mixer has its own nuances that are not visible at first glance to the layman who is going to do such installation. Especially, it is important to know the installation rules for a sink, which is made of stainless material.
First of all, you need to prepare the countertop for installation. Once this is done, proceed to the installation of the mixer itself. To do this, first wrap the threads of the flexible hoses special tape or use a polymer sealing thread by screwing them into the faucet body.
Please note that when screwing the hose, do not support them by the metal braid. You just rip it out.

The mechanism for installing the mixer on a stainless steel sink:
- Wrap the threads of the flexible hose;
- Pass the hose nuts into the holes for the mixer;
- Stretch the faucet body to the stainless sink;
- Glue the sealing tape;
- Insert the fasteners into the grooves of the sink;
- Apply sealant around the perimeter;
- Place the sink with mixer tap on the countertop.
Following this installation mechanism, you will put the faucet on the stainless steel sink correctly.
Installing the mixer on stainless steel is not a hassle. Even if you wash out thin metal, then you just need to make a plywood liner to put it with back side. Then the mixer will hold strong and securely on the stainless steel sink.
How to install a faucet on the sink (video)
Both the plumber and the owner of his house can put the mixer on the sink. If you have all the essential tool for plumbing work installation will only take a couple of hours. Follow all rules and installation mechanism to install the faucet correctly. And then you will be happy to use tap water.
The use of water for domestic needs is characterized by increased requirements for it. There are special GOSTs that control the quality of drinking and household water. Water should have good pressure, have a comfortable temperature for the human body. In order to guarantee these characteristics, you must choose a quality faucet and install it correctly. We will deal with the installation of the mixer.
How to choose a sink faucet
Currently, in specialized stores you can pick up any plumbing equipment, designed for , sinks, bidets. Consumers can choose the mixer of the desired modification, and at a very reasonable cost. Mixers are created based on the average consumer. Manufacturers are trying to produce faucets that novice locksmiths could install.

Some private property owners are trying to install a new faucet on the sink on their own. Before starting installation work, it is necessary to decide which connection option will be used, using rigid or flexible wiring. The choice of connecting the mixer is determined by the version of the water distribution device that exists in your apartment.


When choosing a new faucet, do not forget to take into account the size of your sink, otherwise the water jet will splatter. If the "spout" of the tap is short, it will also be inconvenient to use, since the water will not reach the desired power and height. If you decide to purchase an exclusive and expensive type of faucet, then they may have some installation features. First, try to fully read the instructions that come with the mixer by the manufacturer, then begin installation.
Required Tools
Get a set of tools. To connect a new faucet to the sink, you will need:
- Screwdriver;
- Large and small wrench;
- fum tape;
- Pliers.
- Use a socket wrench to tighten the lower clamp nut.
The procedure for dismantling the old mixer
Installing a new faucet


Advice. Try to protect from mechanical damage outer coating new mixer, performing installation work. To do this, you can use ordinary electrical tape. There is a certain algorithm of actions when installing flexible wiring, which must be followed.
At correct installation the mixer must be completely sealed, in which case the mixer can be operated for long period. It is tightness that directly determines the functionality of the mixer, its reliability and durability. - read the next article.
Hard connection option
Currently, this method is rarely used, since it is more complicated, however, the operational period is much longer.

The mixer connection algorithm for a rigid connection has some differences from a flexible connection:
- Screw the corner needle into the faucet inlet to use the freest area under the sink. In this case, the rest of the eyeliner process will be simpler.
- The gasket achieves a hydraulic seal between the faucet and the sink.
- A new tap is placed in the mounting hole.
- The tap is sealed from below, additionally sealed with a rubber gasket.
- A straight needle is screwed into the mixer until it stops.
- The excess section of the pipe is cut with a pipe cutter.
- Next comes the fixation of pipes with special clamping couplings.
First, decide which design option will be present in your living space, and only then select a new faucet so that it harmoniously fits into overall design kitchens. First of all, purchase a sink for your bathroom (or kitchen), and only then buy a new faucet that will fit the sink.
An important component of any kitchen is the water supply point along with the faucet. The mixer performs an important function - provides comfortable temperature water to be used for various purposes. This is an irreplaceable attribute. However, everything in our life is short-lived - the mixer can break. It can fail for various reasons, especially if you purchase a cheap option.
If you have a faucet in your kitchen out of order, then in most cases it is much easier to change it than to make a lengthy repair. You can change the mixer with the help of a plumber, however, if there is no desire to use their services or it is a pity for money for them, then you can do it. Fortunately, this is not very difficult, the main thing is to strictly follow the installation rules and your outdated device will be replaced without any problems.
Read a detailed review in a separate article.
Preparatory stage
- First you need to turn off the water supply from the central riser, otherwise you can run into big trouble - you will have to eliminate the flooding. Then you need to open the tap so that the remaining water flows out of the mixer.
- You should prepare tools, as well as materials that will be needed for replacement. It will not be superfluous to study the passport and instructions for the purchased kitchen faucet.
Tools and materials needed for work
To change the mixer does not need any tricky devices. In most cases it is enough:
- adjustable wrench (in some cases, if it is not there, you can use a wrench);
- flat screwdriver;
- Phillips screwdriver;
- lamp;
- sandpaper.

It is better to change the mixer immediately with flexible hoses
Recommendation! In case the previous mixer belonged to inexpensive models, it is recommended to also replace the flexible hoses connecting it to the water supply. High-quality models for the most part have good hoses, which will still be in excellent condition for the replacement period and are suitable for further use. But there is a risk that they will fail faster than a newly purchased mixer. That is why it is desirable to change these products.
In addition, it is worth preparing a small container where you will need to pour water from the siphon. It will not be superfluous to have a washing agent in order to clean under the mixer, as well as under the sink, along with the replacement.

Sealant will be needed during the installation of the sink, including for threaded connections.
Important! In the case of a removable sink, and not a mortise one, it is likely that it will need to be removed to dismantle the old one, as well as install the purchased mixer. It will be much more convenient. Others may be required additional tools and fasteners and so on.
First of all, you need to buy a new mixer and prepare the right materials and tools. After that, you should use a flashlight and look under the sink to inspect the place of work.
The process can be conditionally divided into the dismantling of an outdated mixer, as well as the installation of a new one.
Dismantling the mixer
First of all, we turn off the water in the bathroom so that there is no flooding.
The mixer must be removed in the following sequence:

If you decide to use hoses, then they are also disconnected from the mixer and then connected to a new mixer and installation continues. At the same time, to avoid problems in the future, you should make sure that the hose gaskets are in good condition. An indicator of their reliability will be the integrity and absence of deformation, as well as their location in the appropriate place.
