Do-it-yourself weather vane on the roof of the house. Weathercocks on the roof - types of how to make and install with your own hands. The main parts of the weather vane
A weather vane is a device that is installed on the roofs of houses and is used to determine the direction and strength of the wind. Initially, it was used by meteorologists, but now that more reliable and accurate methods have appeared for this, it has become a decorative element that emphasizes the individuality and style of the owners. You can buy a beautiful and original weather vane in a store or order a model with individual design. In this article, we'll show you how to do it. useful device with their own hands from wood and other improvised materials.
A weather vane is a simple meteorological instrument that makes it easy to determine which way the wind is blowing. It is installed on or on the head of the pipe and serves as an interesting decoration, to which it also has practical use. The design of this device includes the following elements:
- Frame. The body or glass is the part of the weather vane into which the axis is inserted and the wind rose is fixed. With the help of struts, it is fixed on the roof ridge. To make a body with their own hands, a piece of pipe is used, sometimes a bearing is placed in it to facilitate the rotation of the axis.
- Axis. The axis of rotation is the element due to which the weather vane rotates. It is made of reinforced twig, stick or other materials.
- Cap. A small piece in the form of a funnel or circle with a hole in the middle is called a cap. It is attached to the axis of rotation of the weather vane and serves as a limiter and protection for the hull from moisture penetration.
- Flygarka. The flag is attached to the axis of rotation, it is driven by wind currents and indicates its direction. The pointing part of the wind vane is called the arrow, and the opposite part is called the counterweight. Experienced craftsmen they can make this detail in the form of an animal or a whole plot picture, while they do not need drawings for work, it is enough to show the photo they like. With your own hands, you can make a weather vane out of wood or plastic.
- Rose of Wind. The wind rose is called the index of the cardinal points, it consists of two twigs crossed at right angles with letter li color designation, by which you can understand where the north, south, west and east are. To properly make a wind rose with your own hands, you need to orient the pointers according to the compass during installation.


Note! If you have visited coastal cities, you have probably noticed that almost every house there is crowned with an intricate weather vane in the form of animals, plants, or even entire plots. It can reflect the occupation of the homeowners, the family coat of arms. At all times, people believed that the weather vane scares away evil spirits and protects from the evil eye. If you do not take superstition into account, then a weather vane made by yourself perfectly scares away birds.
Self-manufacturing
A weather vane of a simple design is easy to make with your own hands from improvised materials using galvanized steel, plywood, plastic bottles, or even unnecessary disks. The advantage of this method is that such a product looks unique and does not require high costs. Spending the weekend in the country, this idea can be turned into joint entertainment for children and adults. Trimming is useful to make a weather vane with your own hands building materials, for example, thin plywood. In addition, you will need a long nail or self-tapping screw, a block of wood, 3 large flat beads, a hacksaw, a pencil, glue and a marker. The manufacturing process is as follows:

Important! Wood is not the best durable material for the manufacture of a weather vane, from constant exposure to moisture, it darkens, becomes covered with mold, and then collapses. To make the craft pleasing to the eye longer, you need to cover the plywood with paint or varnish. This measure will keep appearance its more visible.

Drawing and manufacturing scheme of a windmill with a propeller in the form of a cartoon character "Carlson"

Wind vane installation
After you have made a weather vane with your own hands, you need to fix it on the roof. In order for it to correctly determine the direction of the wind, and not serve as a useless decoration, the following rules should be followed:


Note! In order for the weather vane to show not only the direction of the wind, but also the strength, a special suspension is made. It is cut from a sheet of metal, foam or thin plywood in the form of a small rectangle. On one side of the workpiece, a hole is made, a thread is inserted into it, and then a wind vane is hung from the arrow. When the wind blows, the suspension deviates, demonstrating how strong the gust is.
Video instruction
Since ancient times, mankind has used a weather vane to determine the direction and speed of the wind. It can be a simple device in the form of a flag mounted on a high pole, or a more complex device with a rotating tube and an arrow, which determines the strength of the moving forces. air masses. The rotation of the weather vane occurs due to air pressure on the flag, which tends to take the optimal position. At this time, the counterweight points in the direction from which the wind blew. Often the device is equipped with points indicating the cardinal directions, which are oriented during observations.
How to make a weather vane with your own hands. A photo
A do-it-yourself weather vane can be made of wood and metal, plastic and tin, and its appearance can be a real work of art. The city halls of many European cities are decorated with beautiful, unique weather vanes in the form of birds and animals, buildings and ships, fairy-tale characters, etc. Due to the original appearance and simple, functional design, the devices have gained immense popularity among owners country houses, where they are, for the most part, just decoration.
The main stages of manufacturing a weather vane
To make a weather vane with your own hands, first of all, prepare its reduced sketch on millimeter or other marked paper, or a life-size template of the figure you like. In addition, you will need the following materials and tools:
- metal sheet 1.5 - 2 mm thick;
- wire with a diameter of 3 mm;
- steel pipes with a diameter of 15 mm, 22.5 mm, 25 mm;
- copper tubeØ18 mm;
- 50 mm pipe section Ø 60 mm;
- rolled metal square 15x15 mm;
- steel ball Ø 80 mm;
- ball from a ball bearing Ø 15 mm;
- rolled metal round Ø 12 mm;
- metal plate 60x60 mm 12 mm thick;
- angle grinder (angle grinder, grinder);
- jigsaw;
- a hammer;
- chisel;
- a set of files;
- electric drill and a set of drills for metal;
- welding machine.
Below we will talk about how to make a weather vane with your own hands. Using our instructions and drawings, all work can be done in one day. Photos of individual stages, as well as videos, will help to correctly interpret our recommendations.
The process of making a weather vane with your own hands can be divided into several stages:
- preparatory activities;
- cutting shapes;
- arrow preparation;
- production of a rotary mechanism.
When working with metal, it is important not to forget about safety precautions. Welding work should be carried out in a ventilated area, away from fuels and lubricants. In this case, it is important to use special gloves and a protective shield, and choose clothes from natural fabric of sufficient thickness.
weather vane drawings
As an example, we suggest using sketches and drawings of a weather vane in the form of figures that are very popular in our country. rooster or cat. The dimensional grid allows you to transfer the image to a metal sheet, increasing it to the required size.


Weather vane stencils. A photo
The drawing shows the dimensions of the rotary node of the weather vane and the arrow, which will determine the direction of the wind.

Weathervane drawings. A photo
Step-by-step instructions for making a weather vane
At the first stage from sheet metal with a pre-applied contour cut out the figure of a cat. The steel workpiece must be fixed to prevent it from moving. It is best to use locksmith clamps with which a metal sheet is attached to a workbench.

Making a weather vane with your own hands. A photo
You can remove burrs along the edge of the part using a grinder with an installed grinding around.

In hard-to-reach places, processing is carried out using a wide, thin file.

Having firmly fixed the metal figure on the workbench, a drill with a drill Ø 12-15 mm make holes for the nose, mustache and eyes.

Making a weather vane with your own hands. Photo instruction
The characteristic oval shape of the cat's eyes is obtained by expanding drilled holes semicircular file m and file.

3 mm steel wire cut into segments about 100 - 120 mm in size, after which 10 - 20 mm recede from the edge of each part and make an L-shaped bend. Thus, blanks for the mustache are obtained.

The nose of a cat can be made from round rolled metal up to 20 mm in diameter. The edge of the bar is rounded using the same angle grinder.

To imitate the shape and structural features of a cat's nose, chisel characteristic dents are made on the workpiece.

A prepared fragment with a thickness of about 5 mm is cut from the workpiece, obtaining a part of the desired size.

Nose mounting is performed using welding machine . After that, into the prepared holes with front side insert a mustache and weld them from the inside out.

After welding work be sure to process the seams grinder until a flat, smooth surface is obtained.

Weather vane with your own hands. Photo instruction
The same instruction will be useful for those who decide to make a weather vane in the shape of a rooster with their own hands.

Two pieces of a square bar with a section of 15x15 mm are used as the basis of the arrow. At the same time, plumage is welded to one fragment, and a tip-shaped part is welded to the other. Welding joints are carefully cleaned.


To make swivel assembly, drill holes with a Ø 13 mm drill in its cover and steel ball.

The cover is welded to a 50 mm piece of pipe with a diameter of 60 mm.

On two opposite sides of the steel sphere, so-called flats- recesses for a clear fit of the ends of the boom. A rod with a spherical element is welded to the base of the turning unit.


After both parts of the arrow are attached to the ball, proceed to fastening weather vane. To dock the figure with a spherical element, a semicircular fragment is cut out at its base, after which the parts are connected by welding. To avoid splashes of molten metal on the figurine, it is covered with a sheet of tin. It is very important to correctly orient the parts - the angle between the arrow and swivel mechanism should be exactly 90°.


Sustainability the shape of the cat is determined by the places of attachment - its front paws are welded to steel sphere, and the back ones touch the base of the pointer.

To ensure that the structure can rotate freely, these parts are used. A segment of a round bar is chosen as a reference element.

support rod should fit tightly into the pipe, after which the edges of the parts are scalded.

Ball, which is needed for easy rotation of the structure, is lubricated with any grease and inserted into a wide pipe, after which a copper or brass tube is installed in it.

After assembling the wind vane turntable with your own hands, the design stain and establish on the roof.
DIY weather vane video
The videos below will be able to give the most complete picture of all the stages of making a weather vane with your own hands. You can use the video instructions for assembling a simple design, or start building a windsock with a generator and backlight. In any case, the product, made carefully and with soul, will please the owner and his family members for many years, indicating the direction to the wind.
Types of weathercocks
The popular belief that if you meet a chimney sweep on the street, then good luck will accompany you all day, is reflected in weathervanes with the contours of this character. Today, such a meeting is almost unrealistic, therefore attract good luck you can get into your house by installing a figure of a chimney sweep with a windsock on the roof.

A cottage with numerous turrets and passages can be decorated a series of weather vanes which are easy to do by hand. Stylized images of figures from the Russian ethnic group will perfectly complement the roofs of buildings made according to folk motives.

Cat has long been considered the guardian of the house and its protector from dark forces. By placing a weather vane in the form of a mustachioed purr on the roof, you can create an aura of kindness and tranquility around your home.

As a symbol of Heaven and Sun, eagle embodies strength and power, speed and greatness. A weather vane in the form of this proud bird installed above the house can testify to the independence of the owner, show him social status and high social position.

weather vane in shape horse suitable for purposeful people with an active lifestyle. Those who in their lives are guided by prudence and nobility will be able to declare this to others using this simple and elegant solution.

Griffin, installed on the roof, may testify to the internal struggle of its owner with light and shadow, about fluctuations between good and evil. In addition, a half-lion-half-eagle figurine can speak of the strength, militancy and vigilance of the owner, as well as protect the house from evil forces.

weather vane in shape old Russian boat will harmonize with big house with many windows, doors and stairs. By establishing such a figure, the owner of the household will be able to tell others about his remarkable mental abilities and the desire for new knowledge.

Traditionally owl is a symbol of wisdom and patience, so a person who decides to install such a weather vane should think about how much his self-consciousness corresponds to the chosen image. And even if everything turns out to be very difficult in this regard, a personal owl on the roof can give impetus to self-improvement.

religious motifs are not so common on weather vanes, therefore, when deciding to make a weather vane based on the Bible or the Koran with your own hands, think about what you want to convey to others with such a decision. In extreme cases, choose some heroic figurine, for example, St. George the Victorious, striking a snake.

Ship flying across the sky in full sail - what could be more beautiful and romantic? Having decided to make such a weather vane with your own hands, you must remember the complexity of such work and the need for accurate calculation.

Remembering the old fairy tales, you can find that, despite the negative image, Baba Yaga has always been a positive person. Note that this fairy-tale figure is great solution not only from the standpoint of aesthetics, but also in a constructive way. The broom with which the witch is depicted is an ideal windsock.

Often a weather vane with Baba Yaga is also decorated with a figurine Black Cat- her indispensable companion and adviser. The beauty and originality of such a composition will attract the admiring glances of not only children, but also adults.

Previously, these products were used mainly in order to be able to at least approximately determine what kind of weather awaits us. Then the decorative component was added to the functionality. Elements were attached to the product, which played the role of amulets and simply decorated houses. Today, meteorologists predict the weather, and the need for functionality has disappeared, but the tradition has remained. Consider how you can make a similar decoration for your home on your own.
Do-it-yourself development of a weather vane drawing, based on your preferences
We will consider the option of manufacturing a product from the most weather-resistant material, and which has the most attractive appearance. We will create a drawing of a weather vane from sheet copper with our own hands. In the process we will need the following:
- The dimensions of the sheet copper sheet must be at least 60x100 cm.
- A piece of steel pipe 50 cm long.
- cut copper pipe 13 cm long and slightly larger in diameter than the diameter of the steel element.
- A bearing whose diameter will allow it to freely enter the copper pipe.
- Metal corners - 4 pieces, side length 6x6 cm.
- Drill.
- Saw blade for cutting metal.
- gas.
- File.
- Screws for metal - 32 pcs.
 weather vane drawings
  wind vane device diagram
Before starting the assembly, you must do the following:
1. Transfer the image you like to the canvas.
2. Next, we outline the elements that will not be movable (arrows indicate the cardinal points). On the side where they will be attached to the support pipe, we make two small rectangles each and mark circles in their centers for drilling holes.
3. Draw an inverted right triangle at the bottom of the figure in the center. It is to him that the element for fitting the product onto the rod will be attached.


Now let's move on to production:
1. Cut out all the drawn elements with a saw.
2. Using a file, we process the cut points. We make sure that there are no sharp corners on the parts that can subsequently injure.
3. We drill holes in the intended places of the parts.
4. Insert the bearing into the cut of the copper pipe and weld them to each other. The rotating element must be directed inward, the connection is made along the edge of the pipe and reverse side bearing.
5. We weld the assembled nest for planting to the triangle under the figure.
6. We make 8 holes in a steel pipe at a distance of 30 cm from one edge of the cut. 2 holes located one above the other, on four sides. Using screws, fasten the pointers to the pipe.
7. At the bottom of the same pipe, we make 3 holes, again from its four sides. And we fix the corners in these places.
8. A generous amount of grease is applied to the bearing, and the figure, together with the socket, is put on the stand.
9. The product is assembled and ready for installation.


Installation of the product after assembling the weather vane according to the drawings with your own hands
After the weather vane was assembled with your own hands according to the drawings, it is necessary to hoist it in the place allotted for it. This can be done in several ways:
1. Fastening to the outlet of the chimney pipe.
The most acceptable option, since the stiffness of the fastening here will be the highest, because the chimney is most often made of brick. Accordingly, there will be less chance of breakage and fall of the product. The decoration we are considering is fastened vertically with screws that are driven into holes in the corners.
2. Fastening to the roof ridge.
A less satisfactory method of fastening, since this element is mainly made of wood. Over time, the wood around the attachment points can crack and dry out, which will lead to a decrease in the rigidity of the fixation of the product. Our decoration with this version of the support legs cannot be fixed on the skate. This requires supporting elements located at an obtuse, and not a right angle.
3. Fastening to roof elements.
The most unsuitable fastener option has the highest risk of product falling due to the very low fixation rigidity. In addition, attachment points can cause the roof to leak. Our product cannot be mounted in this way.
Additionally, you can process the figure with chasing, which will give it relief and, of course, ennoble it. You can cover the product with paint, but the material used does not need additional protection, unless it will be done to enhance the decorative effect.
A weather vane is used to determine the direction and speed of the wind. It is installed on a roof or any other high point, and can be equipped with a rotating tube with an arrow to determine the strength of moving air masses. You can make a weather vane yourself, and if you show imagination, you can make it not only a determinant of the strength and direction of the wind, but also an original decorative element decorating the roof of the house on the plot.
Before you make a weather vane with your own hands, you need to prepare a sketch on graph paper or cut out a ready-made template of the figure you like. The most popular figurines for making a weather vane are animals and birds, in particular, a cat or a rooster. It is better to make stencils from lined paper or cardboard, so that later you can easily transfer the pattern to a metal sheet.
In addition, you need to prepare a drawing of the arrow of the weather vane and its rotary assembly, with the help of which it will be possible to determine the direction of the air masses. The drawing should show all the right dimensions: structure height, arrow length, swivel diameter, etc.
Necessary materials and tools
Before you make a weather vane, you need to purchase the necessary material:
- Metal sheet 1.5-2 mm thick.
- Wire 3 mm thick
- Three metal tubes with a diameter of 15, 22.5 and 25 mm
- Copper tube with a diameter of 18 mm
- Profile pipe 15x15 mm
- Metal ball with a diameter of 80 mm
- Ball from a bearing with a diameter of 15 mm
- Round rolled metal 12 mm
- Iron plate 60x60 mm 12 mm thick
From the tools you will need equipment for cutting metal - a grinder, an angle grinder, an electric jigsaw, as well as a welding machine, an electric drill with a set of drills for metal, a hammer, a chisel, a set of files. Of course, in addition to this, you will need special protective gloves, a shield, glasses, clothing for working with welding and cutting metal.
Cut out the shape from the template
A weather vane figurine template is applied to the metal sheet, then it must be cut along the contour. To do this, the sheet is fixed with clamps to prevent displacement during cutting, attach to the workbench. A template is cut along the contour with an electric jigsaw, after which all burrs are removed using a grinder with a grinding wheel set for this function. If there are hard-to-reach places, you need to use a thin file. If an animal figure is cut out, for example, a cat, you will need to make holes for the eyes, nose and mustache. This can be done using a drill with a drill with a diameter of 12-15 mm and a needle file. Mustaches are made of wire, 10-12 cm pieces of which are inserted into the holes made for this. The nose of the animal is made of a round bar with a diameter of 20 mm, the end of which can be rounded off using an angle grinder.
Making an arrow
The arrow indicating the direction of the wind is also cut out along the contour previously applied to the metal sheet with an electric jigsaw. In this case, not the entire arrow is made, but only its plumage and pointing part. These parts must be welded to profile tubes with a cross section of 15x15 mm: the index part to one bar, and the plumage to another. Places of welding are carefully cleaned.
Swivel Assembly Manufacturing

To make a swivel assembly, a hole is drilled in the surface of the steel ball with a 13 mm drill. A cover is welded to a piece of pipe with a size of 50 mm and a diameter of 60 mm. In order for both ends of the arrow to fit snugly against the surface of the ball, small indentations must be made on its two opposite sides. Both ends of the boom are welded to these places. Then a rod is welded to the ball from profile pipe, and to it - a segment of a round tube measuring 50 mm.
Wind vane mount
After the element of the arrow with the turning mechanism is assembled, you can proceed to fixing the weather vane figure to the steel ball. To tightly dock its base with the sphere, you need to cut out a small part of it in the shape of a semicircle and connect it to the ball by welding. In this case, it is very important to ensure that an angle of 90 degrees is formed between the arrow and the rotary mechanism. The weather vane figure must be mounted on the axis so that a counterweight is formed on both sides.
To ensure free rotation of the weather vane, it is necessary to prepare a support rod: a round bar is inserted into the copper tube, the parts are welded together. A ball from a bearing is inserted into a wide tube, which is lubricated with some kind of grease. After that, a copper tube with a bar is inserted there. The design for determining the strength and direction of the wind is ready, it remains to paint and install it on the roof.
In more detail, the entire process of manufacturing a weather vane and its individual elements is shown in the video.
Making a weather vane with a propeller with your own hands

A windmill with a propeller is able to visually show the strength of the wind. This design is installed at a low height, because on a roof that is too high it will be difficult to see with what force the propeller is spinning. The more it spins, the more great speed per second have moving air masses. To learn how to make a weather vane with a propeller with your own hands, you can take the knowledge of making a conventional design as a basis. It is necessary to draw up detailed drawing weather vane, including the propeller, which must be made of metal.
For the manufacture of a vertical support is used metal pipe or fittings with a diameter of 13 mm and a length of 12.5 cm. A wooden plate must be attached to the thread on top of the vertical support to fix the horizontal part of the weather vane.
A bearing is installed on the lower part of the structure so that it can rotate around its axis. The weather vane is directly attached to the roof with plates welded to the bottom of the base on self-tapping screws.
The propeller is cut from galvanized sheet metal using metal shears. Center of the segment sheet metal a hole is made for fasteners, and its edges are bent to the sides at a certain angle. If the design of the weather vane is made of plywood or plastic, the propeller is attached to its end part with self-tapping screws, but without twisting them to the end, in order to rotate freely on the axis. If the weather vane is metal, a small pin is welded to the end part, at the end of which there is a thread. A nut with a washer is screwed onto it, serving as a fastener for the propeller and a limiter, at the same time.
Making a weather vane from a plastic bottle

The simplest and a budget option determining the strength and direction of movement of air masses - this is a weather vane from plastic bottle. You can show your imagination and hold a master class for your children by making a windmill from plastic containers in the form of an airplane. For this you will need: two large plastic containers with lids, one wooden block, a nail 10 cm long, wire, a piece of cardboard, a felt-tip pen, stationery scissors.
Bottles are thoroughly washed, cleaned of labels. A sketch of the propeller and wings of the aircraft is made from cardboard. The propeller is cut from the bottom of the bottle, and the wings pattern is applied to the side surface of the bottle and outlined with a marker.
In the lid with a nail or drill with thin drill you need to make a hole in its center, make the same hole in the propeller, and then connect them by planting them on a nail. The screw must rotate freely around the axis. A blank of wings is cut out of the second bottle, and in the first bottle, using a clerical knife, cuts are made along the width of the wings for their insertion. The fuselage of the windmill aircraft joins wooden block and attached to the roof.
Often used are wind vanes made from bottles in the form of a rotor. In this case, such a weather vane is not mounted horizontally, but vertically. On the sides of the bottle are produced square holes, resembling in their appearance small doors arranged in a checkerboard pattern. It is mounted on a vertical axis, which can be used as a wooden or metal bar. Small bearing balls are inserted under the cork to create rotation. Such windmills-rotors are very useful when used on summer cottages: help keep a weather diary, determining good periods for sowing, determine the strength and direction of air currents, and the sound made during rotation and the very sight of the rotating wings of the bottle scare away birds, protecting the crop.
The main task of a weather vane is to indicate the direction of the wind. Making a metal structure yourself is quite difficult and few can do it. Let's stop at simple options when materials available to everyone - paper or cardboard, are useful for the manufacture of a windsock, plastic tableware, wood. Information on how to make a wind vane in the form of a pinwheel will help to involve your own child in the exciting process.
A simple idea based on paper and plastic
The principle of operation of a weather vane is an arrow that can rotate freely on an axis that is fixed in a fixed housing. In order for the design to indicate the direction from which the wind is blowing, the arrow must be made smaller than the tail section. For a simple weather vane you will need:
- thick paper;
- plastic straw;
- pencil;
- safety pin;
- plastic cup with lid.
The process of creating a weather vane out of paper consists of the following steps:
- Make 1 cm cuts on both sides of the plastic straw. If the straw is bent, this part is removed, the base of the weather vane arrow should be even.
- You can make an arrow and “feathering” from thick paper or cardboard. An unnecessary folder or porridge packaging is suitable as a basis.
Important! The arrow in the form of a triangle must necessarily be smaller than the “feathers” so that the weather vane relatively correctly indicates the direction of the wind.
- The triangle for the arrow should be made in an elongated shape, the approximate height of the figure is 5 cm. It is better to cut a paper square with a side of 7 cm.
- Instead of a square, you can make another figure, the main thing is that it exceeds the size of the weather vane arrow. decorative design parts of the design in the form of coloring or stickers are welcome.
- Both figures are inserted into the cuts of the straw. To make a secure fixation, the elements are fixed with a small amount of glue. Look at the photo, how it looks in finished form:

While the weather vane arrow dries up, proceed to the formation of the hull.

Marking the cardinal points will help to give the weather vane more naturalness. First you need to determine where the structure will be installed. Then, with the help of a compass, the direction of the north is determined and applied to the body of a simple weather vane letter designations. The end result of an easy process is shown in the photo:

Remark ! If the paper windsock design is moved to another location, the markings already applied should be taken into account before installing it.
Working with wood
Paper and plastic are not durable. How to make a weather vane out of more durable material, will be discussed further. The information presented will be useful for people who know how to handle a tree. For any windsock design, it is important to observe two conditions - the front end of the boom must be made smaller than the back, the pointer must rotate freely on the vertical axis. So that the process of balancing the weather vane is not difficult, it is better to make the arrow flat. 3D shapes need additional steps to determine the center of gravity. The main stages in the production of a weather vane made of wood:

Attention ! It is necessary to achieve free rotation of the pointer. If this does not happen, the diameter of the wooden rod is reduced by grinding it. sandpaper. With an unstable position of the arrow, the hole for the pin needs to be made deeper.
On the final stage, after determining the location of the weather vane, cardinal directions are indicated on its body. Use a compass for accurate readings. Letters on the design can be drawn or glued on finished blanks. An important milestone is the fixation of the windsock. It can be nailed or fixed in some other secure way, depending on the material of the surface on which it will be installed.

Funny crafts for kids
A detailed description of how to make a weather vane for children out of paper will help you build a bright turntable yourself or with the participation of a child. There are several manufacturing options funny toy from paper. It can contain 4 or 8 blades, have smooth or curly edges, and be made in the shape of a flower. To make a simple weather vane, the diagram shown in the photo below will help:

To form a toy, you can use a plain or colored paper, the second option will make a more attractive instance. The 8-blade design looks a little more complicated, but it only seems at first glance:
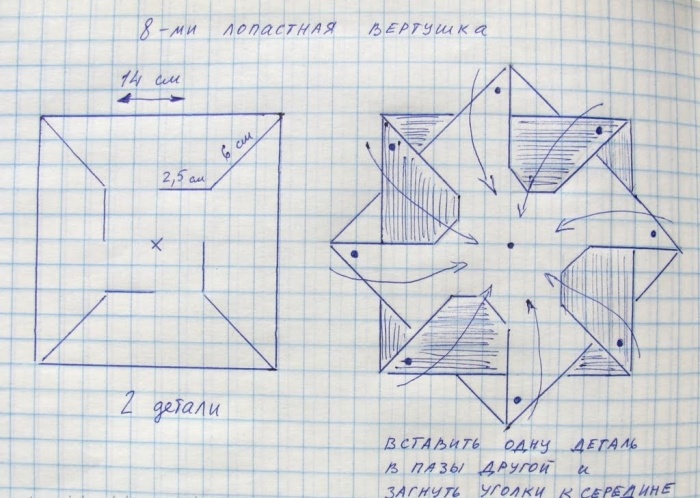
Several simple movements turn two multi-colored blanks into such a detail:

After mounting the holder, you get a simple design:


