Estimated drawing of a children's bunk bed. Detailed instructions on how to make a bunk bed. Photo gallery: bunk beds for children
You can make a bunk bed yourself if you have some skills and study the instructions for making this headset. It is important to clearly understand: what kind of product will be obtained after the work is completed. A design like this would help.
A bunk bed is considered fashionable furniture for the children's room. The advantage of the product is space saving. Besides, original product create a cozy and functional interior in the nursery. There are options for such a headset. There is a bunk bed with wardrobe, sofa or table. These models are suitable for rooms with limited area or for a studio apartment.
The bunk bed is suitable for two children and one child. In this case, instead of a bed, a work area or a play area is installed.
When deciding to self-manufacture a structure, it should be borne in mind that it must be durable and withstand a lot of weight. An important criterion the bed is considered stability. Selected high-quality and durable material. This furniture considered to be ergonomic.

Before starting work, the following steps are performed:
- The amount of materials is determined: timber beams, bolts and corners.
- A set of tools for installation is being prepared.
When developing a drawing, the height of the second tier is determined, taking into account the height of the ceiling. The place for the location of the stairs is determined. At the same time, the staircase performs the functions of a Swedish wall.
For the stability of the structure, it is necessary to provide additional mounts to the ceiling or wall.
If a bunk bed with a table is planned, then the location is thought out working area.

Two-story structures have the following advantages:
- save usable area for the location of the cabinet or work area.
- The berth has dimensions of 170 by 200 cm, which allows you to use this design for a long time.
- The presence of additional playing space and functional elements.
When using these beds, pay attention to important parameters:
- This bed is not recommended for children under six years of age.
- The sides on the second floor are selected high to protect against falling.
- The ladder is selected safe with non-slip steps.
- The bed is stable.
- The length of the bed is determined taking into account the growth of children.
- There should be no sharp elements on the surface.
It is necessary to check the strength of the bottom of the product. Mattress material should be safe and natural.

Bed mounting technology
The height of the tiers is calculated taking into account the height of the ceiling and the thickness of the mattresses. When getting up from a lower seat, a person should not hit his head on the second tier.
The product is made of wood. In this case, parts of the following sizes are selected: 140*20, 30*30, 140*80 and 140*40 mm.
The bed is made of chipboard. In this case, edging is applied. The edges are processed and glued to the cuts.
Material and tools
To make a bed, you will need the following tools:
- Hammer, pliers and screwdriver.
- Roulette, square and building level.
- Screwdriver and drill.
- Hacksaw and clamps.
- Electric jigsaw.
In order for the design to fit into the interior, it is necessary to determine its location in advance. The dimensions of the sleeping places are taken into account.
If a children's bunk bed is made of solid wood, then it is worth preparing the following set of materials:
- Bars made of wood 2.5 and 3 meters long.
- three meter boards.
- plywood sheets and chipboard.
- Nuts, washers, screws.
- Screws, screws, bolts.
- Putty, which is designed for wood.
- Sanding paper and polyurethane.
Instead of wood, you can use chipboard. Boards before installation are kept for a week at room temperature. This will prevent the material from drying out.

The following sequence of actions is performed:
- Bed frames are made. At the same time, a beam measuring 5 * 10 is attached in the form of a rectangle according to the size of the lounger. As fasteners, corners or carpentry with a tongue-and-groove method are used.
- Spacers are mounted in the frame. They are needed to compensate for the load.
- Boards are made from boards, which are attached to the frame. For this, self-tapping screws are used, which are screwed in from the inside.
- For the frame, 4 racks are made. Bars are taken with a cross section of 5 * 10 mm and a length in the height of the bed and mounted in two, so that L is formed - figurative profile.
- Holes for mounting screws are made in the supports and frames.
- The design is fixed to the wall. At the same time, the upper level is attached to the risers with screws. Holes are drilled in the wall for fixing with screws.
The furniture is sanded and covered with a shiny varnish. The edges are closed with a plastic edge and thermal tape.

Children's metal bunk bed is as follows:
- For the frame, a metal corner with a size of 45 * 50 mm is used. At the edges of the corner, sections are cut out for the tightness of the connection. Elements are welded. The evenness of the angle and the parallelism of the parts are checked.
- Vertical racks are made from a pipe with a cross section of 25 mm. A frame is mounted to them. Welding spots are lit up.
- The headboard and sides are ordered in the workshop. You can make a side of the pipe.
If laminated chipboard is used for manufacturing, then grinding and leveling will not be required. The edge is processed and glued. similar material characterized by wear resistance and strength.
Creating a bed from chipboard consists of the following steps:
- planning and creating a project;
- edge processing;
- cutting materials;
- assembly of elements using self-tapping screws.

Nuances to consider
Before proceeding with the installation of the structure, it is worth studying the following recommendations:
- You can consider offers from IKEA. Various two-tier products are offered. You can buy a bed frame. Its cost starts from 6 thousand rubles. Supplement children's Corner will help.
- For stairs and racks, bars from whole wood are selected.
- Panels on end parts the same size for the entire bed.
- The dimensions of the mattress are taken into account. In this case, the design increases by 2 cm on each side. This will make the bed easy to make.
- To determine the height of the lower tier, you need to focus on the child. The child should easily overcome this height.
A bunk bed with a sofa can become good option. Things are stored in the sofa or in special drawers and linens. Also under the lower tier is a box with toys. From the lower tier, a play area is equipped.
Wooden base required additional processing. Leveling is done with a planer and sanding with sandpaper. Lacquer coating will extend the life of the structure.
If you follow the instructions and select quality material, then you can make an ergonomic and beautiful bunk bed. This set will decorate any interior.
A children's room with a bunk bed is convenient. There are several advantages. First, it saves space. And it’s not even always a matter of a small area, although this is a common problem. Indeed, even in a spacious room, it is desirable to leave as much free space as possible for outdoor games and toys. Secondly, you can organize the space more orderly: make drawers at the bottom, attach or attach a cabinet to the side. Thirdly, the kids like this environment. And for both girls and boys. Moreover, a do-it-yourself children's bed is built in a couple of days.
Constructions
There are many varieties of children's bunk beds. It's not about size, it's about design. Let's start with the principles of construction:
- The basis of the design is a frame made of timber, to which all other details are attached: sides, railings. The bars should be above the level of the upper lounger by the height of the back or sides. To ensure safety, the height must be at least 40 cm from the top edge of the mattress.

The design is based on four vertical beams, to which all other parts are already attached
- They make two identical beds with thick posts and a solid frame. One is placed on top of the other and connected with dowels or pins. If the height of the legs and back is not enough, and the mattress of the upper tier is too low, the racks are additionally increased, not forgetting to strengthen the joints.

- A workplace is arranged below, and a sleeping place is arranged above. Such 2-tier beds are also called "attic". This option is for those whose children compete with each other. And two sleeping places on different floors will cause constant conflicts. Two such "sets" solve the problem. Read about the types of loft beds, but about how to do it yourself.

A two-story loft bed is a great way out for small room or rival children
- Corner beds. When sleeping metas are not one above the other, but near two adjacent walls. Then at the bottom there is also the opportunity to organize a workplace or a play space ().

- Sleeping places are located along one wall, but not one above the other, but shifted. This option makes it possible to more efficiently use the available space - fill it from wall to wall.

- Roll-out or pull-out two-story children's beds. This is a variant of furniture-transformer. For a day lower sleeping place hides under the top. With this construction, the height of the bed can be small. This is a way out for those who are afraid that children may fall from the second floor or stairs.

The choice of designs is great, but that's not all. Stairs add more variety. They may be as usual wall bars or in the form of steps or boxes stacked on top of each other. The most economical option is the usual ones: they require little material and they take up little space. But you can put things in a ladder from boxes, like in a chest of drawers, which is also practical. And these steps are more reliable: you can attach high railings to them to make them even safer.

Stairs from rungs or steps can be located in front - along long side beds. At the same time, they are sometimes done in the center, sometimes on the right or left. Another option is stairs from the end. They are also made vertical, and then they take up almost no space, and sometimes at an angle. It is easier to climb such ones, but it is not always possible to put them up: the area does not allow, and it is easy to catch on the protruding legs.
What materials are they made from
For the frame, they mainly use wooden beads or make it from boards. And here are the options. All other elements can be made from boards. This material is natural, but it is not easy and long to work with it: every detail requires careful processing, and there are many of them, since the boards are usually narrow, otherwise such a bed looks rough. If you have at least some skills, it's worth a try. If not, better use other materials.

A faster do-it-yourself bunk bed is built if the parts are cut from sheet material: Chipboard, or . chipboard is better take, the same can be found and plywood. It can also be painted: if you take a birch furniture plywood. She looks good. It is only important to saw off evenly so that there are no chips along the edge.
Chipboard edges can be processed special tapes. They are self-adhesive; they are glued through a rag using an ordinary iron. Only these materials have an unpleasant feature: in their production, a binder is used, which releases formaldehyde into the air. Since the substance is harmful, its quantity is monitored and normalized. For the manufacture of children's furniture, fiberboard and plywood with an emission class of E1 are allowed. In terms of the amount of substances released, it is no more harmful than wood.
Dimensional drawings
Regarding how big or small to make the bed when the kids are small. In principle, you can immediately put a full-size bed. It just seems like it will take a long time for them to grow up. In fact, you won’t have time to look back, as the “children's” sizes become small. And then the problem arises: where to put old bed. Throwing away, of course, is a pity, but second-hand furniture is not sold very well. Therefore, recommendations: make a bed right away standard size A: 1*2m or so.
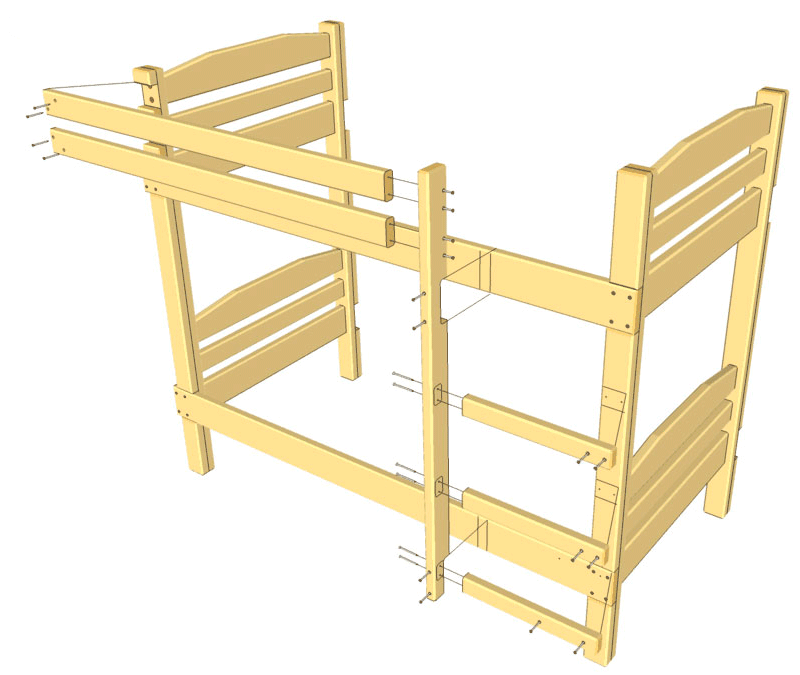
Frame drawing for a bunk bed

Bunk bed frame drawing and necessary materials

Corner bed drawing


Stairs to bunk beds

DIY bunk bed: photo report
To save space in a small room, it was decided to make a bed on the second floor, and equip a workplace for a computer on the first floor. If necessary, by adding a jumper in front and making a shield under the mattress, you can also make a sleeping place on the first tier.
A drawing was developed, materials were calculated. It was decided to make the frame from spliced boards. This is both cheaper and more reliable: a guarantee that the poles will not twist when dried. Therefore, boards were bought, as well as a beam of small section for strapping. The width of the bed is made according to the size of the existing mattress

The following materials were needed:
- for workplace furniture board 18 mm thick and 600*2000 mm in size;
- pine boards 90*45*3000 m - 16 pcs;
- pine timber 45*45*3000 m - 8 pcs;
- for the base under the mattress 2 sheets of plywood 9 mm thick, dimensions 1525 * 1525 mm;
- corners, screws, bolts.
The board was bought already planed and polished: there is no equipment for processing it on the farm yet. We start immediately with the manufacture of pillars:
- We cut it to size - the height of the pillars is 185 cm. In total, 10 identical ones are needed: in the corners and one pillar on the second side of the stairs.
- We fasten them two by one: we lay one on top of the other exactly. At the same time, make sure that the annual rings are directed towards different sides. So, most likely, the pillars will remain even. We drill a hole at the top and bottom for the bolts and tighten the boards by placing washers under the cap and nut. So that all this "beauty" does not spoil appearance, drill large diameter make recesses so that the nut and head are recessed. Then they can be closed with furniture plugs or covered with putty on wood.

- We start assembling the frame. At a height of 145 cm, the first row of timber is the base for a mattress, at a height of 75 cm, the second is a frame for a desktop. Under the timber, we make a wash down in one board for half of its width. We insert the bars into the resulting recesses and fasten them with self-tapping screws to the end. Then we attach the corners to them, and already at the corners there are other segments of the strapping.

- We apply a beam of the required length (145 cm) to the corners and fasten it with self-tapping screws. We attach the corners to the ends of the beam.

- We take two more racks and at the same height we attach the corners of the side strapping bars to them. Now the structure is standing by itself. It remains to attach a long beam in the upper harness.

- In the upper part of the frame, another beam is screwed in length. This is a rib for plywood. You can make cross-beams from short segments, but then it is better to make support strips to support them, and nail the ribs to them. When nailing, you need to make sure that they are all in the same plane. Plywood is laid on top of the frame and nailed to the frame with small carnations.

- A rack is installed, which will serve as a support for the steps of the stairs. It can be made from one beam, which rests on the upper harness and one 185 cm long.

- If desired, the steps can be embedded. If you have a jigsaw, it's easy. You can also plant them in the corners. This is less aesthetically pleasing, but reliable and simple.

- In order to save money, they did not buy a furniture board, but made the tabletop from boards. If you also come to such a decision, it is also advisable to lay a support beam under the outer edge of the boards, otherwise, under load (put your elbows on the table), the board sags.

- Stayed Finishing work: we fill the railing, cover the nails with wood putty. After drying, we grind, cover with paint or varnish.

The option is easy. For its implementation, only a screwdriver, a saw for wood and fasteners were needed. This assembly option is for those who are unfamiliar with carpentry and who find it difficult to make cuts and grooves. If you strongly dislike protruding fasteners, you can close it with decorative overlays: thin boards can be put on glue. They will hide all the shortcomings of the assembly.
Another option for assembling homemade bunk bed see video.
A bunk bed differs little from a regular one: a frame, but high altitude, and two bottoms instead of one. Making it yourself is almost as easy as putting it together. The only difference is the need to independently determine the dimensions of the structure and purchase materials.
How to make a bunk bed for children with your own hands? Judging by the range of products in the store, then wood-fiber material - MDF, fiberboard, OSB is also quite suitable for a children's bed. But, firstly, it is not necessary to use any fiberboard, but only the one in whose passport a low emission class is indicated. And secondly, making a bed from wooden boards is no more difficult, and this material is much safer and more reliable.
Bunk bed made of solid pine (photo)
Most affordable option- solid pine. The wood is cheap, so picking up the right amount of the first grade is not difficult. Much more expensive oak or beech. It is harder, it is harder to work with it, but an oak product also lasts for decades.
In any case, the wood must be well dried - no more than 18% moisture, and treated with antiseptic agents. It is recommended to purchase planed boards.
For a bunk bed you will need:
- wooden beam for racks - 10 * 5 mm;
- timber for stairs - 4 * 6 cm;
- board for spacers and sides - 10 * 2 cm, 15 * 2 cm, 20 * 2 cm;
- plywood for the bottom or a set of rails with batten holders - last option preferred.
Fasteners - screws, self-tapping screws, screws, metal corners, glue.
For cleaning edges and edges, you need sandpaper, and for termination - plastic edge or thermal tape.
Of the tools you will need the following:
- screwdriver or drill with an appropriate nozzle;
- jigsaw,
- hammer, screwdrivers, pliers;
- square, tape measure and building level.

Schemes and drawings
Making any design of a bunk children's bed with your own hands begins with a drawing. Moreover, this drawing must be done independently. Ready-made diagrams and drawings of do-it-yourself bunk beds are not always suitable, and here's why.
- The determining parameter for the size of a do-it-yourself bunk bed is not so much the width and length as the height. If it is assumed that children will sleep on it for several years, then the sizes are selected with a large margin. Most often, these are standard ones - 90 * 190 cm. Alternatively, you can measure the mattress to be used and determine the parameters of the sunbed by its width and length. In this case, the length of the bed should exceed the length of the mattress by 8 cm, and the width by 10 cm.
- The height is determined by the height of the ceiling in the room. The child on the second tier should not only sit freely, but also move. In addition, the ceiling hanging directly above the face is very unpleasant. At a minimum, a seated child should not reach the ceiling with his raised hand.
- Between the first and second tiers, the distance is selected based on the same principles. The easiest way to do this is for an adult: sitting on the second tier, dad does not touch the bottom of the upper bed with his head.
- The distance between the bottom of the lower bed and the floor is at least 30 cm.
- When calculating the ratio, you need to take into account the thickness of both mattresses.
Drawing is required. Moreover, schemes of two sun loungers, the facade of the structure and the end face are required. It is necessary to draw a diagram, given the scale, and in as much detail as possible. According to such a drawing, it is much easier to calculate the required amount of materials.
If used finished circuit do-it-yourself bunk bed found on the pages of the site, you need to make sure that the dimensions indicated on it are suitable for the nursery. They can only be changed proportionally: you cannot simply increase the height of the bunk bed by 30 cm and place the lower sunbed higher. Any change affects the stability of the structure. This requires compensation both by adjusting other parameters and the overall strengthening of the framework.
Do-it-yourself drawing of a bunk bed
Manufacturing and assembly process
We make a bunk bed with our own hands. Before assembling the product, the timber and boards must be kept indoors for several days so that the tree acclimatizes. In this simple way warping and drying of the material is prevented.
You can cut the boards yourself, or you can order a cut to size at the place of purchase.
- The first step is to make frames for the beds. To do this, a bar with a section of 5 * 10 mm is fastened in the form of a rectangle according to the size of the lounger. Best mount- using the spike-in-groove method on carpentry glue, however, this option is only possible if there is a milling tool. If this is not possible, the connection is made on metal corners.
- A spacer is installed in the frame from the same beam or board 10 * 2 cm, after cutting it in width. Depending on the expected load, the spacers can be from 1 to 4.
- The sides are screwed to the frame: from a board with a section of 15 * 2 cm for the lower bed and 20 * 2 cm for the upper one. Self-tapping screws are screwed in from the inside and make sure that they do not go through the side.
- Make 4 racks for the frame. To do this, 2 bars with a section of 5 * 10 mm and a length equal to the height of the bed, together with the fence of the second tier, are fastened two by two so that they form an L-shaped profile. At the same time, the self-tapping screw is sunk into the tree, and the recesses are puttied and sanded with sandpaper.
- At the height of the first and second levels, holes are made in the finished supports for the mounting screw. The same holes are made in the frames of sun loungers.
- It is recommended to fix the structure to the wall. To do this, the upper level is fixed to the vertical risers with screws. Then the product is applied to the wall to mark the fixation points. At this stage, you can not do without an assistant, since the mount must be rigid. Holes are drilled in the wall at the level of the second tier, then the corresponding holes are made in the bed itself so that it passes through the beam of the frame and racks. The structure is pressed tightly against the wall and fixed with screws.
If the bed is installed differently, then the fastening to the walls is not performed.
- The first level is mounted - metal corners are used for reliability.
- At the second level, bumpers are made: boards measuring 20 * 2 cm are fixed on racks. Self-tapping screws are screwed in from the inside, the holes are closed in the manner described above. On the site where they plan to install the stairs, the sides are not fixed.
- For stairs, two 4 * 6 cm beams are fixed on the bed frame - both upper and lower. Install the crossbars, fixing them with self-tapping screws.
- A plywood sheet is laid on the frame - the bottom, or the slats are fixed on the lato-holders.
If necessary, the structure is sanded, opened with a matte or shiny varnish. The edges are closed with thermal tape or plastic edge.
How to make a wooden bunk bed with your own hands (video):
DIY metal bunk bed
 The construction of a metal bunk bed for children with their own hands is even simpler than a wooden one. But it is much more difficult to assemble it: it requires a welding machine and some experience in handling it.
- For the frame of the lounger, a metal corner 45 * 50 mm is used. The product is cut to size - with a hacksaw for metal or a grinder. At the ends of the corners, sections are cut out for a tighter joint and connected to the sides - a channel 65 * 32 mm. Parts are welded, checking the parallelism of the elements and the magnitude of the right angle.
- There are no sides in the metal structure.
- Vertical racks are cut from a thin-walled pipe with a diameter of 25 mm. The sunbed frame is welded to the racks. All welds light up
- Sides for the upper tier, headboard and footboard are more often ordered in the workshop: forging, hot or cold, allows you to get not only durable, but also beautiful product. However, they can also be assembled independently from a pipe of the same diameter and rods. In any case, the sides on the second tier in the form of a single curved railing are not suitable. The sides should be made according to the type of railing with transom filling.
Manufacturing video
- Most of the do-it-yourself videos on making bunk beds show only some moments of assembly. The lion's share of them is removed only for the purpose of familiarization.
- Amateur videos are more often shot by experienced home craftsmen: here you can learn a lot of useful things. But only interesting or important moments from the point of view of the performer are shown here. Processes that he considers trivial or well-known are little covered.
- The most informative source for a beginner is the instructions for assembling a finished wooden bed. Here, the material includes not only the installation sequence, but also a description of all the required parts, an indication of dimensions and illustrations for fasteners.
Using the instructions and more detailed video material, it is quite possible to make a bunk bed.
A homemade do-it-yourself bunk bed is a practical and attractive solution for a nursery. Its design is quite simple, so it can be made even by a novice master. And it’s even easier to arrange to the taste of the child.
Instructions for assembling a finished wooden bunk bed (video):
Owners small apartments solve the problem of saving space. The standard layout with a small area of rooms makes it necessary to look for compact functional furniture in order to make the environment as ergonomic as possible. A do-it-yourself bunk bed is considered a good option, which will free up space for games in the children's room.
Before making a wooden bed, you need to decide on the size and placement of furniture in the bedroom. In addition, you need to determine how the ladder will be installed to climb to the upper tier. It can be on the side or front of the bed. The final length of the structure will be approximately 80 mm longer than the place to sleep, and the width will be 100 mm more. You also need to take into account that the side with the vertical ladder increases by another 45 mm, so it is important to correctly calculate the placement of the bed in a small nursery.
To figure out how to make a bunk bed, you need to prepare a set of drawings - examples are presented below. For standard design, designed for two teenagers, you can choose the following options:
- total height - 1850 mm. It is not recommended to make the second tier too high, as it will be stuffy and uncomfortable for the child right under the ceiling;
- the height of the side of each tier is 490 mm. This is a guarantee of protection, thanks to the side the child will not fall;
- bed length - 1900 mm. This is usually enough even for a tall teenager; when calculating the length, the dimensions of the mattress are taken into account;
- bed width - 900 mm. Ladder width - 345 mm, distance between steps - 250 mm.
The optimal location of the upper tier is determined in such a way that the person sitting on the first tier does not touch the second with his head. It should be comfortable to sit from below, while the height should be optimal. It should be noted that the thickness of the mattress is about 200 mm. At the end of the article, a drawing of a bunk bed with dimensions is presented, it will allow you to create general idea about the design.
All dimensions and drawings are given taking into account the fact that a bunk bed for children will be placed in a room with a ceiling height of 2500 mm. When designing a bed, you need to take into account the standard size of the mattress, it is selected taking into account the age and height of the child. It is recommended to provide a margin, as the furniture should last more than one year.


What is required for work
Before you make a bunk bed with your own hands, you need to prepare the necessary materials and tools. Optimal solution for assembly - durable pine boards, wood must be checked for defects. The table shows the list and quantity of materials that are needed to make a children's bunk bed out of wood.
| Number | Part Name | Quantity |
| 1. | Pine timber vertical posts | 4 |
| 2. | External brackets for attaching to uprights | 4 |
| 3. | Side boards of the frame - sides | 4 |
| 4. | Planks for longitudinal installation on the sides from the inside. Frame boards are attached to them. | 4 |
| 5. | Panels for footboard and headboard | 4 |
| 6. | Center rails for attaching the headboard and footboard | 4 |
| 7. | Lath for installing the railing of the stairs | 1 |
| 8. | stairs | 3 |
| 9. | Guard rails for safety | 2 |
| 10. | Cross rails on which the mattress is installed | 24 |
| 11. | End boards of the frame | 4 |
A do-it-yourself bunk bed made of solid wood will require considerable labor. However solid wood can be replaced with laminated chipboard - there will be less problems with edge finishing. As a basis for a mattress, you can use not a frame made of wooden slats, but sheets of durable plywood, their thickness must be at least 9 mm. Screws 3.5 by 40 mm are used as fasteners, decorative caps are also required to mask the hats, and a set of tools must also be prepared. Home master you will need a drill with a set of drills, a jigsaw, a countersink, a surface grinder. The assembly also uses 8 mm dowels and wood glue. For measurements, you will need a tape measure and a pencil. You can tighten the screws manually, but to speed up the process it is better to use a screwdriver.
Procurement of parts
How to make a bunk bed with your own hands? Having prepared everything you need, you can start preparing constituent parts beds and furniture assembly. The first step is the measurement of the mattress, the shape and configuration of the future bed depends on it. On each side, 2 cm is added to the obtained values, so that in the future it would be convenient to fill the bed linen. All outer edges of the bed must be chamfered, as children's furniture should not have sharp corners. To solve this problem, a plow is used. When choosing materials, it is necessary to pay increased attention to quality: children love to jump on the bed, testing it for strength.

headboard


Side wall
The basis of the frame is made up of 4 side parts - drawers. They are side boards to which longitudinal slats are attached to support the mattress and bars are stuffed. Between these bars will be held transverse slats on which the mattress is placed. A chamfer must be removed from the upper inner side - the sides should not have an internal sharp corner, as this can lead to scratches. The bars hold the mattress boards, preventing them from moving to the sides, so it is not necessary to screw the lamellas with self-tapping screws.
- drill holes in the posts and crossbars for installing dowels;
- connect the support post and headboard with dowels soaked in wood glue. The glued frame is clamped with clamps to dry completely to ensure strength;
- stick on the outer lining to cover the fasteners;
- At the top of the headboard, attach three decorative overlays to which the railing will attach.

Frame assembly
legs
The role of the legs with such a bunk bed is played by the vertical racks of the frame, the assembly is carried out using screws or other types of connection. The lower part of the legs can be given any decorative form. Looks good carved wood: legs can be pre-ordered from the lathe shop. Round curly legs beds will become important element children's decor.
If you want to make your own bunk bed with a sofa installed in a box, use strong bars for the legs. They are fixed from the outside or from the inside, they can also be inserted into the box.
Stairs
It is necessary to make and assemble a ladder with three steps. For this, vertical racks are used, in which it is necessary to make cutouts 38 mm deep for fastening to the frame. Guide holes are drilled in the racks for mounting the steps. When placing the bottom step, it is important to ensure that the fasteners do not end up in the same place where the bottom tier board fastener is placed.
If the ladder is installed at an angle rather than vertically, it is desirable to provide a railing for maximum safety. For this, a beam of small thickness is used, it is selected in accordance with the girth of the child's hand. The railing is firmly fixed with self-tapping screws.

Parts of the stairs
Ladder assembly
Assembly process
Let us consider in more detail how you can make and assemble a bunk bed for children with your own hands using prepared frame elements: there are many design options, but most are assembled according to a single principle. Assemble the tsargi according to the instructions, then take care of the frame of the headboard and backrest. Next, you need to do the following:
- install the drawers in the gaps left between the side plates of the uprights. Attach them on each side with four self-tapping screws. This can be done manually or with a screwdriver;
- install the structure on the floor and attach the handrail, the ladder with steps, and the enclosing crossbar with self-tapping screws;
- screw the slats (lamellas) on which the mattress will be laid. This is an optional step: the slats are held by bolted bars on both sides, which should fit snugly against the slats;
- sand the entire structure to make the boards as smooth as possible. This can be done manually, to reduce labor costs it is better to use grinder. Grinding helps prevent scratches, the surface should become perfectly flat;
- treat all wooden elements with impregnation or stain to protect against decay. After that, it can be painted or varnished to give an aesthetic appearance. Color is selected according to general design interior, it is undesirable to use too bright colors.
The bunk bed assembly guide includes a few additions. Drawers are placed under the lower tier, which allows you to store various useful items and linens. The boxes are assembled from boards or more affordable fiberboard boards and installed on metal rails. For ease of use, they are equipped with handles, or holes can be made in them for ease of extension. Looks original homemade version, boxes in which play the role of a ladder. They both guarantee safety when lifting, and allow you to allocate space for storing toys and other things.
Any homemade bunk beds must be additionally attached to the wall, unless it is made of drywall. This safety measure prevents the structure from tipping over during excessively noisy children's play. The mount must be as reliable as possible, it has to withstand a large load.

Methods for connecting wooden knots
How is it more convenient to make a bunk wooden bed with your own hands for a novice master? There are several ways to connect wooden knots:
- self-tapping is the simplest option, with which the boards are connected at a right angle. Self-tapping screws are screwed in so that the caps do not stick out above the surface, the joints are closed with decorative overlays;
- connection with dowels - they can have a round or rectangular shape. Furniture dowel allows you to connect parts from any materials, including solid wood, chipboard, fiberboard. It is not visible from outer side. It does not spoil the appearance of the furniture;
- glue connection - carpentry glue is used to attach linings that increase the strength of the support posts. This connection option can be additionally reinforced with self-tapping screws.
To create curly elements of the back and foot of a bunk bed with your own hands, the project is initially developed on paper. The finished paper template is applied to the workpiece, after which the part of the desired shape is carefully cut with a jigsaw.

1 - half-tree connection; 2 - connection "in the paw"

1 - complete felling; 2 - cutting is not complete; 3 - steel corner
The main area in the children's room is occupied by beds. As children grow up, there is a shortage of free space in the room. A do-it-yourself bunk bed will help solve this problem. There are many design models that are selected based on the age of the children, the dimensions of the room and personal preferences. You can learn more about the types of bunk beds and options for their self-production in this article.
The problem of lack of free space in the room will help to solve the bunk bed
When designing a bunk bed made of wood or metal, special attention should be paid to the strength and stability of the structure. Here it is necessary not only to create comfortable sleeping places, but also to properly organize the stairs for climbing to the second floor. On the initial stage design, you need to consider where the staircase will be located. Next, the calculation of sleeping places is performed and the distance between the tiers is calculated. These values are determined in such a way as to guarantee convenient operation of the structure in the future.

The distance from the lower tier to the floor level is selected on the basis of a comfortable seat for an adult. The niche that will be formed under the lower tier can be filled with drawers for linen or other things. The distance between the beds in height should allow an adult to sit comfortably. Such a requirement is met not only for the convenience of parents, but also for the safety of the child sleeping on the lower tier, who, when jumping up, should not hit his head on the upper bed.
Do not place the top tier too high. It will be dangerous for a sleeping child. He will also feel uncomfortable, because in a too warm room upstairs he will be very stuffy.
The following are considered the optimal dimensions of a bed: 160x70 cm and 180x80 cm. The recommended construction height is 160-180 cm. The height of the sides of the second tier should be at least 35 cm, which depends on the thickness of the mattress. The most acceptable dimensions for stairs are 39 cm wide, 150 cm high, and 25 cm apart.

Varieties of bunk beds: photos of interesting options
The option of a 2-story bed is selected depending on the purpose, the age of the children and their personal preferences. On the lower tier, a younger child usually sleeps, and his older brother or sister takes the upper place. The two-tier design can also be used for one child. In this case, the sleeping area is located at the top. Under it is a space for games, activities or organized convenient system storage.
There are the following types of bunk beds:
- traditional model;
- bed with sofa;
- construction with a leaving tier;
- bed attic type.
The traditional DIY wooden bunk bed is the simplest design that any craftsman with minimal woodworking skills can complete. This model requires a small amount of accessories. This design can be prefabricated or solid. In the first case, the upper berth, when installed on the floor, turns into a regular bed.

The second type of bunk bed is represented by a design with a folding sofa in its lower part. It is very comfortable and unusual model which allows organizing comfort zone rest and a place for receiving guests, which is carried out with the help of a soft back. In this case, you do not need to additionally purchase chairs in the room.
Helpful advice! On the folding sofa same-sex children can sleep, and on the top floor - the eldest child.
A loft-type bed is convenient for a small room. The design consists of a bed, which is located on the upper tier, and a working area located under it. Here, retractable desk, bedside tables and cabinets. Also, the lower space can be left free by arranging a play area there.
For a large family with four or more children, you can organize a two-tier set consisting of two or more identical sections. Although such a design would require significant more material, sleeping places can be neatly placed along one of the walls of the room, thereby saving free space.
Pull-out wooden bunk beds: photo examples
The retractable tier design can be presented in several versions. At a do-it-yourself sliding bunk bed made of chipboard, the tiers are securely fastened together. In such a transforming bed, the lower tier with a sleeping place extends forward, to the right or to the left. This design is performed with a height of 60-80 cm. The product can be a traditional two-level model with a ladder, in which one more bed extends under the lower bed.
The roll-out model has separate berths. lower tier not attached to the top, so it can be rolled out and installed anywhere in the room. The result is two separate beds.
The most functional is the option that is located under the lower tier. Such a model is successfully embodied in roll-out structures. An interesting variety is a sliding double bed, in which the sleeping place is hidden in a niche during the day, and in the evening it is put forward for further use.

There is the most compact version when there are two pull-out beds under the top bed. When unfolded, this design resembles steps. This model will save you a lot usable space, which can be used for games during the day. In addition, the cost of this triple bed will be much lower than the total amount spent on the purchase of individual stationary options.
Helpful advice! For the lower tier, it is recommended to purchase a thick mattress for full insulation of the bed.
The model with a podium from which the beds are pulled out looks original and unusual. The podium can become a specific area of the room where you can organize a place for games or study. At the base, it is recommended to place lockers for toys, linen and other things. However, this design is advisable to install in rooms with high ceilings.
Another newfangled option is the grow-out bed, in which sleeping places can be transformed, increasing in length. This feature of the model is used as the child grows up.

What materials can be used to make a bunk bed
For the production of a bed, natural wood, metal or wood-containing materials can be used. The most durable of all options is metal. For the manufacture of the bed, straight-seam thin-walled pipes, round bars or wire made of brass, iron, galvanized metal or carbon steel can be used.
Finished products have an aesthetic appearance and are able to withstand a lot of weight. The disadvantages of the material include laborious process manufacturing, requiring the use welding machine, and high construction cost.
Solid wood is a difficult and expensive material to process. When working with it, you must have good skills in working with wood so as not to spoil the products. However, as a result, a bunk bed made of solid wood is strong, reliable, durable and presentable.

Often for the manufacture of structures used planed or edged board, since this is the most economical and easiest option to perform. With proper design, such a design can withstand even an adult.
Important! To create a solid and stable structure, it is important to purchase a well-dried board, which subsequently does not deform.
An affordable option is MDF. Bunk beds from this material are beautiful and durable. However, an MDF product can break under heavy loads. It is advisable to use this material for beds intended for small children, and it can also be used to make headboards, drawers, shelves or decorative panels. For the same purposes, chipboard is suitable, which also does not differ in great bearing capacity.
Important! In the case of using laminated chipboard to create a bed or berth frame, a sufficient number of supporting elements should be provided.

A durable, strong and reliable material is a furniture board. It is represented by a slab, which is glued from different bars natural wood. It is an ideal material for making a bunk bed, as it has a large load-bearing capacity. When working with a plate, it should be borne in mind that it has internal stress.
How to choose the right version of the stairs and side of the bed
In the manufacture of a bunk bed, due attention should be paid to the sides and stairs. It is these elements that are designed to ensure the necessary safety of the child. There are several options for stairs, which is shown in the photo of do-it-yourself bunk beds. A flat vertical structure is mounted on one side of the facade. At the same time, it plays the role of a protective rim for the lower tier. Such a staircase is devoid of railings, therefore it is unsafe for small child. More suitable for children 5-6 years old.
A flat sloping or forward-bent structure can be installed on the side of the bed or in front of its front wall. The element is equipped with a safe railing and has flat steps that are comfortable and safe for the child. This option can be used for children of any age.
Multifunctional and easy to use is a ladder with steps made of drawers. This design is most often used for loft beds, as it requires significant space. Its recommended length is at least 2.4 m.

The sides of the bed provide protection for the child from falling during sleep. Their height can be 30-60 cm. The sides are made in the form of a lattice or a solid canvas.
DIY bunk bed: preparatory stage
When creating a structure, accuracy and accuracy in work are required. Therefore, at the initial stage of manufacturing the product, it is necessary to make detailed drawing bunk bed, where its dimensions are indicated and constituent elements. For each individual node must be performed individual scheme with the exact dimensions of all its components. The general drawing shows the assembly diagram of a bunk bed and how to connect all its parts.
Related article:
Photos and features of the device. What materials are used. How to choose the right one. Sofa-transformer into a bunk bed.

It is taken as the basis for calculating the structure. The size of the bed must strictly correspond to its dimensions. A perimeter allowance of 1 cm is allowed. The width of the backs of the structure must correspond to the width of the bench, taking into account the thickness of the longitudinal strips and the size of the overhang. This calculation is carried out for wooden structures. Concerning metal products, then double the thickness of the pipe is added to the width of the bed, taking into account an allowance of 1 cm. The size of the longitudinal slats corresponds to the length of the mattress with an allowance of 1 cm.
After the model is defined, the material of manufacture is selected and all necessary schemes and do-it-yourself drawings of a bunk bed, you should start manufacturing the constituent elements. To perform the work, you need to prepare tools.

If it is made of metal, you will need:
- grinder for cutting metal products;
- welding machine;
- drill with a drill for working on metal with a diameter of 9 mm;
- roulette;
- square file;
- metal square;
- sandpaper;
- metal brush;
- brush for paint.
To create solid wood bunk beds you will need;
- milling machine;
- grinder or planer;
- hacksaw;
- screwdriver;
- electric jigsaw;
- drill;
- sandpaper;
- roulette;
- level.
Manufacturing technology of iron bunk bed
To make a do-it-yourself metal bunk bed, you will need metallic profile 50x25 for creating frames for sleeping places, a profile with a section of 20x25 for making a slatted base for a mattress and metal elements with a section of 40x40 mm for side racks. You will also need to purchase metal screws, screws, primer and paint for metal surfaces.

Based on the drawing of a children's bunk bed, do-it-yourself cutting of all blanks of a given length is performed. The assembly of the structure begins with the creation of backrests in the amount of 4 pcs. Structural elements must be decomposed into horizontal surface and weld them together. After each step, it is recommended to check the angle value, which should be equal to 90 degrees.
With the help of a grinder profile pipe 20x25 mm slats are cut under the mattress. Next comes the base. On long parts, frames are welded at the same distance from each other 12 metal slats. Then it is necessary to connect the vertical racks in pairs, to which the backs of the lower and upper tiers are attached by welding. The result is two structures.
To the first, at a distance of 35 cm from the floor, a frame is welded under the mattress of the lower tier, and for the upper floor - at a distance of 95 cm from the lower level. All actions are performed according to the drawing of a children's bed with their own hands.
In the places where the frames of the second rack are fastened, it is necessary to weld two sections of the profile measuring 20x20 mm. They should be installed with some clearance, since the elements must fit snugly into the inner part of the 50x25 mm profile. Such a technique will allow in the future to transport the structure, which will not lose the strength and rigidity of the joints.

The final stage is the manufacture of a staircase 36 cm wide. With the help of a grinder, all the constituent elements are cut from a profile pipe, which are welded together. The structure is attached to the bed with self-tapping screws.
After the bunk bed is assembled, all seams are sanded, the surface is cleaned of dust and the base is primed. special composition. After it has completely dried, two layers of metal paint are applied to the structure.
How to make a bunk bed with your own hands from wood
A do-it-yourself bunk bed made of wood is a comfortable classic model that is very popular. For its manufacture, it is necessary to purchase high-quality, straight, well-dried wooden blocks from which parts are cut the right sizes. The most commonly used boards are made of pine. Their number is determined based on a detailed drawing of a do-it-yourself wooden bunk bed.
Helpful advice! Consumable should be purchased with a margin in order to be able not to use the rejected sections of the board.

For a traditional model, based on the presented drawing of a bunk bed made of wood, the following parts must be made:
- vertical racks measuring 3.8x7.6x173 cm - 4 pcs.;
- outer linings for racks with dimensions of 3.8x7.6x173 cm - 4 pcs.;
- drawers measuring 3.8x14x203 cm - 4 pcs.;
- bars for laying frame boards, which are mounted inside on the drawers, with parameters 3.2x4.4x185 - 4 pcs.;
- elements for assembling the headboard and footboard measuring 2x14x91.4 cm - 4 pcs.;
- central boards for mounting end structures with dimensions of 2x9x91.4 cm - 4 pcs.;
- railings with parameters 2x9x151 cm - 1 pc.;
- steps (2x6.4x48.2 cm) - 3 pcs.;
- elements for creating a fence measuring 2x9x180 cm - 2 pcs.;
- transverse slats for making a bed (2x7.6x100 cm) - 24 pcs.;
- side boards for creating a supporting frame measuring 214x91.4 cm - 4 pcs.
Instructions for assembling a bunk bed: stages of creating a structure
How to make a bunk bed? The manufacturing process can begin with the creation of support structures in the form of a headboard and footboard. These elements are almost identical. The difference lies in the design of the upper part of one of the backs, taking into account the location of the railing on it. In this case, on the outer lining vertical rack three blocks are made to secure the side protective enclosing element.

Do-it-yourself footboard and headboard of a children's bunk bed are made from pre-cut racks and crossbeams. The supports are made of timber and parts that will close the fastener holes of the structural elements and form a groove for further laying side frame boards into it.
Based on the drawing of a bunk bed with the dimensions of all the constituent elements, the side parts (tsarg) are manufactured in the amount of 4 pcs. These parts will subsequently hold the lamellas of the structure. A longitudinal bar is attached to the inner side, which is necessary to support the mattress, on which bars are mounted at an equidistant distance from each other. In the grooves formed, transverse rails are installed to support the mattress.
Next, the second tier sleeper and fencing elements are assembled. The rack indicates the location of the steps (in the amount of three pieces). When mounting the lower step, it is necessary to ensure that its fasteners do not fall into the location of the screws that hold side wall lower floor.
Then, the side structural elements are connected to the drawers, as shown in the do-it-yourself drawing of a bunk bed. They must be installed in the gaps that have formed between the linings. Each side is screwed with four self-tapping screws.

How to make a bunk bed yourself: assembling stairs and fencing elements
After the frame is assembled, they begin to mount the handrail, stairs, steps and crossbars for the fence. All elements must be interconnected. Then, by using self-tapping screws, the structure is fixed to the bed posts. For whole assembled structure lamellas are laid between the bars on the side frame boards.
Traditionally, the staircase is made of three steps. Depending on its height, their number can be increased. In this case, it is not at all necessary to install only a vertical structure. The ladder can be inclined and located at any angle.
She is very easy to assemble. Steps are attached to the base, consisting of two bars. In this case, the lower element is additionally connected to the rack of one of the backs. Others are located one above the other. Steps can be fixed externally using a metal corner or installed in a recess. Any fastener should be closed as much as possible.
A finished bunk bed for children with their own hands, if necessary, is sanded to eliminate roughness on its surface. Then it is treated with special impregnation and covered with stain or varnish.
Helpful advice! For reliability and to prevent overturning of the structure, it is recommended to fix it on the wall.
How to make a loft bunk bed: the manufacturing process
There are many types of loft beds. For self-production, you can choose a model from the proposed options posted on sites that display detailed drawings of do-it-yourself bunk beds for children.
To make a classic loft bed (with parameters 250x115 cm) with one bed, stairs and an open area for games, boards will be used different section. The assembly of a bunk bed begins with the manufacture of its left end side. For this, transverse crossbeams measuring 5x10x95 cm are connected with racks of the same section 1650 mm long, they are mounted in pre-prepared holes and fixed with glue and self-tapping screws. A ladder will be installed to this side.

In the same way, installation is organized right side, which will simultaneously become protective fence. The next step is to glue the bars (5x5x190 cm) with separating parts to the drawers 5x15x190 cm in size, which are fastened with self-tapping screws.
Next, the end elements are connected with drawers and wooden elements for a fence measuring 5x10x190 cm. All boards are fastened with bolts. It turns out a sleeping place with a size of 1.0x1.9 m. It is necessary to lay lamellas on the timber. Bolted connections for reliability, you can fix it with carpentry glue.
The next step is to assemble the support frame-rack for the platform from boards measuring 5x10x50 cm and 5x10x95 cm. The frame must be attached to the frame landing using boards having parameters 5x10x50 cm and 5x10x10.5 cm.

Then the whole system is mounted to the main frame using iron corners, which are screwed on the inside of the structure. The site is sheathed with boards (5x10x65 cm), which are immediately connected with glue, then fixed with self-tapping screws.
Important! The heads of the self-tapping screws should go into the tree by a few millimeters, and the resulting recesses are sealed with sawdust mixed with glue.
Next is the installation of the stairs. To two side boards (5x15x100 cm), the ends of which are cut at an angle of 90 degrees, bars measuring 2.5x5x20 cm are attached in parallel. They should be located opposite each other on the side rails. Then steps made of wood measuring 5x10x45 cm are mounted on them. Finished construction fastened by means of metal corners to the podium, after which the strength of the stairs and the bed is checked.
Finally, all recesses are sealed and the surface is ground. All elements are primed, after which varnish or paint is applied to them.

How to make a pull-out bed with your own hands
To create a retractable bunk bed, you can use chipboard. The design made of this material is easy to manufacture and does not require special skills and experience from the master. First of all, a ready-made drawing of a children's bunk bed is created or selected with the dimensions of all elements.
For the manufacture of the main structural parts, laminated chipboard sheets with a thickness of 19 mm are used. For the cover and the lower side of the podium, you can use a furniture board with a thickness of 22 mm. All elements are based on detailed drawings do-it-yourself children's bunk bed. Photos clearly display each detail of the design of the corresponding dimensions. The fastening of the component parts is carried out using screws with bolts and corners.
To create the top tier, you need two sheets of chipboard for the head and foot, and you will also need two thin strips for the side walls. Retractable design made of parts of the same height. The length of this part should be 10 cm less than the given value of the upper level.

The lower tier is equipped with wheels, thanks to which the bed freely leaves if necessary. For framing are used wooden planks 10 cm thick. For beds 1.7-2 mm long, there should be at least 7 such strips.
When free space is limited in a room, and two or more beds are required, a bunk bed comes to the rescue. Today, there are many design options that are selected based on the stated requirements. After completing a detailed drawing of a children's bunk bed, you can independently assemble the selected model that fits perfectly into the interior and saves space.