DIY photo frames from eggshells, shells, paper and other improvised materials. The most original do-it-yourself photo frames - design ideas How to make a beautiful picture frame
Each thing in the house, made independently, brings a special mood and color to the design of the rooms.
So if you want to create unique interior, do not be lazy, and create original masterpieces for home decoration.
These kinds of things include do-it-yourself photo frames, which today can be made from the simplest materials.
Someone will say, why make frames with your own hands, if you can buy almost the same thing in a store.
Of course, we cannot but agree with you, but we still remind you that by making cute crafts for the whole family, you put a special aura into them, which will always produce positive and wonderful memories.
The Ideal Style team will offer you amazing ideas on what kind of frames you can make for photos with your own hands, surprising you with unexpected solutions.
The presented photo frames will not only enrich your interior, but also preserve the most valuable thing - the memories that are associated with a particular photo.
After reading our review, you will see 50 examples of photo frames representing different ways design of this item.
Original and unusual do-it-yourself photo frames 2019-2020: ideas, design, current decor trends
In order to make frames with your own hands, you will need a base, auxiliary tools in the form of tools, glue, etc., and, of course, the materials with which you will decorate the photo frames.
Human imagination is limitless, which gives us the greatest opportunities in any business.
Making photo frames with your own hands, you can use cardboard, colored paper, fabric, vinyl records, matches, ceiling plinths, tree branches and dried plants, window frames and much more.
It all depends on your idea and desire to create unique thing for a unique interior.
Let's take a closer look great ideas how to decorate photo frames with your own hands, and which do-it-yourself frames will successfully complement your captured memories.
DIY frames: shell photo frames - ideas and finishes
 For many, going to the sea is a dream that may never come true. And someone, on the contrary, goes to rest by the sea every year, bringing amazing shells from the resort different forms, sizes, types.
If you don’t have shells collected from the sea, but you really like this decor, you can easily purchase shells in a decor store by creating wonderful handmade frames from shells in different interpretations.
In order to make do-it-yourself frames from shells, you will need a base (cardboard, wood, plastic) and shells.
You can also make frames with your own hands, using not only shells, but also other decor that is in harmony with seafood, for example, rope, pebbles, twigs, etc.
It is noteworthy that the more chaotically you lay out and stick the shells, decorating the frames with your own hands, the more interesting your product will be.
Making a frame with your own hands for a photo with embroidery or beads
 Truly masterpiece examples include do-it-yourself frames decorated with hand embroidery or beads.
Beautiful photo frames of this type can be made using special stencils, which determine which embroidery with threads or beads will decorate your creative frame.
Do-it-yourself frames with embroidery can be bright and multi-colored, or they can be made in a single-color version, concisely complementing the shades of your interior palette.
You can improve embroidered photo frames with your own hands by adding buttons, old jewelry, pearls, etc. to the craft.
If you chose beads for decor, you can not only embroider them, but also stick them in the shape of a photo frame.
Original do-it-yourself frames made of wood, twigs, dried flowers
 Each interior has its own characteristics, so do-it-yourself frames can be completely different, and sometimes very unexpected.
Wood products are one of the elements of many types of interior, so if you make frames with your own hands from rough and uneven pieces of wood, old boards, dry branches, tied together with a thick bundle, or neatly glued and varnished, you get something incredibly interesting .
Also, a do-it-yourself frame for a frame is often made from vine branches, using special equipment weaving.
Do-it-yourself frames look no less creative when dried branches are glued onto the base of the photo frame in combination with pebbles, tows, burlap, etc.
Do-it-yourself frames look tender and sensual when dried flowers or leaves are glued onto the finished base.
Beautiful do-it-yourself frames made of fabric, thread, burlap
 We have already named many interesting ways do-it-yourself frame design. But this, of course, is not all.
The next unique decor ideas for your interior will be do-it-yourself photo frames made using different pieces of fabric, burlap, coarse threads, yarn.
Our collection shows do-it-yourself denim photo frames, fabric flower photo frames, exclusive frames with their own hands from several types of fabric.
Undoubtedly, for the manufacture of such a frame you will need a little patience and time, but the result is worth it.
Also, do-it-yourself frames made of threads, burlap and other types of fabric can be supplemented with pebbles, twigs, shells, unexpected items found somewhere in a box with trinkets.
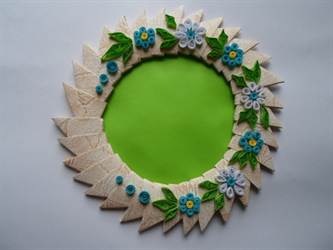
Super fashionable do-it-yourself frames using decoupage, quilling, origami techniques
 Using colored paper and paints, ribbons, etc., you can create truly unique do-it-yourself frames that are relevant later long time.
These include photo frames made using the decoupage technique, which involves painting the surface of the frame in a certain style.
With the decoupage technique, you can create frames with your own hands in vintage style, draw flowers and pictures on the frame, paste over the frame with special decoupage paper.
Do not lag behind in originality and frames made in the style of origami and quilling. Both techniques involve the creation of certain details from paper, with which photo frames will be decorated, or rather pasted over.
lovely curls, delicate flowers and leaves, strict figures and unusual shapes- you will get exactly such frames with your own hands by using these techniques.
Unusual do-it-yourself frames from coffee, cereals, pasta
 When you need to create cool DIY frames for a gift to a friend, and you didn’t find any special materials in your house, pay attention to coffee, cereals, pasta, which are incredibly interestingly reincarnated from cooking products into material for a photo frame.
In our review, you will see beautiful do-it-yourself coffee frames. See how unusual you can lay out coffee beans, and what they can be combined with.
Play with buckwheat, peas, pasta, rice, etc. you can create unique frames with your own hands.
In addition, these materials can also be combined with other types of finishes. Note that pasta, due to the variety of shapes, is a godsend for those who want to surprise everyone with their product.
How to make DIY frames: extraordinary photo frame ideas
 You can create something unique only if you approach this process in the same way.
Do-it-yourself photo frames turn out to be unconventional if you paste over the base with the keys from the calculator, or old keyboard, take colorful pencils for decoration, use parts of the uncorrected clock mechanism as material.
Professionals also offer to stick multi-colored skeins of thread on the base for the frame, old newspaper, corks from wine bottles, buttons and old keys, or create frames with your own hands of completely unusual shapes.
But that is not all. And how do you like frames with your own hands from jewelry. As they say - expensive and angry.
50 DIY Photo Frame Ideas
As you can see, each idea is unique. If you bring at least a few ideas to life, you can get a unique collage that decorates and transforms your room with pleasant memories.
Dare, because everything impossible is possible!


A universal selection of gift ideas for every occasion and occasion. Surprise your friends and loved ones! ;)
Greetings to all gathered on the blog! Many of us love to give gifts (I think you, too). But ordinary gifts quickly get bored and you want something warmer, sincere, attractive. One of these gifts are do-it-yourself photo frames, which we will make today in large quantities
I decided to write this post because I made my first soft photo frame a long time ago, and just recently I repeated the experiment and I was more than pleased with the result. Today I will share with you the secrets of creating it, and also show you what other types of photo frames you can make yourself using improvised materials.
How to make photo frames with your own hands: master classes
Children's photo frame "Totoro" ("Photo Frame")
Let's start with a cute children's photo frame inspired by the wonderful anime "My Neighbor Totoro" (if you haven't watched it, be sure to check it out, you won't regret it).

You will need:
- soft stretchy fabric (fleece (example - green fabric in the photo), minky fleece, velsoft, tight knitwear, etc.)
- thin fabric for the heel (cotton, fleece, etc.)
- synthetic winterizer (cloth)
- plastic base (from under equipment, sweets, etc.)
- threads, needles, scissors, accessories for decoration.
There should be enough plastic base to make three parts the size of the desired photo frame.
First of all, you will need to cut out the plastic base (round, square, triangular - whichever you like best) similarly to that shown in the photo. In this case, it's a flat donut. Cut out several details from the synthetic winterizer of the same shape. I will show a master class on the example of a circle.
You will also need 1 more piece of soft, stretchy fabric, but with large seam allowances.
Attention! Do not save fabric on allowances, they should be about 2/3 from the width of the ring so that the fabric is evenly distributed at the back.

We immediately proceed to the most important part - stitching the front. To do this, make small cuts on the inside of the circle (near the allowances) and sew the edges, pulling them with threads to each other as close as possible. (Specially chose a contrasting thread color to make it noticeable).
Advice. If you chose rectangular shape, then you are unlikely to need incisions, you can try to make them without them.

This is what the ring looks like from the front. If desired, you can hide the seams at the back with a thin fabric overlay (I'll show you how to do this a little further).

Set the ring aside. Cut out two circles from thin fabric and plastic (one is not needed yet). Make fabric circles a millimeter or two larger than plastic ones.
Sew the fabric circles, leaving room to turn inside out and insert the plastic base.

After sewing, turn the fabric part inside out, insert a plastic circle there and sew the remaining hole.

We received the back of the photo frame.

If desired, sew a loop of thread or ribbon into it so that you can hang the photo frame on the wall.

This is how I camouflaged the back of the fluffy bagel. To do this, I cut out the same element from a thin fabric as from a stretch one, but now I made the seam allowances smaller and hid them inside, sewing on a disguise blind seam. Sew the back with the same seam.
Sew the back so that in the future you can insert the last circle of plastic and a photo from above.

Try to make small stitches so that they are not noticeable after stitching the parts.

Attached heel:

Front view:

Now insert the plastic circle into the photo frame.

Ready! It remains only to insert beautiful photo and add decor)

In my case, this is a themed nigella made of wool, with felt leaves sewn on. Photo corresponding You can see the work in more detail in this section (in the "Souvenirs" tab).

Great minky fleece you can buy in this store. In our woven stores, I have not seen this, and if you want to make a thing no worse than a purchased one, then this particular material will be very useful to you (the seller is verified, I ordered from him more than once).
DIY photo frames made of cardboard and paper
The method described above is far from the easiest of possible methods creating a photo frame. Now you will be convinced of this
Photo frame made of... box lids
In fact, regular cardboard can also be used if it is folded into the shape of such a lid. As you can see, the creation process is simple: just take the lid and paste over it beautiful paper for scrapbooking.
It is convenient to fasten such frames together, as a result of which a whole set is formed. They can be glued together to get a panel. It turns out a great option for both children and adults.

Cardboard and clothespins
It is these two elements that will be needed for the next type of photo frame. Cut out a circle similar to what we did in the first master class and glue clothespins around it. We get a simple frame for several photos.

Using fabric and thread
In continuation of the first master class. Here I have included all those frames that can be knitted or sewn (in a pinch, use ideas for decoration).
knitted
A cute idea for a photo frame in the form of a flower, and it’s convenient to make such frames for several photos at once. The photo can simply be glued on the back, covering it with some dense material.

From threads
Everything is simpler here: take a frame, threads and glue and wrap the first one, fixing it along the way. Thus, it is very easy large frames turn into a work of art.

Shabby chic style
It is very similar in the way it was created to the very first one, with the exception of a couple of differences: here pressed cardboard is taken as the basis (I think you can take finished frame simple form) and this souvenir has a leg, not a loop mount.

Felt
Take a simple wooden frame as a base and decorate it with felt flowers. By the way, about creating flowers (including from ribbons and paper), you can read other articles on my blog.

From improvised materials or how to decorate a photo frame
walnut
An interesting idea is to use a pecan (if I call it correctly) for finishing. In our area, it is quite possible to replace ordinary walnuts.

Traffic jam!
For the next two types, you will need a lot of corks from wine bottles. In the first case, it is proposed to prime a simple wooden photo frame, and then cut floral patterns from corks.

But in the torus, everything is much simpler - you just need to glue the corks along the edge. Great option a present, say, to dad on February 23.

Polymer clay and little things
Well sculpt from polymer clay? Or just a lot of beads, buttons, etc. accumulated at home? Then feel free to use them - stick to a frame of a simple shape.


The same applies to stones, shells, etc.

nature style
Roughly speaking, to do this beautiful frame, you will need one long log. It is quite possible to build this at home, if you dry the piece of wood before that.

Ice cream sticks
The hardest part is keeping them together. You can do this with glue, thread, or a dense base.

Gypsum castings
Find suitable shape and plaster. Once a brother experimented with plaster panel- it turned out pretty good, but it stood for a long time.

From thermobeads
I don’t know exactly their scientific name, but if you put them on a special surface and then iron them, you get a dense canvas. You can see an example of a funny frame made in this way below.

On this, Dear friends, I am ending this great review different kind photo frames. I think you found what you were looking for, if not, write in the comments. And share with your friends not only cool handmade gifts, but also useful information using buttons social networks. Goodbye!
Sincerely, Anastasia Skoreva
design solution, stylish element decor, great gift for loved ones and an exciting activity for parents and their children - creating photo frames with your own hands from improvised materials. Most important events and pleasant memories captured in the pictures will serve as an excellent decor for your home. How to make a photo frame beautiful and creative, we will tell in this article.

Stylish interior
The most common way to make a photo frame is out of cardboard. This goodness is in bulk in almost every house, we cut it out the right dimensions. You won’t have to think long about how to decorate such a photo frame, pieces of fabric, scrapbooking paper, buttons, quilling paper, brooches, figurines, emoticons, ribbons and beads, tubes from bright magazine pages will be used.
If you have the opportunity, use glass as well so that the photo frame has a quality look.


Making a photo frame can start with buying a ready-made regular frame, just add it with individual elements that you like best. Photo frames made of shells and sea stones, twine, anchor figurines are suitable for decorating photos from summer sea holidays. Such parts are easy to seat on hot glue from a gun.


Decor with beads and ribbons for lovers of bright and shiny jewelry:

Cardboard and colored paper
Consider one of the master classes on how to design a desktop photo frame made of cardboard and paper on a stand.


Step 1. Material preparation. Cardboard, decor paper, beads, ribbons, glue, stationery knife. Cut out the desired size from cardboard. Back, stand and front.


Step 2. Decorate the main parts. We glue the decorative paper cardboard, which is the back, as shown in the photo.


Step 3. Fold from scrapbooking paper different sizes ladder, making a visual frame. We sew on a typewriter with a zigzag. Of course, you can not do this, but use, for example, a special decorative tape or just stick it on top.


Step 4. We collect the stand and bend the end. We make holes in the fold with an awl. In the future, brads, small carnations are inserted there.


Step 5. Install the stand. We take cardboard and thicken the place where the stand on the brads will be attached, we simply glue pieces of cardboard. We connect the stand and glue the cardboard to the back.


Step 6. The most important thing is to select the decorations and glue them to the frame. These can be flowers, stickers, ribbons and beads.


Decoupage options
Making photo frames will be an interesting educational activity for children with parents. Learning quilling, decoupage, pasting and painting will captivate with an interesting idea to create your own crafts for decorating a children's room.
Old puzzles will certainly lose their details, which cannot upset, paint them or leave the details with the sky, water and grass, glue them randomly to the frame or just leave a smooth outline around the perimeter, if the drawing itself allows it, it will be even more beautiful.


Photo frames with the help of paper modules contribute to the development of fine motor skills of the hands, and spare parts for quilling will create a voluminous carpet of flowers and animal figures. It is easiest to glue on paper with ordinary PVA glue, which is safe and not difficult for children.


Decoupage from small parts involves the application of thick glue. Choose safe, odorless adhesives. Buttons or Lego pieces will create a bright frame, if you don’t have bright buttons, but have old ones, you can cover them with paint or varnish.


Decorating with eggshells, cereals, seeds, pasta, coffee also takes place in creativity, especially since such decoration materials can be painted with paints and combined with other decor elements, creating unusual patterns. Photos in the design of food can be placed on the walls of the kitchen or dining room.


Do not forget that frames are often molded from plaster or dough. The dough recipe is very simple, the same as for regular modeling. You can add food coloring to it or color it after it dries. Flour, salt and water are taken in parts 3:3:2. Make a solid frame and wait for it to dry, or if you have modeling skills, create various figures of your child's favorite cartoon characters or just animals.


Video on the topic of the article
Evgeny Kudryavtsev, an architect and father of a two-year-old daughter, invents toys and useful things made of cardboard for her. This master class is about how the problem of placing children's drawings was solved. And the child is happy, and the walls are intact!
Irishka loves to draw and, like any artist, wants her works to hang in the most prominent places. And in our small panel apartments where are these places? Correctly! Either walls or furniture. You can, of course, hang them on scotch tape to furniture. However, it does not last long, paper and furniture deteriorate from adhesive tape, and masterpieces painted with paints also strive to curl up into a tube all the time.
The walls are even worse - they are concrete! In our P-44 series, the only walls where a frame can be attached by driving a regular nail are the bathroom and bathroom partitions. In the remaining walls, you need to drill holes, hammer in the dowel and screw in the screw. And given the number of masterpieces, the speed of their appearance and the desire of the creator to see his paintings on these walls ... In general, you won’t get enough of victorious drills!
Therefore, we will make a frame out of cardboard. What's the thrill here? And the fact that it can be hung on any wall, as we will use it as load-bearing elements wallpaper and a needle. The frame is light, and you do not need to remove it to replace the picture, which means there is less risk of tearing the wallpaper with a needle. Moreover, in one frame you can hang several pictures at once, one on top of the other.
We will need the following materials and tools:
- a sheet of cardboard, 260 × 350 mm in size;
- a sheet of A4 paper;
- ruler;
- stationery knife;
- flat screwdriver;
- pencil;
- single hole punch;
- round shape template.

As the main material we take microcorrugated cardboard with a thickness of 1.5 mm. In my case, it is white on one side, and it is on this side that you need to make markings. The front side will be back side cardboard color - because it looks more advantageous on our white wallpaper. The original size (260 × 350 mm) is due to the fact that on each side there are 25 mm left on the mat. The beginning of the markup is simple - exactly in half, horizontally and vertically.

We apply in the middle, by eye, a sheet of A4 paper and make serifs 70-80 mm long at the intersections with the marking lines. The entire sheet does not need to be circled.

Now about the round template. It's 60mm in diameter, and it's a lid for a soft-boiled egg cup, simply because it fits the diameter. In general, when you need to make something round, you need to think about the compass last, because in the house where the child lives, there are always caps for paints, children's dishes, plates, etc., which can and should be used instead. Take a look around! Surely somewhere nearby there is something with a diameter of 60 mm! We put the template in the middle of the edge of the sheet and the pencil line and circle it.

It turns out something like this!

Now we take a flat screwdriver and, stepping back a couple of millimeters from the pencil border of a sheet of paper, we push through.

And cut like this!

Flipping the cardboard front side up and extrude the cut segments.

The point is small - to make holes for the needle! They need to be made with a single hole punch, one each on the long and short sides. If there is no single, then you can take a regular hole punch.

Everything is ready! We make all the following frames according to this template. Just put on top, circle, extrude and cut out.
Now we hang a frame with masterpieces on a regular sewing needle horizontally...

Or vertical! We hang works on any wall. We do not damage wallpaper and furniture. Without a twinge of conscience and without removing the frame, we hang the masterpieces of future Picassos with future Renoirs and Shishkins.

Comment on the article "Do-it-yourself frame for children's drawings. The walls and furniture are intact!"
Section: -- gatherings (frames for drawings in Auchan). 2Alt and those who draw. I don’t know exactly what happened to Auchan in our northern Mega, but today they sell everything for ...
Graphic drawing on the wall. Help. About his own, about a girl's. Graphic drawing on the wall. But if I have some kind of graphics, drawing, but rather complex, i.e. stencil...
I take the finished frame and paint it myself: gouache is generously smeared on a dry frame after 1 minute. it is well wiped with a rag - it turns out a frame of a light shade or just paint over well on it ...
Frame for children's drawings with their own hands. Walls and furniture intact! If there is no single, then you can take a regular hole punch. Everything is ready! You can start working with children using the passe-partout technique with early age. I wanted to take care of them and go and buy a lot of frames at once...
Frame for children's drawings with their own hands. Walls and furniture intact! Moreover, in one frame you can hang several pictures at once, one on top of the other. In general, when you need to make something round, then you need to think about the compass last, because in the house ...
Draws on wallpaper. parent experience. Child from 3 to 7. Education, nutrition, daily routine, visiting kindergarten and relationships with caregivers, illnesses and physical development of a child from 3 to 7 years old. Frame for children's drawings with their own hands. Walls and furniture intact!
Frame for children's drawings with their own hands. I decided to design for once the work Frame for children's drawings from cardboard with their own hands - a master class on making a passe-partout.
Frame for children's drawings with their own hands. We have accumulated so many photos and works of children, which are very cool, but because of the lack of frames, they are in folders and albums.
Section: Need advice ( wooden frame dyed from a bolonchik). How to paint the frame? Well, on the wooden frame, I had the first layer of a primer so that the wood would not shine through.
Round frame. Need advice. Mary the artisan: embroidery and needlework. Section: Need advice (First time I make out in round frame). Round frame.
Frame for children's drawings with their own hands. Walls and furniture intact! The walls are even worse - they are concrete! In our P-44 series, the only walls where you can attach a frame by hammering in the usual 2 years ago, they cost 25 rubles, and the cheapest frame in ...
Do you consider frame size when choosing a canvas? For example, if you sew at 14, and the picture just doesn’t fit into a standard photo frame, then: take 16 or smaller canvas ...
Frame for children's drawings with their own hands. Walls and furniture intact! Walls and furniture intact! Each picture - a passe-partout made of cardboard in 5 minutes. Master Class. Paint them in a contrasting color and make them like a frame (like wooden slats with ...
Frame for children's drawings with their own hands. Walls and furniture intact! Walls and furniture intact! Each picture - a passe-partout made of cardboard in 5 minutes. Master Class. About 2 years ago they cost 25 rubles, and the cheapest frame in the photo salon was 60.
how to paint a frame? Need advice. Mary the artisan: embroidery and needlework. how to paint the frame Task. need a pale green shabby frame.
Frame for children's drawings with their own hands. Walls and furniture intact! Walls and furniture intact! Each picture - a passe-partout made of cardboard in 5 minutes. Stock canvas around the edges. Vova, do you happen to know where on the net you can find how to make picture frames?
Walls and furniture intact! Can you find a smaller frame? so that it was right next to the embroidered one. and if the frame is moved in the center of the picture along the edges, what are the holes? Frames for children's drawings. About 2 years ago they cost 25 rubles, and the cheapest frame in the photo salon was 60.
Frame for children's drawings with their own hands. Walls and furniture intact! You can, of course, hang them on scotch tape to furniture. However, it does not last long, paper and furniture deteriorate from adhesive tape DIY crafts for the holiday of March 8: pictures of flowers. Creativity lessons with children.
Paper is universal and available material which is ideal for creating various crafts. Original photo frames made of paper and cardboard are easy to make at home, look spectacular and stylish, create cozy atmosphere at home and enhance the mood of your photos.
DIY paper photo frame
A variety of design options allows you to experiment with materials - create interesting compositions from paper, thread and cardboard, works in a mixed style, decorated with beads and rhinestones, gilding, embroidery. Cardboard frames can be sheathed with fabric, appliqués can be made on them, or paper origami can be decorated with them. contrasting colors. Even such trivial materials as sand, dry twigs and ice cream sticks can be a source of inspiration for original crafts.
You can decorate your photo beautifully with the help of a gilded frame. It is easy to make it from cardboard by cutting it out according to a curly pattern and painting it on top. acrylic paint with gilding. If acrylic is not at hand, you can glue the printed photo of the carved wooden frame for the picture as shown in the photo.


You can also use another drawing, according to which three-dimensional elements of the frame are assembled from cardboard or paper - a cardboard photo frame painted with textured paint looks like a wooden one.

DIY photo frames
Making a photo frame with your own hands is very simple - for its manufacture you can use cardboard, baguettes for pictures, ceiling plinth or other materials convenient for you.
creative design frames will require imagination and skills in the field of hand-made. If you embroider with satin stitch, felt from felt and or do beading, then you will not lack ideas for decor - feel free to use old blanks, make spectacular compositions from them, using all work surface frame, excluding the inner photo area.
How to make a photo frame
A master class on making a vintage-style cardboard frame for decorating your favorite photos:


Creative Photo Frames
Nature gives a lot of ideas for decorating crafts - so, you can decorate the frame with shells, dry twigs, dried flowers and leaves. The frame, pasted over with miniature flat discs-sawed branches, with a diameter of one to five centimeters, looks spectacular. You can make them on a woodworking machine or purchase from craftsmen.

You can use beads, sequins, artificial flowers, felt and felt elements to decorate paper photo frames. It is advisable to divide artificial flowers into petals with tweezers and fix each of them on a cardboard base using glue gun. In such a framework, photographs acquire a solemn and holiday look.

Decorating a photo frame can be done using any improvised materials that you can find at home. Great decor create paper straws, twisted from multi-colored pages of glossy magazines - their edges are fixed stationery glue or fixed with bright threads for sewing or floss.