Installing a sink in the bathroom: installation instructions for modern models. Tips for installing a vanity sink in a bathroom
Add site to bookmarks
Preparing tools and dismantling the old bathroom sink
Installing a new bathroom sink with your own hands requires the following tools:
- Perforator or impact drill.
- Special drill for concrete.
- Screwdriver or screwdriver set.
- A set of wrenches.
- gas key.
- Dowel-screws.
- silicone sealant.
- windings.
Before you start installing a new sink in the bathroom with your own hands or any other work related to the plumbing, you must definitely turn off the water.

First of all, unscrew the nut holding the mixer and disconnect the rigid or flexible eyeliner. Disconnected pipes are best released into a bucket, because. they may have runoff. After that, you can remove the mixer. Next, you need to disconnect the siphon connecting the sink in the bathroom to the sewer. Carefully loosen the bottom nuts and remove the siphon.
If you want to replace old components, then the siphon must be disconnected from the drain, and the remaining hole should be plugged with a rag or cork so that unpleasant odors do not enter the room. After that, the sink should be removed from the mounts and discarded (at the discretion).
Back to index
Do-it-yourself installation of a new sink in the bathroom: what should be considered?
Installing a new sink in the bathroom with your own hands requires taking into account many characteristics, including dimensions and type of product.
According to the design and type of installation, the following bathroom washbasins are distinguished:
- sink on a shelf or cabinet;
- shell-tulip;
- washbasin on brackets;
- washbasin on a pedestal.
Installing each type of bathroom sink with your own hands has its own characteristics. If you are not sure that you can do the installation correctly with your own hands, it is better to immediately contact the professionals.
Back to index
Sink-tulip and washbasin on brackets: installation procedure

Do-it-yourself installation of a tulip sink for a bathroom does not have fundamental differences from the installation of other types of products. The only feature of this type is the installation of the legs on which the bowl fits. The installation height of the washbasin must be selected according to the height of the bottom leg. Together with the washbasin, a faucet is also performed. The installation of these devices may require the use of special tools.
Another feature of this type is that the drain will be located inside the leg. Therefore, all parts must be carefully fixed and insulated so that in the future you do not have to dismantle the product several times and constantly be afraid of leaks.
Do-it-yourself installation of a sink on brackets is not a very difficult undertaking. Installation of such a product is carried out after completion of all finishing works. First you need to do correct markup and only after that proceed to the device of fasteners. First you need to draw a horizontal line at the required height (usually 85 cm from the floor). After that, stepping back to a distance equal to the thickness of the washbasin from the side adjacent to the wall, you should draw a second line, which will become the basis for the brackets.
Measure the width of the sink, attach the brackets to the wall and mark future holes. At these points it is necessary to drill holes and install dowels. Fixings are screwed onto the dowels, after which the sink is installed on them. It shouldn't move or wobble. Only after the bowl is stable and snug against the wall, you can drain. An alternative to this method is to mount the washbasin with your own hands on a hanging shelf or pedestal.
Back to index
Installing a washbasin on a cabinet and pedestal

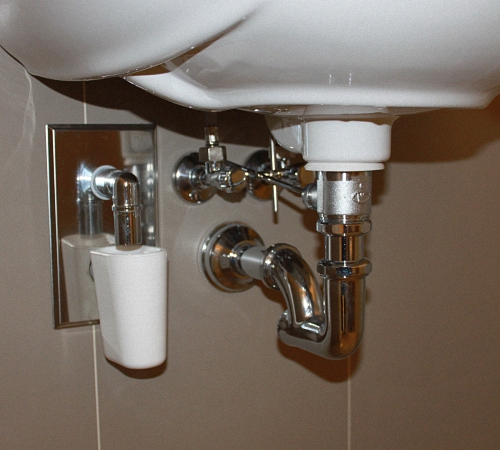
Scheme of connecting a bottle siphon.
If it is carried out on a curbstone, then the countertop becomes at the same time a holder for the bowl. The washbasin is either top-mounted or completely built into the hole. In both cases, the drain is hidden under a shelf or in a cabinet. Such a sink is installed in accordance with the above technology, however, the advantage is that many product models have been created for this method. custom design. Such models can have standard and extraordinary forms. Designer sinks can be made of glass, have a spherical or cubic shape, and you can decorate such a product with your own hands, using smalt, stones and everything that your imagination suggests for this.
If the sink is mounted on a pedestal, then it all depends on the type of bowl itself. Sometimes the washbasin is mounted on brackets, and the pedestal performs a purely decorative function. In other cases, the bowl of the shell rests on a pedestal and seems to stand on it. In this case, the sink can be located at a sufficiently large distance from the wall. If the structure will be adjacent to the wall, then it must first be mounted in the right place and the places for mounting the bowl must be marked. In this embodiment, fastening with brackets is used, the execution technology of which was described above.
Be sure to attach rubber washers to the screws. It is not necessary to tighten them very tightly - it is enough that the washbasin simply does not budge. Large forces may cause cracks to form on the bowl. When the washbasin is installed on a semi-pedestal, the outlet socket should be positioned at a distance of 50 cm from the floor. The bowl is attached to the wall, and the semi-pedestal is installed in accordance with the manufacturer's recommendations.
You don't have to be a professional plumber to install a bathroom sink.
Such work is quite accessible to everyone. But first you need to define for the sink
location - preferably near hot and cold water pipelines.
Tools and materials
- wrench
- open end wrench
- combination key
- roulette
- pencil
- level
- protective glasses
- drill
- drill bits for tiles and concrete plastic dowels hammer
- mounting studs
SAFETY
Wear safety goggles when drilling holes to avoid injuring your eyes.
sharp pieces of tiles.
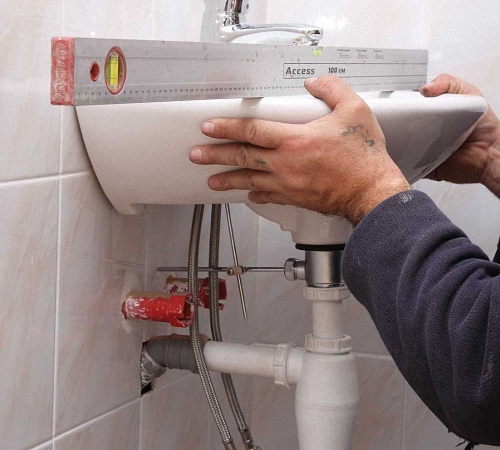
1 We measure the required height of the sink with a tape measure.
2. Make a mark with a pencil in the right place.


3. We draw a sink installation line along the level.
4. Having attached the sink to the wall, we mark the installation locations of the fasteners.
5. Determine the centers of the holes.


6. Drill holes for fasteners.
7. Insert plastic dowels.
8. Hammer plastic dowels all the way
9. We screw the fixing studs into the dowels


10. Install the sink pedestal.
11. We put on assembled sink on the mounting studs and tighten the nuts on them.
Do not forget to put gaskets under the nuts and put washers.


12. We fix the sink so that neither it nor the brackets wobble.
Single lever mixer installation
Sometimes it happens that it is necessary to change a failed mixer or an old one.
after the repair no longer fit into the interior new kitchen. to install
a new mixer, you must first dismantle the mixer.
Instruments
- wrench
- open end wrench
Attention
After assembling the mixer, it is usually connected to hot and cold water.
Additional Information
Set single lever mixer with flexible hoses
1. We screw a flexible hose into the mixer.

2. Screw the stud into the threaded hole.
3. Insert the sealing ring.

4. Screw in the second flexible hose
5. Putting the sink on the floor, we wind the flexible hoses one by one into the hole in the sink.

6. Install the mixer in place.
7. We put a rubber gasket on the hairpin.
8. Install the C-plate.

9. We fix the mixer with a nut
10. Install the grate on the drain.
12. We install a decorative ring-frame in the overflow hole.
Dismantling the sink on the pedestal
If your old sink has fallen into disrepair or has ceased to please you and you
If you want to replace it, it's quite easy to do.
Advice
Until the bolts securing the sink to the wall are unscrewed, it is better not to remove the pedestal: it will serve as a support for the sink, especially if the work is carried out alone.
When removing the sink, care must be taken not to drop the pedestal: it is not fixed.
Place a cloth on the floor before loosening union nuts on flexible hoses.
materials
- wrench (or plumbing pliers)
- open end wrench
- combination key
- screwdriver
- cloth gloves
Shut off hot and cold water supply.
1. Make sure the water is turned off.
2. We unscrew the union nuts with an adjustable or open-end wrench right size. Can
also use plumbing pliers or a “butt” key if the nuts
stuck.

3. Remove flexible hoses. Remove plastic caps from bolts
4. Unscrew the bolts or unscrew the nuts.
5. Disconnect the siphon: unscrew the lock nut at the top, slide the wedge seal down, unscrew the nut from the drain pipe and remove the siphon.

6. Carefully remove the sink.
7. After removing the sink, remove the pedestal. If the design allows, you can put a new sink on it.
Installing a siphon on a sink
Liked? Subscribe to the blog and get new articles!
Installing a bathroom sink is the final step in a renovation. The installation of the washbasin itself and the connection of the water supply and sewer siphon to it is carried out after the completion of the finishing work, so accuracy is needed. The assembly of components, installation and related fittings are not something difficult, but it is important to follow the sequence of all stages of the process.
What is important to consider when installing a sink yourself?
In most city apartments, the bathroom and the combined bathroom are too small. And in a cramped room, almost end-to-end, you have to place:
- acceptance tank water procedures(jacuzzi, bathroom, shower tray);
- sink (washbasin, sanitary ware);
- for a bathroom - a toilet bowl;
- occasionally - bidet.
Each personal care item has its own installation method, but installing a bathroom sink is the simplest example.
The construction market offers big choice shells various designs, but when buying it is important to consider:
- the ratio of the dimensions of all existing tanks and those installed;
- the washbasin and all accessories must comply with the piping and sewerage layout;
- flexible hose and siphon should be enough in length to drain into the sewer pipe.
Sinks come in different materials:
- ceramics;
- porcelain;
- faience;
- marble (another ornamental stone);
- fake diamond;
- strained glass;
- metal (more suitable for the kitchen as a sink).
At the first stage, it is important to understand the type of fastening of sanitary ware. The faucet is mounted on the sink through a special inlet, when the water supply is brought through the container itself. When the faucet is installed above the sink from the wall, it makes no sense to purchase a product with a hole in the center (side), which will have to be covered with something.
All sanitary ware differs in the installation method:
- hanging sinks - mounted on the wall;
- built-in washbasin, part of a cabinet or cabinet;
- tulip shell (on a high narrow stand, behind which is hidden drain hose and entrance to the sewer)
- sink-pedestal (on a stand that hides pipes;
- a sink with a semi-pedestal (the same stand, but attached to the wall, arbitrarily choosing a height);
- overhead sink;
- mortise sink with countertop;
- sink combined type with special design where features of several types are combined.

Install the sink yourself or contact the experts?
Each variety assumes its own type of installation, which is indicated in the instructions for the tank. Of course, the installation of a washbasin with a pedestal is different from a conventional wall-mounted washbasin. And if one or another type raises doubts whether it is possible to install it yourself, then it is better to choose a product with a simple installation scheme.
Is installation worth it? sanitary sink do it yourself or entrust it to specialists? If you already have experience in such a business, then it makes no sense to overpay those who decided to master it a little earlier. And the prices for simple services are clearly too high to make it profitable. If you look at search queries of your region, how much it costs to install a sink in the bathroom, taking into account home visits - it turns out to be expensive. Sometimes the cost of installing a simple washbasin is more expensive than its price.

If desired, any independent man (or economic woman) will cope with such work without the involvement of specialists. Required to have:
- basic knowledge about connecting water communications;
- tools for assembly and installation;
- detailed instructions for installing the selected type of sink;
- tips from experts from the article.
Attention: It is advisable to purchase a new sink faucet that matches its type! When buying a faucet and washbasin, feel free to find out all the details of the assembly and review the components if you intend to do it yourself.
Helpful Hints:
1. A built-in sink is easiest to install if its dimensions fully correspond to the cabinet on which the product should be located. It remains to assemble the siphon and connect it to the sewer.
2. Mounting a wall-mounted or wall-mounted sink requires reliable brackets or other accessories, which are often included with it.

3. The installation of a countertop sink is made on top of a countertop or another plane and is similar to the installation of a built-in washbasin on a cabinet. Only the tank is fixed on top of the countertop in a hole that matches the configuration. Sometimes this cutout has to be adjusted by contacting a carpentry workshop.
4. There are also semi-built-in washbasins, which require the installation of a washbasin with a cabinet, but partially protrude beyond the edges of the support.
5. It is very convenient to install the tulip sink. Here, the back surface is attached with brackets to a wall or other vertical surface, and partially stands on a leg support. But for some “tulip” models, the weight completely rests on the leg, and additional fixation is carried out by a mixer that comes out from below and is attached to a hidden water pipe.
To simplify fixing and understanding, a simple technology for installing a sanitary sink of any type is sufficient
It should be broken down into main steps:
- mixer assembly;
- sink installation;
- siphon output to the sewer;
- plumbing connection.

The first stage: assembling the sink or washbasin
AT in general terms installation of a sink with a pedestal or on a curbstone
involves fixing the mixer and draining the drain siphon from the hole, which causes major difficulties for some beginners. But mixers are mounted in 2 ways:
- horizontally (above the sink);
- vertically (from the washbasin opening).
Tip: Carefully read the instructions for assembling and connecting the purchased sink and faucet. The faucet must have seals, end fittings for connecting to the water supply, flexible and rigid piping. These are rubber or flexible hoses with a metal braid, a corrugated sleeve or special adapters. Flexible rubber hose it is better to replace with a metal braid in the form of a spiral, which will increase the service life of the connection.
The type of attachment for each model of the washbasin is different, but how less details, all the better. And fixing with one large washer or nut is better than other standards, because it does not bend or deform during operation. Due to unbalance vertical mixer often "spread out".
When installing the sink, we connect the mixer strictly according to the instructions supplied by the manufacturer. Usually it is required to screw it into the base and secure it with studs. It is important to be sure to put a gasket in the hole so that water does not seep and flow through the pipe or pedestal. After that, the washer and gasket are screwed with inside tank to finally fix the mixer.

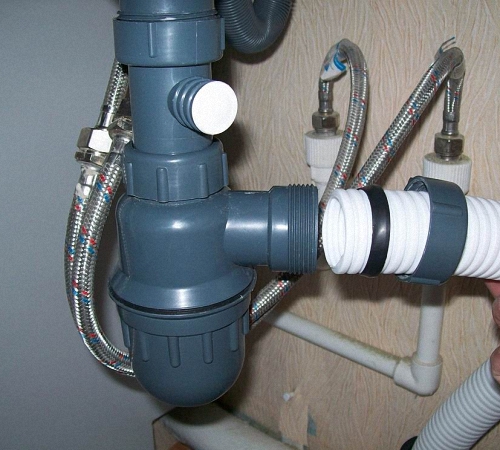
The second stage: connecting and assembling the drain siphon
In the assembly of the drain siphon, there is also nothing difficult when you have on hand:
- all equipment;
- detailed instructions;
- installation diagram in the illustrations in the package.
However, there are some nuances that are important to consider when installing a washbasin. For example, if this is a sink installation with a semi-pedestal, then the sewer inlet is usually on the side of the wall, and not on the floor. All parts of communication must be hidden.
The siphon does not always work flawlessly after installation. And in order not to deal with it after installation in search of the cause of the leak, experts check all areas where they stand rubber seals. All irregularities and burrs that interfere with the tightness of the seal are cleaned. In the same way, all burrs work out on gaskets.
On closer examination of the rubber gaskets, it is noticeable that they are not the same on both sides. It is important to put them on correctly - with a cone in the opposite direction from the nut.
Tip: If the gaskets are old (dried, inelastic), you should not be too lazy and buy the same, better ones, otherwise they do not fulfill their main function - ensuring tightness. Sometimes the problem of a small leak can be fixed with a sealant or silicone, but these are temporary measures.
After installing the siphon and mixer, the installation of the base or the washbasin tank itself is completed. On the cabinet, if the dimensions of the sink match the configuration of the hole or the upper horizontal, then no cuts or adjustments are made. The main condition is compliance with the horizontal and strong fixation. The curbstone usually has screw adjustable legs. Sometimes required additional adjustment sink installation height.
If the sink is fixed to the wall, and not to the cabinet, then it is necessary to fix the brackets or anchor screws, marking the horizontal line according to the universal building level. If this is a tulip sink standing on a leg, behind which the siphon is hidden, then the tank with the mixer is simply glued to the wall (tile) with silicone. It will turn out quite firmly and reliably if the sink itself stands on a support, and not on weight.
Tip: It is better to check the operation of the siphon even before connecting the water supply, pouring clean water in small portions. If everything is dry, pour another bucket of water - for a control check.

Final step: connecting the water supply
Correctly installed faucet does not cause difficulties, but it is important not to confuse where cold water, and where is hot, if it is supposed to be. The connection of the mixer is usually made directly to the water pipes - by connecting a flexible hose.
The most convenient adapter is a corrugated sleeve, fixed with a union nut with rubber gaskets. It is important not to overtighten the nuts so as not to damage the seals.
Installation of a kitchen sink with a curbstone (sinks)
The kitchen sink on the cabinet is installed in the same way. But usually we are not talking about faience or tiled containers, but about a metal sink. In most cases, its dimensions coincide with the cabinet. But sometimes it is mounted on top - like an overhead sink, that is, on top of a common countertop for the entire work plane. If necessary, they turn to specialists who, by machine or special tool cut a hole of the required configuration.
Sealing is the main condition, since water and excess moisture are everywhere in the kitchen. Sealing joints and sealing gaskets is important to do most carefully. And the wider the overhead sink or sink, the less water splashed on the tabletop.

Step-by-step instructions for replacing an old sink:
- turn off the water supply;
- disconnect the old container from the siphon and mixer and remove from the cabinet;
- try on a new container to a countertop or cabinet and make the necessary fit;
- install the mixer according to the instructions;
- connect the siphon and check the tightness;
- open the blocked water supply and turn on the water - at first a small trickle.
Tip: When installing the pedestal, be sure to align the horizontal. Once again, make sure that everything is connected tightly, and water does not ooze.
Complex varieties of shells can be difficult, and then you should turn to the services of specialists. If the countertop is stone or from another solid material, then abrasive cutting is required to obtain a hole of a certain size and configuration. It is not made in a carpentry workshop, but in a porcelain stoneware cutting workshop, tiles and stone.
In any functional bathroom, in addition to the bath itself, there should be a sink. And this is not only for convenience, but also for aesthetic purposes. The installation of the sink should be carried out with high quality, because your safety will depend on it, and you don’t need to quarrel with neighbors from below about flooding. For this reason, pay due attention to the installation of the sink, so that in the future you will not encounter unforeseen financial difficulties.
Shell classification
Modern sinks have the most various designs. They can consist of one or two sinks, installed on a countertop or pedestal, where communications and a siphon “hide”. There is also a semi-pedestal in which the drain outlet is fixed. Some sinks are equipped with fasteners, so the choice of one or another installation method largely depends on the characteristics of the product.
You may be interested in information on how
We are interested in a classification based on installation technology, it looks like this:
- attached to pedestal;
- products installed on brackets;
- on the pedestal;
- on the special hanging shelf attached to the wall.
When buying a sink in a store, pay attention to its dimensions (they range from 30 to 300 centimeters wide), as well as how a particular model fits general style bathroom. Another important criterion is strength.
What will be required in the work
- Actually, a shell.
- Silicone based sealant.
- Adjustable wrench, wrench.
- Dowel.
- Screwdriver.
- Screwdriver (if not, then use conventional drill).
- Self-tapping screws (if possible, with anti-corrosion coating).
- Pencil.
- Winding.
Dismantling the old sink
The first stage of work will be the removal of the old sink.
Important! Before proceeding with the dismantling procedure necessarily water should be turned off.
First, unscrew the nuts with which the mixer was fixed. Then disconnect the eyeliner, remove the mixer. Remove the siphon connecting the sink to sewer system- unscrew the nuts (they are located below), remove the siphon itself and pour water out of it. If you plan to change it to a new one, then disconnect it from the drain, then temporarily plug the hole with something (a rag, for example) so that unpleasant odors do not penetrate into the apartment. Finally, remove the sink from the fixtures.
Bracket mounting technology
Today, brackets are considered the most popular method of mounting a sink. Consider the technology of such installation.

Stage 1. Draw a line parallel to the floor surface at a height of about 80 centimeters. This is the base mark on which you will make further calculations. It is at this height that sinks are often installed.
Stage 2. Measure, using a tape measure, what is the thickness of the shell wall that will be adjacent to the wall surface. The resulting figure is the distance that you need to measure down from the baseline and draw another line there. This is where the brackets will be attached. Measure the distance between the brackets, mark their position on the line. The resulting markup is projected onto the baseline on the wall.
Stage 3. Attach brackets to the baseline, designate where they will be attached and drill holes there. Insert the dowels into the holes, fasten the brackets to the wall.

Stage 4. The sink is attached to the installed brackets according to the manufacturer's instructions.

As we can see, there is nothing complicated here if everything is available necessary tools and natural "eye". Now all that remains for you is to connect the remaining elements - the mixer and the siphon, but we will talk about this later.
Installing the sink on the cabinet
An equally well-known method of installation can be called the installation of the product on the cabinet. This method is characterized by the fact that the installed sinks have a wide variety of shapes and designs. It's practically universal way hence its popularity.

To begin with, you make a cutout in the countertop, but further installation depends entirely on the features of the model, as well as on your wishes. So, you can install your sink on the countertop itself, or deep into the cutout.
Place the product in the resulting cutout and mark the points of future fasteners. You remove the sink and drill holes according to the marks, then put the product back and fasten it with bolts. As you can see, the technology is simple, we only note the ways of attaching the mixer. It can be attached:
- to the cabinet;
- to Wall;
- to the sink;
- to a special stand.
Important! If you wish, you can decorate the sink yourself, using real stone or smalt for this. The only limit will be your imagination.
Installing a sink on a suspended shelf

Hanging shelf is designed not only to distribute the load from plumbing, but also to hide all elements of the system, additionally serve as a place for storage detergents. In a word, the function hanging shelf the same as the brackets, there are only a few additional features.
Installation technology
Stage 1:
- Mark the level where the sink will be located.
- Attach a sink to it and indicate where the fasteners will be. Drill mounting holes.
- Insert plugs for dowels into them, put the sink and fasten it.
Stage 2. Mark the fasteners under the shelf. Without removing the shelves, mark on it where it will be drainer. Also make holes for all necessary pipes plumbing.
Important! The mixer in this case is installed before the shelf is installed.
Stage 3. Drill holes in the wall and attach the shelf, with the drain hole aligned with the corresponding hole in the shelf. For fastening use dowels.
Mounting a sink on a pedestal

Mounted on a pedestal, the beautiful sink is very comfortable to use and looks amazing. The installation procedure for the duet pedestal + sink is easy, but requires some conditions.
- Sewer pipes must hide in the wall.
- The height of the drain socket must be at least 50 centimeters.
Here you also install the sink, siphon and faucet, only after that attach the pedestal to special studs, pre-mounted in the wall.
Important! If the sink is glass, then be extremely careful when installing it so as not to break it!
Installing a corner sink
If the area of the bathroom is small, then it is more advisable to install corner sink. This is how you make the most of free space. The corner sink installation technology consists of several stages.

Stage 1. Take the corner sink and put it in the place of the future installation. If the sink will stand on the pedestal, then first put the pedestal, and the sink on it. If there is no stand, then install on standard height 80 centimeters from the floor. Lean the sink and mark with a marker where the fasteners will be. You can play it safe and measure everything with a tape measure in order to make sure that the dimensions are correct.
Stage 2. Focusing on the markup, drill mounting holes and place plastic plugs in them. Then lean the product again and twist the dowels.
Stage 3. Connect the siphon, mixer.

Mixer and siphon connection
Now, as mentioned above, we will take a closer look at the installation features of these components. They are connected to sewerage and water supply (both hot and cold).
Important! Siphon - a special shutter designed to remove water from the sink and prevent the appearance of water in the apartment unpleasant odors from the sewer.
Siphon connection procedure is simple: first connect the drain to the sink, then lead it into the drain hole. After that, cover all the joints with sealant so that an unpleasant sewer smell does not seep into the room.

The only thing that can cause problems is the installation of the mixer, but this can be dealt with without the help of specialists. At work you will need:
- hose for connection to water supply;
- fum tape as a sealant.
Stage 1. At the ends of the hoses, attach special rubber rings, the so-called gaskets, which completely exclude the possibility of leakage.
Stage 2. Connect the hoses to the mixer. Do it carefully, with the utmost care. Screw the hoses into the mixer until the end.
Stage 3. After connecting the hoses, mount the faucet on the sink. All fastenings are carried out using special clamps, which are often attached to the mixer (if there were none, then buy them in one of construction stores). There are models that are fastened with nuts, clamps are not required for them.

This is followed by the installation of the sink itself, we have already talked about this.
Conclusion
If you decide to install the sink yourself, then you will have the opportunity to decide for yourself how the design and each of its elements in particular will look like. And a wide range of shapes will allow you to create a true miracle in the bathroom, which will please the eye of everyone who enters it.
A washbasin is a key element of the sanitary and hygienic purpose of any home. The need to replace which may arise for various reasons. And the comfort and convenience of its subsequent operation depends on how correctly the installation of the sink in the bathroom is carried out.
Plumbing works of this level can be performed by anyone who wishes, if certain rules are followed.
The main stages of work are:
Selection of equipment for installing a sink in the bathroom;
Preliminary preparation of instruments and related materials for dismantling the old washbasin and installing a new one;
Dismantling of old equipment;
Direct replacement of the sink with your own hands;
Connecting the tap and connecting it to the water supply;
Connecting the drain to the sewer;
Testing plumbing fixtures for performance.
Do-it-yourself sink installation: preparation
Installing a washbasin in a bathroom requires a well-thought-out solution, not only in terms of aesthetics, functionality, but also in terms of installation possibilities.
To date, the following options for sinks are offered, differing in the type of installation: wall-mounted, built-in and on a leg.
However, it should be remembered that when replacing the sink in the bathroom, it is necessary to take into account where and how the nodes for connecting to the sewer and the location of the water pipes are located. This will minimize subsequent modifications when installing new equipment.
To "fit" a new sink in place of the previous one, you must first take measurements, which you will rely on when choosing a washbasin. Key parameters– length, width and depth of the washbasin.
To successfully replace the sink with your own hands, you may need the following tools and materials:
A set of screwdrivers, pliers;
Special plumbing keys;
Connecting pipes;
Silicone sealant;
Spatula, bucket, rag.
Remember: do-it-yourself sink replacement begins with blocking the source of water supply.
As a rule, the main valve is located at the inlet in front of the water meter or directly under the sink itself. After closing it, make sure that hot and cold water does not flow.

Do-it-yourself sink installation: dismantling
1. To replace the sink in the bathroom, you first need to disconnect the water pipes from the faucet. Be careful, as this may result in the leakage of accumulated water. Prepare a bucket and a rag in advance.
2. Find the place where the sink drain siphon and drain to the sewer connect. Using a tool, disconnect the sink from the drain by directing the siphon socket towards the bucket.

3. Using an adjustable wrench, dismantle the water supply system (cold and hot flow).

4. Remove the fasteners that secure the sink to the wall.

5. Using a spatula, carefully remove the old sealant and separate the sink from the wall and contact surface.

6. Remove the old sink and clean the installation area for the new sink.

To competently replace the sink with your own hands, consider the size of the new equipment: analyze whether there is enough space to install it in the old place. It is convenient to use a specially made template or just a tape measure. Often, ready-made templates for a sink cutout are included with the sink. Perhaps, given the new dimensions, the replacement of the bathroom sink will require additional work.
In case of installation of faucets and a faucet from an old washbasin on new equipment, remove the faucets and fix them on the new sink, do not forget to treat the joints with sealant.

Usually new sinks come with clamps and screws. The crane is completed with drain. If you don't have them, buy optional equipment separately. Make sure that the supply pipes match the faucet and fittings under the washing surface.
Do-it-yourself sink installation: INSTALLATION
1. When installing the sink in the bathroom, you must first apply a layer silicone sealant on the lower base of the upper "lip" of the washbasin, and then fix it in place of the old equipment, in the recess on the wall. Fix the sink in the hole, remove excess silicone.

In the event that the installation of the sink in the bathroom requires fastening to the wall or a stone counter is used, then you will need to pre-prepare the areas for fixing the equipment - drill holes in the wall. This requires diamond-tipped drills.
2. Fasten the washbasin with clips, following the instructions step by step.

3. Install the drain siphon tail. If a gasket is included between the shank and the sink, then secure it with a nut, locknut and cardboard washer. At the point of connection to the sewer, an additional seal of the appropriate configuration will be required. When connecting pipes, use Teflon tape or special gaskets as a sealant.

4. Connecting the faucet to water pipe, use hoses of sufficient length so as not to stress the connections. Tighten them with wrench. The tightening force must not be excessive, so as not to destroy the sealing gasket.
5. Treat all cracks and joints with sealant and let it dry for a day.

6. Testing plumbing for performance. Open the valve, then turn on the faucet. If minor leaks are found at the joints, tighten the fasteners tighter, but do not overdo it. If in some places tightening of the connections does not work, then the seals may have to be replaced.
If a leak is not detected and the entire system is functioning properly, then we can assume that the replacement of the bathroom sink has been successfully completed.