What mansard roofs look like - photos of various options. The design and construction of the mansard roof
Attic in a private house - perfect solution for the expansion of residential or useful utility space without completing the upper floor. Arrangement of the attic attic space- this is an original and new exterior of the house, saving energy by reducing heat losses in the roof, and increasing living space. But big sizes at home is not a reason to start work on arranging the attic: you need to have a foundation with a sufficient margin of safety for the weight load, since the finished attic space will have to be thoroughly redone.
Features of the attic
The main thing that distinguishes the attic from ordinary rooms is that it has almost no walls in the usual sense, since the walls are a modified truss system constructed from many inclined roofing surfaces. Therefore, the design of the window will be very different - it should not interfere with natural light, and should take on the load in the form of precipitation and strong wind - the impact weather conditions on a sloping roof is stronger than on massive building elements.
Important! The SNiP regulation stipulates that the area of the window opening should not be less than 10% of the floor surface in the common room. Therefore, when separating attic space partitions, it is desirable to make a window in each newly formed room.

It is easier, cheaper and faster to mount an inclined window in the attic roof than to make a special vertical ledge under it, violating the design calculations. In any case, the window opening must be waterproofed or a window with reinforced glass and a reinforced metal-plastic profile should be ordered.
Benefits of installing an inclined roof window:
- A large stream of natural light, smoothing chiaroscuro;
- There is no need to radically alter the shape of the roof and change its relief;
- Simple installation, feasible for the owner himself.

The degree of illumination depends on the area of the opening, which is proportional to the angle of the roof. Therefore, the conclusion is obvious: the steeper the broken mansard roof, the wider and higher the window opening should be. Thickness metal-plastic profile should almost fit into the distance between the rafters so that there is something to attach the window to without destroying the rafter system. If you order a wider window, you will have to make a reinforced jumper that fastens the rafters cut at the insertion point. If necessary, installation wide window you must first think about the option of installing two small adjacent windows so that the roof remains intact. 
When installing a dormer window (vertical dormer window, requires the frame to be moved outside the attic) geometric shapes roofs need to be complicated by the installation of the upper and side valleys, and laying or installation is also complicated roofing. At the same time, it is much more difficult to remake a finished rafter system than to lay a new roof window in your individual one. Valleys must be carefully waterproofed, as their location and geometry relative to constant atmospheric influences make these places the most vulnerable to the penetration of moisture and cold. In regions with an average annual high precipitation, it is recommended to make snow retainers above the dormers. But the main advantage of the dormer - you can stand next to it in full growth - outweighs all the disadvantages that can be eliminated.
A window recessed into the roof is made if an exit to the balcony is organized through this window. In other cases, this is an unattractive option: bad daylight, unjustified complication of the geometry of the roof, high labor costs with a minimum of effect. 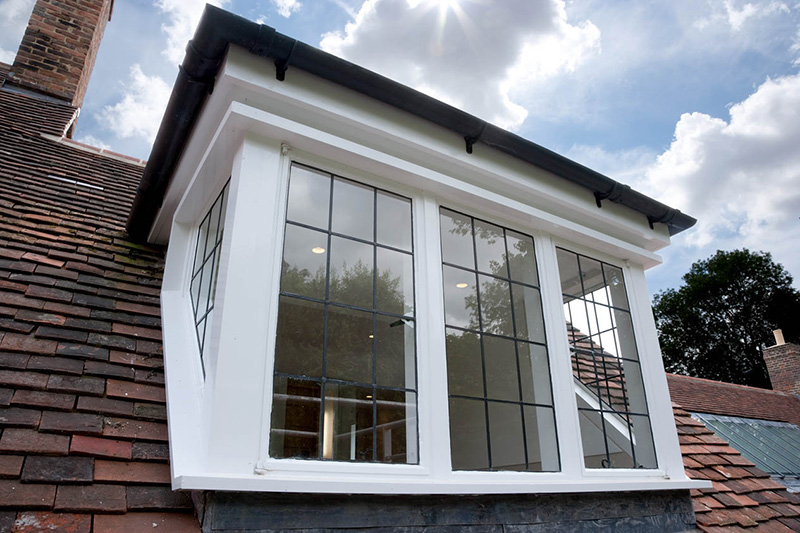
Most affordable option- a window at the end of the attic - a cheap and practical solution that is fully implemented without outside help.
Attic truss system
In individual construction, a house with an attic is often built with broken roof Yes, this is an expensive solution. Broken mansard roofs, due to their design features, greatly increase usable area the interior of the attic. With the same width of the foundation of the house and the floor, the rooms in such an attic will have a larger area due to ledges and niches than rooms under the roof of a conventional design. 
The standard design of a sloping roof allows you to lower the overhangs of the eaves much lower, not only making the exterior of the house very original, but such overhangs protect the walls and foundation of the house from wind and moisture, directing precipitation away from housing.
The more complex the sloping roof with your own hands, the stronger the dependence of the reliability of the structure on the materials from which the roof is made, on climatic conditions, on the thickness of the beams of the truss system and other factors. The classic do-it-yourself mansard roof, the drawings of which are given below, has a slope ratio of the lower slopes to the floor of 60 °, of the upper slopes - 30 °. 
SNiP specifies a comfortable ceiling height in attic rooms- not less than 2 m. Therefore, a scheme with a roof slope of 600 is fully justified, and the reliability of the structure is ensured by thicker floor beams and rafters than when arranging a conventional gable roof.
With the classical construction of the attic, the force of the wind and the load from the weight of snow on the sides of the roof with a large slope are not taken into account. Snow will accumulate on the upper surface of the roof, made with a slope of 300-450. The greater the angle of inclination of the roof, the stronger the windage of the roof, therefore, in climates with strong winds, it is necessary to build roofs with a small slope, and this is a problem for arranging the attic - the area of \u200b\u200bthe house in such conditions should be quite large.
Broken roof schemes
The sloping roof frame is constructed from pine lumber of the first or second grade. For calculations, such parameters as the cross-section of timber and batten boards, the dimensions and weight of the roof from various building materials, snow and wind loads, and the rafter attachment step are regulated. 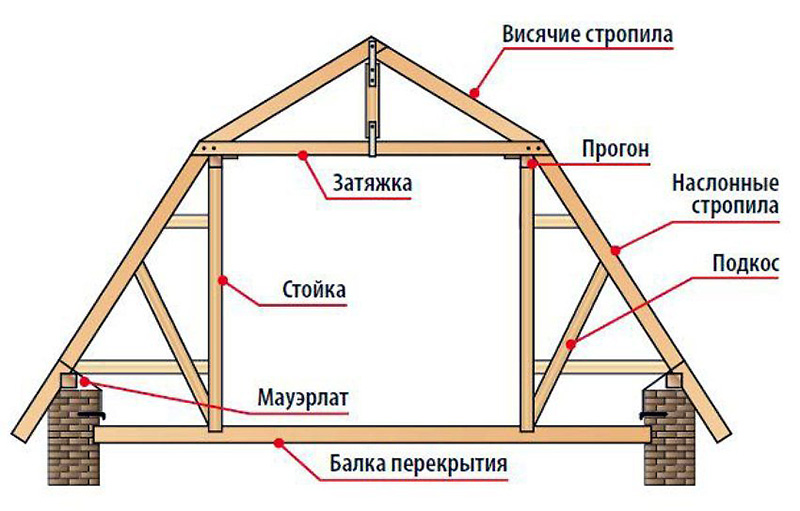
The design of the roof with a hanging truss system is justified if at the base of the triangle (in the upper figure) there is a size ≤ 4.5 m - this determines the width of the attic. If the width is greater, then layered rafters are equipped, which are mounted on the wall.
How to calculate a broken type roof
The step between the rafters is often determined by the width of the insulation - this solution allows you to save on rolled materials, and the distance between the rafters is chosen 2-3 cm less than the width of the insulation material. For example, with a slab width mineral wool at 60 cm, the distance between adjacent racks should be 57-58 cm. 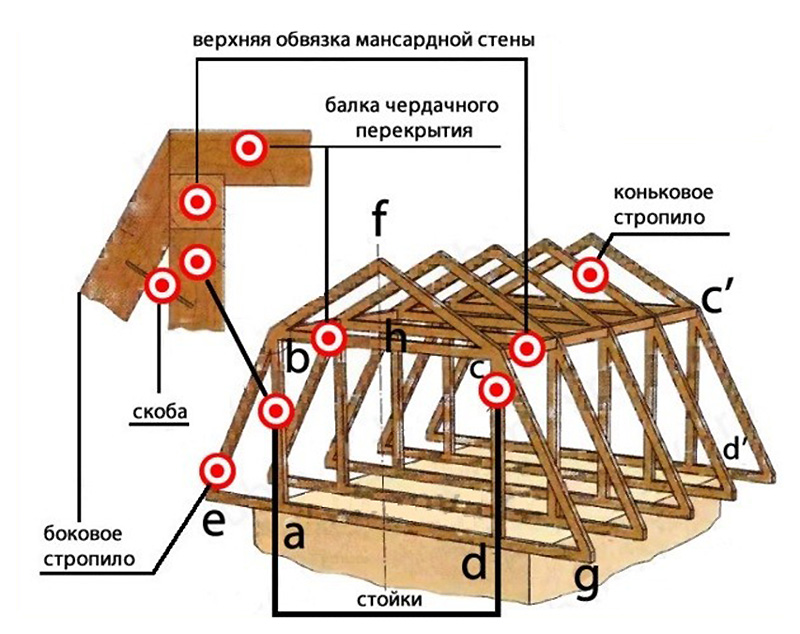
The boards of the rafter legs are also calculated in width, based on the parameters of the insulation. To ventilate the layers of thermal insulation, it is necessary to provide a ventilation gap of 20-30 mm, otherwise the accumulated condensate will cause the wood to rot, and then damage the insulation. For conditions middle lane the thickness of the insulation can be no more than 230-250 mm, therefore the minimum width of the rafter legs is 230 mm with a board thickness of ≥ 50 mm. The greater the wind, temperature and snow loads in the region, the thicker the rafters should be made. 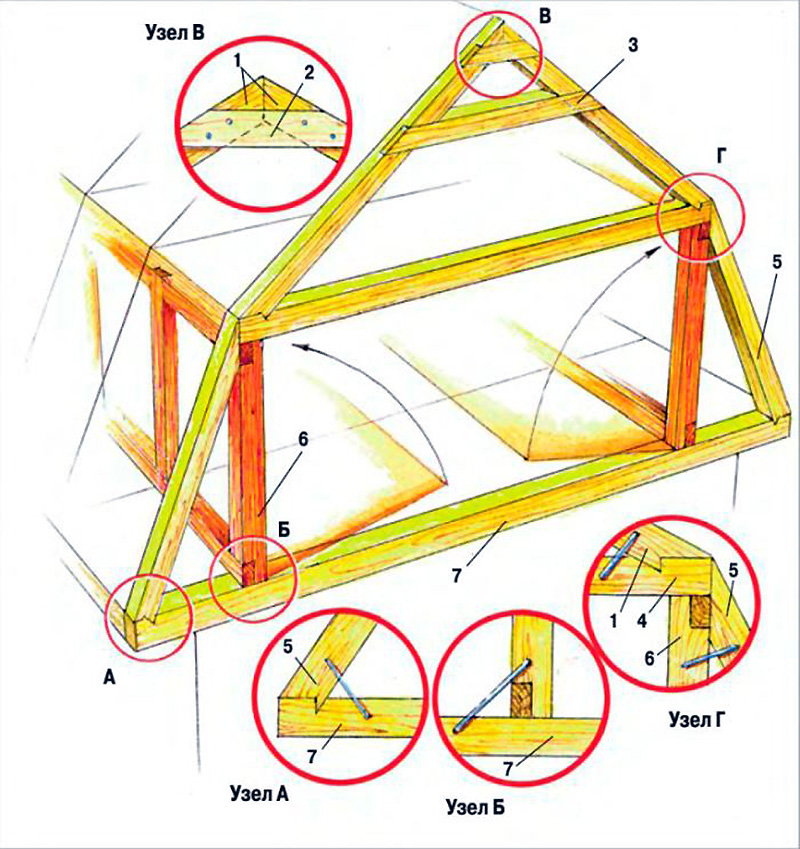
Recommended: To save lumber, the insulation can be laid in two directions: along and across the rafters, making a thin and rare crate between the layers. With a minimum stone wool slab thickness of 100 mm, a 50 x 150 mm board can be used, leaving 50 mm for the ventilation gap.
Mansard roof installation
Mauerlat on the mansard roof is equipped with standard techniques - fastening the beam to the wall with knitting wire, anchors or studs. If the house is timber or log, then the upper crown of the log house, impregnated with an antiseptic and substances that increase the moisture resistance of wood, can serve as a Mauerlat. 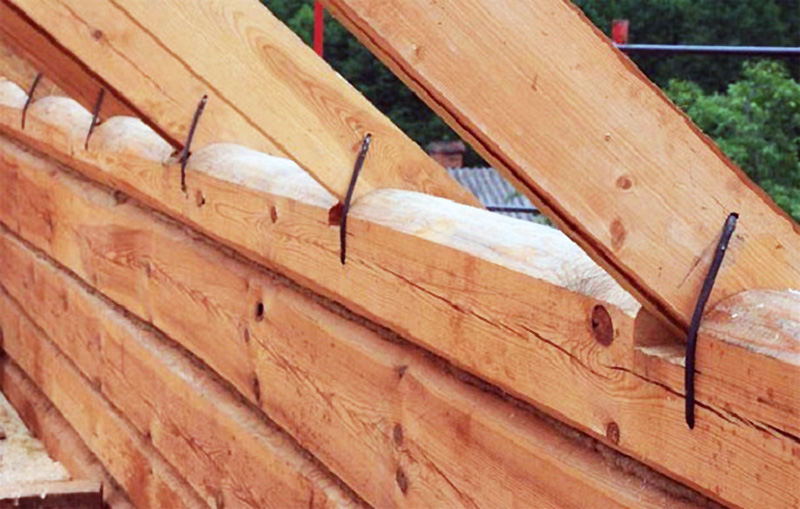
For Mauerlat in the house from cellular concrete a monolithic reinforced grillage is poured on top of the walls, and the Mauerlat itself is attached to the rods concreted into the wall. For walls made of brick or reinforced concrete, such a concrete grillage is not necessary - the wall material itself is quite durable and will withstand any method of attaching the truss system. It will only be necessary to make a two-layer waterproofing around the entire perimeter of the house, and a Mauerlat beam with a section of 150 mm.
To assemble elements roof structure use long nails - 150-200 mm. In the corners and at the intersections of load-bearing walls with internal partitions of the house, it is better to do bolted connections, or use double-sided threaded studs. Also, all intersections of roof elements are recommended to be additionally reinforced with metal plates-overlays. 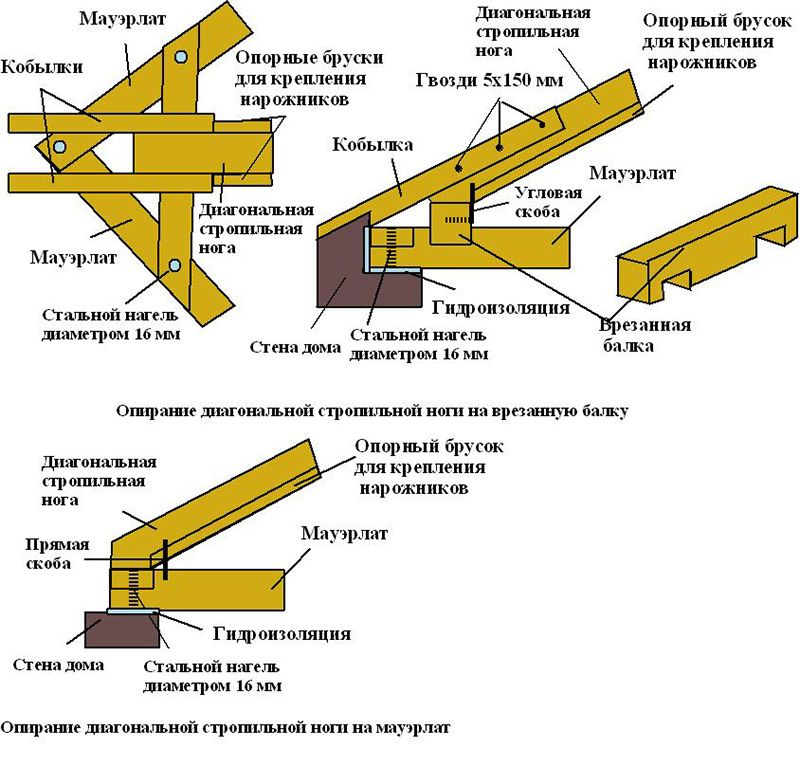 Assembly of elements of the rafter system
During the operation of a private house, country cottage or a country house, the question of increasing living space often arises. It is usually solved by means of an extension or add-on.
Building a house is a tricky business. In addition, the residential extension has one significant drawback - it “steals” the usable area of the site.
Therefore, a popular way to expand living space individual home is the device of the second floor or attic, i.e. attic roof. The design of the mansard roof allows you to use the resulting space as a living space.
What is better attic or second floor
The following facts speak in favor of the attic: the cost of construction is lower, the best insulation living space, less load on the foundation. In general, the attic is the highlight of the house, giving it a certain flavor.
If in essence, then a full-fledged 2nd floor is more practical and easier in terms of implementation than an attic one. It all depends on the situation, if the house is being designed, then it is better to immediately provide for the second floor, because. arranging an attic is a more troublesome task. And if the house is residential and has a mansard-type roof, then it would be reasonable to equip a living room in it instead of an attic "for the right things."
Types of mansard roof
 The optimum angle of inclination is 40°. The slope should be located on the leeward side. Allows you to equip a small attic above the attic. Due to only one acute angle, the usable area of \u200b\u200bthe room increases.
Double pitched mansard roof
 A simple gable (pitch or gable) consists of two slopes connected at a certain angle. The advantage of a gable roof is the ease of manufacturing the rafter part and finishing. The disadvantage is the appearance of a "deaf" area (at the junction of the roof to the wall), which is usually not used. Often attics with a gable roof are erected along with the walls. A 45° pitched roof is ideal for houses up to 6m wide.
 Asymmetrical gable roof. A private house with such a roof will be original and functional at the same time.
The complexity of building a roof with asymmetrical slopes is to carry out calculations.
 Broken mansard roof. Its difference is that each slope has two components. The sloping roof device allows you to get a higher attic space. And also reduce the unused area. Such roofs are most common, due to the possibility of attaching a garage or summer kitchen under one roof.
Four-pitched mansard roof
 Hip mansard roof. In this design, the roof slopes play the role of walls.
 One of the varieties of the hip mansard roof is the Danish hip roof. Its construction is distinguished by the presence of gables, which allow you to mount ordinary windows (dormer windows) rather than roof windows.
 Semi-hip mansard roof (two-slope, four-slope). A complex design, low slopes protect the gables of the house from precipitation.
 Pitched roofs can be single or multi-level.
 Non-standard solutions are also quite possible for a mansard roof. Their device requires careful calculation of loads, stability, etc. Without special education, installation is difficult, so the cost of work is higher compared to classical designs.
Some examples of the original mansard roof are in the photo.
We have decided on the types, the question remains how to make a mansard roof with your own hands.
Brief instructions contain the main stages of work and draw your attention to some of the nuances of their implementation.
Stage 1 - Design and calculation
The choice of the appearance of the mansard roof, and the calculation of its parameters is made taking into account such factors as:
A reliable assistant in the calculations will be SNiP 2.01.07-85 "Loads and Impacts".
Nuance. The larger the angle of inclination, the lower the height will be. attic space(minimum ceiling height of a room on the attic floor is 2.2 m). Accordingly, than less angle the slope of the mansard roof, the larger the area of \u200b\u200bthe room. If the slope is insufficient, then precipitation can collect on the roof, which will lead to additional loads on it.
Closer attention is paid to the calculations if a non-standard mansard roof is being built. For example, an asymmetrical gable mansard roof has a displaced center of gravity. This affects the uniformity of load transfer to load-bearing walls and foundations.
At this stage, such an issue as a way to access the attic floor is also solved. The choice of the location of the stairs to the attic is an important decision. Internal layout allows you to use it at any time of the year. External allows you to save the usable area of the lower floor.
Advice. Ceiling folding ladder for attic floor is the most economical option, but the least practical.
Mansard roof truss system
The choice of truss system is influenced by:
- attic dimensions;
- span parameters;
- roof shape;
- construction of the first floor;
- location of load-bearing walls and additional supports;
- roofing weight.
Mansard roof truss system design
There are two types of roof rafter system with an attic:
- hanging rafters. The walls of the house serve as the basis for the rafter legs. During the construction of hanging trusses, a mauerlat is not always installed (depending on the wall material);
- layered rafters. In this case, it is necessary to build an additional support. Which is used as a ridge run or an attic wall reinforced with reinforced concrete. The device of a layered truss system is allowed with a distance between the bearing walls of up to 7 meters.
The structural difference between the device of the roof with hanging and layered rafters is shown in the diagram.

When building a mansard roof, it is more often used combined type- hanging rafters on top of the system, and layered on the sides.

At the same time, drawings are necessarily made indicating the location of individual elements and the distance between them. An example is shown in the figure.

The material was prepared for the site www.site
Calculation of the rafter leg for the mansard roof
The choice of wood species and the rationale for its optimal thickness.
The amount of material required for the truss system depends on its type and all the factors listed above.
Nuance. The gap between the rafter legs depends on the lumber used.
The step of the rafter legs under the mansard roof will be 60-90 cm.
As a material, glued timber (80x80, 100x100 mm), a board (for slate and metal tiles section 50x150, for ondulin 50-200) can be used.
Nuance. The length of the spans increases the diameter (section) of the rafters or reduces the gap between them.
As for the breed, it is recommended to use pine. Its wood is characteristic high strength, flexibility, ease of processing, no knots. Commercial wood must be at least grade 2. Solid beams can be replaced with glued timber, it has higher quality characteristics.
The thickness of the board for the manufacture of rafters (section of the rafter leg) must be at least 50 mm. The width of the board for the rafter leg is from 150 mm (if the length of the rafters is up to 6 meters, if more, then 180-200 mm). On the one hand, this requirement is due to the fact that it has a load, on the other hand, a heater is placed between the rafter legs.
Council - any construction or restructuring must be legalized in the relevant authorities.
Stage 2 - Installing the Mauerlat
Mauerlat - additional wooden trim along the upper perimeter of the building.
The purpose of the Mauerlat is to create conditions for secure fastening of the lower part of the rafters. As well as the redistribution of the load, which is created from the pressure of the roof on the load-bearing walls and the foundation of the building.
Installation of a simple gable mansard roof requires the installation of a Mauerlat only on those walls on which the rafter legs will rest. A four-pitched roof requires its installation around the entire perimeter of the building.
Advice. In a wooden frame, the role of the Mauerlat is played by the upper crown. This can be done, but subject to the installation of rafter legs on sliding fasteners. Because due to the load on the rafter system (wind, snow), horizontal pressure is created and the upper logs can move outward. In addition, if the material for the truss system is not properly dried, then over time, with rigid fastening, the roof is deformed.
Nuance. A stone cottage and house requires the arrangement of a Mauerlat around the entire perimeter of the outer walls. In brick, you can install its links only under the rafters.
Mauerlat parameters for logs - diameter 150 mm, for timber - 100x100 mm.
The breed is pine, but larch is better.
The Mauerlat mount must be reliable, because this is the basis for the entire truss system.
There are several ways to mount the Mauerlat: anchor bolts, studs or fittings (fixed at the base of the bearing wall);
Advice. If the building is erected from foam concrete or other porous material, only long bolts or reinforcement can be used, the length of which is 3 times the width of the Mauerlat beam. This is due to the fact that any other fasteners are pulled out very easily from a porous material.
- annealed wire (embedded in brickwork);
- wooden dowel (used when installing a Mauerlat in a log house).
Nuance. To prevent the destruction of the Mauerlat, it is necessary to provide proper waterproofing, for example, put roofing material, and treat the beam itself with antiseptic solutions.
If the width of the attic matches the width of the house, the rafter legs rest on the base of the load-bearing wall. But, it’s better to install a Mauerlat anyway.
Stage 3 - Mansard roof construction
Mansard roof frame device
Cover beams. Installed on the Mauerlat. In the future, they will serve as the basis for the device floor in the attic.
Mansard roof truss system
For a simple roof, the manufacture of rafter legs consists in the formation of simple triangles. They can be assembled on the ground and installed in the form of ready-made triangles.
For a gable sloping roof, a U-shaped frame is first attached, and the rafter part is already fixed on it in a hanging (for the top) and inclined (for the sides) way. The diagrams below show this more clearly.
The lower ends of the rafter leg must be sawn down and attached to the Mauerlat with nails or metal staples (movable fastening).
Nuance. Wash down the legs must be very accurate to ensure a snug fit to the Mauerlat.
Rafter legs are installed at the same distance from each other. Otherwise, the load on the system will be unevenly distributed.
Installation starts from the extreme legs. Then between them you need to pull the rope. So the horizontal will be maintained when installing the intermediate legs.
After all the rafters are installed, they are interconnected. The step of the lathing depends on the chosen roofing material.
Advice. Places intended for the installation of roof windows are reinforced with a transverse beam. Thus, the window will be securely fixed.
With a significant width of the mansard roof, you need to install a ridge beam. It will serve as an additional support. And part of the load (from the weight of the roof and snow) is redistributed to it.
With a considerable length, the ridge beam is supplemented by a support.
Mansard roof waterproofing
A hydrobarrier film is attached to the crate. The peculiarity of its fastening is to make an overlap of 100 mm. Most manufacturers mark the overlap with a bright stripe.
The waterproofing film is fastened with a construction stapler. And in case of rain, it will reliably protect the structure even in the absence of roofing material.
Mansard roof insulation
The insulation is placed under the waterproofing. Professionals recommend using flexible heaters for these purposes - mineral and basalt wool. Their advantage is flexibility, the ability to fill any voids.
Laying the vapor barrier
The vapor barrier film protects the roof insulation from steam penetrating into it from the attic living quarters.
Advice. It is important to provide the necessary gaps between the roofing material and the insulation. Their presence and parameters are determined by the type of insulation, the class of films used and the roofing material.
Mansard roof construction - video
Stage 4 - Installation of skylights
Windows area, for sufficient hit daylight, must be at least 12.5%.
Due to the design features of the mansard-type roof, special roof windows are used for glazing. The installation technology provides for the installation of windows before completion finishing works. In this case, the windows must be opened to provide access fresh air. In bad weather, they, of course, should be closed.

Stage 5 - Mansard roof roof
The attic is not only beautiful appearance at home, but also a real opportunity to increase residential meters, to use the entire space under the roof of the house in the most practical and functional way. The most relevant is the installation of a mansard roof in individual private construction, in a country house or in the country.
In order for the building to be reliable and safe, not to collapse under additional loads, you should choose the right type of roof, calculate the slope, size, materials.
In the article, we will analyze in detail how a mansard roof is built with our own hands, we will dwell on construction technologies and structural features.


Types of mansard roofs
Today it is difficult to surprise with architectural delights in private buildings, people strive for the comfort and aesthetics of their homes. The design of the attic is striking in scope: high and low, broken and ordinary pitched, turrets and domes, complex multi-level and most ordinary mansard roofs crown the buildings, giving each one its own unique individual style.
Shed mansard roof the simplest in design, it is supported by a truss system, or truss, on external load-bearing walls located at different levels. Typically, such roofs are arranged during the construction of attics on small country houses, verandah.
Gable or gabled mansard roof- a classic design, which is erected using inclined or hanging rafters. The slope angles of the slopes can be uniform or uneven.
The hip roof is a four-pitched structure that does not have gables. Two large slopes - trapezoids, slopes from the end walls - triangles-hips. Half-hipped roofs are roofs that have trapeziums on the sides, and a vertical wall comes first from the fronts, and it is cut off at an angle to the ridge.
Hipped mansard roof- it's almost hip, but all the slopes are isosceles triangles that meet at one point. This design is symmetrical and has no ridge, suitable for square buildings.
- this is, in fact, a combination of several gable roofs. The design is arranged on houses with complex geometry, with kinks and a polygonal base. Such a roof has many ribs and slopes, therefore it requires complex calculations and professional skills; making such a roof with your own hands is a very difficult task.
A sloping roof is a classic of the attic structure, the shape of the attic roof allows you to significantly increase the usable area and equip a full-fledged living room, bedroom, nursery, study, etc. inside. stingrays. The design of the roofing system of the attic is complicated to the farm, the slopes consist of two rafters, reinforced with racks and reinforced at the break points with stretch marks. The lower belt of the truss is also the basis of the floor.
Vaulted, conical, domed attic roofs are used in elite private housing construction, the design of such attics impresses with its delights. The truss structure of such attic floors is quite complex and is made of materials that can be bent.
When combining several types of roofs, complex and unusually spectacular, beautiful attic structures are obtained. Such an unconventional approach to the design of a mansard roof is necessary if the house complex shape: with ledges, height differences, extensions. Despite the aesthetics and bewitching appearance, complex mansard roofs have significant drawbacks - this is a lot internal corners(valley) with a small slope, pitched breaks, which are a risk zone for the integrity of the roof, and cause leaks and snow gathering. The calculation of this type of mansard roof requires special skills and knowledge, if you intend to make such an attic roof with your own hands, try to minimize the presence of complex elements.

mansard roof, photos of the main types of floors applicable in individual construction: 1. Single-pitched 2. Double-pitched 3. Multi-pitch 4. Hip 5. Sub-hip 6. Hipped 7. Vaulted 8. Conical 9. Dome 10. Classic mansard sloping roof
A simple gable or sloping attic roof will not produce the same effect as a combined one, but such a mansard roof design is much more reliable, it can be calculated and built with your own hands. The choice of the type of mansard roof depends on the architectural design and plan of the house, on the slope of the slopes laid down in the project, the characteristics of the supporting structure and the choice of materials for the roof.
Mansard roof calculation, slope angle and choice of materials
Note that the slope of the attic slopes is affected by roofing materials and the scheme of their installation, but mainly, the slopes depend on the geography of construction. In snowy areas, steep roofs with a small overhang should be arranged; in southern and almost snowless areas, a small slope and a larger overhang can be made. If there are strong gusts of wind in the region, then the roof should be flat, which will reduce the windage of the roof.

The standard scheme of the mansard roof, this arrangement of rafters allows you to make the most of the area of the attic floor
Thus, the calculation of the slope of the mansard roof is based on the starting points:
- the desired height of the attic interior;
- architectural solution;
- in which climate zone the object is located;
- what roofing material will be used.
It is optimal if the gable roof of the attic is inclined by 45 ° and above, and the classic broken mansard roof with its own hands has a slope of the lower slopes of 60 °, the upper 30 °. Such slopes allow you to create a comfortable room for living inside, if you correctly think over the interior of the attic.

Roofs of houses with an attic, photos of the advantages and disadvantages of the internal space with different types of roofs
Do-it-yourself classic broken mansard roof, in addition to rafters, includes racks, struts, puffs, suspensions in the design. Section size structural elements calculated when calculating the truss system.

How to build a mansard roof, the optimal proportions of the roof relative to the width of the house
Important: The angle of inclination of the roof slope of 60 ° allows you to neglect the loads from precipitation. The greater the slope of the truss structure, the longer the rafters and more area roofs, but less useful internal area.The maximum load from precipitation on the roof is achieved with a roof slope of 30 °, at 45 ° rain and snow do not linger.

Table, how the choice of roofing material depends on the angle of inclination of the slopes of the mansard roof
- the width of the end (pediment) is 10 m, we divide it in half: 8/2=4;
- the optimal roof height in the ridge is 2.4 m.
Here we need school course geometry: The sine of an angle in a right triangle is equal to the ratio of the adjacent leg to the opposite leg:
Sin B \u003d 4 / 2.4 \u003d 1.67
We open the Bradis table and see that this value of the sine corresponds to an angle of approximately 59 o, we round the value. Thus, our desired slope angle is approximately 60 o.
Mansard roof construction technology
A broken mansard roof, the drawings of which are presented in the article, is the most popular type of attic floor construction for a private developer, so we will analyze milestones its construction. Sample projects mansard roofs do not require additional calculations, which greatly facilitates installation and reduces financial costs for the manufacture of an individual project.

Mansard roof frame, diagram of the main structural elements
Before you make a mansard roof, a special support bar is laid around the perimeter. If the house is wooden, a beam or a log, then the upper crown of the walls will serve as a Mauerlat. In a brick, stone, monolithic concrete or foam concrete house, a waterproofing layer is laid around the perimeter (2 layers of roofing material, bitumen-polymer mastics), flush with inside load-bearing walls installed wooden beam- Mauerlat, which allows you to evenly distribute the load from the roof and rainfall on the base and on all load-bearing structures. Outside, the Mauerlat is laid facing material, it can be seen that 30 mm of timber should remain so that the loads fall solely on the timber, and not on the cladding.

Scheme of installation and fastening of the Mauerlat and rafters
Advice: the timber for the Mauerlat should be with a cross section of 100 * 100 or 150 * 150 mm.Then we install the floor beams, first we lay the timber along the edges, check the correctness of the geometry with a level, and attach it. We stretch the cord along the upper plane and install the remaining beams at a distance of 500-600 mm from each other. If there is not enough height to the desired level, then we put the slats, if on the contrary, then we squeeze the Mauerlat. The removal of the beams sets the width of the cornice, usually 300-500 mm. Next, we install short beams with a step of 1000 mm for the front ebb device.
Advice: Fasteners to the Mauerlat can be 150 nails, rafter corners for self-tapping screws.Installing the frame
To install the skeleton, we expose the vertical rack-beams along the plumb line or level and fix it on temporary struts. First, we install the extreme ones, in the corners, pull the cord and set the middle ones in increments of no more than 3 m.
The height of the racks depends on the shape of the roof provided by the project, usually it is equal to the distance from the ground to the mauerlat (height of 1 floor) or +100 mm from the desired height of the finished ceiling. We tighten the racks from above with girders - boards 150 * 50 mm.

Construction of a mansard roof, how to properly install a side run
On the girders with the help of roofing corners we fasten crossbars-puffs - in the attic roof these are bars that connect the side girders, with a cross section of 200 * 50 mm. The deflection of the puffs is eliminated with the help of the subsequent suspension device to the rafters, and until the truss system is installed, it is recommended to install temporary supports.

Installation of a mansard roof, puffs from above are fastened with a board, which gives the structure rigidity
truss system
First you need to make a template from boards 20x150 mm: we apply the board to the Mauerlat and to the side run, make notes, saw off, and the template is ready. Since buildings often have errors in geometry, it is better to make a wash down along the upper run, and to cut down the Mauerlat in place.

Mansard roof, installation of side rafters
If the length of the slope is longer than the standard 6-meter board, then it is recommended to order special lumber for your measurements. But if this is not possible, then the boards are spliced, for this a piece of board 1.5-2.0 m long is sewn from below, but a rack will have to be installed under it.
The rafters are attached to the side run with three nails, to the Mauerlat on metal plates, self-tapping screws and nails, or on brackets.

Attic roof, do-it-yourself installation of side rafters, fastening methods
We make a template for the upper rafters. We take the board and fix it on the extreme crossbar in the middle, strictly vertically, one edge of the board should coincide with the central axis of the mansard roof. We apply the beam, draw the lower and upper washed down.

Gable roof attic, how to make a template for the upper slopes
On the ground, we cut out the template, make the left and right rafters and mount them on the roof. A ridge beam is not used on a mansard sloping roof, so the rafters are attached with a strut. By the same principle, we install the rest of the upper truss system.

How to properly build a mansard roof, install struts (top) and install the top slope
Hanging rafters are a triangle - the simplest truss, but this design does not transfer expansion loads to load-bearing walls, so puffs should be installed.

Mansard roof frame, methods for installing puffs on hanging rafters
After the installation of the truss system, a gable (end) frame is installed and sheathed, the structure is reinforced in places where windows will be installed. Then the crate, cornice, overhangs and ebbs are made.

Four-pitched mansard roof, installation of gables
Rest of the way
A vapor barrier membrane is laid along the rafters, which is pressed by a counter-lattice of 40 * 20 mm, 50 * 50 mm rails, additionally creating a gap for ventilation. The crate, depending on the material for the roof, can be solid or indented. Next, waterproofing is laid, on which the roofing material is laid.
The attic should be insulated from the inside, the heat-insulating layer is additionally covered with a vapor barrier to protect the insulation from condensation. Then you can finish the room with the selected facing material.
Be sure to see how the mansard roof is built with your own hands, the video will help you understand the key stages in the construction of the attic floor.
Attic called the roof, under which the living rooms are equipped. The shape of the mansard roof can be different, but most often the attic is equipped under a gable roof. Most rational decision, allowing you to get the maximum usable area of \u200b\u200ba residential attic, is a mansard roof with a broken slope line.
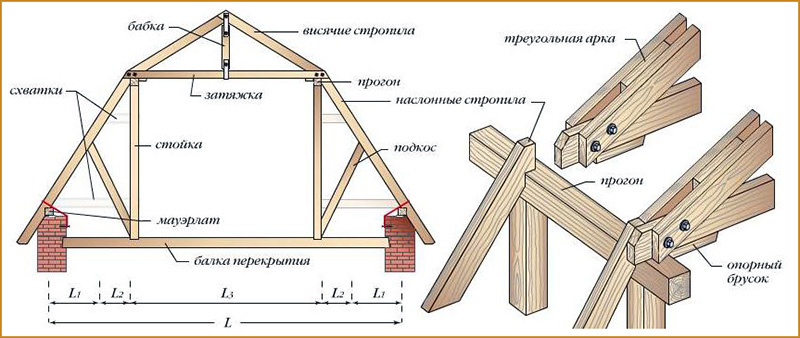
The stages of building a mansard roof with your own hands are in many ways similar to the construction of a regular one, as well as the names of the elements that make up its frame. These include:
- Mauerlat - a support beam that transfers the load from the rafters to the walls of the building;
- Floor beams - boards that form the attic floor and the ceiling of the lower floor;
- Racks - vertical supports supporting the truss system;
- Runs - horizontal supports for rafters;
- Crossbar - transverse horizontal elements, pulling the roof slopes together, otherwise they are called puffs;
- Rafters - boards that form the main contour of the roof;
- Suspension - a suspension rack that supports puffs and redistributes the load between the rafters;
- Sheathing - boards or sheets of plywood designed for laying roofing over them and transferring the load to the rafter system;
- Filly - boards fixed along the axis at the bottom of the rafters and designed to form a roof overhang.

The cross section of the roof elements is determined by calculation, the article presents the most commonly used materials in private construction.
The device of a broken mansard roof and its differences
As already mentioned, a roof with broken slopes is somewhat different from a simple gable roof. The difference lies in the shape of the opposite slopes: they are not a straight line, but consist of two slopes connected at an obtuse angle. The roof can be either symmetrical or have different shape opposite slopes - it depends on the project.
Thanks to the broken shape, the usable volume of the attic space is significantly increased. The lower part of the rafters is usually set at an angle of about 60 degrees to the horizontal, and the support posts supporting these rafters act as a frame. internal walls. The upper part of the rafters is most often installed at a slight angle, from 15 to 45 degrees - this allows you to save materials, but maintain the functionality of the roof and its resistance to snow loads.


Vertical posts resting on floor beams, girders and puffs connecting them form a parallelepiped that limits inner dimensions attic. To give the structure additional rigidity, struts are installed between the floor beams and the lower rafters. After installing the upper rafters, to strengthen the truss and eliminate the sagging of the crossbars, hanging supports - grandmas are installed. To further strengthen the lower rafters, they are pulled together with racks using contractions. The elements are fastened with nails and bolts or studs.
Calculation of the dimensions of the mansard roof
The main condition for a comfortable attic device is the height of the ceilings - it should not be lower than 2.5 meters. To ensure such a height of the room, the break line of the mansard roof must be at a height of at least 2.8 meters, taking into account the thickness of the insulation layer and inner lining attic, as well as the thickness of the finishing floors.
Before proceeding with the purchase of materials and the construction of the roof, it is necessary to draw a detailed drawing, which will indicate dimensions houses, the line of slopes and the height of the attic.

Drawing - mansard roof dimensions
The technology of erecting a broken mansard roof
- Install the Mauerlat around the perimeter of the house. In wooden buildings, the upper beam or log serves as the Mauerlat. In stone - brick or block - structures, the Mauerlat beam is attached to studs or anchors fixed in the walls during masonry at a distance of no more than 2 meters. Align the Mauerlat along the inner plane of the wall, the wall remaining outside is later laid decorative masonry. Mauerlat timber from dry softwood usually has a section of 100 or 150 mm. Saw off the beam of the desired length, straighten the anchor studs if necessary and lay the beam on top of them. Lightly tapping with a hammer. Dents from the studs remain on the beam, a hole of the required diameter is drilled through them. You can also mark the beam with a tape measure, but the probability of error in this case is higher. A rolled waterproofing is laid on the wall, you can use an ordinary roofing material in two layers. Mauerlat is put on the studs and the nuts are tightened.

- For floor beams, coniferous timber with a section of 100x200 mm is usually used. Floor beams are placed either on top of the Mauerlat with an exit beyond the plane of the walls by 0.3-0.5 meters, or in specially designed pockets in the masonry. In the first case, the beams are fixed with corners and self-tapping screws. To make the floors even, the beams are laid in strict sequence: first, the extreme ones in level, then, pulling the cord, they align the intermediate ones along them. The step of the floor beams is usually from 50 to 100 cm, but the most convenient step is 60 cm, which allows you to lay the insulation boards without trimming. To equalize the height of the beams, they are hemmed or board linings are used. If the beams are placed in special pockets in the masonry, their ends must be processed coated waterproofing and wrapped with ruberoid. Align them in the same way.
- Racks are installed on the extreme floor beams. The end posts are made of timber 100x150 mm, the height and installation line of the posts is determined according to a previously prepared drawing. Racks are leveled using a level and a plumb line and temporarily fixed with jibs in perpendicular directions - along and across the axis of the roof. This will allow you to install the racks without deviations in any direction. The jibs are made from any board and nailed. A cord is pulled between the extreme drains and the rest of the racks are set along it with a step equal to the step of the floor beams, that is, for each beam. All racks are fixed in the same way as the extreme ones. You should end up with two rows of uprights of the same height, running parallel to each other.
- Runs from a board 50x150 mm are laid and fixed on racks, runs are fixed on nails 150 mm and on corners using self-tapping screws. Crossbars from a 50x200 mm board are placed on the runs with the narrow side down - this will increase their rigidity. Since there will be no load on the crossbar during operation, this section of the board is quite enough, however, in order to exclude their deflection and increase reliability during installation, when installing the crossbars, temporary supports from the board are placed under them no thinner than 25 mm. On top of the crossbar, they are fastened with one or two boards - also temporarily, before the installation of the rafters. At the same time, the boards should not be placed in the middle of the puff - there they will interfere with further installation, but retreating about 30 cm. After installing the racks, girders and crossbars, you get a rigid structure that limits interior spaces attic. To increase its strength, it is subsequently fixed with struts and contractions.
- Installed from a board 50x150 mm. First, a template is made from a 25x150 mm board - it is easier and faster to process. A board of the required length is applied to the upper run, washed down the shape directly on the board and cut out. A template is applied to the run at the installation sites of the rafters, and if it matches everywhere, then upper part all rafters can be made according to the template. The lower part, which rests on the Mauerlat next to the floor beams, is cut out in place each time. The rafters are fixed with the help of corners and self-tapping screws and on nails.

- To perform the upper rafters, it is necessary to mark the center of the roof. This can be done with a temporary stand nailed to the Mauerlat and an extreme tightening from the end of the roof so that one edge of the board runs along the center line of the roof. The rafters are aligned along this edge. Next, a template is prepared from a 25x150 mm board, applying it to the edge of the installed board at the desired level and to the run on which the lower rafters rest. Mark the top and bottom cuts and cut out the template. Apply it alternately to both sides of the roof, checking how accurately its center is marked. If the rows of racks are made in parallel, then there should be no problems with installing the upper rafters - they will all have the same size.
- Execute according to the template required amount rafter legs. The rafters are installed on the girders and connected in the upper part with the help of overhead metal plates or board scraps for self-tapping screws. In the run, the rafters rest on the cuts and are fixed on the corners. In order for the rafters to stand straight, they are fixed with the help of struts installed with the lower end on puffs. So put all the rafters. Hanging racks are attached - pieces of board 25x150 mm. The upper edge of the board is fixed at the junction of the rafters, the lower edge - to the puff.
- They put struts under the lower rafters from a board of 50x150 mm, resting them with their lower oblique cut into the floor beam and fixing them on the corners, and the upper edge is attached to the side to rafter leg, nailed to one or two nails, after which a through hole is drilled and fixed to a bolt or stud. After installing the lower struts, remove all temporary supports and racks.
- Gables are sewn up, leaving door and window openings. If the floor beams are laid in the pockets of the walls, fillies are attached to the lower rafters - boards that continue the line of the rafters and form a roof overhang. When laying floors on top of the Mauerlat, the beams already protrude on required distance, and there is no need for fillies.
- corresponding to the type of roofing - solid or sparse. Waterproofing is placed on the crate and the roofing is installed, for example,.

A sloping mansard roof usually does not need insulation - only the walls and ceiling of the attic are insulated. Air space, formed under the rafters, provides good ventilation of the attic, reduces the heating of the attic rooms in summer and provides additional thermal insulation in winter. Therefore, when sewing gables, it is important to leave ventilation windows in the upper part of the roof, above the floors of the attic floor.
Video - instructions for building a mansard roof
Let's figure out what exactly we call the attic today. According to building regulations, operating in our time, we are talking about a room in the attic, part of the facade of which is formed by the roof surface.
Moreover, if we consider the line of intersection of the walls of the facade of the building and the roof surface, then its height above the floor level should not exceed one and a half meters.

For their design, there is a wide range possible solutions. It must be remembered that one of the main features of the attic is that there are two sections of the roof slope. One of them is more gentle, the other is with a stronger slope.
In addition, it is desirable that the height of the vertical part of the wall be more than one meter. This will make it possible to feel in such a room much more comfortable than in the opposite case.
Design
Consider the types truss systems for attic rooms. Here we will talk about the main types of such premises, depending on their structure.

Here we are talking about a flat inclined surface. However, the slope in this case is usually relatively small. Designing such an attic is much easier than for other types, but also usable space in such a room there will be relatively little.

There are many such solutions. Let's talk about some of them. It is also one of the most simple options. It looks like this.
As we see here, when designing an attic, the integrity of the roof is not violated in any way. This allows you to reduce the cost of arranging such a room.

But the downside of this option is that the size of the attic itself in this case is minimal in comparison with other architectural and design solutions.

Let's consider a similar option. However, we note that it allows you to increase the size of the attic. It is designed for a different type of roofing device.

Its main disadvantage is the same as in the previous case. There is very little space available here. Which, however, pays off with the simplicity of designing this kind of attic.

Here we will consider more complex geometry.
We see that the design of this type of attic presents certain difficulties. At the same time, the room has much larger volume than in previous cases. There is a vertical outer wall, which makes it possible to make high-quality windows in the attic.

An important aspect of this solution is that there is an opportunity to push the vertical wall of the attic beyond the facade of the house. This gives good opportunity to increase the floor space. Note that here we are talking about a single-level attic.

Here we are talking about a much more complex version. A two-level room with several rooms can also be one of the attic options.
However, designing such an attic is not an easy task, although it can provide additional flexibility and efficiency in the use of available space.
Roof shapes
In this section, we will look at the main types. To the most simple types can be classified as single or double-sided.
A more complex option is to use a broken type. When using this variety of it, the internal space that can be used for an attic space increases significantly. This option is a kind of gable roof.
More complex options are those that are made in the form of a dome, pyramid or cone.
There is also a four-slope, which is also called a hip. In fact, here we are talking about gable roof, supplemented by two more slopes, which are located in front and behind.
It is also impossible not to mention multi-gable roofs. This implies a combination of two or more gables, which are located perpendicular to each other.
The following figure clearly demonstrates some of their types.

Broken mansard roof
There are not so few varieties of attics. However, some options are quite rare. One of the most common is this. What exactly do we mean when we talk about this?
In fact, we are talking about the usual gable roof. Its only difference is that in the variant under consideration, each slope is divided into two sections (this is the most common option, but there may be more than two such sections), which have a different slope. The part that is in the center is less inclined, and at the edges it is more. Let's explain this with a picture.

Now let's move on to how it works. Let's look at another picture.

This diagram shows the location of the rafters that make up the frame. Let's briefly talk about them. Floor beams. This is the part on which the entire roof structure is mounted. On the one hand, this is part of the ceiling of the upper floor of the building.
On the other hand, the remaining structural elements are mounted on these beams:
- Racks - vertically arranged elements that serve as a support.
- Runs are located along the attic.
- Sloped rafters are a sloping base for decking.
- Cross beams are used for attic floors.
The main elements of the design were listed here. Let's show another diagram.

Shown here are a few more important elements truss system:
- Mauerlat. These are longitudinally located beams that serve as the main support for the layered rafters.
- Hanging rafters. They are located in the upper section of the roof.
- The tightening serves to increase the strength of the entire structure.
- The struts are an additional support for the layered rafters.
The truss system is the foundation, but that's not all. The roof itself is quite complex. After all, it should protect the house from rain, cold and heat. In addition, water condensate forms inside the house, which can not only create significant discomfort for residents, but also damage the thermal insulation layer. Therefore, it has a rather complex device.

Let's explain this diagram. Typically, an insulating layer is placed between the layered rafters. Under it directly have a vapor barrier. A waterproofing layer is placed above the insulating layer. A thin air layer is left under it, which serves for ventilation.
On top of the layered rafters, a counter-lattice is nailed (slats that are located along the rafters). And on them - a crate (slats located perpendicular to the rafters). A roofing is installed on top. This is an example of a roof device in which ventilation is provided.
Most are of this type. In areas where a warm and dry climate prevails, a roof can be installed in which this kind of ventilation is not provided.

We will tell you how mansard roofs can look in the most common cases.
Here is a design for a gable mansard roof. Here is another diagram that corresponds to a two-slope polyline.

If it is four-pitched, then this allows you to allocate more free space for the attic. Here is a schematic diagram of the truss system for them.

The above diagram shows the truss system that can be used in the design. Next, we will show another example of a four-pitched (hip) roof.

Do-it-yourself mansard roof construction technology
If we have plans to build an attic, then, in principle, two main ways are possible:
- Do it yourself.
- Contact the experts.

Each of the options mentioned has its own advantages and disadvantages. If you do all the necessary work with your own hands, it will cost much less. But for this you will have to work hard and you will need to do the work at a high-quality, fairly professional level.
If you turn to specialists, then the work, although it will be done efficiently, will also cost much more.
If you still decide to take on this business yourself, then you first need to prepare necessary materials and tools.
Creation will take place in two main stages:
- frame creation,
- roof arrangement.
Various materials will be required to carry out the work:
- Wooden beam of various sections.
- Boards 3-4 cm thick and 15 cm wide.
- Roofing material (slate).
- Insulation.
- Vapor barrier.
- Waterproofing.
- Nails 80 mm.

You will also need tools for work:
- Sharp knife.
- A hammer.
- Axe.
- Construction stapler with staples.
- Plumb.
- Roulette.
- Hacksaw.
Because is enough complex design, then you must first draw up its scheme and calculate the parts.
Consider the situation for a gable broken mansard roof. Let's talk about what calculations and how to do it.
First of all, it is important to decide on the roofing material. It must be chosen based on the specific features of the situation. In particular, let's look at two different sides question. The level of thermal insulation and waterproofing in the attic is significantly lower than in the house.
This necessitates a very careful attitude in the selection of materials for the construction of the roof. Another feature is that it is important to use lighter materials both for the roof and for the interior decoration of the attic being created.
Since each slope is divided into two sections, it is important to determine the angle of inclination of the steeper section. It must be remembered that if it is less than 15 degrees, then this imposes special requirements on the roofing material. If we are talking about a slope greater than 45 degrees, then almost any material can be used for the roof.
In order to determine the weight, you must first determine its area. To do this, its surface is divided into simpler geometric figures and their area adds up.
When determining the weight, the following are taken into account:
- weight of rafters and beams,
- insulation weight,
- waterproofing weight,
- roof weight.
First, the weight per unit area is determined, and then multiplied by its value.
When calculating the weight, do not forget about the possible weight of the applied snow and take into account its size. The additional effect of wind must also be taken into account.
The total load is found by dividing the total load by the roof area. Based on the number obtained and rather complex calculations, the necessary parameters for the truss system are determined using special tables, and, in particular, the value of the rafter pitch and the recommended roof slope.
Carrying out work
Installation of the truss system
Before carrying out such work, it is necessary to prepare the wood. It must be well dried, and also treated with a special antiseptic and fire retardant composition.
At the first stage, you need to install the Mauerlat.

It is laid on a layer of waterproofing. The next step is to attach the ridge beam.

After that, layered rafters are installed. For convenience, the places of their attachment can be marked on the Mauerlat. Usually the installation step of the rafters is 70 cm. It is customary to cut the rafters in order to strengthen the connection with the Mauerlat.

The top edges of the rafters are also cut at an angle. There are braces installed.

Then a crate is placed on the rafters and a vapor barrier film is installed.

The rafter system is the basis for the roof, but you need to install insulation and waterproofing.
First of all, you need to decide on the choice of material for insulation. Several options are common:
- Glass wool. This is a cheap and effective material, but when it is laid, dust is harmful to health. When used, this material is safe, durable and effective.
- MDF board. It has good thermal insulation and sound insulation. It is not usually used for residential buildings.
- Styrofoam is an effective material, it weighs a little. However, it is toxic and flammable.
- Expanded polystyrene is similar in its characteristics to polystyrene, but does not have its shortcomings.
- Mineral wool. AT last years is the most common material used for insulation. Effective in use, almost no flaws.
We lay the rafters on top waterproofing film which must be carefully secured. We insert blocks of mineral wool from below and fix them vapor barrier membrane, attaching it from below to the rafters.
At the same time, sheets of mineral wool must be cut a few centimeters wider than the gaps between the rafters. This is necessary in order to prevent the formation of cracks in the thermal insulation.
Features of rafter systems of mansard roofs
The frame is built with the intent to ensure that it will support the full weight of the mansard roof along with the so-called " roofing cake". On the other hand, it should be as light as possible in order to reduce the load.
Rating: 5 2 votes