My "green" business: decorations from broken dishes. From broken dishes Panel from broken dishes
Broken cups and bowls Last year have become valuable to me. At first, I was just sorry to throw away one of my favorite cups, the handle of which just fell off. And I, like a classic "save house", hid it))
Then there was another cup, and another, and another ... But now I did not throw them away on principle. Because I planned to make new dacha kitchen apron from broken dishes. Which by December of this year I have already accumulated enough.
This is what came out:
Now how did you do it.
Drywall was chosen as the basis. Purely for pragmatic reasons. Firstly, it is easier to saw (no jigsaws, dust and subsequent general cleaning). And secondly, it is relatively light, which is important, because the final work will be heavily weighted by materials, and if the base is also heavy, I will tear my navel again while I carry and fasten it.
IMPORTANT: drywall choose moisture resistant! kitchen apron- an element of a wet kitchen. Especially if this kitchen, like mine, is in an unheated dacha in winter.
Unfortunately, I had to take the smallest sheet available at Leroy: 150 cm by 60 cm, although I needed 65 cm. But it was easier for me to take two small sheets home on a sedan to glue them later than one big.

We measure the right dimensions. We cut directly on the surface with an ordinary construction knife.

Then we turn the sheet with the cut outward, and on the other hand, groan-I-being with my fist, or like I do with my knee)) The sheet breaks evenly, as if it were so)

Then I had to adjust the sheet to the required width of 65 cm. To do this, I cut off a strip of the required width from the second sheet in the same way. Having attached it, I glued it with a sickle (construction mesh) soaked in PVA on both sides. I left the glued sheet to dry overnight.

Prepared and cut under required size(I have it 110 cm by 65 cm), for better adhesion, I first impregnated it with a primer, and then covered it with concrete contact. Left it to dry overnight again.

For later to be less problems with fasteners, even before the start of the creative part of the work, I drilled holes in the drywall. Drywall is very malleable, and you can drill with a simple screwdriver.

Holes are drilled at regular intervals.

And so that later, during work, not to accidentally cover them with glue or grout, you can insert beacons into them. For example, I stuck self-tapping screws. The main thing then is not to step on them with your heel :)


First glue the main elements. They are both practical and aesthetic.
Practical is:
- mugs (without handles), in which I can then put spoons and forks;
- broken handles glued horizontally: on them, with the help of hooks, I will hang towels and spoons;
- a broken bowl almost in half, which I can also use as small place storage (matches, for example).

***
***
And the aesthetic ones are, for example, those I found in a box with porcelain tomatoes and garlic, which I “put on a dish” of a similar color scheme ...

***
***
... and also a vase made of the finest Chinese porcelain (a corner of the bottom broke off), a neat stand for hot dishes in Provencal style(cracked), and in the same style a poacher made (a tiny piece broke off from above).
After the main elements are glued, we begin to fill in the space formed between them. free space. Here is a pallet of fantasy! Pieces of multi-colored broken dishes can be completely mixed and glued in a chaotic manner; or you can - in clusters, selecting them by color and texture.
I chose the second option.
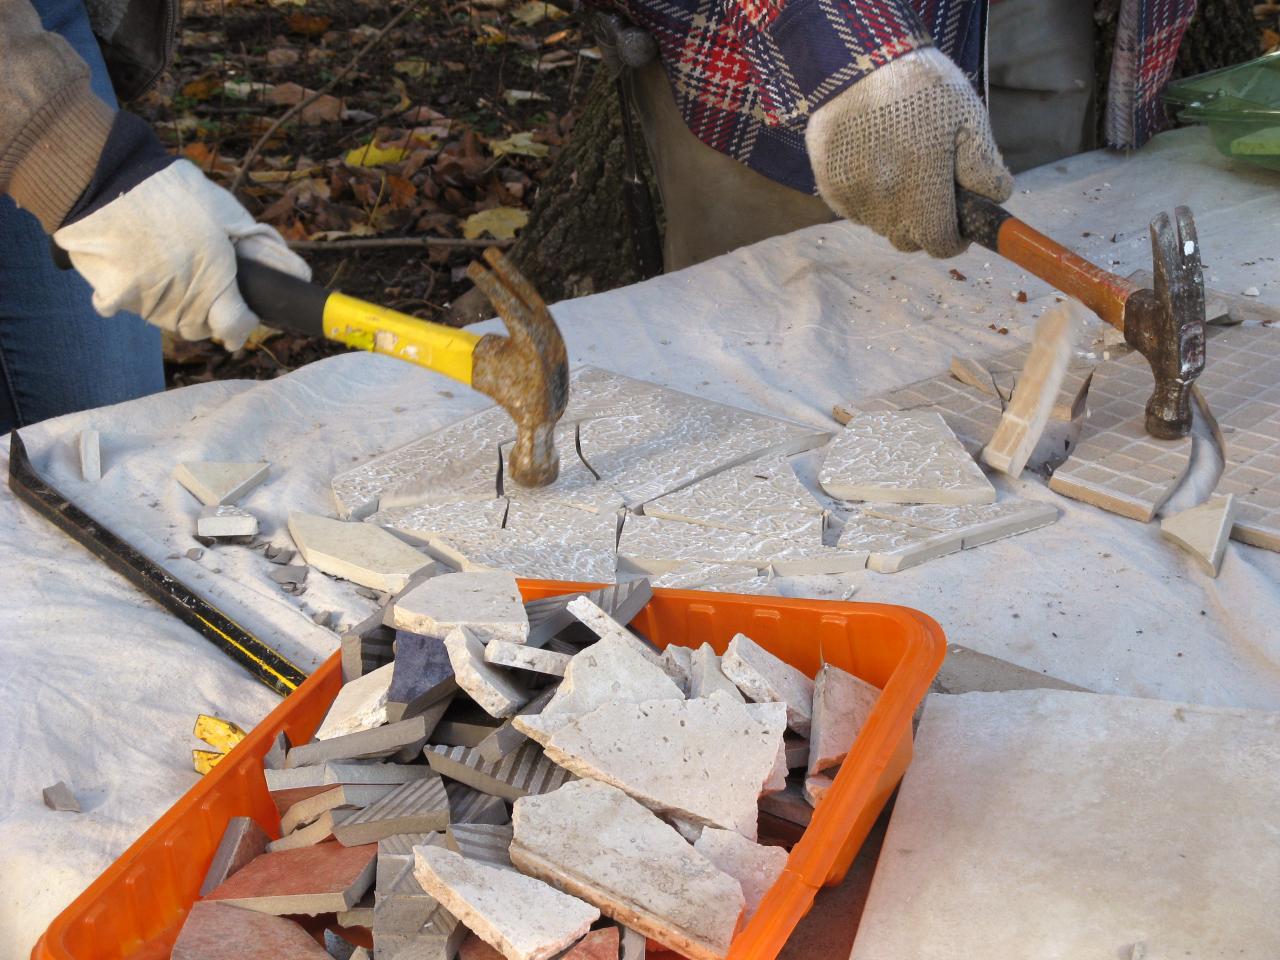
A few words about the actual process of breaking dishes. This is a dangerous business: the fragments really scatter like a fountain. And if the work is carried out not in a workshop, but in an ordinary living space, the matter can end not only with a splinter in the leg, but also with a “Kai diagnosis” - a splinter in the eye.
That's why - IMPORTANT! - we beat the dishes, covering it with a cloth! I, before tapping on the cups with a hammer, wrapped them in an old son's shirt.

Further comments are unnecessary - everything is clear from the photographs: 
***
***
***
***
***
***
After all the shards are glued and the glue has dried, you need to cover the seams (everything is exactly the same as when laying regular tiles). I also have a zaritka from the stash left over from the repair, so about optimal choice I don’t write anything - I used the one that was:

Grout goes really a lot! More than for tiled masonry, because. there are actually more seams. And you have to work in small sections and painstakingly. So I diluted the grout quite a bit.

A disgrace, but there was not one at home rubber spatula to work with grout. The need for fiction is cunning, and instead I used a piece from plastic cap from the factory food container from under the salad "Chuka" :)

We overwrite all the seams, immediately washing off the remnants from the surface of the shards. If the grout dries out, then you can’t peel it off!
Well, that's all - the apron is ready:

***
***
***
***
***
***
***
***
***
***
***
***
***
***
***
***
And finally: workplace during this far from the fastest creative process it will look something like this :) 
Can you have a simple home wooden table that needs restoration and decoration? No special mosaic or tiles? So it's not a problem! Do you have plates? Should we try? This is the result we are aiming for.

Compare before and after photos

So let's restore old table and decorate it with a mosaic of broken plates. This table will fit into absolutely any interior of your home. Many articles on the most different topic on creating beauty and comfort in the house you can find on the DecorDoma.com website. Here you will learn how to choose carpet covering how to organize correct design holla, what secrets does he keep in himself office furniture, how to make a mosaic with your own hands, how to renovate an apartment and redevelop it, and much, much more.
For work, we need a skin (sandpaper), acrylic paint, two-color plates, a hammer, tile adhesive, tile grout.
Skinning our old table and painting it with gold acrylic paint


We take plates and break them into fragments with a hammer

Lubricate the countertop with glue and lay the mosaic of plates

Most likely, you are not indifferent to the mosaic. Such is the nature of this art form. Surely you have admired a certain street panel by an unknown artist more than once. Perhaps your abode is not even deprived of factory mosaics. thousands miniature elements collected by a caring hand, invariably pleasing to the eye, but sometimes they bite the pocket. And they hurt pride - you have so many wandering, but bright, ideas. Why not try it yourself? Take a chance, do-it-yourself mosaic is an indispensable thing not only for the interior, but also for the soul.
At home, compositions are made from anything, the most incredible objects are used: a mosaic of tiles, fragments of dishes, pebbles, broken bottles, mirrors and even .
Making a mosaic is divided into stages:
- tile preparation;
- surface preparation;
- planning and sketching;
- mosaic laying;
- grouting;
Quick article navigation
Tile blank
You may already have raw materials, but if you don’t, don’t worry. Any store will gladly sell battle and the remains of ceramics for a pittance. It is good if there is a familiar master tiler who is constantly faced with the need to throw away waste. Take on his "garbage" and find yourself with an inexhaustible supply of tiles. Stock up on colorful raw materials, better a little different shades than a lot of plain tiles. It’s even better to keep the future drawing in mind, it’s easier to navigate.

Broken tile mosaic requires small pieces different format. We suggest cutting a part of the tile - compositions often need rectangular pieces. Cut ceramics with a glass cutter or a professional tile cutter. If you plan to create regularly, get an inexpensive tool. High cutting accuracy is useless here. Simply break the main part of the tile into fragments. It is more convenient to do this with a rag in which you will wrap the fight, and a hammer wrapped dense layer fabrics. The latter is necessary so as not to unnecessarily crumble the material.
Fill in the puzzle pieces different sizes, it is easy to follow a certain format. For the future: do not throw away the leftover tiles, broken dishes And so on. Postpone for later, the failed garbage will one day become part of the masterpiece.

Surface preparation
Suitable base for mosaic - cement-sand screed or plaster, putty and drywall. They provide good adhesion to adhesives and ceramics. It is important that the surface is clean and even. Remove irregularities, repair cracks, if any. After that, treat the coating with a primer, it helps to strengthen the base and increases adhesion.
Sketch preparation

Even a trained eye is easier with a guide. An inexperienced artist, when working with a complex drawing, is nowhere without him. In order not to get away from the dimensions, contours and proportions, apply a pencil sketch on the base. If you have artistic skills, enough hands and eyes. Without such useful baggage (we are talking about skills), use the scale grid method, or even better, transfer the sketch using a projector.
Plan out color scheme and break the sketch into zones based on tonal representations. Consider how to make a mosaic according to your scheme optimally.
Stick to certain rules:
- Start from the center, so the composition will be better in terms of proportions and compliance with the sketch;
- Do the background last;
- Leave abstraction in the end too, first people, animals, plants - something that has complex geometry.
Mosaic adhesive
The mixture for laying out the pieces should have high adhesion to the materials that you use. It is best to work with white glue, regular gray is not suitable for aesthetic reasons. For typical concrete foundations white cement glue (, Kreps Reinforced White) is suitable. For laying on a non-standard base (for example, wood), it is better to use reactive tile adhesive on epoxy based(Litokol Litoelastic), liquid nails or epoxy grout.

Mosaic laying
If you plan to use tiles different thickness, start with the thickest. It will serve as a guide for others. It is desirable to spread the glue both on the base and on the ceramics, but one of the surfaces requires only light smearing. One that will not increase the thickness of the layer, but will positively affect the strength of the installation.
Apply glue to small areas, which were previously selected on the sketch. Lubricate light areas larger area, complex ones will require slowing down. Having smeared glue on the base with an ordinary spatula, remove the excess mixture with a spatula with teeth. If the pieces of the mosaic are uniform in thickness, the work will go easier. Otherwise, the difference must be compensated by adding glue. But even homogeneity does not always save. Pieces that are too different in size require different bonding forces, smaller tiles with the same layer of mixture will always sink a little deeper, so they need more glue. The comb is just a guideline, each element still has to be brought to the desired plane individually. 
Mosaic of broken tiles on the wall does not have to be in the same plane. Start from your own ideas of beauty. In addition to tiles, use other materials that diversify the composition and allow it to match the idea. The floor mosaic should be flat, irregularities and roughness will create problems when walking on the tiles.

It is difficult to achieve an even coating with only the help of hands and eyes. Use a flat sheet of wood, plastic, or metal to periodically press down on the laid out areas and thus level them. It is better to have sheets of different formats. The principle is simple: more complex drawing - less area covered at a time - less sheet.
Mosaic from broken tiles involves laying pieces with gaps. Do not lay tiles close to each other. A very precise fit of the parts will not only complicate the work many times over, but can also cause damage to the canvas later. Seams compensate for thermal expansion of materials resulting from temperature changes. But it’s also not worth making huge gaps, be guided by common sense. The final drawing should not suffer. Do not put pieces of the same size side by side. Too multi-format is also not a “class”, there should be differences, but within reasonable limits.
Worktop cladding

If the countertop is made of wood, clean it of paint with acetone or special washes. Then go through twice sandpaper, first with a coarse abrasive, then with a fine one. These manipulations are needed to increase adhesion, do not start mosaic without preparation.
How ? This requires a different laying scheme:
- Start from the edges, gradually getting to the center;
- Compact the canvas as much as possible;
- Remove glue immediately high density implies a large number of seams; cleaning at the end will lead to unnecessary waste of time.
Video master class on decorating countertops with mosaics:


Grouting
Applies to floors with walls, and countertops. You can overwrite not earlier than one day after the end of the lining. The mosaic must dry evenly. If the room temperature is too high, cover the canvas with a damp cloth. Before jointing, remove any adhesive residue and wipe the mosaic with a damp cloth. To work, you need a rubber spatula.
A transparent grout based on epoxy resin with a chameleon effect () is best suited for mosaic panels. It will adjust to the color of each piece. cement mix much inferior to epoxy in strength and can literally fall apart.

Apply the puffer with a rubber grater, pressing it firmly into the gaps between the pieces. Remove residue with a damp foam sponge. Epoxy mixtures must be washed off with plenty of water, and plaque is removed with special detergents(Litonet gel, Sopro ESE 548). 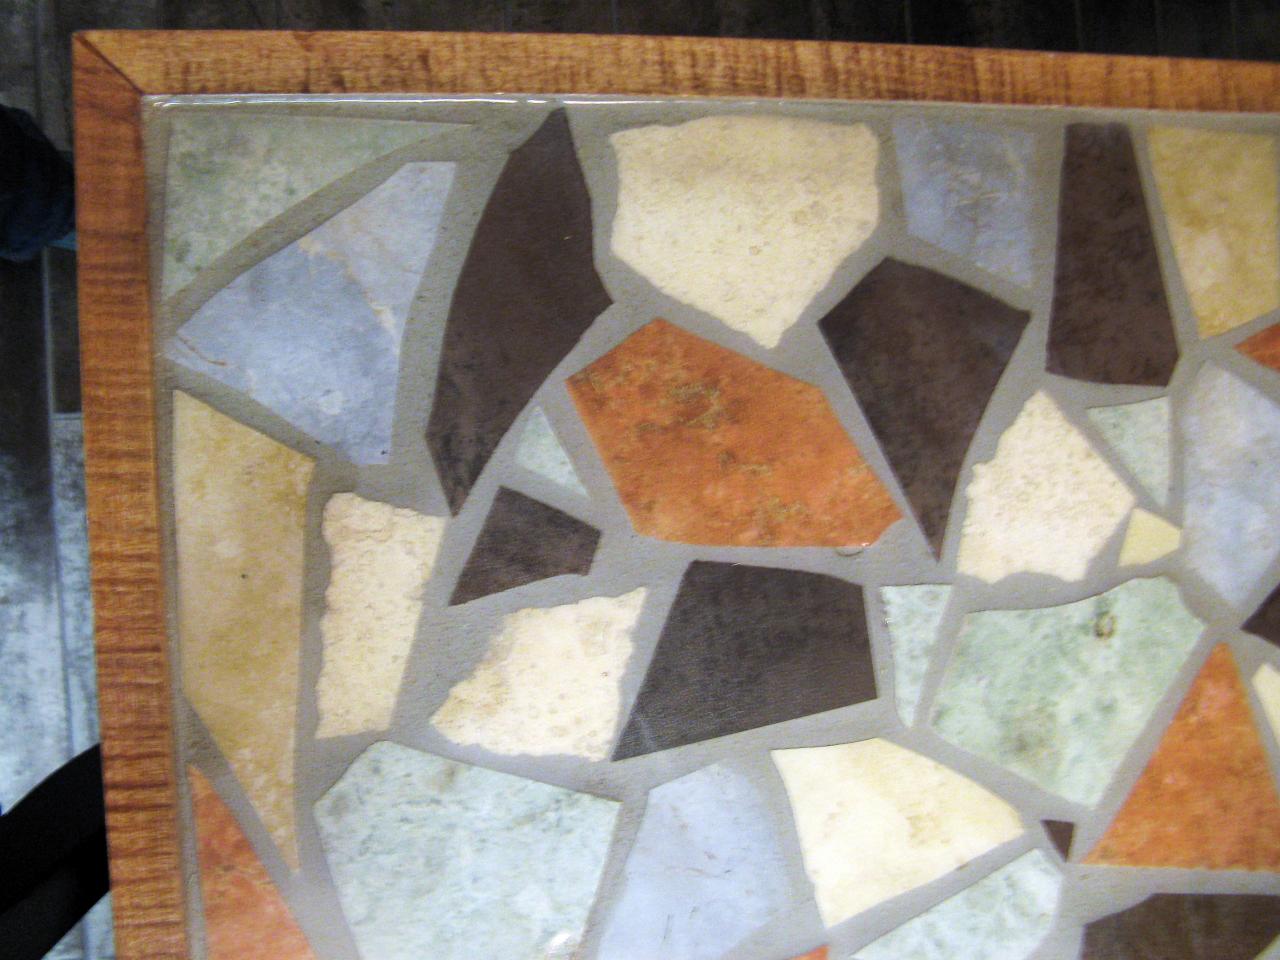

Well, now you know how to make a mosaic at home. We hope that the master class served as a starting point. Remember that the mosaic requires regular care. Do not wipe it with substances containing phosphoric acid. Use products with a low percentage of acidity, but even after them, wipe the mosaic with a rag and water.
Do not get hung up on tiles, train your imagination and use unusual and interesting objects.
comments powered by HyperCommentsAt times when there is a desire to update appearance cottages, it is absolutely not necessary to turn to expensive designers and specialized stores. One of good decisions can be the creation of unique decorative elements with your own hands. Of course, this may take a lot of time, but the lesson will become good rest, if you involve household members in the process. Collective creativity helps to strengthen relationships in the family.
What you need to create a decor
One of the simplest and original elements decor is a mosaic of broken crockery. The idea of creating something unique, individual is sure to captivate your close friends and relatives, which will change the mood. repair work from depressingly routine to captivatingly enthusiastic. Plus, the decor does not require special cash costs.
Material for manufacturing are:
- old broken cups, plates;
- fragments of ceramic tiles left after repair;
- various porcelain vases, other things that have passed into the category of rubbish.

Decor in the form of a mosaic will become the center of attention of guests, create an unforgettable atmosphere of beauty and poetry in the house and in the country.
original ideas
The mosaic that came from the Ancient East demonstrates today the rare and exquisite beauty of products. With its help, you can decorate caskets, vases.
Decor gained popularity in Ancient Greece, where floors, walls, furniture, fountains, dishes were laid out with mosaics. broken dishes will help you bring all the ideas of the ancient Greeks to life.

wall decoration
To complete wall decor, you will need determination and material. The latter can be found if there are broken dishes, ceramic tile, vases, glass or mirrors. The amount of material is directly proportional to the scale of work.
Mosaic technology
- For starters, you need to decide on image complexity. If the goal is to cover the wall with colorful randomly arranged mosaic pieces, you can get to work almost immediately. If the goal is even a very simple drawing, the wall will have to be prepared in advance.
- The decoration area needs to be well clean from the remnants of wallpaper, glue, align. Please note: the temperature when laying out the mosaic should be between +5 and + 30!
- Dilute the solution. You can buy it at hardware store. The color is better to take white or transparent.
- Apply the solution to a small section of the wall. Work on a piece. Broken dishes are applied to it. And so on…

Important! You should start from the center. First lay out the main figures, then the secondary details, the background - last.
- If broken dishes are presented in large pieces, break it into small items. A hammer is suitable for this purpose. In this case, the dishes should be wrapped in cloth, which will protect you from possible injury.
- The grout is applied after a day. Before applying it, remove excess adhesive from the wall surface. The grout is applied in parts. Treat the piece, wait 20 minutes, remove excess material with a damp sponge.
Ideas for using broken dishes (video)
What else can be done
Broken dishes are not only suitable for decorating walls. There are many ideas that can be implemented. This can be done with it:
- hot pads;
- vases;
- spacing;
- candlesticks, plates.
- cabinets;
- tables;
- sideboards;
- chairs.
If there is a desire to surprise guests, you can arrange birdhouses in the garden, a sink in the house with the help of mosaics.

Creating a panel
Inside the country house can be decorated with attractive panels. In this case, in addition to ceramic and glass fragments of dishes, other materials can be used:
- pebbles;
- pebbles;
- beads;
- colored glass;
- shells;
- tiles.
A glass cutter is used to create geometrically even figures. This makes triangles, polygons and even circles! Important so that the edges of the elements are not sharp, which will prevent cuts.

You can draw a sketch of the panel in advance. It marks the location of the elements, their colors, the sequence of work.
Products from broken cups and lids
The use of broken cups allows you to make many unique products. They can be fitted to the surface of the tile so that half of the cup can be pasted on the wall. As a result, excellent coasters for small items, personal hygiene items - toothpaste, combs, brushes will come out.
If you find broken cover from the teapot, don't throw it away. With a few lids, you can make great hangers for potholders and towels.

- Mosaic requires careful care. It is strictly forbidden to rub it with substances containing hydrofluoric and phosphoric acid, as well as oils and wax. Cleaning agents must be non-abrasive. If the contamination is strong, it is worth taking a preparation with a low acid content, treating the surface with it, and then rinsing everything large quantity water.
- On a convex or even, previously degreased surface, you can glue fragments of dishes on “liquid nails” or standard glue. Next, the seams are subject to grouting.
- To divide the dishes into pieces, you can use an ordinary glass cutter.
- Great option- lay out a tabletop with a mosaic. But the surface in this case will not be stable, which means that it will have to be covered epoxy resin. In this case, even fragile glasses can be placed on the table, and the countertop will last a very long time.
- The most common option is decorating garden furniture. If you prefer relaxing on the lawn to work in the garden, you just need to take the idea into service. Production costs - a few hours. Decorating is done in the same way as working with a countertop. The benches look great. You can find out,
For those who like to beat dishes.
How many dishes have we broken in our lives? Of course, no one thought. Even at home, several cups without handles or with a chipped edge always dangle on the shelves. Throw away the hand does not rise. For those who are not afraid of work and love to decorate their own home, you can find a second life for such cups-bowls, using fragments of broken dishes as a mosaic.
Of course, it’s like in an old song from a favorite childhood cartoon: “If you take one brick, it’s of little use in it, if you take a couple of bricks, you won’t build a house.” So with us, things won’t work out with one cup, so it’s worth accumulating material, reviewing it. deposits" dishes. Maybe there are a couple of three saucers or plates that were left in proud loneliness and are no longer used. You can also ask relatives and friends, everyone in the house has at least one cup with a chipped edge.

So the material was collected. Now let's break. Breaking is not building, but even here you need to act wisely and with some caution. Place the cup-plate in a thick cloth. And now you can, gently hitting with a hammer, split into pieces. If you need to get more even shapes or cut out a picture, then use a glass cutter.

When the bowls are beaten, you can sort by color and size. The surface on which we will glue the mosaic is degreased, and the mosaic pieces too. We put them on PVA, on liquid nails. You can post them on concrete mortar. After the mosaic pieces are securely attached, we rub the seams with a special grout for tiles, wipe the surface with a damp, and then with a dry cloth.

The photo has different examples that can inspire creative "exploits".

Well, whoever likes to lay out and decorate surfaces with fragments, and their stocks are exhausted, then you can buy a finished mosaic to continue. It can be both ceramic, marble mosaic looks spectacular. It can be used to decorate the walls in the bathroom, toilet, the surface of the window sill, the wall above working surface table. Mosaic from natural stone it is more difficult to lay out with a pattern, then you need to take more contrasting shades, but the surface laid without special selection looks more uniform, calm color.