Installation of a kitchen unit on the wall. Preparation for the main process. Sink and countertop installation
Hello, friends.
What is an independent, and what is its general algorithm? We will talk about this today in this article.
But before talking about the installation, I will say a few words about what should be done the day before.
And on the eve, all kitchen modules should be assembled and packed for transportation as much as possible (they are usually packed in a special film that protects them from scratches). All facades must be hung on them (at first, the facades can not be adjusted - they will be adjusted at the end of the installation itself), handles must be hung on the facades, etc. In a word, everything that can be done before installing the headset must be done.
The room itself, in which it should, must be completely ready for installation. This means that if it was repaired, then:
- Floors to be made (mounting field kitchen set, you won’t crawl under its supports)
- The working wall of tiles (if any) should be laid out
- All old furniture, located at the place of installation of the kitchen, must be taken out of the room
- There must be working sockets in the room (or somewhere nearby, to connect the carrying)
- All built-in appliances must be available (sink, hob, oven, extractor)
- Tentatively, at least a whole day should be allocated for the installation of a kitchen set.
When all of the above conditions are met, (unassembled, of course) is delivered to the installation site.
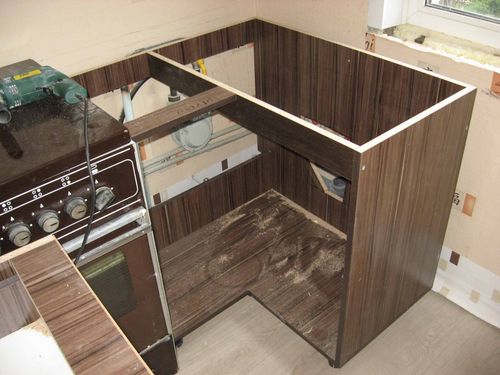
Any kitchen is usually installed from the lower modules. If this is a corner kitchen, then the installation always starts from the corner (corner modules are installed first).
Before mounting the modules, all facades are removed from them.
Having set the lower modules, and having fastened them together with coupling bolts, they must be set “in level”, by means of adjustable supports. The modules are exposed, taking into account all the gaps (relative to the walls and relative to the countertop), which are taken into account in the project.
After all the lower modules are exposed, the countertop is “adjusted” under them. When the countertop is fitted and exposed, a sink with hob. Then the tabletop is installed on the lower modules and fastened.
When the lower base of the kitchen is installed, the level of the upper modules is measured, holes are marked on the wall for awnings for the upper modules.
Then the upper modules are hung, adjusted “by level”, and pulled together by the same coupling bolts.
When the lower and upper bases of the kitchen set are installed, the plinth is installed (on the countertop), the facades are hung and adjusted, and, in general, everything, the kitchen is installed.
Water and gas are connected to the equipment by the owner. Especially, I do not recommend messing with water, because if something is done wrong and the kitchen is flooded, you yourself will be to blame. And this, at least, is stupid, to do a lot of work, and then “screw it up” all over.
If on working wall (Wall panel) it is planned to mount an apron made of MDF, chipboard or plastic, then it is attached at the very beginning (before installing the lower modules).
That's all, see you soon!
Beautiful, comfortable kitchen should include many details. A prerequisite is the presence of a kitchen set that contains all the dishes, kitchen utensils, bulk products And household appliances. This is how multifunctional a kitchen set should be. But it is one thing to choose and purchase furniture in a store. And it’s completely different to install cabinets and pencil cases in the kitchen. Of course, in any furniture store, buyers will be offered the services of masters. But, installing a kitchen set is not so difficult. Therefore, any man can successfully cope with this task.
Auxiliaries
To assemble the details of a kitchen set into a single structure with your own hands, you need to prepare auxiliary devices that will help you cope with the task. For work you will need:
- Drilling tool, screwdriver.
- A carpenter's jigsaw that will help cut the countertop.
- Screwdriver, hex.
- A set of planks for joints and a decorative plinth.

Stages of work
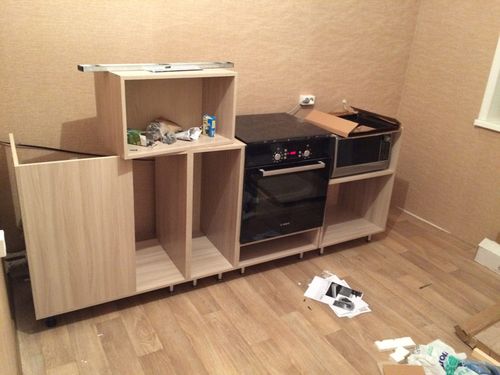
Do-it-yourself headset installation begins with the attachment of cabinets and drawers at the bottom of the structure. First of all, they mount the body part, to which shelves and drawers are attached. In order for the cabinets to be connected into a single strong base, they need to be fastened with metal ties and corners. Then, be sure to check how tightly the pedestal fits against the wall. To prevent the top edges from crumbling, they should be protected with a silicone-based sealant.
The next step is the installation of facades using metal hinges, which are screwed with self-tapping screws. Remember that before starting the installation of the kitchen set, care should be taken to remove the sewer and water pipe. Gas and electricity are also supplied in advance.

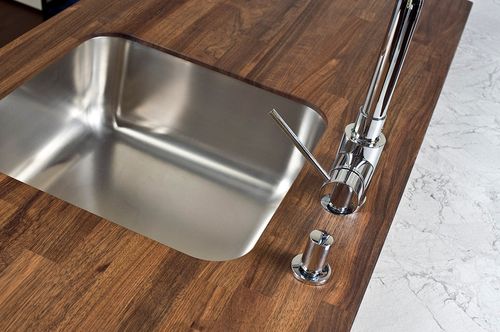
Sink and countertop installation
The kitchen sink is installed by cutting into the surface of the countertop. Preliminary measurements and markings are made corresponding to the size of the sink. The hole for the sink is cut out with a jigsaw. To properly fix the sink, know the design features.

There are two types of sinks:
- With fastening over the curbstone before mounting the tabletop.
- With fastening after installation of a table-top.
However, in both cases, network engineering must be completed prior to commencement of installation work.
Installation and assembly of kitchen sets in the photo, involves the installation of countertops. Dimensions given element should be 1-1.5 cm larger on the front and end sides than the lower cabinets. The remaining gaps between the countertop and the wall are covered with a decorative plinth.

Protecting the work wall
Any kitchen has an apron - a wall between the countertop and upper cabinets. No matter how carefully the hostess cooks food, the apron area becomes contaminated with droplets of fat. To protect the wall, many tile it. But another option is also possible - to purchase a kitchen set with prefabricated panels for guard working wall. These panels are simply attached with dowels. by color protective screens can be very different. But, it is wiser to purchase panels that match in color with the kitchen set.

Upper cabinets
The assembly of the kitchen set continues with the installation of wall cabinets. To secure the locker, it must first be assembled. Usually, cabinets are delivered to the consumer in disassembled form: separately the case and hinged facades. To fix the body part, it is necessary to apply markings at a level of 60 cm from the countertop.
Having outlined this distance with a flat, horizontal line, we designate the place of attachment of the lower part of the cabinets. To determine the attachment point, you need to measure the height of each locker.

As soon as the upper horizontal line is drawn, it is possible to fasten the bar necessary for fixing the cabinets along it. The bar is fixed to the wall with dowels, and then plumb lines are fixed on the bar. And on back wall each cabinet, hooks are attached. After hanging, check that top part the headset was firmly attached to the wall. Then the facades are attached to the body.

In order for the installation of the kitchen set according to the video to go flawlessly, you should start work with the installation of corner cabinets. After assembling with your own hands and installing the structure, it is necessary to tighten each element with special tightening clamps. If, after following this recommendation, gaps and cracks remain between the cabinets, we cover them with a special decorative plinth.

For decoration end parts stubs and beautiful, elegant corners are used.
In custody
In order for the assembly of the kitchen set to go smoothly, it is necessary to carry out the installation step by step. First, the dimensions for installing the kitchen set are determined. Then markup is created, which will clearly show where and how each element of the structure will be located. If the walls in the kitchen are lined with drywall, you should take care of special fasteners that will fix the cabinets on the wall. Having prepared everything you need, you can start phased implementation installation work.
You can encounter many non-obvious nuances that we tried to describe in the first part of the article. But ahead is the installation of a headset, which can puzzle with its "pitfalls".
How is the installation going?
Before hanging cabinets and setting tables, you need to take care of right choice furniture fittings.
The fittings include bolts, screws, hinges, handles, shelf holders, guides for drawers- everything that is not made of chipboard.
Let's start with the main point: confirmation screws. Such screws are often called "Euro screws" and can be purchased at any furniture hardware store. Such a screw is tightened with a special hex wrench or a hex bit for a screwdriver.
The choice of handles is completely up to you: in any accessories catalog you can find dozens and hundreds of their varieties, and depending on the color of the facade will have to choose suitable option pens.
Loops are also an important point. Exactly the quality of the hinges determines whether the doors will open smoothly how long the loops themselves will last and whether they will withstand the load. Standard option- loops with a "cup" diameter of 35 millimeters. For each door up to 800 mm long, it is enough to install two hinges.
I must say that drilling the facade for hinges at home is not an easy process, and even if you find and buy a special cutter, you will need an assistant when drilling with a drill. The facade must be held firmly, and when drilling, it is enough to press hard on the drill so that the cutter does not tear out pieces of chipboard.
When drilling holes, the main thing is to correctly calculate the indents. The selected distance will affect the entire installation process.If you have no experience in such matters, practice on scraps of chipboard: with manual drilling, it is easy to break through the facade, so it is better to order these works from professionals: drilling one hole costs about 30 rubles.
If you decide to do it yourself, pay attention to the photo:
Note: this is an authentic photo that shows the main thing: the distance from the edge to the BEGINNING of the hole is strictly 4 millimeters.
The best option is 12 centimeters from the top (or bottom) edge TO the CENTER of the hole.
We'll hit the sink
As a small digression, we will explain some points regarding the choice of washing. This is not accessories, but a full-fledged element of any kitchen.
The sink can be both overhead and mortise, and they differ in both cost and appearance. Mortise sinks look more presentable and are mounted directly into the countertop itself.
Each sink has its own characteristics, so you need to carefully measure before you start shredding the countertop. Used to cut a hole for the sink electric jigsaw, but it is impossible to give clear instructions on sink insertion: there are many sink manufacturers, and each of them makes bowls in accordance with their own ideas about the correct design.
Therefore, it is best to use the instructions attached to the sink or study the installation materials that can be found directly on the manufacturers' websites.
Otherwise - from configuration to size - the choice of sink will depend on your tastes and financial capabilities.
What to do with all this?!

So, all the modules are assembled, the fittings are installed, the facades are fixed, which means that you can proceed to the last and most important stage: installation.
Let us immediately note that you need an assistant to install, but you don’t need to call all your friends: one person is enough, and a large number of people will not speed up the process and will only create chaos in which everyone will interfere with each other.
You will need the following tools:
- Stepladder or stool;
- Hammer;
- Phillips and flat screwdrivers (or better - a screwdriver with interchangeable bits);
- Pliers and a chisel (just in case);
- Jigsaw and hand saw for metal;
- Building level (the longer - the better);
- Roulette, ruler and pencil;
- Impact electric drill (ideally - a drill and a rotary hammer separately);
- Drills for wood of various diameters (many of them can come in handy in different specific cases);
- Pobedite drills with a diameter of 8 millimeters (for drilling walls);
- Dowels complete with screws for them (dowel size - 8x60 millimeters);
- Wrenches (may not come in handy, but it's better to have);
- Silicone sealant;
- Special bolts.
Get to work!
Installation always starts from the bottom of the headset. Tables must be level. The vast majority of headsets are made on adjustable legs, supports, which allow you to easily raise or lower tables.
If you have designed tables with a common solid worktop- it should be fixed after all the tables are level, but before that it is better to tighten the tables with the help of tie bolts. The sink should already be attached to the countertop.
After that, you can proceed to the canopy of cabinets. For this we need a ladder. One person climbs on it onto the tables and, together with an assistant who remains downstairs and helps, lifts the cabinet. Classic variant cabinet fixings - angle brackets which should already be fixed on the cabinet.
In this case, you need to draw the holes of the bracket ears with a pencil while the assistant holds the cabinet from below.
If the cabinet is equipped with internal brackets, it is immediately hung on a special metal rail, which is pre-attached to the wall.
If the kitchen is corner - installation starts with corner cabinet, while it must be leveled. Read about design corner kitchen with a bar counter is possible.
In the case of a straight kitchen, cabinets also begin to hang from the corner. An average cabinet with a width of 800 millimeters weighs about 12-15 kilograms, but it is extremely inconvenient to lift it.
 An obligatory component of the process of installing a kitchen set is a clear adjustment.
 Thanks to correct execution adjusting your cabinet doors will open properly and last longer.
In order to facilitate the task, you can first remove the shelf from it, if it is loose, or even remove the facades, however, two men of even non-athletic build can easily cope with this task without removing the door.
After the cabinets are hung, it remains the last but crucial step: adjusting the facades.
The fact is that installed modules can skew: this mainly happens if the furniture is not installed level.
Adjustment is carried out with a screwdriver, the photographs show in detail which hinge screws are responsible for the adjustment, and the video on installing the headset clearly demonstrates this process.

What's the price?
That's all: the kitchen set is installed and washed, the doors are adjusted and the furniture is pleasing to the eye. But let's see how much the materials cost, and how profitable it was to spend a few days of your life on this exciting, but not the most difficult task?
Consider the cost of a kitchen set using an example
The cost of the presented direct and not the most complex headset with a width of 280 centimeters in the store is about 37,000 rubles.
- This set took about one and a half sheets of chipboard. One chipboard sheet costs 1050 rubles, the cost of sawing at the rate of 120 rubles per square meter was about the same. The result - 3000 rubles invested in the material. The cost of the softforming facade used is approximately 900 rubles per sheet 2.5 meters long. This set took about 10 meters of the facade, respectively, its cost was 3600 rubles.
- The retail price of the melamine edge, which was used for pasting, is 3 rubles per running meter. The total cost of the used edge was approximately 220 rubles.
- The total cost of fittings, including euro screws (retail price 80 kopecks per piece), hinges (50 rubles per piece), as well as glass, decor, sink and handles, amounted to about 3,500 rubles. Due to the low cost, we will not take into account such components as shelf holders and support legs, besides, the price of accessories as a whole can vary greatly depending on different regions, and therefore there is no point in focusing on the cost of frunitura.
- Another optional expense item is a tool. Assuming that you have an impact drill, you can deduct 6,000 rubles from the estimate.
- Let's not forget about the delivery of material, which can cost from 500 to 1500 rubles, depending on the distance and the total cost of such services in each region.
- Let's not forget about a friend who helped in the installation, who also needs to be thanked with money or a bottle of good cognac.
Below is a table that details the costs at all stages of work.
|
Material |
average cost |
Quantity used in the manufacture of the headset |
Total cost for this headset |
Explanations and notes |
| Chipboard |
1050 rubles / sheet (sheet size - 2.5x1.5 m) |
1.5 sheets | 1575 rub. | – |
|
Sawing work |
120 rubles / m 2 | – | 1500 rub. | – |
| Facade | 900 rubles/sheet |
4 sheets or 10 rm |
3600 rub. | The cost is indicated for the softforning facade, which was used specifically for this headset. When using other types of facade, the cost may vary, but the cost of ordering finished furniture increases exponentially. |
|
Melamine edge |
3 rub./rm | 70 m | 220 rub. | – |
| accessories | – | – | 3500 rub. |
The total cost of euro screws, shelf supports, legs, supports, handles, glass, decor, roller guides for drawers, self-tapping screws, dowels for installation and a dish dryer in wall cabinet above the sink. |
| Washing | 1900 rub. | 1 PC. | 1900 rub. | In this case, an overhead sink manufactured by Franke is installed. This is one of the inexpensive and high-quality models. For reference - the cost kitchen sinks depending on the material, type of installation and design, it ranges from 900 to 22,000 rubles. |
|
Material delivery |
Depending on the region | – | 500-1500 rub. | This refers to the payment for cargo transportation services, which varies depending on the region and distance. This item can be ignored if you have your own car: all the details of such a kitchen can be taken out on your own in 1-2 calls and in a car. |
| Tool | – | – | 200-6500 rub. | This item is also not necessary to consider if there is an impact drill. It is its cost that ranges from 4000 to 6000 rubles. In any case, 200-300 rubles. it’s worth adding to the total estimate, since at home you won’t necessarily find something you need: necessary screwdrivers, level or even an ordinary hammer. |
conclusions
As a result, it turns out that at self-manufacturing such a headset, its cost will be a maximum of 15,000 rubles. Of course, it's no secret to anyone that firms specializing in the manufacture of cabinet furniture wind up up to 200 percent.
In our case, it turned out a little less, but the difference is noticeable. And now that you've spent a few days making a kitchen set, you can answer yourself the question: is the game really worth the candle.