Stands for flowers fastening to the wall. Glass rack for flowers. Corner shelf for flowers: phased construction.
Fans of exotic houseplants often turn their home into a greenhouse - flower pots are everywhere. And over time, you will see the consequences of the effects of water that falls on furniture when watering plants - furniture made of chipboard is deformed, picturesque streaks are visible on the wallpaper, and there are stains on the window sills. Shelves for flowers, which are presented in a wide range in every furniture store, will help to solve the problem of furniture congestion in the house with flower pots. Your attention will be offered beautiful or chipboard, wooden or exquisite forged, wall or. There is also a mass creative options- for example, a shelf for flowers with illumination. And despite such an abundance of options, you can stop at making a flower shelf with your own hands - simple, economical and sweeter to the heart.
How to make a wooden flower shelf?
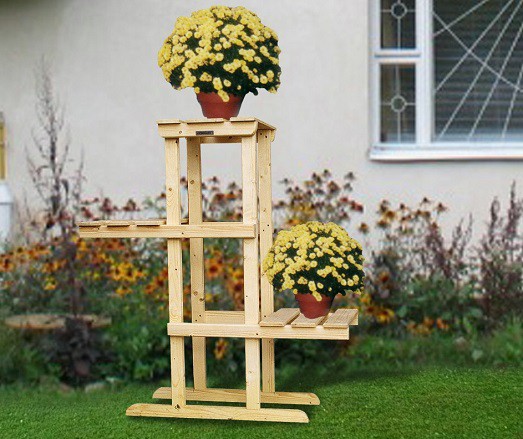
What we offer you to make is not just a flower shelf, but a multi-tiered structure, on which all the pots from the window sills can easily fit. A huge plus is that these pots will always be at hand. The shelf consists of a floor platform on four legs and four shelves, which are held on chrome-plated racks. So let's get started!
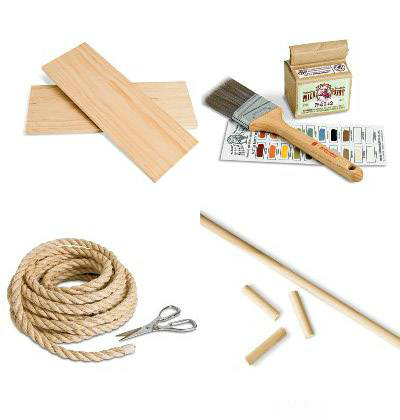
To make a shelf, we need the following materials and tools:
- plywood 15 mm thick, impregnated with a water-repellent agent;
- chrome-plated tubes of the Joker system (diameter 25 mm) with a total length of 510 cm;
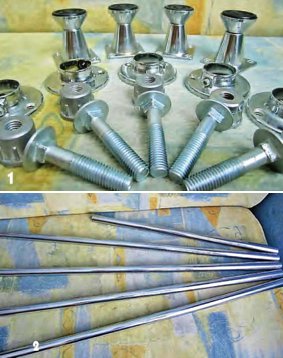
- flanges for pipes of the Joker system (17 pcs.);
- furniture legs(4 things.);
- threaded bushings (5 pcs.);
- screws and self-tapping screws;
- furniture bolts (5 pcs.);
- furniture edge;
- a can of car enamel of the desired color;
- putty on wood;
- jigsaw for a curved cut;
- metal saw or pipe cutter;
- screwdriver and drill;
- Sander;
- screwdrivers.
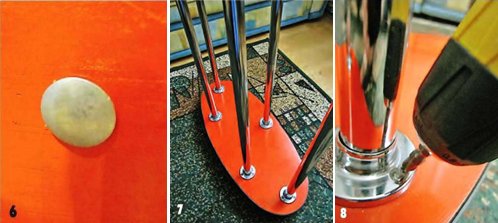
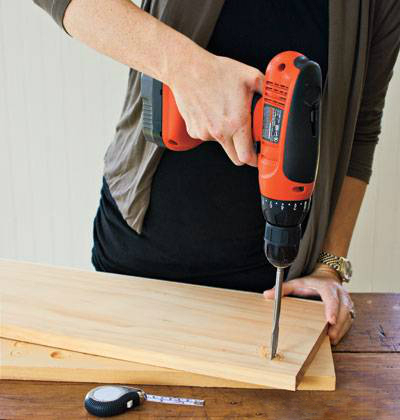
The first step is to mark the contours of the shelf on plywood. To do this, you can use the finished drawing of the shelf for flowers. We cut out the details with a jigsaw and immediately grind the saw cuts.
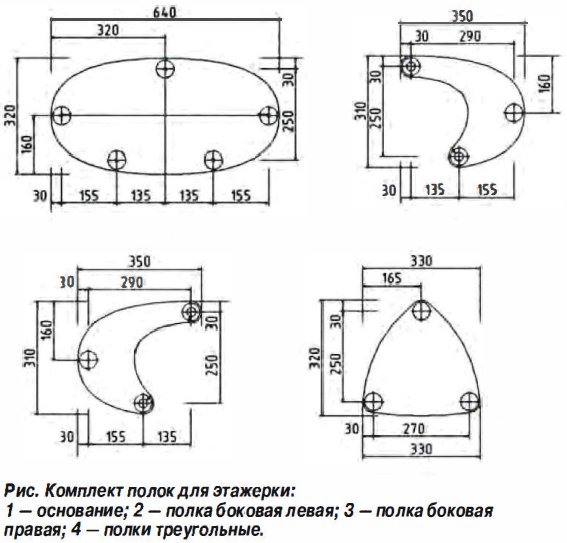
On the lower platform we mark places for furniture bolts and drill holes. On the remaining structural elements, we measure the attachment points of the flanges. And in places for installing flanges, we drill holes with a diameter of 25 mm.
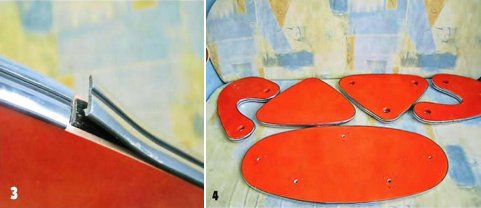
We putty shelves, due to which surface defects will even out. After the putty dries, sand the surface with a fine sandpaper. After that, the shelves can be painted by applying spray paint in two layers. When the paint is completely dry, you can glue a decorative edging to match the color of the tubes on the ends of future shelves.
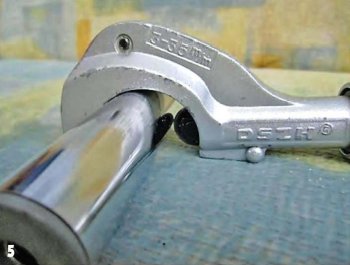
The next step is working with tubes. To assemble our decorative shelf for flowers, you will need 5 tubes - one tube 60 and 90 cm long, respectively, and 3 tubes 120 cm long. You can cut metal with a saw or a pipe cutter, which, unlike a saw, will leave smooth edges.
Now the most crucial moment is the assembly of the structure. First you need to fix all the racks on the lower platform. We put the flanges on the racks and fasten them with screws to the base.
By the same principle, we fix the following tiers of our design, the distance between which should be 30 cm.
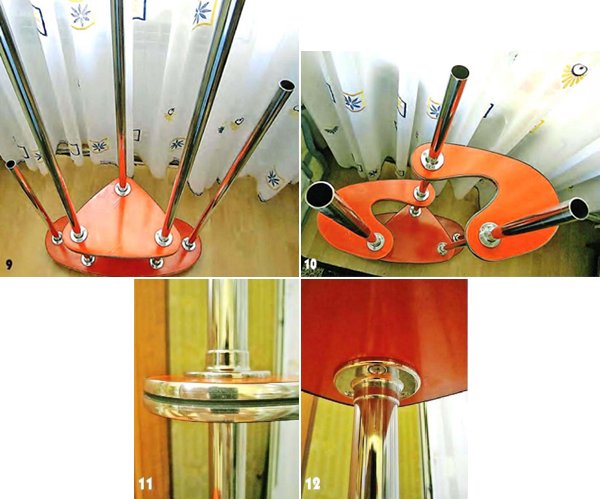
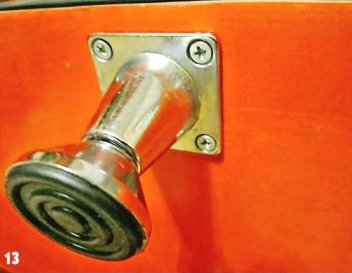
After completing the work with the shelves, fix the furniture supports (or wheels) on the lower platform of the structure.
The author of the idea and images is Vladimir Grek (http://www.enkor.ru/forum/viewtopic.php?t=4610)
Do-it-yourself hanging shelf for flowers - an option for the lazy
A wooden flower shelf on ropes is a very easy piece of furniture to make. To do this, we need the following materials and tools:
- wooden boards;
- dye;
- rope 20 mm thick;
- putty for wood;
- drill;
- wooden chopsticks.
First you need to prepare the tree - you need to cover the irregularities with putty, sand it, drill holes for the ropes and cover the boards with paint of the desired color.
We cut the rope into two pieces of equal length. To make it easier to pull through the holes, wrap the ends with tape. We pull the rope, starting from the bottom board, and at the top we leave a fairly large loop on which the future shelf will hang.
To leave the required distance between the shelves, we push the glazing beads into the rope. Tie knots under the bottom shelf. Such a simple homemade flower shelf will become the same decoration for your home as the plants themselves.
Shelves for flowers on the wall allow you to beautifully place flowers in the house. Living plants in the room bring beneficial energy, can help to cope with various negative phenomena. But it is not very pleasant to place flowers on the windowsills, where after watering you can find traces of stains and dirt.
And the design for plants of a special “live” corner with neat and beautiful shelves, made by the same with their own hands, will give the room special atmosphere, where it will be cozy and warm, and how best to arrange it, the article will tell you.
Flowers - the best decoration in any home. Many lovers often wonder how best to place pots and flowerpots.
Shelves on the wall for flowers should be:
- Roomy.
- Comfortable.
- Compact.
When choosing a design type, consider:
- Room type.
- Room view.
- Type and number of plants on the shelves.
- Owner's personal preference.
Depending on the number of places for flowerpots, the designs are:
- multi-seat. Such structures occupy the entire wall or a certain part of it. Wall shelves should be carried out with small sizes, due to the fact that they cannot withstand the great severity of the impact of the soil, which is located in flowerpots. It is better to make such designs on the floor, perfectly accommodating a large number of flowerpots.
- Double. Suitable for installing plants of the same type that feel good in the same climatic conditions- in the sun or in the shade.
- Single products, they can accommodate only one flowerpot. They will look good climbing plants from big amount flowers and leaves.
Shelf for flowers on the wall can be made of:
- tree. These are the most common designs. But the low resistance of wood to moisture requires careful processing of wooden parts. by special means to increase their service life.
- Plastic. Such products cannot be made independently; they are purchased in stores. Product benefits include:
- practicality;
- ease of care;
- variety of shapes and colors.
- metal. Their difference is stability and rather heavy weight. But metal is a material corroded. To protect the product, they must be carefully treated with anti-corrosion solutions. Metal shelves can be decorated with forged details, it will be beautiful and elegant in any interior.
- glass. Such shelves are distinguished by sophistication, they give the room airiness and lightness. But when building shelves from it, you need some skills when working with glass. Shelves can be decorated with mosaics, stained glass or make prints on glass. They need timely and meticulous care.
- Combined materials. These designs are distinguished by the use of several materials in their manufacture. For example:
- forged elements decorate wooden shelves;
- added to glass surfaces metal pipes, which are used to make the frame for the shelves.
| Shelf type | Design description |
| Classical | Is different:
Can be made from simple square shapes, to the most creative designs, with an asymmetric product shape |
| Angular | This type of shelves differs in the method of fastening to the walls. Most commonly used in bathrooms and utility rooms |
| Suspension | Fastening of structures is carried out on cables or vertical racks |
| Floor | Such products are especially relevant in hallways and large rooms, where the loss of space is not too noticeable |
| open or closed | Shelves can be made with or without glass |
Features of manufacturing a simple design of shelves for flowers
To create original and interesting models can be used entirely simple options structures for the manufacture of shelves.
For this you will need:
- Wide board.
- Leather belts.
- Fasteners.
Tip: In the absence of belts, use: rep tape, twine or other materials.
Step-by-step instructions for the work:
- The dimensions of the structure are determined.
- A sketch of the product is being developed.
- Boards desired width divided into several equal-sized fragments.
- The ends are polished sandpaper.
- All elements of the future shelf are painted in any chosen way. It can be:
- stain, followed by a colorless varnish;
- applying colored paint.
- The shelves are left to dry.
- Fixings are being prepared. For this:
- the belt is divided into 2 blanks, the length of which is approximately 0.60 meters;
- blanks are folded in half;
- 4 centimeters retreat from the edge, and holes are drilled.
- The parameters of the shelves are measured.
- Appropriate markings are applied to the wall.
- In the places where the dowels are installed, holes are made in the wall.
- Loops are made from the belt and fixed through pre-made holes on the wall.
- Installed on hinges wooden shelves as in the photo.
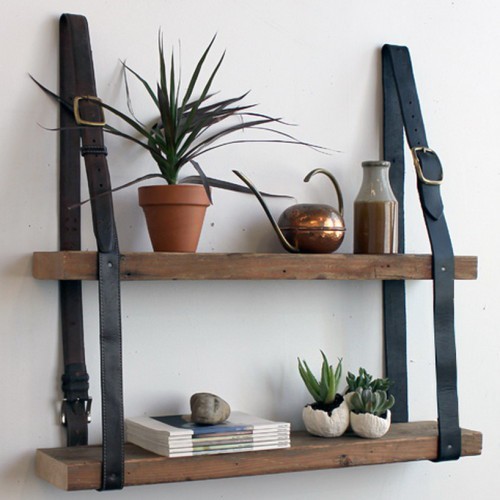
- Pots with live plants are arranged.
Tip: For better aesthetics of such products in the room, you should hang several, and for decoration, choose a shade that will match the interior of the room.
How to make a combined design
A fairly small price of shelves for flowers will be assembled from improvised materials.
To make them you will need:
- Simple plastic window sill. As a basis, you can take a window sill, the length of which is 3.9 meters.
- Galvanized or nickel-plated pipes, in the amount of three pieces.
- Brackets - 2 pieces.
- Flange fasteners - 9 pieces.
Stages of work:
- The plastic window sill is cut into fragments of 1.3 meters in length. There should be three of them. These will be the flower shelves.
- To install the shelves on the frame, three holes are made in the plastic, arranged in such a way that they are the vertices of an isosceles triangle. FROM back side, near the ends, it is necessary to drill two holes, in the middle of the shelves closer to the front edge is placed the third.
- Prepare three pieces of pipe of the same length.
- Parts of the structure are fixed with tightening flange fasteners.
- The rack is attached to the floor with the same fasteners.
- From above, the structure is attached to the wall with brackets.
How to make a glass flower shelf
Shelf on the wall for glass flowers in the interior looks impressive, especially if it is equipped with lighting. Such a detail fits into the style of any interior.
For example, you can make a design using:
- 6 pre-prepared glass shelves.
- Two slats made of wood.
Work order:
Tip: For work, you should select strained glass, the thickness of which is not less than 5 millimeters.
- Grooves are made in wooden slats that correspond to the thickness of the glass and the dimensions of the slats in cross section. In this case, the fragility of the material should be taken into account and grooves should be made so that they are as strong as possible.
- Glass shelves are inserted into the grooves.
Tip: To increase strength, wooden elements in places of its attachment should be lubricated with a suitable adhesive.
- The rack is mounted on the wall in the right place.
What kind of shelves on the wall can be for flowers and the technology for their manufacture, the video in this article shows in detail.
If you have nowhere to put flowers, and you don’t want to buy an ordinary and boring shelf, then try to make it yourself.
What are they?
All flower shelves can be divided into floor and wall. The former are more reliable and durable, but additional space is required to accommodate them. Wall-mounted places do not occupy, but if not properly fastened, they can be fragile and unreliable. In addition, they are unlikely to be able to put voluminous and heavy pots with sprawling plants.
What can be made from?
In general, for the manufacture of shelves, materials such as wood, metal, plastic or glass are usually used. It is most convenient to work with wood, since not everyone can cut glass or metal on their own. And at home, such an item can be made practically from improvised and sometimes unnecessary things.
How to make?
So, how to make a flower shelf with your own hands? Below are some interesting ideas.
Idea #1
You can make interesting floor shelf from an old staircase. But be prepared for the fact that it will take up a lot of space.
For manufacturing you will need:
- old unnecessary stairs;
- plywood;
- electric jigsaw;
- varnish or paint;
- roulette;
- nails (not too long).
Preparation method:
- The old staircase needs to be laid out and varnished or painted.
- Now measure the distances between the paired steps located on different sides but on the same level. Take measurements from farthest edges. Also measure the length of each step.
- Now transfer the measurements to plywood. You will get several rectangles different sizes. They need to be cut with a jigsaw.
- Now the parts should be varnished or painted.
- Next, put each rectangle on the corresponding steps and nail it. If desired, you can use self-tapping screws for fastening. But it is advisable to try so that they do not go beyond the steps below, this will spoil appearance the whole structure.
- The shelf is ready!
Idea #2
To make this shelf, which is hung on the wall, you will need a drill, a jigsaw, a tape measure, plywood, a rope, or a rather thick and very strong rope, self-tapping screws and a screwdriver, glue and unnecessary wide rings from the eaves.
Description of the manufacturing process:
- First you need to cut out several rectangles of the same size.
- Now, in their corners, make holes that match the diameter of the rope or rope. Make sure that they are in all boards are located in the same way.
- Next, thread the ropes or ropes (4 pieces are required in total) into the first shelf (the lowest), tie the ends into knots. For reliability, it is desirable to fix them with glue.
- Put several rings on the rope, they will serve as decorative elements.
- Now, after about 20-30 centimeters (everything will depend on the size of the flowers), make one more knot. But they should be located at equal distances. Also fix the knots with glue.
- Put on the second shelf. Then string the cornice rings. If there are three shelves, tie another knot on the rope (also at equal distances).
- Place the structure against the wall, connect the ends of the rope on the sides, glue them and cut off the excess, and screw the shelf into the wall right at these joints with self-tapping screws.
Idea #3
An interesting shelf for a summer residence or a garden can be made of wood, or rather, of old stumps. For manufacturing you will need:
- 9 stumps (it is advisable to use stumps of the same size so that there are no difficulties when connecting them to each other);
- grinder or sandpaper;
- varnish or paint;
- wooden pins (they are usually used when assembling furniture);
- drill;
- crayon or marker;
- glue for wood (super strong).
Manufacturing:
- First you need to prepare the hemp. To do this, sand them with a typewriter or sanding paper. But only slices need to be processed, do not touch the natural texture of the tree, it will give the shelf a zest. If desired, the stumps can be varnished or painted (only sections or the entire surface can be painted).
- Now take the first five stumps and place them side by side in a circle.
- Mark the points of contact with a marker or chalk.
- Next, take the first two stumps. First you need to fix them. Prepare the pin and drill one blind hole in each of the stumps (the diameter will be equal to the diameter of the pin) in the marked places. Next, grease the pin with glue, place it in one hole and place another stump next to it so that the end of the pin is in its recess.
- In the same way (that is, using glue and pins), connect all five stumps in a circle.
- Now, on top of the connected stumps, install new ones, also placing them next to each other. First, fix the entire structure using a drill, pins and glue. Then place it on the first floor and fix it with glue.
- Glue the last stump to the second floor so that it is located in the middle.
- Ready! In the photo, such a multi-tiered shelf looks very original.
Idea #4
Make a wall miniature shelf. To do this, you will need one wide board or plywood, a jigsaw, a tape measure, a pencil and a ruler, one long belt or two short ones, glue and self-tapping screws for fastening.
Manufacturing:
- First, decide on the dimensions and use a jigsaw to cut the shelf of the required size, having previously applied a drawing to the board or plywood.
- Now you need to make simple calculations, namely, find the hypotenuse of a right-angled triangle, the legs of which will be the width of the shelf and the segment of the wall from the shelf to the mount. To do this, square these two values \u200b\u200band add them up, and then extract the square from the resulting sum. Sum up all three values, that is, obtained during the calculations and two legs (the width of the shelf and the distance from it to the mount) and add 2-3 centimeters. Measure the resulting number on the belt and cut it off. This segment will be used for fastening.
- If the shelf is not long, then two fasteners will be required, and if it is long, then it is better to use three.
- Now glue the ends of the belt pieces with the wrong sides. Insert the shelf into the hinges and position it so that it is vertical when attached to the wall.
- Glue the strap to the shelf at the points of contact.
- Next, attach the shelf to the wall using self-tapping screws at the junction of the ends of the belt segments.
How to arrange a finished shelf?
Making a shelf is only half the battle, because in order for this item to be original and interesting and harmoniously fit into the interior, you need to develop its design.
Several interesting ways decoration:
- Stickers, both regular and vinyl.
- Dye. You can create interesting patterns and patterns.
- old Decoration Materials, for example, wallpaper.
- Textile. It can be used as upholstery.
Let your interior become interesting!
Do-it-yourself flower shelves on the wall are an excellent device for placing flowerpots and pots. Such designs must be compact, convenient and at the same time roomy, which requires special attention and effort in their manufacture. What are the shelves on the wall for flowers, and how to make them, the article will tell.
Features and types of shelves
The type and size of the shelf on the wall for flowers is selected depending on:
- The number of plants placed on them.
- Room type.
- The appearance of the room.
- The type of flowers themselves.
- Owner's personal preference.
The number of places for flowerpots determines its type.
Shelf for flowers on the wall can be:
- Single. It only has one pot. This shelf can be placed indoors or outdoors. front door. It is especially good to use them for climbing plants with a large number of leaves and flowers. In addition to being placed on the wall, the shelf can be installed on the floor, and a flowerpot with a plant that looks like a tree can be placed on it.
- Double. Such designs are suitable for installing plants of the same type that feel good under the same conditions, for example, in the sun or in the shade.
- Multi-seat. It can occupy the entire wall or a certain section of it. Such shelves can be:
- wall-mounted, usually made not large sizes to withstand a certain weight of soil in flowerpots;
- floor, perfectly accommodate many flowerpots.
Shelves for flowers on the wall can be angular. They hold up to seven flowerpots. You can fasten them directly to the ceiling, and put pots with climbing plants.
Materials for the manufacture of shelves can be:
- Tree (see). These are the most popular, but not very practical products. Wood does not tolerate moisture, but flowers require frequent watering and spraying.
Tip: Before making such a shelf with your own hands, you should carefully process wooden details, otherwise the product will lose its appearance in a year, or maybe earlier.
- Plastic. Such shelves are not made independently, they are purchased in specialized stores. The advantages of this type of shelves:
- practicality;
- variety of shapes and colors;
- ease of use;
- ease of care.
- Metal. Their difference from other materials:
- sufficient stability;
- heavy weight;
- susceptibility to corrosion.
Tip: All metal parts must be carefully treated with anti-corrosion solutions.
Decoration for metal shelves can be the use of forged parts that will look beautiful and elegant in any interior.
- Glass. These products have a special sophistication, they make the room lighter and more airy. When constructing shelves, certain skills in working with glass are required. There are options for decorating shelves with mosaics, stained glass or special printing on glass. Such products require careful maintenance, which makes them impractical.
- Combined materials. In this case, the use of several materials in their manufacture is implied. For example:
- wooden shelves are decorated with forged details;
- to glass surfaces you can add metal pipes to make a frame for the shelf.
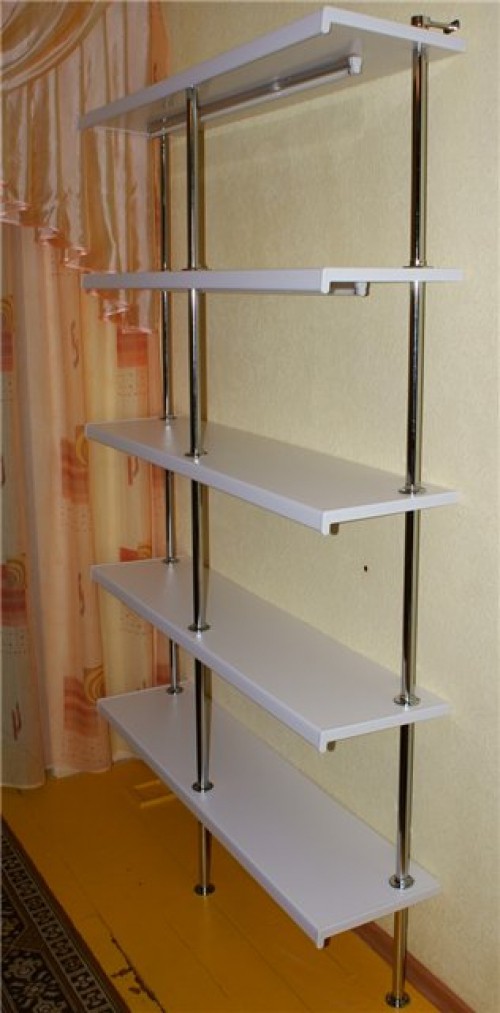
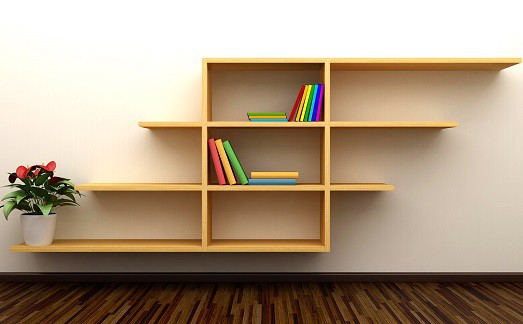
How to make a simple flower shelf
The model shown in the photo is easy to manufacture, it has a low price, while it is enough to have a sheet of plywood, and the costs for constructing the structure are minimal.
The dimensions and thickness of the plywood sheet determine the dimensions of the flower shelves, and hence their capacity. With an increase in the thickness of plywood, you can make a large shelf.
For the construction of such a shelf, materials will be required:
- Plywood sheet.
- Two nickel-plated or galvanized pipes.
- Finishing materials for surface treatment. It can be:
- dye.
From the tools you need to purchase:
- Electric jigsaw.
- Electric drill.
- Nozzles for a drill.
- Roulette.
- Sandpaper.
Tip: When making a shelf, you should be guided by the dimensions of the place where it will be located, determine the dimensions of the shelves and their capacity.
Work procedure:
- A drawing is developed with all dimensions, taking into account free space in room.
- The contours of the shelf are drawn on the plywood sheet.
- Details are cut along these lines. In this case, the shelves can have standard view square or rectangle, or a non-standard design with curvilinear or elliptical cutouts, which depends on the imagination of the manufacturer and the interior of the room.
- Marking is done for the installation of pipes.
- An electric drill drills holes of the required diameter for installing pipes.
- Wooden parts are processed with sandpaper or a grinder.
- Plywood parts are coated with special materials, which increases their resistance to moisture and antiseptics, which prevent the formation of fungus or mold on the shelves.
- The shelf is painted or varnished.
- The design is fixed on the wall surface. To do this, metal brackets are attached to the bottom of the shelf and special holes are drilled to fix it to the wall with self-tapping screws.
Tip: In the manufacture and fastening of the shelf, it is necessary to monitor the strength and reliability of the structure, these factors ensure the safety of people who are near the flower shelf.
How to make a shelf for flowers on the windowsill
In any size window, you can fit shelves for flowers.
This will require:
- Two wooden slats.
- A certain number of glasses, which depends on the size of the window and the desire of the owners.
Tip: When purchasing glass, preference should be given to tempered glass, at least 0.5 centimeters thick. This is due to the severity of flowerpots, which significantly affects the strength of the structure.

In the manufacture of vertical rails, wooden elements are used, the thickness of which depends on the thickness of the groove for installing glass. The advantage of this model is the ability to transmit light, which allows all plants to receive it in full.
The combination of wood and glass gives the shelf not only practicality, but also beauty. In addition, to facilitate the load on the shelf, it is better to make its lower part from wood. Depending on the size, the design can accommodate up to 10 medium-sized flower vases.
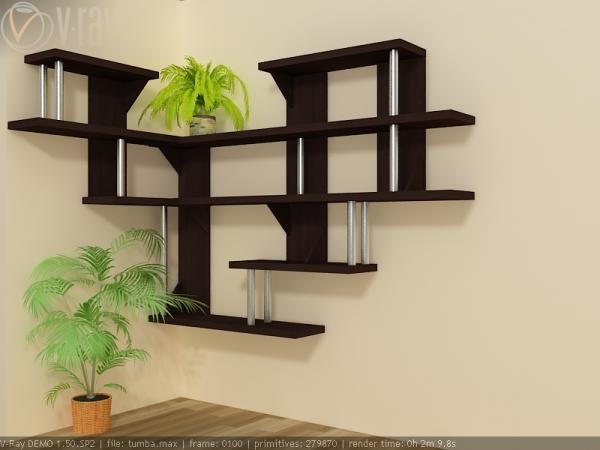
How to make a flower shelf out of wood and metal
Products include:
- Welded racks from a round profile, with a diameter of 10 millimeters.
- Wooden partitions, for the arrangement of flowers.
For example, when constructing a structure with dimensions:
- The length of the side contours is 0.9 meters.
- Width - 20 centimeters.
In this embodiment, the arrangement of four shelves with a step between them of 30 centimeters is implied. Flowers of small sizes will be installed on the shelves, and tall ones on the top shelf.
Wherein:
- Racks are connected by welding crossbars to each other.
- Installed on the frame wooden structure that holds the flowers.
- The number of parts for strapping should be selected sufficient for the device of four tiers of the product.
- After manufacturing welded construction covered with anti-corrosion solution and painted.
- Wooden parts 0.6 meters long are being prepared.
- The planks are laid on the frame and fixed with bars, 20 centimeters long.
- The design is fixed on the wall with self-tapping screws.
Tip: When attaching the product to the wall, it is necessary to monitor its reliability.
- The step between the fasteners should be no more than 0.5 meters.
- Wooden surfaces are covered with paint or varnish.
- After complete drying of the coating, the shelf can be used.
How to make a corner shelf for flowers
Such designs are used to install any number of flowerpots.
For the manufacture of a standard shelf, in order to install one flowerpot on it, you will need:
- Remaining chipboard.
- Galvanized steel pipes.
- Fasteners, for connecting all the elements together and fixing the shelf on the wall.
When assembling the shelf:
- cut out chipboard sheet required size and forms.
- Holes are drilled in it for installing pipes.
- The blanks are interconnected, and the brackets fix the product on the wall.
- The shelf is painted to match overall design premises.
Comfortable and beautiful shelf for flowers decorates any room.
Many hostesses will agree that to place flower pots best on a windowsill. Here houseplants get the necessary sunlight, are together and absolutely do not interfere with the household. But often the number of pots significantly exceeds the size of one or more window sills. And then the question arises of how to fit the entire green greenhouse in a limited window space. To solve this problem, we suggest you choose according to your taste on the windowsill. About what are the shelves for flowers, we will tell in our article.
Types of shelves for flowers on the windowsill
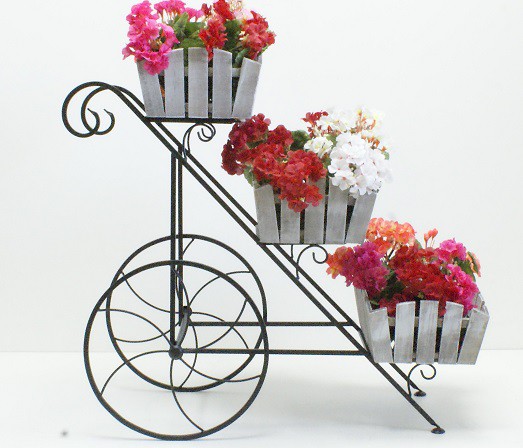
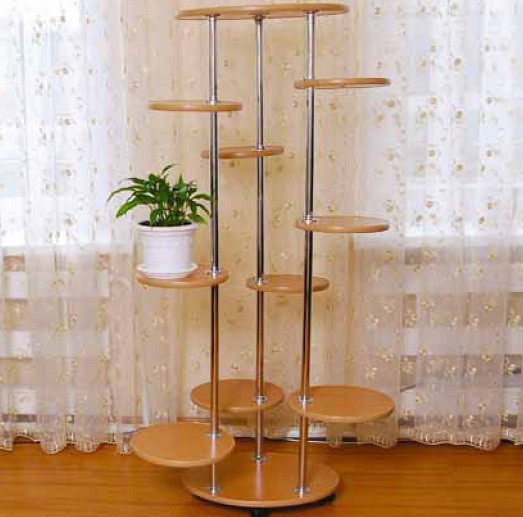
There are several of the most common options for flower shelves on the windowsill: whatnots, racks, forged stands and hanging shelves. As budget option you can choose normal plastic shelves for the bathroom (corner or rectangular) and adapt them to flower pots.
The simplest outwardly resemble several shelves fastened together. A bookcase in the form of a ladder looks interesting, especially if you place two of these on the windowsill from different angles from the window. Shelves are made of metal or wood; tempered glass is also used for shelves.
Racks or struts are vertical metal support with round holders for flower pots. Racks differ in height, number of holders, their diameter. large plants on the rack put in the lower cells, the smallest - on top. Some models allow you to adjust the placement of cells on the spacer in height and width.
Forged shelves for flowers on the windowsill are produced in a wide variety of forms. Rectangular forged stand can be attached outside the window and placed in it flowering plants on the summer period. You can choose a forged shelf on the windowsill with one or more flower stands, for example, in the shape of a bicycle. Such products are durable, durable, openwork design and unpretentiousness. In blacksmith workshops, you will be offered to make an exclusive shelf for flowers according to your own design, which will certainly become a wonderful interior decoration.