Flower wall mount. Floor shelves for flowers with their own hands made of wood.
What lovers of indoor flowers will not come up with in order to place their favorites more comfortably at home - capricious violets, spreading monsters and variegated dieffenbachia. After all, if there are a lot of flowers, then placing them so that they do not close the light to each other is sometimes problematic. Before you make a flower rack, decide on the place where it will be placed: against the wall, in the corner or on the windowsill itself.
Shelving for indoor flowers
Flower rack can be wooden, metal, plastic, plasterboard. Looks very good glass rack for flowers. But in this case, you need to take into account the thickness of the glass and whether you can cut the glass yourself or it is better to contact a glass workshop. Often they use everything that is at hand, combining different types materials. It all depends on what tools the master owns and what materials the hostess of the flower kingdom has chosen.
Rack for plywood flowers in 6 hours

Let's say you have a sheet of plywood on hand. A fairly durable and not too expensive material that can turn into an elegant flower shelf in just a few hours if you have a jigsaw and you can use it to cut smooth lines on wood.
What do you need? Materials: plywood - 1 sheet, nickel-plated pipe - 2 pieces, shelf fasteners - 2 for each shelf, varnish or paint, fixing tool. Tools: jigsaw, drill, sandpaper, tape measure.
Manufacturing technology:

1. We think over the dimensions of the shelves: we measure the place for which it is intended.
2. According to the measurements, we draw future shelves on a sheet of plywood. At the same time, their configuration can be either the simplest (rectangular shelves with rounded corners), or with all kinds of waves, the number and depth of which depend on you.
3. After marking, the shelves are cut out of plywood.
4. Fold the blanks on top of each other and mark the distance where the hole for the pipe will be located. It is important that this point exactly matches on all workpieces.
5. In two places on each workpiece, a hole is made for a nickel-plated pipe.
6. Workpieces are ground sandpaper(especially the ends).
7. We cover the shelves furniture varnish preferably several times.
8. We pass a nickel-plated pipe through the holes, fixing it near each shelf. It is important to ensure that the shelves are placed parallel to each other and perpendicular to the tubes.
9. The next step is wall mounting. These can be special brackets that are attached to the back of the top and bottom shelves and to the wall. Here it is important to correctly mark the wall and use a drill to drill holes into which the self-tapping screws will be screwed. The size and strength of the fastening tool determines whether the shelf will fall under the weight flower pots.
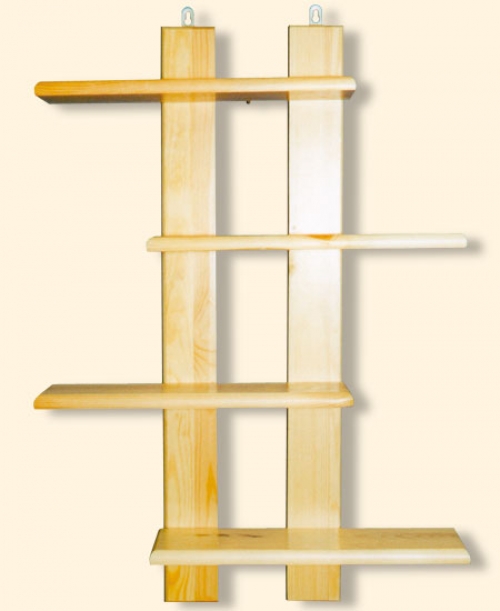
Do-it-yourself wooden flower rack in 3 hours

Dimensions of the proposed rack: 23 cm wide, 60 cm long and 70 cm high. There are 3 shelves in total.
Materials: planks of wood (dimensions 3.5x0.5 cm, length - 2m) - 6 pieces, planks, dimensions of which are 2x2 cm, length - 2m - 2 pieces, nails (size 25 and 40).
Tools: tape measure, regular hammer, wood saw.
Thin slats will be used to make the shelves themselves, and 2x2 slats will be used to make racks for the shelf.
Manufacturing technology:
1. We mark thin planks into pieces 60 cm long, after which we cut them. We get 18 bars.
2. We mark the planks 2x2 cm by 70 cm and saw them. We get 4 racks.
3. From the remains of the planks 2x2 cm, we cut out 2 bars of 23 cm each.
4. We take 2 racks, lay them parallel to each other on the floor and mark the places for the future fastening of the shelves. They must be accurately measured. The distance between the shelves depends on the height of the flowers you plan to place on the inner shelves.
6. Help is needed to assemble the entire structure. One holds racks with shelves, the other fixes the structure with nails (40th size).
7. Ready product varnished or painted.
Rack-shelf for flowers made of metal and wooden slats
Such a shelf will serve as a solid wall construction. After all, its racks are welded from metal.
For this they take metal bars with a diameter of 7-10 mm or a corner (if the rack will stand on the floor) and weld a similar design, the dimensions of which depend on the wishes and the availability of space for the shelf. If the side bases are 90x20 cm, then this will allow you to place 4 shelves at a distance of 30 cm from each other. This is very convenient for placing undersized flowers, as well as ampelous ones. Tall flowers can be placed on the top shelf.
In the process of welding, fastenings are provided on the upper inner edge of the structure, and crossbars for placing shelves. There will be 4 in total. Then, when the structure is ready, it can be painted.
In parallel, planks 0.50-0.60 cm long are cut out of bars 2.5x1.5 cm. You will need 20 planks. Then lay them out parallel to each other. front side down and knocked down with the same planks, but short - 20 cm each.
The next step is to place metal structure on the wall. To do this, use a molly if the wall is made of drywall, and ordinary self-tapping screws for other types of walls. It is important to correctly measure the attachment points of the bases for the shelves. They must be in a parallel plane. Otherwise, the shelves will not lie flat on the crossbars. So, the distance between fasteners is 50-55 cm. metal supports laying shelves. The entire wood-metal structure can be coated with paint, or you can wooden shelves varnish, and metal ones - with paint to match the rest of the room.

Shelf for flowers from the windowsill
For this you will need plastic window sill length 3.90 m, nickel-plated pipes (3 pcs.), fasteners (flange) - 3 for each shelf, brackets - 2 pcs.

Manufacturing technology:
1. An ordinary window sill is sawn into pieces of 1.3 m.
2. In the resulting blanks, 3 holes are made at the same distance: 2 along the edges of the rear wall and 1 - in the center at the front.
3. Pipes are cut to the required height. with the help of flanges and screws fasten the entire structure.
4. The lower edge of the pipes is fixed to the floor using the same flanges in 3 places. Brackets are put on the upper edge of two pipes placed near the wall and also fastened to the wall with the help of screws.

Corner rack for flowers
This design is most simply made of chipboard and the same nickel-plated pipes. It will take only 3 pipes of the length you need, several identical shelves cut with a jigsaw according to the pattern (triangular shape) and the number of flanges and screws corresponding to the number of shelves. Everything is assembled according to the technologies mentioned above. Measure seven times - cut one. At the top, the shelf is attached to the walls with brackets. For fixing, it is enough to place the brackets on the two outer corners.
Glass rack for flowers

Such a device is convenient in that if you place a backlight on top, then the light will penetrate all the shelves. You can make such a glass shelf using two wooden slats and 6 glasses. Of course, the material of the shelves - strained glass not less than 5 mm thick. Vertical slats can be made of wood. The size of the groove, which is made for fastening the glasses, and, accordingly, the strength of their fastening depends on their thickness. For shelves about 20 cm thick, the grooves should be about 10 cm. This means that the thickness of the slats should not be less than 20 cm. There may be other proportions, but they are more suitable for placing souvenirs and various small things on such shelves. Flowerpots weigh a lot, and if there are several of them, then pressure is created on the entire structure. In the design described above, one of the shelves below can be replaced with a wooden one.

Plasterboard shelves for flowers
Many shelving and shelving options are available in drywall. It can be both niches in the wall, and regular shelves. In both the first and second cases, a frame is built, which is sheathed with drywall. From a decorative point of view, such a design wins a lot, but from a practical point of view - no. Flowers are water and it is impossible to guarantee 100% that moisture will not get on the material that deteriorates from it. Therefore, one of the options is drywall frame attach glass shelves. This design would look great with backlighting.
As you can see, there are a lot of options for flower racks. Photos clearly demonstrate that there is no limit to human imagination. Whatever material falls into the hands of the master, it can make durable and beautiful flower racks.
Flowers are the most the best decoration any home, so their lovers often face the problem of placing pots and flowerpots. Shelves for flowers, first of all, should be roomy, compact and comfortable, so their construction requires attention and effort. How to make a shelf for flowers, consider below.
The type of shelf that is needed to set the colors depends on many factors, such as:
- the number of plants;
- type of room;
- the appearance of the room;
- type of plant;
- owner's preferences.
Therefore, when choosing a shelf designed to accommodate flowers, all these factors should be taken into account. Depending on the number of places for flowerpots, shelves are:
- single;
- double;
- multi-seat.
The first option involves the location of just one flowerpot. Such shelves are installed both indoors and outdoors, for example, at front door. On single shelves, climbing plants look good, with a lot of leaves and flowers. Such shelves are:
- wall;
- floor.
Floor shelves involve the installation of a large flowerpot with plants in the form of trees.
Double shelves are suitable for the installation of the same type of plants that feel good with the same climatic conditions, for example, in the shade.
Multi-seat shelves occupy either a specific section of the wall or the entire wall. Such shelves are also available both on the wall and on the floor. In most cases, wall shelves have small size, since they are not able to withstand the heavy weight of the soil located in the flowerpots, but the floor shelves perfectly accommodate several dozen flowerpots.
Photo shelves for flowers:


In addition, flower shelves are angular. This type is able to accommodate from one to seven flowerpots. Also shelves for flowers are ceiling. They are attached directly to the ceiling and involve the placement of climbing plants.
In relation to the material from which flower vases are made, they are divided into:
- wooden;
- plastic;
- metal;
- glass;
- combined.
Shelves for flowers made of wood are the most common, but at the same time not very practical. As you know, a tree is unstable in front of moisture, and flowers require frequent watering and spraying. Therefore, careful processing is required before the construction of such a shelf. wooden parts, otherwise, such a shelf will not serve its owner even a year.
It is impossible to build plastic shelves on your own, they are sold in specialized stores. Among the advantages of this type of shelves are practicality, a variety of shapes, ease of use, ease of maintenance and a variety of colors.
Metal shelves for flowers are stable and quite heavy. At the same time, one should not forget that metal is a material, corroded. Therefore, it requires careful treatment with anti-corrosion solutions. Metal shelves are decorated with forged parts; they look beautiful and elegant in any interior.
Glass shelves for flowers are particularly sophisticated, as they make the room more airy and light. For the construction of such shelves, you must have certain skills in working with glass. It is possible to decorate the shelf with mosaics, stained glass or printing on glass. This type of shelves requires careful care and therefore very impractical.
Combined flower shelves involve the use of several materials in the process of their construction. For example, wooden shelves are decorated with forged elements, to glass surfaces add metal pipes, in the form of a frame for a shelf, etc.

DIY flower shelf: a simplified version
This shelf model is distinguished by its ease of construction and low cost, since in the presence of a plywood sheet, the cost of its construction is minimized. The size of the flower shelves and their capacity depend on the size and thickness of the plywood sheet. The thicker the plywood, the larger the shelf will be.
To build such a shelf you will need:
- plywood sheet;
- two nickel-plated or galvanized pipes;
- finishing materials for surface treatment, in the form of varnish or paint.
From the tools you need to prepare:
- electric jigsaw;
- electric drill with special nozzles;
- roulette;
- sandpaper.
In relation to the location of the rack, determine the required size of the shelf and its capacity. Make a drawing to accurately calculate every centimeter free space. In relation to it, draw the contours of the shelf on the plywood sheet and proceed to cutting out the details. It is possible to build a standard shelf in the form of a square or a rectangle, as well as non-standard designs with wavy or elliptical cutouts. It all depends on the interior of the room and the imagination of the manufacturer.

Via electric jigsaw cut out the desired shape. On the part, make markings for the installation of pipes. Drill holes with an electric drill required size, for pipe installation. All wooden components should be sanded down with sandpaper or grinder.
Cover plywood parts with special materials that increase their resistance to moisture and antiseptics, preventing the formation of fungus or mold on the surface of the shelf. The following is the procedure for coating them with paints and varnishes.
The next step is fixing the structure on the wall surface. Attach metal brackets to the bottom of the shelf and drill special holes through which they are fixed to the wall with self-tapping screws. Pay attention to the strength of the structure and the reliability of the connections, since the safety of people near the shelf depends on these factors.
Wall shelves for flowers made of wood: shelving construction
Before the construction of this model, a drawing should be made with which blanks will be cut. The flower rack has the following dimensions:
- length - 60 cm;
- width - 23 cm;
- height - 70 cm.

It will safely accommodate up to ten flower pots, as the rack consists of three levels. To build such a shelf for flowers you will need:
- six wooden planks, the length of which is 200 cm, and the cross section is 3.5x5 cm;
- two bars, 200 cm long, with a section of 2x2 cm;
- several dozen nails, the length of which is 2.5 and 4 cm;
- finishing materials in the form of varnish or paint.
In addition, it is necessary to prepare a tool in the form of a saw, hammer, grinder or sandpaper and a tape measure.
Thin planks will be required for the manufacture of shelves, and from the bars we will make racks for the rack. The first step includes cutting wooden blanks into details in the form of eighteen elements. For their manufacture, it is necessary to measure 60 cm from the length of the board.
On the beam, markings are made along the length of 70 cm, four elements in the form of racks will be obtained from it. From the remnants of the timber, elements should be cut out, each 23 cm long.
Put on workplace all racks, place them parallel to each other, make markings at the place where the first, second and third shelves are fixed. Their height depends on the type and height of the plants that will be located on them. Each of the shelves consists of six slats. Shelves connect end parts with the help of parts from a bar of 23 cm. They are fixed with nails, 2.5 cm long. Using a grinder, process the end sections and sharp edges of the rack. Cover the finished product with an antiseptic, varnish or paint.

How to build a flower shelf on the windowsill
This type of shelf will fit perfectly into any size window. For its construction, you will need:
- two wooden slats;
- several glasses, the number of which depends on the size of the window.
When choosing glass, make sure that it is tempered, and its thickness is not less than 0.5 cm. Since the severity of flowerpots will significantly affect the strength of the structure.
For the manufacture of vertical rails, wood is perfect, its thickness affects the thickness of the groove into which the glass is installed. This shelf model has a special advantage: it is able to pass light through itself, so all plants will receive it in full.
If the thickness of the shelf is about 40 cm, then the groove will be 15-20 cm in size. In this case, slats 35 cm thick will be required. The combination of wood and glass makes this shelf not only practical, but also beautiful. In addition, in order to lighten the load on the shelf, it is recommended that its lower part also be made of wood. Such a shelf for flowers on the window can accommodate up to fifteen flower vases.

Combined flower shelf: wood and metal
Such a shelf is wall-mounted and consists of welded metal racks and wooden partitions on which flowers are located.
To make a shelf, you will need metal rods with a diameter of 10 mm. When arranging floor version, the use of metal corners is recommended. Before the construction of the shelf, it is necessary to determine its location, and in accordance with this parameter, its size is selected.
We suggest considering the construction of such a shelf with dimensions:
- side contours of length - 90 cm;
- width - 20 cm.
This option implies the presence of four shelves with an interval of 30 cm. small flowers, and for tall plants the top shelf will do.
The racks are connected by welding the crossbars together, and already installed on the frame wooden structure holding flowers.
The number of elements for strapping should be sufficient for the construction of four tiers of the shelf. Welded construction after manufacturing, it is painted with paint and coated with an anti-corrosion solution.
To fix the structure on the wall, use self-tapping screws. Watch out for the strength of the structure and the reliability of fastening. The interval between fixing the shelf with fasteners is a maximum of 50 cm. This is followed by coating with paint or varnish wooden surfaces. After their complete drying, the shelf is ready for its intended use.

Floor shelves for flowers from the windowsill
original and practical solution is the manufacture of a shelf for flowers, using a window sill from plastic windows. This material It has high strength characteristics, is not subject to moisture and is easy to maintain, therefore it can serve as a shelf for many years.
To make such a shelf you will need:
- plastic standard window sill, length 390 cm;
- three pipes coated with zinc;
- nine flange mounts;
- two brackets.
First of all, it is necessary to cut the plastic window sill into three parts, each 190 cm long. These parts must be drilled so that they have three holes for installing a galvanized pipe. Two holes are located at the edges, and one is in the middle, slightly pushed forward. In all workpieces, holes must be drilled in the same place. Otherwise, the shelf will turn out to be crooked.
Next, three pipes are cut, which should have the same length. The structure is fastened with screws tightening the flanges. The shelf is installed on the floor using the same parts. The lower fixation of pipes is carried out using screws and flanges. To increase the strength and stability of the shelf, it is necessary to pull the brackets from above, which are fixed to the wall with screws.
Corner flower shelf: phased construction
Corner shelves for flowers are designed to install one or more flowerpots, in the second option, you should make a corner shelf, in the form of a rack.
To make a standard shelf to accommodate one flowerpot, you will need the remains of a chipboard sheet, a pipe, preferably made of galvanized steel, and fasteners that will help connect all the elements together and secure the shelf to the wall.
Such a shelf is assembled very simply, just cut it out chipboard sheet right size and molds and make a hole in it for installing the pipe. Flanges and screws will help connect the wooden and metal blanks, and brackets - fix the shelf on the wall. This is followed by the procedure for painting the shelves, in accordance with the overall design of the room.
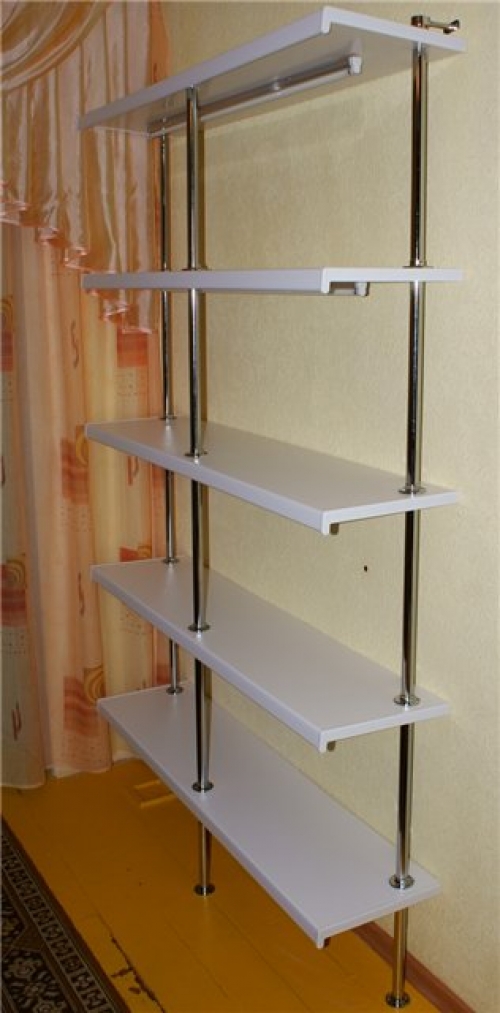
Making a multi-tiered flower shelf with your own hands
This shelf model involves the installation of a large number of flower pots, but at the same time it takes a minimum free space. The manufacture of such a shelf is relevant for owners small apartments or houses. At the same time, the shape of the shelf does not prevent light from reaching any of the pots, so that the flowers are in almost the same climatic conditions.
The main components of such a shelf are a floor platform with four legs, on which racks made of chrome-plated pipes are fixed. These racks hold four shelves located at different heights from the floor.
To build a multilayer flower shelf, you will need:
- multi-layer plywood, with a minimum thickness of 1.5 cm, preferably with a water-repellent impregnation;
- several chrome pipes, 2.5 cm in diameter, with a total length of 5.1 m;
- seventeen pipe flanges;
- five threaded bushings;
- four furniture supports;
- several screws and self-tapping screws;
- five furniture bolts;
- furniture edge in the same color as the pipes;
- aerosol can, for painting the structure;
- putties for working with wooden surfaces.
This shelf must be stable, as it will withstand the weight not only from flowers, but also from wet, heavy soil in flowerpots.
In addition, you will need the following tools:
- jigsaw;
- pipe cutting tool;
- screwdriver;
- electric drill;
- Sander;
- screwdriver.
This stand will delight its owners not only with beauty and functionality, but also with practicality and elegance.
Using the drawings of the flower shelves, cut the plywood and prepare the parts for the lower shelves:

Process all blanks with a grinder. On the part that is located below, make holes for installing furniture bolts. On blanks in the form of shelves, measure the places where racks and sections will pass through them for mounting flanges. To drill holes for pipes, it is recommended to use a drill with a diameter of 2.5 cm.
To smooth the surface of the sawn shelves, use wood putty. After it dries, use a fine mesh for sanding. Next, paint the shelves with an aerosol can of paint. desired color. After the paint has completely dried, glue the end sections of the shelves with a furniture edge.
- one in the form of a 60 cm rack;
- one rack per 90 cm;
- three racks of 1.2 m.
Use a pipe cutter to cut metal. It will provide beautiful and smooth surface ends. In its absence, it is possible to use a hacksaw for metal.
Completion of work includes the assembly of all parts. Such a prefabricated structure will delight the eye in any corner of the room, but in order for it to last as long as possible, it is necessary to ensure that all parts are securely attached to each other.
First, all racks are attached to the lower base. Their fixation is carried out with the help of furniture bolts. Flanges are put on the racks and screwed to the main part. Their fixation occurs with the help of self-tapping screws. Similarly, all shelves are fixed. The interval between them is 30 cm. When all the shelves are installed, you need to attach furniture supports to the lower base. On this, the manufacture of the shelf is considered complete, it is ready to perform its direct duties.
lovers indoor floriculture often face the problem of lack of space for their pets. Keeping pots on the windowsill is not always convenient; putting them on the table is also not a good option. The real salvation in this case are the shelves on the wall. Making them with your own hands will take several hours of your time, but your flowers will have a permanent and comfortable place to live.
Work materials
To make flower shelves with your own hands, the most various materials. They can be made of metal and wood, plastic and drywall, glass and others. durable materials. It is also important that the shelves on the wall fit into the interior and fit the conditions of the room.

- Drywall- it is used in the case when the shelf on the wall is going to be made in the form of a niche, and it becomes part of overall design rooms.
- Wood- This classic version, which is easy to work with and will last a long time with normal humidity rooms.
- Chipboard- resistant to moisture, deformation and temperature extremes, easy to use and is in an affordable price category.
- Metal- needs to be painted to protect the material from corrosion. In addition, a welding machine is required to work with it.
- Plastic- its advantages are affordability and resistance to mold, it is ideal for placing a shelf on a balcony or loggia.
- Glass- provides good light transmission, which can be extremely important for certain types of flowers.
- Plywood- moisture-resistant material, which, with a certain skill, can be given the most diverse shape with your own hands.


If one material is not enough to build a rack with your own hands, they can be combined. For example, make shelves for flowers, alternating plastic and glass or wood.
Plywood shelf
If there are several sheets of plywood lying around on the farm, and you know how to make smooth lines with a jigsaw, in one evening with your own hands this material can be turned into elegant shelves for flowers. To make such a design, in addition to plywood you will need:
- two galvanized or nickel-plated pipes;
- fastenings for shelves and self-tapping screws;
- paint or varnish;
- jigsaw;
- sandpaper;
- drill;
- tape measure and pencil.

Work order:
- Measurements are taken of the place for which the shelves are intended and a design drawing is created.
- The dimensions are transferred to a sheet of plywood, if desired, the cut can be decorated with curly edges.
- Shelves are cut out of plywood according to the drawing with an electric jigsaw.
- The edges of the blanks are polished with sandpaper.
- On each workpiece, holes for the pipe are sawn.
- Details are covered with paint or furniture varnish.
- Through the holes, the shelves are threaded onto the pipes parallel to each other, fastening near each plywood board.
- Make holes in the wall to which the shelves will be attached using self-tapping screws.
How to make a decorative plywood shelf (video)
Plastic rack
Window sills have become quite a familiar place for flowers. But since it is not always convenient to keep flowers by the window, original solution will make a rack for them with their own hands from the same plastic window sills.

 For work you will need:
- plastic window sill 3.9 m long;
- three galvanized or nickel-plated pipes;
- 9 flanges for fastening;
- 2 brackets.
Work order:
- The window sill is cut into 3 identical parts.
- In the blanks, 3 holes are drilled with a diameter of the pipe section: 1 at the front wall in the center, 2 at the rear along the edges.
- The pipes are cut to the height of the future rack.
- Window sills are put on pipes, fixing each shelf with flanges at the required height.
- The structure is flanged to the floor.
- Brackets are put on the upper ends of the pipes, which are attached to the wall with screws.
glass shelves
If you have the skills to work with your own hands with a glass cutter, it will not take much time to make a glass flower rack. But when suitable material there is, but there is no one to cut, the workshop will help out. You will only have to provide necessary measurements and at home to assemble with your own hands a structure of wooden slats on which the shelves will be held.
It is important that the glass be tempered, at least 0.5 cm thick. This fragile material must withstand significant stress from the pressure of flower pots.

For work you will need:
- glass cutter;
- hacksaw;
- 6 glasses;
- 8 iron corners;
- 2 wooden slats or boards.
Work order:
- Carry out the cutting of glass shelves of the required dimensions.
- In wooden slats, grooves are cut with a depth of at least ½ of the width of the glass shelf.
- Reiki with self-tapping screws on the corners are attached to the wall at the top and bottom of the rack on both sides of the wooden board.
- Glass shelves are inserted into the grooves.
wooden shelving
Wood is a malleable and relatively soft material. With only a saw, a hammer and a few nails, it's easy to make corner shelves for flowers from several scraps of a board or a full-fledged rack for the entire wall.

For work you will need:
- 2 bars 2 m long with a section of 20 × 20 mm;
- 6 wooden planks 2 m long with a section of 35 × 5 mm;
- nails 40 and 25 mm;
- sandpaper;
- a hammer;
- saw;
- roulette.
Work order:
- Planks are cut to a length of 60 cm.
- The bars are cut into 4 parts of 70 cm and 6 of 20 cm.
- The saw cuts are polished with sandpaper.
- 4 racks will be made of long bars.
- Short bars are nailed to the ends of the racks, on which the shelves will be held.
- Planks are laid on the bars and fastened with nails for structural strength.
- If desired, the rack is painted and varnished - this will save the tree from deformation and decay.
Making a shelf for flowers (video)
Conclusion
A little effort - and your house will have a functional exclusive little thing that will not only provide your flower pots convenient location, but will also become the pride of the owner. One has only to turn on the fantasy and set aside a few hours of your free time for this.
Attention, only TODAY!
What lovers of indoor flowers will not come up with in order to place their favorites more comfortably at home - capricious violets, sprawling monsters and variegated dieffenbachia. After all, if there are a lot of flowers, then placing them so that they do not close the light to each other is sometimes problematic. Before you make a flower rack, decide on the place where it will be placed: against the wall, in the corner or on the windowsill itself.
Shelving for indoor flowers
Corner rack for flowers
Glass rack for flowers
Shelving for indoor flowers
Flower rack can be wooden, metal, plastic, plasterboard. The glass flower rack looks very good. But in this case, you need to take into account the thickness of the glass and whether you can cut the glass yourself or it is better to contact a glass workshop. Often they use everything that is at hand, combining different types of materials. It all depends on what tools the master owns and what materials the hostess of the flower kingdom has chosen.
Rack for plywood flowers in 6 hours
Let's say you have a sheet of plywood on hand. A fairly durable and not too expensive material that can turn into an elegant flower shelf in just a few hours if you have a jigsaw and you can use it to cut smooth lines on wood.
What do you need? Materials: plywood - 1 sheet, nickel-plated pipe - 2 pieces, shelf fasteners - 2 for each shelf, varnish or paint, fixing tool. Tools: jigsaw, drill, sandpaper, tape measure.
Manufacturing technology: 
1. We think over the dimensions of the shelves: we measure the place for which it is intended.
2. According to the measurements, we draw future shelves on a sheet of plywood. At the same time, their configuration can be either the simplest (rectangular shelves with rounded corners), or with all kinds of waves, the number and depth of which depend on you.
3. After marking, the shelves are cut out of plywood.
4. Fold the blanks on top of each other and mark the distance where the hole for the pipe will be located. It is important that this point exactly matches on all workpieces.
5. In two places on each workpiece, a hole is made for a nickel-plated pipe.
6. Workpieces are sanded with sandpaper (especially the ends).
7. We cover the shelves with furniture varnish, preferably several times.
8. We pass a nickel-plated pipe through the holes, fixing it near each shelf. It is important to ensure that the shelves are placed parallel to each other and perpendicular to the tubes.
9. The next step is wall mounting. These can be special brackets that are attached to the back of the top and bottom shelves and to the wall. Here it is important to correctly mark the wall and use a drill to drill holes into which the self-tapping screws will be screwed. It depends on the size and strength of the fastening tool whether the shelf will fall under the weight of the flower pots.
Do-it-yourself wooden flower rack in 3 hours
Dimensions of the proposed rack: 23 cm wide, 60 cm long and 70 cm high. There are 3 shelves in total.
Materials: planks of wood (dimensions 3.5x0.5 cm, length - 2m) - 6 pieces, planks, the dimensions of which are 2x2 cm, length - 2m - 2 pieces, nails (size 25 and 40).
Tools: tape measure, regular hammer, wood saw.
Thin slats will be used to make the shelves themselves, and 2x2 slats will be used to make racks for the shelf.
Manufacturing technology:
1. We mark thin planks into pieces 60 cm long, after which we cut them. We get 18 bars.
2. We mark the planks 2x2 cm by 70 cm and saw them. We get 4 racks.
3. From the remains of the planks 2x2 cm, we cut out 2 bars of 23 cm each.
4. We take 2 racks, lay them parallel to each other on the floor and mark the places for the future fastening of the shelves. They must be accurately measured. The distance between the shelves depends on the height of the flowers you plan to place on the inner shelves.
6. Help is needed to assemble the entire structure. One holds racks with shelves, the other fixes the structure with nails (40th size).
7. The finished product is varnished or painted.
Rack-shelf for flowers made of metal and wooden slats
Such a shelf will serve as a solid wall structure. After all, its racks are welded from metal.
To do this, take metal rods with a diameter of 7-10 mm or a corner (if the rack will stand on the floor) and weld a similar design, the dimensions of which depend on the wishes and the availability of space for the shelf. If the side bases are 90x20 cm, then this will allow you to place 4 shelves at a distance of 30 cm from each other. This is very convenient for placing undersized flowers, as well as ampelous ones. Tall flowers can be placed on the top shelf.
In the process of welding, fastenings are provided on the upper inner edge of the structure, and crossbars for placing shelves. There will be 4 in total. Then, when the structure is ready, it can be painted.
In parallel, planks 0.50-0.60 cm long are cut out of bars 2.5x1.5 cm. You will need 20 planks. Then they are laid out parallel to each other face down and knocked down with the same planks, but short - 20 cm each.
The next step is to place the metal structure on the wall. To do this, use a molly if the wall is made of drywall, and ordinary self-tapping screws for other types of walls. It is important to correctly measure the attachment points of the bases for the shelves. They must be in a parallel plane. Otherwise, the shelves will not lie flat on the crossbars. So, the distance between the fasteners is 50-55 cm. Shelves are laid on the placed metal supports. The entire wooden-metal structure can be coated with paint, or wooden shelves can be varnished, and metal shelves can be painted to match the rest of the room.
Shelf for flowers from the windowsill
To do this, you will need a plastic window sill 3.90 m long, nickel-plated pipes (3 pcs.), Fixings (flange) - 3 for each shelf, brackets - 2 pcs.
Manufacturing technology:


Manufacturing technology:
1. An ordinary window sill is sawn into pieces of 1.3 m.
2. In the resulting blanks, 3 holes are made at the same distance: 2 along the edges at the back wall and 1 in the center at the front.
3. Pipes are cut to the required height. with the help of flanges and screws fasten the entire structure.
4. The lower edge of the pipes is fixed to the floor using the same flanges in 3 places. Brackets are put on the upper edge of two pipes placed near the wall and also fastened to the wall with the help of screws.
Corner rack for flowers
This design is most simply made of chipboard and the same nickel-plated pipes. It will take only 3 pipes of the length you need, several identical shelves cut with a jigsaw according to the pattern (triangular shape) and the number of flanges and screws corresponding to the number of shelves. Everything is assembled according to the technologies mentioned above. Measure seven times, cut once. At the top, the shelf is attached to the walls with brackets. For fixing, it is enough to place the brackets on the two outer corners.
Glass rack for flowers

Such a device is convenient in that if you place a backlight on top, then the light will penetrate all the shelves. You can make such a glass shelf using two wooden slats and 6 glasses. Of course, the shelves are made of tempered glass with a minimum thickness of 5 mm. Vertical slats can be made of wood. The size of the groove, which is made for fastening the glasses, and, accordingly, the strength of their fastening depends on their thickness. For shelves about 20 cm thick, the grooves should be about 10 cm. This means that the thickness of the slats should not be less than 20 cm. There may be other proportions, but they are more suitable for placing souvenirs and various small things on such shelves. Flowerpots weigh a lot, and if there are several of them, then pressure is created on the entire structure. In the design described above, one of the shelves below can be replaced with a wooden one. 
Plasterboard shelves for flowers
Many shelving and shelving options are available in drywall. It can be either niches in the wall or ordinary shelves. In both the first and second cases, a frame is built, which is sheathed with drywall. From a decorative point of view, such a design wins a lot, but from a practical point of view - no. Flowers are water and it is impossible to guarantee 100% that moisture will not get on the material that deteriorates from it. Therefore, one of the options is to attach glass shelves to the plasterboard frame. This design will look very advantageous with backlighting.
As you can see, there are a lot of options for flower racks. Photos clearly demonstrate that there is no limit to human imagination. Whatever material falls into the hands of the master, it can make durable and beautiful flower racks.
Many housewives love flowers and therefore they simply need floor or for flowers. In order to pick correct option, you should turn to the advice of professionals and strictly follow them. The furniture market has great amount firms that are engaged in the manufacture of shelves. Such products differ from each other in configuration, adaptation, functions and appearance.
Types of shelves
The shelf is a fixture that does not have a front wall. AT wall options there are special mounts, in the floor - legs. Wall shelves for flowers, they can be cantilevered, with or without side walls, with back surfaces, different orientations (vertical and horizontal), multi-tiered, with corners (including straight lines), inclined and rounded.
Usually, this species furniture designed for storage various items interior, including flowers. Some models are made from different materials(metal, glass, wood, etc.), which indicates that each individual piece of furniture has its own advantages. In the interior at the same time there may be such types as wall, hanging and corner.
Wall shelf for flowers great option, since it takes up a minimum amount of space due to the fact that it is located above the main furniture.
A suspended shelf has the same advantages as a hinged one. The difference between them is that this option is attached to the surface of the ceiling or wall using straps or other fasteners.
They are located between adjacent walls and can be attached both to the side surfaces and to the ceiling.
If we classify this piece of furniture according to the material from which it is made, then the following options can be distinguished: wooden, glass, metal wall shelves for flowers. There are models from chipboard, GVL, MDF, as well as combined ones.
The range of shelves on the market is quite diverse, and therefore everyone can choose the right option. 
Detailed characteristics for the apartment
In each apartment you can see shelves that are intended for various pieces of furniture, including flowers. They install models that correspond in their design to the general concept, as well as to the material used, that is, it must be repeated in other pieces of furniture. The shelf can be fixed with corners, brackets and hinges. Which option the owner chooses depends on the style of his room.
The most popular are wall shelves for flowers made of wood and drywall. This is due to the fact that they are very easy to install and can be assembled by hand. Often, the shelves are sewn together with GVL sheets and mounted on rails made of metal or wood. Such a device will look great in any room, and will not clutter up the room.
In order to use the brackets with pins, it is necessary to fit the shelf onto the cylindrical rod. As a rule, furniture in this case has a thickness of at least 25 mm. You can use this mounting option in the version with an interior in the style of minimalism. This piece of furniture, in this case, looks very concise and concise. Wall shelves for flowers, which are attached to the wall using this method, are installed on top of the bracket itself. These elements carry not only a constructive load, but also a decorative one.
Corner shelves for flowers are suitable for those who want to beat the defects in the joints of the walls. There are currently both internal views, as well as external. An openwork metal shelf will become a luxury in the interior. It can be a great accent in any room. 
DIY wall shelves for flowers
At this stage, there are a huge number of different wall and floor shelves created by world designers. However, they may not suit all interiors. There are also people who find it difficult to choose the option they need from a huge assortment. In this case, there is nothing left but to make a shelf yourself. This is how you can save money and fully satisfy your desires.
First you need to decide on colors, materials and the place where the item will be located. It should be remembered that many flowers require spraying from a spray bottle. That is why the paint to be coated on the shelf must be completely resistant to moisture. true friends at the time of the manufacture of the shelf, fasteners, a drill, a saw, as well as nails and screws will become the owner. Rails can be used if desired.
For lovers of extraordinary solutions, there is an option beautiful shelves from ropes and an ordinary board. The product will be somewhat reminiscent of a hanging flower box. It is this design that saves a lot of space, because it requires fixing in window opening. Thanks to this solution, flowers will receive large quantity sun rays.
Removable shelves for flowers in this version are made quite easily and simply. You should take a strong rope, reinforcements in the form of hooks and an ordinary wide board. The latter should be cut into several equal parts. In this case, it must be taken into account that the more elements are obtained, the higher the shelf will be. In order not to miscalculate with a place for fastening, it is necessary to step back 3 cm from the corner. Next, use a drill. With it, you need to drill several holes through which the rope will be passed. You also need to prepare a place for mounting on the window. Then you need to stretch the rope and fasten it to the fasteners.
Blanks for shelves
Wall shelves for flowers can be made from ready-made blanks. In this case, they are the most professional and inexpensive. As a rule, in stores there are complexes made of chipboard, which are covered with a film. Often you can find small pieces of glass or wood. But for last version You need to purchase fasteners yourself. The simplest design will be bars. In the event that it is not possible to buy them in a store, you can do it yourself using rails. 
Manufacturers
Most major manufacturers, which are known in Russia, Ukraine, Belarus and other countries, are "Mebel UA" and MERX. The first of them opened its branch in the USA in 2013, which indicates an undeniable success. The company's products began to spread around the world, including appearing in such major countries like Germany, France and so on. The key to success was the use the latest technologies and quality materials.
MERX is a company founded in 1993. Since then, it has been a leader in the furniture market. This brand is known in such countries as Great Britain, the USA, Canada, Estonia, Lithuania and in the CIS countries. 