Make a wax candle with your own hands. Secrets of making candles with your own hands: from wax to gel. Materials for a homemade candle
Candle making at home is becoming an increasingly popular hobby. This is a very interesting and simple activity, having mastered the basics of which you can always surprise your friends or colleagues with a small but pleasant gift. You can also decorate the interior of your home with interesting candles. handmade. In this article, the author invites you to try your hand at candle making with minimum set materials and tools, you do not have to buy any special devices or components. And if you are fascinated by this activity, then you will already be experimenting with dyes, flavors and shapes.
To get started, prepare everything you need:
1. Paraffin ordinary candle.
2. Small knife.
3. An empty juice or milk bag.
4. Pencil.
5. Dishes for a water bath. Since the dishes are very difficult to put in order later, it is recommended to use inexpensive dishes, which will later be used for such purposes.
6. Small sieve.
7. Coffee beans.
8. Small decorative elements for decorating candles (optional).
Before starting work, carefully read the safety precautions for working with paraffin !!!
1. Paraffin is a flammable substance, so melt it directly on fire or in microwave oven not worth it. You need to melt paraffin only in a water bath, while the fire should not be too strong. In the process of melting, paraffin can be stirred with a wooden stick or spatula and in no case should paraffin be left on fire unattended.
2. When pouring paraffin into a mold, be careful, if you use a bowl with an iron handle to melt paraffin in a water bath, then do not forget to use an oven mitt.
3. Also, when pouring paraffin into molds, be extremely careful and make sure that the melted paraffin does not get on the skin.
4. Keep an open pack handy for emergencies. baking soda. In case of fire, paraffin should not be extinguished with water, only with soda.
So let's get started.
1 step.
With a knife, carefully make shallow cuts along the entire length of the candle without cutting the wick. We break the candle into pieces, carefully remove the wick. We will need it in the future. We grind the paraffin from the candle with a knife and put it in a previously prepared container for melting. Now we take a pan of a larger diameter, pour water into it and put it on gas. From above, into the water, we put a vessel with finely chopped paraffin. When the water in the pan boils, the paraffin will begin to melt in a water bath.

2 step.
Until the water boils, prepare the form for the future candle. To do this, take a bag of juice and cut off the top with a knife. Now we take the wick previously removed from the candle and wind it around the pencil. Then place the pencil with the wick strictly in the center of the form.

3 step.
Now let's get back to the paraffin. The water boils, and the paraffin begins to slowly melt in a water bath. After the paraffin has completely melted, pour a handful of coffee beans into it.

4 step.
Now pour all this mixture into the previously prepared form. This will be the first, decorative layer of the candle. Now you need to give the paraffin mixture in the form a little time so that it freezes.

5 step.
Then again melt the paraffin in a water bath and pour it into the form with a second layer. Since this layer is already made without grains, any impurities are undesirable in it. Therefore, you can use a strainer and pour the paraffin into the mold through it, sifting out unnecessary impurities.

6 step.
Now we patiently wait for the paraffin to finally harden. Then, with a knife, we cut the juice bag, which served as a mold for the candle, and carefully remove it. The candle can be decorated special stickers for candles, or simply rewind with tape, which will need to be removed when it comes time to light a candle. like this excellent result at a minimum cost.

And if you choose a wider shape and wind several wicks on a pencil, you will get such a wonderful candle with several wicks. And in order for it to be a pleasant coffee color, it is enough to add an ordinary wax crayon in the process of melting paraffin Brown. I hope you enjoyed your new experience and you will enjoy learning a new useful hobby. Successful creativity!
An attractive idea of \u200b\u200bself-earning is making candles at home as a business. In its features and technological process Even a novice can figure it out, and the owners' reviews confirm that with an established sales of products, it is possible to reach full payback within the first months.
Today, candles are considered quite a popular commodity. After all, they are purchased as a gift, to decorate the interior, to create a romantic atmosphere. Ordinary household needs and use in churches have also not lost their popularity. The demand for such products is only increasing, and if you can attract a buyer original product then your project is guaranteed success.
Benefits of this business
Making candles at home has a number of advantages, which make such an undertaking attractive:
- The cost of materials for manufacturing is quite low.
- The technology is simple and accessible to any beginner.
- At the same time, you can show your imagination, realize your creative potential and create original and unique products.
- There is a wide range of niches to choose from.
- Registration of a business is simple and does not require large tax deductions.
- High rates of profitability.
- You can do this in the form home business or aim at large-scale production in the format of a mini-factory.
Of course, there are also disadvantages. For example, start-up entrepreneurs may have difficulty selling finished goods, especially if competition is high enough in the chosen region.
Are documents required?
It is believed that when making candles at home, it is not necessary to register even as an individual entrepreneur. As an artisan, you can apply for an annual tax return indicating the income received and make standard deductions. But since you also need to think about selling products, it is advisable to register as an entrepreneur or entity. In this case, you as a supplier of goods will be more trustworthy.
The taxation regime can be chosen according to a simplified system, and to reduce deductions, do not forget to enter all purchased equipment in financial statements and put it on depreciation.
It is also important to register the enterprise in the following regulatory services:
- Pension Fund;
- statistical bodies;
- sanitary and epidemiological station in case of opening a separate workshop or plant;
- fire inspection.
Variety of candles
Even at the stage of business planning, you need to think about what kind of products you are going to offer customers. There are a lot of options and they all require their own approach:
- Church - will diverge well if there are a lot of temples, churches nearby. They are used for official purposes, put by parishioners during prayer, set for holidays, weddings, etc. Each procedure requires its own shape, shade, and even the raw materials used.
- Household - usually made from paraffin and have the same standard shade without the admixture of flavors and dyes. They are in demand in rural areas.
- Decorative - differ in originality of form and shade. They are used to create different materials and try to make it unique. Often purchased as a gift or to decorate the house, restaurants, rooms, etc. this species Candles are characterized by manual work and, accordingly, high cost.
- Canteens are a cross between household and decorative options. Can be different shapes and shade, but for their production are used simple materials.
- Tablets - when wax or paraffin is poured into special small aluminum sleeves. They are often used to decorate and create a special atmosphere in a room. There is always a demand for them.
- Carved candles - made on the basis of ordinary ones, but at the same time dipped in colored paraffin for additional processing and providing the required patterns.
- Ice openwork - a separate type of candles decorative direction. The technology of their manufacture is distinguished by the addition of pieces of ice, due to which unusual openwork forms are created.
- Colored cubes - during the solidification of wax or paraffin, the product is cut into pieces and then mixed again. After several such procedures, cubes are poured into the mold. different shades and when burned, they create a unique effect.
- Can do aroma candles, which differ unobtrusively pleasant smell. This is achieved by adding essential oil to melted paraffin.
room
Experienced entrepreneurs who create candles with their own hands say that doing it in the kitchen at home is wrong. It is advisable to equip at least a small garage for production. Even if you make candles by hand, without special machines and equipment, you need to properly equip your workspace:
- the size of the room should be about 10-15 square meters. m.;
- divide it into working area and a warehouse for finished products;
- provide good ventilation;
- make sure the temperature is constant so that it is 18-20 degrees, as similar material does not tolerate drops, and at elevated values, the entire product will deteriorate.
For storage, it is desirable to install convenient and free racks so that the products do not come into contact with each other. In the manufacture of confectionery varieties, it is necessary to additionally disinfect all surfaces using kitchen tools.
Technological process
Making a candle with your own hands is quite easy. It does not even require special equipment or hire other employees. The whole process goes through the following stages:
- We prepare the desired shape. You can buy it in specialized stores or make it yourself from improvised materials.
- A wick is installed in the center. If a voluminous candle is supposed, then it is advisable to connect several threads (2-4 pieces) to each other and fix them at the end with a paper clip or an iron stick.
- The paraffin or other base used is melted. This should be done strictly in a water bath, since direct contact with fire can ignite it. If crushed solid material, then the melting process will be significantly accelerated.
- When is reached liquid state, dyes, flavors and other additives that are supposed to be used for decoration can be added to the base. Stir the resulting mixture with a wooden stick.
- Ready liquid base poured into molds. For safety reasons, be sure to use oven mitts, gloves and towels, as hot paraffin causes burns if it comes into contact with the skin.
- After a few hours, the product hardens and is ready for the final decoration.
More detailed or varied techniques for making candles at home can be learned with the help of videos and other master classes, of which there are a lot today. Before starting a business organization, it is advisable to master suitable way and make a few pieces for yourself.
So, you can understand if this thing works and what the final result looks like. If this is not possible, then you can purchase ready-made simple candles and just decorate them.
What will be required?
Depending on the scale of production and the selected product options, different materials and equipment will be needed. For homemade desirable to have:
- raw materials for the base;
- forms;
- utensils for melting paraffin (for example, pots);
- a wick made of cotton thread;
- and wooden rods for fixing it;
- thin knives for carving and giving patterns;
- stove;
- stationery for decoration;
- for dyes, wax children's crayons are used;
- and for flavoring essential oils.
If you are going to organize a small workshop, then you need to purchase expensive equipment:
- Candle machine.
- Tank for melting raw materials.
- Extruder press.
- Packing machine.
- Hand stamps.
- Thermometer.
- Matrices.
As a basis, you can use:
- Paraffin - as the cheapest and most popular material.
- Stearin - provides the candle with a long burning time. Most often used for carvings. This fatty substance is added to the paraffin base to improve its characteristics.
- Beeswax or soy wax, as well as honeycomb, is a natural and environmentally friendly product. Gives off a light, pleasant fragrance when used.
- Gel is a transparent jelly-like substance. Used to fill glass molds. Differs in high cost.
Be sure to stock up on enough cotton thread for the wicks, aluminum sleeves, decoration materials, and packaging to give the candles a marketable appearance.
Sales channels
If manufacturing is not particularly difficult, then for a novice entrepreneur, selling finished products may be the most difficult. To this end, you need to study the market in advance, evaluate competitors, and find permanent points of sale of goods. Usually candles are sold through the following channels:
- Stationary souvenir shops.
- Hardware stores or department stores.
- Social media.
- Internet shops.
- specialized forums.
- Delivered directly to restaurants and hotels.
- Cooperate with church and other religious organizations.
- design studios, etc.
Financial calculations
When creating a real mini-factory for the production of candles, considerable investments will be required.
| Expenses | Cost, in rubles | |
| 1 | candle machine | 300 000 |
| 2 | Finished forms | 35 000 |
| 3 | Wick (for 3000 items) | 1 000 |
| 4 | Paraffin | 31 500 |
| 5 | Workshop rental | 10 000 |
| 6 | Public utilities | 12 000 |
| 7 | Employee salary | 15 000 |
| 8 | Equipment installation | 20 000 |
| Total: | 424 500 |
These figures assume the production of 3000 table candles. Usually they are sold for 40 rubles apiece. So, with a good sale of goods, the revenue will be 120 thousand rubles. Then you will only need to pay for the material and monthly expenses, so the payback of the business will come in 3-4 months.
If to produce decorative candles at home, the costs will be minimal. It will be necessary to purchase only materials for their creation and decoration, which will be included in the cost of production. Therefore, after the first sale of the goods, you will fully return your investments and receive a net profit.
When planning the financial component, it should be taken into account that household, church and table varieties cost 15-50 rubles per unit. But decorative, flavored, gel and other options are priced much higher and can be sold from 150 rubles apiece or more. The profitability of the business will depend on your investment and the final price for the product.
Video: making decorative candles at home.
Carved candles are a unique and inimitable decoration of any celebration or. In addition, handmade candles are an unusual and versatile gift for the holidays, for example, New Year's, Easter, wedding. Decorative candles can be bought ready-made or made at home. Home production of decorative candles with your own hands will require special equipment and materials.
Several designs of homemade carved candles
The following master class will help you understand the intricacies of making carved candles.
Creating carved candles is a complex but interesting process. At the same time, the preparation of equipment, which requires a lot of responsibility, is also important. To do quality products it is important not to make a mistake with the choice. High-quality paraffin, dyes and a machine are a guarantee that decorative candles will please the eye, and at the same time they will not contain harmful components that can be released during combustion.
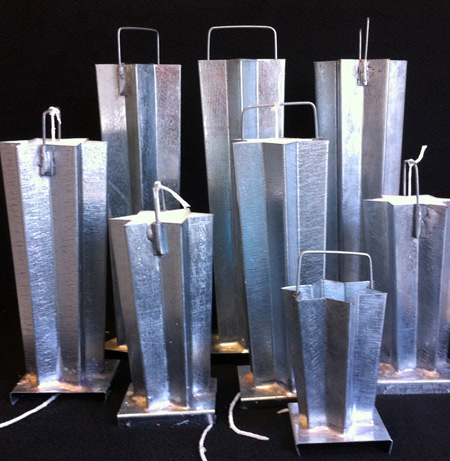
Paraffin melting bath
A paraffin furnace or a smelter is a container made of stainless or galvanized steel, divided into several compartments. In order for the paraffin in the tanks to be liquid, an electric heater is located under the smelter bath, which must maintain a stable temperature of 80-90 degrees.
 It looks like a bath for melting paraffin
 Specialized firms offer equipment for carved candles of different depths and compartments, for several colors of paraffin:
- four;
- six;
- eight.
On request, the store can make a paraffin smelter for 10 or 12 colors. The equipment may also different depth, the height of the finished handmade product will depend on it. Usually the depth of the containers is 20 and 30 cm for medium and large candles. Equipment for carved candles can be bought on average from 13 to 30 thousand rubles.
But there are also compact options that can be placed directly on cooker. Such smelters take up little space, are easily transported, and are cheaper - from 8 to 9 thousand rubles.
To do carved candles at home, not on a production scale - compact version quite suitable. Of course, with certain skills, paraffin melting equipment can be made by hand.
 An example of carved handmade candles
 For this you need welding machine, sheet steel, electric heater. Problem homemade options- constant monitoring of the temperature of the molten paraffin will be required. More serious production needs special equipment.
Forms for carved candles
Forms for carved candles can be bought in specialized stores. Finished goods come with a fixture for fixing the wick and have a different configuration. Usually, a master class in the manufacture of carved candles suggests using a blank cast in the shape of a five or six-pointed star. You can also make the basis of the following form:
- cylindrical;
- pyramidal;
- globular;
- ovoid;
- rectangular.
You can make carved wedding candles from a thin round or faceted blank.
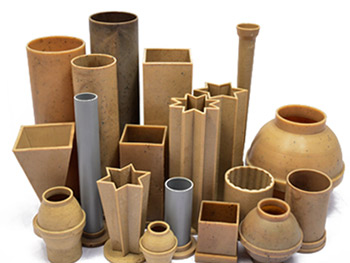 Various patterns of shapes for carved candles
 The material for the molds is different: plastic, silicone or metal.
- main knife - has a straight blade and is suitable for creating most carved details;
- loop knives - used for cutting special patterns;
- knives for decorating the top of the candle - have different shapes and sections depending on the diameter of the candles.
Materials for carved candles
Making handmade candles is impossible without the following materials:

Master class on making carved candles
After all the materials and tools are prepared, you can start making original candles. A master class on making carved candles at home includes the following steps:
- production of paraffin blanks;
- preparation of containers with paraffin;
- layer-by-layer staining of the workpiece;
- cutting and decorating candles;
- cooling the product and coating it with a fixing varnish.
A master class on creating carved candles is not particularly difficult. Although the artistic taste and imagination of the carver should definitely be present.
A novice craftsman or one who wants to try his hand at making carved candles does not have to make the base for a candle on his own.
 The process of making carved candles
 You can choose a special store that sells ready-made samples of blanks various forms and sizes. When choosing a ready-made base for a candle, there is no need to make or purchase molds and wicks yourself. You can buy a paraffin blank from 90 to 200 rubles, depending on the weight and shape.
A complete master class for making carved candles:

Of course, the first time is unlikely to turn out a masterpiece, you need some skills and knowledge: at what angle to make cuts and how to form a particular pattern. You will have to watch more than one master class and make more than one candle before you receive a handmade product that can be presented as a gift or even put into production.
Undoubtedly, making carved candles is very exciting - this is an opportunity to combine an interesting hobby and get additional source income. Carved candles are especially in demand during holidays, weddings or as original gifts. Another positive point - own production and the store is easy to equip even at home.
Decoration holiday table, parts of the interior, a lifesaver in case of a sudden power outage, a nice gift for loved ones. What is it? Candles made by hand!
Yes, there is such an activity. Moreover, those who are fond of such a hobby get incredible aesthetic pleasure from this.

You can look endlessly at the photo of candles made by yourself ...
What you need is at your fingertips
Anyone can make candles. What will be needed?

Wax
Sometimes it can be successfully replaced with paraffin. The difference between them is that wax, due to its naturalness, does not emit soot, while paraffin, when completely burned, smokes.

These are simple materials, the acquisition of which is not difficult. You can find them in any needlework store or, in extreme cases, melt a ready-made candle, the cost of which is quite low.

Wick
There are also two options here: take it out of an unnecessary candle or make it from cotton-based threads. Twisting them strongly is not recommended - the flame may go out.

It should also be taken into account that too thick wick will make the candle melt faster, while emitting a lot of smoke.

The length of the wick is determined by the size of the candle plus a small length for easy lighting.
mold
A hollow container made of any material. The only thing: the edges of the form should be straight and not tapered.

Handy materials are:
- Saucepan and metal utensils for a water bath;
- Stick or any long thin object(pen, match) for fixing the wick.

Making a candle
Having prepared everything necessary materials, you can start creating. Detailed master class will show how to make candles with your own hands quickly and beautifully.

Lower the wick into the prepared mold for the future candle, fix one end of it on a stick, and place it on the container.

Paraffin or wax grind and melt in a water bath. The fire should be small, and the process must be observed, and in order to avoid lumps, constantly stir the mixture.
It should be borne in mind that the temperature of the molten material is quite high, so it should be handled with care.

Pour a little melted paraffin (wax) into the mold with the prepared wick. Place the tip of the cotton thread in the middle, and let the material harden a little.

Wax has the ability to quickly cool, so you need to work with it quickly.

Note!

Fill the form with the remaining melted material to the required level.

Wait for the candle to harden and cut off the excess part of the wick. It is recommended that this be done at least 24 hours later.

It remains only to remove the candle from the container. For ease of removal and to avoid damage, the form must be sent to the freezer for half a minute or lowered into hot water.

You can light a finished candle only a day after the end of its manufacture. During this time, it will have time to completely freeze, which will favorably affect its operation.
Candle colors
You can make candles at home not only in the main (white) colors, but also in absolutely any shade.

In order to color a wax work, paints cannot be used. Oily or acrylic, they will not fulfill their purpose, but will only stick together in molten paraffin, turning into unattractive colored flakes.
Note!


Wax pencils will help to give the desired shade. They are perfectly mixed with the selected material by adding small pieces directly during the melting process.

Using several pencils, you can create a real rainbow of shades by gradually pouring paraffin of various colors into the mold.
aromatherapy
When making wax products, it is only painted, but also forced to give aroma. The fragrance of a burning candle can create an atmosphere of peace and comfort, as well as energize or, conversely, relax.

In order to make a beautiful candle that will please the eye and smell, you will need essential oils. They are in great abundance blown in any pharmacy or cosmetic store.

A few drops of oil will give the future candle a unique aroma.

Note!

When choosing a smell, you need to focus on the purpose or color of the wax miracle:
- relaxation will give lavender oil, and a candle, in this case it is better to paint it in a light purple color;
- bergamot can also relax - it’s suitable for this green color candles;
- an orange can improve your mood - a bright orange tint will complement the effect;
- ylang-ylang will set you in an intimate mood - lilac or pink color candles will just be in place.

Wax art
Decorating candles belongs to the real top of wax craftsmanship.

You can decorate a candle in various ways:
- Natural materials - pebbles, shells, twigs and others. Basically, they are placed at the bottom of the mold before adding the molten paraffin.
- Food products - coffee beans and dried fruits. Such materials can be placed throughout the entire volume of the form, pouring wax gradually and giving it the opportunity to fix the decoration.
- Decoupage. The technique has been known for a long time and has been successfully used in the manufacture of candles. A colored pattern from a napkin is placed on the surface and fixed with glue designed specifically for candles. This fixation protects the paper from burning.

Separately, it is worth highlighting the carved decoration of candles. Not everyone can do this - it will take perseverance and accuracy, but the result exceeds all expectations.

For cutting you will need: a clerical knife, paper and a pen. Wrapping the candle with paper, determine the size of the future drawing, cut off the excess. A pattern is applied to the remaining rectangle.

Paper is wrapped around the candle again and secured with tape. Carefully acting, the knife circles the pattern along the contour, and then cut out the excess layers of wax.
You can use these candles at a wedding, to decorate the table or just for the interior.

Transparent candles
You can make completely transparent candles using a special gel.

The advantages of such material are:
- lack of smoke, odors and soot;
- transparency (for beauty and decor);
- the possibility of self-cooking.
How is the gel prepared? Glycerin, gelatin and tannin are mixed in equal amounts, the same amount of water is added to them, all this must be put on a small fire and boiled until the liquid evaporates.

The gel may be cloudy at first, but will become clear as it cools.

Working with gel is not much different from using wax, but there is still a slight difference:
- after the candle hardens, it cannot be removed from the mold, so it is better to use a glass and transparent container;
- before the process of adding the gel, the form should be slightly warmed up - this will protect against the appearance of air bubbles in the candle.

You can color, scent and decorate a gel candle in the same way as any other.

Knowing how to make candles on your own, you can always have a wonderful table decoration at hand, an exclusive gift for friends and relatives, as well as use your creations in the interior.

DIY candle photo


Behind last years the attitude towards candles as a means of lighting the house in the absence of electricity has completely changed. How to make a candle at home so that this item becomes exquisite decor and emphasized the individuality of the design of the house?. For many, candle making has become the backbone of a small business.
In recent years, the attitude towards candles as a means of lighting a house in the absence of electricity has completely changed.
Candle made with my own hands, - This lovely gift friends and relatives. It is very convenient to make such a gift for Valentine's Day to a loved one.
Seeing a beautiful candle in a souvenir shop, many are eager to make a similar one themselves. Most of those who wish never try, because they think that this is a difficult task, and without special training they will not be able to make decorative candles with their own hands.
It turns out that this is not the case, and anyone who wants to learn can do it. The main thing is to start, and over time, understanding of the process and mastery will come.
Making candles at home does not require a large number materials and tools. This allows you to learn candle making faster, and this lesson is not too expensive for the family budget.
For beginner candle makers, you need to purchase the following materials and tools:
- wax, paraffin, candle gel;
- capacity for melting wax and paraffin;
- natural cotton threads or ready-made candle wicks;
- sticks, at least 2, for stirring the base of the candle and attaching the wick;
- several forms for candles;
- decoration materials;
- saucepan for a water bath;
- wax crayons;
- water thermometer.
Beeswax can be purchased from beekeepers. Paraffin is sold in needlework stores or in the household departments of supermarkets. Materials can also be ordered online.
 Seeing a beautiful candle in a souvenir shop, many are eager to make a similar one themselves.
 To start making your first candles at home, you can collect paraffin from cinders. Candle gel is purchased at art supply stores or is easy to make yourself.
Any cups, glasses, various containers made of plastic or metal, any improvised means that are not deformed from a paraffin or gel base heated to a high temperature are used as a form for candles.
It is better to start making candles on your own from paraffin. beeswax - natural material, but it is not suitable for making decorative candles. It does not lend itself to coloring and flavoring.
To tint paraffin, you should take oil-based paints. Colour good quality can be obtained using children's wax crayons. In needlework stores, special pigments are sold in tablets for coloring paraffin. Some craftswomen use lipstick and shadows for this purpose.
How to make candles with your own hands (video)
Wax and paraffin candles
To make a neat wax candle with your own hands, you need to correctly carry out the process of melting the base. The same remark can be attributed to candles made of paraffin. The base material melts at high temperatures. You need to adapt well and act quickly, because the melted wax and paraffin cool quickly and do not pour well. Due to the high melting temperatures, safety rules must be observed when working with these bases.
Step by step instructions for making candles.
Habitual beeswax is little used to make decorative candles. As noted above, scented and beautifully colored products cannot be made from such wax.
Instead of beeswax DIY decorative candles at home are made from soy gel. This is the most popular base material. It is environmentally friendly and slow burning.
The first stage in the production of candles is preparatory. All necessary ingredients, tools and fixtures are purchased and prepared. A professional master class on the topic, with photos and a description, or a video is selected on the Internet.
Before melting, warm water is poured into the prepared container. soap solution. It may be needed to collect wax in case of splashing or spilling of the molten mass. Nearby have cardboard and a towel or cloth napkin.
It is absolutely impossible to melt wax directly. This process must be done slowly so that the wax does not burn out and evaporate. Therefore, the melting of the base is carried out in a water bath.

A water bath is built from 2 pans. In container bigger size half pour water. Another pan is inserted into it, preferably with handles. It is needed to melt the wax.
The second stage is the manufacture of the wick. To do this, take a cotton thread. The wick of colored floss threads looks original.
The type of wick depends on the base material. For wax candles, it is made from thick, slightly intertwined threads. For paraffin and gel products, the threads are tightly twisted so that the candle does not smoke when burning. From a thick wick, a candle will burn and smoke very quickly, and from a thin one, it will burn badly and go out.
In addition to simple twisting, the threads can be braided or crocheted. Before pouring the candle, the wick is impregnated with wax or paraffin.
The third stage is the choice of form. How to make a candle at home without special forms? It all depends on the imagination of the craftswoman. The shape for a candle can be any container and packaging that can withstand high temperatures melted wax. Since the wax coating is poorly removed from the dishes, it is better to choose unnecessary consumable containers as forms.
The fourth stage is the melting of the base material. The melting temperature of wax candles depends on its type:
- paraffin wax has a melting point of +50…+60°С;
- bee - +62 ... + 79 ° С;
- soy gel can be melted at temperatures not exceeding +80°C.
There are many master classes on the Internet on how to melt wax correctly. The melting temperature can be monitored with a candy thermometer or a meat thermometer.
Wax or paraffin is crumbled into small pieces, as big chunks melt for a long time. The grated mass is placed in the upper saucepan of a water bath. When the water in the lower saucepan boils, reduce the heat slightly to maintain an even melting point.

A flavoring agent is added to the melted wax if it is made scented candles. The mixture mixes well. Then add the dye and mix again.
The fifth stage is the casting of wax or the actual creation of a candle. The wick is fixed in the center of the form. Its tip must be fixed on a wooden stick. It is laid on top of the mold so that the thread is exactly in the middle of the mold. A knot is tied at the free end of the wick. The length of the thread should be such that it rests on the bottom of the container.
The wax is then poured into the mold and allowed to cool. If the candle mold has a hole in the bottom, then the wax is poured in several passes. Pour the molten base carefully so as not to burn yourself and not move the wick to the side.

The mold is left to cool. The product must be refrigerated for at least 24 hours. Some people try to speed up the cooling process by placing the mold in the freezer. It is better not to do this, as such candles do not burn well. During natural cooling, the material is evenly compacted and maintains high-quality and long-term combustion.
Gel candles
To make a gel candle with your own hands, you need to have the following materials:
- gel wax;
- reinforced wick;
- essential oils;
- liquid dyes;
- decor elements.

Soy gel is a natural, absolutely non-toxic substance. It is used to make decorative and aromatherapy candles. The substance retains essential oils well and releases them better when burned. The smell will be richer and brighter.
The addition of essential oils to wax lowers its melting point. Impregnation of the wick with soy gel allows you to get an even and clean burning. During combustion, soot and carcinogens are not released, which cannot be said about paraffins, and even more so about stearins.
Do-it-yourself scented candles (video)
Making gel wax at home
It is not difficult to establish the production of candles from soy gel, since they can be made at home. You can read about how to make soy gel yourself on the forums of craftswomen on hand made. Standard Recipe:
- gelatin - 5 g or 1 tsp;
- tannin - 2 g or on the tip of a knife;
- water - 20 ml or 4 tsp;
- glycerin - 35 ml or 1 tbsp. l. and 2 tsp.
Tannin is dissolved in glycerin by heating. Continuing to heat the mixture, gelatin is added to it. The resulting solution should be clear. The prescription amount of water is added to it. While stirring, the mixture is brought to a boil. When adding water, the solution may become cloudy, but with further boiling it will clear. The mixture is boiled until the water has completely evaporated.
The finished gel is poured into a pre-prepared refractory mold with a wick fixed in it. The gel, made by hand, is not inferior in quality to the one bought in the store.

Making scented candles
If you have the skills to make wax candles at home, then it will not be difficult to solve the problem of how to make an aromatic candle. Homemade scented candles have many advantages over store-bought ones. The main advantage is that they are environmentally friendly, the components used for their production are harmless.
Any natural essential oils can be used to flavor wax products. But it should be borne in mind that when burning, some of them can change their smell. Before adding aromatic substances, they should be heated in order to understand what the smell of a burning candle will be like. Waxes can be flavored with exotic spices, tea mix, coffee beans.

Candle decoration
You can decorate homemade candles different ways. The very first is the shape of the products, it can be unusual and unexpected. Various stickers are used. interesting way finishes - decoupage with napkins.
A decorative pattern can be made using dried flowers, grass, fruits, citrus fruits, coffee beans, pebbles, shells, petals and other elements. In finishing decorative items they use everything that fantasy tells the craftswomen.
Jewelry should be fixed in the mold before pouring the melted base. Pour the hot mass carefully so as not to shift the pattern.
Attention, only TODAY!