Crafts for the new year from coffee beans. Simple crafts from coffee beans.
Coffee beans are an excellent product for preparing an invigorating and fragrant drink with great taste. However, not every person who uses it knows that all kinds of interesting crafts from coffee, for the manufacture of which the same product is used as for the preparation of the drink, they can decorate any room, giving it individuality and originality. In addition, handmade souvenirs often become great gift close person.
Decor items with coffee beans
Needlewomen who are just starting to get acquainted with the peculiarities of creating unusual gizmos from coffee beans should pay attention to decorating objects with this “material”, thanks to which any thing acquires a completely new appearance and becomes a kind of decoration in the kitchen, living room or bedroom.
So, the first "contenders" for "transformation" most often become large plates for fruits and small ones for cups. This is due to the fact that they are always in front of the mistress of the house, and their monotonous appearance gets bored over time, but it is enough to paste over the plate with coffee beans around the office - and it will again please the eye. Similarly, you can update photo frames, vases, and thick decorative candles, and flower pots, and many other items. In addition to the fact that such crafts from coffee beans able to bring a touch of novelty to the house, they also fill it with a magnificent aroma.
Wood from coffee beans: preparation of materials
Recently, it has become very fashionable to decorate work and living quarters with decorative trees made from various materials. It turns out that it is also possible to make such crafts from coffee beans with your own hands. To do this, you need a plastic ball right size, superglue, a small pot, a stick for the trunk (can be straight or curved), twine, as well as pebbles in order to fix the tree in the pot. And, of course, it is important not to forget about the main material - coffee beans.
The process of making wood from coffee beans
Start by putting all the pieces together. So, you need to wrap the stick intended for the trunk with twine and fix it with glue. Next - pierce a plastic ball with it and install these two parts in a pot filled with stones. Now it remains only to paste over the ball with coffee beans, preferably in several layers. In this case, the ball will be completely hidden. Pasting can be done in the order that is most convenient for the needlewoman, the main thing is that the finished coffee crafts have a neat look. At the final stage, you can tie a bow on the tree trunk, and stick a few decorative flowers on the ball, or you can not do this, because such a tree already has a magnificent view in itself.

"Heart" from coffee beans: a master class on making a magnet
A few years ago, the refrigerator in every house was literally covered with all kinds of magnets bought in souvenir shops in different cities and resorts of the world. Over time, they moved away from this, however, there are still several similar decorations on the doors of this “technique”. True, now I want them to be exclusive. So why not take some time and master the master class below. Crafts from coffee in the form of magnets will not take you much effort, and the process of making them will bring great amount joy.
So, we will talk about the manufacture of the "heart". To do this, you will need a thermal gun, hard cardboard, a brush, a magnet, scissors, black gouache, an anise star, a ribbon, and coffee beans. First, you need to cut out a heart of the size and shape that you like from thick cardboard. Next, you need to cover the template with black gouache on both sides. And, after waiting for drying, you can proceed to the next step in making crafts from coffee beans. The master class involves covering one side of the painted template with coffee beans, and you will need to attach a magnet to its other side. It is necessary to paste over a cardboard heart along the perimeter, starting from the edge and gradually moving towards the center. Coffee beans must be placed with the smooth side up. The finished magnet can also be decorated with a ribbon and an anise star, which will give the craft additional originality.

Candlesticks made from coffee beans
Candlesticks belong to the things that perform not only a decorative function, but also a practical one. So, they can be used to set candles when creating a romantic atmosphere, or when the electricity suddenly goes out. In any case, it is much more pleasant to use unusual candlesticks, which are coffee crafts. With your own hands, using grains and a bowl, you can make a candle in just a few minutes. To do this, pour a little more than half of the vessel of coffee and place a flat candle in the middle.
There is another way to make a candlestick - gluing with grains glass jar or a glass. If you want to get a more original little thing, then you can come up with an interesting ornament on which coffee will be laid out.

Do-it-yourself coffee bean painting: preparing the base
You can refresh any room with the help of a picture, especially if you make it with my own hands using coffee beans, thick cardboard, a glue gun, a piece of linen (cotton) fabric and a glue stick. The production of this picture should begin with the preparation of the base. It is necessary to cut out a square from cardboard, the size of which will correspond to the future picture. Then - prepare the fabric, it is important that its edges protrude 1.5-2 cm beyond each edge of the cardboard base. on the reverse side and glued.
Coffee Bean Painting: Pattern Formation
When the base is dry, you need to sketch the pattern on the fabric using a simple pencil. The most organic in this case looks like a coffee cup with a plate, but you can choose a different theme for the picture. When the drawing is ready, you can start pasting it with coffee beans. You should start with the contours, gradually filling the middle. The grains should be placed with the convex side against the fabric. At the final stage of making coffee crafts, you must also make a frame. To do this, the base around the perimeter must be pasted over with coffee beans. This will give the product a finished look.

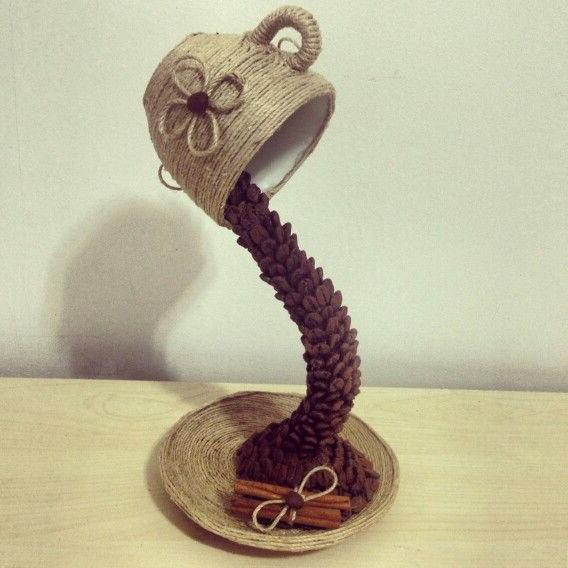
"Cup with spilled coffee": preparing materials and connecting craft elements
An excellent souvenir both for decorating a house and for presenting to someone as a gift can be a craft in the form of a cup with a spilled drink. To make this craft from coffee beans, you will need a cup, a saucer, thick wire, masking tape, a black marker, a hot glue gun, twine and stationery silicate glue. At first outside cups and the inside of saucers must be pasted over with twine. It is important not to forget about the "eye" of the cup. To do this, it is necessary to cover the surfaces with silicate glue and wind the thread with spiral movements.
While these two items are drying, you need to prepare a connecting element for them. They will serve as a wire - at one end you need to make a small loop (the cup will be attached to it), and at the second - a large loop in the form of a stand (it will be installed on the saucer). By connecting all these elements, the wire will need to be wrapped masking tape, achieving the required width of the “flow” of spilled coffee. Next, the surface of the adhesive tape will need to be painted black - this is done in order to avoid translucence.
"Cup with spilled coffee": photo of the finished product
Now you just need to put the coffee beans in their places - and you can search appropriate place for crafts from coffee. A photo finished product can be seen below. So, to get the effect of a spilled drink, several grains should be attached to the bottom of the inner wall of the cup. For a secure attachment, it is best to use a glue gun. Pasting should be continued until the wire wrapped with adhesive tape is covered on all sides with coffee beans. They should also cover part of the plate. To complete the composition, next to the coffee spilled on the saucer, you can glue two or three cinnamon sticks and a few anise stars.
Coffee hedgehog: master class
Considering interesting coffee crafts, one cannot ignore the hedgehog, the manufacture of which will surely please the needlewoman. So, first you need to prepare the following materials: a ping-pong ball, twine, cardboard, foam plastic, gun glue, coffee beans, scissors and two black beads.
The ping-pong ball must be cut into two parts - one will be used for further work. Next, you need to cut a circle out of cardboard, the diameter of which will correspond to the diameter of the resulting hemisphere. These two parts must be connected to each other with glue - the body of the hedgehog is ready. Now - the nose, a cone should be cut out of the foam and wrapped with twine. The same material should cover the cardboard bottom of the “torso” of the future coffee craft.

Next, the spout must be attached to the ball - and you can start pasting it with coffee beans. It is worth noting that starting this process it is necessary from the middle of the “torso”, gradually moving towards the back, and then similar actions will need to be done with the front. In this case, coffee beans should be placed vertically. When the craft is completely ready, you can decorate it by gluing artificial fruits or leaves to the back of the hedgehog.
Coffee, and roasted coffee beans in particular, are a wonderful decoration material. various items. Masters use it to decorate postcards, candles, topiaries and decorative panels and much, much more. It is enough to have glue and grains on hand to decorate in an original way. Wall Clock, vase, frame or box. The only downside is that no matter how dusty the grain product is, it cannot be washed. However, this drawback is also easy to fix by covering the craft with varnish or a moisture-resistant coating. And in this article we will tell you how to make crafts from coffee beans with your own hands, and the master class will clearly demonstrate all the moments of creating decor from this material.
Candles with coffee beans
Coffee candles made from this tutorial will become a wonderful gift for any holiday, will bring a stylish touch to the interior, decorate it. And to make them is simple and within the power of each of us. To create a craft we need:

- coffee beans;
- paraffin candles;
- decor of your choice.
So, first of all, we rub and melt a few candles in a water bath.
When the paraffin melts, add grains to it.

Pour coffee paraffin into a pre-prepared container with a wick installed (as in the photo).

Cooking again water bath and melt the candles. Next, pour the second layer into the container, and the first one should already grab a little by that time.


We wait until the candle finally hardens, take it out of the mold. It remains only to decorate with any decor. These candles can be made in any shape and size.


coffee topiary
And the next version of crafts from coffee beans - decorative topiary, european tree with a "crown" in the form of a heart. It can serve as a decoration for a wedding or other celebration, your coffee lover will certainly like it.

In our work we will use the following materials:
- cardboard;
- cotton pads;
- threads or twine;
- ice cream sticks;
- glue gun;
- thick wire or stick;
- can;
- acrylic paints;
- coffee beans.
On thick cardboard, draw and cut out a heart, glue a wire or wood trunk.


Color the heart brown.


When the paint dries, use a gun to glue the heart with grains.

We decorate the trunk with a thread.


We paint the tin can with white acrylic and decorate with ice cream sticks.


Pour gypsum into the jar and install the barrel.

When the gypsum has completely hardened, we decorate the crown and base, decorate with ice cream sticks.


Here is such a beautiful topiary as a result.
flying cup
An unusual "flying cup" will be an original gift for a coffee lover. It is done in the following way.

Materials:

- coffee cup with saucer;
- grains;
- mass for modeling;
- glue "Moment-Crystal";
- wire.
We bend the wire to the desired shape and glue it to the mug and saucer.

We wrap the wire with mass for modeling. It looks like milk is pouring out of a mug. After drying, the mass will become similar to foam.

We paint the mass in brown - and now "hot chocolate" is pouring.
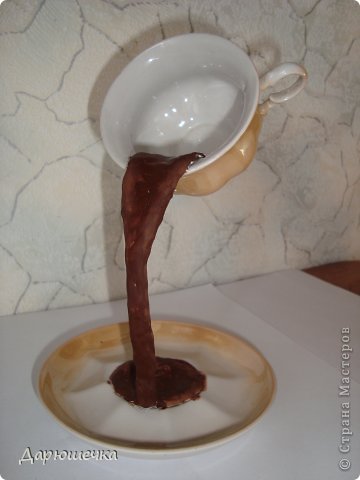
After that, we glue the coffee beans and get a wonderful gift cup of coffee.

You can also decorate the cup and saucer with thin twine, as the author of the following work did.


First of all, a cup with a bottom is wrapped with outer side, and the saucer - from the center with the front. After that, the rest of the side is decorated in the same way. The "jet" is made of wire and glued with hot glue. After that, grains and decor are glued - cinnamon and anise.
Video Compilation
Pictures can be painted not only with paints:
How do you like this heart?
You can also make such a funny sheep:
Do-it-yourself crafts made from coffee beans are not only pleasing to the eye, but also have a pleasant smell of coffee. These little things decorate our lives, give good mood and improve the atmosphere in the house. The master class does not require large material costs, we will tell you how to make such crafts from coffee beans.
An interesting stand for spices A cat from coffee beans can be made in one evening. A cat decorated with coffee beans, with a garden and a fence made of ice cream sticks or medical spatulas will definitely decorate your kitchen. It can be used as a spice holder or coffee jar and napkin holder. You can make a flower stand. The composition is decorated with lavender decor. A master class with decoupage elements is not difficult. We will decorate our home with such a cute coffee-scented craft.
For work you will need:
- Cardboard.
- Ice cream sticks or medical spatulas.
- Cotton swabs.
- Threads.
- Coffee beans.
- Acrylic paint in white and brown.
- PVA glue or glue gun.
- Napkins or a printout on a laser printer of a pattern with lavender.
- Scotch tape.
First, print out or draw by hand the Cat template. Choose the size of the template yourself.


The template must be cut out and transferred to thick cardboard. Circle and cut out.


We glue the cardboard sides to the stand, and fix it around with adhesive tape on top.

We take cotton pads and apply to the product.

Then we fix, that is, we tie everything with threads.

There is another option: cut out the silhouette from dark fabric, and stick it on the workpiece. And already directly on the fabric to glue coffee beans. Choose which option you like best. It seems to us that the fabric option is simpler and faster. Then take the brown acrylic paint, and paint over the Cat before gluing the grains. We let the paint dry, and only glue coffee beans on the dried surface. If you work with a hot glue gun, then you need to glue quickly, as the glue dries quickly.


This is how the product looks from the wrong side, if there were threads, then we cut them off.

This is what it looks like from the front side. A bit like a front garden.

We make a napkin holder out of cardboard, securing the edges with tape. Then we decorate it with decoupage - using napkins, printouts, or postcards with a lavender pattern.

We put the cover from the napkin holder on top, and glue it, securing it with tape on the sides.

It is better to cover the napkin holder with white acrylic paint, wait for the paint to dry, and then do the decoupage.

For decor coffee jar you need napkins and white acrylic paint. We take a sponge and apply acrylic paint to the jar. We are waiting for complete drying.

We make decoupage with lavender napkins. Napkins or pictures can be any you like. If you have a laser printer, you are lucky, you can print any image.

Carefully remove one layer from the napkin, coat the napkins with a brush with PVA glue. That is, first we coat with glue the place where we planned to glue the drawing, and then we cover the drawing with glue on top. Here's what happens in the end.

Professionals almost always cover decoupage with varnish on top, but we think that in this case it is unnecessary.

As you can see, nothing complicated, but as a result we have interesting decor for kitchen.
See also: dough cats

I won’t reveal a secret if I say that twine and coffee beans make original souvenirs such as fridge magnets. You can make such a fragrant cat for yourself, or as a gift. After all, now many people collect magnets for the refrigerator, so such cats can be very expensive for someone. The master class uses various materials, and you can add something besides this, it all depends on your imagination.

For work you will need:
- Coffee beans.
- Cardboard.
- Burlap, or other cotton fabric of dark color.
- Leg-split.
- Acrylic paint brown.
- Brush or sponge.
- PVA glue.
- Scissors, paper, pencil.
- Glue gun or glue Moment.
- A piece of magnetic tape (cut from an old advertising magnet).
- Eyes ready, or homemade.

We print or draw by hand a template on a piece of paper. Transferring to cardboard. Please note that the distance between the paw and the tail is only 0.3-0.5 cm. - this is important, since in the future we will need to connect the tail and paw. We do this in order not to break the tail, because it is thin. There should be 2 cardboard parts, since we need a dense base.

We glue 2 parts of cardboard, we get a dense base.

With inside glue the base to the burlap with PVA glue, first smearing the workpiece well.

It is advisable to put the workpiece under the press for a day. The burlap after gluing will become rigid and will not crumble. We cut off the excess.

We paint front side products brown paint. In the future, we will stick coffee beans on the brown side.

Let the workpiece dry.

We draw glue along the cut of the workpiece to glue the twine and hide the ugly cut of cardboard.

We glue the twine on the cut of the workpiece, slightly pulling it.

Coffee is the most fashionable drink in the world, which has an unsurpassed aroma, rich color and large quantity useful substances. Coffee beans are widely used in cosmetology, medicine, and recently they perfectly complement the interior of residential premises. Crafts, paintings, plots, scenery and, of course, a panel are made from coffee, which perfectly complements any architectural style and is combined with interior items and furniture.
How to create a panel of coffee beans with your own hands
Making a panel of coffee beans with your own hands is quite simple, you need a little imagination, creativity, free time, and a beautiful panel will be ready. What do you need for a panel of coffee beans? Depending on the chosen plot, it is necessary to take a certain amount of coffee beans of the desired shade, glue, a base on which the grains and decorative elements for the panel will be glued. It can be buttons, pebbles, plants, hay, herbs, cinnamon. Nut shells go well with coffee.
At the beginning of work on a panel of coffee beans, it is necessary to make preliminary notes on the basis to which the grains will be glued in order for the drawing or plot to come out smooth and beautiful.

From coffee beans, base blanks, glue and a yellow satin ribbon, you can create beautiful sunflowers. To do this, the center of the sunflower is marked on the workpiece in a circle, satin ribbons are cut into triangles, and the edges are covered with fire. Then, in a circle of a sunflower, prepared shreds of a satin ribbon are glued, and the middle of the circle is filled with coffee beans. If sunflowers are supposed to be created on a stem, then the stems are created from improvised means: laces, ropes, cardboard, etc., gluing them with glue to the workpiece as well. When the panel is ready, it can be framed or outlined auxiliary materials: hay, grass, cinnamon, etc. The panel of coffee beans is ready, you can decorate the interior.
Creating a panel of cats from coffee beans
In order to make a panel of cats from coffee beans, you need to prepare all the tools and materials.
We will need:
- Canvas or base on which cats will be depicted;
- 2 stencils with silhouettes of cats that you can cut out of paper yourself;
- Beans of coffee, preferably several tones, to create a shade and a few beans of coffee light tone to create a cat-eye effect;
- Glue or silicone in a can, you can use mounting glue;
- Decor items: cinnamon, hay, artificial butterflies, etc.

When all the tools are ready, you can start. Sketch the silhouette of cats on the canvas with a simple pencil or soap (depending on the base material) and roughly lay out the coffee beans, choosing dark shades along the edge and light shades for body parts: paws, ears, tail tip. If plain coffee beans are used, the panel will turn out to be a silhouette. After the approximate placement of the grains over the area of the canvas, you can glue the grains to the base. To do this, glue is taken and applied dropwise to each grain, after which it is tightly pressed against the base. You need to know that the glue is applied directly to the coffee beans, it cannot be applied to the base, otherwise the pattern will not stick. After the cats are ready, it is necessary to glue light grains in the eye area vertically. After that, the grains can be varnished or painted and decorative elements can be added: flowers, butterflies, cinnamon sticks, etc.
Panel "Coffee Cup": do it yourself
For this panel, you will also need a canvas (base), glue, coffee beans, ground coffee, decorative elements, a neck plastic bottle. This panel will be voluminous.

Work begins on the placement of elements on the basis, notes are made with a simple pencil.
Then work begins on the cup itself, for this, the neck of the bottle must be cut in half and trimmed upper part in the form of a month, leaving gaps on the sides, this will be the cup.
Glue coffee beans of the desired tone on the cup, glue the cup with gaps to the workpiece. The bottom of the cup is made flat, on the workpiece. To create the aroma coming out of the cup, you need to take ground coffee and put it on the workpiece, after lubricating this place with glue. Get a natural cup with aromatic coffee. After that, a panel is drawn up decorative elements: grass, flowers, candied fruits, etc. Such a coffee panel will successfully decorate the interior of the kitchen, hallway and even the living room, it can serve as a wonderful gift for the holiday.
How to make a panel "Coffee Cup yourself" (video)
How to make a panel of coffee and beans
To create more interesting plots and landscapes on the panels, coffee beans are used in combination with beans. How to make a panel of coffee and beans?

For this, also, on the basis of the panel, approximate marks are outlined and the beans begin to be laid out. The beans serve as the background, the main color, while the coffee beans serve to create the shade, lines and edge. With the help of beans and coffee, you can create a beautiful female silhouette of a figure, a face, draw a heart from two halves, beautiful flowers, create silhouettes of cats in two colors, one silhouette of a cat can be from coffee beans, and the second from beans.
Pictures and panels from coffee beans
A master class on making paintings and panels from coffee beans implies a rather similar algorithm of actions.
For this you will need:
- Workpiece (fabric, cardboard, plastic, etc.);
- Glue, scissors, thick rope for a loop, thread, needle;
- Coffee beans;
- Decorative elements: beads, buttons, stones, herbs, spices, etc.;
- Details for framing panels and paintings: sticks, matches, pods, etc.

On the flat surface it is necessary to place the workpiece and fix it so that it does not move. Align the edges of the workpiece and trim as needed. Lay out the desired plot of coffee beans and mark its edges with a pencil or soap. Open the glue, applying a drop of glue to each coffee bean, apply to the workpiece and press firmly. Hold for 10 seconds and start gluing the next grains. When the plot is ready, you need to take the work into a frame from the prepared materials, gluing the elements with glue, and also make a loop of thread on the inside of the work in order to hang it on the wall. The last element is decorating the work with decorative elements. After the work is completed, leave it in horizontal position for 20-30 minutes, and then hang in a certain place or present as a gift.
How to make a panel of coffee beans (video tutorial)
The cost of such work will be less than the purchase finished work from the shop. Work from coffee beans is stored for a long time if it does not have mechanical damage.
Do-it-yourself panel of coffee beans (photo)


Attention, only TODAY!
Remember your childhood: how wonderful we spent time in the lessons of applied arts and vocational training. We were instilled with needlework skills, we mastered various areas of origami and other types of art. Agree, because many of us liked to make something, and then give it to loved ones. And for some, creating crafts has become a real and favorite pastime. Alas, having matured, many have left their hobby in the past due to the emergence of new worries and lack of time. If you have at least a few minutes of free time, plunge into childhood and try to build crafts with your household.
In this article, we will talk about how to make crafts from coffee beans.
What do-it-yourself crafts from coffee beans can you make?
What just do not come up with experienced needlewomen. This type of art will be especially interesting for coffee lovers: now you can not only enjoy a cup of fragrant drink, but also create a real hand-made coffee masterpiece.
Whole coffee beans can be decorated various surfaces, for example:

- clock;
- frames for paintings or photographs;
- shelves;
- flower pots;
- flowerpots and much more.

If you like to create masterpieces, then you can make unusual crafts from coffee beans:
- paintings;
- cups with saucers;
- hearts on a stand;
- souvenir cars;
- clock;
- flowers;
- Christmas trees;
- globes;
- candles;
- decorative bracelets;
- horseshoes;
- football balls;
- hedgehogs.

You can independently invent and make your own unique, vintage or original craft in hi-tech style.
Master classes from the best needlewomen
Is modeling coffee bean crafts your favorite hobby, or are you, on the contrary, just trying to join this type of needlework? Then check out our master classes. All crafts are very easy to do, and you only need necessary materials, a little imagination and a bit of patience.
In fact, only at first glance it seems that it is very difficult to make such a craft. However, it is this masterpiece of coffee beans that can be classified as simple crafts.

Necessary materials:
- coffee beans;
- mug of any size (preferably coffee);
- dark brown paint;
- cotton pads;
- strong threads;
- glue gun or very strong glue.
Step by step description of the process:

Making a cup and saucer
Soaring mugs look very beautiful and mysterious. Such a masterpiece of coffee beans creates a feeling of weightlessness and mystery. The mug floats above the saucer, and coffee pours out of it in a magical cascade.
Necessary materials:
- coffee beans;
- glue gun;
- saucer;
- mug;
- wire;
- scissors;
- strong rope (best twine).
Step by step description of the process:

If you want to make a beautiful amulet and decorated item for your home, be sure to try building a coffee mill. This craft looks very beautiful and unusual. Believe me, many guests will like your product, and they will ask you to give a master class or give a craft.
Necessary materials:
- glue;
- scissors;
- twine thread;
- thick cardboard;
- coffee beans;
- toothpicks or skewers;
- empty container (can).
Step by step description of the process:
