Wooden frame for drywall: pros and cons, installation. How to install a wooden frame under drywall
If you are faced with the task of leveling the walls with drywall and you want to solve it by installing drywall, then the option of using a wooden frame may be the most optimal.
The presence of a wooden frame will allow you to place sound and heat insulating layer in the interstitial space, which of course will increase the comfort of the room.
True, it is necessary to take into account some important factors related to the specifics of this material.
Of course, from the point of view of ease of operation (with the installation of drywall on wooden frame a beginner can handle), the cheapness of the material, its availability, the wooden frame is superior to most alternatives.
However, it can only be used in rooms with medium or even low humidity. The wood is subject to rapid decay, the risk of damage by insects, this material is a fire hazard: therefore, if you want your structure to last for a long time,
must be subjected given material special processing, in the form of impregnation.
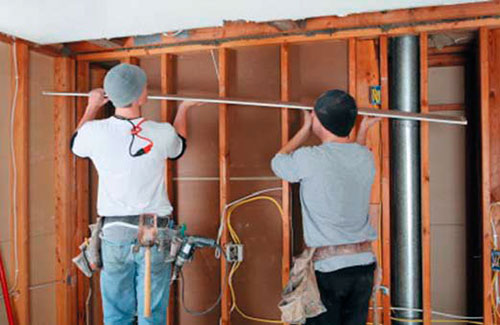
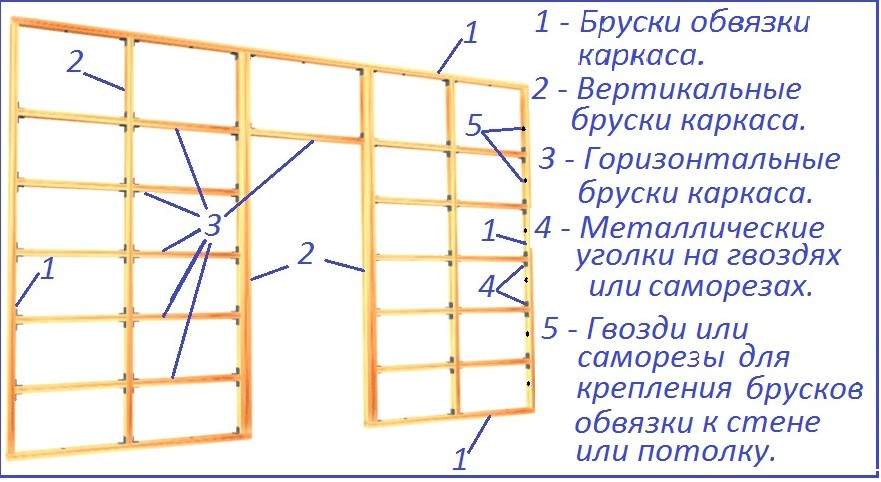
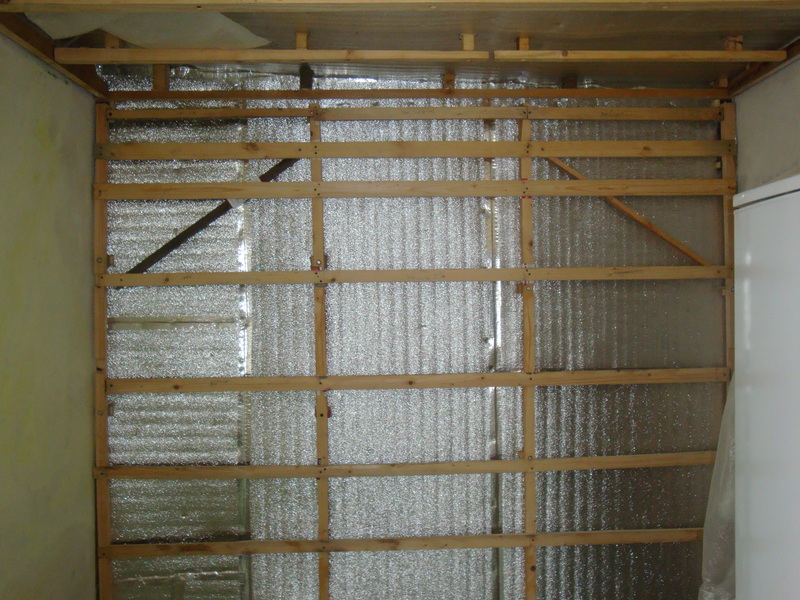
Installation of a partition on a wooden frame
In addition, a wooden frame can only be used for simple rectangular structures.
The main difficulty in mounting such a frame can arise if you are dealing with an uneven wall. In this case, adjusting the structure in one plane, you will either have to put wedges under the sagging bars, or cut off part of the bar thickness in places where the wall plane protrudes.

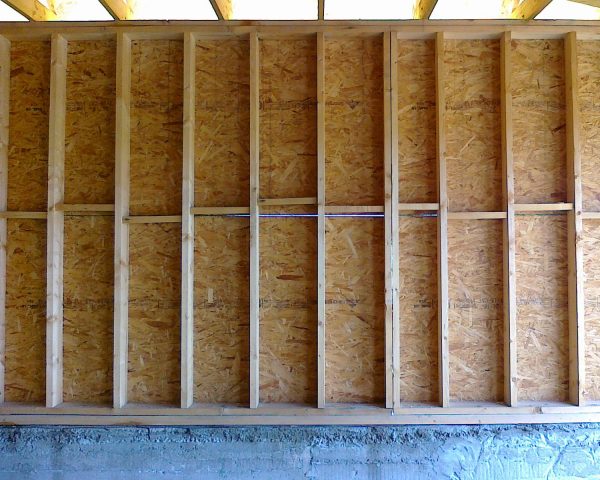
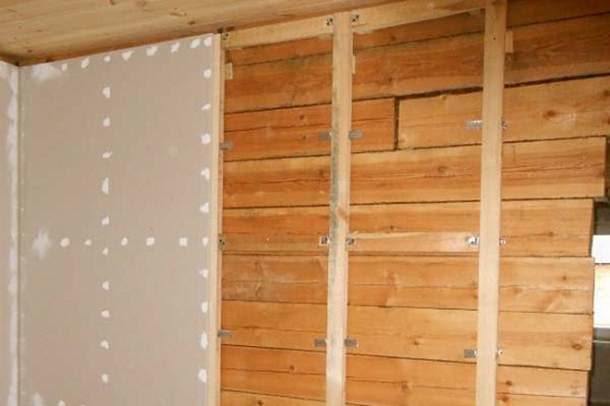
Finished wooden cladding frame
But first things first.
First of all, we make a wall sag. To do this, using a system of plumb lines, we determine the optimal location of the plane in which the drywall sheets will be located.
It is necessary to ensure that this plane is completely vertical. Next, we mount two vertical bars along the edges of the wall so that the outer side
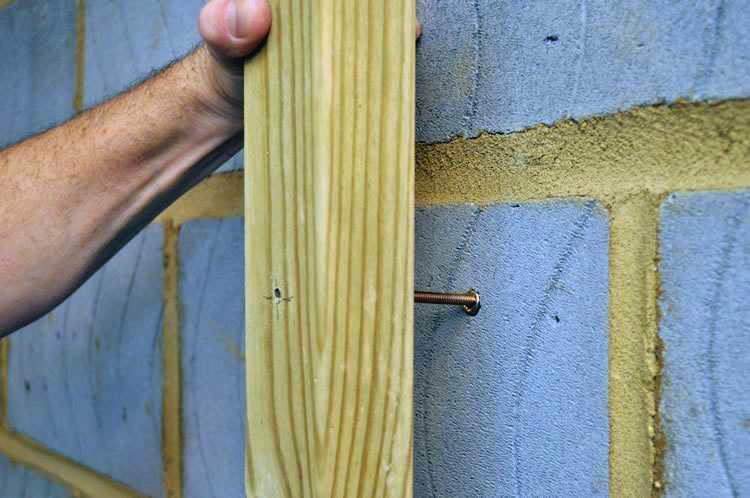
the bar was strictly in our intended plane. To do this job, you will need an assistant. The bars are attached to the wall with a plastic dowel. To do this, a hole is drilled in the wall, the diameter of which corresponds to
dowel diameter and length. The dowel is carefully hammered into the hole. With this work, there is a certain subtlety: it is practically impossible to drill a hole for a screw in a beam in such a way that it exactly matches the dowel in the wall.
Therefore, they act according to the opposite scenario: they apply the beam to the wall and first drill a hole in the beam for the screw, when the drill forms a through hole in the beam, it marks exactly the place on the wall where
you can already safely drill a hole for the dowel. When all the holes for this bar are drilled, the dowels are driven in, the bar is again applied to the wall and is already firmly screwed with screws.
If you are mounting a massive beam, then you can immediately drill through holes through the beam with a drill, without a drill. True, while doing this you should use screws with large hats.
The distance between the screws should not exceed 50 cm. When two vertical bars are fixed, the rest of the structure is mounted between them.
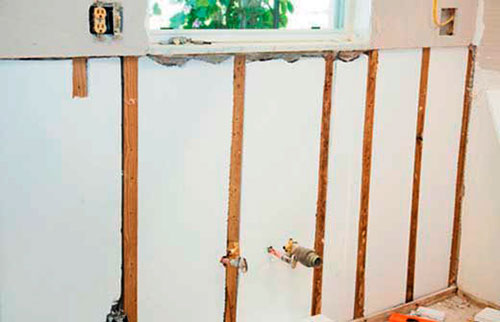
Laying soundproofing material into the crate space
In this case, simple rules should be followed: the crate should be evenly distributed along the wall,
excluding the presence of large voids. In places where an increased load on the surface of the walls is expected (the presence of shelves, hangers, mirrors, etc.), the crate must be strengthened.
As a rule, for each sheet of drywall, at least two vertical bars are required. Vertical bars are mounted in increments of about 60 cm. Those bars to which two sheets of drywall will be attached should be wider than 80 mm.
Places of horizontal drywall joints are reinforced with additional horizontal bars. The same must be done with the crate of any openings or holes - they are sheathed around the perimeter.
The main task is to ensure the location of all outside parties crates in one plane can be solved in two ways.
The first - a cord is stretched between two vertical bars and the remaining structural elements are mounted in such a way that outside lightly touch the cord.
The second way is to set additional horizontal bars at the top and bottom, using the rule to ensure their location in the same plane as the vertical bars.
Now apply the rest of the crate.
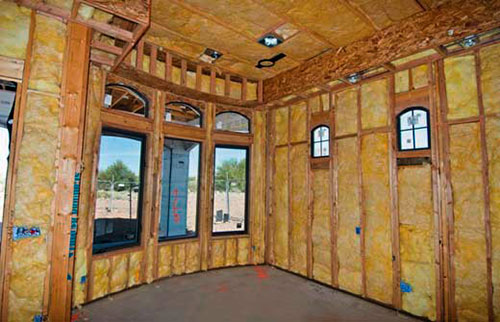
Finished wooden frame with mineral wool insulation
The next step is to install the insulating layer. Materials that are used for this: foam, mineral wool, foam rubber or combinations of these materials.
Hard-to-reach places are treated with polyurethane foam.
You can learn about the technology of installing drywall on a metal frame.
It is necessary to ensure the most dense filling of the intra-wall space with insulating material.
Naturally, this material should not protrude beyond the plane of the crate, as this will complicate the subsequent installation of drywall.
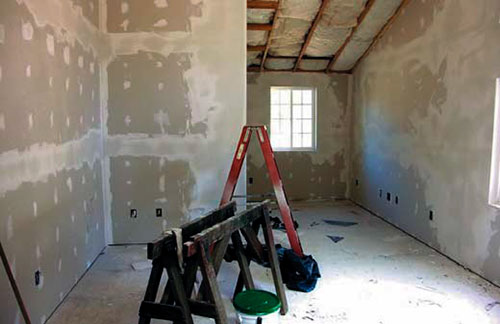
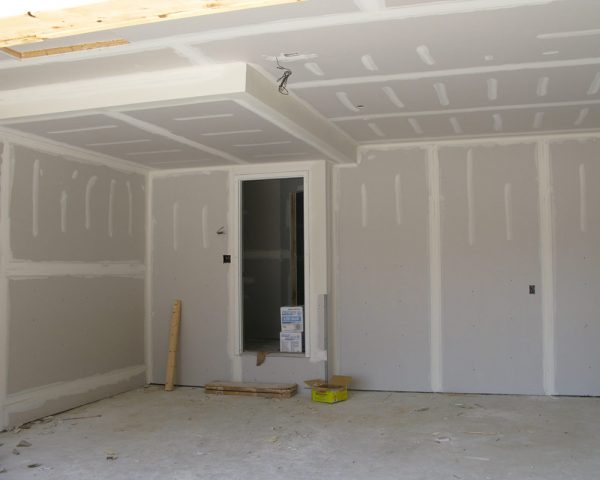
Finished wall cladding with ceiling frame
Finally, you can proceed to the final stage of work - the installation of drywall sheets. Installation begins with whole sheets. Screws are screwed at a distance of 15-20 cm from the edge of the sheet, in increments of 30-40 cm.
When screwing screws, you should monitor the degree of effort applied, avoiding thread breakage - turning the screw.
Liked? Subscribe to the blog and get new articles!
For leveling or redevelopment of living space, partitions made of GVL or drywall are used. GKL win against the background of brick and block partitions in that they are light, the equipment of such structures is quick and simple, and after completion of work there is little dirt and dust left. GKL and GVL are economical, good heat and sound insulation.
In addition to the standard GKL, there are such types of material:
- moisture resistant;
- fire resistant;
Moisture resistant used in places with high humidity, fire-resistant is used for other premises (kitchen, service premises).
Moisture resistant drywallGKL is great for finishing living rooms, because it is environmentally friendly and, when heated, does not emit poisons. Regulates the microclimate of the room in a natural way.
For durable structures, GVL is used. These are gypsum-fiber sheets that are stronger than drywall. GVL is made from building plaster with additives. GVL is an environmentally friendly material for dry construction, it does not have a cardboard shell, like drywall. But there are such disadvantages of using GVL:
- GVL is heavier than GKL;
- costs more.
Characteristics of a wooden frame
GCR fastening to a wooden frame is often used.
A wood frame is cheaper than a metal frame, it is made from wooden planks and bars, wood is usually used conifers. Bars with a section of 40 * 40 centimeters are used at the junction of two layers or where massive objects (mirror or cabinet) will be on the wall.
Material requirements:
- The moisture content of wood is from 12 to 18%;
- Fire treatment must comply with the first group of fire safety;
- The wall thickness should not exceed 132 mm.
Before use, wooden slats are processed protective equipment from fire and pests, are viewed for the presence of knots and irregularities.
Base fixing
Screwing drywall parts onto wooden slats must be carried out in residential and dry buildings. The frame is assembled in accordance with the vertical and horizontal levels, otherwise the structure will come out skewed.
Construction tools:
- hammer;
- perforator;
- nails;
- building level;
- self-tapping screws;
- mounting dowels;
- metal corners.
If the design needs additional insulation, then this is done during assembly.
 Base fastening technology
 Stages of work:
- The partition is preliminarily marked on the ceiling with the help of a level, then the wooden frame is fixed;
- Fix the strapping bars, starting from the ceiling. Then comes the floor, and after it - the walls. It will be easier to work if all the coatings in the building are made of wood (liquid nails or self-tapping screws will do). If the house is made of brick and concrete, then fastening is done with dowels and anchors to the ceiling;
- Having fixed the bars on the ceiling, they make markings on the floor (at least three marks) and continue to mount the frame.
- After checking the compliance of the fasteners with respect to the ceiling and floor, they begin to mount the base. To do this, it is enough to connect the floor and ceiling guides with vertical bars. The distance between them is observed at least 40-50 centimeters. It is very important to install these bars with high quality, since the main load will fall on them.
- After installing the verticals, the racks are fixed to the corners with self-tapping screws on both sides for 3-4 holes.
Mounting GKL on the base
Begin sheathing from solid sheets or the most large pieces. They are fastened with self-tapping screws to the bars every 25-30 centimeters.
 Facing
 When sheathed with material on only one side, then the insulation is laid and the electrical wiring is pulled before installing the top layer.
During the installation of the other side, the insulation is laid as needed. It is better to do without pulling cables, but if they are still needed, they are placed in a special protective tube.
If the partition has a doorway, increase the number of posts and horizontal lintels.
Tips for beginners:
- When mounting the second side of the wall, move the sheet one step so that the structure is strong;
- To avoid problems during fastening, make sure that the joints of the gypsum plasterboard fall exactly in the middle of the vertical racks.
isolation
Sometimes it is impossible to do without additionally isolating the structure, especially if it is not just a decorative part of the interior. There is nothing complicated in this, it is enough to lay and fix the material.
 Structural insulation
 For this, mineral wool, polystyrene foam or polystyrene is suitable. Rigid material is already attached to the inside of the lined partition.
Each material has both disadvantages and advantages, it all depends on what the room in which they are used is intended for.
Working with irregularities
If suddenly the base is uneven, the unevenness should be identified with the help of a beam. For this:
- Lay a beam along the wall and draw a line from the outer edge;
- Vertically lean the rack wood beam, mark at regular intervals the location of the butt behind its exit on the floor.
It is important to install the frame evenly so that the whole structure comes out even.
If there are difficulties with plasterboard sheathing, the video will help:
Advantages of using GKL
This material has a number of advantages over other raw materials:
- low cost and assembly costs;
- little weight;
- fast installation;
- the best sound and heat insulation;
- the ability to use even in freezing rooms;
- wall alignment;
- installation of drywall does not require additional preparation of the base;
- after installation, there is little debris and dust left.
If everything is done correctly, as final touch remains to be done decorative trim walls. And drywall constructions will last a long time and save a lot of time and money.
In contact with
- Advantages
- Tools and materials
- Lathing installation
- Drywall fixing
So popular finishing material, like GKL, in most cases is attached to special frame. It is usually mounted from metal profiles. Alternative option- a crate of wooden beams, which is very easy to assemble with your own hands. But do not be deceived by the ease of manufacture: wood is a capricious material, its use is far from always possible. Consider all the features of this design and find out when and how you can make a wooden crate for drywall on your own.
Features and disadvantages of wood lathing
The construction of a wooden frame under the gypsum board attracts with its low cost and ease of operation. Especially if during the repair a small number of boards remain that can be used as slats load-bearing structure. In this case, you do not have to spend money on the purchase of a metal profile, as well as the necessary fasteners, such as direct suspensions.
But you should also remember about the properties of wood that limit its use in construction:
- Wooden structures are subject to change in geometric dimensions with excessive or insufficient moisture. Drywall attached to such a crate will move with it, resulting in cracks that appear at the joints of the sheets. This is a constant process, as the wood gives off moisture when the room is dry or absorbs it when it is too humid.
- Alignment of walls with gypsum boards is often combined with insulation. Under these conditions, ventilation of the wooden parts of the crate is minimal, which leads to their rapid decay.
- Bars are not well suited for leveling walls. It is unacceptable to use wedges for lining: over time, the tree can bend under the influence of moisture and temperature, and weak areas form in the places of such linings.
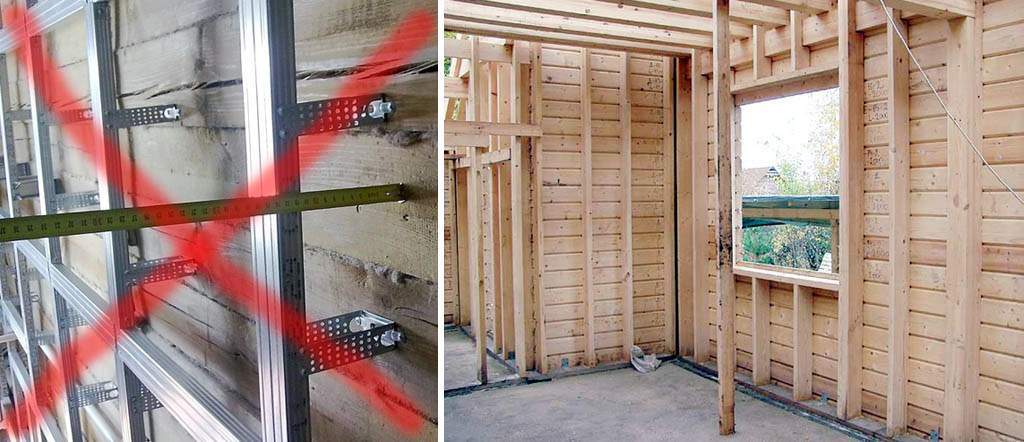
- It is not recommended to use a wooden frame when finishing with a plasterboard ceiling. This design does not have a sufficient margin of safety; it is better to use a metal profile for this purpose.
- It is unacceptable to use a wooden frame in rooms with a high level of humidity or temperature. Strictly speaking, a crate made of this material is only suitable for rooms with constant microclimate indicators.
- If it is planned to place under the surface of the GCR electric wires, then you need to use metal guides: wooden elements do not have a sufficient level of fire safety.
When can I make a frame for gypsum boards out of wood?
It is recommended to use a wooden structure for plasterboard sheets:
- In houses made of logs or timber. In this case, the crate is ideally combined with the material of the walls due to the same physical properties. It turns out that any change in humidity is compensated. In such conditions, drywall remains motionless and is not damaged.
- IN ordinary apartments with perfectly smooth walls. In this case, the timber frame will be a reliable basis for fixing the plasterboard.
Advantages
Advantages of a wooden crate:
- Simple installation, which can be done by hand.
- Available and cheap materials, more environmentally friendly than a metal profile.
- Subject to all necessary conditions properly installed crate will last a long time and will be solid foundation for drywall sheets.
Tools and materials
First of all, you will need a wooden beam itself with a cross section of at least 40 × 40 mm. If it is planned to carry out insulation and soundproofing, then the beam must be chosen thicker, for example 40 × 80 mm. To prevent decay, it is impregnated with antiseptic and water-repellent solutions. It would be useful to treat it with a composition that improves the fire safety of the material.
Before installation, all wooden elements must be kept indoors for several days in order to adapt to its microclimate and take on their final geometric shape.
You will also need:
- Measuring tool: level, plumb line, tape measure.
- Pencil, coated cord.
- Perforator and dowels for fixing the beam to the wall.
- A screwdriver and self-tapping screws, as well as corners for connecting frame elements to each other.
- Hacksaw, hammer and construction knife.
As you can see, almost the entire tool can be found in the arsenal of even a novice master. To install a wooden frame and fasten drywall, you do not have to purchase specialized expensive fixtures.
Lathing installation
Preparatory work consists in removing the old coating if there is doubt about its strength. Things in the room can be covered plastic wrap or other material.
The order of the wooden frame device:
- First you need to do the markup. The size of the GKL determines the optimal step between the vertical posts - 600 mm. Thus, each sheet will be attached to three bars: one in the center, and two at the edges. The joints should be located on the surface of the rack, as shown in the photo.
- A horizontal beam is attached to the ceiling. Using a plumb line, the location of the rail on the floor is determined. They must be located strictly in the same plane.
In the case of a perfectly even overlap, horizontal bars can be attached directly to the wall. Here, the same thickness of all elements of the crate is of paramount importance: any error in size will result in frame irregularities.
- Attached to the beams on the ceiling and floor strictly according to the level vertical racks. To the wall, they are mounted on dowel-nails, for which holes are pre-drilled in the rails and in the wall for fasteners.
In houses with wooden walls, you can mount racks to the base with wood screws. But you still need to drill holes: this eliminates the possibility that the beam will crack.
- According to the markup, horizontal jumpers are attached. They provide structural rigidity and are located at the junction of drywall sheets.
The optimal step for attaching elements to the wall is 25–40 cm.
- You can strengthen the frame with the help of corners placed at the junction of vertical and horizontal racks.
Drywall fixing
GKL installation is carried out as standard:
- Pre-cut sheets are attached to the frame. Step between screws - 25 cm.
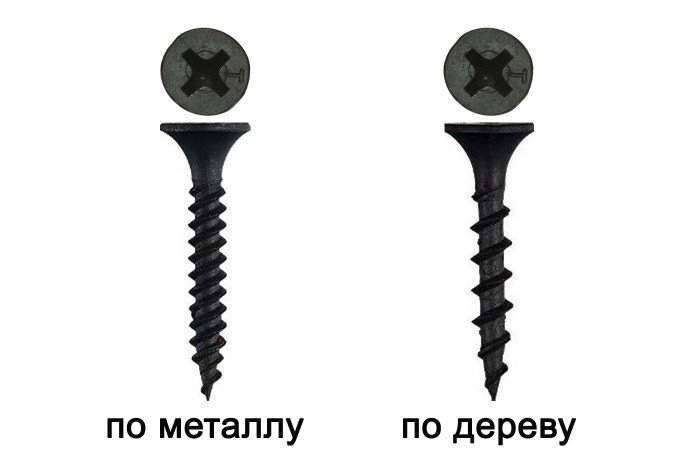
Please note: you need to take wood screws with less frequent and larger threads.
- The heads of the self-tapping screws are recessed deep into the sheet by 1 mm.
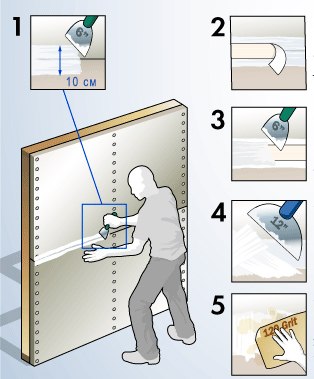
- In the future, the joints are reinforced and puttied, as well as the recesses of the screw heads.
- After grinding, the surface is primed and ready for further finishing.
More clearly, the process of creating a crate made of wood is presented in the following video. Questions on the topic ask in the comments.
When creating structures, drywall is attached only to a base of wooden slats or metal profiles. Mounting drywall on a wooden frame is a less expensive method than mounting on a frame made of profiles.
Required materials and tools:
mineral wool, wooden slats, self-tapping screws, screws or dowels, thread, drywall sheets, screwdriver.
Step-by-step instruction
- Installation of drywall on a wooden frame begins with the marking of the future structure. Thus, the distance through which the rails will be attached is determined. For wall cladding optimal distance between the slats is from 30 to 60 cm.
- After marking, wooden slats are fastened along the contour of the wall with screws or self-tapping screws. First, we make holes for the screws in the rail, so that the diameter of the holes is slightly larger than the screw head. Then, we fasten the rails with a screwdriver, top and bottom, parallel to the wall, then on the sides, perpendicular to the surface. After that, we fasten the vertical slats with the same pitch.
- We stretch a thread between the contour rails, using it we determine the height of the fastening of the transverse bars. We cut the rail into pieces of the desired length, then fasten them at an equal distance from each other. The frame is ready.
- We produce on a wooden frame. First, we fill the void between the wall and the drywall sheets with mineral wool.
- We fasten the drywall sheet to the frame with a screwdriver, the distance between the screws or self-tapping screws should be 20-25cm. In the same way, we sheathe the entire wall. We leave a gap of about 3-4 mm between the sheets of drywall for processing the seams.
- After the wall is completely sheathed with drywall, proceed to the finishing of the seams. To do this, we plaster all the bumps and joints, removing excess plaster.
- When the plaster at the joints dries, apply the mixture to the entire wall. Only after that it is possible to carry out a decorative surface finish.
Video on leveling walls with drywall
We will talk only about the longitudinal (vertical) scheme for the manufacture of cladding. The approximate sequence for manufacturing cladding on a wooden frame is as follows:
1. Mark the position of the battens and cut them to size. When cutting racks, subtract the thickness of the lower and upper horizontal bars from the length of the wall.
2. Install the racks and the upper and lower horizontal bars.
3. Install short bars above the door and window openings, slightly shifting the vertical short bars so as not to make cuts in the drywall.
4. Finish (paste over GKL) window and door openings inside. Nail sheets of drywall onto the walls.
5. Nail sheets around window and door openings.
6. Close the joints between the sheets and prepare the walls for finishing.
Walls made of brick and masonry are rarely perfectly even, therefore, in the manufacture of plasterboard cladding, all irregularities should be taken into account. The greatest difficulty is the alignment of the bars of the crate vertically and horizontally. If you do not pay due attention to this procedure, even and smooth walls will not work.
Mounting the frame uneven wall perform like this. First, the irregularities of the wall are revealed. The cut out lower horizontal beam of the future frame is placed on the floor near the wall and a line is drawn along its outer edge. Perform marking under the racks with a step of 600 mm. Then press the rack bar vertically against the wall and at regular intervals mark the position of the butt when it goes beyond the line on the floor. Connect the marks with a second line parallel to the first. Attach the support beam to the floor so that its outer edge runs along the outer line of the mark. Install vertical bars on the support, aligning them external surfaces inserting, if necessary, spacers. Evenness is checked by plumb, level and rule. Fix the horizontal beam at the level of the ceiling. It is more convenient to first install two extreme racks (vertical bars) and pull a cord between them. Then they install intermediate racks and check the evenness of the installation along the cord. If the floor is uneven, then something is also placed under the support bar in the right places (so that it is installed on the same level), and then all the other bars are set.
To align the racks, use scraps of plywood, fiberboard, wood of the desired thickness. The spacers can be covered with a little wood glue before hammering into the bars. Gaskets are also installed in cases where the ends of the bar lie tightly on the surface of the wall, and in any of its middle parts there is a gap (concave wall).
When deflecting over a large distance, the step between the dowels should be reduced in order to increase the rigidity of the bar.
If the room has a flat floor and if its area allows, you can simplify the process of mounting the frame. To do this, carefully measure the inner perimeter of the wall. Then a frame is assembled on the floor, the outer perimeter of which should be equal to the measured perimeter of the wall, minus 5 mm in length and 5 mm in height. Bearing bars are inserted into the resulting frame in increments of 600 mm, and they are fastened with nails driven through the frame into the ends, which is much more convenient. Since the assembled frame lies front side on a flat floor assembled he will already have flat surface. Therefore, the stage of leveling each beam is thus excluded. It remains only to insert assembled frame into the perimeter of the wall and, aligning their edges, fix with dowels with screws or dowel-nails.
Marking for ordinary (universal, etc.) dowels is performed using electric drill. To do this, the bar is applied to the floor, or to the ceiling, or to the wall in the position in which it should be after installation. Having asked a partner to securely hold the bar in its original position, through holes are drilled in it in increments of 800-1000 mm so that the drill makes marks on the wall at the exit. The drill diameter should be equal to or slightly smaller than the diameter of the screws used. After that, the wall is drilled for the installation of dowels. The holes of the dowels after their installation exactly match the holes in the bar.
In the event that the fastening of the bars will have to be performed without a partner, then do so. Find the location of one dowel. A hole is drilled in the wall (floor, ceiling) under it, into which the dowel is installed. After that, the bar is fixed on one dowel and, holding it with one hand so that it does not move, through holes are drilled in the bar until a clear mark is obtained on the wall. After that, the bar can be removed or simply rotated around the axis of the installed dowel (after unscrewing a little screw) so that access to the marked places is opened. After that, holes are drilled and the rest of the dowels are installed.
It is most convenient to fasten the frame to a brick or concrete wall dowel-nails. The bar is applied to the wall in the appropriate position, through holes are drilled in it in increments of 800-1000 mm. Then change the drill and drill a hole in the wall. The diameter of the drill with a pobedit tip is determined by the diameter of the dowel.
Attaching the frame to wooden wall carried out using long galvanized nails.
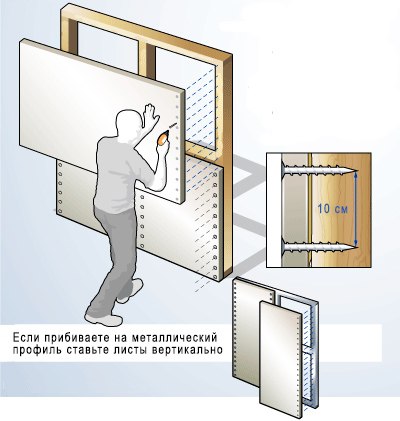
Facing the walls of the room with drywall can be started either from the corner, or from the window or doorway. To fasten the sheathing to a wooden frame, use wood screws 35 mm long with a fastening pitch of 250 mm or galvanized nails (preferably special jagged ones) 40 mm long (for sheets 12.5 mm thick) with a fastening pitch of 200 mm. GCR is attached around the perimeter and to intermediate posts (see Fig. 47). The indent from the edges is the same - from the edge of the edge lined with cardboard at least 10 mm and from the edge of the unlined edge at least 15 mm. Work is carried out from the corner in two mutually perpendicular directions or from the middle to the edges. Nails are driven in until their heads are slightly below the paper surface. Neither the head of the nail nor the screw should tear the paper. There should be a space of 5-7 mm between the sheets of drywall for finishing the seams. Between floor and end edges drywall sheets leave a gap of 10 mm. Between the ceiling and the upper end edges of the plasterboard sheets, it is also necessary to leave a gap of 10 mm. All joints between sheets and holes from nails or screws must be puttied and cleaned.
If the length of the sheet is not enough to cover the entire room in height, the sheets, when facing, are placed with an offset of adjacent end joints (off-set), and transverse bars are mounted at the joints.