Phase and zero check. Zero and phase in electrics - the purpose of the phase and neutral wires. Video: How you can determine the location of the phase and zero
Check functionality electrical networks in an apartment or a private house can be different ways. From a financial point of view the best option there will be an indicator probe that can replace a multimeter at home.
While doing installation work with sockets and light switches, it is often necessary to find the phase and zero. Of course, for experienced electricians, such a task is a trifle, but for those who are not familiar with the rules for the construction of electrical networks, this issue can drive into a dead end.
indicator screwdriver. Nuances in use
Considering the number of electrical appliances in each apartment, everyone should have this device. With it, it will be possible to determine the presence of current in any conductor, socket or electrical panel.
The design of the indicator screwdriver
The design of an ordinary probe in the form of a screwdriver is simple:
- probe, acts as a conductor;
- a resistor is connected to the sting, it is needed to lower the current strength to a value that is safe for the human body;
- then there is an LED that is connected to the contact patch brought to the end of the screwdriver;
- body is made from transparent plastic, this allows you to see the LED lighting up.

Phase and zero in a screwdriver
Find phase and zero indicator screwdriver won't be difficult. When the probe touches a live wire, the current will pass through the rod, then through the resistor, cause the LED to glow, and then fall on the hand that touches the metal plate. The current will also pass through the body of the person who performs this operation, and then leave the ground.
The person himself will not feel the current passing through him, since its value is too small.
Application area
Any work that relates to electrical wiring must be safe. For this purpose, everyone should have this necessary tool in the house.

This device can be used for the following purposes:
- check to which contact of the socket or switch the phase conductor is connected;
- when the extension cord outlet is not working, you can check all the sockets with a probe;
- with its help, you can find out where the phase is connected in the cartridge: to the central contact or to the thread;
- find out if the electrical appliance is energized;
- by touching the tip of the tool to the central contact of the socket, you can check the serviceability of the grounding conductor.
Important! If the mains is AC, then there is no need to press your finger against the plate!
Screwdriver types
New models of screwdrivers can detect the presence of stress in the strand even through a layer of whitewash, plaster and clay. Their algorithm of action is almost always the same. But there are also differences that arise depending on the types, models and a number of functions that the tool has.

Sometimes, in terms of its functionality, one screwdriver can replace several expensive devices. There are devices with a battery, this makes it possible to check the health of the wire, even in a de-energized state.
Important! Any indicator screwdriver has lower and upper voltage measurement limits. Exceeding them may break the device or display incorrect information.
Such a model can give maximum amount interesting information about the circuit under study:
- a beep will indicate that there is voltage in the circuit;
- the digital display will display the voltage value in volts;
- makes it possible to check the circuits of the alternating and direct current in household electrical appliances;
- determine the polarity of the networks;
- with its help, you can carry out the continuity of the electrical circuit with a light or sound indication.
Checking the device before use
Before use, the indicator device must be checked for serviceability. The battery that is inside the device will help make sure of this. You will need to touch the sting and the other finger to the metal contact on the handle at the same time. The indicator light should light up at this point.

If the device does not provide for a battery, then a live conductor is needed. You need to touch it with the tip of a screwdriver, and the metal on the handle with your finger. As a result, the LED will also glow.
Basic Security Measures
Be sure to follow the precautions:
- it is forbidden to use a probe without a screw;
- only batteries can be removed from the device;
- after the battery is replaced, the screw should be tightened clockwise until it stops;
- if the probe has mechanical damage, then its use is prohibited;
- do not use the device above the limits specified in the technical specifications;
- before using the probe, you will need to check it in the network with the exact presence of a phase;
Important! When measuring electrical lines, the probe is held only by insulated elements. Exceptions are circuits without voltage.
Instructions for use
According to their characteristics, such indicator devices are intended for:
- the ability to determine the alternating voltage by contact method up to 250 V;
- non-contact method up to 600 V;
- examination of the circuit for integrity from 0 to 2 MΩ;
- establishing polarity: from 1.5 V to 36 V;
- the tool must be stored in a dry and moisture-protected place;
- all operations are best done with gloves to ensure contactless examination;
- after work, the tool should be cleaned of dust and debris.

Non-contact screwdrivers are very sensitive, it can respond to both phase and neutral, although the real voltage will be in only one wire. Therefore, for an ordinary electrician, such a screwdriver is not needed. However, it can help in checking the quality of cable shielding and the absence of radiation.

In such devices, there are three switch positions. Two are provided for remote action. In the event that a screwdriver accidentally touches the current-carrying part of the wire in this mode, the entire electronic part, consisting of transistors and an LED, will burn out.
Electrical appliances surround a person in Everyday life. Sooner or later in any electrical system problems and problems occur. These problems are not always worth inviting an experienced electrician; some breakdowns can be fixed on your own. However, to be able to find a fault in the network, you will definitely need special tool, which costs, purchase in advance.
Content:
Our household electrical network is everything to us. Especially where gas is not used for cooking - everything is on electricity. We are used to using electrical appliances very simply: there are sockets and switches. The light can be turned on or off with the touch of a button. To turn on some other device, we find an outlet, plug it in and use it. Vacuum cleaner, for example.
And most of the devices are already connected and are never pulled out of the network, like a TV. Also a switch, similar to a switch for a lamp or a chandelier, and all switching on occurs with one touch. And even in general - the refrigerator costs itself and itself, when it wants, it turns on and off.
Well, this means that everything is fine on the network, and you don’t even need to know exactly what is there, in the sockets, the wires are different in nature.
The voltage in our network is variable, 220 volts, with a frequency of 50 hertz. This is how our energy system is designed. Generators give three-phase voltage, in a sense, this is optimal for delivery to consumers. After all, if a simple sinusoidal voltage requires wiring from two conductors, then a three-phase voltage can be transmitted in a complex, with all three phases at once. But for transmission, you need not six wires, as you might expect, but only four. That is one and a half times less. When transmitting over long distances, this is oh so essential for saving metal.
Three-phase voltage with an amplitude of 380 volts is brought to our houses and apartments. But on the shield, usually one phase is selected. And this means that for power consumption we need at least two wires. And one of them is called phase, and the other is called zero. This was the case with the old connection. And the old sockets were made without counting on connecting a third wire - grounding. Now grounding has become the norm, it should protect us from electric shock from our household appliances, if a breakdown occurred in them, and 220 volts were directly on the metal case or casing of the device. Therefore, it is supposed that there should be grounding everywhere. It joins all non-current-carrying metal structures appliances, and it’s good if it is grounded as close as possible to us. This is to ensure that the resistance between the grounded parts of the devices and, in fact, the ground, is as small as possible. Then, in the event of an emergency breakdown of the wire carrying the phase and the body of the device, the phase would immediately go into the ground without damaging us.
But it is not always the case. Previously, and even now, if there is no grounding of devices, it was possible to determine whether, for example, an iron or a refrigerator is connected to the network or not, or maybe its fuse has blown. If you hold your hand - especially sensitive back side elbow - just "stroke" the iron, touching it lightly, then something like a slight vibration or a slight tingling was felt. This indicated that the phase was applied to the device, and inductive voltages were generated in the ungrounded case.
There is nothing good in such pickups in themselves, they can sometimes reach 100 volts, and even sensitively “crack” a person. Depends on the mutual capacitance of the phase conductors and body parts. The refrigerator will have more, the iron will have less.
Actually, this is the first way to check the phase, although you don’t need to do this - it can crack, or the focus won’t work at all when there is a normal ground. And in this way it is completely incomprehensible through which wires zero and phase are fed. Their presence will only be stated.
And the supply occurs at least two (phase and zero, as already mentioned here) wires, a maximum of three. This is for a single phase connection. And when applying to some consumer at once three phases of wires will be five. Three phases - this is much more serious, a voltage of 380 volts is much more dangerous - more often leads to death, so grounding such installations is always a prerequisite.
A single-phase network has one phase wire, one - zero and one - ground.
The ground wire is selected immediately, it does not need to be defined. But the phase and neutral wires in the outlet can be at least on the right, even on the left. There is no rule that defines this precisely. You can see by the color of the insulation of suitable wires, but they are:
- are laid under the cover of the outlet and go secretly into the wall;
- even if you get to them by unscrewing the screw and removing the cover, there is still no guarantee that:
- the color marking of the phases is observed;
- it was observed when they stretched the wire from the junction box.
The color designation of the wires in the power network prescribes:
- blue color designate the neutral wire;
- yellow-green striped - ground wire;
- a wire of a color different from these two indicates the phase (black, red, gray, purple ...).
A three-phase leash is designated in exactly the same way, only the phase wires must be all different color and not be blue or yellow-green.
This is under normal professional installation must be carefully observed, but ... We buy apartments and move to new habitats and become owners. And we do in our apartments what we consider useful and correct and do not always care about compliance with standards. We usually remember what we did, and we can easily find, when necessary, in a do-it-yourself socket, both phasing and a neutral wire without an indicator. What absolutely cannot be said about the owners who will replace us if we sell the apartment.
For these reasons, it is necessary for any owner, and not just useful, to know how to check the health of the network and how to find the phase and zero anywhere in the household network. And, in addition, inspect the entire electrical network and establish the correct marking on all tested conductors. If the standard marking of the tested wires by color is not maintained, mark them with rings of electrical tape or heat shrink tubing different, but standard colors. Mark the locations of the faults especially and start correcting everything that is wrong as soon as possible.
Phase and Zero Definition
You can do this with different devices. The simplest thing is to check the presence of a phase with an indicator. A device specifically designed for this purpose. How to determine zero when you know the phase? If everything is fine, then this is the wire where there is no phase.
The indicator is often performed like a screwdriver. They can even unscrew a small screw, not very twisted, but it's better not to tempt fate - this is a device, and it's better to use it for its intended purpose. It consists of a sting, from which, through a large resistance (about 1 MΩ) the wire goes to a neon lamp. The other contact of the neon comes out on the other side of the indicator, and when measuring, you should touch it with your finger. The sting for the conductor sample must be pressed against it. Since a person has enough large area surface, it forms a kind of capacitor with zeroed / grounded metal surfaces of the network. If there is an alternating voltage on the wire to which the sting is pressed, a very weak, not dangerous for humans, current of about 0.02 mA will flow through the person and the neon lamp, which will cause a weak glow of the neon lamp, which will show the presence of a phase in the wire. The indicator is designed for voltage up to 500 volts. The device (the resistor in it) can be broken through with a high voltage, then it fails, and it will become dangerous to use it. Therefore, just in case, it is necessary to work with all safety measures: be in insulating shoes, the room must be dry. Because the electric shock in the event of a breakdown will be directed from the phase through the checking person to zero or ground, or any grounded metal (housing of a household appliance, radiator, water pipe, etc.).
Such an indicator is also sensitive to voltages that occur in conductors where there is no phase. It happens like this: in the socket, both contacts give off a neon indicator light. Phase is one of them. And the other is a "bad" zero. If zero somewhere in the wiring is broken, interrupted or burned out, then there will be a pickup from the phase in it. Her voltage, of course, is not the same as in the phase, but sufficient for the indicator to show it with a neon glow. How then to distinguish zero and phase? In this case, there is no success - nothing is determined. And we need to use other means. For example, try to find the phase with a multimeter.

It can be used as a single-pole one: press the sting of one pole to the contact where the phase is supposed to be, take the second pole with your hand. But with a break at zero, it shows a glow on both contacts. In this case, you can check for a voltage drop between two different pins. Relative to ground, defined somewhere in another socket of a "good" zero. Two phase wires in different sockets, but on the same phase they will show the absence of a potential difference.
If there is voltage between the two poles, the indicator neon should glow.
Using a tester - a control lamp
A probe is made to determine the integrity of the wires. This is a light bulb with a battery and two fairly long wires with ends that are convenient for connection: pin or with crocodile clips. With such a probe, it will then be possible to search for the place of the break in the neutral wire, which was mentioned above. However, such searches should already be done with a completely de-energized network.

But we need a probe to check for voltage. It is also called a control lamp - this is the same as a two-pole indicator, the difference is in using an ordinary incandescent lamp instead of a neon bulb, designed for the voltage whose phase we are looking for. The advantage of this design is that the bulb will light up only at "its native" voltage. However, if it is possible to stick it into two different phases, it may burn out. But if there is no such probability (the apartment is powered by only one phase), then such a probe can be safely used. Plugging it with one pole into one socket contact, and connecting the other to EXACT zero, we get light from a light bulb, indicating that we have found the phase. A broken zero in this case will not give any glow. As well as unbroken.
How to determine phase and zero with a multimeter
To determine the phase and zero, you can use a multimeter, or a tester. In this case, the voltage is simply determined. Everything is almost the same as in the previous case with a light bulb, only we will see the voltage value from the reading of the device. It is only necessary to pre-set AC (alternative current - alternating current) and the measurement range is such that our mains voltage of 220 volts is inside it, for example, switch the range “up to 500 volts”.
Polarity with alternating current does not matter; to determine the phase, you need to check the voltage between the two conductors with two probes. And it’s better to catch the “exact zero” with a crocodile (or the ground - a heating battery, just find a place where there is no paint - or tear it off), and check the phase in the outlet contacts with another probe. Phase should give how much? That's right, 220 volts, or less, as usual in our network. Zero voltage will give us a good zero - that is, it will show an unbroken zero bus, and some intermediate values \u200b\u200bmean bad wiring. This or the phase comes bad - somewhere bad contacts on the phase, and we must urgently look for - or a bad zero - dangling. If both zero and phase are bad in the outlet, this means that the wiring is completely unsuitable, and something is about to happen on the network.
And then a new stage begins - to find, find out, find out all the faults and eliminate them.
Any person doing electrical work at home or simply deciding to install a chandelier, sconce or connect an outlet, you will definitely encounter the question - how to determine the phase, zero and ground at the wires, at the installation site?
In our articles and instructions, we often post wiring diagrams, rules for installing and connecting electrical equipment to the network, and much more, where for correct execution of all operations, you need to know where the phase wire is, where is the zero (working zero), and where is the ground (protective zero). For an experienced electrician, determining where the phase and zero or finding the ground is usually not difficult, but what about the rest?
Let's try to figure out how at home, without having complex specialized measuring instruments and electronic devices, to determine for yourself where the phase is, where is zero, and where is the ground in the wiring.
Of all known methods, the most simple definition phases and zero, we have selected the most, in our opinion, available in implementation and at the same time safe. For this reason, in the article you will not see tips - how to find the phase with the help of potatoes or calls for a short touch of the wires various parts body.
In fact, there are not so many options for determining the phase, zero or ground, for example, in a socket, without the use of specialized equipment, and sometimes, depending on your goals and objectives, it is enough just to know the standard color coding electrical wires adopted by us in order to distinguish them.
Wire marking by color
Really, the easiest way to determine the phase, zero and ground at electric wire, is to see the color coding and compare with the accepted standard. Each lived in modern wires used in electrical wiring, as well as electrical equipment has an individual color. Knowing which color of the cores corresponds to which function (phase, zero or ground), you can easily perform further installation.
Quite often, this is quite enough, especially in cases where the installation is carried out in new buildings or places with fairly new electrical wiring done by professional, competent electricians in all areas. modern rules and standards.
In our country, as in Europe as a whole, the IEC 60446 standard of 2004 is in force, which strictly regulates the color marking of electrical wires.
According to this standard for an apartment electrical network:
Working zero
(neutral or zero) - Blue wire or blue-white
Protective Zero
(earth or ground) - yellow-green wire
Phase
– All other colors including black, white, brown, red, etc.
Now, knowing the wire color code standard, you can easily determine which wire performs which function. This applies to most cases, with the exception of wires suitable for switches, switches, etc., due to a fundamentally different scheme of operation of this electrical equipment.
If you are not sure about the exact correspondence of the colors of the wire cores to the IEC 60446 2004 standard, you have old wiring, you do not exclude the possibility of errors or even negligent attitude of electricians to their work, or maybe electricians laid wires of a different standard and, accordingly, a different color marking, then we proceed to practical method determination of phase and zero (working and protective).
HOW TO DEFINE THE PHASE, ZERO and GROUND AT THE WIRES YOURSELF
So let's start in order:
PHASE DETECTION
For greater convenience, it is always better to determine which of the available wires is the phase first.
PHASE DETERMINATION WITH INDICATOR SCREWDRIVER
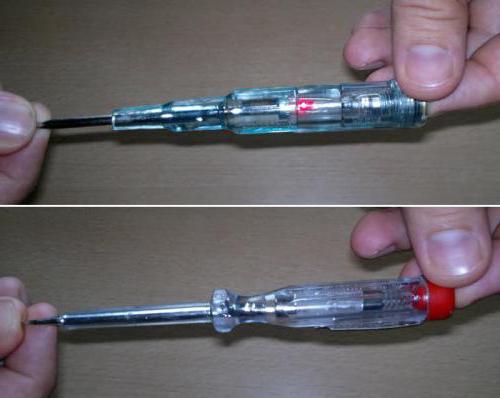
The easiest way to find a phase wire is to search using indicator screwdriver. This the simplest tool anyone should have home master dealing with electrics in the apartment - whether it is a complete electrical installation, simple replacement lamps or installation of fixtures, sockets and switches.
The principle of operation of an indicator screwdriver is simple - when the tip of the screwdriver touches a live conductor and at the same time touches the contact, on the back of the screwdriver, with a finger, the indicator lamp in the tool body lights up, which signals the presence of voltage. Thus, you can easily find out which wire is phase.
The principle of operation of the indicator screwdriver is simple - inside the indicator screwdriver there is a lamp and resistance (resistor), when the circuit is closed (we touch the rear contact), the lamp lights up. Resistance protects us from electric shock, it reduces the current to a minimum, safe level.
This option for determining the phase on your own is the most preferable and we recommend using it, especially since the cost of an indicator screwdriver is more than affordable. The main disadvantage of this method is the likelihood of erroneous operation, when the indicator screwdriver, reacting to interference, determines the presence of voltage where it is not.
DETERMINATION OF PHASE, ZERO AND GROUND BY PILOT LAMP
Another way in which you can determine the phase, neutral and ground wire in a modern three-wire electrical network, this is the use of a pilot lamp. The method is ambiguous, but effective, requiring special care.
To begin the determination, it is first necessary to assemble the test lamp device itself. The easiest way is to use a cartridge with a lamp screwed into it, and fix the wires with the insulation removed at the ends in the terminals of the cartridge. If there is no electric cartridge at hand or there is no time to make something, you can use the usual table lamp with electric plug.
The technology for determining the phase, zeros and grounds using a test lamp is as simple as possible - connecting the lamp wires to the wires that need to be determined in turn, each with each.
Determine phase and zero from two wires
In case of definition control lamp phase wire among the two wires, you can only find out whether there is a phase or not, and which of the phase conductors cannot be determined. If, when connecting the wires of the control lamp to the conductors being determined, it lights up, then one of the wires is phase, and the second is most likely zero. If it does not light up, then most likely there is no phase among them, or there is no zero, which also cannot be ruled out.
In this way, rather, it is more convenient to check the operability of the wiring and the correctness of its installation. It is better to determine the phase with an indicator screwdriver, but to recognize the presence of zero in this way.
In this case, you can determine the phase wire by connecting one of the ends coming from the control lamp to a known zero (for example, to the corresponding terminal in the electrical panel), then when the second end touches the phase conductor, the lamp will light up. The remaining wire, respectively, is zero.
Find phase, zero and ground from three wires:
In such a three-wire system, it is often possible to accurately determine the phase, neutral and ground wires with a test lamp.
We connect the contacts coming from the control lamp in turn to the cores of the cable that needs to be determined.
We act by elimination method:
We find the position in which the lamp is on, this will mean that one of the wires is phase and the other is zero.
Then we change the position of one of the contacts of the control lamp, then several options are possible:
- If the lamp does not light up (if there is an RCD or a differential circuit breaker of the line being tested, they can also work), then the remaining free wire is PHASE, and the tested ZERO and EARTH.
If, after changing the position, the lamp flashes for a short time, the RCD or differential will immediately work. the machine (if any), then the remaining free wire is ZERO, and the tested ones are PHASE and GROUND.
- If the line is not secured by the device protective shutdown(RCD) or differential automaton, and the light will be on in two positions. In this case, you can find out which wire is working zero (zero), and which is protective (grounding), you can simply turn it off in the metering and distribution panel input cable from the ground terminal. After that, also check all the wires with a test lamp and, again by the elimination method, in the position when the lamp is off, identify the ground conductor.
As you can see, in different situations, at different schemes wiring implemented in the apartment, the methods and methods for determining zero, phase and ground are changing. If you encounter a situation that is not described in this article, be sure to write in the comments to the article, we will try to help you.
And if you know more, simple ways of how to determine the phase, zero and ground at home, without a specialized tool, write in the comments. The article will be updated for sure. The main requirement for the methods of determination is simplicity, the ability to get by in the search with only improvised, household means that many have.
In every house there are electrical appliances and electrical wiring, in the operation of which there are some difficulties. Call professional electrician for every slightest reason it will cost a pretty penny, it is much easier to solve the problem yourself. For these purposes, you may need a multimeter that measures network parameters. However, the tool is expensive, and it is not always advisable to purchase it for use at home. Its functions can be replaced by an indicator screwdriver. What is it and how to use it? How to determine where the phase is, and where is zero?
Principle of operation
How does an indicator screwdriver work? Appearance The device is similar to an ordinary screwdriver, but it has an indicator built into the cavity of the handle. The metal part of the screwdriver acts as a probe, while it is able to reduce the strength of the supplied electricity so that the use of the device is as safe as possible. Also, the device has an LED, which is located at the top of the handle. In addition, the screwdriver has a metal plate of the contact type.
The principle of operation is quite simple - the probe of the screwdriver touches the conductor of electricity, then, passing through it, the current strength decreases significantly, after which the person touches the contact plate with his finger. The circuit is closed, causing the light to turn on. A screwdriver is needed in order to show the presence of a permanent or alternating current.
Varieties of screwdrivers
Today, in the range of any hardware store The following types of indicator screwdrivers are available:
- Safeline multifunctional screwdriver.
- MS 18.
- Lek OP 1.
- Lek OP 2E.
- VM 1141 220 250V.
- Indicator screwdriver with battery.
The presented modifications of the device have some difference in functionality.
Screwdriver options
The standard device is designed for the following purposes:
- The indicator screwdriver shows phase or zero.
- Definition concealed wiring contactless way.
- Determining the location of the cable break.
- Determining the polarity of the batteries.
- Checking the integrity of the electrical circuit.
Depending on the modification of the screwdriver, it may have other additional functions.
Definition of zero and phase
Many novice electricians and people who decide to repair electrical appliances on their own are interested in how to find the phase and zero with an indicator screwdriver. To do this, follow the following algorithm of work:
- first, the wiring is de-energized;
- the wires to be tested must be stripped from the insulating winding;
- after which it is necessary to turn on the electricity;
- the probe must alternately touch the wires, while remembering that the circuit must be closed with a finger on the contact plate;
- the wire, when touched, to which the light bulb lights up, is the phase of the electrical circuit.
How to find phase and zero with an indicator screwdriver in a socket? To do this, you need to alternately place the probe into the holes of the outlet. When a phase is detected, the light will turn on. There will be no glow if the screwdriver shows zero. If, when touching both holes of the socket, the light does not light up, this indicates a break in the zero.
In addition to using an indicator screwdriver, you can determine the phase by the color of the wire:
- yellow-green wire is ground;
- phase wire color - black;
- zero has blue color wires.
If the color distribution is not respected, you will need an indicator screwdriver to determine.

Checking the health of incandescent lamps
When buying another incandescent light bulb, it is important to check its performance right in the store. If there is no corresponding stand, this can be done using an ordinary indicator screwdriver. To do this, you need to take the lamp with one hand by the metal base, and with the probe of the indicator screwdriver in the other hand, touch the central contact on the bulb. If it is correct, the LED on the device will light up.

Although the method is effective, the result may be a failure if the light bulb is depressurized. In this case electrical circuit saved, but the lamp still does not light up. However, this happens quite rarely.
Checking the heating element
Check the functionality of the heating element washing machine possible without even taking it out. It is enough to provide access to the contacts, while the remaining wires must be disconnected. To check, you need to touch one of the contacts of the heating element with your hand, with a screwdriver probe - to the other. In this case, the circuit is closed by touching the metal plate on the device. If the lamp lights up, then a heating element serviceable.

Checking the voltage in an insulated wire
How does an indicator screwdriver work? Its functionality allows not only to determine the phase and zero, but also to check the voltage in wires with insulation. It is not recommended to bite an unknown wire, as it is often not clear whether it is energized or not. In this case, the following manipulations are carried out:
- take the indicator screwdriver directly by the probe;
- a metal plate must be attached to the wire;
- if the cable is live, then the indicator on the screwdriver will show this.
This method of determination is suitable even for wires that are under plaster, however, the glow may be less bright.
Finding a broken wire
The instruction for the indicator screwdriver notes the versatility of the device. This is very important and convenient home use. Having figured out how to find the phase and zero with an indicator screwdriver, you can also find a wire break with it. If the carrier suddenly stops working, then the first step is to check the integrity of the electrical circuit:

Similarly, a wire break is searched for in the wiring of the house.
Electronic indicator screwdriver
You can find the phase and zero with both an indicator screwdriver with an LED and an electronic one. The only difference is in their design. An electronic indicator screwdriver can be either with or without a liquid crystal screen.

Instead of light signal such a device notifies the presence of voltage sound signal. In addition, a great advantage of such a device is the output of information about the voltage on the liquid crystal screen, if any. The principle of operation of the electronic device is the same as that of a conventional indicator screwdriver.
Health check
Before you determine where the phase is and where is zero, you need to check the performance of the screwdriver itself, since it, like any other device, may be faulty. To do this, you should pay attention to such nuances:
- The body of the device must maintain its integrity. Working with electricity requires good insulation without damage.
- For accurate readings, check the screwdriver. To do this, touch the probe with the probe to the conductor, which is 100% energized.
- If you use a battery-powered product, you need to replace them in time.
Safety when using a screwdriver is extremely important, so if a problem is found, it is recommended to purchase a new device. The cost varies from 50 to 1000 rubles. depending on modification.
Security measures
When working with the device, the following safety precautions must be observed:
- Do not disassemble the screwdriver, replace only the batteries, if any.
- The use of a damaged screwdriver is strictly prohibited.
- Do not use the device without a screw.
- When the probe comes into contact with electricity, do not touch the bare part of the device with your hands.
- Do not use the device at voltages higher than indicated in the technical specifications.
In order to find out whether the phase or zero on the indicator screwdriver is lit, you need to follow all the recommendations outlined above. At the same time, it is important to monitor the health of the device and not to neglect the rules safe use indicator screwdriver.
When connecting various electrical devices(socket or switch), it is not necessary to take into account the polarity of the conductors. But what if the wiring used in the house is three-core and does not have a color marking, and the devices must be connected with a grounding conductor. To do this, there are several ways to check which of the wires is phase, zero or ground.
Determination of phase and zero without instruments
There are situations when, for the correct connection, it is necessary to find out which wire is the phase and which is zero. For example, to ensure the normal operation of the lighting fixture, a phase wire is cut into the gap (through the switch), and the zero wire is laid directly to lighting device. Currently, wiring in houses and apartments is laid with three-core wires, which are divided into three types.
Types of conductors:
- Phase;
- Zero;
- Grounding.
It is possible to distinguish the phase from zero in the wiring visually. But for this one must be observed important condition. Wiring in a house or apartment should be made using multi-colored conductors.
Phase conductor according to GOST rules, must be marked following colors: black, white, brown, purple, teal, red, grey, pink and orange.
Note! The most common colors found for marking phase wires, are white, brown and pink.

The neutral conductor is easy to find, as it is always marked in blue. The ground wire is yellow-green.
It is worth noting that electricity, which is supplied to the residential sectors, is variable, so the polarity of connecting electrical appliances does not matter. Proper connection is only important for DC equipment.
Phase and zero in the socket: how to determine with an indicator screwdriver
by the most in a simple way determining the phase conductor is to use a conventional indicator screwdriver. Currently on the market there are great amount instrument data.
Indicator types:
- With neon indicator;
- With the use of LEDs.
An indicator using a neon bulb is made in the form of a dielectric case, inside of which there is a neon lamp with a resistor connected to it.
Design LED indicators It is presented in the form of a conventional screwdriver, inside which there is an LED, a microcircuit and several small batteries. These devices, having various characteristics are similar in principle of operation.
It is important to know! It is possible to determine the phase conductor only if there is voltage in the electrical network.
In order to find the phase in the wiring, you must do the following. The voltage is removed from the conductor. This is done by turning off the circuit breaker in the electrical panel.
After that, the wires are stripped of insulation to a length of about 1 - 2 cm. The ends of the wire are pulled apart, this will help to avoid a short circuit between these conductors.
Voltage is applied to the wire by turning on the circuit breaker. Then, the metal part of the indicator is applied in turn to each and wires. The illuminated indicator will indicate the working phase in the wiring.
It should be noted that some devices, due to their design features, can be equipped with a metal plate at the top. To correctly determine the phase conductor, it is not necessary to touch it.
How to find the phase, zero and ground with a multimeter
If the phase conductor is easy to detect using an indicator screwdriver, then it is not possible to determine zero and ground with its help. Since these conductors do not affect the operation of the indicator in any way. In this case, it makes sense to use a multimeter.

To determine you need:
- Multimeter (tester);
- The presence of voltage 220 V.
The definition of each of the conductors should begin with the preparation of the device. Probes are connected to the plugs under the name COM and V.
If you need to find a phase wire, then for this, by turning the switch, on the multimeter, you must select the value of the measurement of alternating current in the range of more than 220 volts. After that, the probe that is connected to the socket with the name V, we touch all the conductors in turn. When touching the phase conductor, the display of the device will show values from 8 to 15 Volts. The neutral and ground conductor will not change these readings.
Note! When working on energized wiring, be sure to follow the safety rules.
After the phase conductor is found, you can start searching for the zero one. To do this, with any probe of the multimeter we touch the phase conductor, with the other we close the contact with any of the other conductors. The neutral conductor will be indicated by the value of 220 Volts that appears on the display of the device.
The third conductor will be the ground conductor. The readings on the display when touching the phase and ground wires are always lower than 220V.
Non-standard ways: how to determine the phase in the wiring
It should be borne in mind that these methods are unsafe. It is recommended to use them only if all necessary safety measures are observed.
Definition methods:
- Homemade control light;
- Potato.
To make a control light, you will need an ordinary cartridge, an incandescent lamp of any fashion and a meter wire. First of all, we clean the wire from insulation by about 1 cm. Next, we disassemble the cartridge and connect the ends of the wire to its terminals.

Then, in order not to damage the light bulb, it is necessary to strip the remaining ends of the wire to a length of 3 cm. We screw the light bulb into the prepared device. After that, turning off the voltage, we clean the ends of the conductor on which it is necessary to find the phase wire.
It is not necessary to twist the contacts of the control bulb with the wire, since free access to the conductor contacts is required.
Next, using any metal object, we clean small plot on the metal surface water pipe. We apply voltage to the conductor and with one contact of the control we touch the stripped area on the pipe, and with the second one of the contacts of the wire. When touching the phase conductor, the lamp will light up.
Using a potato, check which of the phase wires is presented as follows. The device will require two meter-long wires and a 1 mΩ resistor. One of the wires must be mounted in a potato and attached to the pipe. The other wire is mounted in a potato with one of the ends, and the phase wire is searched for with the other. The appearance of browning on the potato will indicate the phase wire.
Understanding how to determine the phase and zero (video)
As practice shows, in most cases, the search for phase and neutral conductors in an AC electrical network is not necessary, since the polarity when connecting different home appliances irrelevant.