Two-level stretch ceilings with LED strip. LED strip for stretch ceilings is a soft and cozy light source. Mounting options for stretch ceilings with lighting
LED Strip Light under a stretch ceiling is not only beautiful and economical, but also functional. Translucent structure stretch fabric allows you to have LED lights right under the ceiling. They create soft lighting with a decorative effect.
There are a number of ways to install light diode tape under the stretch ceiling, namely under the lower level multi-level ceiling from GKL:
There are two levels to the acoustic lighting system, which allow for a good acoustic performance, as well as a clear light output. The bottom layer is perforated with one of four perforations, and upper layer remains normal without any perforation.
As you can see above, you can have insulation behind the material if needed. In this case, additional electrical considerations come into play. If the distance is 100mm, the distance between them should be 100mm. Our little tutorial will help you learn more about using and installing these modern elements lighting. From bare strips intended for installation in dry areas, in waterproof types, which can be immersed in water permanently and in in full.
- in an open niche;
- in a closed niche;
- in skirting boards.
They differ from each other in the way the lamps are located. This way of lighting rooms has enough wide opportunities. For example, the creation of beautiful color compositions is due to the richness of the choice of colors.
The following are other advantages that diode lighting elements have:
The tapes are divided into marked places where the copper plates are located. They then serve to feed the entire tape. This allows you to get a fairly accurate required length. It is also possible to use regular office scissors without any problem. Simply remove the tape and stick the tape to the prepared surface.
This setup looks much better and more professional. At least basic aluminum profile recommended even in places that are not directly visible. metal base provides better cooling of the belt and therefore a longer service life.
- devices are not able to heat up to high temperatures;
- lamps are durable and safe;
- light sources based on diodes are resistant to mechanical damage;
- low power consumption unlike other light sources.
The tape itself after installation becomes invisible from below. Only the light from it is noticeable, which is directed from an open or closed niche on the stretch ceiling of the upper level. This solution is more suitable for matte canvases and not for glossy ones.
The power supply just needs to be connected to the first segment, and the entire belt will light up. If you choose a soldered connection, be sure to insulate it. You can use duct tape, heat shrink sleeve or silicone. However, soldering is not absolutely necessary.
For outdoor installations or bathrooms, use a waterproof power supply, for interiors, you will need resources with less coverage. The result will be the energy consumption of the entire tape. The output power must be at least 10% higher. If you are unsure about finding a suitable resource, feel free to contact us.
Gloss is able to reflect the fixtures themselves, as well as power supplies and controls, and this does not add to the beauty of the ceiling structure.
The active use of LEDs in outdoor advertising, in the design of entertainment halls and retail space has already become familiar. This source is safe, since diode lamps cannot heat up to temperatures that are dangerous for vinyl stretch fabrics.
LED lighting and its characteristics
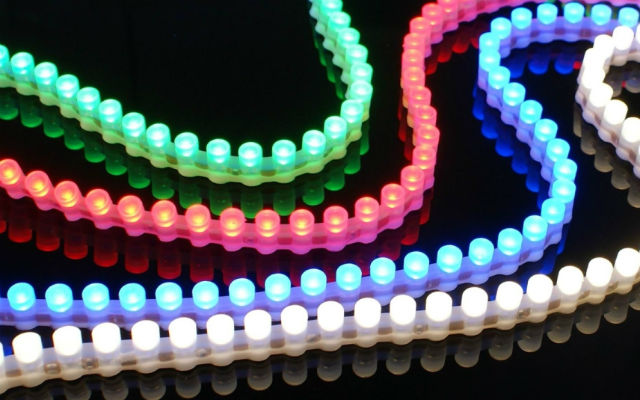
LED strips differ in their technical specifications depending on purpose. Diodes are usually located on the ceiling in a certain amount. The density of standard decorative tapes for contour lighting can be 30 and 60 elements per 1 m. Full lighting of the room is provided using tapes with a LED density of 120 or 240 pcs. at 1 m.
LED ceiling lights are economical and durable. Such an element has a service life of about 100 thousand hours. If you use the LED lighting of the stretch ceiling every day for 12 hours, then this source will last for 22 years. At the same time, the installation of LED strip in a stretch ceiling is beneficial for the following reasons:
- quick payback of electricity costs;
- selection of the optimal lighting angle;
- spectral purity when choosing a color.
The low energy consumption of LED elements quickly enough allows you to recoup all the costs of electricity. Uniform scattering of light by these sources occurs under optimal angle lighting, which is up to 140 °. The LED gives exactly the color that was chosen to illuminate the stretch ceiling.
The room is filled with even soft light that does not create shadows. If you take a photo in such a room, then expensive lighting equipment is not required. Professional photographers attach great importance to it.
Thanks to its functions, LED equipment allows you to create bright elegant ceilings that shine different colors. For creating classic design suitable in the room white lighting. Can be equipped with LED strip only separate sections ceiling or adjust the lighting of the entire perimeter. The LED strip in the stretch ceiling can be used both as the main source of lighting and as an additional one.
There are models of LED strips that are protected from moisture. In terms of their cost, they do not differ too much from conventional diodes, and the benefits from their use are obvious. If flooding occurs from above, then such a light source will not fail, so it will not have to be replaced with a new one.
The choice of LEDs for stretch ceiling
The brightness of the LED strip may be uneven around the entire perimeter of the room. Such a light source in the room makes it more comfortable. For different parts rooms can be provided with a tape having a different density of diodes. The brightness of the light can be adjusted using a dimmer.
When choosing diodes, you should pay attention to their marking. SMD elements 5050 give white light High Quality. They are quite expensive because they include 3 colors. The SMD 3528 brand is produced on the basis of a diode that has a blue glow, which should fade during operation.
After installing the stretch fabric, in most cases it is impossible or very difficult to dismantle it so as not to damage the vinyl film.
The decorative strip for the stretch ceiling must be installed before the canvas is mounted.
Harpoon-strengthened ceilings can be removed and then re-arranged.
Creating highlights for stretch ceilings due to the use of LEDs with a long service life. Diode manufacturers guarantee continuous operation of the equipment for about 10 years. Since during this period something can happen to the ceiling, the installation of LEDs under a false or stretch ceiling is quite reliable.
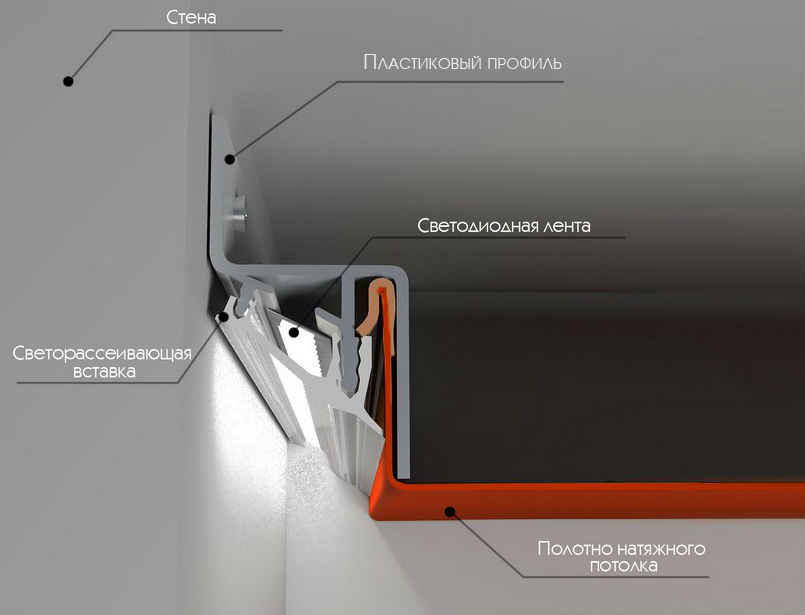
If there are concerns about the durability of the LED elements inside the ceiling structure, it is possible to place them around the perimeter. To do this, you need to hide the lighting system in a drywall box. In some cases, the stretch ceiling and the LED strip are covered with a special plinth after installation.
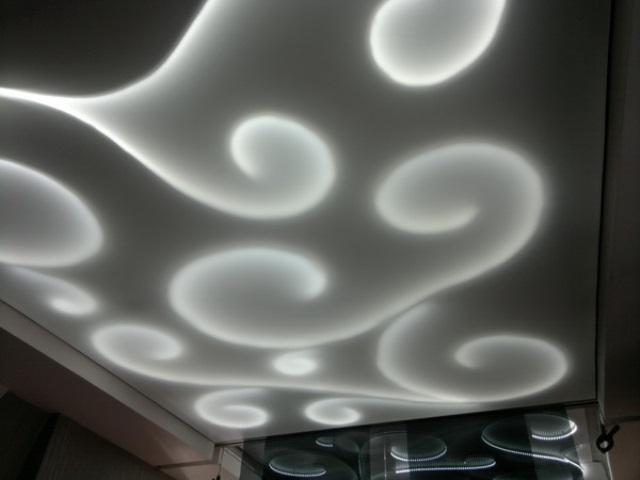
Scheme of installation of a soaring stretch ceiling with LED backlight
When choosing a light source of one color or another, it should be borne in mind that the unchanged picture of the stretch fabric can be boring. Such lighting is often preferred by young people who create color music for discos and parties at home.
This type of lamp remains unchanged for children's rooms. Many babies are afraid to go to bed without the lights on, and this is very expensive. The pattern of LED strips in the children's room under the ceiling may resemble a starry sky map or a favorite character from a fairy tale. This will not only save energy, but also soothe the child.
Mounting options for stretch ceilings with lighting
The best way to illuminate is to illuminate the entire perimeter of the room. To create a calm mood, you can use soft lighting. Both options never go out of style, and the backlight type can be changed.
When installing the lighting of the stretch ceiling around the perimeter, the LED system is masked using a special plinth. During installation, the installation of LEDs is carried out slightly below the stretch ceiling. When arranging a multi-level ceiling with plasterboard around the entire perimeter, it is best to hide the tape in it.
A stretch ceiling with LED lighting does not provide full lighting, so a chandelier should be installed in the room. When the main light is off, you can relax, watch TV or read. If you leave lighting with a chandelier, then your eyes will not rest.
The installation of lighting sources on stretch ceilings requires the preparation of a power supply and lead wires. Mounting diode lamps on the ceiling structure is quite simple. Installation is carried out in accordance with certain nuances. Before performing work, it is necessary to make the appropriate calculations:
- power supply unit;
- length of the LED strip.
To do this, find the product of the total footage of the tape and its power on a segment of 1 m. Experts do not recommend serial connection more than 10 m of tape. When using long chains the best option there will be a parallel connection.
You can use a certain number of power supplies if the total power consumption exceeds 40 watts. If a multi-colored backlight device is planned, you will need not only a power supply, but also an RGB controller that allows you to control the color.
First you need to apply a primer to the surface of the ceiling. The tape must be securely fastened, so it must be removed from it before installation. protective film. After gluing the material, connect it to the power supply and check the system's performance. If no violations are found, then you can begin to stretch the vinyl sheet.
Since the ceiling is mounted by fixing it to the rails around the entire perimeter of the room, the space between them is the basis for the backlight device. Installing a stretch ceiling is quite complicated, but the installation of light patterns on it is available to many.
The location of the fixtures on the ceiling is designed on the basis of an exclusive light pattern. They should be chosen depending on the color of the ceiling material. These can be white or colored LEDs.
The footage of the tape is carried out according to the drawing. The material is taken with a margin. Its cutting is carried out only on special marks. Separate parts of the tape are connected using connectors. A relay is used to change the light intensity.
The surface of the base for fixing the backlight must be well cleaned and degreased so that the light source can last a long time.
When creating a pattern, it is necessary to take into account the fact that the service life of luminaires is reduced under the influence of strong bends. No need to think that the lighting mounted on the ceiling is connected directly to the outlet. This should be done using a special power supply. After the final installation of the backlight and connecting the lighting to the network, it is necessary to check the operation of the entire system.
LED lighting in last years became really popular. The reasons are easy to explain - they are more economical, brighter and more reliable. simple lamps incandescent.
In addition, LED light sources have best performance and don't get hot. These qualities have opened up a lot of opportunities for the use of the product, including in the field of ceiling structures. The stretch ceiling, which is illuminated by LEDs, looks bright and unusual.
Remains to be decided technical question- how to do this work, and what material will be required.
LED strip under a stretch ceiling: characteristics, advantages
In the process of creating LED structures, it is possible to use two technologies:
The second version (SMD) is more popular in the domestic market, so it is he who should be preferred. When buying a device, you should pay attention to the size of the chip.
For example, the number "3528" in the designation indicates the size of 3.5 * 2.5 mm. Recently, SMD series "5050" (multi-colored LEDs) have been popular.
The main characteristics of LED lamps:
1. Placement density. One of the main parameters when choosing light sources is density. The higher the value, the brighter the light. The following options are most popular (by the number of LEDs):
- thirty pieces per meter;
- sixty pieces per meter;
- one hundred and twenty pieces per meter.
If you plan to install an LED strip under the ceiling, then thirty or sixty light bulbs will be enough. If the design plays the role of the main lighting (not just lighting), then the number of light sources per meter should be 120.
1. Color. Thanks to the variety of colors, it is possible to give the interior new "shades". For example, a ribbon with a single-color glow - classic version which is suitable for most tasks. Here we are talking not only about white (as many believe). There are enough options - yellow, blue, green, purple and others. As for multi-color diodes, they open the way for changing the design of the room according to the mood;
2. Protection. At first glance, the tape with light sources looks unreliable from the standpoint of the potential effect of water. But it's not. Modern devices There are two types - with protection and without protection against moisture. If there is a risk that the neighbors will arrange a "surprise" in the form of a flood or installation is carried out in a room with high humidity, then you can’t do without a special (moisture-proof) tape.
3. Tension. Modern designs are powered by different voltages - 12 Volts, 24 Volts (there are devices for 48 or 64 Volts). The first option is more popular. But you can't do without a transformer that converts the voltage from household 220 to 12 volts.
Advantages:
- ease of installation. It is enough to watch a video of installing an LED strip under a stretch ceiling to understand the intricacies of the process. In the absence of a video, the option with photos is suitable;
- economy. One of the main advantages of diode light sources is energy savings (the brightness of the lighting remains at its best);
- reliability. Operational practice shows one hundred average term LED service life exceeds the ten-year threshold. Some manufacturers note that their devices are able to work even longer;
- no heating. PVC film is afraid high temperature, which can cause melting of the structure. In the case of LED lighting such problems are excluded;
- optimal lighting. Unlike competitors, diode light sources are able to illuminate at an optimal angle, covering the maximum amount of elements. At the same time, high-quality lighting is guaranteed, without reflection in the film;
- fast payback. This advantage is possible due to two parameters (were discussed above) - reliability and low light consumption.
Watch the video: Connecting and installing LED strip. 3 main rules
As for the shortcomings, it is one - the high cost, which scares away most of the buyers.
Masking tape for stretch ceiling: advantages, features
The PVC tension structure is a solution that allows you to eliminate many of the shortcomings of the ceiling, ensuring the implementation of any ideas. Correct installation blades guarantee the concealment of defects and maximum service life.
One “but” remains - the junction of the wall and tensile structure. This is where masking tape comes into play. At the same time, there is still debate about which is better - a ceiling plinth or masking tape.
The principle of operation of the masking tape is simple - it camouflages the joints between the PVC film and the wall. Installation of such a tape is carried out without applying an adhesive composition, and the entire process of performing work takes several minutes.
The product is installed in the opening between the wall and the profile. The reason for the appearance of such a gap is easily explained. PVC film is not attached directly to the ceiling, but to a special profile.
After finishing installation work there is a technological hole where the tape is installed.
Why not use a ceiling plinth? There are several reasons:
- the classic plinth is attached only to the wall (you can’t glue it to the ceiling, because ugly waves will appear on the canvas). In addition, the action of the adhesive composition may damage the film. That is why it is recommended to buy skirting boards with a wide adhesive area on the side that is attached to the wall;
- mounting ceiling plinth and the need to work with glue cause a number of difficulties for beginners. In addition, there are risks to smear pvc film. Subsequently, it will be difficult to clean the product from the frozen glue;
- additional problems if it is necessary to dismantle the ceiling structure, for example, when it is necessary to repair ceiling communications or change pipes, eliminate the consequences of flooding from neighbors from above, and so on. Glued skirting boards will have to be torn off and it is unlikely that they will be reused. This means that you will have to endure additional costs.
Benefits of masking tape:
- ease of dismantling(if it is necessary to change the wallpaper or remove the ceiling structure). Upon completion of all activities, the film can be easily returned to its place without worrying about its integrity;
- efficiency. At correct installation existing defects are easily masked. Such work is especially relevant when the walls are pasted over with vinyl or textile wallpaper;
- wide possibilities. Thanks to the flexibility decorative film can be used for multi-level ceiling structures;
- ease of cleaning. If there is such a need, the masking tape can be washed and used in the future.
The main types of masking tapes:
- T-shaped. The product is based on rigid PVC. Such a tape is more suitable for flat walls, for example, on which ceramic tiles or tiles lie;
- L-shaped. Distinctive feature- comparative softness. The product is used to mask cracks on curved surfaces;
- Separating tape- a product that is mounted in a connecting different areas ceiling profile. The product is most relevant when the goal is to splice ceiling structures of various colors.
The most versatile of the described "trinity" is the L-shaped tape for masking the gaps between the wall and the stretched PVC film. The main advantages are flexibility, elasticity and the ability to use with various types profile.
Masking tapes differ in color:
- in colour installed PVC films. In the case of using such a film, the area of \u200b\u200bthe ceiling visually increases;
- in the color of the wall. In this case, the height of the walls visually increases;
- contrast to the ceiling and wall. Such a tape is a chance to outline the transition point and achieve a more original design.
When installing masking tape, the following points should be considered:
- installation of the product is carried out around the entire perimeter of the room;
- no adhesives are used in the process of work;
- to avoid the appearance of seams, the tape is mounted at a right angle;
- re-use of the tape after removal is allowed;
- thanks to the installation of such a product, the overall strength of the structure increases.
Installation of LED strip under a stretch ceiling
The simplicity of the design of lighting devices based on LEDs opens up a lot of opportunities for the realization of ideas and fantasies.
So, the tape can be attached in several ways:
- illumination from within. In this case, an LED strip is installed behind the stretch ceiling. The place for installation is a plate or a specially installed profile. Thanks to this method, it is possible not only to illuminate ceiling structure from the inside, but also to create various images (figures, geometric shapes);
- invisible ceiling cornice. In this case, the installation is carried out on a special cornice. The peculiarity is that the light falls on the curtains to a greater extent, and not on the PVC film. With proper installation, it is possible to obtain a “hovering effect” of a tension structure;
- drywall layer. Here, as a rule, 2-level structures are used. Installed from below metal carcass, upholstered with drywall, and on top - a tension structure.
For mounting a diode tape under a stretch ceiling (or behind it), it may be required- controller, power supply, LED strip, connector, RGB amplifier, soldering iron with a power of 20-40 W, wires with a “square” floor section, cable for connecting to the network.
When choosing a light source, it is worth considering that the power of the product depends on the number of light bulbs.
So, tapes with 60 LEDs consume 4.8 W (based on one meter of construction), 120 - 7.2 W, 240 - 16 W.
Many choose products as powerful as possible, but this is wrong.
The air near the PVC film can heat up, which leads to premature failure of products.
LED strips can be powered by different voltages - from 12 to 64 volts. Based on this, it is worth choosing a power supply. The power of the PSU should be a quarter higher than the total power of the diodes.
If the length of the tape exceeds five meters, then without purchase additional block not enough. On average, one PSU accounts for five meters of tape. Otherwise, the LEDs closest to the source will overheat.
In addition, you will need a controller, which is necessary to change the color of the glow of the device.
When installing the tape, consider the following points:
- prepare a place for fixing the tape. The product can be fixed to a wall or ceiling. The place where the device is attached must be primed and degreased;
- to increase the reliability of installation, it is allowed to use glue or special PVC corners. Such foresight will protect against problems associated with installing tape on low-quality tape;
- when using several sectors of the tape with diodes, it is worth using special connectors or using soldering. The main thing here is not to confuse the polarity;
- after attaching the tape to the ceiling or wall, it is connected to the PSU or controller;
- during operation, the PSU and the controller may break, so they must be installed in accessible places, that is, under a PVC film (for example, near a floor plinth);
- the wires that connect the tape and the PSU can be hidden behind furniture, behind a corner plinth or behind plaster;
- installation of the ceiling is carried out after the completion of the installation of the tape.
Photo of the LED strip under the stretch ceiling - help in choosing
As you can see from the article, there are many types of LED strips and options. Against this background, it is difficult to determine suitable option for your interior. To simplify the task, it is worth studying the photos, which show the following points:
- the process of mounting the LED strip (step by step);
- the process of installing masking tape;
- end result of the work various options fasteners (under or over PVC construction), with different color schemes;
- the subtleties of fastening the PSU and the controller.
If you have a complete picture before your eyes, then problems with installation and selection are excluded.