Illumination of the kitchen with LED strip which profiles are suitable. Choice of power supply and accessories. Illumination in the kitchen above the work area.
Do you know that the illumination of a dwelling is regulated by SNIPs? Unfortunately, in most cases, the illumination in a residential area is less than necessary by 20-30%. If we talk about the working area of \u200b\u200bthe kitchen, even more. But the illumination of the working area affects our health: vision, nervous system, fatigue, concentration, mood.
Illumination in the kitchen above the work area
It has been established that in order to achieve optimal illumination of the working area in the kitchen, 40-50 W/m2 is required. This is true for fluorescent and halogen lamps. For LED-based luminaires, it requires about 10 times less. Since the power consumption of LEDs is about 10 times less with the same luminous flux.
Increase 
Fig.1.
An important point of lighting in the kitchen above working area is the direction of illumination. For comfortable work, you should direct the light to the countertop, and exclude the direction of light towards the eyes.
Increase 
Fig.2.
Where should lighting be installed? Illumination is necessary in the area where cooking, cutting and washing dishes are performed. In the cooking area, i.e. above the stove, the backlight is usually built into the hood. Lighting above the worktop in the cutting area and above the sink is very important, since in these areas our attention is most concentrated, and, therefore, the load on vision is maximum.
Increase 
Fig.3.
Options for lighting the working area in the kitchen
There are several options for organizing the lighting of the working area in the kitchen. All of them serve to create comfortable conditions for cooking food. The combination of lighting options will make the kitchen set not only convenient, but also beautiful.
Illumination of the working area in the kitchen with LED strip
Recently, the LED strip has gained great popularity due to the ease of installation, as well as the large gamut of the radiation spectrum. This allows you to have not only functional lighting, but also decorative. At the same time, switch modes as you wish. In addition, LEDs can have a warm (yellow) and cool (white) glow, so the choice is huge.
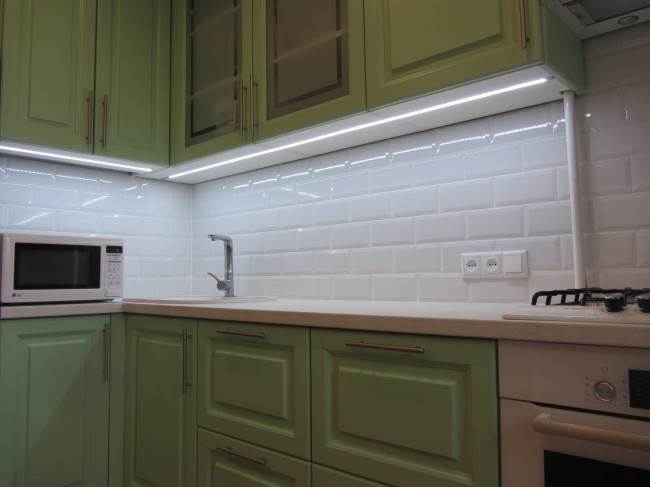
The easiest way to install light diode tape is to stick it on Double-sided tape on the underside of the cabinets around the perimeter of the entire kitchen. Depending on the power of the LEDs, it will carry the function of the main or auxiliary lighting of the working area.
Increase 
Fig.4.
To connect the LED strip to the network, you will need a special driver. It can be purchased in the same place as the LED strip.
The disadvantage of this approach to lighting the working area of the kitchen is the discreteness of the light sources, and as a result, the unevenness of illumination. In addition, the LED strip is not protected from moisture and dirt.
Increase 
Fig.5.
There are two ways to solve these problems.
Especially for the LED strip, boxes with a diffuser are produced. Boxes can be built-in, i.e. for them it is necessary to specially prepare a groove in the furniture, by analogy with built-in lamps. Boxes can be laid on, no special preparation is required for them.
Increase ![]()
Fig.6.
Other more expensive option These are ready-made lamps based on LED strip. Such lamps often already have a driver in their design and they just need to be mounted on furniture.
Increase 
Fig.7.
LED work area lighting in the kitchen

Fig.8.

Fig.9.

Fig.10.

Fig.11.
Connecting the LED strip

Fig.12.

Fig.13.

Fig.14.
Illumination of the working area in the kitchen fluorescent lamps
Illumination of the working area of the kitchen with fluorescent lamps is very common due to the ease of installation, low cost and availability of lamps, as well as low energy consumption of this type of lamps and high service life.
There are two options for organizing lighting: installing specialized fixtures, installing conventional fluorescent fixtures.
Increase 
Fig.15.
The most affordable second option. To implement it, you will need fluorescent lamps. They can be purchased at any store. As a rule, fasteners are included with them, with the help of which the lamps can be fixed on the bottom of the cabinets.
Increase 
Fig.16.
However, this approach has one drawback. To hide the lamps, it is necessary to provide an additional bar on the cabinets, which is not always possible.
To get around this shortcoming, you can go the other way. Buy lamps general purpose, but designed specifically for furniture or to illuminate kitchen countertops. Such lamps have a more attractive appearance and fit well into the interior of the kitchen.
Increase 
Fig.17.
The great advantage of fluorescent lamps is the absence of the need for additional electrical parts, such as transformers. All you need to do is plug them into an outlet.
Lamps to illuminate the working area in the kitchen
Spotlights with halogen lamps have become widespread due to the radiation spectrum most corresponding to the sun. Spotlights for furniture have many various options design. They can be divided into two groups: embedded and overhead.
Increase 
Fig.18.
To achieve optimal illumination of the working area of the kitchen Spotlights set at a distance of 50 cm from each other along the entire countertop. Considering that their power does not exceed 20 W, such an installation distance will provide 40 W / m2.
Recessed lamps for illuminating the working area are not often used, since for their installation it is necessary to make a recess in the bottom of the cabinet with a depth of at least 20 mm. This means that either a double bottom must be installed or a thicker slab must be used. Therefore, they are usually used in the kitchen canopy, as general lighting. kitchen set.
Increase 
Fig.19.
Overhead lights are more convenient. They do not require special recesses. They are mounted on the bottom kitchen cabinets. Given the variety of designs of luminaire bodies, choose the best option design is not a big deal.
Increase 
Fig.20.
To connect furniture lamps, it is necessary to carry out additional wiring and provide transformers based on the power of the lamps.
Increase 
Fig.21.
LEDs can be used as lamps. Thus, you can significantly save on electricity.
Do-it-yourself illumination of the working area in the kitchen
Despite the variety of types of lamps, it is very problematic to solve the problem of lighting only the working area. To make the kitchen comfortable not only to cook, but also to spend time A complex approach for kitchen lighting.
Lighting kitchen furniture can be divided into three components: illumination of the working area, i.e. countertops and stoves, kitchen lighting and decorative lighting.
Decorative lighting is the illumination of the plinth and cabinets with glass doors. Basement lighting is easy to organize with fluorescent lamps or LED strip. Illumination of lockers is usually done using spotlights.
Increase 
Fig.22.
Illumination of the kitchen set is as important as illumination of the working area. This type of lighting captures a lot more space and compensates for the lack of directional light from countertop lighting. Also, the backlight of the kitchen set can serve as a light source in the kitchen when bright lighting is not required.
The design of any room includes high-quality lighting. The kitchen is no exception. If you distribute the light fluxes correctly and conveniently, then cooking in such a kitchen will be a joy. To achieve this, lighting needs to be designed and calculated. Modern kitchen interiors more and more often recently they include the insertion of diode tapes.
LEDs are semiconductors that emit light when passed through them. Electric Energy. They are different chemical composition, due to which they have varying degrees brightness. The LED strip in the kitchen is never mounted directly, as overheating and breakage can occur due to this. A stabilizer is a prerequisite for connecting diodes.
Advantages and disadvantages of LED backlight (table)
| + | - |
| First of all, it is worth noting the service life. On average it is 50 thousand hours | The cost of good LED lamps will be quite high |
| If we compare LED lighting with other light sources, the former consume much less energy. | Warm white lamps may interfere with color reproduction. In addition, such lighting can be very tired eyes. |
| They are not afraid of mechanical damage and temperature changes, because they do not contain an incandescent filament and a glass bulb | LED lighting is most often not used as the main one, but only as an application, decorative element adjacent to the main |
| LEDs are manufactured for any voltage, there is no need to use ballast reserves | To install such lighting, you need a power source (LED driver), which, by the way, has a strong influence on the cost of such lighting. In addition to the fact that its acquisition is simply necessary, it also needs to be hidden from the eyes. |
| High light output | Chemical and physical parameters reflective crystals degrade over time, and the lamp begins to dim |
| Wide range of colors. LEDs can be, for example, white, red, orange, green, blue, magenta or yellow flowers. There are also ultraviolet and infrared spectra of LEDs. There is a cold and warm light transmission | |
| Brightness can be adjusted | |
| work, no matter what temperature regime in room. LEDs are compact and flexible modules that can bring almost any lighting idea to life. | |
| LEDs can be installed at different radiation angles | |
| They are safe and environmentally friendly | |
| Works no matter what the room temperature is |
Why are diodes handy in the kitchen?
- Diodes can be zoned various elements rooms, highlight cabinets, niches and shelves.
- Highlight decorative elements.
- If you highlight a kitchen apron with them, especially a glass one, it will look very impressive.
- They can distinguish stained glass windows.
- If you illuminate the bottom of the bedside tables with them, then, in this way, the effect of furniture will be created, as if frozen in the air.
- If your ceiling is made in several levels, then each of these levels can also be highlighted, which will create a beautiful view.
- If you highlight the bar counter, then the effect of a real bar will be created.
Thus, it turns out that the use of LED lighting in the kitchen will create a cozy and inviting atmosphere in the kitchen. kitchen area. Although the cost of such lighting can cost a pretty penny, it will soon pay off in that there will be big savings on electricity.
Classic interiors are most often illuminated warm shades, and the high-tech style involves the use of cold lighting.
Photo gallery: Kitchen lighting with LEDs
Illumination of cabinets from above Illumination of the working area Illumination of shelves Illuminated bar counter "Soaring" furniture  Color options that LED backlight can have
How to choose LED strip
SMD LEDs are used in the installation of LED lighting. They are divided into types:

To purchase the right LED strip for you, you need to clearly understand what kind of lighting you would like to see as a result. There are a couple of suggestions for this:
- In order to illuminate the area where you are cooking or having lunch and make it bright and even enough light, it is recommended to use SMD tape with three crystals sized 50x50.
- To implement decorative illumination of the headset, a tape with diodes in one crystal sized 35x28 is enough
Selecting a power supply
 Power Supply Option
Power supplies can have different power, and, consequently, the size. The main thing when choosing a unit is to determine the power of the transformer, which should work with a margin, but not very large. Let's look at an example of a calculation with certain parameters to make it easier for you to calculate the power that you need. It is necessary to calculate the power of the block for SMD 5050 tape 5 meters long, the power of which is 12 W:
- 12(W) * 5(M) = 60W
- 1.25 (required margin factor) * 60 = 75 watts.
- 75 W is the power of the transformer, which is needed in this case.
How to illuminate the countertop, dining area
In order to illuminate the work area, as mentioned earlier, you can use LEDs with an average level of moisture protection. This is enough to protect the elements from exposure to steam, dirt and other things. Such lamps can even be subjected to wet cleaning.
Special aluminum profile attached to the table, thus, the tape is attached to the surface of the table. The profile is necessary to hide the wires and give the light elasticity. Tapes are also self-adhesive.
Using accessories, you can make a backlight that changes brightness and / or color.
To illuminate the desktop, the use of warm white color. Such lighting most accurately conveys the true color of the food.
The use of LEDs as an additional backlight also requires protection from moisture. Fairly average. Tapes are installed using double-sided tape.
Mounting tools
- 12W LED strip
- Electrical cable, the cross section of which is 0.74 mm 2
- Transformer
- Soldering iron with solder and rosin
- Insulating tape
- In some cases it is necessary to use a drill
- Scissors
- PVC corner or aluminum profile, which is used to mount the LED
- 2 sided tape
- Sometimes the use of electrical installation brackets is provided.
How to install a tape with your own hands

Before attaching the tape, the surface must be well cleaned and degreased!
Do not press the tape too tightly at once, so that later it will be possible to trim it, in case of uneven gluing.
Connecting a diode tape of the same color with a dimmer
The dimmer regulates, i.e., reduces or increases the brightness of the diode tape. In addition, it turns on and off this very diode tape.
There are currently two types of dimmers:
- The control of the tape with one color is carried out from the remote control.
- The control of a tape with one color is carried out using a potentiometer (switch, ordinary twist for incandescent lamps)
Both of the above options are connected according to the same scheme.
Video: How to make LED lighting for the working area of the kitchen yourself
LED lighting is a big breakthrough in area lighting. They will perfectly complement your interior and serve you good service. Their variety will allow you to choose exactly the one you would like. Durability will give you a chance to save more money than you spend on their purchase. And fixing them yourself will not be difficult, and they will delight you for a very long time. Light to you and good luck!
The kitchen is one of the places that have high demands in terms of ergonomics and design. Also, not the last place here is occupied by the illumination of the workplace and interior, since not only the quality of cooking depends on it, but also the desire to do it again and again. All this is due to the fact that the quality of light, its color and intensity directly affect the well-being and performance. It has long been noticed that flickering light, poor lighting have a negative impact on performance and well-being, so you should pay close attention to this fact, and perhaps your loved ones will please you with something tasty. Next, we will tell you how to make an apron backlight in the kitchen. led strip.
Overview of lighting options
The usual placement of a chandelier in the kitchen in the center is not the most optimal position, because standing at the table, the hostess covers the light with herself and a shadow falls on the place of production. The way out of this situation is to install a light source above the workplace, under a wall cabinet.
Now, when LED light sources have ceased to be exotic and have moved into the category of consumer goods, it is possible to independently install the backlight on the kitchen apron and above the workplace. we have already considered in one of our articles. 
In this article, we will not consider incandescent and fluorescent lamps. So, to install incandescent or halogen lamps, it is necessary to take measures to prevent fire and exclude thermal contact, and fluorescent lamps are quite large in size.
LED lamps are devoid of such shortcomings, and with the help of LED strips you can illuminate the most sophisticated interior. Besides, in design solutions an apron is made of glass, with a printed pattern, which is highlighted with an RGB colored tape or by illuminating niches above and below the shelves. Such an apron lighting in the kitchen gives a unique charm to the room, conducive to emotional relaxation and mood.
Installation instructions
To install the tape, you need to follow the instructions, and you will succeed. Provided below simple rules will help you make your own backsplash lighting in the kitchen LED strip:

These 10 rules will help you make a highlight kitchen apron with your own hands. We also recommend watching the video, which discusses 2 mounting options: one-color and RGB LED ribbons.
Photo examples of finished works


How to set up lighting home interior? It's no secret that it is the light composition that helps to give the room an indescribable atmosphere and mood. Also, it is with the help of lighting that you can divide the room into zones, each of which has its own purpose. The right lighting solution for everyone a separate room apartments are selected in accordance with the function that the premises perform, and in accordance with the personal wishes of the person who will continue to live in this apartment. It is possible that a person will want to make some changes in the light interior without resorting to overhaul zones. Lighting under cabinets in the kitchen, mirrors with special lighting in the bathroom, in the decoration of the bedroom and living room - these are some possible options what a person can easily do, giving the interior a certain mood and atmosphere.
Lighting functions in the interior
Highlighting certain areas in the kitchen can only carry decorative purpose, but it is much more useful to think over the layout of additional lighting in advance in order to ensure its functionality. The easiest way is to do the lighting in the kitchen under the cabinets with your own hands. It is performed using an LED strip, and its main functional purpose This is tabletop lighting. Also, LED strip is used to illuminate the area under the drawers and inside the drawers - for more convenient use of space, and to give a certain character to the kitchen area, if the backlight is mounted close to the floor level. Illumination under cabinets in the kitchen is one of the most common design solutions for this room; LED lighting of the cornice in the kitchen, illumination of certain niches, imitation of a bar counter in the kitchen area also look no less spectacular.

What is LED strip?
LED strip is a fairly new and very affordable replacement for difficult-to-install lighting systems. It is a flexible tape on which semiconductor elements - LEDs - are sequentially fixed.
The use of the LED strip is safe: it does not contain fragile and dangerous elements, it is simple enough for installation and further use, and it provides the necessary rate for lighting and backlighting. That is why it is used to illuminate the kitchen under the cabinets. LED strip exists in various varieties: single-color or multi-color, a modification that is protected from moisture and dust, varieties with different size LEDs and their number, as well as varieties that require different electrical voltages and work directly from the network.
When choosing LEDs for illuminating a cabinet in the kitchen, you should also pay attention to such characteristics as the color of the base of the tape, the heat-resistant and moisture-proof qualities of adhesive tape. Usually the LED strip provides enough light to remove the shadow from the wall cabinets. 
The nuances of working with LED strip
What is important to remember when working with LED strip and installing it when lighting is provided under cabinets in the kitchen? First of all, the tape can be cut and soldered only in special marked areas. On a single-row tape, these sections are located every three diodes, on a double-row tape, every six. To connect sections of such a lighting device, special connectors may be required, and special power supplies may be required to install certain types of tapes. They are necessary because D.C. low voltage is suitable for LED strips when kitchen lighting is installed. A power supply is hidden under cabinets with a socket, which will later be connected to the network. The power supply is selected according to the following calculations:
Power supply power = Tape length * Power of 1 meter of tape + 20% in the form of power reserve.
When connected lighting device to the power supply it is worth remembering the polarity. If you need to install multiple large segments LED strip, it is important to prepare a separate power supply for each or power a segment from it separately. By connecting these segments in series to each other, one may encounter a situation where the subsequent segment will give too dim light and fail quickly enough.

Multicolor LED strips
When using, you can also use a controller with a remote control that will allow you to set up a lighting program, change colors, add various effects, such as flickering.
Illumination for the kitchen under the cabinets: photo
There are many options for decorating the working space of the kitchen with the help of such lighting fixtures. You can install a multi-color system with your own hands, the lighting in which can change depending on the program installed on the controller or manually. Also, the LED thread can be discreetly fixed under the cabinets, performing a decorative function. LED corner lighting for kitchen under cabinets can be installed using a special corner aluminum profile, which is purchased in construction stores and supermarkets.

in the kitchen: necessary preparations
Installation will require LED strips (the most pleasant and relaxing is warm white light), a power supply for LEDs, a connecting wire and a power cord with a plug. Even before purchasing such a lighting fixture, it is important to make appropriate measurements of the space on which the tape will be fixed and the distance to the countertop. This will allow you to choose the right length and power of the device. The place where the backlight is installed under the cabinets in the kitchen, it is advisable to wipe it with alcohol and wait a short time for its evaporation - this simple procedure will remove dirt and securely stick the tape in the future. If the pollution is too strong, the structure can be reinforced with connecting clips or they can be installed on a special aluminum profile.

How to install LED strip in the kitchen: fixing
Illumination for the kitchen under the cabinets - LED strip - mounted on double sided tape, while you need to control the reliability of attaching it to the tape and to the surface of the wall or cabinet. After installing the lighting, you need to connect it to the power supply. The LED strip, taking into account the polarity, is connected to the power supply, and then it is connected to the network. It is important to remember that after the work done, it should not remain, and during the connection to the unit, it should not be energized. After the final installation, the structure can be connected to the network. If all the steps were performed correctly, and the polarity is not reversed, the tape will begin to glow.
Illumination of the working area can be created using three species lamps- halogen, fluorescent and LED.
1. Using halogen lamps create point lighting- for example, a cooking zone. If you need more or less uniform lighting, you need to install several of these fixtures. As a rule, they are mounted in the lower part of the cabinets at the rate of one lamp per 70-100 centimeters of surface, but mounting is also found with greater frequency.

2. Mounting is more popular LED ribbons or LED lamps. With their help, it is possible to create uniform backlight working area. The advantages of LED strips also include ease of installation. If the installation of halogen lamps should be planned at the stage of creating a headset, then the LED strip can be installed at any time. In addition, modern LED strips allow you to choose the color of the backlight or even change it during operation.
3. Fluorescent lamps give even white lighting. Unlike LED strip, you do not need to purchase a power supply for them - just fix it and plug it into a power outlet.


Also in high demand track lamps. To the bottom upper cabinets an aluminum profile is fixed, on which there are several movable small lamps. Thus, you can independently adjust the direction and saturation of lighting in the desired area.

Price lighting for the work area is quite democratic. So, LED lamp, completely ready to install, will cost about $ 20, depending on the length. LED strip itself is quite cheap - from 2 to 15 dollars per meter, depending on the number of diodes. But to install it, you will also need to purchase a power supply - from $ 10, depending on the characteristics.
1.2 Apron lighting
1. Elegant solution - skinali co built-in backlit. Such an apron is made of two layers of glass, between which the LED strip will be mounted. Adding to this a picturesque drawing, you can get a very, very unusual cuisine.


Skinali with built-in backlight will cost: from about $ 60 for running meter the apron itself, plus $3 to $15 per linear meter of backlighting and a $15 to $50 power supply. In addition, the cost will be reflected in the need to bring out additional sockets, fixtures - for each action, installers have a certain price.
2. Illumination of the apron with LED strip at the bottom of the upper cabinets in close proximity to the apron.


3. Can be used lamps-spots- Spot small lamps. But they have one significant drawback - the light on the apron will look like a bright spot, so the effect of such illumination is lost. Spots are better suited for matte or embossed aprons, for example, from decorative tiles under the brick

1.3 Cabinet lighting inside
Illumination of cabinets inside is not an urgent need, but it enjoys a certain popularity. The internal lighting of cabinets can be divided into functional And decorative:
Functional works only when the cabinet door is opened, which makes it easier to search for something inside.
Decorative - manually activated, installed for cabinets with doors with glass inserts.

For both functional and decorative lighting inside cabinets in the best way Suitable LED strip. It practically does not take up space, and self-adhesive options do not require complex installation. If for decorative lighting the connection cost is practically the same, for example, from lighting the working area, then for functional lighting you will have to spend an additional $ 10 on a relay automatic start when opening cabinets.
If desired, in upper part locker can also be mounted spots. The cost of one spot is approximately $ 3, but it is worth adding the cost of installation, wiring, connecting the switch and the light bulb itself. The switch can be easily hidden.


by the most simple view lighting for cabinets is a separate small lamps battery powered. The cost of such a small lamp is about $ 15. They work from several fingers of batteries, and the inclusion is due to the motion sensor. Installation takes place either on adhesive tape, or on a magnet - but before that, a metal plate must be attached to the cabinet.

1.4 Illumination of the frieze (wall cabinets) and plinth


The schemes and cost of lighting these parts of the kitchen are practically the same as the rest. For illumination frieze spots can be used with various types lamps, LED strip or remote lamps. Many headset models are initially equipped with cornices with built-in spots.
When choosing an LED strip, it is desirable that the aluminum profile with a diffusing stripe screen does not look like an alien element - the profile can be disguised as a headset style. For already installed kitchen remote lamps, costing from $ 20, are best suited.


Backlight plinth- a phenomenon quite new, which is actively gaining popularity. Plinth lighting not only creates an unusual effect in the kitchen, but is also often used as a night light. Here, the LED strip has no competitors - installing other types of lighting is simply unreasonable, and besides, it allows you to choose the desired color.


2. Types of lamps
Today there are 4 types of lamps that are used to illuminate the kitchen:
1.LED lamps. Today, this type of lamp can rightly be called the most popular. LED lamps can be found in the form conventional light bulbs, but more often they are made in the form of LED strips with various lengths and degree of illumination. Besides, LED lamp able to create illumination different colors, which favorably distinguishes them as a decorative source of illumination.
2. Halogen lamps characterized by fairly good brightness and low power consumption. Most often they are used in spots for spot lighting. Creating a uniform illumination with their help is impossible. Sometimes halogen lamps can be found, for example, in hoods.
3. Energy saving lamps. Despite the reduced power consumption, these lamps have two main disadvantages: high cost and long time warm-up (up to 2 minutes). In addition, their brightness cannot be adjusted with a dimmer.
4. Fluorescent lamps. This type of lamp has been practically superseded by LEDs and "halogens". They do not heat up during operation, the lighting is quite even and pleasant, but the minuses include blinking when turned on and a possible “hum” during operation.
3. Switches
Switch installation is not restricted by any rules. Moreover, today you can choose from several types of switches:
- conventional overhead switch, which is displayed either on the apron or on the wall
- small mortise switches that are mounted in furniture
![]()
- touch switches that are triggered by touch

- switches-sensors that react to movement near them

- switches, with the ability to change the brightness of lighting (dimmers)

- sometimes the switch can be equipped with a remote control

Photo: vk.com, site, avito.ru, lotusbleudesign.org, xuefl.blog.bokee.net, homedesigninteriorphotos.co, giesendesign.com