How to install laminate step by step instructions. Step-by-step instructions for laying laminate flooring: video tutorial, useful recommendations. Styling materials
Laying laminate flooring is one of the fastest and most technologically advanced stages of repair. How to lay a laminate correctly, what are the subtleties here - read on.
Features of laminate as a material
The advantages and disadvantages of laminate flooring make it, without exaggeration, the most popular flooring material:
- The material is completely ready for use - lay and use.
- Laying technology does not require special knowledge and skills.
- In the manufacture of synthetic components are used. This makes the material very resistant to damage and durable.
- The price of the material itself and the cost of laying it are the lowest in comparison with alternative options - parquet board and parquet.
The disadvantages include:
- Whatever one may say, the material is artificial. Fans of everything natural and eco-friendly, it will not work.
- This is an imitation of natural materials. And this, too, can repel connoisseurs of naturalness.
When is the best time to put
Repair in the apartment is very similar to growing cucumbers. To obtain good harvest you need to choose the right variety, conscientiously prepare the land for planting and do not relax during the growth of plants: water, tie up, drive pests. Only then can we hope for a good harvest.
In repair, everything is interconnected. If the preparatory work is done well, finishing It will take a minimum of time and will also be of high quality. If, for example, the walls are crooked, there is no way to fix this with a sticker of expensive wallpaper.
Advice:
And not just a council - an arch-council!
From the very beginning of the repair, do each stage with the highest possible quality. Let your motto be: "You need to try to do well, but badly and it will turn out by itself."
Moving from poetry to practice. Laminate is laid almost at the very end repair work. All dirty and "wet" work must be completed. The room must be clean and have normal humidity.
To work you will need…
About the choice of laminate
Of course, first of all, you will look at the appearance of the material. As for quality, pay attention to the following nuances:
- Thicker laminate is stronger and more durable. The adhesion of the "dice" to each other is the better, the greater the height of the "locks" profile.
- Experience has shown that bevelled laminate is more like a real wood plank and looks more "natural". The chamfer also helps hide gaps that may appear over time.
- Think about the laying pattern: along the walls or diagonally; "in a row" or "deck", etc. In different occasions will be different amount scraps. This must be taken into account in order to buy material with the necessary margin.
About the choice of substrate
The underlay is a layer of special material that is placed between the base and the laminate. The material should be both elastic and pliable. It should “absorb” small irregularities, but resist distributed loads well. For example, polystyrene can withstand a load of 200 kg per 1 sq. meter, but easily crushed under the fingers.
The substrate, thanks to these properties, performs two important functions:
- Levels uneven ground.
- Reduces the "boom" of the floating floor, muffles the sound of footsteps.
On sale you can find different types substrates. The most common are polyethylene foam, polystyrene and cork. From a practical point of view, any of them will do. Lovers of natural materials choose cork. Masters appreciate polystyrene for the convenience of work.
Sometimes you can run into something very "exclusive". For example, there is a substrate made according to the assurances of the manufacturer from spruce needles.
Laminate laying direction
Usually laying is carried out perpendicular to the window. However, this is nothing more than a tribute to tradition.
In a square or rectangular room, rows of laminate can be placed along the walls or at an angle of 45 degrees. With a diagonal laying direction, a triangular cut will remain at the beginning and end of each row. If you decide to lay the laminate at an angle, you need to take into account these wastes and buy material with a margin.
We calculate the amount of sufficient stock as follows: you need to multiply the perimeter of the room in meters by the width of one laminate board in meters, and then divide the resulting number by 2.8.
In hallways and corridors, laminate flooring is laid along the long side of the room. And now it's time to do...
Important note!
Laminate is a "floating floor". This means that it is not attached to the floor in any way. During operation, due to the humidity changing throughout the year, the geometric dimensions of the laminate also change slightly: this process is said to be “laminate breathes”.
In order not to interfere with the laminate to “breathe”, a small gap is left along the walls of the room: as a rule, 8-10 mm wide. And for the same reason, the laminate in each room is laid independently of the neighboring one. A deformation gap is also left in the doorway. It is closed with special decorative thresholds in the color of the laminate or in the color of the door.
Sometimes, in order not to put a threshold, the laminate is laid as a whole sheet in adjacent rooms or even in all at once. Each large “sheet” of laminate “breathes” in its own way, and somewhere in the narrowest and “tense” place, the laminate locks will disperse: a gap will appear! Moreover, such “loaded” places are always located in a conspicuous place.
Moral: do not neglect the expansion gaps!
The Basics of Laminate Laying
To get started, carefully read the installation instructions that the manufacturer attaches to your product. It contains drawings that consistently show how to properly lay the laminate. Pay attention to two points:
- In what direction - from left to right or vice versa - is laying.
- How laminate elements are connected along the short side. Manufacturers race to invent various "proprietary" locks and you should deal with them.
An important clarification about "locks"
Depending on the design of the locks, there are two options for laying the laminate. (Adhesive connection is not considered, since it is now completely a thing of the past.)
In the first case, the elements of the laminate are stacked individually. Each next element is connected to those already laid first long side and then a short one. The locks on the long and short sides of such a laminate are different.
If the locks are the same in shape and design, such a "piece" assembly is impossible. The elements are first connected to each other with short sides and a FULL ROW is assembled. Then a whole row joins the previously laid one. Here's how it's described in the laminate manufacturer's instructions.

Such styling is very difficult, and sometimes impossible to perform by one person. You need to work with an assistant.
About ground preparation
There are three requirements for the base on which the laminate is laid:
- Evenness.
- Rigidity.
- Humidity.
The curvature of the surface should not exceed 2 mm per 1 meter of length. Laminate is a tough material. On curved floors, it will bend and the locks will disperse.
For concrete floors, this requirement is fulfilled by itself. Wooden floors and plank floors should not sag when walking on them by more than the same 2 mm per meter of length. If the floors are constantly "playing", the laminate locks will break very quickly.
The basis of the laminate is wood. Humidity is contraindicated in principle. The problem is solved by laying a vapor barrier on the base. Cover the floor surface cleared of debris and dust with ordinary polyethylene. The joints of the panels must overlap by at least 30 cm.
Moving from theory to practice

- If the available instructions are worse than a puzzle (alas! this happens!), The laying direction can be determined by the locks. Hold the laminate element in front of you with the lock groove facing you. If the groove is on the left at the end of the laminate, the rows are laid from right to left. If the groove is on the right, vice versa, from left to right.
- To cut without chips, saw the laminate from the back (as in the photo above).
- End joints in adjacent rows must be offset relative to each other by at least a quarter of the length (as in the photo).
- Laminate, until it is laid on the floor, is a fragile thing. If carelessly transported, it is very easy to damage it. The photo shows that the locks are broken on several pieces of laminate in a row. Such elements, if there are not too many of them, are placed so that the damage goes into trimming.
 Laying laminate is one of the fastest and most interesting finishing works. Just a couple of hours ago, the room looked unfinished and uncomfortable. And now - the miracle of transformation happened! She's almost ready!
If I were you, I would never entrust this work to anyone, but did it myself. You already know how to lay a laminate correctly. Get to work!
The popularity of laminate flooring is easily explained successful combination good wear resistance, attractive appearance and easy installation. More precisely, laying a laminate with your own hands is not a job, but a pleasure that you don’t want to give to anyone.
In our particular case, based on the above, it was decided to lay the floor with laminate in the living room and guest rooms. At the same time, ceramic tiles turned out to be more practical for the bathroom, kitchen and hallway; study and nursery were awarded more expensive and less sustainable, but prestigious and natural parquet board; the bedroom and gym got carpet, and there was enough linoleum for the pantry.
High-quality and attractive material can not but rejoiceThe design of the laminate and the requirements for the base for laying it
Most often, laminated panels have a length of 1260-1380 mm and a width of 185-195 mm. The thickness of the laminate is 6-12 mm, and the most popular is 8 mm.
The structure of laminated panels may differ slightly depending on the manufacturer, however, a standard board consists of 4 layers:

Thus, laminate flooring is assembled from individual sheets, which are joined using locks. Hence the requirement of the manufacturers of this type of product to the base arises, which consists in the fact that it should not have irregularities of more than 2-3 mm per linear meter. Obviously, the base must be sufficiently elastic and not move under the influence of the corresponding operational loads.
 So you can easily check the quality of the base for the laminate
 At the same time, a prerequisite for the installation of laminated lamellas is the preliminary laying of a special substrate. Only subject to listed rules you can hope for a long service life of the flooring without the destruction of locks and the appearance of squeaks and crevices in which debris collects.
The need to level the floor when laying laminate
In our particular case, the floor was pre-screeded over the floor slabs, which is the ideal case for laying laminate flooring. How to do it right, read the article. In a situation where there is already a concrete base with minor irregularities, it is convenient to level using self-leveling floor technology.
It is noticeably more difficult to provide a quality base for laminated panels in the case of existing wooden floors. In the event that the existing flooring from the boards sags and creaks, there is an assumption that the logs are unstable, best solution it will be dismantled. Then the leveling of the base should be done with a cement screed or self-leveling floor.
 Cement floor screed
 This option is also interesting because it is possible to equip a warm floor. Of course, the type of laminated flooring should be selected based on the possibility of heating it. So, in the example under consideration for the Krono Castello laminate, the manufacturer allows the use of a water heated floor with operating temperature up to 27 °, but the use electric option heating is not allowed.
If it was decided to leave the wooden floors as a base, they should be properly prepared and leveled. It may be necessary to temporarily dismantle the flooring in order to lay leveling substrates between the supports and sagging joists, as well as securely fix the latter. In any case, the boards should be well fixed and better - with self-tapping screws.
Theoretically, it is possible to achieve the required evenness of the base of no more than 2-3 mm per linear meter using an electric planer or grinder. However, in practice it is more convenient to fix an uneven floor with plywood sheets.
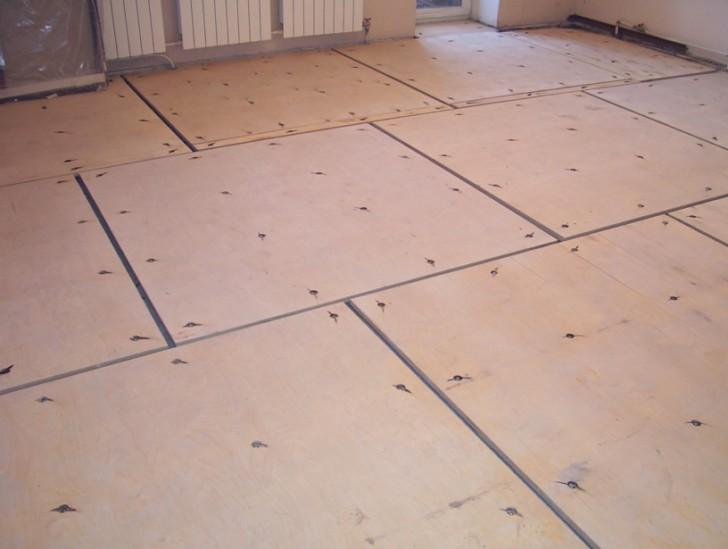 An example of leveling the floor with plywood
 The latter are placed on wooden planks with rows shifted relative to each other. At the same time, a gap of the order of several millimeters must be left between the sheets, which compensates for the change in the size of the flooring at different levels of humidity. Fastening plywood to the boards must be done with self-tapping screws, the caps of which should not protrude above its surface. Of course, when performing work, the level of irregularities should be controlled using the rule.
In some specific cases, the question may arise, is it possible to lay a laminate on linoleum or an existing laminate flooring? Of course, it is possible subject to the already agreed condition: the size of the irregularities should not be more than 2-3 mm, and the existing coating should be reliable and immovable.
In this case, the laminate does not lie directly on the linoleum properly, and the use of a substrate is mandatory. An uneven floor in the form of damaged linoleum will have to be corrected by replacing individual sections with new ones using “cold welding”. The flooring of laminated panels along the laminate is perpendicular to the old flooring.
About the choice of laminate flooring
When choosing a laminate, we decided to first consult with those who already have a similar floor. Very soon, cases came to light when the laminate flooring had an unsightly appearance after several years of operation. As a result, the idea arose to return to the good old linoleum, which was successfully destroyed by the flooring store salesman.
It turned out that laminated panels serve for a long time if you purchase quality products and lay the panels according to all the rules. So read on and take the right decision.
 Laminate with and without chamfer
 Please note that bevelled laminated panels exist. Such a product is more expensive, and we did not purchase it for fear that dust would accumulate in the recesses between the plates. In the future, I had to make sure that this problem does not arise, but such a coating is made with pronounced individual elements and seems more prestigious. In contrast, conventional laminate flooring has implicit seams that look different depending on the lighting and creates a mixed perception of the quality of the flooring.
How to choose and install the right underlay
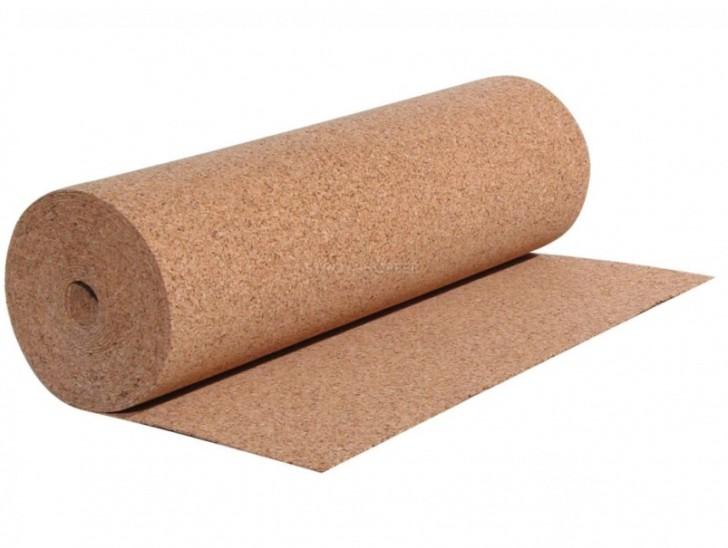 Expensive and durable cork backing
 The substrate under the laminated panels is necessary to compensate for the unevenness of the base, some cushioning and distribution of the load on the coating from above, as well as to protect the laminated panels from moisture from below. In addition, it helps to improve sound insulation and thermal insulation of the floor. For mounting a laminate with a thickness of 8 mm, a substrate with a thickness of 2 mm is usually chosen.
The most expensive and durable substrate is cork, the recommended service life of which reaches 20 years. Being made of cork chips, it has good properties heat and sound insulation. However, this material is afraid high temperatures and does not provide waterproofing. That is, its use is limited to living rooms with unheated floors.
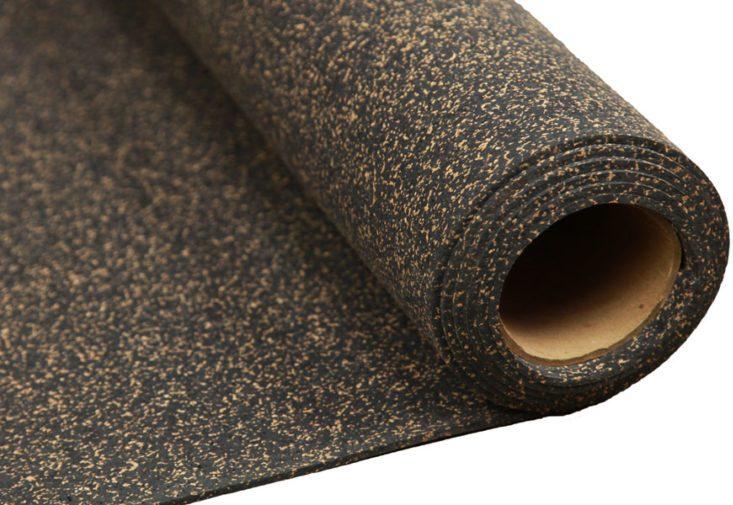 Practical bituminous cork underlay
 A bituminous cork underlay is somewhat cheaper and can be used in combination with underfloor heating. Structure this material consists of a layer of cellulose impregnated with bitumen, covered with cork chips.
 The most budgetary, but short-lived polyethylene foam substrate
 The polyethylene foam backing is the cheapest and comes in rolls, like the two previous options. The material is well tolerated high humidity, resistant to fungus and chemicals, and provides additional thermal insulation. At the same time, the substrate of this type has a recommended service life of 2-3 years, does not have the best sound insulation and does not provide waterproofing.
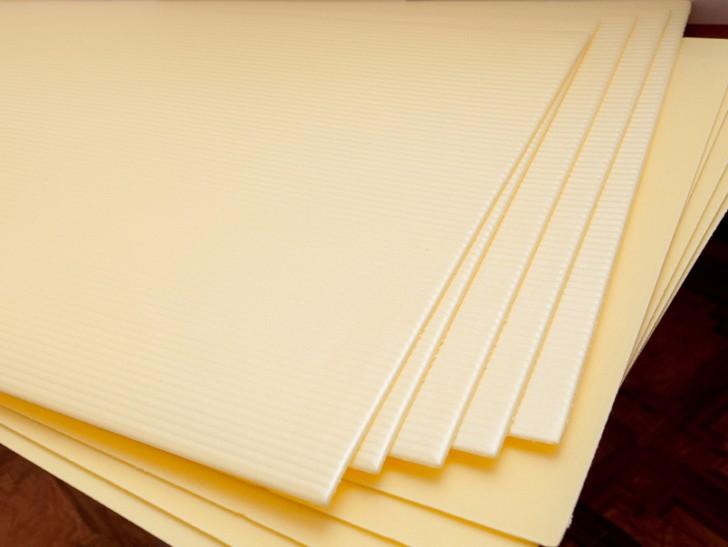 Styrofoam underlay has average characteristics
  Foiled polyurethane underlay for universal use
 Styrofoam underlay has an average price and is available in sheets as well as rolls. The material has relatively high density and retains its shape well, provides good heat and noise insulation. In this case, the use of expanded polystyrene in a scheme with a warm floor is not allowed.
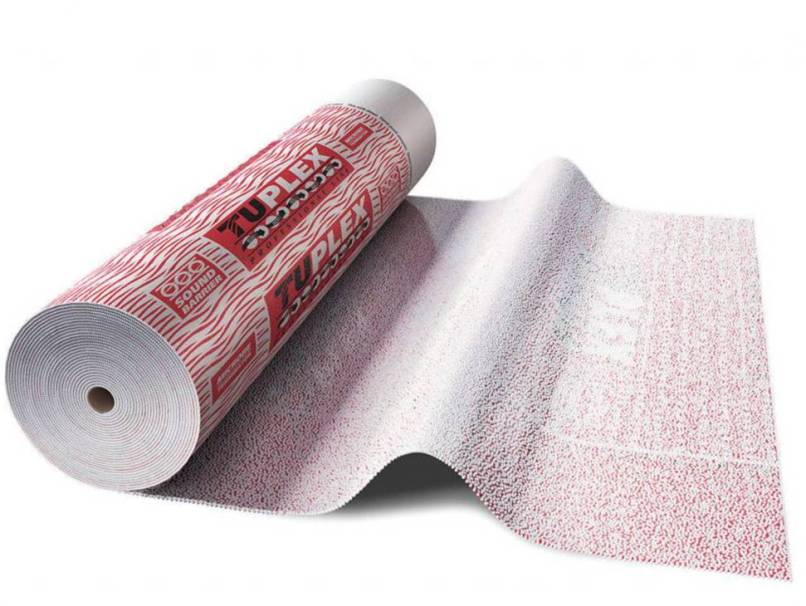 Modern three-layer underlay TUPLEX PROFESSIONAL
 Foiled polyurethane has best performance at respectively high price and is suitable for use in the arrangement of a warm floor. It probably makes sense to lay the material in tandem with expensive laminate flooring.
Relatively recently, a three-layer TUPLEX PROFESSIONAL substrate appeared on the market: a layer of expanded polystyrene balls is placed between two film sheets. At the same time, the lower film has microperforations and allows moisture to pass into the middle of the material. The top film provides waterproofing and prevents the penetration of moisture to the laminated flooring.
The balls are responsible for sound insulation and leave the possibility of moisture to escape from the end face of the three-layer material. Eventually, given substrate prevents the accumulation of moisture and the formation of fungus and mold under the coating, and the use of an additional layer of waterproofing is not required. The recommended service life of the material is 15 years.
Before laying the substrate, a level, dry and clean base must be provided.
The last operation is most conveniently performed with a vacuum cleaner. Laminate flooring manufacturer Krono Castello requires to check the moisture content of the substrate, which should be no more than 2.0 CM% for a cement-based surface and no more than 0.5 CM% for a calcium sulphate surface. In addition, to protect laminated panels from moisture, before installing them, it is necessary to lay a moisture-proof film, for example, polyethylene, with a thickness of at least 0.2 mm in case of mounting boards on a mineral or stone base.  PE film laying process
In other words, when using cork backing, which allows moisture to pass through, it is necessary to first lay polyethylene on the cement base to protect the laminated panels from damage. The film is laid out with an overlap of at least 15 cm and glued with adhesive tape. In the case of using a moisture-proof substrate, additional waterproofing is not needed. There is a third option: when using a laminate with a built-in sound absorption system, the substrate is not required, but waterproofing is necessary.
 Laying and fixing the substrate
 The first strip of the substrate is laid along the wall from which the installation of the laminate will begin, and along the entire length of the room. You do not need to lay out the next piece of material until the first one is covered with laminate flooring: this technique will protect it from damage. Lay the next sheet as needed. This recommendation also applies to polyethylene waterproofing, which should also not be walked on in street shoes, so as not to damage it. Adjacent backing sheets are closely aligned and sealed with adhesive tape.
Schemes for laying laminate boards
To understand how to lay a laminate on your own and without mistakes, you should study possible options panel placement. Most often, the laminate is laid in such a way that the light from the windows falls along the boards, in which case the panel joints are less visible. Nothing prevents laying the coating perpendicular to the direction of light, then the seams stand out more, and the room seems visually wider. There is an option and diagonal laying. This method is considered more interesting in appearance, and the room is visually larger. However, such installation is noticeably more difficult, and there are more scraps. 
Even before going to the store, it is useful to draw up a laminate layout plan that will allow you to correctly determine required amount material, as well as to avoid errors in the installation of panels. The sketch should be made taking into account all the corners and protrusions, which will provide the most accurate calculations.
In this case, one should be guided by the basic rule for placing boards with offset transverse seams. In the standard case, its value should be at least 0.4 m, but some manufacturers quality products allow a minimum displacement of up to 0.15 m. In the most simple circuits layouts take its value equal to 1/2 or 1/3 of the board. 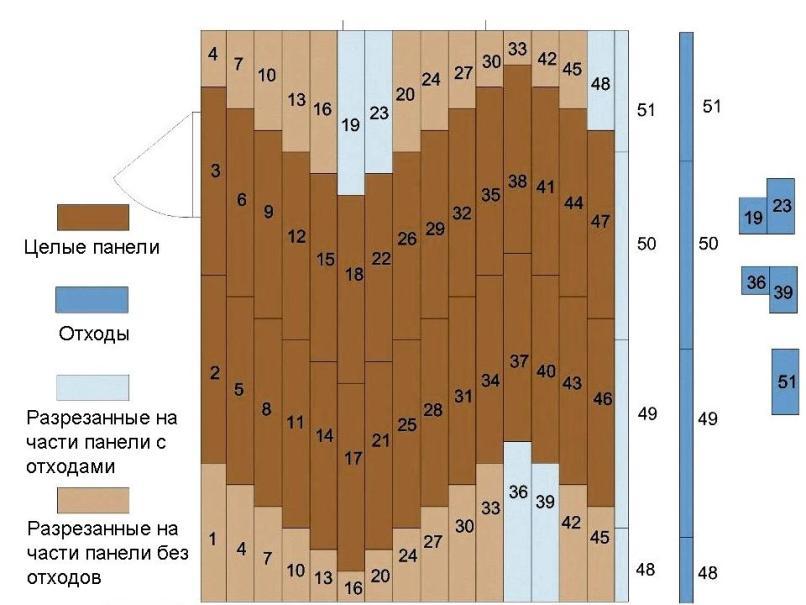
The most rational laying pattern is presented above and is obtained by using trim from the previous row to start the next. Of course, pieces less than 0.4 m long are turned into unused waste. Note that sawing laminated panels in this case will have to be the least.
In practice, when buying material, it is purchased by 5-7% more than the calculated amount when laying along the walls and by 10-15% more when placed diagonally.
Interlock options for laminate flooring
Manufacturers of laminated panels offer various designs interconnecting panels. This suggests slightly different laminate assembly options. The packaging of the material must indicate the technology of their installation in the form of pictograms and a brief description. 
So, the CLICK and LOCK locking systems are fundamentally different in that in the first case, the installation of the panel starts at an angle, and then it turns and locks in place. double lock after a characteristic click. A variant of the LOCK locking system involves horizontal laying of the board and further connection of the panels when striking the side surfaces.

Systems for joining laminate sheets are constantly being improved, and today TARKETT brand products with a movable plastic lock are offered. This design allows you to install one sheet at a time, sequentially engaging first the long and then the short side of the board without special efforts. There are other locking schemes in which either the short or long side is joined first. It is also possible that the sheet slides into place during horizontal movement.
A few notes before installing the cover
Before starting work, you need to prepare a tool and some auxiliary materials. In the general case, you can get by with an elementary set. Additionally, a grinder and a jigsaw may be required from the tool, glue and sealant from materials.

Before installation, the laminate is kept in the room where it will be installed for at least 48 hours at room temperature not taken out of the package. It happens that panels from different batches have different shade, so that some specialists prefer to review all the material before starting work in order to solve possible problems "on the shore".
At the same time, each sheet should be inspected before installation so as not to use damaged material.
Quite often, small protruding fragments are found on the edges of the board, which can noticeably harm, which means they must be removed.
Before laying laminated boards, you need to prepare the base, as well as provide waterproofing and soundproofing, as mentioned above. How to lay a laminate with your own hands, consider the example of the material "Krono Castello" 32 class with a thickness of 8 mm and dimensions of 1380x155 mm. 
The manufacturer of the mentioned brand suggests using glue when installing the most loaded areas. However, there is a practice of using glue to strengthen all joints. In this case, the moisture resistance of the flooring increases markedly, while the speed of work decreases significantly, and it is impossible to replace failed panels later.
In this case, a special sealant was used to seal the joints, which provides good protection against water, but does not prevent the deck from being dismantled. Field tests were carried out by a curious cat, which knocked over a vase of flowers, and about 2 liters of water fell on the floor of the Krono Castello. After the water was collected, there were no traces left on the coating at all.
Do-it-yourself step-by-step instructions for assembling a laminate floor with a CLICK lock
Installation of the flooring starts from the wall opposite the doorway. The sheets are laid with the protruding part of the castle against the wall and are sequentially joined by the ends, forming a strip of flooring.

To do this, each subsequent sheet is carefully and accurately inserted into the lock of the previous one at an angle of 15º to the floor, and then rotated down until the connection is triggered, which is confirmed by the absence of a gap. In our example, a sealant was previously applied to the protruding elements of the locks with a strip 2-3 mm wide.
During operation, laminate flooring can vary in size due to changes in the humidity of the surrounding air. For this reason, when laying it, gaps are provided, which are provided by the installation of wooden or plastic inserts with a thickness of about 12-15 mm between the walls and panels, including at its ends. On sale there are special plastic wedges that are inserted in pairs, which allows you to quickly select gaps of different sizes.
At the same time, the walls can be so uneven that the plinth will not close the increased gap. To avoid mistakes, it is better to have a piece of the planned plinth on hand and control the correctness of its installation. In the case of an excessively large gap, the panels will have to be cut in places with the smallest gap.

The last sheet of the flooring strip must be cut according to the distance to the wall. To do this, it is turned 180º and laid through the liner to the wall parallel to the penultimate sheet. The cut line is marked in accordance with the end working surface the previous board, increasing the length of the desired piece of lamella by the size of the protruding part of the castle.
You can cut the laminate with a hacksaw, a jigsaw or a grinder. It may happen that the last sheet of the mounted row turns out to be too small, then you will have to shorten the very first sheet to required size. In practice, when laying laminate, panels up to 200 mm long are used, if they are located in places where there will definitely not be a large load on the floor.

A cut with a length of at least 400 mm is used to start laying the next row. The floor manufacturer "Krono Castello" offers to assemble the flooring in rows. In this case, the second row is assembled with the ends into a tape, like the first, and is preliminarily laid out by the protruding part of the side lock on the groove of the first row. Then several people raise the outer side of the panels by 3-4 cm, insert the protrusions of the second strip into the grooves of the first, and then lower it until the connection is fixed.

In this way, the installation of the coating is quite fast. In this case, it will not be possible to install the flooring on your own - assistants are needed to complete the work. In addition, it is difficult to use a fast-curing sealant, so in our case, the assembly was carried out on separate panels. With this choice, we go back to the two photos of the above step-by-step instructions and move on according to the following scheme.

In the example under consideration, before installing the first panel of the next row, a sealant was previously applied to the protrusion of its side lock with a strip 2-3 mm wide. The board was then inserted at an angle into the lock of the first row, turned down and laid in place. Next, the sealant is applied to the end ledge of the lock of the installed panel and the sidewall of the next one. The sealant that comes out of the seam dries up and is easily collected with a rag.
The next panel is mounted in place in the same way as the previous one, but a small gap is left between the end locks. A wooden bar is applied to the end of the panel to be installed, and the sheet is moved into place with light blows of the mallet on the bar. In this case, the bar is applied to the end of the board above the ledge of the lock. To do this, it must have clear edges, and better - a specially cut ledge.

When installing the last board in a row, it is convenient to use a curved crowbar, like a lever, which rests with its lower end against the end of the panel, and in the middle against the wall. When the lever is pressed, the board slides into place. By default, you need to have special tool that works together with a hammer.

To install the last board against the wall, it must be cut along. To do this, it is turned 180º and laid through the liners against the wall. The cut line is marked in accordance with the angle of the working surface of the previous board, increasing the width of the desired piece of the lamella by the size of the protruding part of the lock.
Difficult places and finishing operations
In practice, during the installation of a laminate with your own hands, various situations arise that are best resolved competently. Thus, the manufacturer of laminated flooring "Krono Castello" offers to provide a mounting gap of about 12-15 mm when laying panels for a length and width of up to 8 m. In other words, if the total size of neighboring rooms does not exceed the specified value, the doorway between them can be equipped with a continuous layer, without thresholds.
 Laminate laying option without thresholds and design expansion joint
 In the case when the size of the room is more than 8 m, it is necessary to arrange intermediate seams, which are closed with a joining bar. Accordingly, if some room size is noticeably smaller than the specified value, it is possible to get by with a noticeably smaller gap in this direction. The photo above shows the laying of a laminate without thresholds, as well as a scheme for arranging an intermediate seam.

When installing laminate doorways their boxes will need to be trimmed a bit to allow clearance for the laminate to move with changes in humidity. The work is done with a hacksaw in place, using a board turned upside down as a template.

For the same purpose, holes for pipes of the heating system are marked 20-30 mm larger than their diameter. First, holes are drilled in the board, and then it is cut along the axis of the holes. In the future, the sawn off part is attached to the board with wood glue. In the same way, when installing a door stop on the floor, it is also necessary to drill an oversized hole for it so as not to fix the panels to the base.

Upon completion of the laminate flooring, you can proceed with the installation of platbands on doorways and baseboards. Easiest to install inexpensive plastic plinth, which is well coordinated with budget flooring options. If the floor mimics the structure well natural wood, it is better to use a plinth made of precious wood. In our example, the option of pine covered with beech veneer successfully approached.
How to install LOCK laminate flooring and other laying options
Note that the technology of laying laminate with a chamfer is no different from installation conventional coating. When using this type of material, the contours of individual panels are clearly defined, so that when laying out the herringbone lamellas, you can get an interesting pattern.
 Herringbone and diagonal laminate installation options
 Figured installation is noticeably more complicated, and in this case it starts not from the long, but from the short wall of the room and carefully monitors the observance of the even line of laying the "Christmas tree". It is relatively easier to lay the lamellas diagonally. In this case, the installation starts from the corner of the room, and the boards are placed at an angle of 45º to the wall.
 Icons for paving with LOCK lock
 As mentioned above, laying laminate with the LOCK locking system differs in the way the panels are installed. The above short instruction demonstrates the installation features in full.
Caring for laminate floors
After the laying of the laminate floor is completed, you can admire the result of the work with your own hands. Now you need to think about how to ensure that the quality of the coating does not suffer as long as possible. To achieve this goal, laminate manufacturers recommend wiping the coating only with a well-wrung rag, do not use wax for parquet and other products based on petroleum components during maintenance.
 Care items for laminate flooring
 Felt pads should be glued to furniture legs and a rug should be provided at the front door. When vacuuming, use an attachment designed for hard floors.
As you know, it is better to see once than hear a hundred times. In practice, you have to spend a lot of time to find videos with useful information. Now you can do it quickly, thanks to short previews of the videos we have already watched.
Very sensible and with good diction about seven mistakes when laying, but the mistakes are very simple and far from relevant for everyone. Someone will be interested.
Inexpensive laminate flooring, inexpensive underlay, simple and short installation and cutting instructions. The main points are shown, but not all issues are considered. It is not told how to work at door frames, set thresholds and plinth.
A long story, in which a lot of useful and advertising. However, there is almost nothing about how to lay the boards directly.
Laying TARKETT 2-Lock laminate with a "plastic" lock: "silent movie", after which a number of unclear points remain. But briefly, clearly and without "water".
(6 rated for 4,17 from 5 )
today it can be quite diverse - the range intended for this purpose is quite wide. However, as they say, the new is the well-forgotten old. Previously, parquet was an indicator that the apartment was good. Nowadays, of course, you will not find parquet laying, but there is. In today's article, we'll talk about how to lay a laminate with your own hands ( step-by-step instruction with photo examples will help in this), we will deal with the methods and nuances of the production of such works. We will also provide several step by step video instructions do-it-yourself laminate flooring
Laminate is a material that requires a perfectly flat base. That is why before starting work on laying the floor is thoroughly prepared. Sometimes there are such "masters" who claim that irregularities are not at all terrible due to the laying of the substrate under the laminate. If you decide to use the help of a professional and you come across just such a one - drive him in the neck, there can be no question of any quality here. Let's figure out how to prepare the base before laying the laminate with your own hands.


Preparing a wood or concrete subfloor before laying laminate flooring
Let's start with concrete base. Using a long rule, we check the evenness of the surface. If there are pits or bumps, then significant gaps will appear between the rule and the floor. In this case, the surface should be leveled. For this purpose, a self-leveling mixture has recently been successfully used, which must be poured over the floor and dispersed. It does not dry for long, but. Laminate can be laid after the surface has completely dried.

Wooden floors are also suitable for laying laminate flooring. The main task is to get rid of creaking boards. If the floors are old, the boards can go bumpy - in this case, you can not do without a grinder. Parquet, plywood - all this is a completely acceptable base, if there are no damage in the form of rotten places. The surface must be thoroughly dry before laying.
Can laminate flooring be laid on other surfaces?
In fact, the list of surfaces suitable for laying laminate flooring is unlimited. It can be parquet, linoleum,. The main condition is that the base must be even. Parquet should not have rotten planks, and tiles should not be chipped.

Related article:
Scope, characteristics, advantages and disadvantages of linoleum and laminate, comparison of coating parameters, expert opinion and reviews on the forums - read in the publication.
Laying laminate: methods depending on the location of the board
This material can be laid in several different ways, each of which has its own characteristics. The main types of laminate flooring are:
- along the room, parallel or perpendicular to the lighting from the window;
Useful information! Using the second option, you should be prepared for the fact that material consumption will be higher due to more waste.
The diagonal arrangement of the panels looks more aesthetically pleasing, but there is much more waste with such installation:


Laying laminate: rules for the production of work when located along the room
How to lay laminate on the floor? If you plan to lay the coating along the room, you should consider one important detail. When the boards are perpendicular natural light, all joints will be clearly visible, while with parallel placement they are almost invisible. Otherwise, there are no differences, as well as restrictions - everyone does this work in the way that is convenient for him. The only thing to consider is the displacement of the boards relative to each other. The seams of each subsequent row should be shifted relative to the previous row by at least 40 cm. This will give strength to the hitch and prevent the boards from dispersing later.

Diagonal laying scheme: difficulties and features
Laying laminate in this way is a little more difficult. In this case, how to start work will depend on the skill of the worker. There are three options here:
- We start from any corner. It turns out that the first board will have the shape of a triangle.
- We step back a little from the corner, sawing off a board in the shape of a trapezoid, which, in fact, is practically an analogue of the first option.
- We start laying from the middle of the room - it is not recommended to choose a similar method without (at least the slightest) experience in such work.

Various insulating layers: options for laying laminate on a substrate
After preparing the base, an insulating layer is laid on it, and after that - a substrate, a special shock-absorbing material that protects the laminate locks from an external load that is detrimental to it. Let us analyze in detail what goals these materials pursue.
Insulation layer: why is it needed and is it necessary to use it
As an insulating layer, a special membrane or polyethylene is used, with a thickness of at least 0.5 mm. If it is not possible to lay the material in a whole piece, the strips overlap (10-15 cm) and the joints are glued with adhesive tape. This is done to prevent moisture from entering the bottom of the laminate and causing it to swell. Many people ignore this stage of laying, but experts recommend doing it.

Substrate for laminate: materials of manufacture
There are 4 main substrate materials:
- polyethylene foam is a short-lived material that quickly loses its shape. Only suitable for cheap laminate;
- polystyrene foam - the average price / quality ratio. Absorbs noise well;
- polyurethane on foil - recommended for arrangement;
- - this substrate is considered the best due to the high rates of and. However, when using it, high-quality is necessary - the “cork” does not like dampness.
Types of substrates for laminate during installation - they protect the locks from mechanical stress:


How to properly lay a laminate with your own hands and what you need for this: a complete instruction with photo and video reviews
Before starting the main work, you should prepare the necessary one - it’s not a matter of running after one or the other while laying. Here's what we'll need:
- With wooden block(you can use a block of dense rubber). Through it, blows will be made to the laminate to snap the lock;
- pencil, tape measure, miter box with a hacksaw. If there is no miter box, you can use a square and a jigsaw;
- gap wedges. They are used to level the required gap between the coating and the wall;
- a special bracket called a mount. It will help to snap the lock into place when installing the last board against the wall.

Calculations made before laying the laminate on the floor with your own hands
Before you buy material, you should calculate how much it will take per room. The calculation will depend on the installation method. To begin with, we take the area of \u200b\u200bthe room and divide it by the area of one panel. Next, add 10% for straight styling or 15% for diagonal. With this calculation, the material will definitely be enough.
Preparing and leveling the surface of the base
First of all, we sweep out all the garbage and check how even the base is. Permissible difference - 2 mm / m. If the base is concrete, we cover all cracks, holes, let the surface dry thoroughly. wooden surface we level with a grinder (if necessary, with a planer) and close it with even material. It can be chipboard, OSB or plywood. At the same time, the sheets are stacked in a checkerboard pattern, fastened, and the seams are smeared with mastic.

Important! The more carefully the base is prepared, the longer the life of the laid laminate will be. Any irregularities will begin to have a detrimental effect on the coating in the first year of operation.
Insulating coating and underlay: laying materials under the laminate correctly
On the prepared dry surface we spread polyethylene or waterproofing (the strips overlap). We glue the seams of polyethylene with adhesive tape. The membrane does not require this - it has an adhesive layer along the edge. Just needs to be removed protective film. insulating layer should go on the wall by 10-15 cm.
We unwind and lay the substrate. Here overlap is not allowed, the layout is end-to-end, the seams are also glued. Small gaps between the stripes are allowed - it is unlikely that it will be possible to do without them. Before you figure out how to properly lay the laminate with your own hands, we suggest watching a video on laying the substrate.
How to lay a laminate with your own hands: step by step instructions for the process with photo examples
Consider in detail the entire process of laying flooring.
| Illustration | Action Description |
 | To begin with, as already mentioned, we are preparing all the tools that may be needed in the work, so that after it starts, nothing distracts us. As you probably noticed, there is no hammer with a finisher in the photo. The reason for this is the lock system, which allows it to be locked manually. |
 | The first strip is located in such a way that the protruding part (the spike of the lock) is towards the master. Otherwise, nothing but a waste of nerves, you will not succeed. |
 | We collect the first strip. To do this, we insert the next part of it into the lock, holding it at an angle. After we see that the connection is in the right place, we lower the board. A characteristic click should be heard, which will notify you that the lock has clicked into place. |
 | The last board is a little longer. We measure the part that needs to be cut off by unfolding the laminate (should be cut off from the side adjacent to the wall). If used, then you need to cut from the back, if a simple hacksaw, then from the front - so we will avoid chips. |
 | We break the cut off part and use it instead of the gap plates, which are necessary when laying the laminate. In addition to saving, with such pieces we achieve uniform pressure on the board when the subsequent locks are snapped into place, in contrast to the gap plate wedge. |
 | We continue: the second row is in line. There are no problems with the first board - the lock also snaps into place at an angle, as was done in the first row. |
 | Connecting subsequent strips, we snap the lock on the narrow side, and on the wide side, such a gap remains. It snaps into place with a sharp and not even too strong blow of the palm from the end of the strip. So we pass gradually the whole room. |
Thus, it is possible to lay the flooring for one person without an assistant. If the installation technology is not fully understood by the Dear Reader, we suggest watching a video on how to properly lay the laminate.
And now we suggest that you familiarize yourself with the finished works in order to know what result you need to achieve by laying the laminate.
Examples finished works- perfectly laid laminate. This is the result that should be achieved.
1 of 9


We cut the laminate correctly: cut without chips
As already mentioned, laminated boards must be cut correctly to avoid chipping on the surface. If you use a miter box, then there will be no problems. With this method, the hacksaw, which has practically no wiring, moves smoothly along the plane without tilting. But if you put a strip front side up and start sawing with an electric jigsaw or manual circular, chips cannot be avoided. Therefore, when working with a tool, the board is placed face down.

Types of locks: laminate laying technology depending on the latch
There are 2 types of locks with which the strips interlock with each other - these are “Lock” and “Click”. In order for the Dear Reader to more accurately understand the difference, we suggest watching a video on how to properly lay a laminate with one or another type of lock.
Rules for laying laminate flooring with a lock
The video tutorial below will explain how to lay a laminate with a similar lock.

How to lay a laminate with a click lock with your own hands
From the video below, it becomes clear how to lay a laminate with a Click lock with your own hands.
As you can see, none of the options is difficult. However, there is one more important question on laying: how to finish a multi-level coating. We'll figure out.
Laying flooring on multi-level floors - video tutorial
The following video will clearly show how to lay a laminate between multi-level coatings with your own hands different rooms.
How to put a laminate on the wall: innovations of home craftsmen
Such installation of a laminate is still a novelty and the exact technology of this process does not exist, because this coating was originally intended for the floor. Everyone does what he thinks is right. However, we suggest watching a short video on your own, and after that decide on your own whether it is worth doing it.
Examples of laying laminate on the wall - an innovation of home craftsmen:


The average cost for the work of laying laminate in Russia
The cost of laying such a floor covering depends on several factors. Here are the average numbers as of October 2018.
- dismantling of the old floor covering - 70 rubles / m²;
- (the price includes a mixture) - 100 rubles / m²;
- if leveling with plywood is planned - 200 rubles / m²;
- laying the substrate - 35 rubles / m²;
- direct laying of laminate - from 150 rubles / m²;
- diagonal - from 200 rubles / m².
These are approximate rates for such work.
Summing up
Looking at the prices, it becomes clear that by doing the self-laying of such a floor covering, you can do well. Moreover, it has probably already become clear to the dear reader how to lay a laminate thanks to the presented video tutorials and step-by-step instructions. Special difficulties this does not represent, which means there is reason to think about whether it is worth paying strangers who are not known how professional, if it is possible to do all the work on their own. After all, it is not for nothing that they say: “If you want to do it well, do it yourself.”
YOU MAY ALSO BE INTERESTED IN:
Creating the design of your apartment or house, you want to do everything in style and taste, using high-quality, innovative and aesthetically beautiful materials. If the question arises of choosing a floor, laminate coatings are most often used, which have a wide variety of textures and shades. Let's find out how do-it-yourself laminate flooring is done.
In the construction market you can find a wide variety of laminate. This material is classified according to several criteria.
Types of laminate by shape:
- Rectangular board. The main part of the coatings is made in the form of boards, the length of which is 1.2-2 meters. It is convenient to use such material when installing floors in large rooms. Laying laminate with your own hands takes a minimum amount of time, and convenient connections greatly simplify installation.
- Tile. Many manufacturers have recently produced lamination coating in the form of tiles. square shape, this allows you to create complex decorative patterns. It costs more, but has the advantage of not needing a backing. Laying such material is much more convenient, but there is one drawback: repairing tiles is somewhat more difficult than classic laminate.
The difference between the laminate on the top layer of its surface: the appearance of the coating largely depends on this. The diverse types of surfaces include: classic wooden base, look of aged wood, gloss, relief, natural surface, oil tree, country.
Designers use the versatility of their imagination, creating different kinds laminate design: classic wood, leather luxury, metallic sheen, stone calmness, designer laminate (decorated with original patterns and designs burnt into wood).
Correctly calculate the amount of material
How to lay a laminate with your own hands, so as not to be mistaken in its quantity and proper installation? There are several ways how to calculate the laminate per room, but they are not able to calculate the material without trimming. This is due to the fact that the boards must be cut during the laying of the coating.
First method
To correctly calculate the amount, you need to know the exact dimensions of the room. This method can be used to calculate not only at home, but also in industrial enterprises.
The knowledge acquired in school will be useful for this. You can calculate the area of a rectangle by multiplying its length by its width. There are cases of non-standard forms of premises, when there are not very large spaces in the room that cannot be taken into account in the total area. They need to be counted separately. After that, all individual areas are summed up and the total value is displayed.
Next, you need to find out how much material you need on the floor. The width of the laminate panel can be 185-195 mm, and usually 1260-1380 mm long. To get the area of one board, you need to multiply its length and width. And to find out how much material is needed, you need to divide the area of \u200b\u200bthe room by the area of \u200b\u200bthe panel, so you find out the number of pieces that you have to buy for the entire floor in the room. It is important to have material with a margin. Usually there are about 8 pieces in one package. Thus, you need to divide the total number of laminate boards by 8, and you will get the number of packs that you need to buy for self-laying laminate.
Second method
When calculating the laminate in a room where there are protrusions or columns, let's say one is 0.4x1.17 m, and the room has dimensions of 6.5 × 3.25 m, the laminate board is 0.185 × 1.26 m. To begin with, the length of the room is 6 5 m divided by the length of the board - 1.26 m, so we find out the number of pieces that need to be taken. After that, we divide the width of the room - 3.25 m by the width of the board and again we get the pieces. We multiply the results and get the amount that will be required for laying the laminate with your own hands. Be sure to add the existing piece of area measuring 0.4 × 1.17 m, dividing 0.4 m by 0.185 m, we get 2 more pieces. So, let's add 2 more boards to the existing pieces, in which case we get 101 laminate panels. 101/8=12.625, or 12 packs and 5 pieces.
Recommendation. The second method differs from the first in that it focuses on the number of cuts when installing a laminated coating, that is, this technique will be more accurate and reliable. However, when calculating according to the first method, a sufficient number of trimmings remains, this will help save money when laying the laminate with your own hands in adjoining room. This is very convenient, and, most importantly, pay attention to the fact that you need to step back from the wall 1-1.5 cm and perform the calculation manually, so you can see the real picture and calculate the required stock of material.
How to lay laminate. Various flooring options
How to lay laminate on the floor, depending on design project interior or lighting conditions in the room? Laminate, like parquet, must be installed: parallel or perpendicular to the direction of light rays, as well as diagonally - this means at an angle to them. Correct selection ways and schemes for flooring the material helps to visually change the geometry of the room, paying attention to the advantages and concealing any structural flaws.

Most often, the direct method is chosen for laying the laminate, placing the panels parallel to the direction of the light rays. But, if the geometric structure of the room allows, it is possible to use other options: and perpendicular.

Depending on the direction of the light flux, you need to choose one or another scheme for laying the laminate with your own hands, there are also three of them:
- classic version;
- brick or chess;
- diagonal flooring.

For any scheme of laying boards, the creation of the strength of the flooring remains the main point. This is ensured by the fact that each board in the next row is shifted by no less than 15-20 cm in relation to the adjacent panel of the previous row. Achieving harmony in the combination of lighting and a schematic masonry pattern, you can visually expand or narrow the room, hide or emphasize it. unusual shape or just get nice flooring.
Instructions for the correct laying of laminate
The first key point when laying any type of laminate flooring is knowing how to lay laminate flooring on the following types of surfaces: concrete, wood, ceramic tiles and linoleum. Each of these coatings has its own characteristics that should be taken into account when installing the material.
Laminate on concrete floor. Styling nuances
Concrete screed is the best base for laminate flooring, but before proceeding with the installation of the coating, it is necessary to allow the concrete to dry completely. If the foundation has been poured for a long time, then before laying the laminate on the concrete floor, a thorough examination should be carried out for cracks and chips. After thorough cleaning a special polyethylene film is laid, and its edges can be fixed with ordinary tape. Next, lay the substrate and the material itself. Choose the layout according to the characteristics of the room, lighting and type of laminate.

Laminate flooring on wood floor
The old base for the laminate, made of wood, must be examined for the possible presence of fungal infections or cracks and various deflections of the boards. Parts that are prone to rotting will have to be replaced with new ones, fixing them with self-tapping screws. If there are any irregularities, you need to correct upper layer and make the surface even.
It is allowed to install laminate on a floor covered with linoleum or tiles, in cases where the coating remains even and is mounted in compliance with all conditions that will be required for proper styling material. In this case, you can not use a plastic film, but the substrate is required. You can lay the laminate on the old laminate flooring without dismantling it. In this case, the main condition will be the obligatory evenness of the base.

Features of laying laminate on the "warm floor" system
You need to know that a laminate is laid on the "" system, which is suitable for this. This feature is determined by the manufacturer and indicated on the packaging of the material.
Before carrying out work, it is necessary to mount the system itself. You will have to choose from several options: an electric floor using mats, cable or film, in addition, it happens water system, which involves the installation of special pipes where water circulates.
You can start laying the laminate with your own hands only when the screed is completely dry. You need to start work at a temperature not lower than 18-20 degrees. First you need to lay a plastic film, fixing it with tape. Then a substrate is laid around the entire perimeter of the room, and a laminate is laid on top.
When not to install laminate flooring
- laminated panels are not placed on a base covered with carpets;
- laminate does not spread in bathrooms, baths and other rooms with high humidity;
- for the kitchen and corridor use only special types laminate flooring.
Installation methods for laminate panels
How to lay laminate flooring using three laying methods: adhesive method, "Click-Lock" and "Lok-Lock" system?
The first option is used the least often, and it is similar to the parquet laying system. The process is that the edges of the laminate board cover adhesive solution and tightly connected to each other. This method is rarely used due to some of its disadvantages: installation is quite laborious; not a long period services (adhesive mixtures quickly dry out); there is no possibility of repairing a separate part of the coating.
The most popular option is to lay the laminate yourself with the "Click" locking system. This is due to the simple installation procedure. The boards are inserted one into the other with an angle of 30 degrees and pressed against each other. After that, using a bar and a hammer, one panel is slowly driven into the previous one.
With the help of the “Lok” locking system, the boards are laid horizontally. Leave a small gap between the panels. The spike is combined with the groove, continuing the fastening until the lock is activated.
To make everything look aesthetically pleasing, you need to know how to properly lay the laminate. It is worth adhering to the following rules:

Having studied the features of the choice of material and the procedure for laying the laminate with your own hands, you can get a high-quality floor covering that will last you for more than one year, remaining beautiful and durable.
Video instructions for laying laminate